Thorsen Fully Automatic Intelli-Fast Battery Charger User manual
1
© 2010 THORSEN TOOL Co.®
#19-014
#19-014
Owners Manual
Owners Manual
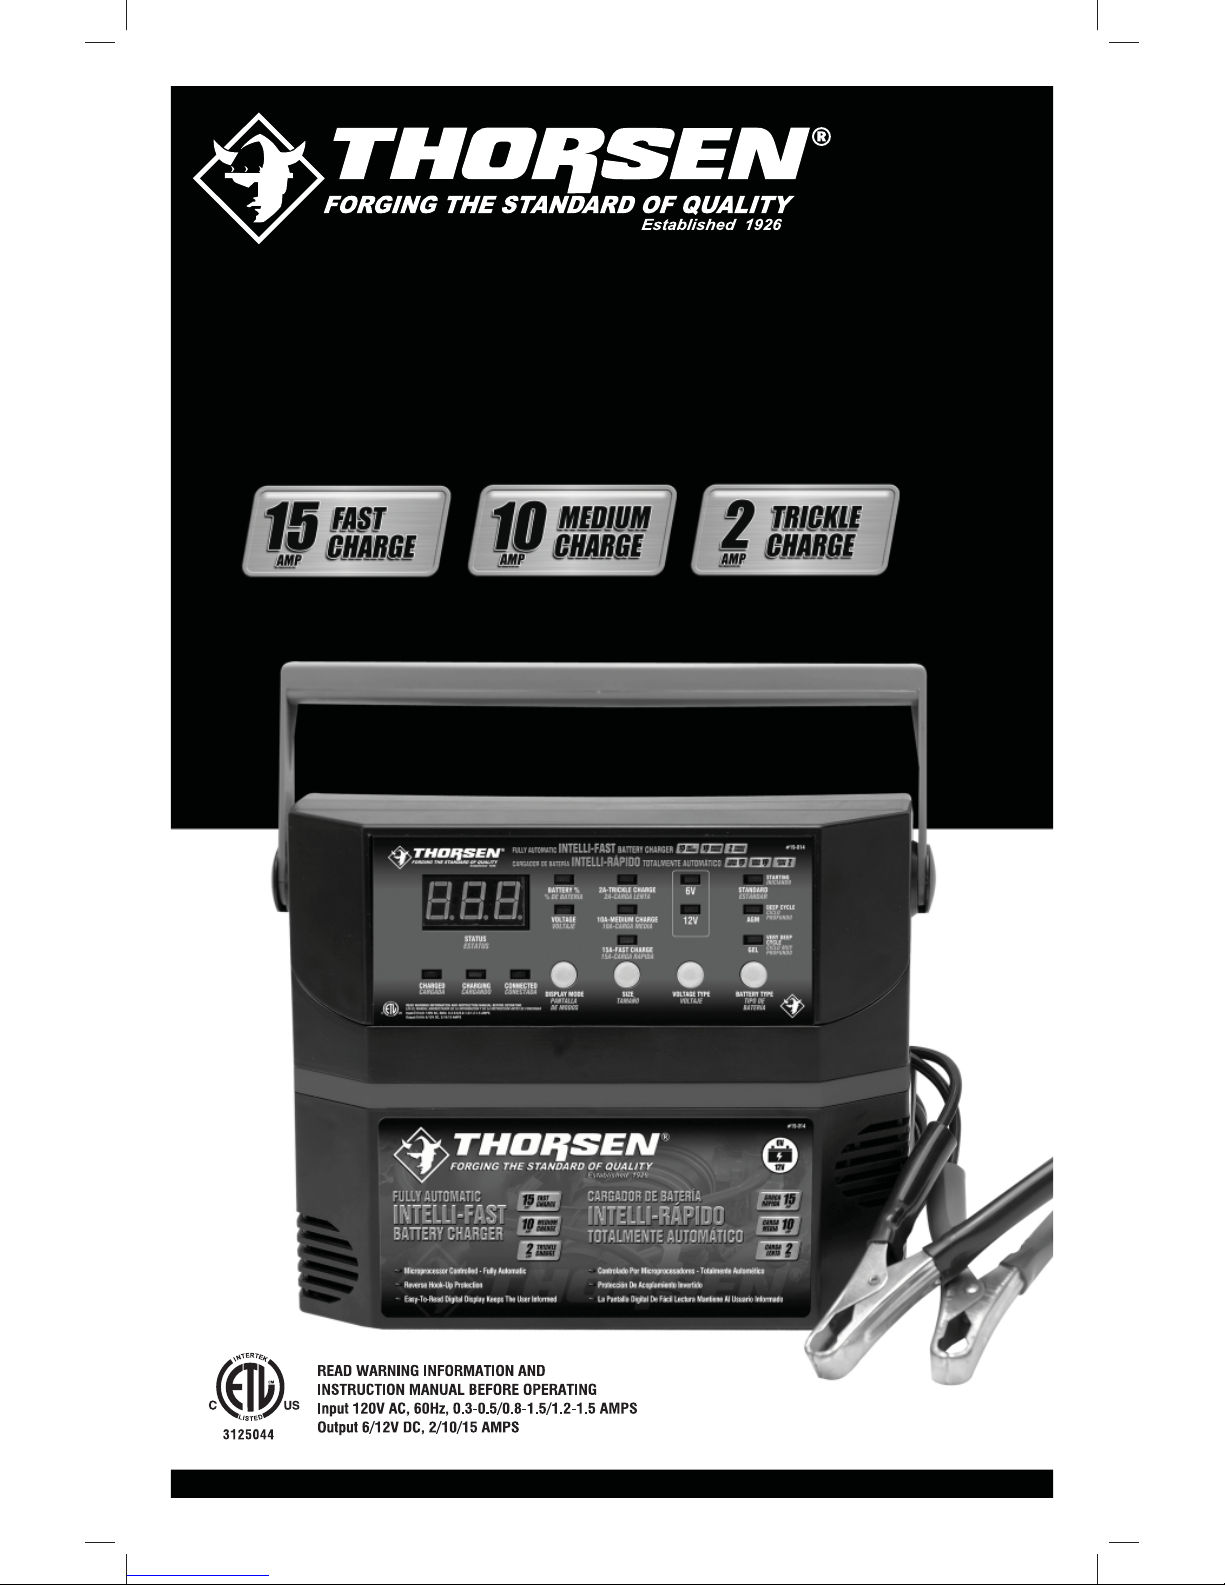
Fully Automatic
Fully Automatic
Intelli-Fast Battery Charger
Intelli-Fast Battery Charger

2THORSEN Intelli-Fast Battery Charger
Congratulations on your purchase of this THORSEN product. We design and engineer
our products to give you years of dependable service. Please review this manual carefully
before operating your new product.
Please take a few moments to read this manual; it will help you understand your
new purchase. As with anything that could cause harm, PLEASE USE CAUTION
WHEN USING THIS PRODUCT. Keep this manual around for future reference.
SAFETY PRECAUTIONS:
• SAVE THESE INSTRUCTIONS
• Please read, understand and follow these instructions and precautions carefully,
as this manual contains important safety and operating instructions.
• Do not expose charger to rain or snow.
• Use only recommended attachments. Use of an attachment not recommended by
THORSEN TOOL Co. may result in a risk of fire, electric shock or injury to persons.
• To reduce the risk of damage to electric plug or cord, pull by the plug rather than
the cord when disconnecting the charger.
• An extension cord should not be used unless absolutely necessary. Use of an
improper extension cord could result in a risk of fire and electric shock. If an
extension cord must be used, make sure:
1. That the pins on the plug of the extension cord are the same number, size
and shape as those of the plug on the charger.
2. That the extension cord is properly wired and in good electrical condition.
3. That the wire size is large enough for the AC ampere rating of the charger as
specified in the table on page 6.
• Do not operate the charger with a damaged cord or plug; take it to a qualified
service person.
• Do not operate the charger if it has received a sharp blow, been dropped or
otherwise damaged in any way; take it to a qualified service person.
• Do not disassemble the charger; take it to a qualified service person when service or
repair is required. Incorrect reassembly may result in a risk of fire or electric shock.
• To reduce the risk of electric shock, unplug the charger from the outlet before
attempting any maintenance or cleaning. Simply turning off the controls will not
reduce this risk.
#19-014
#19-014
15, 10 & 2 AMP FULLY AUTOMATIC
INTELLI-FAST BATTERY CHARGER

3
© 2010 THORSEN TOOL Co.®
Working in the vicinity of a lead-acid battery is dangerous. Batteries generate
explosive gases during normal battery operation. For this reason, it is of upmost
importance that you follow the instructions each time you use the charger.
To reduce the risk of battery explosion, follow these instructions and those
published by the battery manufacturer and the manufacturer of any equipment
you intend to use in the vicinity of the battery. Review the cautionary markings
on these products and on the engine.
PERSONAL PRECAUTIONS:
• Consider having someone close enough by to come to your aid when you work
near a lead-acid battery.
• Have plenty of fresh water and soap nearby in case battery acid contacts your
skin, clothing or eyes.
• Wear complete eye and body protection, including safety goggles and
protective clothing. Avoid touching your eyes while working near the battery.
• If battery acid contacts your skin or clothing, wash immediately with soap and water.
If acid enters your eye, immediately flood the eye with cold running water for at least
10 minutes and get medical attention right away.
• NEVER smoke or allow a spark or flame in the vicinity of a battery or engine.
• Be extra cautious to reduce the risk of dropping a metal tool onto the
battery. It might spark or short-circuit the battery or other electrical part that
may cause an explosion.
• Remove personal metal items such as rings, bracelets, necklaces and watches
when working with a lead-acid battery. A lead-acid battery can produce a
short-circuit current high enough to weld a ring or the like to metal, causing
a severe burn.
• Use this charger for charging a LEAD-ACID battery only. It is not intended
to supply power to a low voltage electrical system other than in a
starter-motor application.
•
Take care not to drop a metal tool or other metal onto the battery.
Metal may cause sparking or short circuit the battery or another electrical
devise. Sparking may cause an explosion.
• Do not use this battery charger for charging dry-cell batteries that are commonly
used with home appliances. These batteries may burst and cause injury to
persons and damage to property.
• NEVER charge a frozen battery.
• NEVER overcharge a battery.
#19-014
#19-014
15, 10 & 2 AMP FULLY AUTOMATIC
INTELLI-FAST BATTERY CHARGER

4THORSEN Intelli-Fast Battery Charger
PREPARING TO CHARGE:
• If it is necessary to remove the battery from the vehicle to charge it, always remove
the grounded terminal first. Make sure all of the accessories in the vehicle are off,
to prevent arcing.
• Be sure the area around the battery is well ventilated while the battery is being
charged.
• Clean the battery terminals before charging the battery. During cleaning, keep
airborne corrosion from coming into contact with your eyes, nose and mouth. Use
baking soda and water to neutralize battery acid and help eliminate airborne
corrosion. Do not touch your eyes, nose or mouth.
• Add distilled water to each cell until the battery acid reaches the level specified by
the battery manufacturer. Do not overfill. For a battery without removable cell caps,
such as valve regulated lead-acid-batteries, carefully follow the manufacturer’s
recharging instructions.
• Read, understand and follow all instructions for the charger, battery, vehicle and
any equipment used near the battery and charger. Study all of the battery
manufacturer’s specific precautions while charging and recommended rates
of charge.
• Determine the voltage of the battery by referring to the vehicle owner’s manual
and make sure that the output voltage selector switch is set to the correct voltage.
If the charger has an adjustable charge rate, charge the battery in the lowest
rate first.
• Make sure that the charger cable clips make tight connections.
• Locate the charger as far away from the battery as the DC cables permit.
• Never place the charger directly above the battery being charged; gases from
the battery will corrode and damage the charger.
• Do not set the battery on top of the charger.
• Never allow battery acid to drip onto the charger when reading the electrolyte
specific gravity or filling the battery.
• Do not operate the charger in a closed-in area or restrict the ventilation in any way.
DC CONNECTION PRECAUTIONS:
• Connect and disconnect the DC output clips only after setting all of the charge
switches to the “off” position and removing the AC plug from the electrical outlet.
• Never allow the clips to touch each other.
• Attach the clips to the battery and chassis:
NEGATIVE GROUNDED Vehicle:
• Connect the POSITIVE (RED) clip from the battery charger to the
POSITIVE (POS, P, +) ungrounded post of the battery. Connect the
NEGATIVE (BLACK) clip to the vehicle chassis or engine block away from
the battery. Do not connect the clip to the carburetor, fuel lines or
sheet-metal body parts. Connect to a heavy gauge metal part of the frame
or engine block.
#19-014
#19-014
15, 10 & 2 AMP FULLY AUTOMATIC
INTELLI-FAST BATTERY CHARGER

5
© 2010 THORSEN TOOL Co.®
POSITIVE GROUNDED Vehicle:
• Connect the NEGATIVE (BLACK) clip from the battery charger to
the NEGATIVE (NEG, N, -) ungrounded post of the battery. Connect the
POSITIVE (RED) clip to the vehicle chassis or engine block away
from the battery. Do not connect the clip to the carburetor, fuel lines
or sheet-metal body parts. Connect to a heavy gauge metal part of the
frame or engine block.
FOLLOW THESE STEPS WHEN BATTERY IS INSTALLED IN VEHICLE:
A SPARK NEAR THE BATTERY MAY CAUSE A BATTERY
EXPLOSION. TO REDUCE THE RISK OF A SPARK NEAR THE BATTERY:
1. Position the AC and DC cables to reduce the risk of damage by the hood,
door and moving or hot engine parts.
2. Stay clear of fan blades, belts, pulleys and other parts that can cause injury.
3. Check the polarity of the battery posts. The POSITIVE (POS, P, +) battery post
usually has a larger diameter then the NEGATIVE (NEG, N, -) post.
4. Determine which post of the battery is grounded (connected) to the chassis.
If the negative post is grounded to the chassis (as in most vehicles), see step 5.
If the positive post is grounded to the chassis, see step 6.
5. For a negative-grounded vehicle, connect the POSITIVE (RED) clip from
the battery charger to the POSITIVE (POS, P, +) ungrounded post of
the battery. Connect the NEGATIVE (BLACK) clip to the vehicle chassis
or engine block away from the battery. Do not connect the clip to the carburetor,
fuel lines or sheet-metal body parts. Connect to a heavy gauge metal part of
the frame or engine block.
6. For a positive-grounded vehicle, connect the NEGATIVE (BLACK) clip from
the battery charger to the NEGATIVE (NEG, N, -) ungrounded post of the battery.
Connect the POSITIVE (RED) clip to the vehicle chassis or engine block away from
the battery. Do not connect the clip to the carburetor, fuel lines or sheet-metal
body parts. Connect to a heavy gauge metal part of the frame or engine block.
7. When disconnecting the charger, turn all switches to off, disconnect the AC cord,
remove the clip from the vehicle chassis and then remove the clip from the
battery terminal.
8. See CALCULATING CHARGE TIME for length of charge information.
FOLLOW THESE STEPS WHEN BATTERY IS OUTSIDE VEHICLE:
A SPARK NEAR THE BATTERY MAY CAUSE A BATTERY
EXPLOSION. TO REDUCE THE RISK OF A SPARK NEAR THE BATTERY:
1. Check the polarity of the battery posts. The POSITIVE (POS, P, +) battery post
usually has a larger diameter than the NEGATIVE (NEG, N, -) post.
#19-014
#19-014
15, 10 & 2 AMP FULLY AUTOMATIC
INTELLI-FAST BATTERY CHARGER

6THORSEN Intelli-Fast Battery Charger
2. Attach at least a 24-inch long 6-gauge (AWG) insulated battery cable to
the NEGATIVE (NEG, N, -) battery post.
3. Connect the POSITIVE (RED) charger clip to the POSITIVE (POS, P, +) post
of the battery.
4. Position yourself and the free end of the cable you previously attached to
the NEGATIVE (NEG, N, -) battery post as far away from the battery as
possible – then connect the NEGATIVE (BLACK) charger clip to the free end
of the cable.
5. Do not face the battery when making the final connection.
6. When disconnecting the charger, always do so in the reverse order of the
connecting procedure and break the first connection while as far away from
the battery as practical.
7. A marine (boat) battery must be removed and charged on shore. To charge it
onboard requires equipment specially designed for marine use.
BATTERY CHARGING — AC CONNECTIONS:
• This battery charger is for use on a nominal 120-volt circuit.
• DANGER – Never alter AC cord or plug provided – if it does not fit the
outlet, have proper outlet installed by a qualified electrician. Improper
connection can result in a risk of an electric shock.
• Recommended minimum AWG size for extension cords for battery chargers:
AC INPUT RATING
AMPERES
IF THE INPUT ARTING OF A CHARGER IS GIVEN IN WATTS RATHER THAN IN AMPERES, THE CORRESPONDING AMPERE
RATING IS TO BE DETERMINED BY DIVIDING THE WATTAGE RATING BY THE VOLTAGE RATING — FOR EXAMPLE:
1250 WATTS / 125 VOLTS = 10 AMPERES
AT LEAST
0
2
3
4
5
6
8
10
12
14
16
18
2
3
4
5
6
8
10
12
14
16
18
20
18
18
18
18
18
18
18
16
16
16
14
14
18
18
18
18
16
16
14
14
12
12
12
12
18
16
16
14
14
12
12
10
10
10
8
8
16
14
14
12
12
10
10
8
8
8
8
6
BUT LESS
THAN 25
(7.6) 50
(15.2) 100
(30.5) 150
(45.6)
AWG SIZE OF CORD
LENGTH OF CORD, FEET (M)
#19-014
#19-014
15, 10 & 2 AMP FULLY AUTOMATIC
INTELLI-FAST BATTERY CHARGER
7
© 2010 THORSEN TOOL Co.®
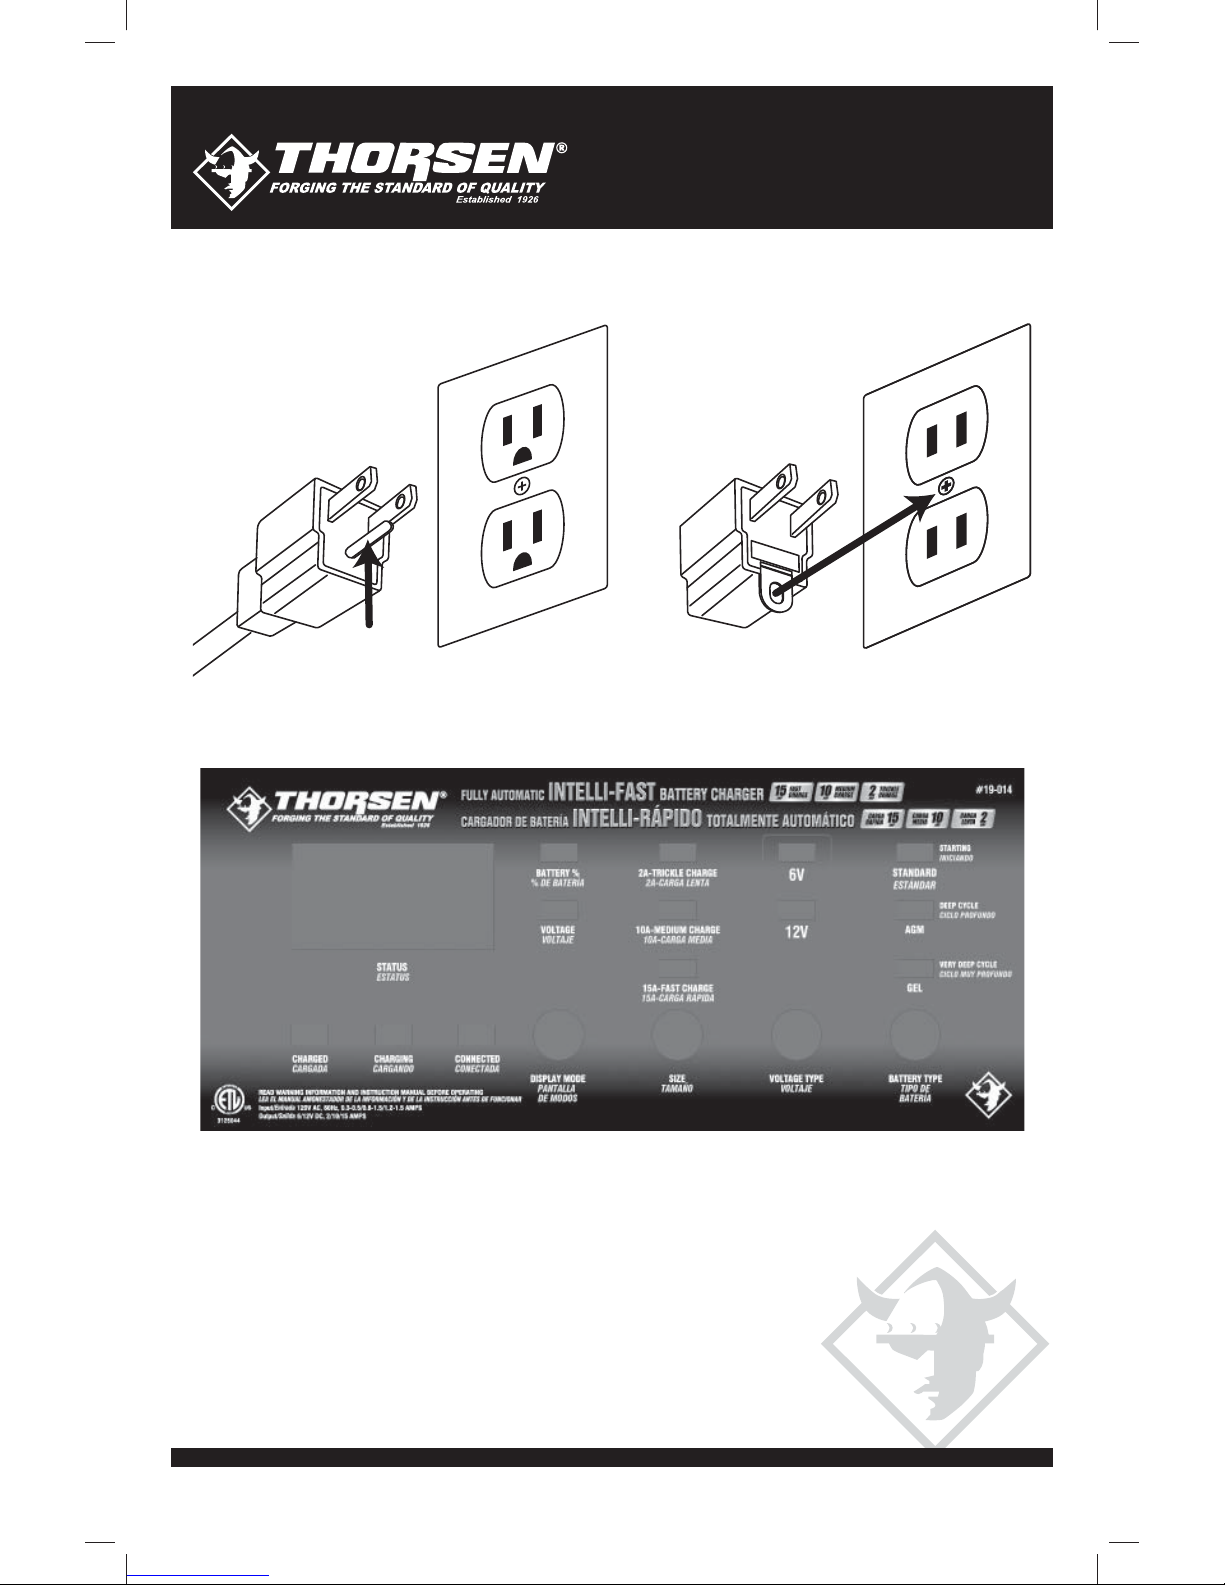
GROUNDING
MEANS
GROUNDED
OUTLET OUTLET
ADAPTER
(C)
GROUNDING
PIN (A) (B)
GROUNDING METHOD:
CONTROL PANEL:
DIGITAL DISPLAY
The Digital Display gives a digital indication of % of charge or voltage, depending
on the Display Mode chosen.
#19-014
#19-014
15, 10 & 2 AMP FULLY AUTOMATIC
INTELLI-FAST BATTERY CHARGER

8THORSEN Intelli-Fast Battery Charger
DISPLAY MODE BUTTON
• Battery % - The Digital Display shows an estimated charge percent of the battery
connected to the charger battery clamps.
•Voltage – The Digital Display shows the voltage at the charger battery clamps in
DC volts.
CHARGE RATE BUTTONS
Use these buttons to set the maximum charge rate to one of the following:
• 2A Trickle Rate – Intended for charging small batteries such as those commonly
used in garden tractors, snow mobiles and motorcycles.
• 10A Medium Charge Rate – Use for charging automotive, marine and deep-cycle
batteries. Not intended for industrial applications.
• 15A Fast Charge Rate - Use for charging automotive and light truck batteries.
Not intended for industrial applications.
BATTERY TYPE BUTTONS
Use these buttons to set the type of battery to be charged.
• 6V – This battery type is usually used in garden tractors, motorcycles and
antique vehicles.
• 12V – This battery type is usually used in automotive, marine and deep
cycle situations.
• Regular (Standard) – This battery type is usually used in cars, trucks and
motorcycles. These batteries have vent caps and are often marked “Low
Maintenance” or “Maintenance-free”. This type of battery is designed
to deliver quick bursts of energy (such as starting engines) and have a greater
plate count. The plates will also be thinner and have somewhat different material
composition. Regular batteries should not be used for deep cycle applications.
• Deep-Cycle – Deep-cycle batteries are usually marked as “Deep-Cycle” or “Marine”.
Deep-cycle batteries are usually larger than the other types. This type of battery has
less instant energy but somewhat greater long-term energy delivery than regular
batteries. Deep cycle batteries have thicker plates and can survive a number of
discharge cycles.
#19-014
#19-014
15, 10 & 2 AMP FULLY AUTOMATIC
INTELLI-FAST BATTERY CHARGER

9
© 2010 THORSEN TOOL Co.®
•AGM – The Absorbed Glass Matt construction allows the electrolyte to be
suspended in close proximity with the plate’s active material. In theory, this
enhances both the discharge and recharge efficiency. Actually, the AGM batteries
are a variant of Sealed VRLA (valve regulated lead acid) batteries. Popular
uses include high performance engine starting, power sports, deep cycle, solar
and storage battery.
• GEL – The Gel Cell is similar to the AGM style because the electrolyte is suspended,
but different because technically the AGM battery is still considered to be a wet cell.
The electrolyte in a GEL cell has a silica additive that causes it to set up or stiffen.
The recharge voltages on this type of cell are lower than the other styles of lead
acid battery. This is probably the most sensitive cell in terms of adverse reactions to
over-voltage charging. Gel Batteries are best used in VERY DEEP cycle application
and may last a bit longer in hot weather applications. If the incorrect battery charger
is used on a Gel Cell battery, poor performance and premature failure is certain.
OPERATING INSTRUCTIONS:
• Connect the battery and AC power following the precautions listed on page 6.
• Select the appropriate battery type and charge rate for your battery.
CHARGING
If the charger does not detect a properly connected battery, the CONNECTED
(red) LED will not light until such a battery is detected. Charging will not begin while
the CONNECTED (red) LED is not on. When charging begins, the CHARGING (yellow)
LED will be lit.
BATTERY PERCENT AND CHARGE TIME
This charger adjusts the charging time in order to charge the battery completely,
efficiently and safely. The microprocessor automatically performs the necessary
functions. This section includes guidelines that can be used to estimate charging
times. The duration of the charging process depends on three factors:
• State – If a battery has only been slightly discharged, it can be charged in less
than a few hours. The same battery could take up to 10 hours if very weak.
• Battery Rating – A higher rated battery will take longer to charge than a lower rated
battery under the same conditions. A battery is rated in ampere hours (AH), reserve
capacity (RC) and cold cranking amps (CCA). The lower the rating, the quicker the
battery will charge.
#19-014
#19-014
15, 10 & 2 AMP FULLY AUTOMATIC
INTELLI-FAST BATTERY CHARGER

10 THORSEN Intelli-Fast Battery Charger
• Charge Rate – The charge rate is measured in amps. The 2A rate is for charging
smaller batteries such as those used for motorcycles and garden tractors. Such
batteries should not be charged using the higher rates. The 10A and 15A rates are
for charging automotive and light truck batteries. All charging modes will decrease
the charge rate as the battery approaches maximum charge. After the charging
process has started, the digital display can be used to determine charging progress
by selecting the BATTERY % mode.
There are some important facts to keep in mind when charging a battery.
• When the display indicates 77% charged, the battery has been charged enough
to start most vehicles.
• When the battery is fully charged, the display will indicate 100% charged.
• The battery % shown in tester mode is an estimate based on the battery voltage.
• The battery % shown in charger mode is an estimate of the relative charge in the
battery compared to the charge it should have if the charging process is allowed
to complete and can be used to estimate the relative charge time. The lower
the % shown the longer the charge time for a given battery.
• The battery % shown in charger mode is an indication of the relative progress of
the charging process. The higher the battery % displayed, the less charge time
remains.
• The more a battery is discharged, the faster it absorbs charge from a charger. That
means that the battery % increases faster at the beginning of the charging process
than at the end. In other words, it takes longer for the battery to absorb the last few
percents of charge than the first several percents.
Automatic Charging Mode:
When a charge rate is selected, the charger is set to perform an automatic charge.
When an automatic charge is performed, the charger switches to the maintain mode
(see below)automatically after the battery is charged.
Aborted Charge
If charging can not be completed normally, charging will abort. When charging
aborts, the charger’s output is shut off and the CONNECTED (red) LED will blink.
In that state, the charger ignores all buttons. To reset after an aborted charge, either
disconnect the battery or unplug the charger.
Desulfation Mode:
If the battery is left discharged for an extended period of time, it could become
sulfated and not accept a normal charge. If the charger detects a sulfated battery,
the charger will switch to a special mode of operation designed for such batteries.
Activation of the special desulfation mode is indicated by the CHARGING (yellow)
LED blinking. If successful, normal charging will resume after the battery is
desulfated. The CHARGING (yellow) LED will then stop blinking and stay lit.
Desulfation could take up to 10 hours. If desulfation fails, charging will abort and
the CONNECTED (red) LED will blink.
#19-014
#19-014
15, 10 & 2 AMP FULLY AUTOMATIC
INTELLI-FAST BATTERY CHARGER

11
© 2010 THORSEN TOOL Co.®
Completion of Charge:
Charge completion is indicated by the CHARGED (green) LED. When lit, the charger
has stopped charging and switched to the Maintain Mode of operation. If the DEEP
CYCLE battery type is selected, the CHARGED (green) LED comes on when the
battery is charged enough for normal use.
Maintain Mode:
When the CHARGED (green) LED is lit, the charger has started Maintain Mode.
In this mode, the charger keeps the battery fully charged by delivering a small
current, when necessary. The voltage is maintained at a level determined by the
BATTERY TYPE selected.
Using The Battery Voltage Tester:
Overview
This battery charger has a built-in voltmeter to test your battery’s state of charge.
The charger does not have a built in load tester. As such, a recently charged battery
could have a temporarily high voltage due to what is known as “surface charge”.
The voltage of such a battery will gradually drop during the period immediately after
the charging system is disengaged. Consequently, the tester could display
inconsistent values for such a battery. For a more accurate reading, the surface
charge should be removed by temporarily creating a load on the battery, such as by
turning on lights or other accessories for a couple of minutes before you read the
display. Read it a couple of minutes after you have shut the headlights off.
Testing Sequence: There are four basic steps required to test the battery state
of charge:
1. With the charger unplugged from the AC outlet, connect the charger
to the battery following the instructions given.
2. Plug the charger AC power cord into the AC outlet.
3. If necessary, press the BATTERY TYPE button until the correct type is indicated.
4. Read the voltage on the digital display or press the display mode button to set the
tester to BATTERY % to read the voltage as a percent of charge.
#19-014
#19-014
15, 10 & 2 AMP FULLY AUTOMATIC
INTELLI-FAST BATTERY CHARGER

12 THORSEN Intelli-Fast Battery Charger
Tester and Charger:
Tester and Charger: When first turned on, the unit operates only as a tester, not
as a charger. To continue to use it only as a tester, avoid pressing the CHARGE
RATE button. Selecting a charge rate activates the battery charger and deactivates
the tester.
Power-Up Idle Time Limit:
If no button is pressed within 15 minutes after the battery charger is first powered
up, the charger will automatically switch from tester to charger, if a battery is
connected. In that case, the battery will be set for the 2A charge rate and 12V
REGULAR battery type.
Tester without Time Limit:
If either the DISPLAY MODE or BATTERY TYPE button is pressed within the first
10 minutes after the battery charger is powered up, the unit will remain a tester
(not a charger) indefinitely, unless a charge rate is selected.
Testing After Charging:
After the unit has been changed from tester to charger (by selecting a charge
rate), it remains a charger. To change the battery charger back to a tester, press
the CHARGE RATE switch until all charge rate LED’s are off.
Tester Status LED’s:
When the unit is operating as a battery tester, the status LED’s light under the
following conditions:
• The CHARGED (green) LED will light if a charged battery is tested.
• The CHARGING (yellow) LED does not light in the battery test mode.
• The CONNECTED (red) LED lights when a properly connected battery
is detected.
• When the tester display mode is set to VOLTAGE, the CHARGED and
CHARGING LED’s won’t light.
#19-014
#19-014
15, 10 & 2 AMP FULLY AUTOMATIC
INTELLI-FAST BATTERY CHARGER

13
© 2010 THORSEN TOOL Co.®
GENERAL CHARGING NOTES:
Restart
If the charge mode is changed after charging has started (by pressing the
CHARGE RATE or BATTERY TYPE button), the charging process will restart.
Voltage
The voltage displayed during charging is the charging voltage and is usually
higher than the battery’s resting voltage.
Charging Tips:
Read this entire manual before using your battery charger. The following tips
serve only as a guide for specific situations:
• If your vehicle won’t start – It is not necessary to fully charge your battery to start
a vehicle. If operating the vehicle continuously for an extended period of time
(such as a long drive) the vehicle’s charging system should charge the battery
during that period. If the vehicle will only be operating for a short period of time
(short drive) the battery might need to recharge before starting the vehicle again.
• Reviving your battery – It is not necessary to fully charge your battery to start a
vehicle. When the battery’s charge is 77% or more, the battery has usually been
charged enough for the vehicle to start and operate normally.
• Completing an interrupted charge – If the charging process has been interrupted
and restarted, the charger could go straight to Maintain Mode. However the
charge can often be completed using the 2A rate.
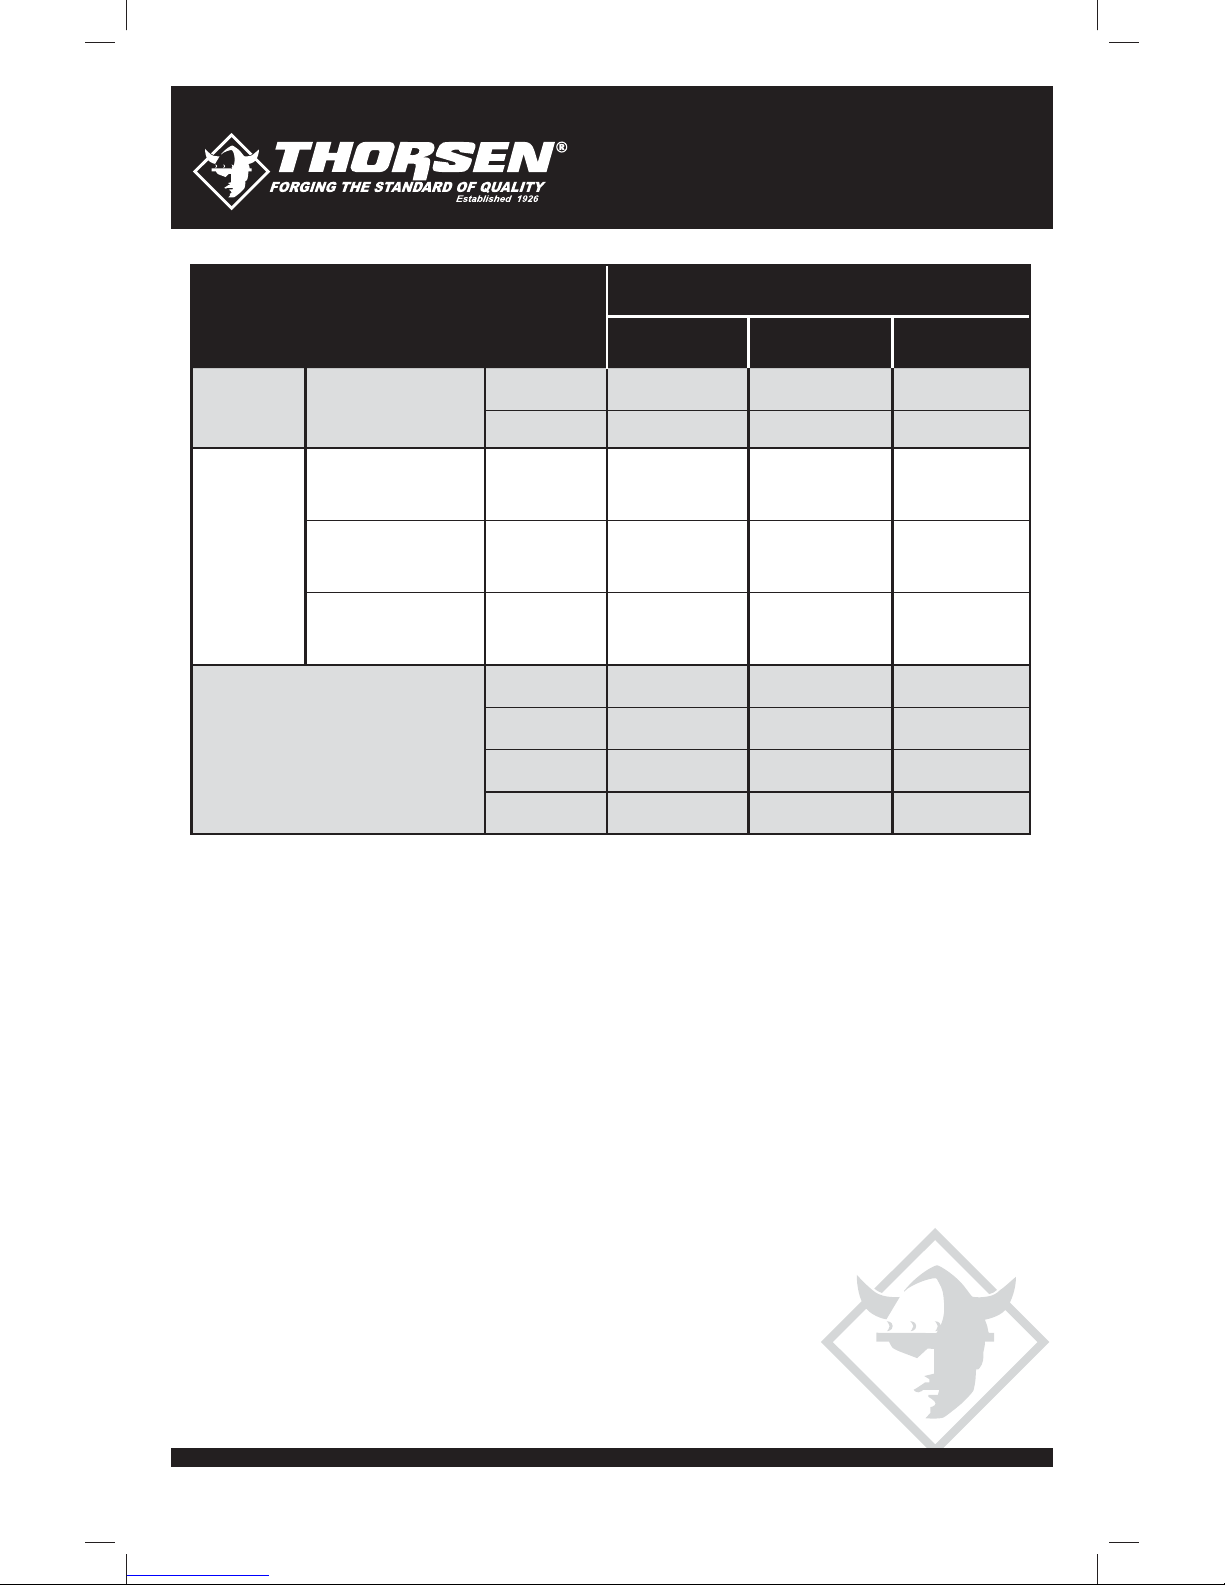
CALCULATING CHARGE TIME:
Use the table on page 13 to more accurately determine the time it will take to bring
a battery to full charge. First, identify where your battery fits into the chart.
• Small batteries – motorcycle, garden tractors, etc. – are usually rated in
Ampere Hours (AH). For example: 6, 12, 32 AH etc.
• Batteries in cars and smaller trucks are usually rated in Reserve Capacity(RC),
Cold-Cranking Amps (CCA) or both.
• Marine or deep-cycle batteries are usually rated in Reserve Capacity (RC).
• NR means that the charger setting is NOT RECOMMENDED.
Find your battery rating on the chart and note the charge time given for each charger
setting. The times given are for batteries with a 50-percent charge prior to recharging.
Add more time for severely discharged batteries.
#19-014
#19-014
15, 10 & 2 AMP FULLY AUTOMATIC
INTELLI-FAST BATTERY CHARGER
14 THORSEN Intelli-Fast Battery Charger
BATTERY SIZE / RATING
SMALL
BATTERIES 6 - 12 AH
12 - 32 AH
2 - 3-3/4 HOURS
MOTORCYCLE,
GARDEN TRACTOR,
ETC.
CARS
TRUCKS
MARINE / DEEP-CYCLE
200-315 CCA
315-550 CCA
550-1000 CCA
40 - 60 RC
60 - 85 RC
80 RC
140 RC
160 RC
180 RC
17-1/2
HOURS
27
HOURS
30
HOURS
33
HOURS
3-1/2
HOURS
5-1/2
HOURS
6
HOURS
6-1/2
HOURS
2-1/2
HOURS
3-1/2
HOURS
4
HOURS
4-1/2
HOURS
85 - 190 RC
CHARGE RATE / CHARGING TIME
2 AMP
3-3/4 - 10 HOURS
11-1/4 - 14-1/2
HOURS
14-1/2 - 18-1/4
HOURS
18-1/4 - 34-3/4
HOURS
2-1/4 - 3
HOURS
3 - 3-3/4
HOURS
3-3/4 - 7
HOURS
1-1/2 - 2
HOURS
2 - 2-1/2
HOURS
2-1/2 - 4-1/2
HOURS
NR
10 AMP
NR
NR
NR
15 AMP
MAINTENANCE INSTRUCTIONS:
• Before performing maintenance, unplug and disconnect battery charger as
described on page 5.
• After use, unplug charger and use a dry cloth to wipe all battery corrosion
and other dirt or oil from terminals, cords, and the charger case.
• Servicing does not require opening unit, as there are no user-serviceable parts.
STORAGE INSTRUCTIONS:
• Store charger unplugged, in an upright position. Cord will still conduct electricity
until it is unplugged from outlet.
• Store inside, in a dry, cool place (unless you’re using an on-board Marine Charger ).
• Do not store clips on the handle, clipped together, on or around metal, or clipped
to the cables.
#19-014
#19-014
15, 10 & 2 AMP FULLY AUTOMATIC
INTELLI-FAST BATTERY CHARGER

15
© 2010 THORSEN TOOL Co.®
PROBLEM POSSIBLE CAUSE SOLUTION
CONNECTED (Red)
light is NOT on
CHECK (Red)
light is NOT on
The battery is not
connected correctly
Connection to battery is reversed
The battery voltage is less
than one volt
Check for poor connection to battery and frame.
Make sure connection points are clean.
Rock clips back and forth for a better connection.
Correct connection.
Replace the battery or try using a manual
charger to bring above one volt.
Indicator lights are lit
in an erratic manner,
not explained in the
Operating instructions
A button may have been
pressed while the charger
was being plugged in
Make sure nothing is touching the control panel,
then unplug the unit and plug it in again
CONNECTED (Red)
light is blinking Charger in abort mode. Battery
may also be faulty. This will
happen if the battery did not reach
full charge within 48 hours.
May be due to a very large battery
or a bank of batteries requiring
more power than the charger
can deliver in 48 hours.
Reset the charger by unplugging it. Select the
desired charge rate and battery type again,
if necessary.
The CHARGED (Green)
light turns on a few
minutes or less after
connecting the battery
The battery may be fully charged
or recently charged, leaving the
battery voltage high enough to
appear to be fully charged.
The battery may be faulty (sulfated).
If the battery is in a vehicle, turn the headlights
on for a few minutes to reduce the battery voltage
and try charging again. Also try a lower charge
rate selection.
A sulfated battery will eventually accept a charge.
Continue charging for a few hours. The charging
(Yellow) led will blink. If not, have the battery
checked or call customer service.
The measured current is
much lower than what
was selected.
The charger reached the maximum
voltage and is reducing the current. No problem; this is a normal condition.
The charger is making
an audible clicking sound Circuit breaker is cycling.
Battery is defective.
Shorted battery cables or clamps.
Severely discharged battery, but
otherwise in good condition.
Reverse connections at battery.
The settings may be wrong.
Check the charger settings.
Have the battery checked.
Circuit breaker cycles when current draw is too
high. Check for shorted cables or clamps and
replace if necessary.
The battery may not want to accept a charge due
to a run-down state. Allow charging to continue
until battery has a chance to recover and take a
charge. If more than 20 minutes, stop charging
and have the battery checked.
Shut charger off and correct the lead connections.
Charger will not turn on
when properly connected AC outlet is dead.
Poor electrical connection.
Check for open fuse/circuit breaker supplying AC outlet.
Check power cord and extension cord for loose fitting plug.
The battery is connected
and the charger is on,
but is not charging
Clamps are not making a
good connection Check for poor connection at battery and frame.
Make sure connecting points are clean.
Rock clamps back and forth for a better connection.
#19-014
#19-014
15, 10 & 2 AMP FULLY AUTOMATIC
INTELLI-FAST BATTERY CHARGER

16 THORSEN Intelli-Fast Battery Charger
#19-014
#19-014
Manual Del Usuario
Manual Del Usuario
Cargador De Batería INTELLI-FAST
Cargador De Batería INTELLI-FAST
Totalmente Automático
Totalmente Automático

17
© 2010 THORSEN TOOL Co.®
#19-014
#19-014
15, 10 & 2 AMP TOTALMENTE AUTOMÀTICO
CARGADOR DE BATERÌA INTELLI-FAST
Muchas felicidades por la compra de este producto THORSEN. La ingeniería y diseño
que aplicamos en nuestros productos le ofrecen años de servicio dignos de confianza.
Sírvase a revisar cuidadosamente este manual antes de usar su nuevo producto.
Dedique algunos minutos para leer este manual. Le ayudará a comprender mejor el pro-
ducto que acaba de adquirir. Como cualquier herramienta que puede causar algún daño,
TENGA MUCHA PRECAUCIÓN CUANDO USE ESTE PRODUCTO. Guarde este manual
para futuras referencias.
PRECAUCIONES DE SEGURIDAD:
• GUARDE ESTAS INSTRUCCIONES
• Sírvase en leer, comprender y seguir los pasos de estas instrucciones y
precauciones cuidadosamente ya que este manual contiene instrucciones
de operación y seguridad muy importantes.
• No exponga el cargador a la lluvia o nieve.
• Utilice únicamente las conexiones recomendadas. El uso de una conexión no
recomendada por THORSEN TOOL Co. puede dar como resultado riesgo de fuego,
descarga eléctrica o daños a personas.
• Para reducir el riesgo de daños a la clavija o cable, jale desde la clavija en
lugar del cable cuando desconecte el cargador.
• No debe usarse una extensión de cable a menos que sea absolutamente
necesario. El uso de una extensión de cable puede provocar riesgo de incendio
y descarga eléctrica. Si su trabajo requiere el uso de una extensión de cable,
asegúrese de:
1. Que las puntas de la clavija de la extensión de cable sean del mismo
número, tamaño y forma que las de la clavija del cargador.
2. Que la extensión de cable esté diseñado adecuadamente y en buenas
condiciones eléctricas.
3. Que el tamaño del cable tenga la suficiente clasificación de amperaje
AC del cargador como se especifica en la tabla de la página 21.
• No utilice el cargador con una clavija o cable dañados. Acuda a un
especialista calificado.
• No utilice el cargador si ha recibido un golpe severo, se ha caído o se ha dañado
de cualquier forma. Acuda a un especialista calificado.
• No desarme el cargador, acuda con un especialista calificado cuando requiera
servicio o reparación. Un armando incorrecto puede provocar riesgo de incendio
o descarga eléctrica.
• Para reducir el riesgo de descarga eléctrica, desconecte el cargador del
tomacorriente antes de limpiarlo o darle mantenimiento. El simple hecho de
apagar los controles no reducirá este riesgo.
18 THORSEN Intelli-Fast Battery Charger
#19-014
#19-014
15, 10 & 2 AMP TOTALMENTE AUTOMÀTICO
CARGADOR DE BATERÌA INTELLI-FAST
Trabajar cerca de una batería de ácido y plomo es peligroso. Las baterías
generan gases explosivos durante la operación normal de la batería. Por esta
razón, es extremadamente importante que siga las instrucciones cada vez
que use el cargador.
Para reducir el riesgo de explosión de la batería, siga estas instrucciones y las
instrucciones del fabricante de la batería, así como las instrucciones del fabricante
de cualquier equipo que vaya a usar cerca de la batería. Revise las marcas de
precaución en estos productos y en el motor.
PRECAUCIONES PERSONALES:
• Considere tener a una persona cerca de usted en caso que necesite ayuda
cuando trabaje cerca de una batería de plomo y ácido.
• Tenga a la mano agua limpia y jabón en caso de que el ácido de la batería
entre en contacto con su piel, ropa u ojos.
• Utilice protección completa para ojos y cuerpo incluyendo gafas de seguridad
y ropa protectora. Evite tocar sus ojos cuando trabaje cerca de la batería.
• Si el ácido de la batería entra en contacto con su piel o ropa, lave inmediatamente
con agua y jabón. Si el ácido penetra en su ojo, lave el ojo bajo un chorro de
agua fría al menos por 10 minutos y acuda inmediatamente al médico.
• NUNCA fume cerca de una batería de motor o prenda chispas o flamas.
• Tenga extremo cuidado en tirar una herramienta de metal dentro de la batería.
Esto puede provocar una chispa o corto circuito en la batería o en cualquier
pieza eléctrica que pueda causar una explosión.
• Retire cualquier objeto personal de metal como anillos, brazaletes, collares o relojes
cuando trabaje en una batería de plomo y ácido. Una batería de plomo y ácido
puede provocar un corto circuito en la corriente lo suficientemente potente para
fundir un anillo o cualquier objeto al metal, causando severas quemaduras.
• El diseño de este cargador es para su uso únicamente en baterías de PLOMO
y ÁCIDO. No está diseñado para proporcionar potencia a un sistema eléctrico
de bajo voltaje aparte de aplicaciones de marcha de motores.
•
Tenga cuidado de no tirar herramientas de metal dentro de la batería. El metal
puede provocar una chispa o corto circuito en la batería o en cualquier otro
dispositivo eléctrico. Una simple chispa puede generar una explosión.
• No utilice este cargador de batería para cargar baterías secas que se usan
generalmente en electrodomésticos. Estas baterías pueden estallar y causar
lesiones a personas y daños a la propiedad.
• NUNCA cargue una batería congelada.
• NUNCA sobrecargue una batería.

19
© 2010 THORSEN TOOL Co.®
#19-014
#19-014
15, 10 & 2 AMP TOTALMENTE AUTOMÀTICO
CARGADOR DE BATERÌA INTELLI-FAST
PREPARÁNDOSE PARA CARGAR:
• Si es necesario retirar la batería del vehículo para poder cargarla, siempre retire
primero la terminal a tierra. Asegúrese de que todos los accesorios dentro del
vehículo estén apagados para prevenir un arco eléctrico.
• Asegúrese de que el área alrededor de la batería esté bien ventilada mientras
ésta se carga.
• Limpie las terminales de la batería antes de cargarla. Durante la limpieza, evite
que la corrosión en el aire entre en contacto con sus ojos, nariz y boca. Use
bicarbonato de sodio y agua para neutralizar el ácido de la batería y ayudar
a eliminar la corrosión en el aire. No toque sus ojos, nariz o boca.
• Agregue agua destilada a cada celda hasta que el ácido de la batería alcance
el nivel especificado por el fabricante de la batería. Evite el sobrellenado. En
casos de usar una batería sin tapas de celdas desmontables, como baterías
de plomo y ácido con válvula reguladora, siga las instrucciones de recarga
proporcionadas por el fabricante.
• Lea, comprenda y siga todas las instrucciones del cargador, batería, vehículo y
cualquier equipo que use cerca de la batería y el cargador. Estudie todas las
precauciones específicas del fabricante de la batería mientras la cargue, así
como las clasificaciones recomendadas de cargas.
• Determine el voltaje de la batería consultando el manual de usuario del vehículo
y asegúrese de que el interruptor selector de voltaje de salida esté posicionado en
el voltaje correcto. Si el cargador tiene una clasificación de voltaje ajustable,
cargue primero la batería en la clasificación más baja.
• Asegúrese de que las pinzas del cable del cargador estén conectadas fijamente.
• Coloque el cargador lo más lejos de la batería, dependiendo de lo largo del
cable DC.
• Nunca coloque el cargador directamente encima de la batería que esté cargando;
los gases que emanan de la batería corroen y dañan el cargador.
• No coloque la batería encima del cargador.
• No permita que el ácido de la batería gotee dentro del cargador al leer la
gravedad específica del electrolito o cuando llene la batería.
• No utilice el cargador en un área cerrada o con ventilación restringida.
PRECAUCIONES DE CONEXIÓN DC:
• Conecte y desconecte las pinzas de salida DC sólo después de ajustar todos los
interruptores de carga a la posición “off” (apagado) y después de retirar la clavija
AC del tomacorriente.
• No permita que las pinzas se toquen entre sí.
• Conecte las pinzas a la batería y al chasis:
Vehículo con TIERRA NEGATIVA:
• Conecte la pinza POSITIVA (ROJA) del cargador de batería al poste positivo
de la batería a tierra (POS, P, +). Conecte la pinza NEGATIVA (NEGRA)
al chasis del vehículo o bloque del motor, lejos de la batería. No conecte la
pinza al carburador, líneas de combustible o partes de lámina. Conecte a
una parte de metal resistente en el chasis o bloque de motor.

20 THORSEN Intelli-Fast Battery Charger
#19-014
#19-014
15, 10 & 2 AMP TOTALMENTE AUTOMÀTICO
CARGADOR DE BATERÌA INTELLI-FAST
Vehículo con TIERRA POSITIVA:
• Conecte la pinza NEGATIVA (NEGRA) del cargador de batería al post
NEGATIVO (NEG, N, -) sin conexión a tierra de la batería. Conecte la pinza
POSITIVA (ROJA) al chasis del vehículo o bloque del motor, lejos de la
batería. No conecte la pinza al carburador, líneas de combustible o partes
de lámina. Conecte a una parte de metal resistente en el chasis o bloque
de motor.
SIGA ESTOS PASOS CUANDO LA BATERÍA ESTÉ INSTALADA EN EL
VEHÍCULO:
UNA CHISPA CERCA DE LA BATERÍA PUEDE PROVOCAR UNA EXPLOSIÓN.
PARA REDUCIR EL RIESGO DE UNA CHISPA CERCA DE LA BATERÍA:
1. Coloque los cables AC y DC para reducir el riesgo de daño por el cofre, la puerta
y las partes móviles o calientes del motor.
2. Manténgase alejado de aspas de ventilador, cinturones, poleas y otras piezas
que puedan causar alguna lesión.
3. Revise la polaridad de los postes de la batería. El poste POSITIVO de la batería
(POS, P, +) regularmente tiene un diámetro más grande que del poste
NEGATIVO (NEG, N, -).
4. Determine qué poste de la batería tiene conexión a tierra (conectado) al chasis.
Si el poste negativo está conectado a tierra al chasos (como en la mayoría de
los vehículos), consulte el paso 5. Si el poste positivo es el que está conectado a
tierra al chasis, consulte el paso 6.
5. En caso de un vehículo con conexión a tierra negativa, conecte la pinza POSITIVA
(ROJA) del cargador de batería al poste sin conexión a tierra POSITIVO
(POS, P, +) de la batería. Conecte la pinza NEGATIVA (NEGRA) al chasis del
vehículo o bloque del motor, lejos de la batería. No conecte la pinza al carburador,
líneas de combustible o partes de lámina. Conecte a una parte de metal resistente
en el chasis o bloque de motor.
6. En caso de un vehículo con conexión a tierra positiva, conecte la pinza NEGATIVA
(NEGRA) del cargador de batería al poste sin conexión a tierra NEGATIVO
(NEG, N, -) de la batería. Conecte la pinza POSITIVA (ROJA) al chasis del vehículo
o bloque del motor, lejos de la batería. No conecte la pinza al carburador, líneas de
combustible o partes de lámina. Conecte a una parte de metal resistente en el
chasis o bloque de motor.
7. Cuando desconecte el cargador, apague todos los interruptores, desconecte el
cable AC, retire la pinza del chasis del vehículo y a continuación retire la pinza de
la terminal de la batería.
8. Vea el TIEMPO DE CARGA CALCULADO para mayor información acerca de la
duración de la carga.
SIGA ESTOS PASOS CUANDO LA BATERÍA ESTÉ INSTALADA FUERA
DEL VEHÍCULO:
UNA CHISPA CERCA DE LA BATERÍA PUEDE PROVOCAR UNA EXPLOSIÓN.
PARA REDUCIR EL RIESGO DE UNA CHISPA CERCA DE LA BATERÍA:
1. Revise la polaridad de los postes de la batería. El poste POSITIVO de la batería
(POS, P, +) regularmente tiene un diámetro más grande que del poste
NEGATIVO (NEG, N, -).
This manual suits for next models
1
Table of contents
Languages:


