Thulos KOOL BREEZE TH-KB11 User manual

AIR COOLER
TH-KB11
MANUAL DE INSTRUCCIONES
Lea este manual atentamente antes de usar el aparato por primera vez.
Conserve este manual para futuras consultas.

Bienvenido a Thulos.
Estimado cliente
Agradecemos la confianza depositada en nosotros al adquirir este producto THULOS®. Nuestro
principal empeño es ofrecer artículos excelentes, manteniendo los más estrictos controles de
calidad y cumpliendo todas las normativas vigentes de seguridad, con el objetivo de presentar un
producto perfecto y seguro para el uso doméstico.
Instrucciones De Seguridad.
- Verifique si el voltaje de su casa corresponde con el voltaje del aparato.
- El aparato debe colocarse en una superficie estable, firme y plana para evitar vuelcos.
- No tape la entrada ni salida de aire mientras el aparato esté en funcionamiento.
- No use el aparato cerca de enchufes ni dirija el aire del aparato hacia enchufes.
- La toma de corriente debe ser de más de 10A.
- No enchufe el aparato junto con otros aparatos en multiplicadores.
- Este aparato puede ser utilizado por niños mayores de 8 años y personas con capacidades
físicas, sensoriales o mentales reducidas o con falta de experiencia y conocimientos
solamente cuando están supervisados en todo momento por un adulto, o si un adulto
responsable le ha proporcionado instrucciones sobre el uso de la unidad y le ha explicado
y entienden los riesgos implicados.
- Los niños no deben jugar con el aparato. Este aparato no es un juego para niños.
- El padre, madre ó tutor legal del niño ó de la persona con capacidad reducida,
será el responsable de que usen este aparato.
- Mantenga el aparato y su cable lejos del alcance de niños.
- No pegar el aparato a la pared, cortinas o similares, ya que bloquea la entrada de aire y
afecta al funcionamiento correcto del aparato, dando lugar a posibles averías.
- Nunca introduzca los dedos ni objetos a través de los oricios de la carcasa de plástico.
- No utilice el aparato cerca de ventanas.
- No manipule el aparato con las manos mojadas para evitar el riesgo de descarga eléctrica.
- Apague siempre el aparato antes de desconectar el enchufe.
- Para desenchufarlo, nunca tire del cable. Agarre desde el mismo enchufe para desenchufar.
- Para cualquier manipulación del aparato, debe desenchufarlo primero de la corriente.
- Si el enchufe, cable ó el aparato se daña, debe repararlo un servicio técnico cualificado.
- No utilice el aparato en zonas donde haya humedad.
- No usar el aparato donde pueda salpicar agua ni otros líquidos.
- No utilice el dispositivo al aire libre.
- No ponga nada sobre el aparato.
- Antes de usar la función de humidificar, asegurarse que el indicador de nivel del depósito
de agua está por debajo de la señal “Max” y por encima de la señal "Min".
Controlar esto en todo momento mientras se esté usando la función humidificar ó enfriamiento.
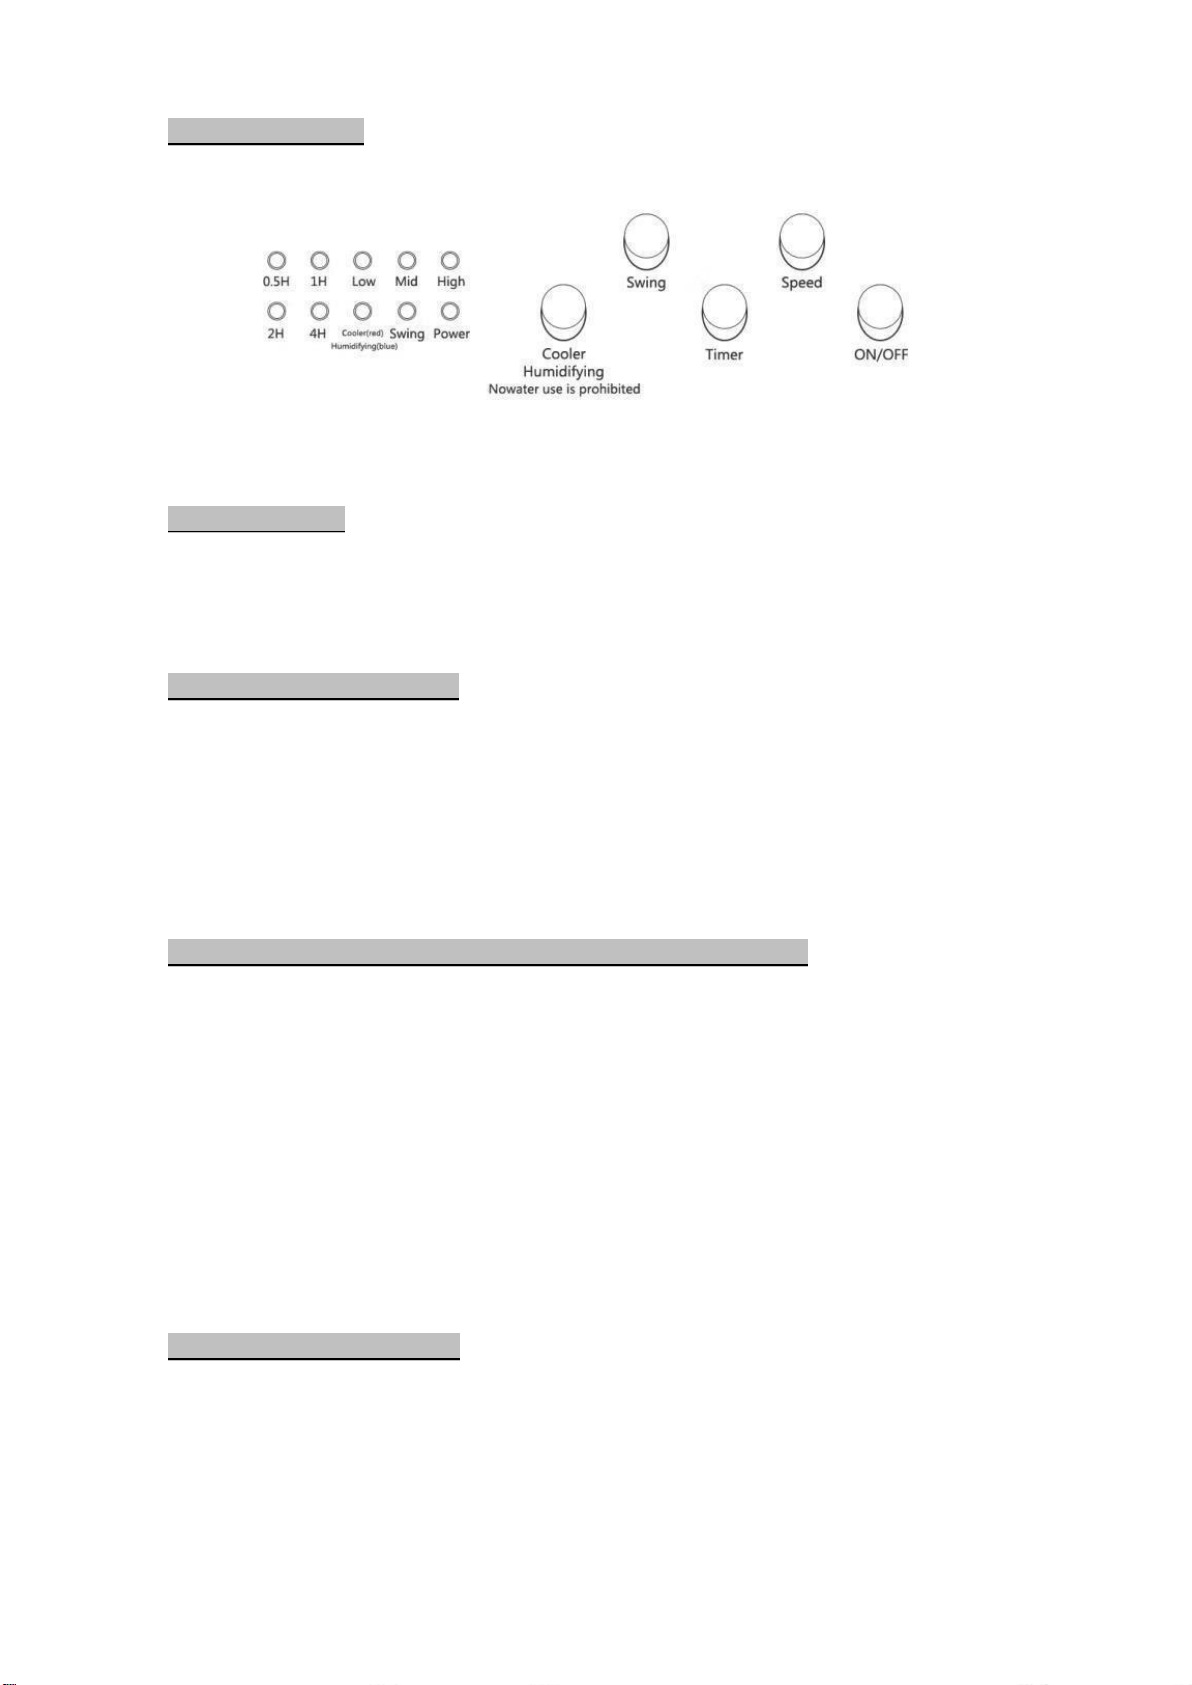
Panel De Control.
Botón "On / Off".
- Presione este botón para encender ó apagar el aparato.
- El piloto rojo "Power" permanece siempre encendido mientras esté enchufado.
Botón "Speed" (Velocidad).
- Cuando enciende el aparato, se encenderá el piloto de velocidad "Low".
- Cada vez que pulse el botón "Speed" irá cambiando la velocidad del ventilador
entre baja, media y alta sucesivamente.
- Según la velocidad se irán encendiendo los correspondientes pilotos indicadores.
( Velocidad baja "Low" / Velocidad media "Mid" / Velocidad alta "High" )
Botón "Cooler / Humidifying" (Enfriamiento / Humidificador).
- Presione el botón una vez, el indicador "Cooler” (enfriamiento/rojo)" del panel de control indicará
que la función de enfriamiento está enmarcha.
Esta función va refrescando un poco el ambiente dependiendo de lo fría que esté
el agua del depósito.
- Presionando el botón una segunda vez, cuando el indicador “Humidifying” (Humidificación/azul)
del panel de control indicará que la función del
humificador está en marcha.
Esta función humedece un poco el ambiente seco.
Botón "Swing" (Oscilación).
- Cuando el aparato esté en funcionamiento, presione el botón "swing" para que la función de
oscilación se ponga en marcha. Se encenderá el piloto indicador "swing".
Para detener la función y dejar el aire fijo en una dirección, volver a pulsar el mismo botón.

Botón "Timer" (Temporizador).
- Cuando el aparato está en funcionamiento y quiere que se apague automáticamente
transcurrido un tiempo, pulse este botón para activar el temporizador.
- Cuando pulse por primera vez, se activará el temporizador con media hora "0.5h".
- Cada vez que pulse el botón irá sumando media hora, y así hasta 7.5 horas.
- Una vez transcurrido el tiempo seleccionado, el aparato se apagará automáticamente.
- Para desactivar el temporizador, pulsar el botón consecutivamente hasta que los
4 indicadores queden apagados (16 veces a partir de la primera pulsación).
Llenado Del Depósito De Agua.
- Abrir despacio el depósito de agua de la parte inferior trasera del aparato. No sacar entero.
- Verter agua limpia sin rebasar la señal "Max".
- El nivel de agua debe estar por debajo de la señal "Max" y por encima de la señal "Min".
- Solamente es necesario vigilar que tenga agua en las funciones de enfriar y humidificar.
- Para que el aire sea un poco más fresco introduzca una placa de hielo en eldepósito.
- Las placas de hielo debe congelarlas previamente en un congelador.
Advertencias.
- Tenga en cuenta que al meter las placas de hielo en el depósito, sube el nivel del agua.
- Deberá vigilar que el nivel de agua no rebase la señal "Max".
- Nunca añadir hielo al depósito. Solamente puede añadirse la placa.
Utilización De Las Placas De Hielo.
La función de las placas de hielo es bajar la temperatura del agua del depósito.
De esta manera el aparato emite un aire más fresco.
Antes de utilizarlas en el aparato hay que prepararlas previamente.
Rellenarla de agua hasta la marca "Max". Ponerlas en un congelador.
Cuando estén bien congeladas, estarán listas para usar en el aparato.
Solamente tiene que introducirla en el depósito de agua del aparato con agua.
Nota.
Se incluye 2 placas de hielo con el aparato para que pueda utilizarlas continuamente.
Tenga preparadas siempre las 2 placas en un congelador.
Después puede ir usando una mientras la otra se está congelando en el congelador.
Advertencia.
Tenga en cuenta que al meter las placas de hielo en el depósito, sube el nivel del agua.
Deberá vigilar que el nivel de agua no rebase la señal "Max".
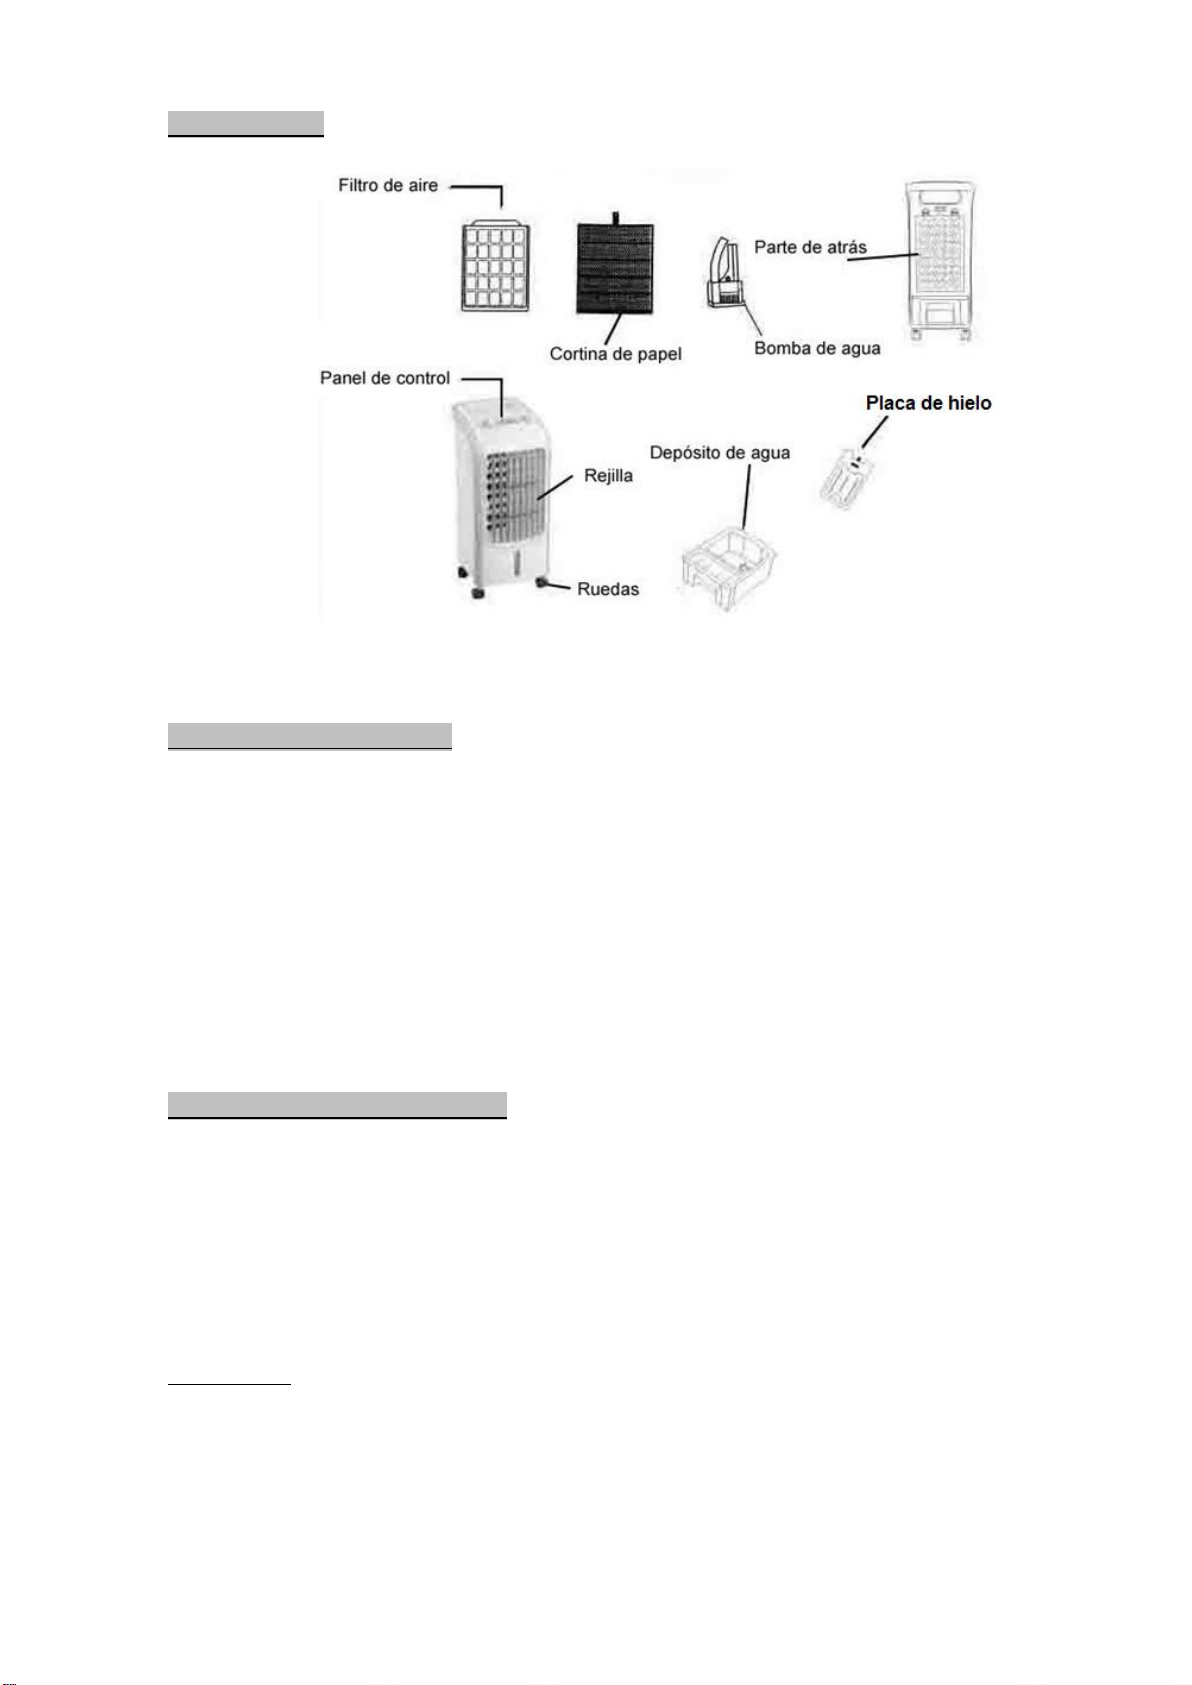
Componentes.
Limpieza del Filtro de Aire.
- Desenchufar el aparato de la corriente eléctrica.
- Quitar el tornillo central entre las 2 pestañas del filtro trasero.
- Presionar las 2 pestañas a la misma vez hacia bajo y tirando hacia fuera.
- Una vez fuera, sacar el filtro hacia arriba.
- Limpiar el filtro con un cepillo suave, agua y jabón neutro.
- Nunca use productos de limpieza abrasivos.
- Dejar secar bien antes de volver a colocarlo.
Limpieza de la cortina de papel.
- Desenchufar el aparato de la corriente eléctrica.
- Proceder como en el apartado anterior para quitar el filtro trasero.
- Una vez quitado el filtro, extraemos la cortina de papel.
- Limpie la cortina de papel con agua limpia y un cepillo muy suave que no dañe al papel.
- No use productos de limpieza abrasivos.
- Tras su limpieza vuelva a colocar la cortina de papel y el filtro trasero.
Advertencia.
Asegúrese de colocar bien la cortina de papel ya que puede tener fugas de agua.
Limpieza del depósito de agua.
- Desenchufar el aparato de la corriente eléctrica.
- Abrir con cuidado y despacio el depósito de agua.
- Secar los restos de agua usada del depósito de agua.
- Limpiar con un paño humedecido en agua con jabón neutro el depósito.
- Nunca use productos de limpieza abrasivos.
- Una vez limpio vuelva a colocar el depósito en su sitio.
Limpieza del exterior del aparato.
- Desenchufar el aparato de la corriente eléctrica.
- Limpiar con un paño suave humedecido en agua con jabón neutro.
- Nunca use productos de limpieza abrasivos.
Almacenamiento del aparato.
- Después de la temporada de uso del aparato, guardar en zona fresca, seca y sin polvo.
- Si es posible, guardar en su caja original.
- Asegúrese de limpiar bien el aparato antes de guardarlo por un tiempo.
- Asegúrese de que todos sus componentes están bien secos antes de guardar el aparato.
- Si no tiene su caja original, cubrir con una manta ó plástico para que no coja polvo.
- No almacenar más cosas encima del aparato.
Advertencia.
Antes de guardar el aparato por un tiempo, asegúrese de que está limpio y muy bien seco.
Si alguna de las partes se guarda mojada puede crear humedad en el aparato y averiarse.
Además puede originar bacterias tóxicas y respirarlas cuando se vuelva a poner en uso.
Especificaciones.
- Voltaje: 220V-240V // 50Hz.
- Potencia: 75W.
- 3 Velocidades.
- Temporizador hasta 7.5 horas.
- Rejilla Oscilante 120º.
- Mando a distancia.
- Nivel de ruido 60dB.
- Ruedas para facilitar el transporte.
- Volumen flujo de aire 300 m³/h.
- Velocidad del viento 7 m/s.
- Peso Neto 4Kg.
- Tamaño 250x260x570mm.

CONDICIONES DE GARANTÍA.
1. Este aparato está cubierto contra cualquier defecto de fábrica.
2. El aparato se cambiará siempre y cuando esté dentro del plazo de cambio
y se devuelva con todos sus accesorios y embalaje.
3. La garantía será válida siempre y cuando el aparato vaya acompañado de su factura
ó ticket de compra donde salga reflejado el modelo del aparato ó también su tarjeta
de garantía debidamente cumplimentada y sellada.
4. El aparato estará exento de garantía (no cubierto) cuando:
- Tenga señales de golpes, caídas ó arañazos.
- Presente signos de mal uso.
- Presente un estado de desgaste de uso excesivo.
- Se haya manipulado inadecuadamente.
- Haya sido abierto y manipulado el sistema eléctrico por terceros no cualificados.
- No tenga documento acreditativo (tarjeta, ticket ó factura de compra).
- No ha sido usado siguiendo el manual de instrucciones.
NOTA:
- Bajo ningún concepto de hará cambio directo ó abono directo del aparato, sin antes ser
revisado por el servicio técnico, dando éste la autorización para el cambio ó abono.
NORMAS DE PROTECCIÓN DEL MEDIO AMBIENTE
Este aparato no se debe desechar con los residuos domésticos cuando finalice su
durabilidad, sino que se debe ofrecer a un centro de reciclaje de aparatos eléctricos y
electrónicos domésticos. Este símbolo en el aparato, manual de instrucciones y
embalaje le avisa de este aspecto importante.
Los materiales utilizados en este aparato se pueden reciclar. Mediante el reciclaje de
electrodomésticos, usted contribuye a fomentar la protección del medioambiente.
Consulte a sus autoridades locales para obtener información acerca del punto de recogida.

AIR COOLER
TH-KB11
INSTRUCTIONS MANUAL
Read this manual carefully before using the device for the first time.
Keep this manual for future reference.

Welcome to Thulos.
We appreciate the trust placed in us when buying this Thulos product.
Our main effort is to offer excellent items, keeping the strictest quality controls and complying
with all current safety regulations, with the aim of presenting a perfect and safe product for
domestic use.
Safety Instructions.
- Check if your home voltage corresponds to the device voltage.
- The appliance must be placed on a stable, firm and flat surface to avoid overturning.
- Do not cover the air inlet or outlet while the appliance is in operation.
- Do not use the appliance near plugs or direct the appliance air towards plugs.
- The power outlet must be more than 10A.
- Do not plug the device together with other devices into multipliers.
- This device can be used by children over 8 years old and people with capacities reduced physical,
sensory or mental or lack of experience and knowledge only when supervised at all times by an
adult, or if an adult responsible has provided instructions on the use of the unit and explained
and understand the risks involved.
- Children should not play with the device. This device is not a game for children.
- The father, mother or legal guardian of the child or the person with reduced capacity,
will be responsible for using this device.
- Keep the device and its cable out of reach of children.
- Do not glue the device to the wall, curtains or similar, as it blocks the entry of air and affects the
correct operation of the device, leading to possible breakdowns.
- Never insert your fingers or objects through the holes in the plastic housing.
- Do not use the appliance near windows.
- Do not handle the appliance with wet hands to avoid the risk of electric shock.
- Always switch off the appliance before disconnecting the plug.
- To unplug it, never pull on the cable. Grasp from the same plug to unplug.
- For any manipulation of the device, you must first unplug it from the power.
- If the plug, cable or the device is damaged, it must be repaired by a qualified technical service.
- Do not use the appliance in areas where there is humidity.
- Do not use the device where it may splash water or other liquids.
- Do not use the device outdoors.
- Do not put anything on the device.
- Before using the humidify function, make sure the tank level indicator of water is below the
"Max" signal and above the "Min" signal.
Control this at all times while using the humidify or cool function.
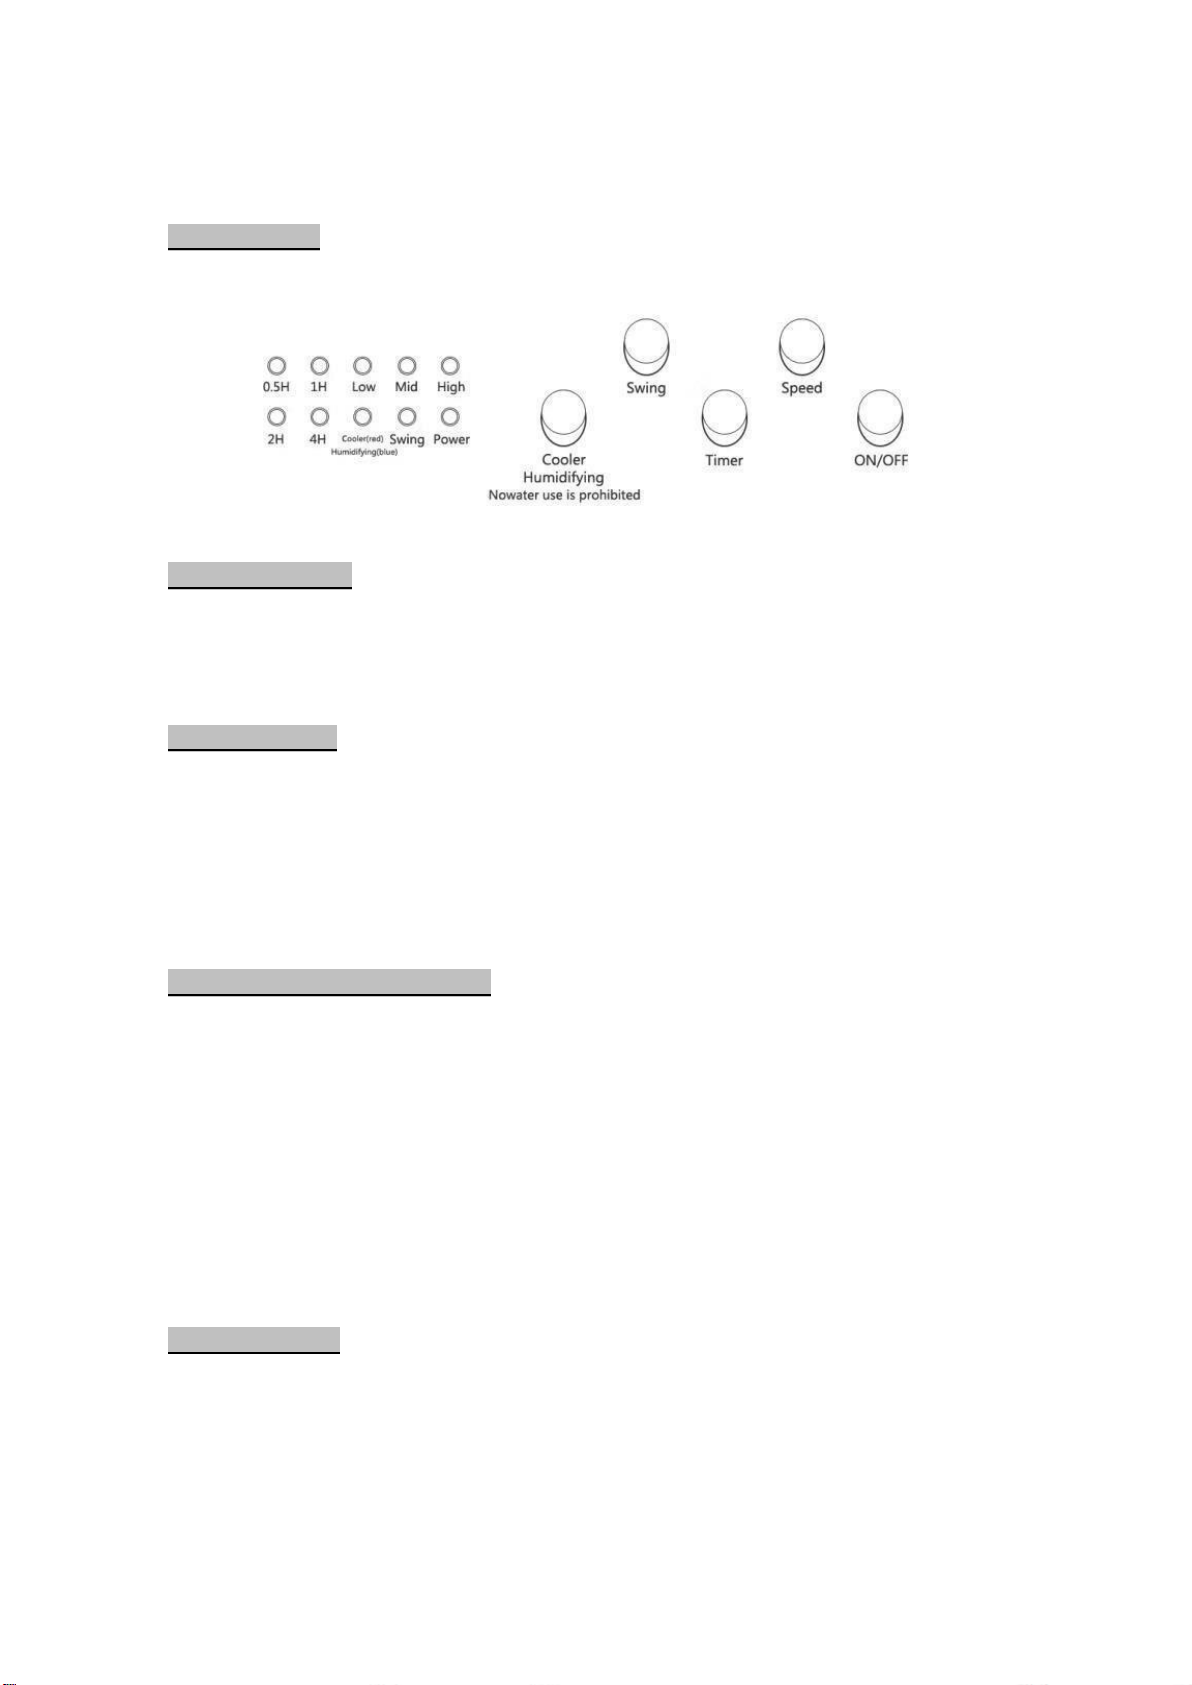
Control Panel.
"On / Off" Button.
- Press this button to turn the device on and off.
- The red "Power" light always stays on while it is plugged in.
"Speed" Button.
- When you turn on the appliance, the "Low" speed light will come on.
- Each time you press the "Speed" button, the fan speed will change
between low, medium and high successively.
- Depending on the speed, the corresponding indicator lights will light up.
(Low speed "Low" / Medium speed "Mid" / High speed "High")
"Cooler / Humidifying" Button.
- Press the button once, the "Cooler" (cooling / red) indicator on the control panel will indicate
that the cooling function is running.
This function is cooling the environment a bit depending on how cold it is
the water in the tank.
- Pressing the button a second time, when the “Humidifying” indicator on the control panel
will indicate that the function of the Humidifier is underway.
This function slightly moistens the dry environment.
"Swing" Button.
- When the device is in operation, press the "swing" button so that the oscillation function
starts up. The "swing" indicator light will come on.
To stop the function and leave the fixed air in one direction, press the same button again.

"Timer" Button.
- When the device is in operation and you want it to turn off automatically after a while,
press this button to activate the timer.
- When you press for the first time, the timer with half an hour "0.5h" will be activated.
- Each time you press the button it will add half an hour, up to 7.5 hours.
- After the selected time has elapsed, the device will turn off automatically.
- To deactivate the timer, press the button consecutively until the 4 indicators remain off.
(16 times from the first press).
Filling the water tank.
- Slowly open the water tank at the bottom rear of the device. Do not take out whole.
- Pour clean water without exceeding the "Max" signal.
- The water level must be below the "Max" signal and above the "Min" signal.
- It is only necessary to monitor that it has water in the functions of cooling and humidifying.
- To make the air a little cooler, insert an ice plate into the tank.
- Ice sheets must be previously frozen in a freezer.
Warnings.
- Note that when you put the ice plates in the tank, the water level rises.
- You must ensure that the water level does not exceed the "Max" signal.
- Never add ice to the deposit. Only the ice plates can be added.
Use of Ice Plates.
The function of the ice plates is to lower the water temperature of the tank.
In this way the device emits a fresher air.
Before using them in the device you have to prepare them beforehand.
Fill it with water to the "Max" mark. Put them in a freezer.
When they are well frozen, they will be ready for use in the appliance.
You just have to put it in the water tank of the appliance with water.
Note.
2 ice plates are included with the device so you can use them continuously.
Always have the 2 plates ready in a freezer.
You can then use one while the other is freezing in the freezer.
Warning.
Note that when you put the ice plate in the tank, the water level rises.
You must ensure that the water level does not exceed the "Max" signal.
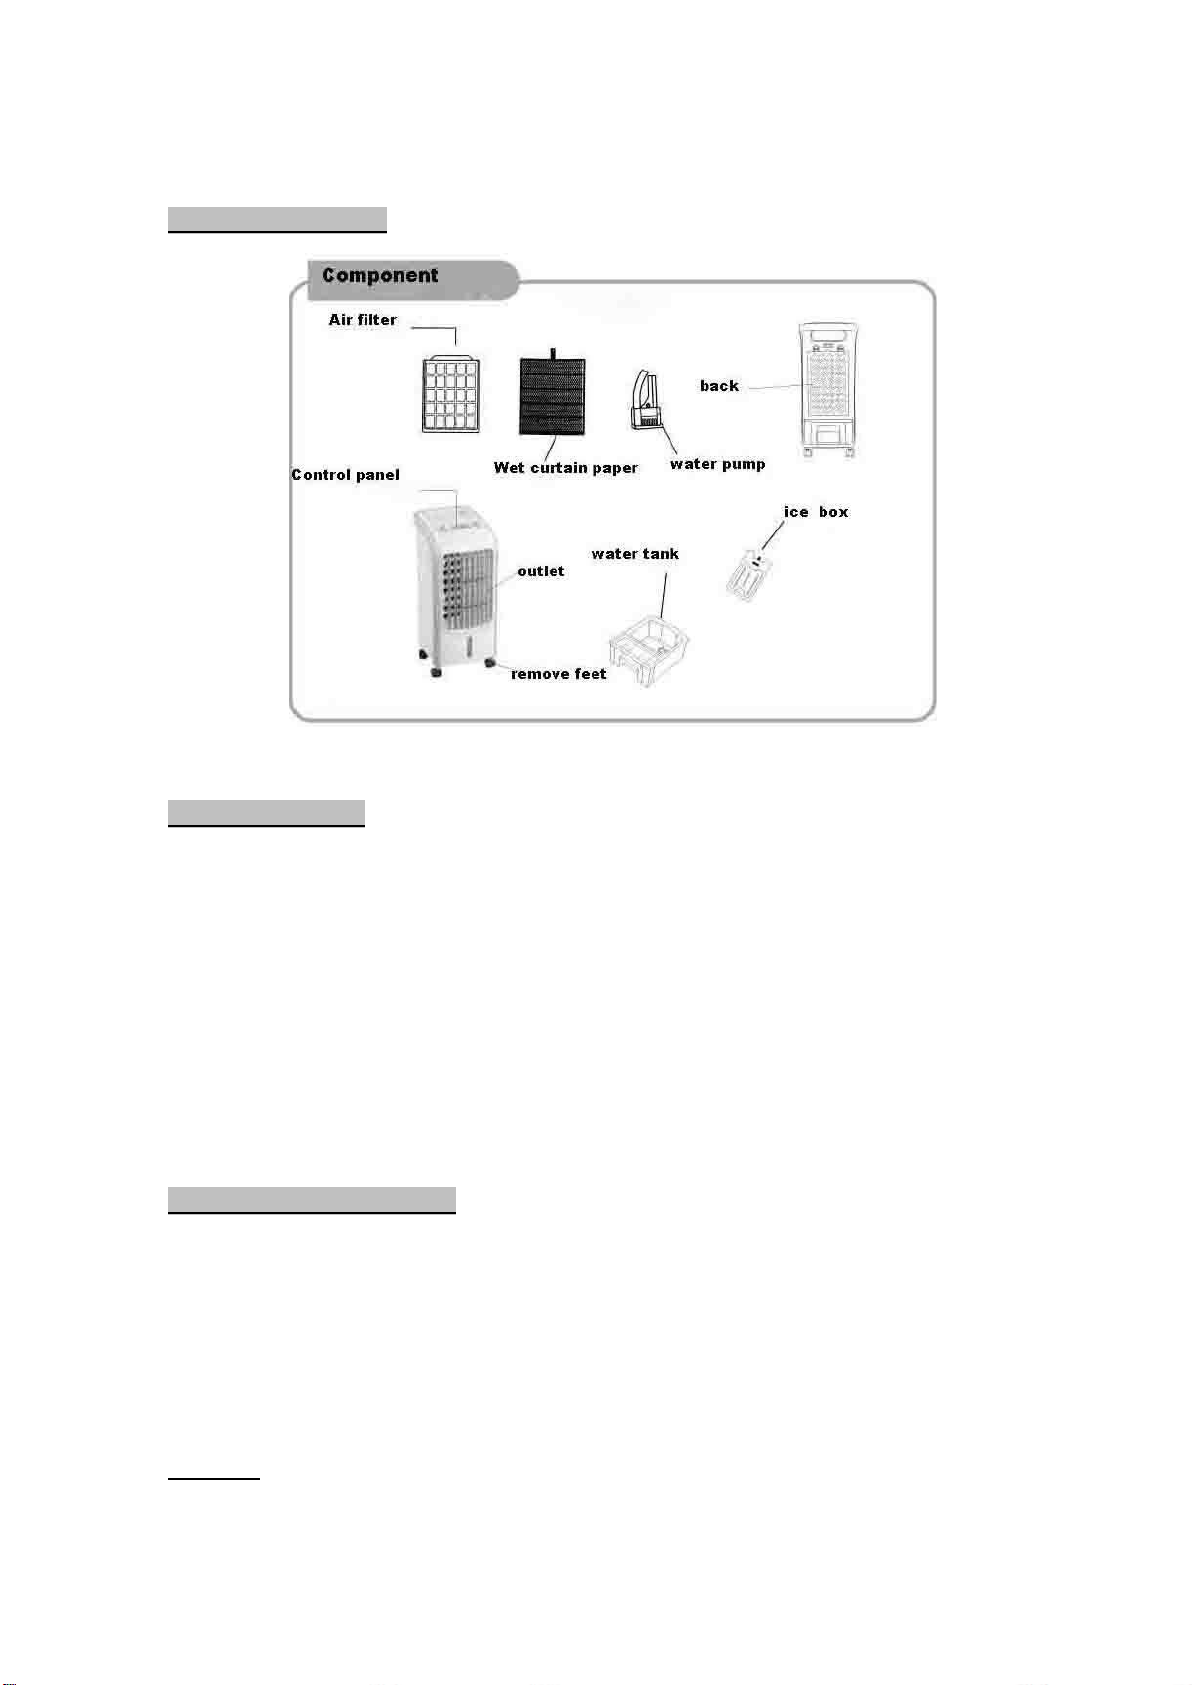
Components device.
Air Filter Cleaning.
- Unplug the appliance from the electric current.
- Remove the central screw between the 2 tabs of the rear filter.
- Press the 2 tabs at the same time down and pulling out.
- Once outside, pull the filter up.
- Clean the filter with a soft brush, water and neutral soap.
- Never use abrasive cleaning products.
- Let dry well before replacing.
Cleaning the paper curtain.
- Unplug the appliance from the electric current.
- Proceed as in the previous section to remove the rear filter.
- Once the filter is removed, we remove the paper curtain.
- Clean the paper curtain with clean water and a very soft brush that does not damage the paper.
- Do not use abrasive cleaning products.
- After cleaning, replace the paper curtain and the rear filter.
Warning.
Be sure to place the paper curtain properly as it may leak water.

Water tank cleaning.
- Unplug the appliance from the electric current.
- Open the water tank carefully and slowly.
- Dry the remains of used water from the water tank.
- Clean the tank with a cloth dampened in water with neutral soap.
- Never use abrasive cleaning products.
- Once clean, put the deposit back in its place.
Cleaning the outside of the device.
- Unplug the appliance from the electric current.
- Clean with a soft cloth dampened in water with neutral soap.
- Never use abrasive cleaning products.
Appliance storage.
- After the season of use of the device, store in a cool, dry and dust free area.
- If possible, store in its original box.
- Be sure to clean the appliance thoroughly before storing it for a while.
- Make sure all its components are dry before storing the appliance.
- If don't have the original box, cover with a blanket or plastic so that it does not pick up dust.
- Do not store more things on the device.
Warning.
Before storing the appliance for a while, make sure it is clean and very dry.
If any part is kept wet it can create moisture in the device and break down.
It can also cause toxic bacteria and breathe them when put back into use.
Specifications.
- Voltage: 220V-240V // 50Hz.
- Power: 75W.
- 3 Speeds.
- Timer up to 7.5 hours.
- Oscillating grid 120º.
- Remote control.
- 60dB noise level.
- Wheels for easy transport.
- Air flow volume 300 m³ / h.
- Wind speed 7 m / s.
- Net Weight 4Kg.
- Size 250x260x570mm.

Warranty conditions.
1. This device is covered against any factory defect.
2. The device will be changed as long as it is within the period of change
and be returned with all its accessories and packaging.
3. The guarantee will be valid as long as the device is accompanied by your
invoice or purchase ticket where the device model or your card is reflected
warranty duly completed and sealed.
4. The device will be exempt from warranty (not covered) when:
- Have signs of bumps, drops or scratches.
- Present signs of misuse.
- Present a state of excessive wear.
- It has been handled improperly.
- The electrical system has been opened and manipulated by unqualified
third parties.
- Do not have a supporting document (card, ticket or purchase invoice).
- It has not been used following the instruction manual.
NOTE.
- Under no circumstances will make direct change or direct payment of the device, without first
being reviewed by the technical service, giving this authorization for the change or payment.
GUIDELINES FOR PROTECTION OF THE ENVIRONMENT
This appliance should not be put in to the domestic garbage at the end of its durability,
but must be offered at a central point for there cycling of electric and electronic
domestic appliances. This symbol on the appliance, instruction manual and pack again
put your attention to this import an tissue.
The materials used in this appliance can be recycled. By recycling of used domestic appliances
you contribute important push to the protection of our environment.
Ask your local authorities for information regarding the point of recollection.

Table of contents
Languages:
Other Thulos Air Conditioner manuals


Popular Air Conditioner manuals by other brands


Mars
Mars Comfort-Aire Century SVH Series owner's manual

Mitsubishi Electric
Mitsubishi Electric PKH-2FKHA Operation manual

Samsung
Samsung AS10U Series User's manual & installation manual

Fujitsu
Fujitsu GENERAL ABHG36KRTA Service manual

Mitsubishi Electric
Mitsubishi Electric MXZ-24UV - E1 Service manual

DURASTAR
DURASTAR DRAL12F1A installation manual


