Thulos TH-EXT10 User manual

ESTUFAS DE EXTERIOR PARA TERRAZAS
Manual De Instrucciones
TH-EXT10
ATENCIÓN.
- Este producto no es apto como sistema principal de calefacción.
- Este producto solamente es apto para exteriores al aire libre y uso ocasional.
Por favor, lea cuidadosamente este manual antes de usar el aparato por primera vez.
Guarde el manual para futuras consultas.
Si entrega la estufa a terceros, entregue también el presente manual de instrucciones.

INTRODUCCIÓN.
Estimado Cliente:
Agradecemos la confianza depositada en nosotros al adquirir este producto THULOS®.
Nuestro principal empeño es ofrecer artículos excelentes, manteniendo los más estrictos controles
de calidad y cumpliendo todas las normativas vigentes de seguridad, con el objetivo de presentar un producto
perfecto y seguro para el uso doméstico.
MEDIDAS Y ADVERTENCIAS DE SEGURIDAD.
•
Lea las instrucciones antes de usar este aparato.
•
El aparato debe ser instalado de acuerdo con las instrucciones y regulaciones locales.
•
Esta estufa es un aparato para uso en exteriores ó extensas áreas ventiladas.
•
Nunca utilizar en interiores, puede causar lesiones personales o daños a la propiedad.
•
Esta estufa no está destinada a ser instalada en vehículos de recreo y / o barcos.
•
La manipulación y reparación deben ser realizadas por un técnico de servicio calificado.
•
Nunca altere ajustes, puede causar lesiones personales o daños a la propiedad.
•
Nunca reemplazar o sustituir piezas que no sean las sugeridas por el fabricante.
•
No almacene ni utilice gasolina u otros vapores o líquidos inflamables cerca de la estufa.
•
No almacene bombonas que no se estén utilizando cerca la estufa.
•
No utilice la estufa hasta que todas las conexiones hayan sido comprobadas.
(Leer apartado Comprobaciones Y Fugas)
•
No transporte la estufa mientras esté en funcionamiento.
•
No mueva la estufa después de que se haya apagado hasta que se haya enfriado.
•
Mantenga las aberturas de ventilación del habitáculo de la bombona libre de obstrucciones.
•
No pinte ninguna parte de la estufa por riesgo de incendio.
•
Mandos, quemadores y circulación de conductos de aire deben mantenerse limpios.
•
Se requiere un mantenimiento de limpieza cada seis meses.
•
Cierre el paso de gas de la bombona cuando la estufa no esté en funcionamiento.
•
Compruebe la estufa inmediatamente si cualquiera de las siguientes situaciones:
-La estufa no calienta.
-El quemador hace ruidos de explosión durante el uso (un ligero ruido es normal cuando
se apaga el quemador).
-Olor a gas junto a una llama muy amarilla.
•
El regulador / manguera de gas deben estar ubicados en un lugar adecuado para evitar
tropiezos y estén protegidos de daños y accidentes.
•
Cualquier dispositivo de protección eliminado debido al mantenimiento del calentador
debe volver a colocarse antes de usar el calentador.
•
Los adultos y los niños deben mantenerse alejados de la superficie a alta temperatura para
evitar quemaduras o que la ropa se incendie.
•
Los niños deben ser supervisados cuando se encuentran cerca de la zona de la estufa.
•
Ropa u otros materiales inflamables no se deben colgar en la estufa ni colocados cerca.
•
Para cambiar la bombona de gas, debe hacerse en una zona ampliamente ventilada,
lejos de cualquier contacto con puntos de ignición (velas, cigarrillos, otros aparatos
productores de llama, ...).
•
Comprobar que el regulador y el tubo de goma están bien instalados con las abrazaderas.
•
En caso de fuga de gas, el aparato no debe ser usado. Apagar el suministro de gas y deberá
ser inspeccionado y corregido antes de ser utilizado de nuevo.
•
Comprobar la manguera al menos una vez al mes, cada vez que se cambia la bombona, o
antes de cada temporada de uso.
•
Si la manguera muestra signos de agrietamiento, división u otro deterioro se sustituirá
por una nueva de la misma longitud y de calidad equivalente.
•
El uso de este aparato en lugares cerrados puede ser peligroso y está prohibido.

COMPROBACIONES Y FUGAS
Modo de Comprobación.
- Preparar una mezcla de agua y jabón a partes iguales (50%+50%).
- Aplicar la mezcla con un pulverizador, cepillo ó paño.
- Abrir el paso de gas, solamente el paso de gas, no encienda ninguna llama.
- En caso de fugas, aparecerán burbujas de jabón.
- La comprobación debe hacerse con una bombona de gas llena.
- Nunca encienda la estufa si observa burbujas de gas.
- Nunca fume mientras hace la comprobación de fugas.
- Repita la comprobación cada vez que mueva o apriete alguna conexión.
- Nunca utilice la estufa hasta que desaparezcan por completo las burbujas.
- No obstruir los orificios de ventilación del habitáculo de la bombona.
Si detecta olor a gas,
- Apague cualquier llama encendida y cierre de inmediato la válvula de gas.
- Gire la válvula del regulador en posición de apagado.
- Cierre el paso de gas de la bombona.
- Ventile bien la zona.
Fuga en la manguera y/ó en las conexiones.
- Apretar las conexiones de la manguera y realizar otra prueba de fuga.
- Si siguen apareciendo burbujas cambie la manguera por otra nueva y realice otra prueba.
- Si siguen apareciendo burbujas lleve la estufa al servicio técnico especializado.
- Si la fuga está en el regulador / conexión de la válvula de la bombona:
desconectar, vuelva a conectar y realizar otra prueba de fuga.
- Si sigue observando burbujas después de varios intentos, el regulador de la bombona
está defectuoso y debe ser devuelto al establecimiento de compra.
Inspecciones periódicas.
•
El sistema de gas general, la manguera, el regulador, el montaje, las conexiones y
quemador deben ser inspeccionados en busca de fugas o daños antes de usar, y por
lo menos antes de cada temporada de uso.
•
Todas las pruebas de fugas se deben hacer con una solución jabonosa.
Nunca use una llama para comprobar si existen fugas.
CARACTERÍSTICAS DE GAS
- Utilice butano o propano solamente.
- Recomendamos encarecidamente el uso de Propano, puesto que dispone de un punto de
congelación más bajo, adecuado para aparatos al aire libre.
- El regulador, tubo de goma y abrazaderas deben seguir la normativa vigente de cada país.
- La instalación debe ser bajo la normativa local. En ausencia de esta, deberá realizarse según
el estándar de almacenamiento y uso de los Gases Licuados del Petróleo.
- Una bombona agrietada, oxidada o en mal estado puede ser peligrosa y debe ser comprobada
por el fabricante o suministrador.
- Nunca use una bombona con una válvula en mal estado.
- La bombona utilizada debe tener un máximo de:
31.8cm de diámetro, 58cm de alto y peso máximo de 15Kg.
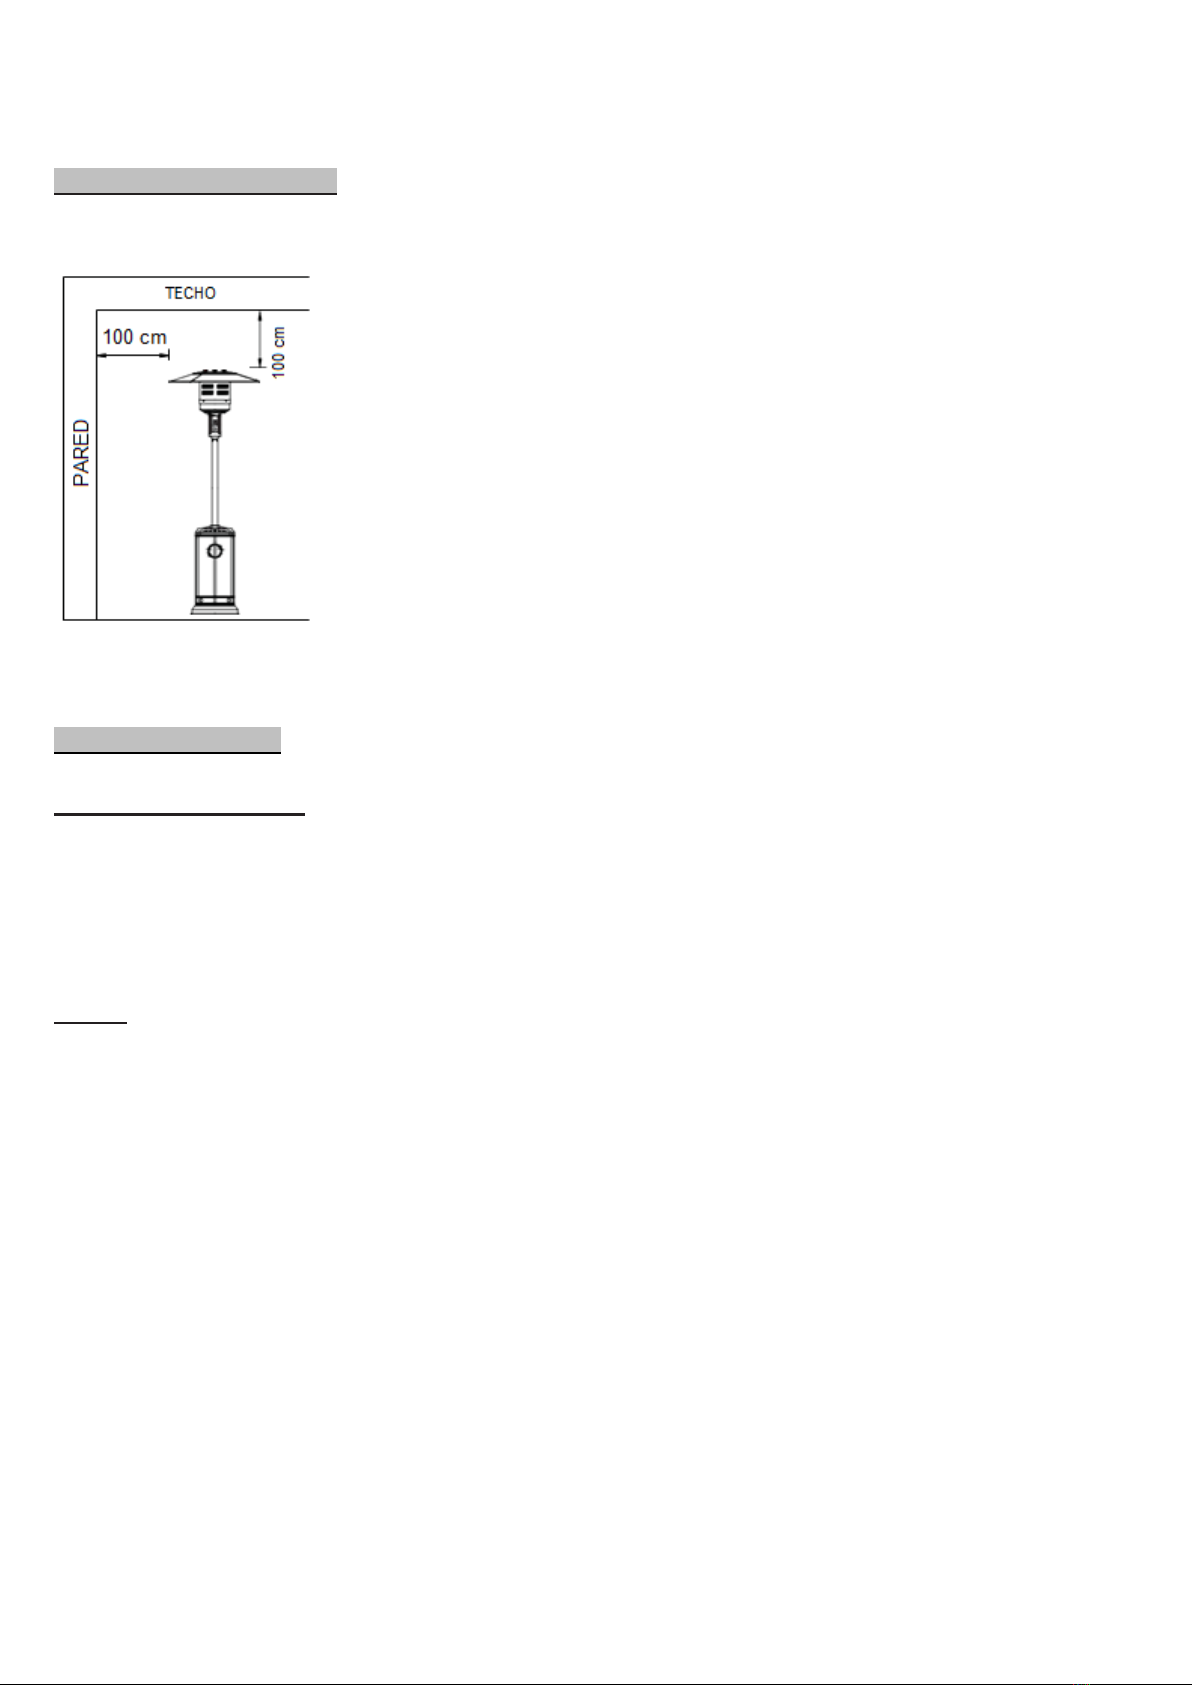
POSICIÓN Y UBICACIÓN
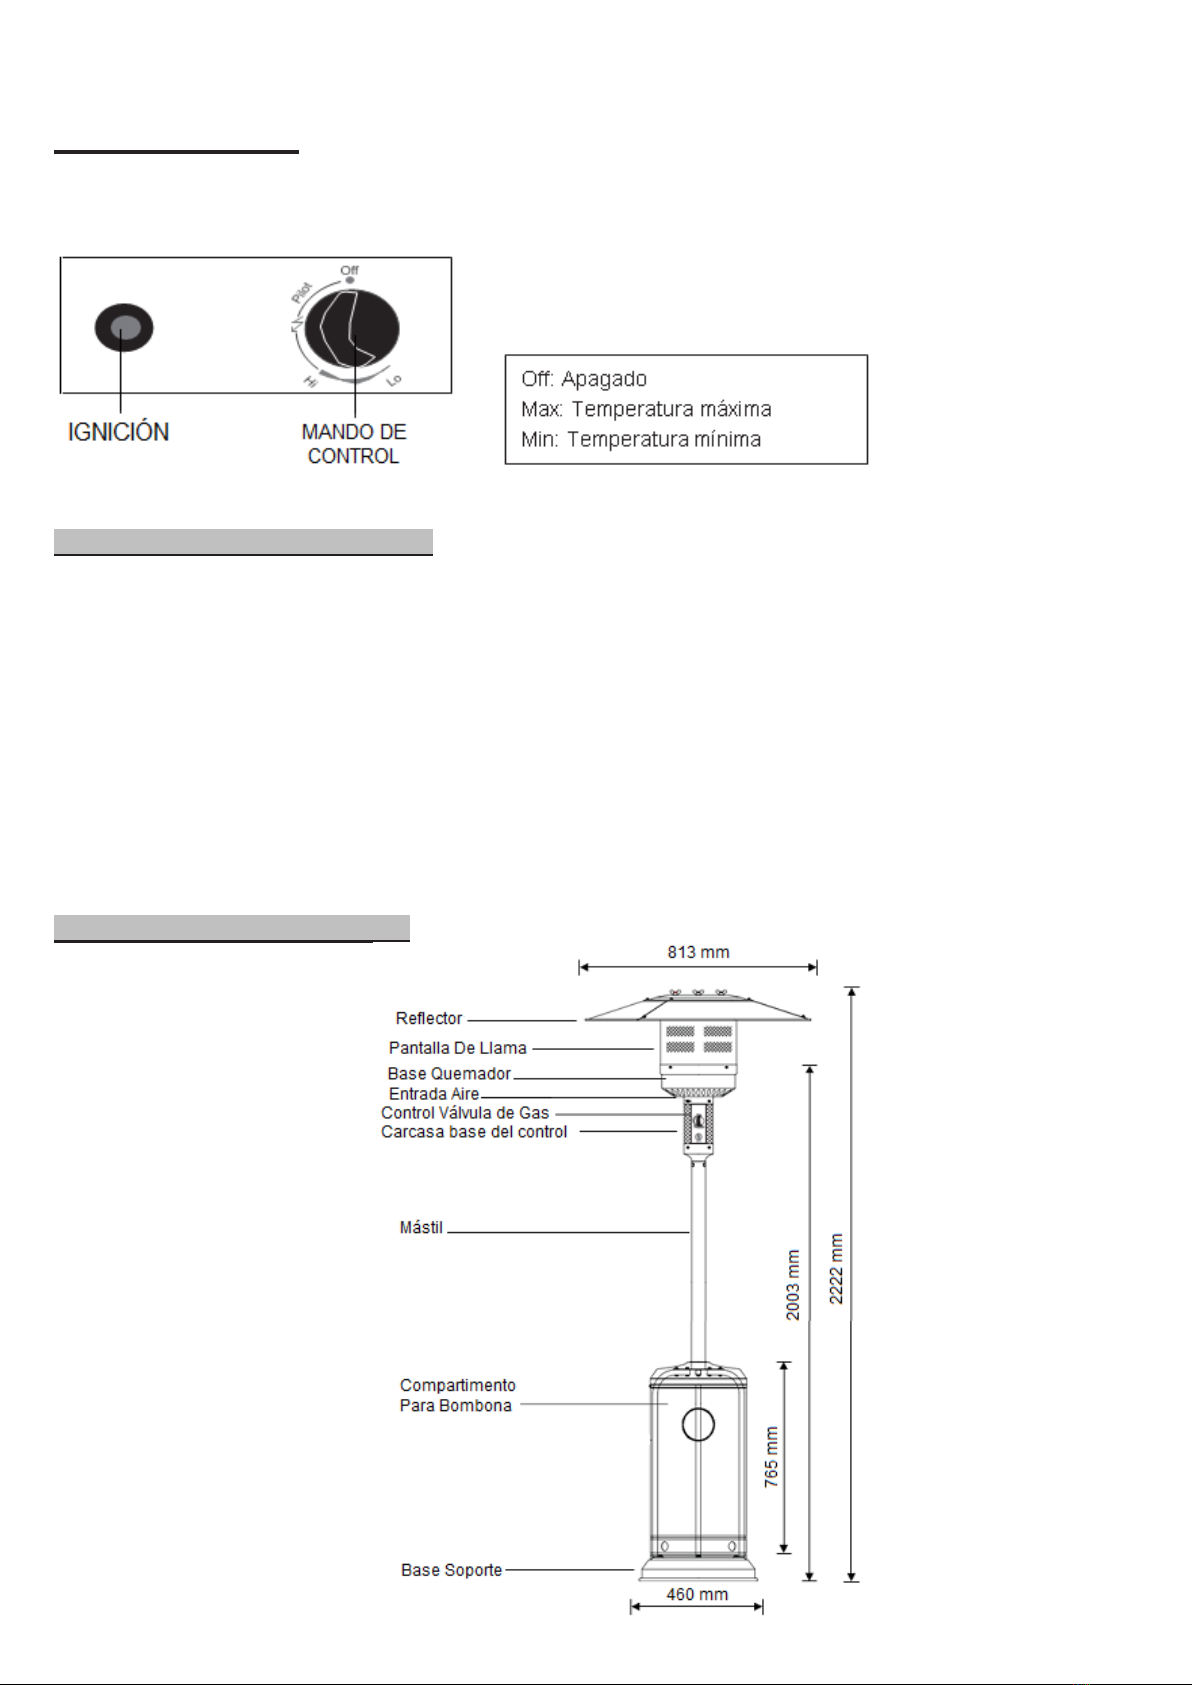
FUNCIONAMIENTO.
PUESTA EN MARCHA
1. Abrir el paso de gas del regulador de la bombona.
2. Presione y gire el mando de control hasta la posición PILOTO (90º en sentido antihorario).
3. Presionar hasta el fondo el mando de control y mantener durante 60 segundos.
4. Mientras aprieta el mando de control, presionar el botón de IGNICIÓN repetidamente
hasta que se encienda la llama piloto.
5. Soltar el mando de control después de que se encienda la llama piloto.
NOTA.
- Si se acaba de cambiar la bombona, mantenga apretado el mando de control en la
posición PILOT al menos durante un minuto para purgar el aire en los conductos de gas.
- Para encender la llama piloto, asegúrese que el mando de control está presionado
durante la opresión del botón IGNICIÓN. El mando de control puede soltarse a los 5 segundos
después de encenderse la llama piloto.
- Si la llama piloto no se enciende o se apaga, repetir el proceso desde el paso 3.
6. Después de encender la llama piloto, gire el mando de control hasta la posición de máximo y
mantener durante 5 minutos o más antes de girar el mando de control hasta la posición de
temperaturadeseada.
ATENCIÓN: Compruebe que no hay grietas o roturas en el cristal antes de utilizar.
- Esta estufa es para uso exterior exclusivamente.
- Asegúrese de que tiene ventilación suficiente.
- Mantenga una distancia mínima de seguridad entre la estufa
y los materiales inflamables, así como del techo y la pared.
- Se recomienda 1m de distancia mínima de seguridad.
- La estufa debe ser ubicada en suelo firme y a nivel.
- No utilice líquidos combustible peligrosos cerca de la estufa.
- Para proteger la estufa de fuertes vientos, asegure la base
al suelo con tornillos.
- Ubique la estufa a mínimo de un metro de la pared,
y a un metro del techo.
APAGAR LA ESTUFA
1. Gire el mando de control hasta la posición PILOTO.
2. Presionar y girar el mando de control hasta la posición de apagado.
3. Cerrar el paso de gas del regulador de la bombona.
LIMPIEZA Y ALMACENAMIENTO.
•Limpiar el polvo de las superficies con un trapo poco agresivo. No utilice productos de
limpieza corrosivos o inflamables.
•Abrir las protecciones laterales, sacar el tubo de cuarzo y quitar las impurezas del quemador
para mantenerlo limpio y seguro para el uso.
•Cerrar siempre el paso de gas de la bombona después de usar o en caso de problemas.
•Quitar el regulador y el tubo de goma.
•Comprobar la válvula de la bombona y del regulador. Si existen desperfectos, reemplazar
por uno de nuevo.
•Taparla estufa con una funda opcional cuando la estufa no se utilice.
•Nunca almacenar bombonas de combustible en un sótano o en lugares sin ventilación
adecuada.
PARTES Y CARACTERÍSTICAS
A. Construcción y características
Estufa de terraza transportable con alojamiento para bombona.
Armazón de acero inoxidable.
Conexiones de gas con abrazaderas metálicas (fabricadas en Alemania)
Emisión de calor por el sombrerete.
B. Especificaciones
Utilizar butano o propano. Recomendamos el uso de propano.
Potencia máxima: 13kW
Potencia mínima: 5kW
Consumos:
CATEGORÍA APARATO:
I3+(28-30/37)
I3B/P (30)
I3B/P (50)
I3B/P (37)
TIPOS DE GAS:
Butano o Propano
Butano, propano
O sus derivados
Butano, propano
O sus derivados
Butano, propano
O sus derivados
PRESIÓN DE GAS:
28-30 / 37 mbar
30 mbar
50mbar
37mbar
Utilizar el regulador correspondiente acorde con la presión de salida mostrada en la tabla anterior.
C. Tabla del inyector
CATEGORÍA APARATO:
I3+(28-
30/37)
I3B/P (30)
I3B/P (50)
I3B/P (37)
TIPOS DE GAS:
Butano o Propano
Butano, propano
O sus derivados
Butano, propano
O sus derivados
Butano, propano
O sus derivados
PRESIÓN DE GAS:
28-30 / 37mbar
30 mbar
50mbar
37mbar
POTENCIA CALORÍFICA
13kW (Butano: 30:945g/h; Propano: 31:929g/h)
TAMAÑO INYECTOR:
1.80 mm
1.70 mm
1.50 mm
El tubo de goma y el regulador deben ser los correspondientes a la normativa local.
La presión de salida del regulador debe corresponderse con la categoría del aparato en la parte B
(Especificaciones).
El aparato requiere de un tubo de goma inferior a 0,6 m.

DESPIECE
Herramientas necesarias:
-Destornillador de estrella.
-Solución jabonosa.
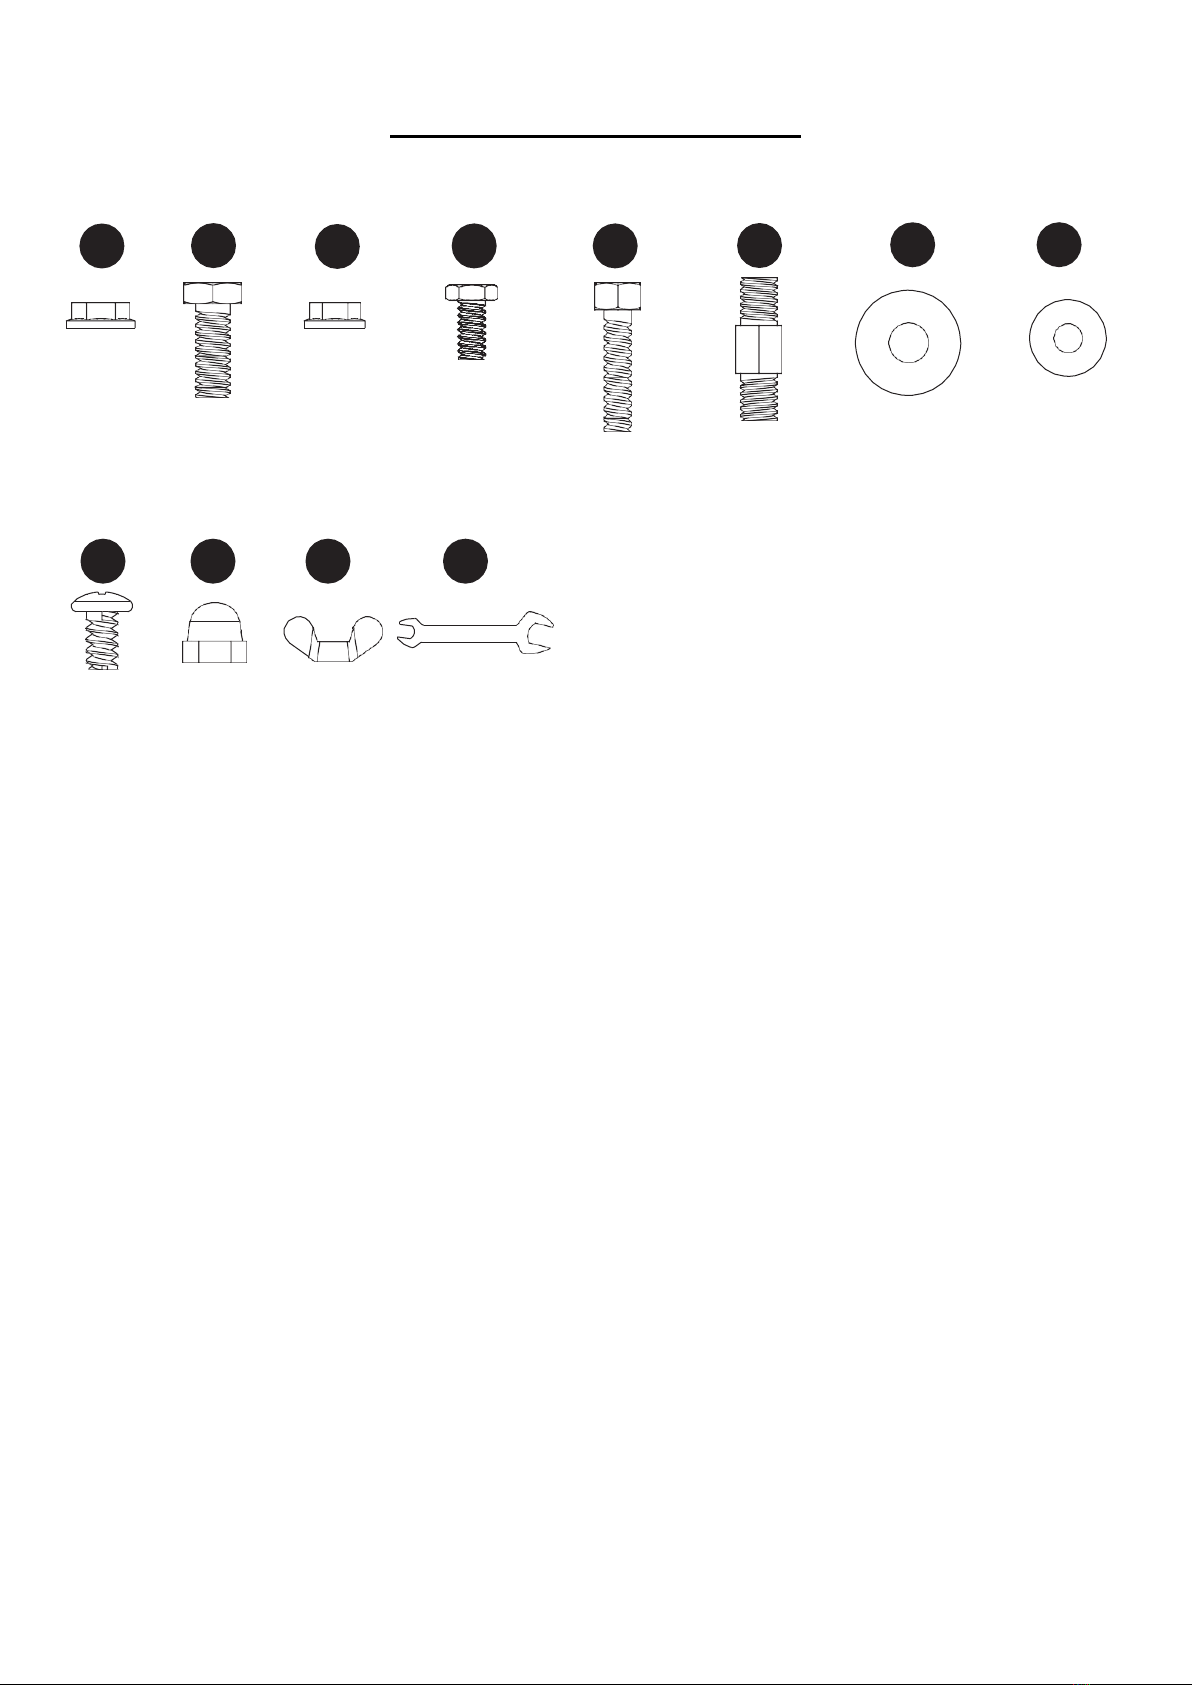
COMPONENTES DE MONTAJE
Herramientas necesarias (Dibujos en tamaño real)
Tornillo
Qty. 4
Tornillo
M6 x 30
Qty. 6
Espárrago
Qty. 3
Arandela Φ8
Qty. 9
Arandela Φ6
Qty. 9
Tornillo
M6 X 10
Qty. 9
Tuerca
Qty. 9
Palometa
Qty. 3
Llave
Qty. 1
(no tamaño
real)
LL
KK
JJ
II
AA
BB
CC
DD
EE
FF
GG
HH
M8
Tuerca
Tornillo
M6
Tuerca
Qty. 2
M8 x 16
Qty. 6
Qty. 5
Paso 3
Carcasa
bombona
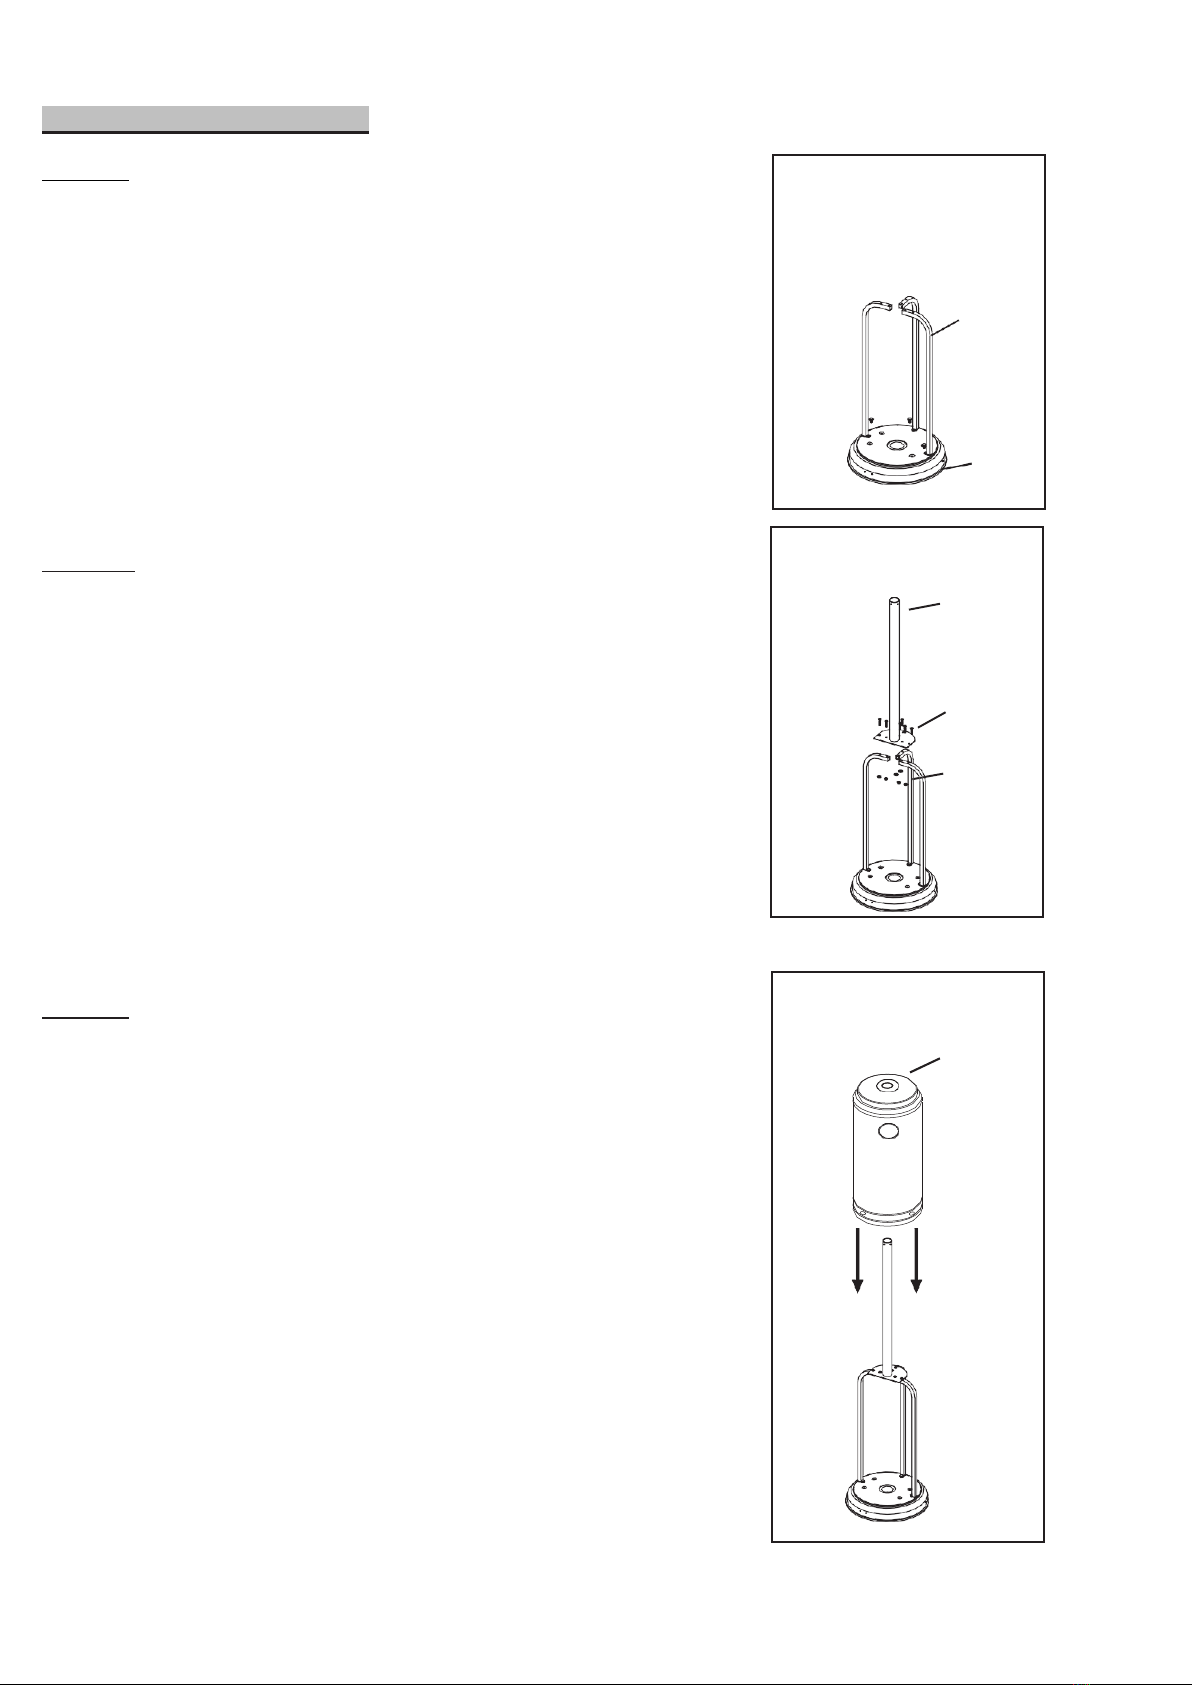
PASOS PARA EL MONTAJE.
PASO 1
1-1. Coloque los 3 soportes en cada posición de la base como
se muestra en la imagen.
1-2. Utilice 3 tornillos medianos (M8x16) para unir los soportes del
poste a la base soporte.
PASO 2
2-1. Coloque el mástil en la parte superior de los soportes de 3 piezas.
2-2. Use 6 Tornillos grandes y Tuercas (M6) para atornillar el mástil
a los 3 soportes. Apretar los tornillos y tuercas.
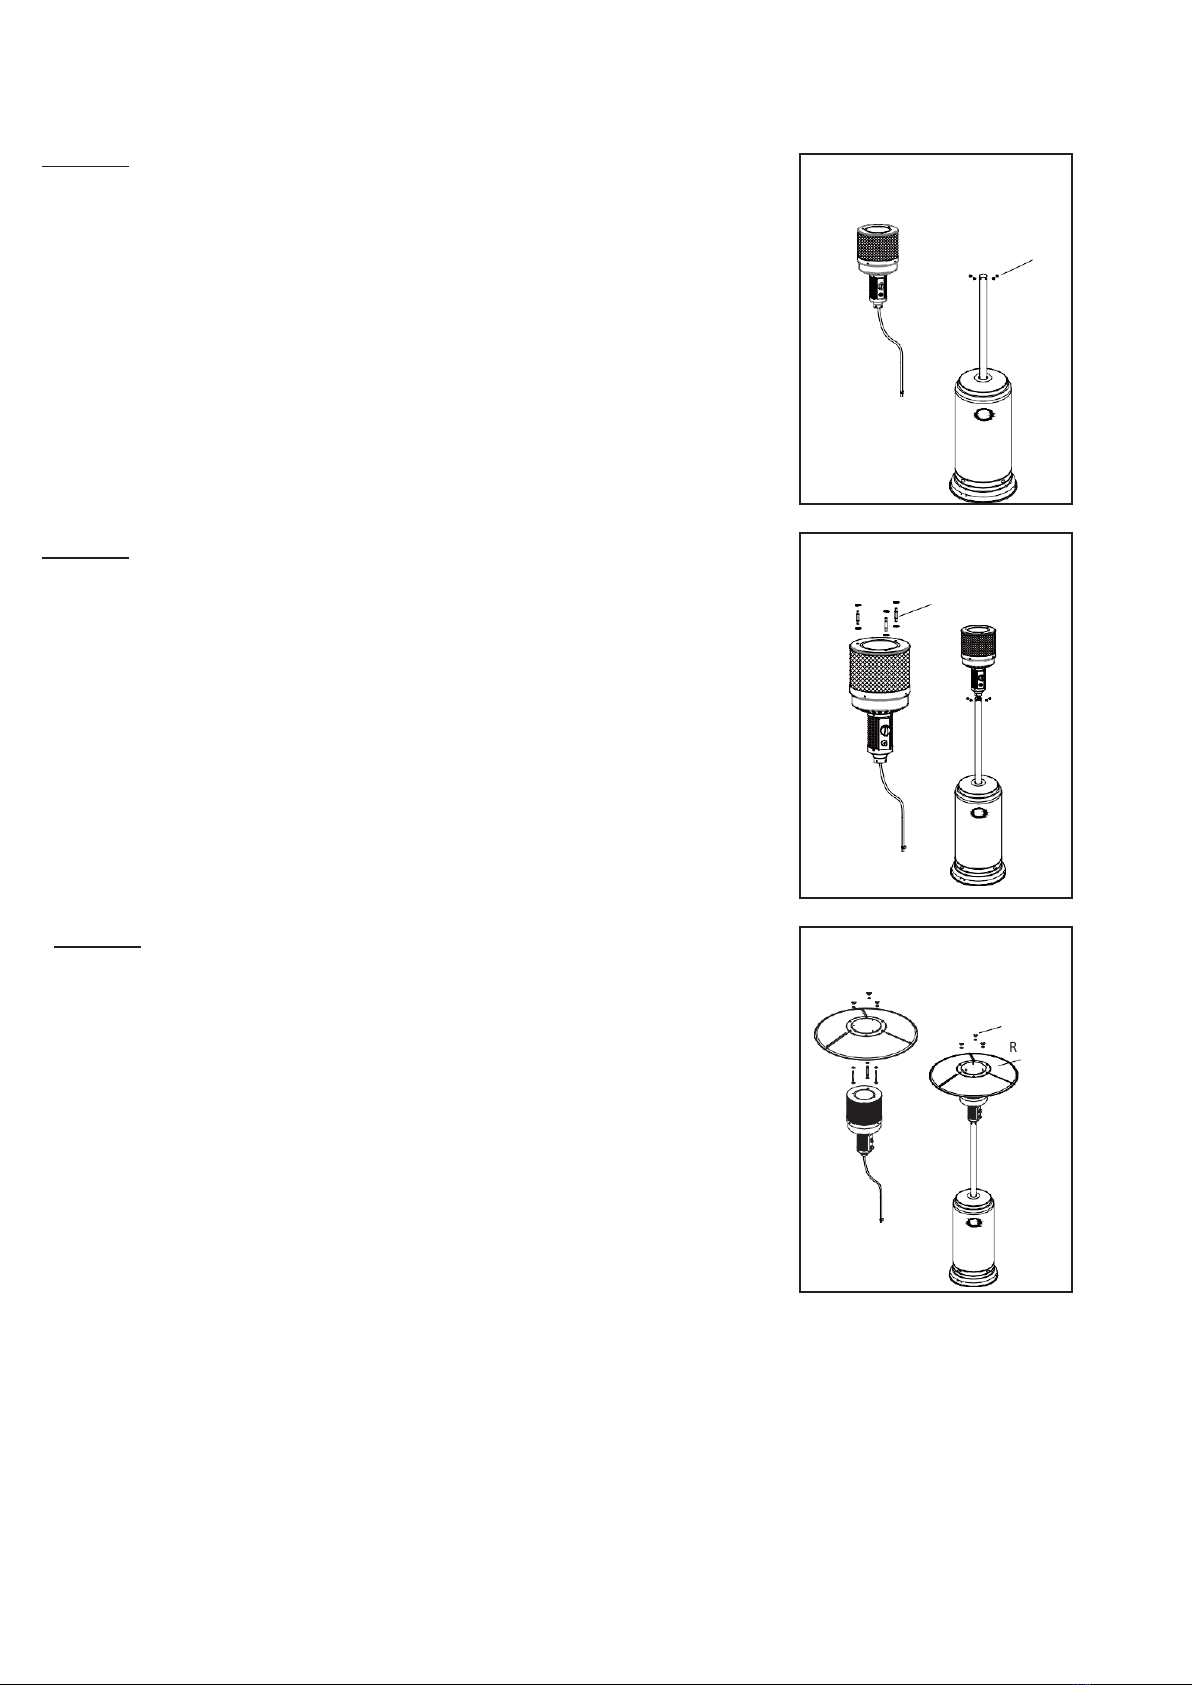
PASO 3
Coloque la carcasa de la bombona por arriba hacia bajo.
Paso 2
Mástil
Soporte
Tuercas
Paso 1
Soporte
Mástil
Base Soporte
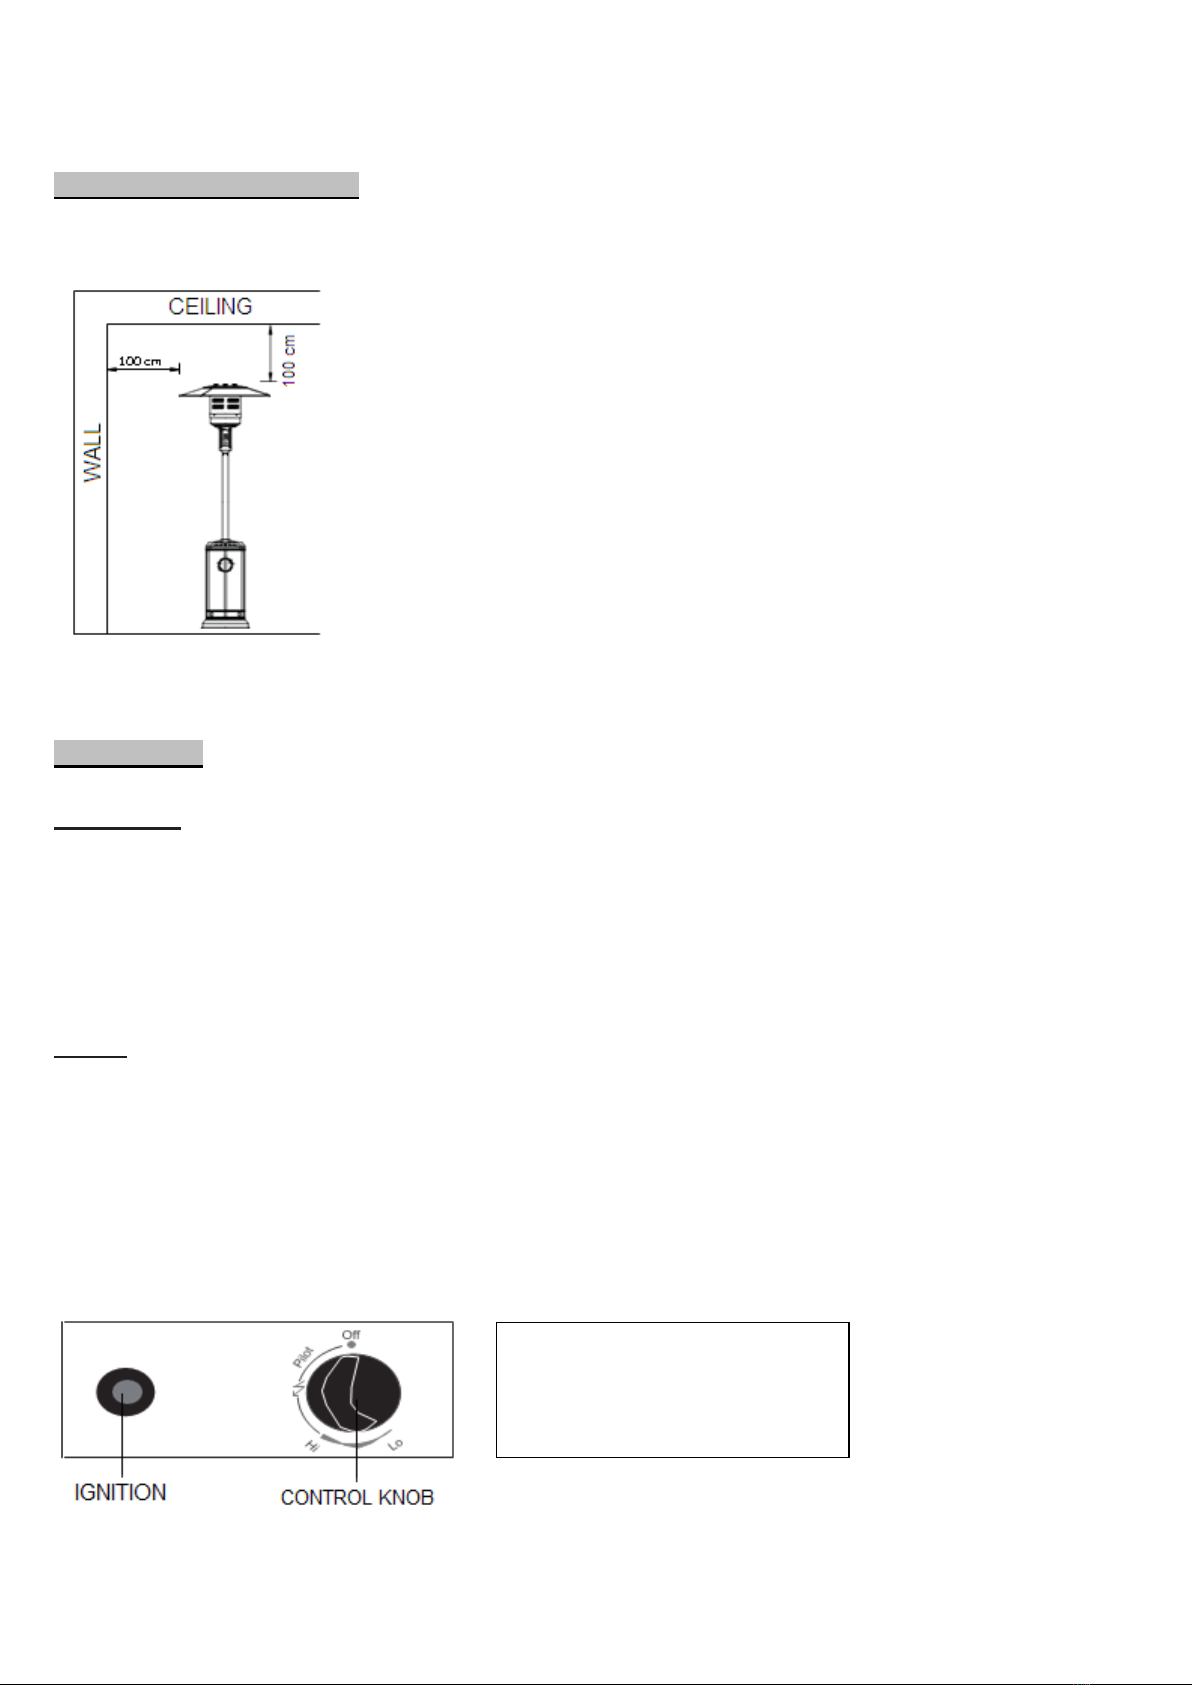
Paso 6
Tuercas
Reflector
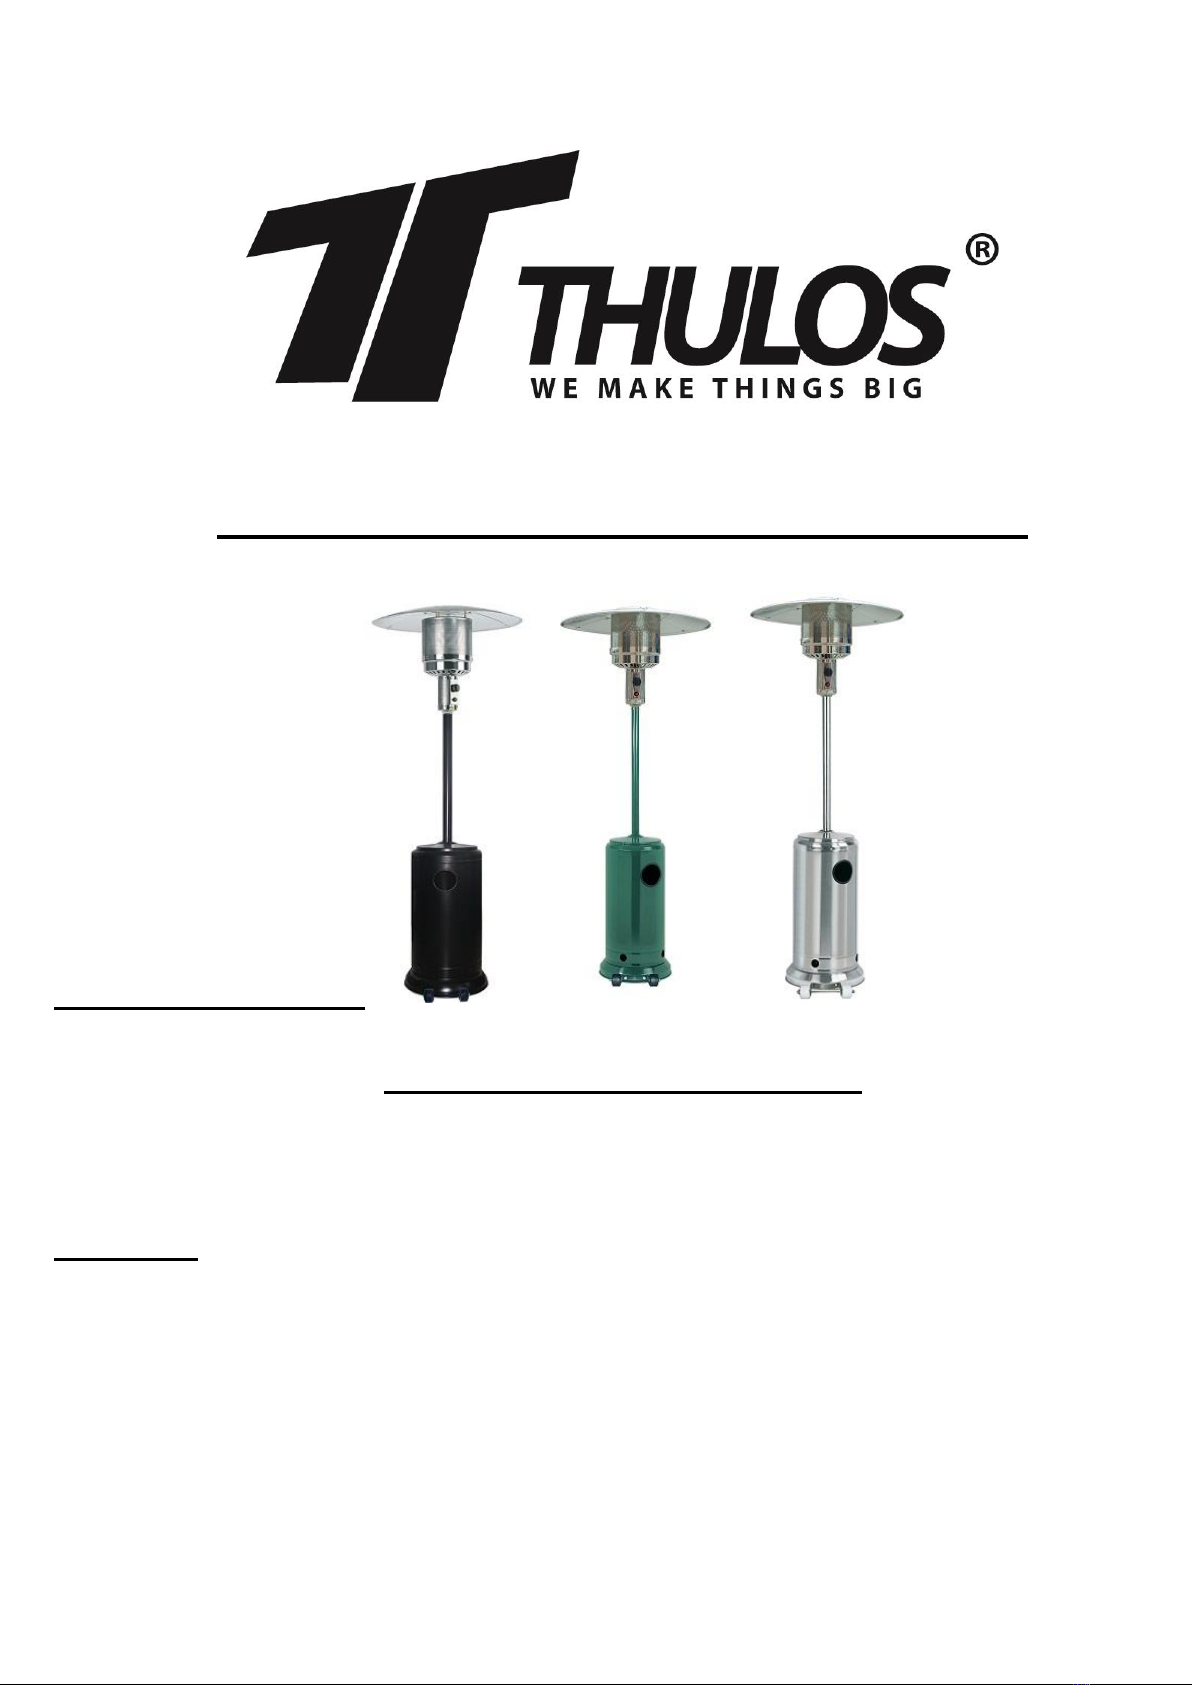
PASO 4
4-1. Retire los 4 tornillos del quemador.
4-2. Coloque la manguera de gas en el mástil.
4-3. Fije la unidad del quemador al mástil con los 4 tornillos.
PASO 5
5-1. Verifique si la conexión del mástil vertical y el quemador se
ensamblan de acuerdo con las instrucciones, y todos los
tornillos y tuercas están bien apretados.
5-2. Coloque 6 piezas arandelas planas grandes en los 3 espaciadores
del reflector.
PASO 6 Sujete el reflector con 3 arandelas planas grandes y 3 tuercas.
Paso 4
STEP 5
ESPACIO REFLECTOR

PASO 7
7-1. Levante la carcasa de la bombona y descanse sobre el mástil.
7-2. Conecte la rosca final de la manguera de entrada de gas al regulador.
7-3. Conecte el regulador a la bombona y apriételo con una llave
ajustable.
7-4. Colocar la bombona dentro del compartimento y bajar la carcasa
PROBLEMAS Y SOLUCIONES
PROBLEMA
POSIBLE CAUSA
POSIBLE SOLUCIÓN
Llama piloto no enciende.
Válvula de gas cerrada.
Bombona vacía.
Aire en el circuito.
Mala Conexión.
Abrir la válvula de gas.
Cambiar bombona.
Purgar el aire del circuito.
Revisar las conexiones.
La llama piloto no se queda
encendida.
Piloto sucio.
Mala-conexión.
Termopad Malo.
Fuga de Gas.
Baja Presión de Gas.
Limpiar el piloto.
Revisar conexiones. Sustituir
el Termopad. Comprobar
fugas de gas.
Bombona casi vacía, reemplazar.
El Quemador No Enciende.
Presión de gas baja.
Aberturas obstruidas.
Válvula de gas cerrada.
Termopad malo.
Conjunto piloto doblado.
Conjunto piloto en posición incorrecta.
Bombona vacía, reemplazar. Limpiar
piloto y aberturas.
Abrir válvula de gas.
Sustituir el Termopad.
Colocar el conjunto piloto en
posición correcta.
Si el dispositivo presenta algún defecto o problema de montaje o uso, no modifique ni manipule usted mismo ningún
punto que no haya sido contemplado en las instrucciones. Contacta con tu distribuidor para solucionarlo.
El tubo de goma y el regulador no están incluidos con el producto principal.
Debe adquirir estos accesorios en una tienda especializada.
Paso 7
Regulador
Bombona

CONDICINES DE GARANTÍA.
1. ESTE APARATO ESTA CUBIERTO CONTRA CUALQUIER DEFECTO DE FÁBRICA.
2. EL APARATO SE CAMBIARÁ SIEMPRE Y CUANDO ESTÉ DENTRO DEL PLAZO DE CAMBIO Y SE
DEVUELVA CON TODOS SUS ACCESORIOS Y EMBALAJE.
3. LA GARANTÍA SERÁ VÁLIDA SIEMPRE Y CUANDO EL APARATO VAYA ACOMPAÑADO DE SU FACTURA
Ó TICKET DE COMPRA DONDE SALGA REFLEJADO EL APARATO,
Ó TAMBIÉN SU TARJETA DE GARANTÍA DEBIDAMENTE CUMPLIMENTADA Y SELLADA.
4. EL APARATO ESTARÁ EXENTO DE GARANTÍA (NO CUBIERTO) CUANDO:
EL APARATO TENGA SEÑALES DE GOLPES Y/O CAÍDAS.
EL APARATO PRESENTE SIGNOS DE MAL USO.
EL APARATO PRESENTE SIGNOS DE USO EXCESIVO.
EL APARATO ESTÉ MANIPULADO INADECUADAMENTE.
NO TENGA DOCUMENTO ACREDITATIVO (TARJETA, TICKET Ó FACTURA COMPRA).
EL APARATO NO SE HA USADO SEGÚN LAS INSTRUCCIONES DE USO.
NOTA:
- BAJO NINGÚN CONCEPTO SE HARÁ CAMBIO DIRECTO Ó ABONO DIRECTO
SIN ANTES REVISAR EL APARATO Y LAS CAUSAS POR LAS QUE SE HA AVERIADO.
NORMAS DE PROTECCIÓN DEL MEDIO AMBIENTE
Este aparato no se debe desechar con los residuos domésticos cuando finalice su durabilidad, sino que se
debe ofrecer a un centro de reciclaje de aparatos eléctricos y electrónicos domésticos. Este símbolo en el
aparato, manual de instrucciones y embalaje le avisa de este aspecto importante. El los materiales utilizados
en este aparato se pueden
reciclar. Mediante el reciclaje de electrodomésticos, usted contribuye a fomentar la protección del medioambiente.
Consulte a sus autoridades locales para obtener información acerca del punto de recogida.
VERDE
ACERO INOXIDABLES
NEGRO
www.thulos.com | www.grupothulos.com
Servicio Técnico: sat@grupothulos.com
OUTDOOR STOVE FOR TERRACES
INSTRUCTIONS MANUAL
TH-EXT10
ATTENTION.
- This product is not suitable as the main heating system.
- This product is only suitable for outdoors and occasional use outdoors.
Please read this manual carefully before using the device for the first time.
Save the manual for future reference.
If you deliver the stove to third parties, also give this instruction manual.

INTRODUCCIÓN.
Dear Customer:
We appreciate the confidence placed in us when purchasing this THULOS® product.
Our main effort is to offer excellent articles, maintaining the strictest controls of quality and
complying with all current safety regulations, with the aim of presenting a perfect and safe
product for domestic use.
SECURITY MEASURES AND WARNINGS.
•
Read the instructions before using this device.
• The appliance must be installed in accordance with local instructions and regulations.
• This stove is an appliance for outdoor use or extensive ventilated areas.
• Never use indoors, it may cause personal injury or property damage.
• This stove is not intended to be installed on recreational vehicles and / or boats.
• Handling and repairs must be carried out by a qualified service technician.
• Never alter settings, it may cause personal injury or property damage.
• Never replace or replace parts other than those suggested by the manufacturer.
• Do not store or use gasoline or other flammable vapors or liquids near the stove.
• Do not store cylinders that are not being used near the stove.
•Do not use the stove until all connections have been checked.
(Read section Checks and Leaks)
• Do not transport the stove while it is in operation.
• Do not move the stove after it has been turned off until it has cooled down.
• Keep the ventilation openings in the tank interior free from obstructions.
• Do not paint any part of the stove because of the risk of fire.
• Controls, burners and circulation of air ducts must be kept clean.
• Cleaning maintenance is required every six months.
• Close the gas passage of the cylinder when the stove is not in operation.
• Check the stove immediately if any of the following situations:
- The stove does not heat up.
- The burner makes explosive noises during use (a slight noise is normal when
the burner goes out).
- Gas smell next to a very yellow flame.
• The regulator / gas hose must be located in a suitable place to avoid
trips and are protected from damage and accidents.
• Any protection device removed due to maintenance of the heater
it must be replaced before using the heater.
• Adults and children should stay away from the surface at high temperature to
avoid burns or clothes that catch fire.
• Children should be supervised when they are near the stove area.
• Clothing or other flammable materials should not be hung on the stove or placed nearby.
• To change the gas cylinder, it must be done in a well ventilated area,
away from any contact with ignition points (candles, cigarettes, other appliances)
flame producers, ...).
• Check that the regulator and the rubber tube are properly installed with the clamps.
• In the event of a gas leak, the appliance must not be used. Turn off the gas supply and you must
be inspected and corrected before being used again.
• Check the hose at least once a month, each time the cylinder is changed, or
before each season of use.
• If the hose shows signs of cracking, splitting or other deterioration it will be replaced
for a new one of the same lengths and of equivalent quality.
• The use of this device indoors can be dangerous and is prohibited.

CHECKS AND LEAKS
Check Operation.
- Prepare a mixture of water and soap in equal parts (50% + 50%).
- Apply the mixture with a sprayer, brush or cloth.
- Open the gas passage, only the gas passage, do not ignite any flame.
- In case of leaks, soap bubbles will appear.
- The check must be done with a full gas bottle.
- Never light the stove if you notice gas bubbles.
- Never smoke while checking for leaks.
- Repeat the check every time you move or tighten a connection.
- Never use the stove until the bubbles completely disappear.
- Do not obstruct the ventilation holes in the passenger compartment of the cylinder.
If it detects gas smell,
- Turn off any ignited flame and immediately close the gas valve.
- Turn the regulator valve to the off position.
- Close the gas passage of the gas bottle.
- Ventilate the area well.
Leakage in the hose and / or connections.
- Tighten the hose connections and perform another leak test.
- If bubbles continue to appear, replace the hose with a new one and perform another test.
- If bubbles continue to appear, take the stove to a specialized technical service.
- If the leak is in the valve regulator / connection of the gas bottle:
disconnect, reconnect and perform another leak test.
- If you keep observing bubbles after several attempts, the gas bottle regulator
It is defective and must be returned to the purchasing establishment.
Periodics inspections.
• The general gas system, the hose, the regulator, the assembly, the connections and
burner should be inspected for leaks or damage before use, and for at least before each
season of use.
• All leak tests must be done with a soap solution.
Never use a flame to check for leaks.
GAS CHARACTERISTICS
- Use butane or propane only.
- We strongly recommend the use of Propane, since it has a point of Lower freezing,
suitable for outdoor appliances.
- The regulator, rubber tube and clamps must follow the current regulations of each country.
- The installation must be under local regulations. In the absence of this, it must be done according to
the standard of storage and use of Liquefied Petroleum Gas.
- A cracked, rusted or damaged cylinder can be dangerous and must be checked
by the manufacturer or supplier.
- Never use a cylinder with a valve in poor condition.
- The cylinder used must have a maximum of:
31.8cm in diameter, 58cm high and maximum weight of 15Kg.
POSITION AND LOCATION
OPERATION.
START UP.
1. Open the gas passage of the regulator of the cylinder.
2. Press and turn the control knob to the PILOT position (90º anti-clockwise).
3. Press the control knob all the way down and hold for 60 seconds.
4. While pressing the control knob, press the IGNITION button repeatedly
until the pilot flame is lit.
5. Release the control knob after the pilot flame ignites.
NOTE.
- If the cylinder has just been replaced, keep the control knob pressed on the
PILOT position for at least one minute to purge the air in the gas lines.
- To light the pilot flame, make sure that the control knob is pressed
during the pressing of the IGNITION button. The control knob can be released after 5 seconds
after the pilot flame is lit.
- If the pilot flame does not turn on or off, repeat the process from step 3.
6. After lighting the pilot flame, turn the control knob to the maximum position and hold for
5 minutes or more before turning the control knob to the desired temperature position.
ATTENTION: Check that there are no cracks or breaks in the glass before use.
- This stove is for outdoor use only.
- Make sure you have sufficient ventilation.
- Maintain a minimum safety distance between the stove
and flammable materials as well as roof and wall.
- 1m minimum safety distance recommended.
- The stove must be located on firm and level ground.
- Do not use combustible combustible liquids near the stove.
- To protect the stove from strong winds, secure the base
to the ground with screws.
- Locate the stove at least one meter from the wall,
and one meter from the ceiling.
Off Position: OFF.
Pilot: Position to Ignicion.
HI: High Temperature.
Lo: Low Temperature.

TURN OFF THE STOVE.
1. Turn the control knob to the PILOT position.
2. Press and turn the control knob to the off position.
3. Close the gas passage of the regulator of the gas bottle.
CLEANING AND STORAGE.
• Clean dust from surfaces with a non-aggressive cloth. Do not use products from
corrosive or flammable cleaning.
• Open the side protections, remove the quartz tube and remove impurities from the burner
to keep it clean and safe for use.
• Always close the gas passage of the cylinder after use or in case of problems.
• Remove the regulator and the rubber tube.
• Check the valve of the cylinder and regulator. If there are flaws, replace for one again.
• Cover the stove with an optional cover when the stove is not used.
• Never store fuel cylinders in a basement or in unventilated places adequate.
PARTS AND FEATURES.
D. Construction and Features.
- Transportable terrace stove with housing for bottle.
- Stainless steel frame.
- Gas connections with metal clamps (manufactured in Germany)
- Emission of heat through the bonnet.
E. Specifications.
- Use butane or propane. We recommend the se of propane.
- Maximum power: 13 kW.
- Minimum power: 5 kW.
- Consumptions:
APPARATUS
CATEGORY:
I3+(28-30/37)
I3B/P (30)
I3B/P (50)
I3B/P (37)
TYPES OF GAS:
Butane or Propane
Butane, propane or
its derivatives
Butane, propane
or its derivatives
Butane, propane or
its derivatives
GAS PRESSURE:
28-30 /n 37 mbar
30 mbar
50mbar
37mbar
Use the corresponding regulator according to the outlet pressure shown in the previous table.
F. Injector Table.
APPARATUS
CATEGORY:
I3+(28-30/37)
I3B/P (30)
I3B/P (50)
I3B/P (37)
TYPES OF GAS:
Butane or Propane
Butane, propane
or its derivatives
Butane, propane
or its derivatives
Butane, propane
or its derivatives
GAS PRESSURE:
28-30 / 37mbar
30 mbar
50mbar
37mbar
HEAT POWER TOTAL
13kW (Butane: 30:945g/h; Propane: 31:929g/h)
INJECTOR SIZE:
1.80 mm
1.70 mm
1.50 mm
- The rubber tube and the regulator must correspond to the local regulations.
- The output pressure of the regulator must correspond to the category of the device in Part B (Specifications).
- The device requires a rubber tube less than 1.4 m.

ASSEMBLY PARTS
DD
EE
PART DESCRIPTION QUANTITY
A
Reflector Panel
3
B
Reflector Plate
1
FF
Reflector Stud
3
C
Head Assembly
1
D
Cylinder Housing
1
E
Post
1
F
Gas Hose
1
G
Support Bracket
3
H
Base
1
I
Wheel Kit
1
TOOLS NEEDED:
- Star screwdriver.
- Soap solution

ASSEMBLY PARTS
HARDWARE CONTENTS (shown actual size)
Stainless
steel bolt
Qty. 4
Bolt
M6 x 30
Qty. 6
Reflector
spacer
Qty. 3
Washer Φ8
Qty. 9
Washer Φ6
Qty. 9
Screw
M6 X 10
Qty. 9
Cap nut
Qty. 9
Wing nut
Qty. 3
Wrench
Qty. 1
(not actual
size)
LL
KK
JJ
II
AA
BB
CC
DD
EE
FF
GG
HH
M8
Flange
nut
Bolt
M6
Flange
nut
Qty. 2
M8 x 16
Qty. 6
Qty. 5
Table of contents
Languages:
Other Thulos Stove manuals

Popular Stove manuals by other brands

GERES
GERES TEZPAZ Construction and operation manual

Quadra-Fire
Quadra-Fire CASTILE-MBK-C installation manual

TONWERK
TONWERK T-Sky eco2 operating instructions

Ravelli
Ravelli RBC 810 Use and maintenance manual

Lotus
Lotus PCT-63G Instructions for installation and use

United States Stove Company
United States Stove Company 5660 manual


