Ti-Research Cast User manual

March 2004
T
i
-
Research
Cast Product Information

2
T
i
-
Research
TABLE OF CONTENTS
LIST OF PARTS ........................................................................ 4
Specifications ........................................................................................... 5
Used symbols and their meaning................................................................ 5
PRINCIPLE OF OPERATION ..................................................... 6
SAFETY INSTRUCTIONS........................................................... 7
Intended Use............................................................................................ 7
Electrical Safety......................................................................................... 7
Safe Operation......................................................................................... 7
INSTALLATION AND FIRST OPERATION.................................... 8
Unpacking ............................................................................................... 8
Installation ............................................................................................... 8
First Operation ....................................................................................... 10
Conversion of the Device for large Moulds................................................ 11
PRODUCTION OF CASTINGS ............................................... 12
Sprueing ................................................................................................ 12
Invest..................................................................................................... 13
Preheating.............................................................................................. 14
Casting.................................................................................................. 14
Devesting............................................................................................... 16
MAINTENANCE AND SERVICING........................................... 17
Maintenance .......................................................................................... 17
Servicing and Cleaning ........................................................................... 17
PROBLEMS AND SOLUTIONS ................................................ 18
CONSUMABLES, SPARE PARTS AND ACCESSORIES................. 19

3
T
i
-
Research
ANNEX I: CORRECT SPRUEING...............................................20
The Waxdisk ...........................................................................................20
Fixing of Sprues to the Waxdisk.................................................................20
Positioning of Models in the Mould ...........................................................21
ANNEX II: HINTS FOR PROPER MELTING.................................23

4
T
i
-
Research List of Parts
1cabinet 9mould pliers
2top lid 10 wax disks
3lever 11 crucible
4power switch 12 crucible holder
5power cord 13 crucible holder handle
6metal ring, large 14 mounting screw M4 x 6mm
7metal ring, small 15 wrench 3mm, 5mm
8mould socket 16 3 screws M6 x 10mm

5
T
i
-
Research
Specifications
Dimensions
diameter: 170 mm
height: 270 / 320 mm
weight: 8,5 kg
Power
EU US
voltage: 230 V 115 V
frequency: 50 Hz 60 Hz
power consumption: 30 W 40 W
rotation speed: 930 min-1 850 min-1
Environment
temperature range 5 °C - 40 °C
rel. humidity 90 % @ 20 °C
Used symbols and their meaning
Attention!
hot surface
Caution!
dangerous electrical voltage
open lid
close lid
The type plate with serial number and CE-sign is on the rear side of the device.

6
T
i
-
Research Principle of Operation
Cast made by Ti-Research is a centrifugal casting device for the production
of precision castings. The device is suitable for all kinds of castable materials.
The scope of usage reaches from technical products for further processing,
jewelry and dental appliances.
For the production of castings made of metal, precious and non-precious
alloys may be used. The device is designed for melting of metals by flame with
a suitable torch which provides the best means for controlling the melting
process.
With a small and a large metal ring for different sizes of moulds various sizes of
parts or different numbers of castings may be produced. For the casting of
dental parts, for example 40 and more crowns and/or bridge elements may be
produced with a mould in the small ring and three or more partials may be
casted with a mould in the large ring in one cast.
The operation of Cast is based on a patented process where balancing of the
rotating part is not necessary. Despite of the extraordinary small dimensions the
device allows the production of more parts in one process than any other
competitors‘ dental casting device today available on the market.
Cast is distinguished by ease of use and the extraordinary small size and is the
first choice for locations with limited workspace.
The device comprises of a special safety mechanism to protect the user by
activating a mechanical brake while opening the top lid and switching off the
power to protect from accidental restart.
The device meets all applicable safety standards. Nevertheless care has to be
taken to prevent dangerous situations during operation.
For safe operation of the device, this instruction manual is to be read
prior to the first usage and the instructions given here are to be obeyed.

7
T
i
-
Research
Safety Instructions
For safe operation the following instructions are mandatory:
Intended Use
The usage of Cast by Ti-Research is intended for the production of castings
with the centrifugal casting principle by qualified users only. Any other
application is not intended use and not permitted.
Ti-Research is not liable for damages resulting of not intended use. Not
intended use is any use not mentioned in this instruction manual.
All local regulations for safety at work and accident prevention are to be
obeyed for operation.
Electrical Safety
Prior to the connection it is to be verified that the local power supply, i. e.
voltage and frequency meets the technical specifications of the device.
The device may be connected to a power outlet with protection earth contact
and a leakage current safety switch with FI< 30mA only. Care has to be taken
for the power cord is not subject to mechanical tension.
For maintenance or repair purposes the device is to be disconnected from
power supply by pulling the power plug out of the socket.
Repair of the device is to be carried out by the manufacturer or persons
appointed by the manufacturer only.
Ti-Research is not liable for damages resulting of improper work.
After repair-work on electrical parts of the device an insulation test and
protection earth inspection is to be carried out by a certified electrician.
Safe Operation
During operation heat sensitive parts have to be kept in a sufficient distance
from the device.
Combustible, inflamable and explosive substances are to be kept away from
the device during operation.
Do not touch hot parts, i. e. the crucible, crucible holder, top lid, mould, etc..
Handling of preheated moulds while inserting into or removing from the mould
holder may cause danger of burning. For the safe handling of moulds the
specially shaped mould pliers has to be used.

8
T
i
-
Research For the usage of torches the local safety regulations and precautions are to be
obeyed. In case of defects or damages resulting in dangerous conditions for
use the device is to be disconnected from the power supply and to protect
against accidental use.
Installation and first Operation
Unpacking
After unpacking check the content for damages of transportation and
completeness according to the packing list.
Not complete deliveries are to be claimed with the invoice and the serial
number of the device within three days after delivery at the retailer.
Damages of transportation are to be complained immediately at the
transportation company.
Installation
The table-top device 1is to be placed on top of a horizontal, flat and non-
slippery surface with sufficient distance from heat sensitive objects. Care is to
be taken to provide enough working space for the handling of hot parts.
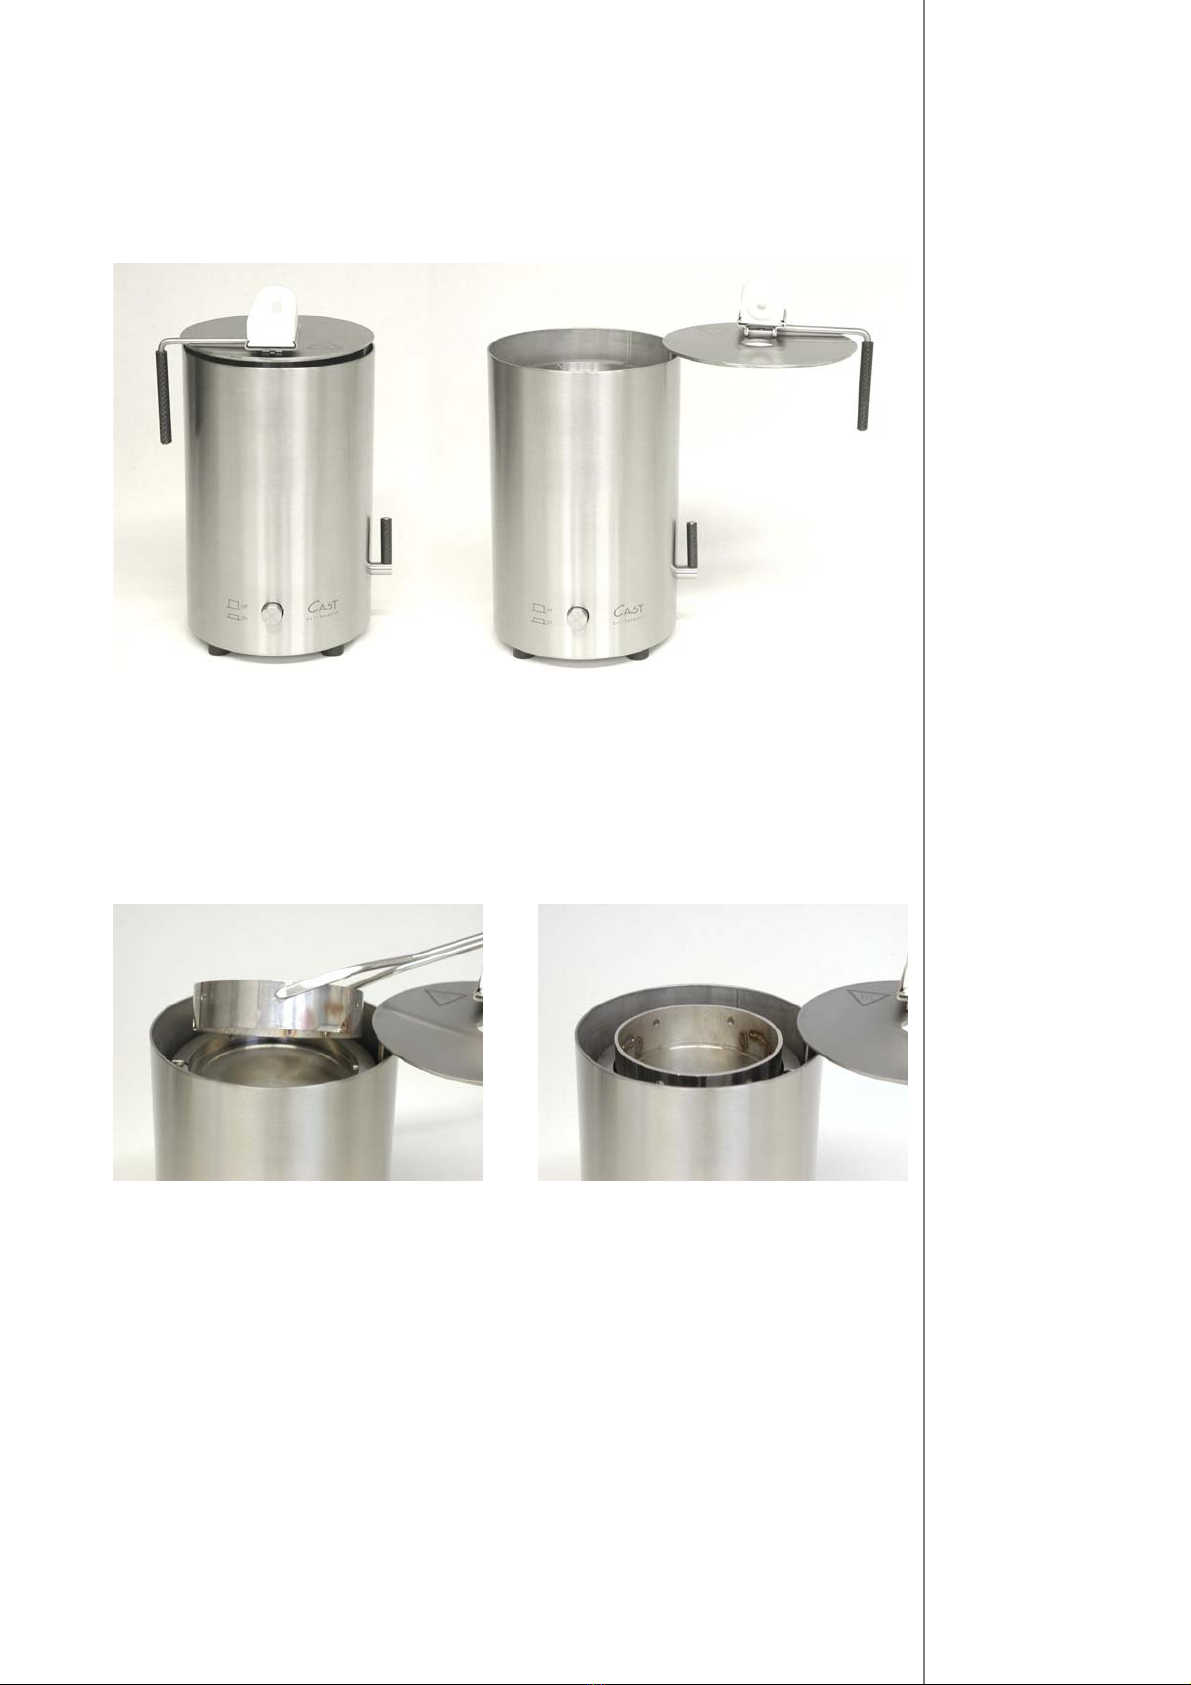
The crucible holder 12 is to be mounted on the top lid 2and to be fixed with
the mounting screw M4 x 6mm 14. The crucible holder 12 must be easily
tipped over by moving the crucible holder handle 13.
9
T
i
-
Research
Lift the top lid 2by turning the lever 13 upward and turn it to the side. The
mould holder inside the device must not be able to rotate free by hand
operation. In case the mould holder rotates free proceed as indicated in the
troubleshooting section.
Check the mould rings for easy insertion and correct fit using the special
shaped pliers. In any other case claim to your retailer.
Close the top lid 2by turning it back over the device 1and turning the lever
13 downward. The top lid 2must close tight with the cabinet 1.

10
T
i
-
Research First Operation
Before connecting to the power outlet check the specifications of your power
supply with the specification of the device on the type plate.
In case the specifications of the device do not match to your local power
supply, the device must not be connected.
Make shure the device is switched off by pushing the main switch button 4:
button snapped out – device off,
button snapped in – device on.
Connect the power cord 5of the device to a correctly installed and fuse
protected power socket protected by a leakage current switch (FI< 30mA).
In case the top lid 2is open, turn it back over the cabinet 1and close it firmly
by turning the lever 13 downward. The top lid 2must close tight with the
cabinet 1.
Snap in the power switch 4by pushing it – device is running: the mould holder
in the device starts rotating counterclockwise. Turning is visible through the
central hole in the top lid.
NEVER put fingers or other parts through the central hole in the
top lid. Danger of injuries may occur!
In case the device does not start rotation proceed as indicated in the
troubleshooting section.
Snap out the power switch 4by pushing it again – device is turned off: the
rotation of the mould holder slows down. Turning is visible through the central
hole in the top lid. For a quick stop of the mould holder turn the lever upward
to activate the break mechanism.

11
T
i
-
Research
Conversion of the Device for large Moulds
Unscrew the three mounting screws of the mould holder with the small key (part
of delivery). Take the mould holder and the 3 cm high adapter-ring underneath
out of the device.
Place the mould holder without the adapter-ring in the device and fix it by hand
with the three short screws at equal torque.
Place the large metal ring 6onto the mould holder and check for correct fit.
The top lid 2must close tight with the cabinet 1.
For re-conversion to the small ring just follow the instructions in reverse order.
Incorrect mounting may cause damages to the device and/or to the
user.
12
T
i
-
Research Production of castings
Depending on type and volume of objects to be casted three different types of
mould rings may be used:
-small 30 mm high mould ring for crowns, bridges and small partial
dentures,
-small 30 mm high mould ring with reduced volume for a few or even single
parts (to be purchased separately),
-large 60 mm high mould ring for large and/or more than one partial
dentures.
Sprueing
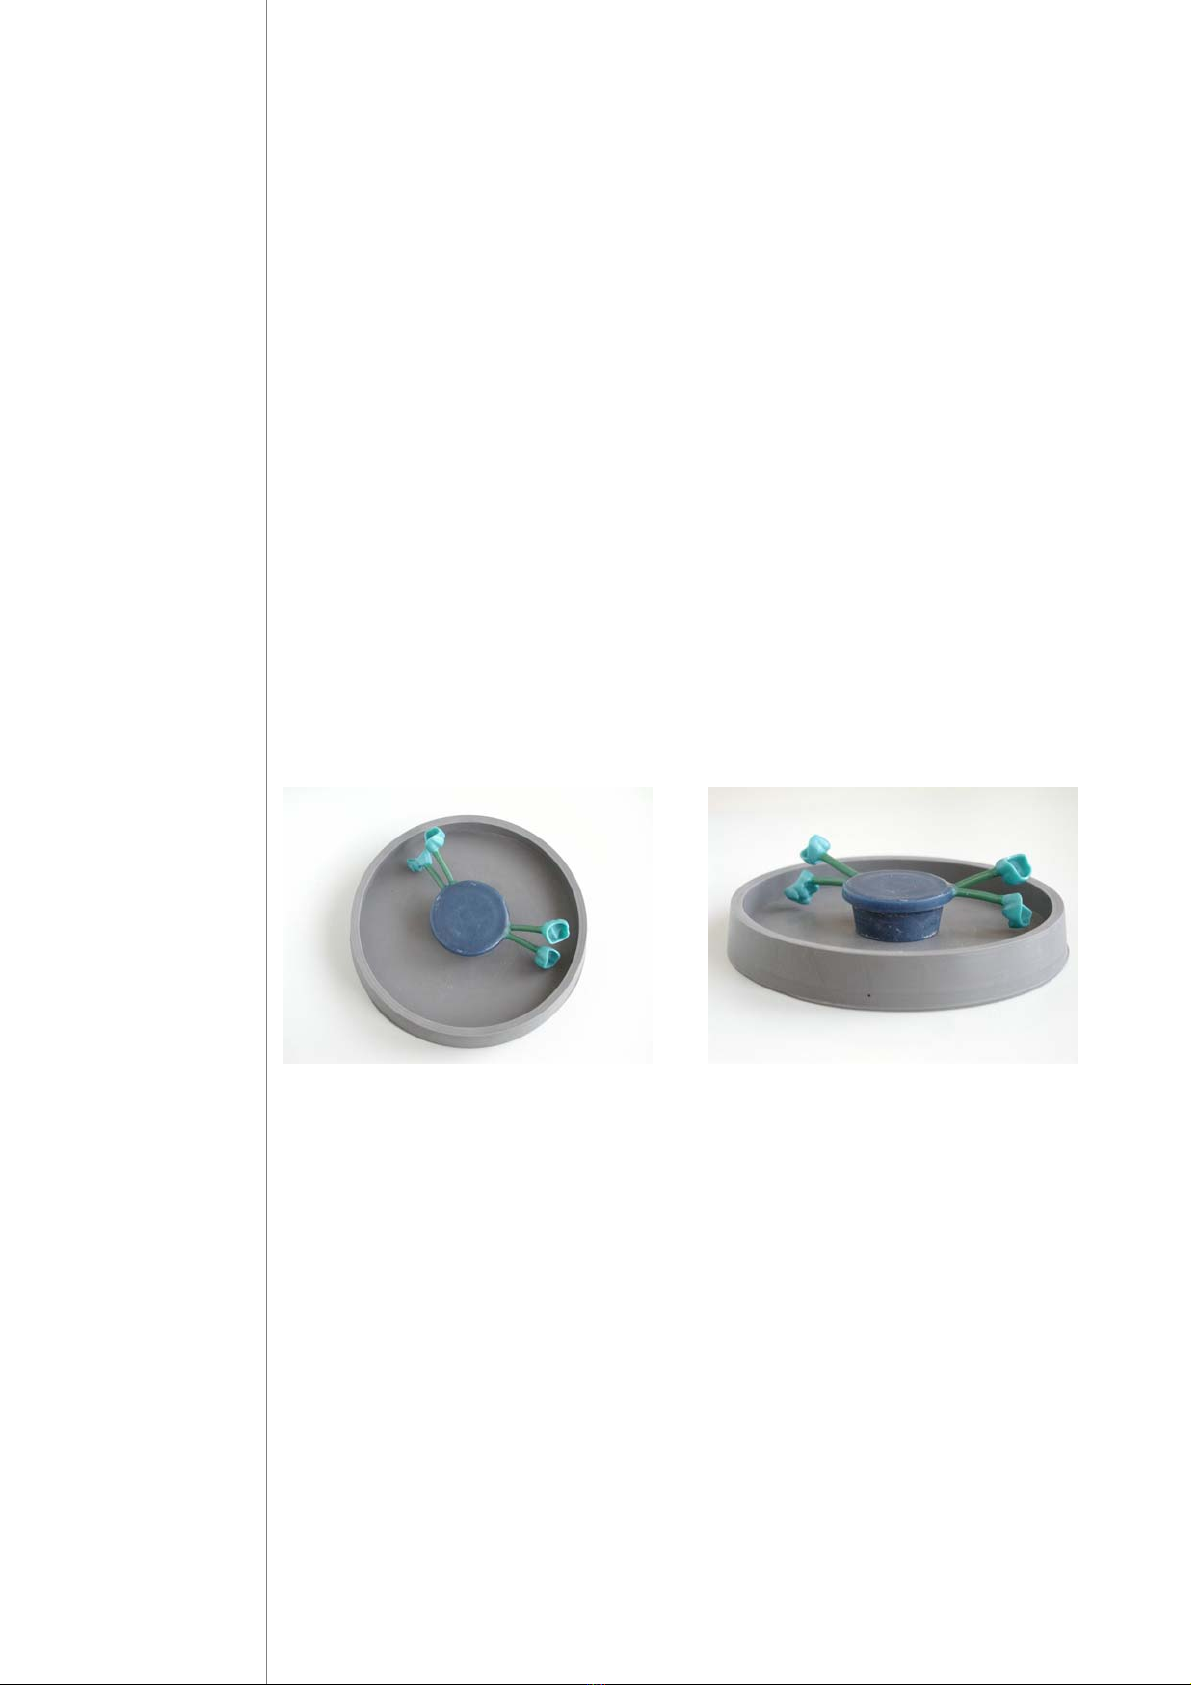
In contrast to conventional sprueing the wax modellations are mounted radially
around the wax disks 10.
To prevent air bubbles it is important that the parts are fixed with the open side
on top or at least parallel to the mould socket base.
Hint:
For most alloys the remaining metal ring is suitable to replace the bar in
conventional castings, thus there is no bar or other reservoir constructions
necessary. This circumstance is time saving and advantageous for preparation
of large castings like full metal bridge elements or wide bridges.

13
T
i
-
Research
Depending on the density of the alloys used different distances from the metal
ring are recommended:
non precious alloys approx. 1 cm to the inner side of metal ring
precious alloys (reduced) approx. 1,5 cm to the inner side of metal ring
precious alloys approx. 2 cm to the inner side of metal ring
These recommendations may vary depending on the alloy, investment material
and mould temperature.
Best values are to be determined individually at work with the materials used.
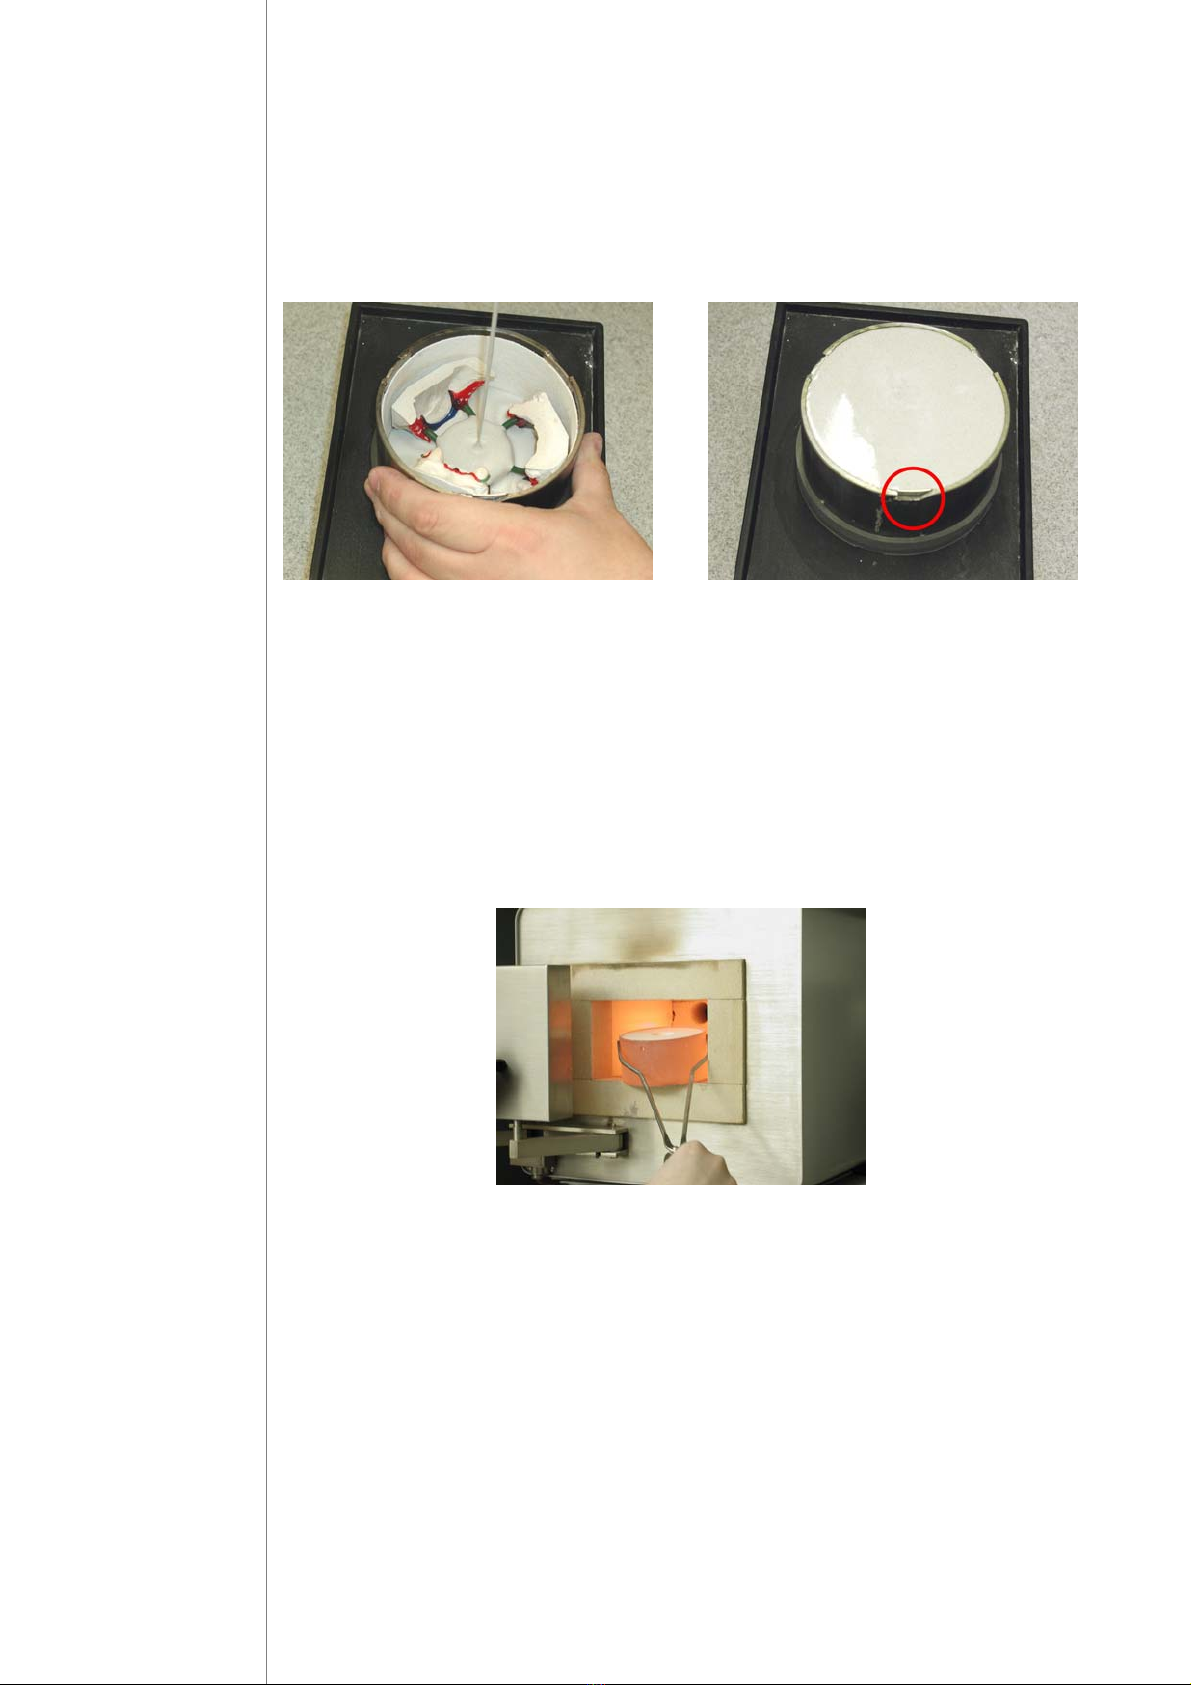
Invest
Prior to the investment an approx. 1 mm thick liner of 25 mm width for the
small metal ring 7or 55 mm width for the large metal ring 6respectively are to
be placed to the inner side of rings (Fleece 25 or Fleece 55 of Ti-Research is
recommended). A small contact zone of approx. 2 mm on top and bottom side
remains to prevent the mould from sliding out of the hot metal ring.
Important!
While pourring the invest material into the ring the shaped edge of the
ring must be on top.
Invest the modellation with a suitable investment (e. g. Invest C/P or Invest NP
by Ti-Research)
Important!
By filling the prepared metal ring placed on the mould socket 8 with
invest-material care has to be taken that the invest material does not
exceed the edge of the metal ring. Otherwise mounting of the mould
into the mould holder is more difficult or not possible.
14
T
i
-
Research
Warning!
The shaped edge of the metal rings must be free of investment.
Preheating
The mould and the crucible are to be preheated as usual according to the
instructions of the invest material used.
Casting
After preheating the mould is to be taken out of the furnace and placed into
the mould holder by turning the ring clockwise to the stop. A correctly placed
ring may not be lifted off the holder. The lid is to be closed and the crucible is
to be mounted into the crucible holder and filled with alloy. After these
preparations melting of the metal may start.
The type and power of the torch used is crucial for the quality of the casting
result – see annex II: hints for proper melting.

15
T
i
-
Research
Prior to the melting process or at least 5 seconds before pourring the device is
to be switched on to reach nominal speed for casting.
After reaching the liquidus point of the metal it may be pourred into the mould
by turning the crucible holder handle 13 in a smooth move to tip over the
crucible 11.
Depending on the alloy used and the preheating temperature of the mould the
device must kept running for a sufficient time to allow cooling down the metal
before switching off.
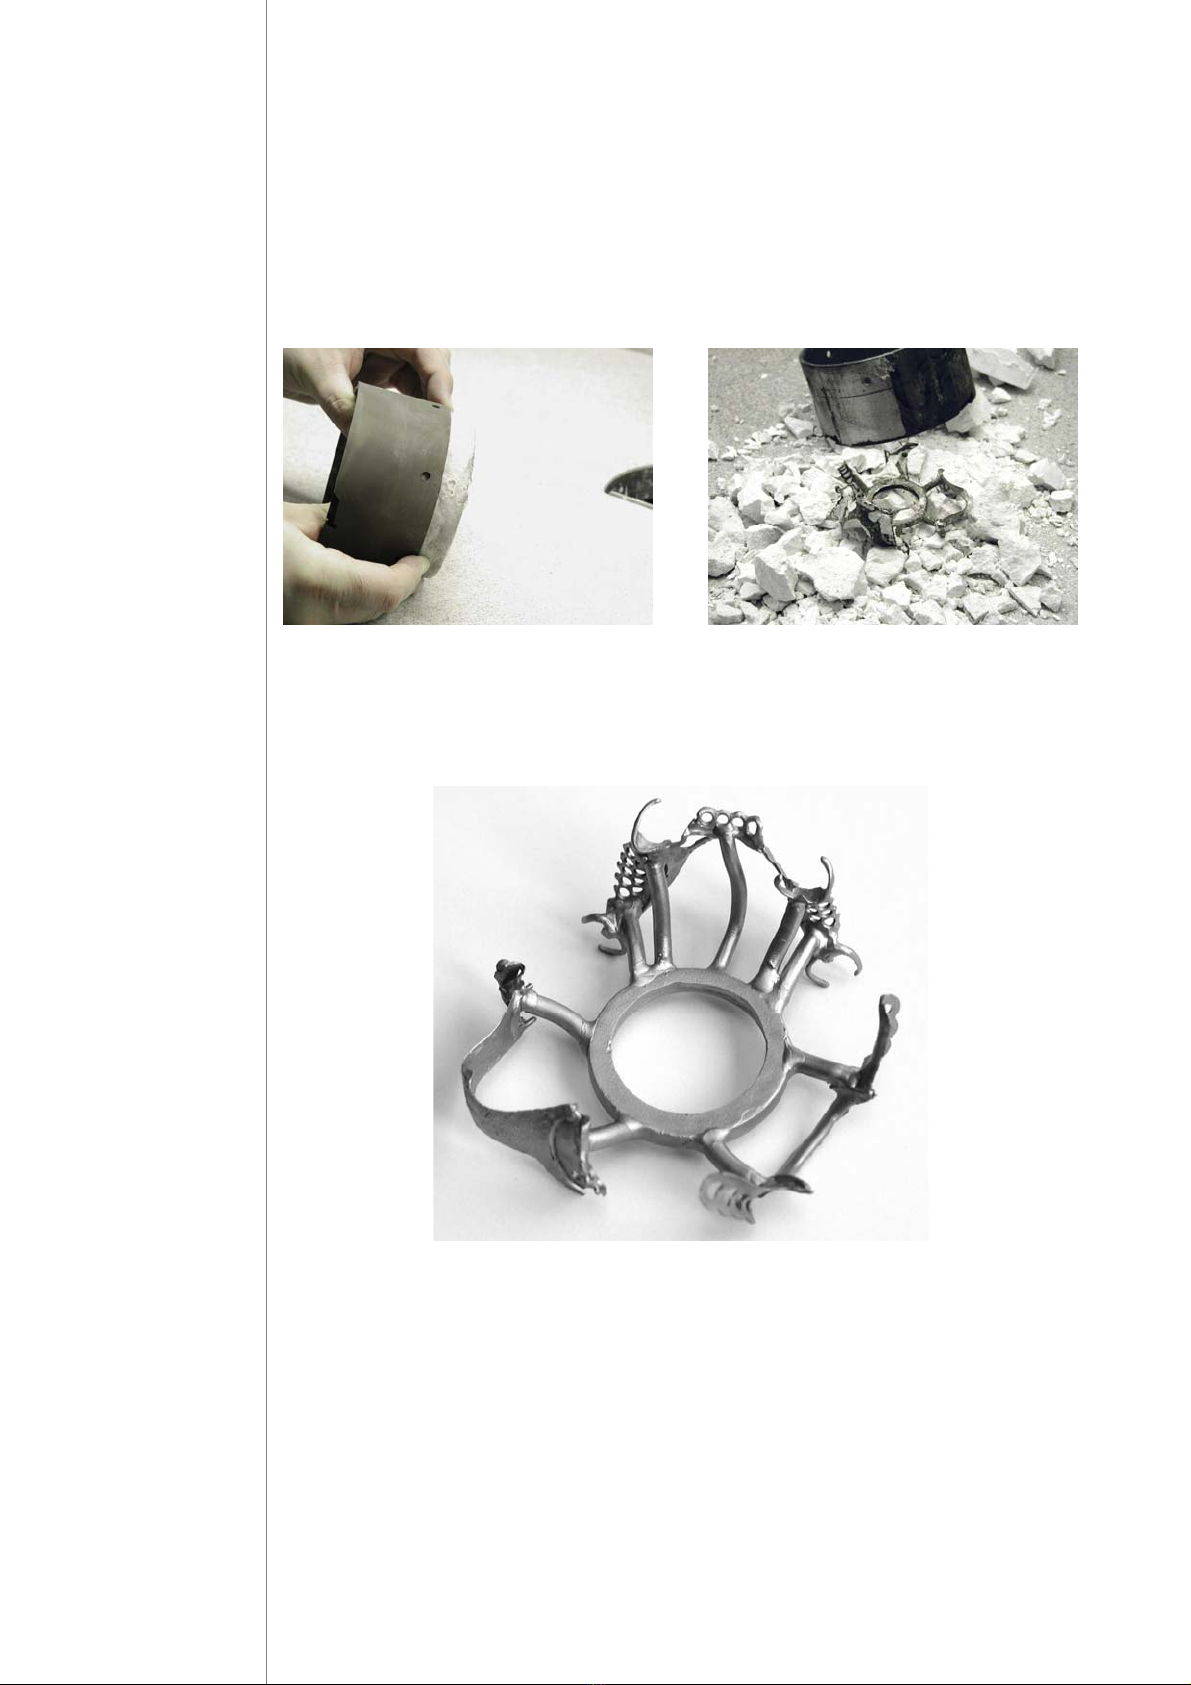
After solidification the top lid 2may be opened by turning the lever 3to access
the mould with the mould pliers 9for cooling down.
ATTENTION: Danger of burning at hot parts
16
T
i
-
Research Devesting
After sufficient time of cooling down the casting may be taken out of the mould
as usual for further processing.

17
T
i
-
Research
Maintenance and Servicing
Maintenance
The casting device requires no special maintenance. With respect to safe
operation a visual check of the cabinet or other parts of the device and the
power cord should be done before each use. The top lid 2must close tight with
the cabinet 1.
Prior to any placement of moulds the three pins of the mould holder must be
checked visually for damages. The pins must be firmly fixed, equally long (3
mm) and straight pointing towards the center.
Prior to any use the crucible 11 has to be checked for damages. Cracked,
broken or damaged crucibles must not be used.
Usage of defective crucibles may cause danger of burning by splashed
metal.
Defective parts are to be replaced by the manufacturer or a person appointed
by the manufacturer. Unusable crucibles must be replaced by crucibles from
Ti-Research only. Ti-Research is not liable for any damages caused by
defective or third party replacements.
Servicing and Cleaning
Prior to each cleaning the device is to be disconnected from mains
power by pulling the power plug out of the socket.
The drive assembly is dust protected. To prevent accumulation of invest
material or others during usage cleaning of the device by compressed air on a
weekly basis or more frequent if necessary is strongly recommended.
Keep off liquids from inside the device!
The cabinet may be cleaned by a moistened piece of cloth. For special care the
usage of stainless steel detergents (e. g. Clean by Ti-Research) is
recommended.
Maintenance, servicing and cleaning is to be performed by qualified
personnel only.

18
T
i
-
Research Problems and Solutions
problem possible cause solution
no spin up device not
connected
connect device to an
appropriate mains socket.
top lid not closed close top lid by turning the
lever.
mould is stuck open top lid and check
mould for correct fit.
defective electrical
components
disconnect the device by
pulling the power plug and
protect from accidental use –
inform customer service.
device does not stop
within 5 seconds with
opened top lid
brakes used up or
misadjusted
inform customer service.
mould holder turns free
by moving by hand,
device runs free with
top lid open
misadjusted
brakes or defect
in breaking
appliance
disconnect the device by
pulling the power plug and
protect from accidental use –
inform customer service.
Use original packing for transportation.

19
T
i
-
Research
Consumables, Spare parts and Accessories
The items listed below may be ordered at your local retailer or at Ti Research.
Accessories/consumables
Item No. Item
3010-00 Mouldpliers (Cast-System)
3020-00 Mould socket
3030-00 Metal ring 30 mm (C&B/small PD)
3030-10 Metal ring, sectioned 30 mm (C&B)
3040-00 Metal ring 60 mm (PD)
3100-00 Melting set for propane
3110-10 Pressure regulator for oxygen
3110-20 Pressure regulator for propane
3110-30 Gas saving device with torch holder
3120-00 Torch handpiece with screw connections
3120-10 Melting torch, 27000 kJ/h
3120-20 Melting torch, 38000 kJ/h
3120-30 Micro-welding inserts with 3 exchangeable nozzles
3130-10 Gas-station, portable
3130-20 Refill adapter for oxygen
3130-30 Refill adapter for propane
3180-10 Flame arresting device for oxygen
3180-20 Flame arresting device for propane
3190-00 Twin feeding hose, propane/oxygen Ø 6mm, 1m
3190-10 Single feeding hose, oxygen Ø 6mm, 1m
3190-20 Single feeding hose, propane Ø 6mm, 1m
3190-30 Goggles
4010-00 Fleece 55R (40 m roll, 55 mm)
4020-00 Fleece 25R (40 m roll, 25 mm)
4030-00 Waxdisk (25 pieces)
4100-00 Invest C/P 5 kg, speed investment for C&B
4100-10 Invest C/P 20 kg, speed investment for C&B
4110-00 Invest NP 5 kg, speed investment for PD
4110-10 Invest NP 20 kg, speed investment for PD
4200-00 Invest Liquid 1l
4200-10 Invest Liquid 5l (buy five get six)
4500-00 Clean (stainless steel detergent) 100 ml
4600-00 Carry firing tray, Ø77 mm, incl. 5 pins
5010-00 Partialloy, non-precious alloy for PD 1kg
5020-00 Bondalloy High, non-precious bonding alloy (CTE 14.3) 1kg
5030-00 Bondalloy Low, non-precious bonding alloy (CTE 16.1) 1kg
6000-00 Cast-crucibles M (150g gold) package of 5
6000-10 Cast-crucibles L (250g gold) package of 5

20
T
i
-
Research Annex I:
Correct Sprueing
As common to any casting system some device dependent and physical
properties have to be obeyed to obtain satisfactory results.
The Waxdisk
The waxdisk of the Cast – system replaces the sprue base known from other
casting systems.
In common casting systems objects are sprued to a central sprue base acting
as a bottleneck for the metal flow. Using the Cast – system objects are sprued
radially to the waxdisk resulting in a higher flow rate for each single sprue.
Fixing of Sprues to the Waxdisk
The sprues are to be fixed radially around the widest extent of the waxdisk with
wax as depicted in the illustration below. Care has to be taken that the sprues
are fixed with their full intersection along the waxdisk – otherwise the effective
diameter for metal flow will be reduced resulting in a delayed or insufficient
filling of the mould or miscasts.
Table of contents
Popular Laboratory Equipment manuals by other brands


Belden
Belden HIRSCHMANN RPI-P1-4PoE installation manual

Koehler
Koehler K1223 Series Operation and instruction manual

Globe Scientific
Globe Scientific GCM-12 quick start guide

Getinge
Getinge 86 SERIES Technical manual

CORNING
CORNING Everon 6000 user manual

Biocomp
Biocomp GRADIENT MASTER 108 operating manual


