TIFATECH LA TIFALENO User manual

S21-037
ENGLISH
S
Coffee Machine
LA TIFALENO
Instruction Manual

2
S21-037
ENGLISH
S
PREFACE
Thank you for purchasing La Tifaleno, a coffee machine product from Tifatech.
This manual contains instructions for the mounting, functions, operations, and
notes when operating La Tifaleno coffee machine. To ensure safe and correct
use, thoroughly read and understand this manual before using this product.
To prevent accidents arising from the misuse of this product, please ensure the
operator receives this manual.
HAZARD INTENSITY LEVELS
The level of risk and importance of the notification is determined by the
following definitions. Always observe the warnings to ensure safety and prevent
potential injury and product damage.
Important:
Alerts against unsafe practices. Observe Important notifications to
prevent possible minor personal injury or damage to the board.
Warning:
Indicates a potentially hazardous situation that, if the Warning is
ignored, could result in injury or death.
Note:
Gives additional information which may be helpful for the proper
operation of the board.

S21-037
ENGLISH
S
WARNINGS:
Note: TIFATECH Co., Ltd declines all responsibility for damage to persons or
property resulting from failure to follow the instructions and warning listed
below when installing and using this machine.
▪The installation of the machine must be completed by Tifatech’s personnel.
▪This product needs to be wrapped appropriately before transport. A user
manual, accessories, and a La Tifaleno coffee maker should all be included in
the delivery. Please get in touch with us right away for assistance if any listed
items are missing.
▪Mount the machine 110cm above the ground on a solid, water-resistant
surface
▪Ensure that the power supply voltage does not fluctuate by more than 6%.
▪The main water supply must satisfy safety and stability requirements for a
perfect machine operation
▪Before mounting or removing the machine, disconnect it from the power
supply and wait a while for it to cool down.
▪Do not remove any original electrical part of the machine.
▪To protect the machine from electrical trouble, keep it away from sink, water
faucets or wet places to ensure water is not splashed into machine.
▪Repairing, or parts replacement should only be performed by TIFATECH or
other qualified service personnel.
▪Children should never be allowed to play with the machine.
▪This machine is intended to only use for coffee dispensing, steaming and
frothing milk. Do not use it for any other purpose.
PRECAUTIONS
➢Installation precautions
Read thoroughly the following conditions before installing the La Tifaleno
coffee machine.

4
S21-037
ENGLISH
S
The mounting location must be:
▪No flammable, explosive gases
▪No exposure to water.
▪An ambient temperature of 0 to 70°C that does not change rapidly, and
no icing.
▪An ambient non-condensing humidity of 35 to 85 %RH.
➢Operation and Maintenance Precautions
▪Do not touch live terminals. This may cause an electrical shock or
problems in operation.
▪Ensure the board surface is completely dry before powering.
▪Periodic cleaning will reduce the risk of damaging the board.

S21-037
ENGLISH
S
*** CONTENTS ***
I. GENERAL..............................................................................................................1
1. Introduction ..........................................................................................................1
II. TECHNICAL SPECIFICATIONS...................................................................1
III. INSTALLATION ...............................................................................................2
1. Position.................................................................................................................2
2. Electrical connection............................................................................................3
3. Water connection..................................................................................................3
IV. USE ......................................................................................................................3
1. Start the machine..................................................................................................3
2. Re-filling the boiler ..............................................................................................4
3. Heating the boiler.................................................................................................4
4. Coffee dispensing.................................................................................................4
5. Steaming and frothing milk..................................................................................6
V. PROGRAMMING..............................................................................................7
1. Programming standard dose.................................................................................7
2. Pre-infusion ..........................................................................................................7
3. Setting of operational parameters.........................................................................7
a. Temperature setting...........................................................................................8
b. Other parameters setting ...................................................................................9
4. Advanced setting (For technician only).............................................................11
VI. CLEANING AND MAINTENANCE.............................................................12
1. Cleaning the group head.....................................................................................12
2. Cleaning the filter basket....................................................................................13

6
S21-037
ENGLISH
S
3. Cleaning the group gasket..................................................................................13
4. Automatic group cleaning..................................................................................14
VII. TROUBLESHOOTING ...............................................................................15

1
S21-037
ENGLISH
S
I. GENERAL
1. Introduction
The La Tifaleno coffee machine by Tifatech is a one group coffee machine with
cutting edge features including pre-infusion, automatic group cleaning, and many
more innovative functions.
Note:
▪This manual contains important instructions regarding the safe intended use
of the machine.
▪If any damaged or loss to this manual, request a copy from the TIFATECH
manufacturer.
II. TECHNICAL SPECIFICATIONS
Specifications
La Tifaleno
1GW
1GB
1GW Plus
1GB Plus
Steam wand
1 unit
Heating element control
Temperature control
LED display
1 unit
Color
White
Black
White
Black
Width, Height, Depth (cm)
25, 35, 41
36, 41, 53
Boiler volume (lit)
2
2.5
Power supply
230V AC 50/60Hz
Heating element power
1200W
2000W
Daily coffee capacity
(cups/day)
150
200
Weight(kg)
25
30

2
S21-037
ENGLISH
S
Steam boiler operating
pressure(bar)
0.8 - 1.2
Ambient noise(dB)
< 70
Ambient temperature (°C)
0 - 70
Ambient humidity (%)
< 70
III. INSTALLATION
1. Position
•Put the machine in place on a level surface. Make sure the feet are adjusted so
that the coffee is distributed equally among the cups.
•The machine should be placed in a location that meets the minimum
requirements described below.

3
S21-037
ENGLISH
S
2. Electrical connection
•Ensure that the electrical specifications of the main supply match the
specifications of the power supply required of machine.
•The power supply should be equipped with circuit breaker to protect against
unexpected system failure.
3. Water connection
•Water supply pressure needs to be between 1.5 and 6 Bar.
•Use drinking water with a hardness of between 20 and 30 ppm for the greatest
coffee quality and avoid damaging the machine's components.
IV. USE
1. Start the machine
Set the rotary power switch to the position 2 to turn on the machine.

4
S21-037
ENGLISH
S
2. Re-filling the boiler
The filling operation will start automatically when the water level falls below
the minimum threshold and stop when the level probe is reached.
Note: The water source should always be available for filling operation.
3. Heating the boiler
•The heating element will kick on to heat the boiler when its temperature drop
below the preset value for heating (page xx).
•The heating element will be shut off if the actual boiler temperature exceeds the
set point.
Note: Open the steam tap briefly when the machine starts up for the first time
after being off for a day or more to let the old steam out of the boiler.
4. Coffee dispensing
Note:
•Keep the portafilter inserted to the brewing group to keep it warm. This
will ensure that the coffee is served at the optimal temperature.
•Place the portafilter face down and tap the metal side at the top of the filter
basket to remove any extra coffee.
5
S21-037
ENGLISH
S
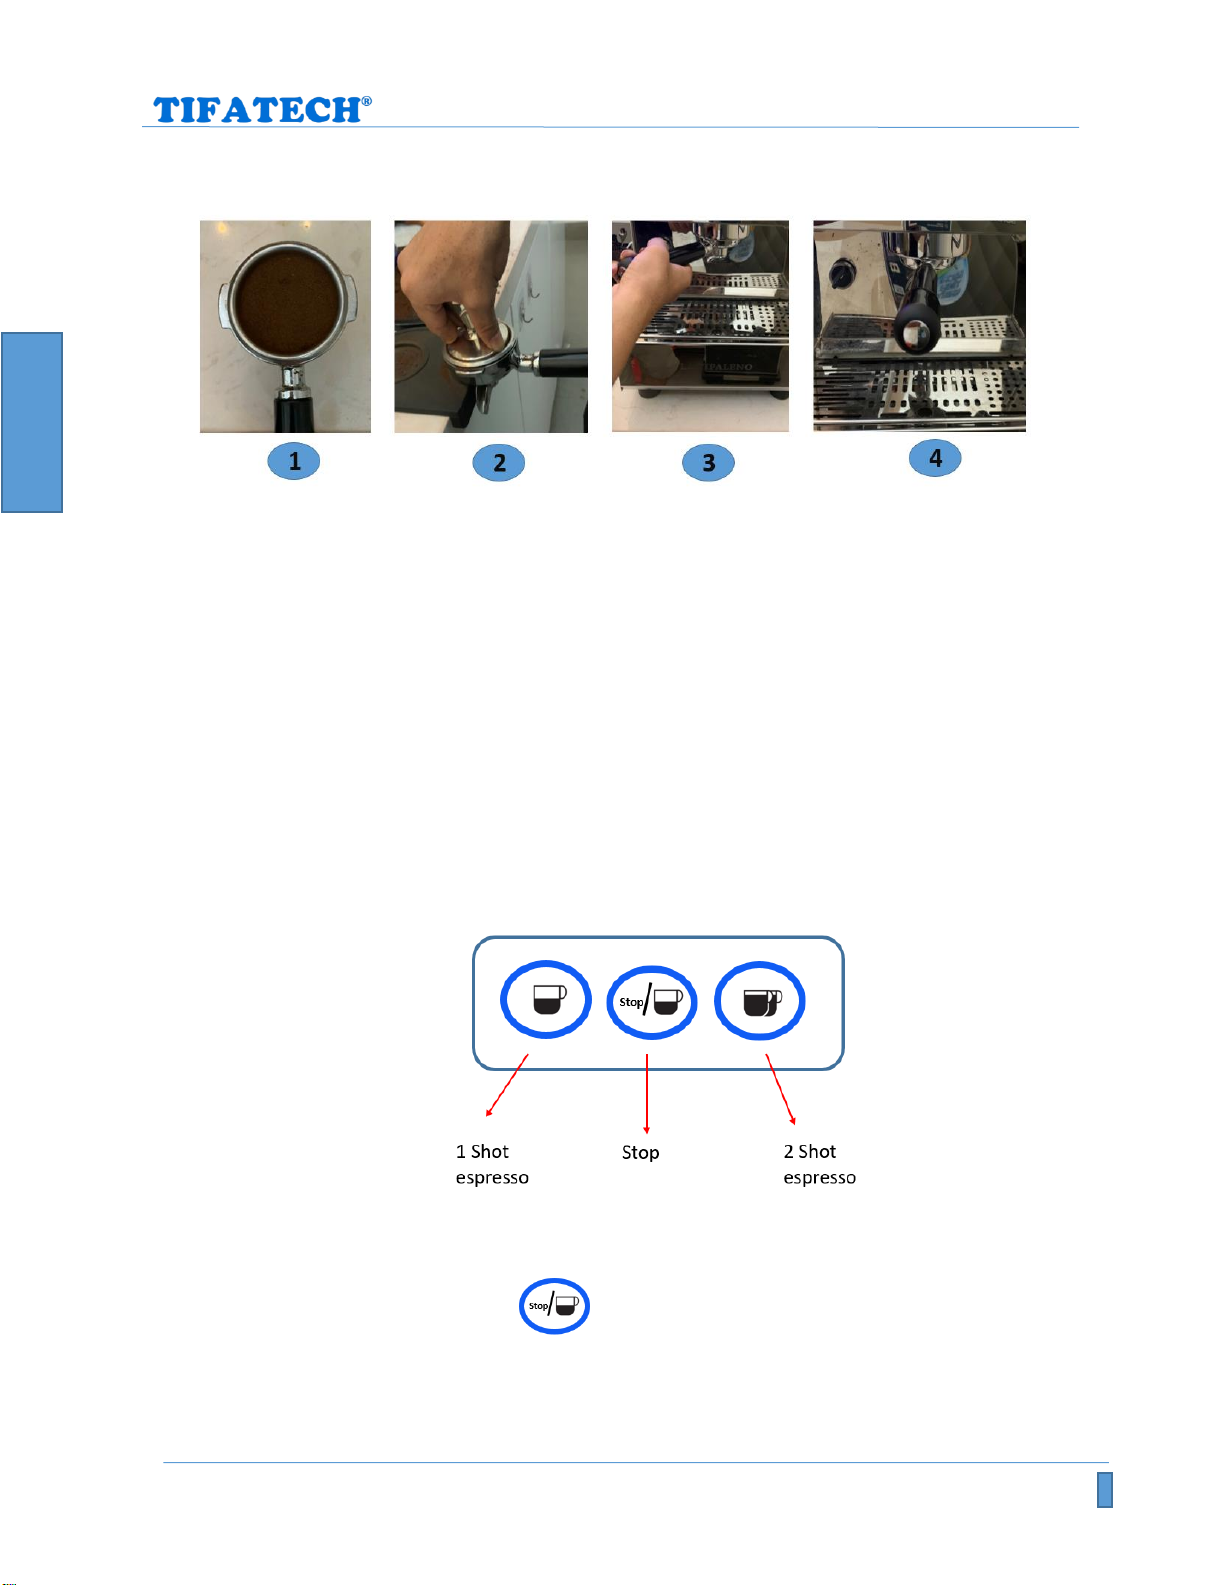
Follow these procedures to before starting to dispensing coffee:
Step 1: Unlock and remove the portafilter from the group head, fill the filter basket
with a proper amount of ground coffee.
Step 2: Press the coffee with a moderate force use coffee tamper.
Step 3: Insert the portafilter into the unit with the knob facing to the left, then turn
to the right until it lock to the correct position.
Step 4: Place the cup beneath portafilter outlet, then use the buttons to operate the
machine as directed below
•Press the Stop button once to start the coffee brewing process, then
press it again to stop.

6
S21-037
ENGLISH
S
•Press the 1 shot espresso button or 2 shot espresso button
to dispense a preset coffee dose that is previously programmed (page 7).
Important:
•Ensure that the portafilter is correctly locked into the brewing group before
beginning any dispensing operation.
•Never take out the portafilter while dispensing.
➢Tips for a good cup of coffee:
Conditions
Coffee extract slowly
Coffee extract rapidly
Amount of ground coffee
Excessive
Insufficient
Coffee pressure
Excessive
Insufficient
Ambient humidity
Too damp
Too dry
Grinder temperature
Too fine
Too coarse
Filter state
Clogged or dirty
Hole enlarged due to wear
5. Steaming and frothing milk
•Place the steam wand into the beverage and rotate the steam tap in a
anticlockwise direction.
•Close the steam tap and take the pitcher away when the beverage archives the
expected temperature.
Note: Open the steam tap briefly both before and after steaming to let any
leftover condensed water out.

7
S21-037
ENGLISH
S
V. PROGRAMMING
1. Programming standard dose
Follow the instructions below for programming coffee dosage for drink buttons.
Step 1: Press and hold the 1 Shot espresso button or 2 Shot espresso
buttons for 3 seconds to start to program on that one. Siren sounds and
the selected button begin flashing.
Step 2: Press the Stop button to dispense coffee and press it again
when reaching the desired coffee dose. The Stop button light is on while dispensing.
Step 3: Press and hold the programmed button for 3 seconds to save its new dose
and finish the setting process.
Repeat the procedure above for programming on the remaining button.
2. Pre-infusion
•To enable the pre-infusion mode, press and hold the button for 3 seconds
until the siren sounds.
•Do similarly the step above to disable it
Note: The coffee dose on buttons needs to be reprogrammed for it to work
correctly.
3. Setting of operational parameters
In addition to the core functions, a machine’s operational parameters can be changed
to improve the user experience.

8
S21-037
ENGLISH
S
Button
Name
Replace function
1 shot espresso
Increase (+)
2 shot espresso
Decrease (-)
Stop
Change/Confirm
Temperature setting
Press and hold the 1 shot espresso and 2 shot espresso
simultaneously for 3 seconds until the siren sound.
The display starts to alternate between two states like the image below.
Use the increase/decrease button to adjust the threshold temperature of the boiler
heating process.
•Temperature range:0 -120°C
•Step: 1
•Default: 114°C
Press and hold the Confirm button for 3 seconds to exit the setting process.

9
S21-037
ENGLISH
S
Other parameters setting
Press and hold the 2 shot espresso and the Stop button
simultaneously for 3 seconds until the siren sound. The 2 shot espresso light begins
to flash.
•Use the Increase/Decrease button to adjust the parameter value.
•Use Confirm/Change button to save your changes and move on to set a new
parameter.
•Press and hold the Confirm button for 3 seconds to leave the setup
mode. All lights return to the off state.

10
S21-037
ENGLISH
S
➢Table of parameters explanation :
Parameter
Range
Step
Default
Description
P
0 - 100
1
0
Propotional coefficient
(Recommend: P = 0)
HYS
1 - 10
1
2
The smallest temperature
difference required to
activate the heating element
ACT
1 - 10
1
7
Auto cleaning time
ACC
1 - 10
1
7
Period of the cleaning
process
SCF
1 - 5
1
3
Pre-infusion time
Unit: second
11
S21-037
ENGLISH
S
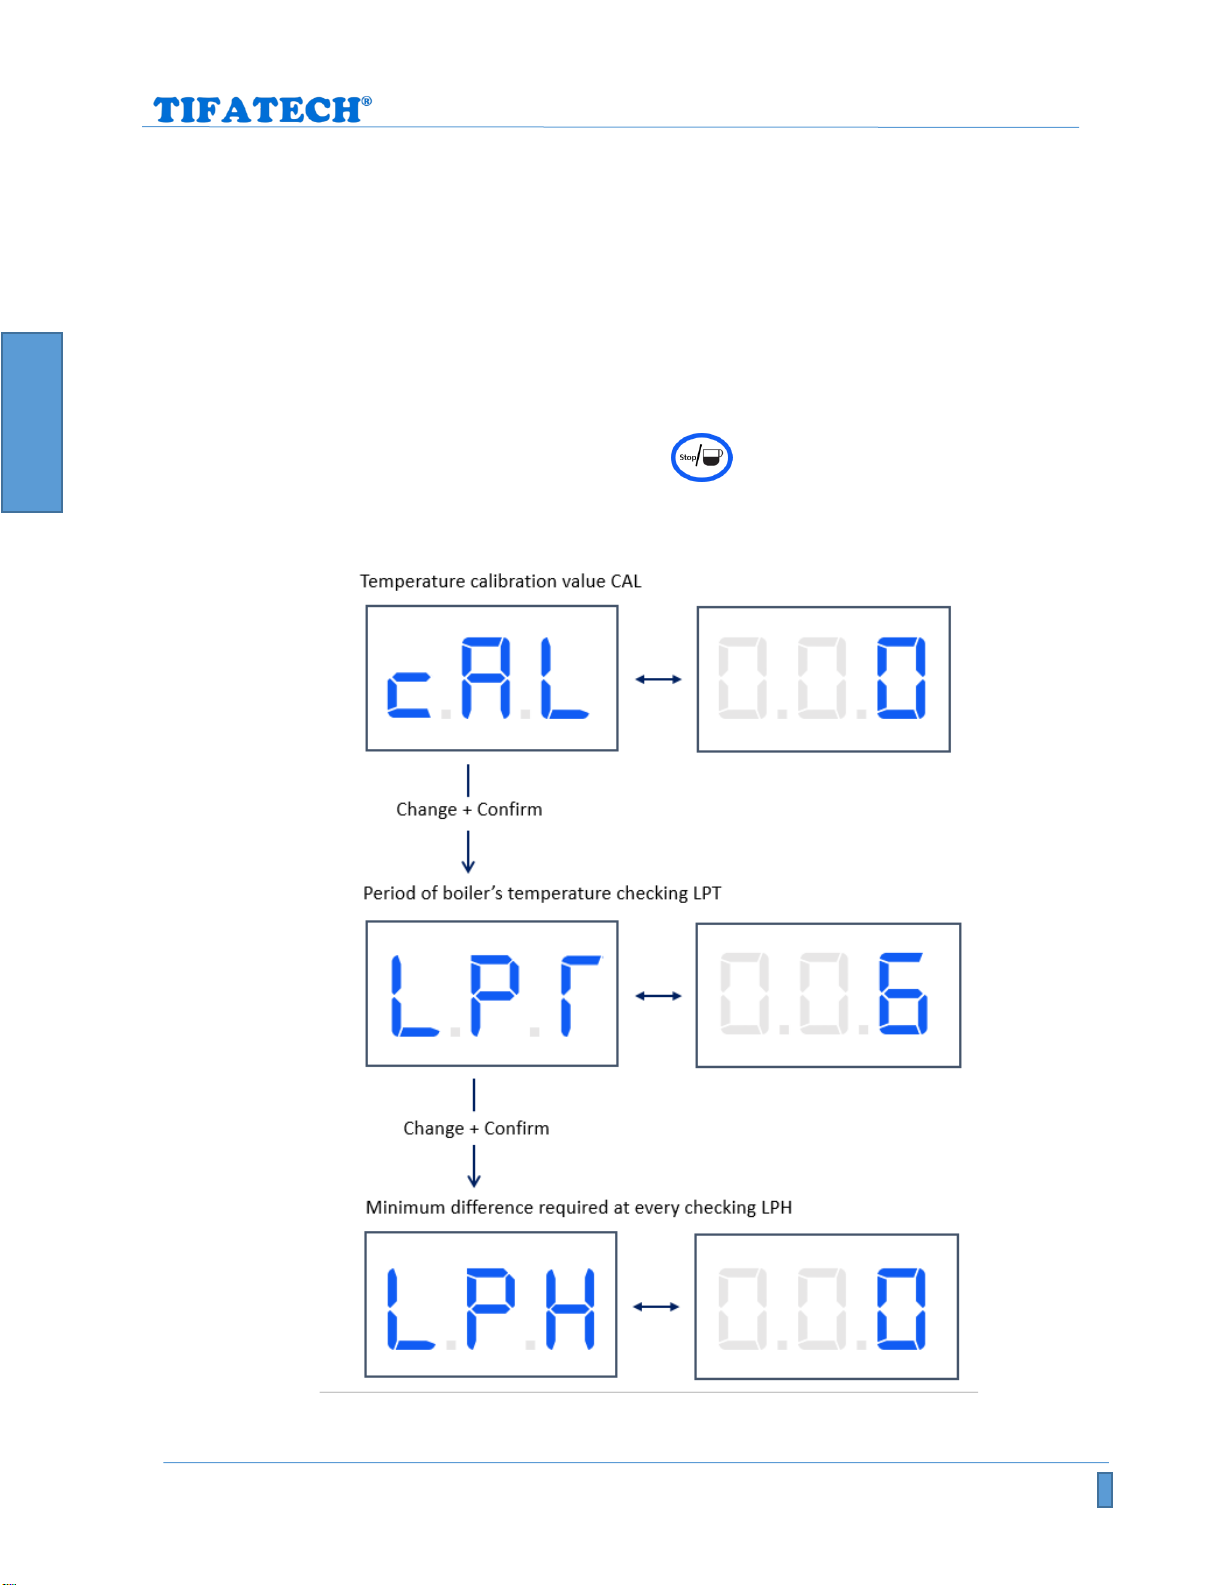
4. Advanced setting (For techinician only)
Press and hold all buttons simultaneously for 3 seconds until the siren sound. The 2
shot espresso light begins to flash.
•Use the Increase/Decrease button to adjust the parameter value.
•Use Confirm/Change button to save your changes and move on to set a new
parameter.
•Press and hold the Confirm button for 3 seconds to leave the setup
mode. All lights return to the off state.

12
S21-037
ENGLISH
S
➢Table of parameters explanation :
Parameter
Range
Step
Default
Description
CAL
-5 ÷ 5
0.1
0
Calibration value of
temperature sensor
Unit: °C
LPT
0 ÷ 200
1
6
Checking boiler’s
temperature with LPT
period
Unit: minute
LPH
0 ÷ 999
0.1
0
The minimum
temperature difference
required at every LPT
checking period.
Unit: °C
VI. CLEANING AND MAINTENANCE
Note: You should always follow to the cleaning instructions provided in this
manual to keep the machine running at its highest efficiency and prolong its life.
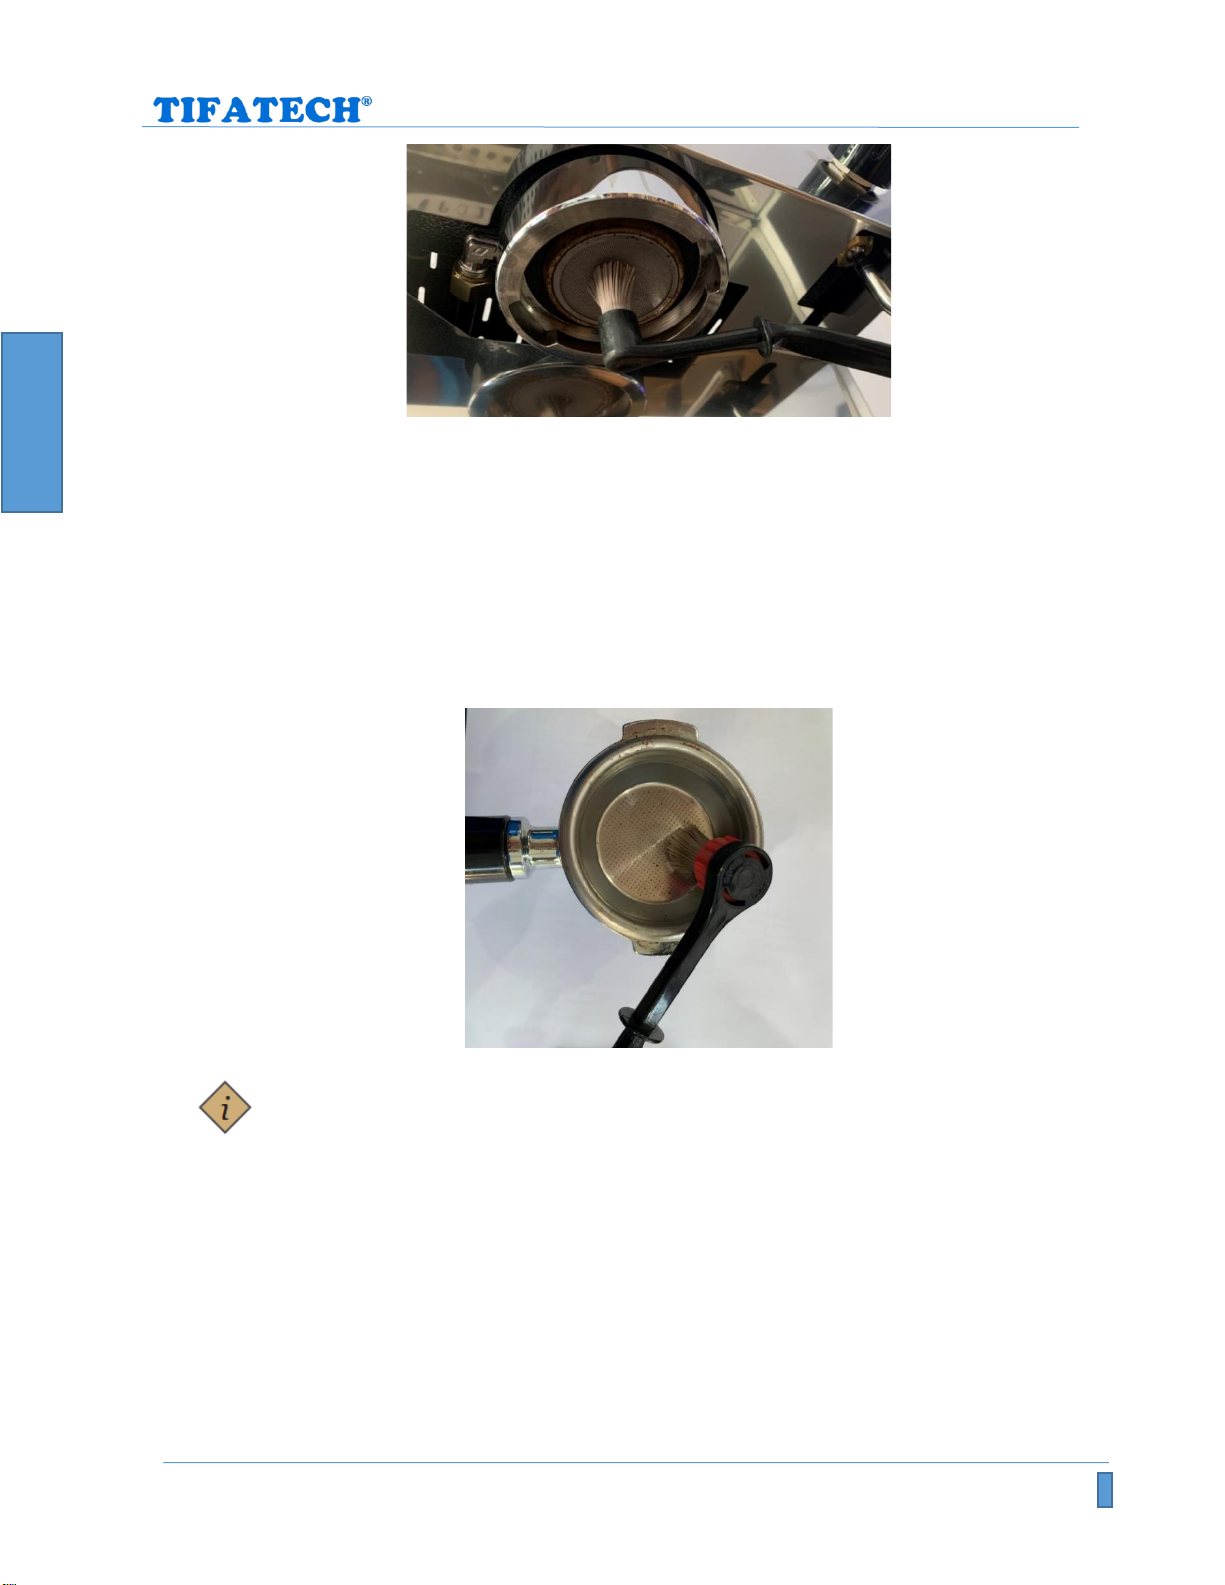
1. Cleaning the group head
Step1: Remove the portafilter from the filter holder and discharge water to wash
both group head and the portafilter.
Step2: Using the the provided brush supplied with the machine to eliminate the
coffee residues from the filters and the shower plate. Press Stop again to finish the
cleaning process.
13
S21-037
ENGLISH
S
2. Cleaning the filter basket
•Remove the basket filter from the portafilter, then also use provided brush to
get rid of the residual coffee.
•If the filter get clogged up and you're not able to clean it normally, burn any
coffee particles with a bare flame.
Note: Abusing this burning solution could harm the filter, thus avoid doing it
frequently.
3. Cleaning the group gasket
While dispensing coffee, the coffee may gather on the group's sealing surface. Over
time, it will make it difficult to open or close the portafilter to the group head and
eventually break the group gasket.
Follow the procedure below for cleaning the group gasket:

14
S21-037
ENGLISH
S
Step 1: Insert the blind basket into the portafilter
Step 2: Place the portafilter into group head and start to discharge water by pressing
Stop button.
Step 3: Briefly opening and closing the portafilter so that the water run out. Keep
your hands and other body parts out of the water to prevent burns.
Step 4: Stop discharging water and remove the portafilter from group head.
4. Automatic group cleaning
The group cleaning process can be automated to save user's time by following steps
below:
Step 1: Insert a suitable amount of provided cleaning powder into the blind basket,
then lock the portafilter into the group head.
Step 2: Press and hold the 2 shot espresso button for at least 5 seconds
until the siren stops sounding and the machine starts to discharge water.
Step 3: After completion of the cleaning process, remove the portafilter and
thoroughly clean the group head.
Note: The cleaning time and period can be modified by the user (page 9, 10).
This manual suits for next models
4
Table of contents


