TIME LED 781005 User guide

Installation and Operating Instructions
INS-781005-V1
Read and follow instructions before operating your driver.
Save this manual for future reference.
Package includes:
1 x Secure LED Emergency Driver
1 x Manual
TIME LED is part of Pitacs Limited. For customer support contact:
Bradbourne Point, Bradbourne Drive, Tilbrook, Milton Keynes, Buckinghamshire MK7 8AT
T: +44 (0)1908 271155 F: +44 (0)1908 640017 E: info@timeled.co.uk W: www.timeled.co.uk
015
015
Secure LED Emergency Driver
Safety:
• This is a Class II Double Insulated product.
CAUTION:
• SWITCH OFF BEFORE INSTALLATION TO PROTECT THE BATTERY. SWITCH ON AFTER INSTALLATION.
SPECIAL ATTENTION:
• To protect the battery, please ensure the emergency pack is powered and charged within 10 days of turning the red
switch to ON.
Features:
• For use with LED lamps such as LED panels or LED downlights of compatible voltage.
• Inside IC protects the battery from over charging/discharging.
• Contains replaceable Nickel Metal Hydride (Nimh) battery pack.
• Suitable for LED lamps with input voltage between 5-42Vac.
• Emergency lighting provided up to 3 hours.
Application Guide:
• This pack must be installed by a competent person in accordance with the current building and IEE wiring regulations.
• Prior to installation, ensure that the mains supply has been isolated and necessary safety precautions have been taken.
• This unit is suitable for indoor use only.
• Do not cover the fitting with any insulation materials, ensure adequate air flow around thefitting.
• Do not install objects which operate at the maximum of the given temperature range. Please make sure that the
operating ambient temperature is below 50°C (Ta), and maximum case temperature (Tc) is not exceeding 75°C.
• Do not operate this unit beyond the operating supply range.
Full Technical specification available upon request. Contact info@timeled.co.uk for PDF.
Instructions for new installations:
ALWAYS SWITCH OFF THE MAINS SUPPLY BEFORE
INSTALLATION OR SERVICING.
• Install the unit according to wiring diagram. Deviation
from the advised setup may lead to permanent damage to
the unit.
• Once wiring is complete, ensure the lid is fixed in place
using the screw on the base.
• Once installed, the indicator LED will be illuminated.
• To ensure maximum performance of the built-in battery,
please fully charge the unit for 36 hours after first
installation.
• To extend battery life, conduct a discharge test of the
battery at least once every three months.
Secure LED Emergency Driver
Cleaning:
• Do not use any chemical or abrasive cleaners.
• Clean product with only a soft dry cloth.
Warranty:
• This product is warranted to be free of defects in materials, design and workmanship for 3 years from the date of
purchase (conditions apply, please see TIME LED website for further details). If a suspected fault should develop in this
time, please contact us via the address on the front.
Recycling Advice:
Waste Electrical products should not be disposed of with household waste. Please recycle where facilities exist. Check
with your local authority or retailer for recycling advice.
Product Code 781005
Size (mm) 170x33x55
Lifespan (Hours) 25000 hours
IP Rating IP20
Input Frequency 50Hz
Input Current 1A MAX
Fuse 250V 1A
Voltage 110-265V 50/60Hz
Class Class II
Material Mixed Polycarbonate
Lamps 3-100W Lamps Only
Emergency Battery Nimh 4.8V 2.5Ah
Emergency Charge
Time (Hours)
36 hours
Emergency
Discharge Time
(Hours)
3 hours
Emergency
Output Voltage
5-42V
Warranty 3 Years
Product Weight: 240g
Ta: 50°C Tc: 75°C
LED Indicator Functions:
• LED green on: mains ok and battery connected
• LED green slow flash: low battery
• LED green rapid flash: poor connection between emergency
pack and LED Lamp
• LED o: ‘Emergency pack is operating for LED lamps
currently experiencing a power cut’ or ‘Battery is out of power.’
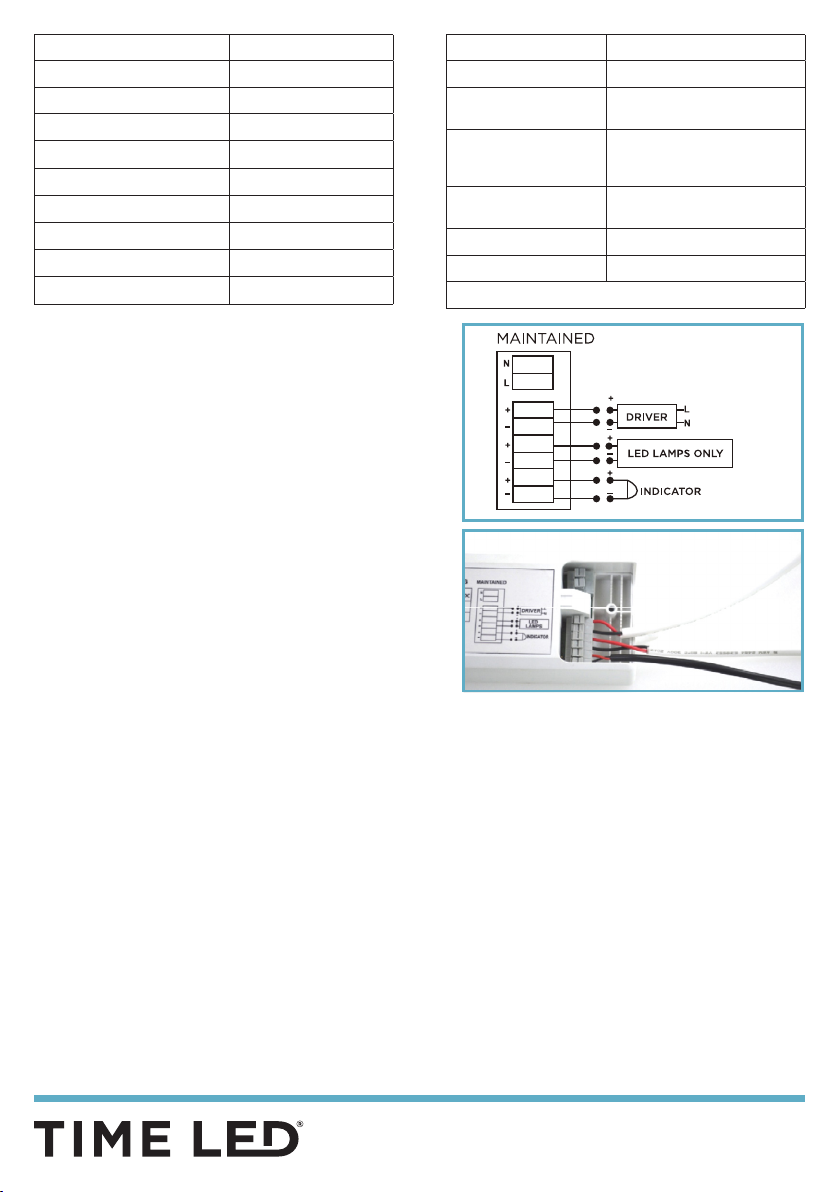
CLASS II WIRING DETAILS (FIG.1)
• Primary 240V 50Hz
• Class II
• Wire-Brown cable to connection marked ‘L’
• Wire-Blue cable to connection marked ‘N’
Wiring Diagram (FIG 1)


