Times Fitness Sensors User manual

Starting the Bodylink® System
When using the Performance Monitor, you can view real-time data from a Heart Rate
Sensor or Speed + Distance Sensor, or both, in Time of Day, Chrono and Timer. The
procedure to do this is the same in all modes, though the data that you can view and their
position on the display in each mode will vary.
1. Make sure you’re wearing your Heart Rate Sensor or Speed + Distance Sensor, or
both, and that they are powered up and functional.
2. Stand at least 6 feet (2 meters) away from any other users of fitness monitor
systems and from any source of radio interference such as electrical equipment,
power lines, etc.
NOTE: Though the Bodylink® system has a working range of about 3 feet (1 meter) from
the sensors to the watch, for the most reliable operation, make sure that the watch is as
close to the sensors as possible when starting up the system.
3. Press and release the DISPLAY button. This tells the watch to look for any
Bodylink® sensors nearby; it will search for one minute. The antenna icon will
appear on the watch display, indicating that the Bodylink® system is active.
NOTE: As a convenience, Chrono and Timer will automatically search for Bodylink
sensors for fifteen seconds upon entering the mode.
4. When the watch has successfully detected transmissions from the sensors, the
watch display will switch to a new format showing some or all of the sensor data,
depending on the mode. Time of Day and Timer show the data in the lower line
exclusively, while Chrono allows up to three lines of performance data.
Viewing Performance Data
Press and release the DISPLAY button to select the data or combination of data that you
wish to view during your workout. For your convenience, a “banner” showing the names
of the information and their position on the display is shown briefly before showing the
data itself.
Here are a few more things you should know to use the watch effectively:
•While in Chrono, press and release SET/FORMAT to swap the positions of the
information in the upper and middle display lines. This allows you to view the
data most important in the larger middle display line.
•If you want to stop monitoring data from your Bodylink® sensors, hold the
DISPLAY button down until the message HOLD TO SHUT OFF RCVR is
displayed on the watch display. Continue holding the DISPLAY button for a few
more seconds; the watch will beep indicating that the radio link between the
watch and the sensors has been shut down.
TIP: If you are already viewing data from one sensor, for example the Heart Rate
Sensor, and you wish to also view data from the Speed + Distance Sensor, simply press
and hold the DISPLAY button until the watch emits a short beep and the antenna icon
begins flashing. The watch is now searching for a second Bodylink sensor. When it
detects this second device, the antenna icon will stop flashing and the display may
change to a new format that includes the new information, Press and release the
DISPLAY button (as detailed previously) to view various combinations of two sensor’s
data.

TIMEX is a registered trademark of Timex Corporation.©2004 Timex Corporation.
Bodylink is a registered trademark of Timex Group, B.V.
English page 1
Français page 21
Español página 39
T-0407-15_TX576_NA_NEW8_02.qxd 8/4/04 3:11 PM Page CV1

1
Heart Rate Sensor
Speed + Distance Sensor
Watches are for more than keeping time. Digital technology gives
your watch the ability to display your heart rate or measure your
speed and distance traveled.These functions require the use of
external sensors that transmit information wirelessly to your
watch.This booklet provides instructions for properly setting up,
operating and maintaining these devices. Look for the section that
is appropriate for the type of device you have.
For information on using your watch, consult
the watch instruction booklet.
Timex®
Fitness Sensors
T-0407-15_TX576_NA_NEW8_02.qxd 8/4/04 3:11 PM Page 1

3
Warning
This is not a medical device and is not recommended for use
by persons with serious heart conditions. You should always
consult your physician before beginning or modifying an
exercise program.
Interference with the radio signal,poor contact between your skin
and the chest strap, and other factors may prevent accurate
transmission of heart rate data.
Maintenance
Rinse Heart Rate Sensor and strap in fresh water to avoid build up of
materials that can interfere with the measurement of your heart rate.
Transmitter Battery Life and Replacement
Battery life of the transmitter should exceed two years, based
upon using it an hour a day. Greater usage will shorten the battery
life. Replace transmitter battery when any of the following occur:
•The watch no longer receives heart rate information from the
chest transmitter when properly worn on the chest.
• Error messages (COMM ERR, SIGNAL LOST) appear with increased
frequency on the display.
Battery Replacement
NOTE: You’ll need to have a device (such as a watch) capable
of displaying heart rate information to verify that the new
Heart Rate Monitor
How the Digital Heart Rate Monitor Works
The Heart Rate Monitor is a combination of a Heart Rate Sensor
and a sport watch.The Heart Rate Sensor attaches to your chest
and measures the electrical signals generated by the heart as it is
beating. Using this information, it then calculates your heart rate
and transmits it to your watch. You simply glance at the watch
during exercise/training to make sure you are in the appropriate
heart rate range to maintain or improve your fitness level.
How to Use the Digital Heart Rate Monitor
1. Wet the Heart Rate Sensor pads. THIS IS ESSENTIAL for proper
operation of the Heart Rate Monitor.
2.Put on the chest strap. Fasten the strap
snugly around your chest,just below
the breasts. Be sure the transmitter is
centered on the chest and is right side
up so the logo can be read by someone
facing you.
3.Start the Heart Rate Monitor: Refer to the
user manual for your watch for detailed
instructions on viewing heart rate data.
2
Sensor Pads
T-0407-15_TX576_NA_NEW8_02.qxd 8/4/04 3:11 PM Page 2

5
Speed + Distance Sensor
How the Speed and Distance System Works
The Speed + Distance (S+D) Sensor acquires signals from orbiting
GPS (Global Positioning System) satellites to determine your position
and changes in position anywhere on the globe. This information
is transmitted wirelessly to your watch so that it can compute
your speed, pace and distance traveled. For additional information
on determining your speed and distance, see the instructions for
your watch.
About GPS Lock Times
• On first use, the S+D Sensor can take up to 5 minutes or even
longer to establish a link with the satellites.After that,the unit
typically needs only one minute.
•If you move hundreds of miles from the location where you last
used the S+D Sensor or if you leave the S+D Sensor powered up
indoors for long periods of time before going outdoors, the search
may take longer than expected.
• For shortest GPS lock times, try to minimize movement while
the indicator light is flashing red.
battery has been inserted correctly. Use a coin to open the
battery compartment cover (back of sensor).
• Insert new battery (CR2032 or equivalent) with “+” facing you.
•Push the reset button next to the battery. Use a toothpick or
straightened paper clip.
• Reinstall battery cover.
• Perform quick test of the unit:
1.Move away from sources of electrical or radio interference.
2.Liberally moisten the Heart Rate Sensor pads and put the
chest strap around your chest,securely against your skin.
3.Activate the heart rate monitor function on the watch.
4.Within a few seconds,the heart symbol on the watch display
should begin flashing,indicating that the sensor is active. This
confirms that the battery was installed correctly.
NOTE:A heart rate value does not need to appear on the
display during this test.
IF FLASHING HEART DOES NOT APPEAR ON WATCH:
•Press the reset switch in the battery compartment again and
replace the battery cover.
• Reinstall the battery, and repeat test procedure above.
Water Resistance
The Heart Rate Sensor withstands water pressure to 60 p.s.i.See
chart at end of booklet for equivalents.WARNING: The Heart Rate
Sensor will not display heart rate when operated under water.
4
T-0407-15_TX576_NA_NEW8_02.qxd 8/4/04 3:11 PM Page 4

— The battery becomes exhausted.
—No motion is detected for 15 consecutive minutes.
—No GPS signals are detected for 15 consecutive minutes.
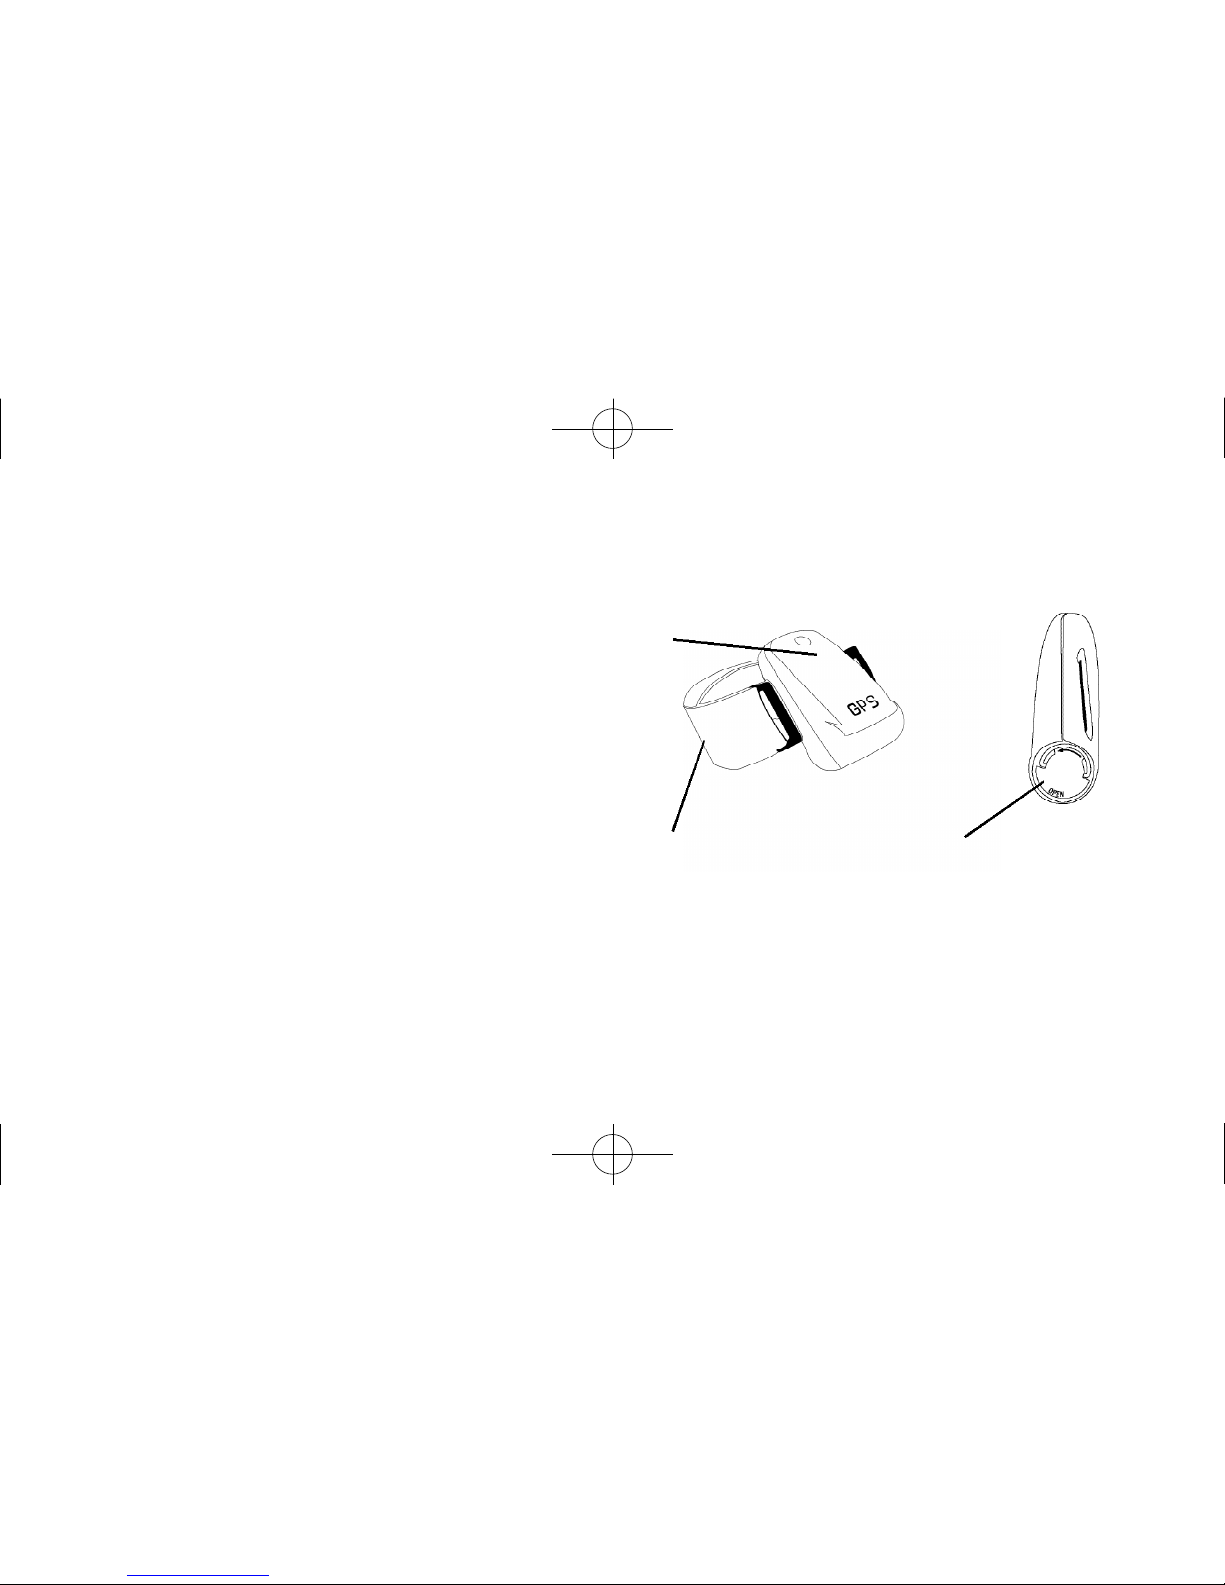
Wearing the Speed and Distance S+D Sensor
For best results, strap the S+D Sensor to your upper arm.You may
also clip it to your waist. Wear your watch so it is always within
1 meter (about 3 feet) of the S+D Sensor. Be sure the sensor is
right side up so the GPS logo can be read by someone facing you.
Any clothing worn over the S+D Sensor must be dry and free of
metal.
7
S+D Sensor ON/OFF
Removable Arm Band Battery Hatch
Operating the S+D Sensor
For best results, the Sensor needs a clear view of the sky.
• Press and hold the S+D SENSOR ON/OFF button to turn on the
receiver. You should be outdoors in an open area.If the button
light glows red immediately (continuously, not flashing),the bat-
tery is exhausted to the point where GPS operation is not possi-
ble and the battery must be replaced.The ON/OFF button on
the S+D Sensor will initially flash red while the S+D Sensor cal-
culates its position relative to the GPS satellites. The text
“SEARCHING”may appear on the watch display if using a com-
patible Timex® watch.
• The ON/OFF button will flash green when the S+D Sensor has
successfully acquired signals from the satellites. Speed and
distance information is now being transmitted to the watch (or
other device).
• To turn off the S+D Sensor, press and hold the S+D SENSOR
ON/OFF button for one second.The button will glow red while
you are holding the button and then go out,indicating that the
S+D Sensor has shut down.
•The S+D Sensor will shut itself off automatically if any of the
following events occur:
6
T-0407-15_TX576_NA_NEW8_02.qxd 8/4/04 3:11 PM Page 6

9
Wearing the S+D Sensor on your belt
•If attached,remove armband by sliding out plastic attachment.
•Insert belt clip by lining up tab on belt clip with slot on Sensor
and pop into place.
• Wear sensor on same side of body as watch.
Wearing the S+D Sensor on your upper arm
•Please make sure that the belt
clip is removed. To remove the
belt clip, grasp clip and gently
pop off. (Fig. 1) To replace clip
line up tab on clip with slot on
sensor and gently pop clip
on to unit.
•If the armband is not attached,slide plastic attachment with
elastic strap into the slot of the S+D Sensor as shown.(Fig. 2)
•Slide the elastic strap through the open end of the attachment,
and fix it in place with the hook and loop closure.
•Slip the sensor and strap over your hand and onto your
upper arm. Watch must be worn on same arm.(Fig. 3)
•Pull armband through the adjustable end so that it fits snugly
around your arm.
8
Fig. 1
Fig. 2 Fig. 3
T-0407-15_TX576_NA_NEW8_02.qxd 8/4/04 3:11 PM Page 8

11
is broadcast to your watch along with your performance data.
Refer to the user manual for your watch for the procedure to
check the S+D Sensor’s battery level.
Replace battery
•Flip out the half-circle handle on the battery hatch (located on
the side of the S&D Sensor case) and turn it counter-clockwise
to unscrew.
• Remove the battery hatch.
•Remove old battery and insert one (1) new AA battery. Observe
the +/- markings inside the battery compartment to ensure the
new battery is properly aligned.
• Replace the battery hatch and tighten the cap by turning clock-
wise. Do not over-tighten.
Maintenance
Rinse the S+D Sensor and its strap in fresh water periodically to
avoid buildup of materials that can interfere with the measurement
of your speed and distance.
Resolving S+D Sensor Errors and Error Messages
PROBLEM
•The S+D Sensor cannot lock onto GPS satellites (ON/OFF button
never changes to flashing green).
•The GPS S+D Sensor loses signals from the satellites during use.
The watch may display a message that the GPS signal is weak.
SOLUTION
• Move to a more open outdoor area.
• Move away from metal objects.
• Replace the battery in the S+D Sensor.
NOTE:The system can maintain accuracy for short periods when
GPS signals are lost.
PROBLEM
• Watch displays FATAL GPS ERROR message.
SOLUTION
•The S+D Sensor is damaged;contact Timex Customer Service.
S+D Sensor Battery Life and Replacement
The battery in the S+D Sensor will last approximately 12 hours.
The S+D Sensor itself does not indicate the condition of its
battery, except if the battery is completely exhausted (as noted in
the section “Operating the S+D Sensor”).Instead,this information
10
T-0407-15_TX576_NA_NEW8_02.qxd 8/4/04 3:11 PM Page 10

13
INTERNATIONAL WARRANTY
(U.S. LIMITED WARRANTY)
Your product is warranted against manufacturing defects by Timex
Corporation for a period of ONE YEAR from the original purchase
date. Timex and its worldwide affiliates will honor this
International Warranty.
Please note that Timex may, at its option,repair your product by
installing new or thoroughly reconditioned and inspected compo-
nents or replace it with an identical or similar model.IMPORTANT:
PLEASE NOTE THAT THIS WARRANTY DOES NOT COVER DEFECTS
OR DAMAGES TO YOUR PRODUCT:
1) after the warranty period expires;
2) if the product was not originally purchased from an authorized
retailer;
3) from repair services not performed by the manufacturer;
4) from accidents, tampering or abuse;and
5) Case, attachments or battery. You may be charged for replac-
ing any of these parts.
All Sensors
Water-Resistance
The level of water-resistance (if any) is marked on the case. See
the chart below for equivalents.
The S+D Sensor is splash-resistant.If it becomes submerged,
remove the back of the case and the battery to let compartment
dry.
*pounds per square inch absolute
WARNING: TO MAINTAIN WATER-RESISTANCE, DO NOT PRESS
ANY BUTTONS UNDER WATER.
WARNING:SENSORS WILL NOT DISPLAY DATA WHEN
OPERATED UNDER WATER.
12
Water-Resistance p.s.i.a.* Water Pressure
Depth Below Surface
30m/98ft 60
50m/164ft 86
100m/328ft 160
200m/656ft 284
T-0407-15_TX576_NA_NEW8_02.qxd 8/4/04 3:11 PM Page 12

15
For the U.S.,please call 1-800-448-4639 for additional warranty
information. For Canada,call 1-800-263-0981. For Brazil,call 0800-
168787. For Mexico, call 01-800-01-060-00. For Central America,
the Caribbean,Bermuda and the Bahamas, call (501) 370-5775
(U.S.).For Asia,call 852-2815-0091. For the U.K.,call 44 208 687
9620. For Portugal,call 351 212 946 017. For France, call 33 3 81
63 42 00. For Germany, call +43 662 88 92130. For the Middle East
and Africa,call 971-4-310850. For other areas, please contact your
local Timex retailer or Timex distributor for warranty information.
THIS WARRANTY AND THE REMEDIES CONTAINED HEREIN ARE
EXCLUSIVE AND IN LIEU OF ALL OTHER WARRANTIES, EXPRESS OR
IMPLIED, INCLUDING ANY IMPLIED WARRANTY OF MERCHANTABIL-
ITY OR FITNESS FOR PARTICULAR PURPOSE.TIMEX IS NOT LIABLE
FOR ANY SPECIAL,INCIDENTAL OR CONSEQUENTIAL DAMAGES.
Some countries and states do not allow limitations on implied
warranties and do not allow exclusions or limitations on damages,
so these limitations may not apply to you.This warranty gives you
specific legal rights and you may also have other rights which vary
from country to country and state to state.
To obtain warranty service, please return your watch and Trans-
ceiver to the manufacturer, one of its affiliates or the retailer
where the product was purchased,together with a completed
original Product Repair Coupon or, in the U.S. and Canada only, the
completed original Product Repair Coupon or a written statement
identifying your name, address, telephone number and date and
place of purchase. Please include the following with your watch
and Transceiver to cover postage and handling (this is not a repair
charge):a US$ 7.50 check or money order in the U.S.;a CAN$6.00
cheque or money order in Canada;and a UK£ 2.50 cheque or
money order in the U.K.In other countries, you will be charged for
postage and handling. NEVER INCLUDE ANY ARTICLE OF PERSONAL
VALUE IN YOUR SHIPMENT.
14
TIMEX INTERNATIONAL WARRANTY — WATCH REPAIR COUPON
Original Purchase Date:
(Attach copy of sales receipt,if available)
Purchased by:
(Name, address and telephone number)
Place of Purchase:
(Name and address)
Reason for Return:
THIS IS YOUR WATCH REPAIR COUPON. PLEASE KEEP IT IN A SECURE PLACE.
T-0407-15_TX576_NA_NEW8_02.qxd 8/4/04 3:11 PM Page 14

FCC Notice (U.S.) / IC Notice (Canada)
Timex Corporation declares that the following products, which
include all components of the Timex® Bodylink® System,are
compliant to the relevant FCC Part 15 and Industry Canada rules
for Class B devices as follows:
Product Name:
Speed + Distance System - GPS Transceiver Series M8xx/M1xx
Heart Rate Monitor System – HRM Transmitter Series M8xx/M5xx
Product Type: Intentional Radiator
Model FCC ID No. IC Certification No.
M821 Heart Rate Monitor EP9TMXHRM 33481021492A
M515 Heart Rate Monitor EP9TMXM515 3348A-M515
M185 Speed + Distance Monitor EP9TMXM185 3348A-TMXM185
M850 Speed + Distance Monitor EP9TMXM850 3348A-12181
These devices comply with Part 15 of the FCC rules.Operation
is subject to the following two conditions: (1) The device may
not cause harmful interference,and (2) the device must accept
any interference received,including interference that may cause
undesired operation. 17
Service
If your Sensor should ever need servicing,send it to Timex as set
forth in the Timex International Warranty or addressed to:
HotLine Watch Service
P.O. Box 2740
Little Rock,AR 72203.
Street address:
HotLine Watch Service
1302 Pike Ave.
North Little Rock,AR 72114
For your convenience in obtaining factory service, participating
Timex retailers can provide you with a pre-addressed Watch
Repair Mailer. See the Timex International Warranty for specific
instructions on the care and service of your watch module.
For service questions, call 1-800-448-4639.
Should you need a replacement strap or band,
call 1-800-448-4639.
16
T-0407-15_TX576_NA_NEW8_02.qxd 8/4/04 3:11 PM Page 16

1918
Product Name:
Watch Receivers – HRM/Speed+Distance Series
M8xx/M5xx/M6xx
Data Recorders – HRM/Speed+Distance Series M5xx
Product Type: Unintentional Radiator
This equipment has been tested and found to comply with the
limits for a Class B digital device,pursuant to Part 15 of the FCC
rules. These limits are designed to provide reasonable protection
against harmful interference in a residential environment.This
equipment generates, uses, and can radiate radio frequency
energy and,if not used in accordance with the instruction manu-
al, may cause harmful interference to radio communications. If this
equipment does cause harmful interference to radio or television
reception,which can be determined by turning the equipment off
and on,the user is encouraged to try to correct the interference
by reorienting or relocating the receiving antenna;or by increas-
ing the separation between the equipment and receiver.
Caution: Any changes or modifications to the equipment listed
above, not expressly approved by Timex Corporation,could void
the user’s authority to operate this equipment.
Industry Canada Notice: This Class B digital apparatus complies
with Canadian ICES-003.Cet appariel numérique de la classe B
est conforme à la norme NMB-003 du Canada.
DECLARATION OF CONFORMITY
Manufacturers Name: Timex Corporation
Manufacturers Address: 555 Christian Road
Middlebury, CT 06762
United States of America
declares that the following products, which include all components of the Timex Bodylink
System, are compliant to the relevant EU Directives as follows:
Product Name:
Speed + Distance System — GPS Transceiver Series M8xx/M1xx
Heart Rate Monitor System — HRM Transmitter Series M8xx/M5xx
conforms to the following product specifications:
LVD: 72/23/EEC
Safety: IEC 60950
EMC: 89/336/EEC and amendments 92/31/EEC, 93/68/EEC, and 98/13/EEC
Emissions: EN300-330-1, -2
Radiated Emission 9kHz to 30MHz H-Field (magnetic
Radiated Emission 30MHz to 1000MHz E-Field (electric),
Ref. EN55022
Immunity: EN300-683
Radiated Immunity 80MHz to 1000MHz, Ref. EN61000-4-3
ESD Electrostatic discharge, Ref. EN61000-4-2
Supplemental Information: The above products comply with the requirements of the Low-
Voltage Directive 72/23/EEC and the EMC Directive 89/336/EEC (including amendments
92/31/EEC, 93/68/EEC, and 98/13/EEC) and carry the 0983(!) marking accordingly. Notifying
Body – Underwriters Laboratories Inc., CAB# - 0983; 1285 Walt Whitman Road, Melville, NY
11747.
Timex Corporation declares that these low power radio equipment devices are in compliance with
the essential requirements and other relevant provisions of R&TTE Directive 1999/5/EC.
T-0407-15_TX576_NA_NEW8_02.qxd 8/4/04 3:11 PM Page 18

21
Cardiofréquencemètre
Capteur de vitesse + distance
Les montres font plus que mesurer le temps. La technologie numérique
confère à votre montre la capacité d’afficher votre fréquence cardiaque ou
de mesurer votre vitesse et la distance parcourue. Ces fonctions supposent
l’emploi de modules externes qui transmettent les données à votre montre
sans fil. Ce livret contient les instructions de configuration, d’utilisation et
d’entretien de ces appareils. Reportez-vous à la section correspondant à
votre type d’appareil.
Pour tout renseignement sur l’utilisation de la montre, consultez le mode
d’emploi de la montre.
Timex®
Capteurs de forme
20
Product Name:
Watch Receivers – HRM/Speed+Distance Series M8xx/M5xx/M6xx
Data Recorders – HRM/Speed+Distance Series M5xx
conforms to the following product specifications:
Generic Emissions Standard EN 55022: 1998
Generic Immunity Standard EN 55024: 1998
Supplemental Information: The above products comply with the requirements of
Electromagnetic Compatibility (EMC) Directive 89/336/EEC (including amendments 92/31/EEC,
93/68/EEC, and 98/13/EEC) and carry the marking accordingly. Conformity Assessment Body
(CAB) – Underwriters Laboratories Inc., CAB# 0983; 1285 Walt Whitman Road, Melville, NY
11747.
Timex Corporation declares that these low power electronic devices are in compliance with the
essential requirements and other relevant provisions of the EMC Directive.
Agent: ___________________________
Brian J. Hudson
Director, Test Engineering and Module Development
Date: 10 May 2004, Middlebury, Connecticut, U.S.A.
T-0407-15_TX576_NA_NEW8_02.qxd 8/4/04 3:11 PM Page 20

23
Avertissement
Ceci n’est pas un appareil médical et son emploi est déconseillé aux
personnes souffrant de troubles cardiaques graves. Veillez à toujours
consulter votre médecin avant d’entamer ou de modifier un
programme d’exercice physique.
Le brouillage du signal radio, un mauvais contact entre la peau et la sangle
de poitrine et d’autres facteurs peuvent entraver la transmission des
données de fréquence cardiaque.
Entretien
Rincez le cardiofréquencemètre et la sangle dans de l’eau proprepour éviter
l’accumulation de matières susceptibles d’entraver la mesure de fréquence
cardiaque.
Durée de service et changement de la pile
de l’émetteur
La pile de l’émetteur devrait durer plus de deux ans, à raison d’une utilisation
d’une heure par jour.Un usage plus intense raccourcira la durée de service de
la pile. Changez la pile de l’émetteur dans l’un des quelconques cas suivants :
• La montre ne reçoit plus de données de fréquence cardiaque alors que
l’émetteur est porté correctement sur la poitrine.
• Des messages d’erreur (COMM ERR, SIGNAL LOST) s’affichent de plus en
plus fréquemment.
Changement de la pile
REMARQUE : Vous devez disposer d’un appareil (une montre, par ex.)
capable d’afficher les données de fréquence cardiaque pour vérifier
Moniteur de fréquence cardiaque
Comment fonctionne le moniteur de fréquence
cardiaque
Le moniteur de fréquence cardiaque combine un cardiofréquencemètre et
une montre de sport. Le cardiofréquencemètre s’attache à votre thorax et
mesure les signaux électriques produits par le cœur lorsqu’il bat. À partir de
cette information, il calcule votre fréquence cardiaque et la transmet à la
montre.Durant votre séance d’exercice/entraînement, un simple coup d’œil
sur votre montre vous permet de vérifier que vous êtes dans la plage de
fréquence cardiaque correcte pour maintenir ou améliorer votre forme
physique.
Comment utiliser le moniteur de fréquence cardiaque
1. Humectez les coussinets du cardiofréquencemètre. CECI EST ESSENTIEL au
bon fonctionnement du moniteur de fréquence
cardiaque.
2. Posez la sangle de poitrine. Serrez bien la sangle
autour de la poitrine, juste sous les seins.
Vérifiez que l’émetteur est centré sur la poitrine
et qu’il est à l’endroit, à savoir que le logo peut
être lu par quelqu’un face à vous.
3. Démarrez le moniteur de fréquence cardiaque :
Reportez-vous aux instructions d’affichage des
données de fréquence cardiaque dans le mode
d’emploi de la montre.
22
Coussinets
du capteur
f f
T-0407-15_TX576_NA_NEW8_02.qxd 8/4/04 3:11 PM Page 22

25
Capteur de vitesse + distance
Comment fonctionne le système de vitesse et distance
Le capteur de vitesse + distance (V+D) capte des signaux de satellites GPS
(Global Positioning System) en orbite pour déterminer votre position et vos
déplacements partout dans le monde.Ces données sont transmises sans fil à
votre montre, qui calcule votre vitesse, votre allure et la distance parcourue.
Pour plus de renseignements sur la détermination de la vitesse et de la
distance,consultez le mode d’emploi de votre montre.
À propos des durées d’accrochage GPS
• Lors de la première utilisation, le capteur V+D peut nécessiter jusqu’à 5
minutes voire plus pour établir une liaison avec les satellites. Par la suite,
l’appareil nécessite généralement une minute seulement.
• Si vous vous déplacez à des centaines de kilomètres de l’endroit de votre
dernière utilisation du capteur V+D ou si vous laissez le capteur en marche
à l’intérieur pendant des durées prolongées avant de sortir en plein air, la
recherche peut être plus longue que prévue.
• Pour raccourcir les durées d’accrochage GPS, essayez de minimiser vos
déplacements pendant que le témoin lumineux clignote en rouge.
que la batterie neuve est posée correctement. Ouvrez le couvercle du
logement de la pile (au dos de l’émetteur) avec une pièce de monnaie.
• Introduisez une pile neuve (CR2032 ou équivalent) avec le “ +” vers vous.
• Appuyez sur le bouton de réinitialisation à côté de la pile. Utilisez un cure-
dent ou un trombone déplié.
• Remettez le couvercle en place.
• Effectuez un essai rapide de l’appareil :
1. Éloignez-vous des sources de brouillage électrique ou radio.
2. Humectez généreusement les coussinets du cardiofréquencemètre et
posez la sangle sur la poitrine, bien appuyée contre la peau.
3. Activez la fonction de contrôle de fréquence cardiaque sur la montre.
4. Au bout de quelques secondes, le symbole du cœur doit commencer à
clignoter sur l’écran pour indiquer que l’émetteur est activé. Ceci
confirme que la pile est correctement installée.
REMARQUE : Il n’est pas nécessaire qu’une valeur de fréquence
cardiaque s’affiche durant cet essai.
SI LE CŒUR CLIGNOTANT NE S’AFFICHE PAS SUR LA MONTRE :
• Appuyez de nouveau sur le bouton de réinitialisation dans le logement de
la pile et remettez le couvercle en place.
• Remettez la pile en place et répétez l’essai ci-dessus.
Étanchéité
Le cardiofréquencemètre résiste à une pression d’eau jusqu’à 60 p.s.i.
Reportez vous à la table d’équivalences à la fin du livret. MISE EN GARDE :
Le cardiofréquencemètre n’affiche pas de fréquence cardiaque lorsqu’il est
utilisé sous l’eau.
24
T-0407-15_TX576_NA_NEW8_02.qxd 8/4/04 3:11 PM Page 24
27
— La pile est déchargée.
— Aucun déplacement n’est détecté pendant 15 minutes consécutives.
— Aucun signal GPS n’est détecté pendant 15 minutes consécutives.
Porter le capteur de vitesse + distance
Pour obtenir les meilleurs résultats, attachez le capteur V+D sur le haut du
bras. Vous pouvez aussi le fixer à la ceinture avec la pince. Portez votre
montre afin qu’elle soit toujours à moins de 1 mètre du capteur V+D ;
Assurez-vous que le capteur est orienté vers le haut de telle façon que la
personne en face de vous puisse lire le logo GPS.Tout vêtement porté sur le
capteur V+D doit être sec et ne doit pas comporter de métal.
Fonctionnement du capteur V+D
Pour bien fonctionner, le capteur doit avoir une vue dégagée du ciel.
• Tenez le bouton S+D SENSOR ON/OFF enfoncé pour allumer le récepteur.
Faites-le dehors dans un endroit dégagé. Si le bouton s’allume en rouge
immédiatement (en continu, pas clignotant), c’est que la pile est déchargée
au point que la fonction GPS n’est pas possible et qu’elle doit être changée.
Le bouton marche/arrêt du capteur V+D clignote d’abord en rouge pendant
que le capteur V+D calcule sa position par rapport aux satellites GPS. Le
texte “ SEARCHING ” peut s’afficher sur la montre s’il s’agit d’une montre
Timex® compatible.
• Le bouton marche/arrêt clignote en vert lorsque le capteur V+D a réussi à
capter les signaux des satellites. Les données de vitesse et de distance
sont alors transmises à la montre (ou autre appareil).
• Pour éteindre la capteur de vitesse + distance, tenez le bouton S+D
SENSOR ON/OFF enfoncé pendant une seconde. Le bouton brille en rouge
pendant que le bouton est enfoncé puis s’éteint, indiquant que le capteur
V+D a été éteint.
• Le capteur V+D s’éteint automatiquement si l’un des quelconques
événements suivants se produit :
26
Marche/arrêt du capteur V+D
Brassard amovible Logement de la pile
T-0407-15_TX576_NA_NEW8_02.qxd 8/4/04 3:11 PM Page 26

29
Port du capteur V+D à la ceinture
• S’il est attaché, enlevez le brassard en enlevant l’attache plastique.
• Introduisez la pince pour ceinture en alignant l’onglet de la pince sur la
fente du capteur et enfoncez-le en position.
• Portez le capteur du même côté du corps que la montre.
Port du capteur V+D sur le haut du bras
• Veuillez vous assurer d’enlever la pince pour
ceinture. Pour enlever la pince, saisissez-la et
détachez doucement (Fig. 1).Pour la remettre,
alignez l’onglet de la pince sur la fente de capteur
et rattachez doucement la pince sur l’appareil.
• Si le brassard n’est pas attaché, faites glisser
l’attache plastique avec le bracelet élastique dans
la fente du capteur V+D, comme sur l’illustration (Fig. 2).
•Faites glisser le bracelet élastique dans l’ouverture de l’attache et main-
tenez-le en position avec la fermeture velcro.
•Glissez votre main dans le bracelet pour placer le capteur et le bracelet sur
votre bras. La montre doit être portée sur le même bras (Fig.3).
•Tirez le brassard par la partie ajustable de façon à ce qu’il soit bien serré sur
votre bras.
28
Fig. 1
Fig. 2 Fig. 3
T-0407-15_TX576_NA_NEW8_02.qxd 8/4/04 3:11 PM Page 28

31
capteur V+D »). Par contre, cette information est transmise à la montre en
même temps que vos données de performances. Reportez-vous aux
instructions de contrôle de la charge de la pile du capteur V+D dans le mode
d’emploi de la montre.
Changer les piles
• Soulever l’anneau semi-circulaire sur le couvercle du logement de la pile
(situé sur le côté du capteur V+D) et tourner dans le sens contraire des
aiguilles d’une montre pour dévisser.
• Enlevez le logement de la pile.
• Sortez la pile usagée et introduisez une (1) pile R6 (AA) neuve. Respectez le
marquage +/- à l’intérieur du logement de piles pour vous assurer du bon
alignement de la pile neuve.
• Remettez le logement de la pile en place et serrez le couvercle en tournant
dans le sens des aiguilles d’une montre. Ne forcez pas le serrage.
Entretien
Rincez périodiquement le capteur V+D et sa sangle dans de l’eau propre pour
éviter l’accumulation de matières susceptibles d’entraver la mesure de
vitesse et de distance.
Résolutions des erreurs de capteur V+D et
messages d’erreur
PROBLÈME
• Le capteur V+D ne parvient pas à accrocher de satellites GPS (le bouton
marche/arrêt ne devient jamais vert clignotant).
• Le capteur V+D GPS perd les signaux des satellites durant la marche. La
montre peut afficher un message indiquant que le signal GPS est faible.
SOLUTION
• Placez-vous dans un lieu extérieur plus dégagé.
• Éloignez-vous des objets métalliques.
• Changez la pile du capteur V+D.
REMARQUE : Le système peut rester précis pendant de courtes périodes de
perte des signaux GPS.
PROBLÈME
• La montre affiche FATAL GPS ERROR (erreur GPS fatale).
SOLUTION
• Le capteur V+D est endommagé ; contactez le Service clientèle de Timex.
Durée de service et changement des piles du capteur
V+D
La pile du capteur V+D a une autonomie de 12 heures environ. Le
capteur V+D par lui-même n’indique pas l’état de sa pile, sauf si elle est
totalement déchargée (comme indiqué dans la section « Fonctionnement du
30
T-0407-15_TX576_NA_NEW8_02.qxd 8/4/04 3:11 PM Page 30
33
GARANTIE INTERNATIONALE
(GARANTIE LIMITÉE ÉTATS-UNIS)
Votre produit est garanti contre les défauts de fabrication par Timex
Corporation pendant une durée de UNAN à compter de la date d’achat.
Cette garantie internationale est honorée par Timex et ses filiales à travers le
monde.Timex se réserve le droit de réparer votre produit en y installant des
pièces neuves ou remises à neuf et contrôlées avec soin ou de le remplacer
par un modèle identique ou comparable.IMPORTANT : VEUILLEZ NOTER QUE
CETTE GARANTIE NE COUVRE PAS LES DÉFAUTS OU DOMMAGES DEVOTRE
PRODUIT :
1) après l’expiration de la période de garantie ;
2) si le produit n’a pas été acheté initialement chez un revendeur agréé ;
3) résultant de travaux de réparation non effectués par le fabricant ;
4) résultant d’accidents, d’altérations ou d’emplois abusifs ;
5) s’il s’agit du boîtier, des accessoires ou de la pile. Le remplacement de ces
pièces peut être payant.
Tous capteurs
Étanchéité
Le degré d’étanchéité à l’eau (le cas échéant) est indiqué sur le boîtier.
Consultez la table d’équivalences ci-dessous.
Le capteur V+D résiste aux éclaboussures. S’il a été immergé, enlevez le dos
du boîtier et les piles pour laisser sécher le logement de piles.
*livres par pouce carré (abs.)
MISE EN GARDE : POUR PRÉSERVER L’ÉTANCHÉITÉ, NE PAS ENFONCER
LES BOUTONS SOUS L’EAU.
MISE EN GARDE : LES CAPTEURS N’AFFICHENT PAS DE DONNÉES
LORSQU’ILS SONT UTILISÉS SOUS L’EAU.
32
Profondeur d’étanchéité Pression de l’eau sous la sur
face en p.s.i.a.*
30m/98ft 60
50m/164ft 86
100m/328ft 160
200m/656ft 284
T-0407-15_TX576_NA_NEW8_02.qxd 8/4/04 3:11 PM Page 32
Table of contents
Languages:
Popular Fitness Equipment manuals by other brands


G-FITNESS
G-FITNESS AIR ROWER user manual

CAPITAL SPORTS
CAPITAL SPORTS Dominate Edition 10028796 manual

Martin System
Martin System TT4FK user guide

CIRCLE FITNESS
CIRCLE FITNESS E7 owner's manual

G-FITNESS
G-FITNESS TZ-6017 user manual

Accelerated Care Plus
Accelerated Care Plus OMNISTIM FX2 CYCLE/WALK user manual


