Tisira TOC919 User manual

USER MANUAL
900 // ELECTRIC OVENS
TOC919
IMPORTANT // Please ensure that you read through this user manual prior to installation and use. This manual
contains important information to ensure optimal performance and keep you safe. Please retain your proof of
purchase, as this will be required in the event that you require warranty service. Remember to keep this manual for
future reference.
www.tisira.com

Page 2 Electric Oven User Manual
Hello
CONGRATULATIONS ON THE SELECTION OF THIS TISIRA APPLIANCE. TISIRA
APPLIANCES HAVE BEEN SPECIFICALLY DESIGNED FOR AUSTRALIAN AND
NEW ZEALAND KITCHENS.
Please read through this user manual carefully as it contains information that will ensure that
your appliance is installed correctly, important operating & care instructions and also some
advice of what you need to do if this appliance is not performing as intended.

Electric Oven User Manual Page 3
Warning & Safety Instructions
Product Overview
4
5
Electrical Connection 6
Installation 7 - 8
Operating Instructions 9-10
3 Button Digital Timer 11-12
Notes 15
Contact Details 16
Maintaining your Oven 13-14
Contents

Page 4 Electric Oven User Manual
IMPORTANT // To ensure best performance, avoid risk of damage or accidents.
Warning & Safety Information
• This appliance is designed for indoor domestic
use only. The manufacturer will not be held
liable for any damages that might arise out of •
incorrect installation or improper, incorrect or
unreasonable use of the appliance.
• This appliance is not intended for use by
persons (including children) with reduced
physical, sensory or mental capabilities, or lack
of experience and knowledge, unless they have
been given supervision or instruction concern-
ing use of the appliance by a person responsi-
ble for their safety.
• The electrical system of the appliance may be
only used safely when it is correctly connected
to an efficient earthing system in compliance
with the safety standards currently in effect.
• The electrical connection must be accessible
aer installation. The appliance must be
electrically isolated before any maintenance is
performed including changing the light globe.
• Young children should be supervised to ensure
that they do not play with the appliance.
• There is a fire risk if cleaning is not carried out
in accordance with the instructions. You must
read the details concerning the method and
frequency of cleaning.
• If the supply cord of this equipment is dam-
aged, it must only be replaced by the manufac-
turer or its service agent or a similarly qualified
person in order to avoid a hazard.
• This appliance must be installed correctly by a
suitably qualified person, strictly in accordance
with the manufacturer’s instructions.
• Never line the bottom of the oven with alumini-
um foil or rest pans on the base of the oven, as
this will damage your oven enamel coating and
void warranty.
• When the appliance is not in use it must be le
in the ‘off’ position.
• All cabinetry and surrounding materials that is
used in the installation of this oven must be
able to withstand a minimum 50ºC above the
ambient room temperature whilst the oven is in
use. Consult your kitchen manufacture to
ensure the surfaces will not be affected by heat.
Damage caused by the appliance that is not
installed in accordance with the temperate
limit will be the liability of the owner.
WARNING // The oven will become hot during and
aer use. Do not touch any component during
this time as they may be hot and cause burns.
Do not touch the heating elements inside the
oven to avoid burns. Children should be kept
away. Use heat resistant cooking gloves where
ever possible when moving food and accesso-
ries in and out of your oven.
Electric Oven User Manual Page 5
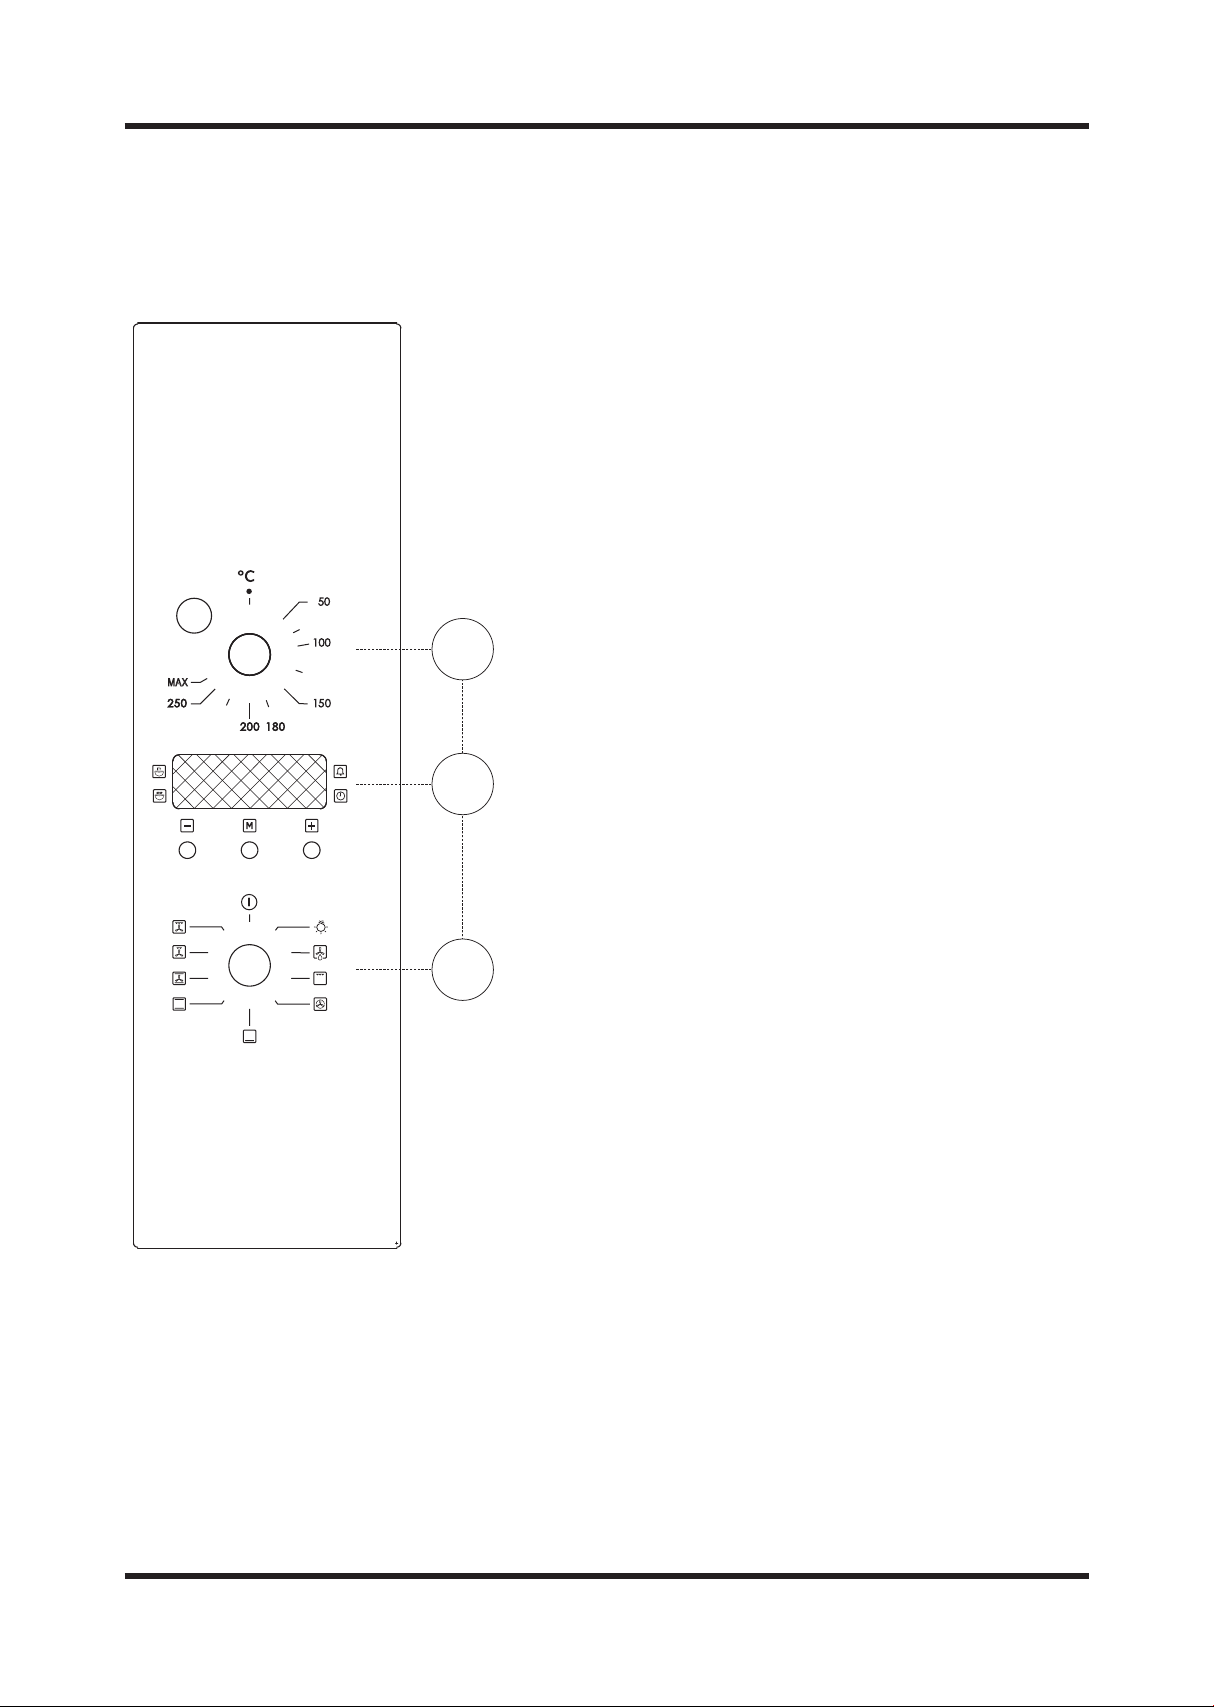
Product Overview
900 ELECTRIC OVEN 9 FUNCTION
1. Thermostat
2. 3 Button digital timer
3. Function selector
2
3
1
a
250
MAX
200
150
100
50
180
M

Page 6 Electric Oven User Manual
Electrical Connection
NOTICE // This appliance must be connected only be a licensed electrician and installed in
accordance with the manufacturers instructions.
• Check that the power rating of the mains supply and of the sockets are suitable for the maxi-
mum power of the appliance as indicated on the specification plate. This oven must be
connected to a 220-240V 50Hz power supply. It is earthed via the cord and 15A plug.
• If the appliance is fitted with a supply lead and is not fitted with a plug, then permanently
connect it to the fixed wiring as follow:
• The “yellow/green” earth wire, which must be connected to terminal, has to be about
10mm longer than the other wires; the “blue” neutral wire has to be connected to the
terminal marked with letter N.
• “Black, brown, red” live wires have to be connected to terminal L. Mains connection can
also be made by fitting a double pole switch with a minimum gap between the contacts of
3mm, proportionate to the load and complying with the regulations in force.
• The yellow/green earth wire should not be controlled by the switch.
• The plug or a double pole switch used for mains supply connection should be easy to get at,
once the appliance is in position.
IMPORTANT // Position the mains supply cable so that it is never subjected to a temperature
which is more than 50°C above ambient temperature. The electrical safety of the appliance can
only be guaranteed when it has been correctly connected to an efficient earthed power supply,
as laid down in the regulations for electrical safety. The manufacturer cannot be held responsi-
ble for any damage to persons or objects due to lack of an earth connection. If the supply cord is
damaged, it must be replaced by the service agent or similarly qualified person in order to avoid
a hazard

Page 7 Electric Oven User Manual
Installation
* All dimensions in MM* ELECTRIC OVEN

Page 8 Electric Oven User Manual
Installation
IMPORTANT // The panels of the adjoining furniture should be heat resistant. Particularly
when the adjoining furniture is made of veneered wood, the adhesives should be able to
withstand a temperature of 120°C. To comply with safety regulations, once the appliance has
been fitted it should not be possible to make contact with the electrical parts. All parts, which
offer protection, should be fixed in such a way that they cannot be removed without the use
of a tool.
To ensure that the oven works as intended it is important to install the unit as shown in the
diagram and allow enough airflow to enable to ovens cooling system to perform.
Fit the appliance into its surround (beneath a work-top or above another appliance) by inserting
screws into the 4 holes that can be seen in the frame of the oven when the door is open.
IMPORTANT // The first time you switch the oven on, some smoke may appear. These are the
coatings used to protect your appliance during transport and storage. There is nothing unusual
about this. If it happens, simply wait until the smoke disappears before putting any food in the
oven. Never roast or bake on the base of the oven.
70
A
A
A
Operating Instructions
70
70
Turning the function selector to the required function and setting the desired temperature (in
a clockwise direction) will turn on your oven ready for use.
NOTICE // Your oven is equipped with a thermostatically controlled cooling fan that will switch
on when required to cool the oven door and cabinetry. This fan may continue to run even aer
the oven is switched off, but will automatically turn off when the cavity is sufficiently cool. Some
air may discharge from the front of the oven this is a normal function.
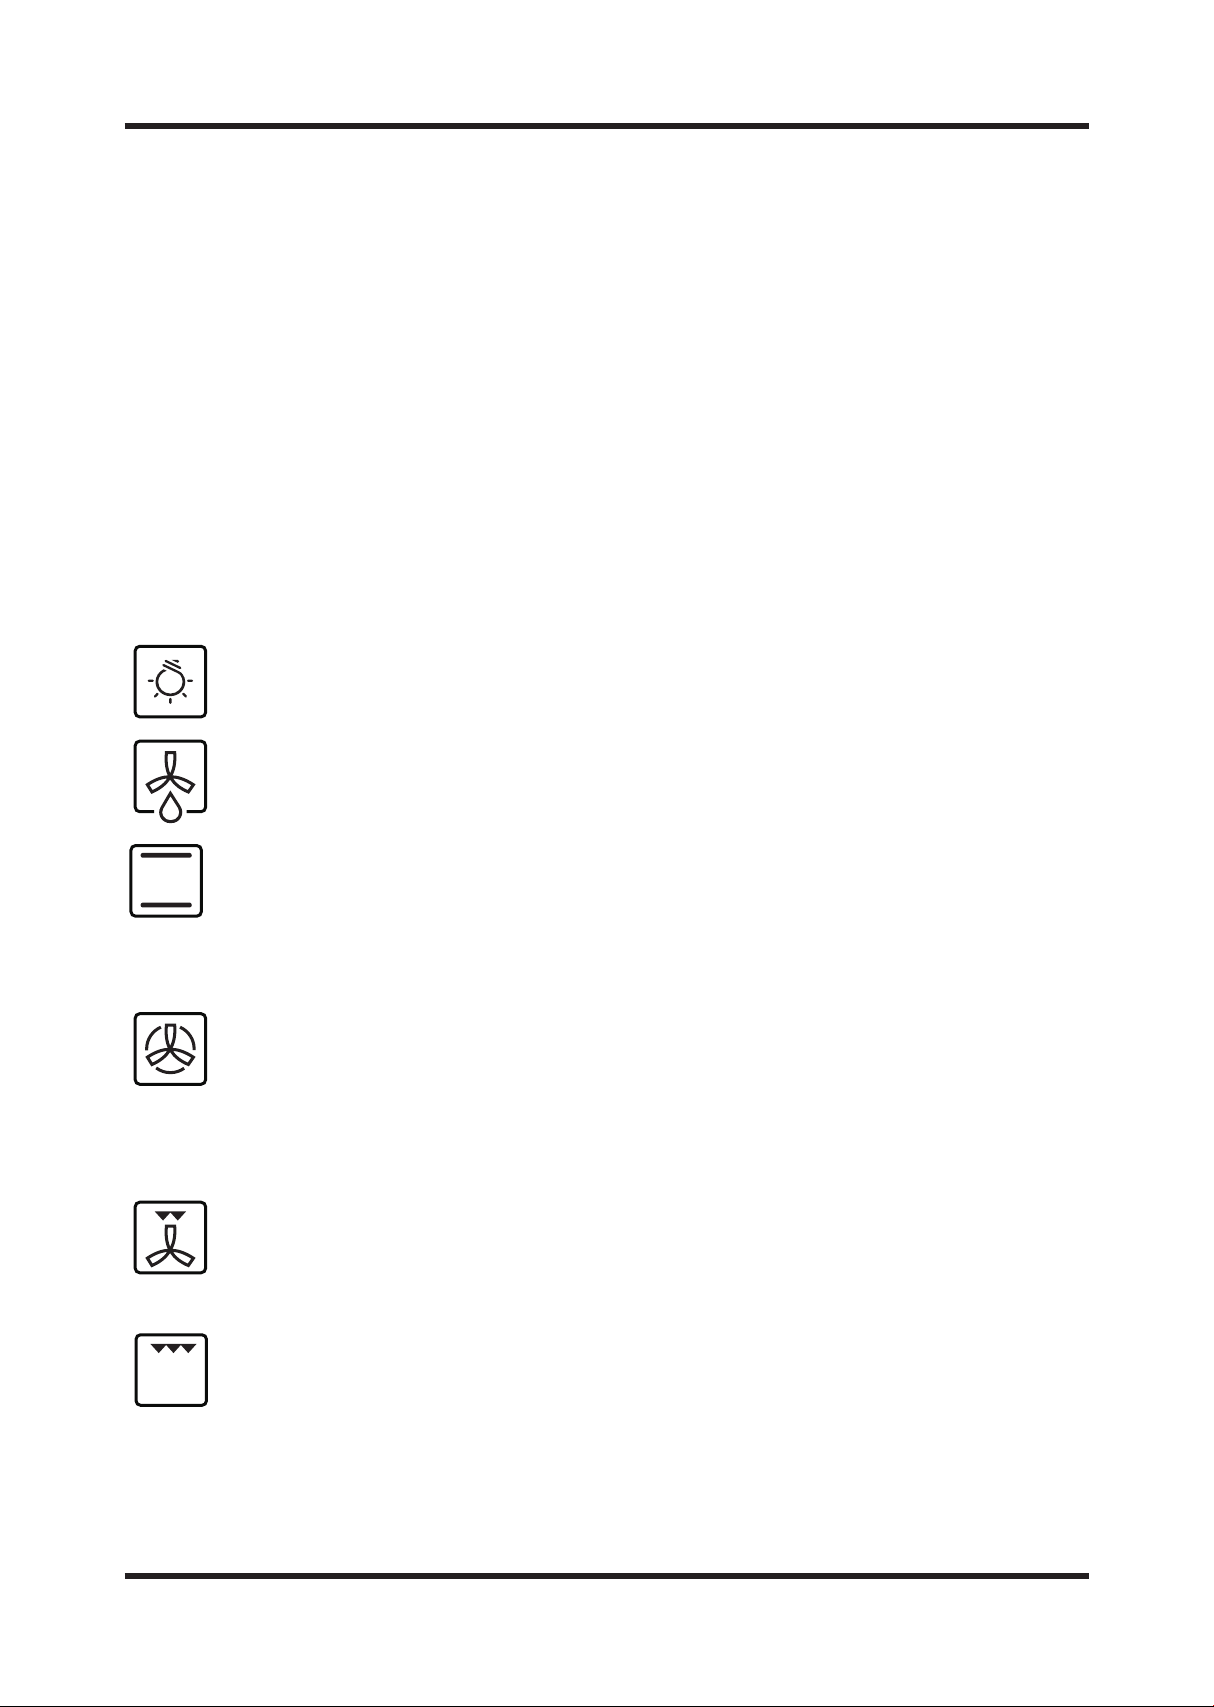
GENERAL FUNCTIONS GUIDE
Only the oven light comes on. It remains on in all the cooking
functions.
The air at ambient temperature is distributed inside the oven for
defrosting food more quickly.
Both the lower and upper elements operate together. This
traditional cooking function is good for roasting, baking and crisping
food. Good results are achieved by adjusting the shelf height to suit
your cooking requirements. Temperature range: 50°C – MAX.
Both the oven fan and the circular heating element operate together.
The fan forced function distributes the heat evenly inside the oven.
This is ideal for variety of cooking styles; roasting, baking, pastries,
re-heating food, casseroles and multi-level cooking. Temperature
range: 50°C – MAX.
The middle part of the grill element and the fan operate together,
with the fan circulating the heat generated by the grill element.
Temperature range: 200ºC - MAX
The full grill element operates to give top down heat only. This is
idea for traditional grilling of food. Temperature range: 50°C – 225°C
MAX.
GRILL
DEFROST
LIGHT
MED. FAN
GRILL
NATURAL
CONVECTION
FAN
FORCED
Electric Oven User Manual Page 9

Page 10 Electric Oven User Manual
Operating Instructions
The full grill element and the fan operate together, with the fan
circulating the heat generated by the grill element. This function
is ideal for cooking tender cuts of meat and poultry. Temperature
range: 50°C – 200°C.
The bottom element and the fan operate together. This function is
idea for cooking food that require heat from the base with the
additional benefit of the heat being circulated by the fan.
Temperature range: 50°C – MAX.
The bottom element operates to generate heat from the base of
the oven. This function is used for cooking pizza and other food that
requires only heat from the bottom. Temperature range: 50°C – MAX.
FAN
BAKE
FAN GRILL
BAKE
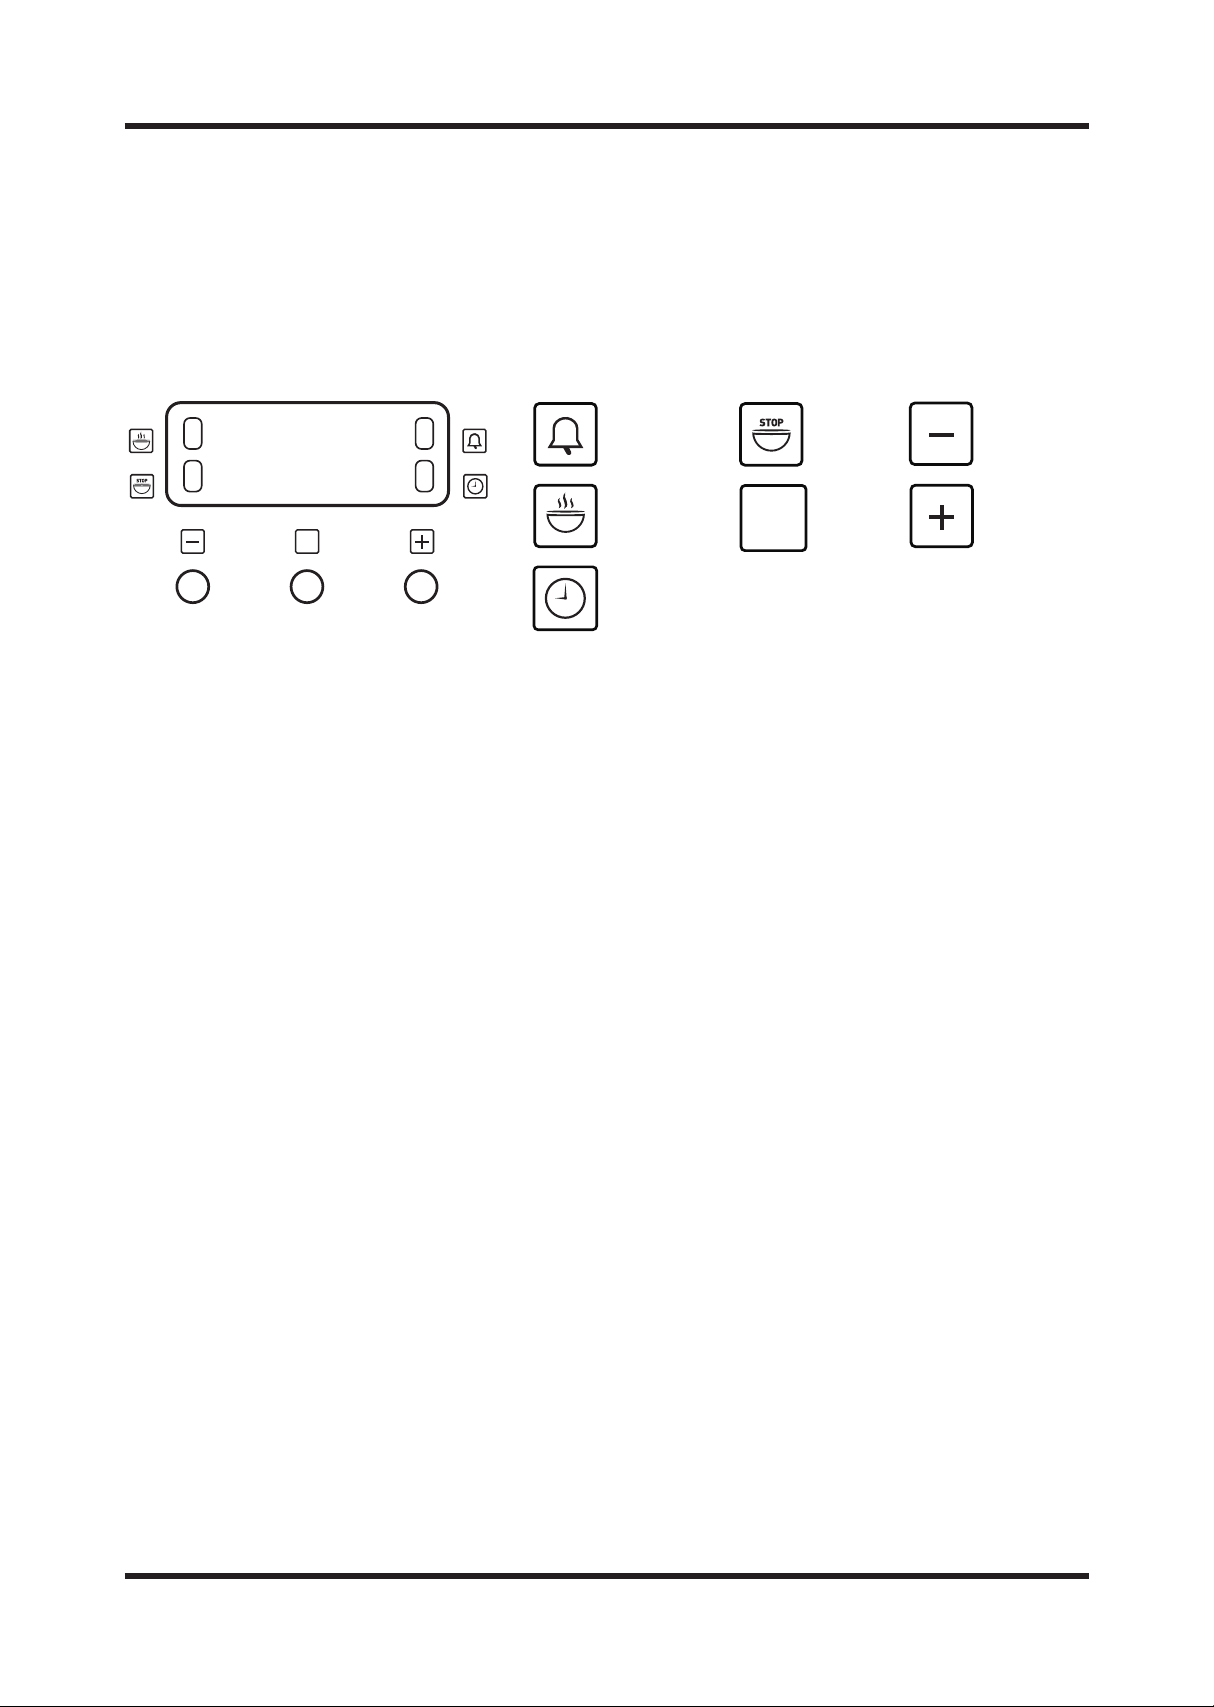
3 Button Digital Timer
The operation of this timer is done using 3 buttons. The functions of the buttons are:
With this arrangement it is possible to select the following four functions:
• Minute minder • Operation period
• Operation stop • Time-of-day
These modes can be selected by repeatedly pressing the mode button. The desired time for
minute minder, operation period, operation stop or time-of-day can be set with the “+” and
“-“ buttons.
Time of day
When connected to mains supply the display shows 12.00 o’clock and the LED L4 flashes. As
long as it is flashing, it is possible to adjust the time via the plus and minus buttons. Once the
time is adjusted, it is stored approx. 5 seconds aer the last operation, the LED L4 goes dark
again. It is possible to adjust the time-of-day by pressing the mode button until L4 flashes,
then the time-of-day can be adjusted.
Minute minder (interval time)
In order to set the interval time, the “Mode” button has to be pressed repeatedly until LED L3
is flashing. Then the interval time can be set between 0.01 and 2.30 h by using the plus and
minus buttons. Aer setting the interval time, it remains displayed and the LED L3 is now
illuminated steadily. Aer the interval time has run down, the alarm signal sounds (2 beeps
every 2 seconds) and the LED L3 is flashing again. Pressing any of the buttons stops the signal
and the flashing, the LED goes dark and the display reverts to the time-of-day. If the alarm is not
stopped manually, it terminates automatically aer 2 minutes. The minute minder can be
applied at any time while other functions are operative.
MINUTE
COUNTER
COOKING
TIME
END
TIME
MODE
SUBTRACT
TIME
ADD
TIME
TIME
M
M
L1
L2
L3
L4
Electric Oven User Manual Page 11

Page 12 Electric Oven User Manual
3 Button Digital Timer
Operation period
In order to set an operation period, the mode button has to be pressed repeatedly until the LED
L1 is flashing. Then the desired operation period (time frame between 0.01h and 10.00h) can be
set using the plus and minus buttons. Once adjusted, it will be stored aer approx. 5 seconds,
the LED L1 remains illuminated steadily, and the set time starts running down. The display
reverts to the time-of-day. As soon as the operation period has ended, the relay opens and the
alarm signal sounds (4 beeps every 2 seconds) and the LED L1 is flashing again. Pressing any of
the buttons stops the signal and the flashing, the LED goes dark and the relay closes again. If
the alarm is not stopped manually, it terminates automatically aer 2 minutes.
Operation stop
In order to set an operation stop, the mode button has to be pressed repeatedly until the LED L2
is flashing. Then the desired operation stop, which is limited to a point being maximally 23.59 h
in the future, can be set using the plus and minus buttons. Once adjusted it will be stored aer
approx. 5 seconds, and the LED L2 remains illuminated steadily. The display reverts to the
time-of-day. As soon as the operation stop has been reached, the relay opens and the alarm
signal sounds (4 beeps for 2 minutes) and the LED L2 is flashing. Pressing any of the buttons
stops the signal and the flashing, the LED goes dark and the relay closes again.
It is possible to combine the duration and end time in order to program a delayed mode. To do
this, both the operation period and operation stop time have to be set (above). LED L1 and L2
are illuminated and the baking process will start at a point in time “operation stop minus
operation period”. If a baking process ought to be finished at 12.00 and shall last 1.30 h, both
times have to be set in the respective modes, and the timer will switch on the oven at 10.30. The
timer is capable to avoid conflicts during the programming. (Eg with an operation period of 60
minutes resp. 1.00 hr set, and the time-of-day being 11.34 o’clock, then the operation stop can
be earliest at 12.34 o’clock.)
NOTICE // A running program can be checked and corrected at any time. In order to avoid
conflicts, it is not possible to set the time of day when an automatic program is active.

Maintaining your Oven
GENERAL MAINTENANCE
Ensure that the power to the unit is switched off prior to cleaning the unit. Surface should only
be cleaned with warm soapy water and a so non abrasive cloth. In coastal environments and
humid areas more frequent cleaning is required to maintain the finish.
To extend the life of your oven, it must be cleaned frequently, keeping in mind that:
• Do not use steam equipment to clean the appliance.
• To protect against the risk of electrical shock, do not immerse the unit, cord or plug in water
or other liquid or sprinkle water to clean the appliance!
• Don’t clean the appliance when it is hot! The inside and external surface of the oven should
preferably be cleaned by damp cloth when it is cooled down. Wash all accessories in hot
soapy water, wipe dry with a paper or cloth towel.
• If you use your oven for an extended period of time, condensation may form. Dry it using a
so cloth.
• There is a rubber seal surrounding the oven opening, which guarantees its perfect
functioning. Check the condition of this seal on a regular basis. If necessary, clean it and avoid
using abrasive products or objects to do so. Should it become damaged, please contact your
nearest service centre. We recommend you avoid using the oven until it has been repaired.
• Never line the oven bottom with aluminum foil, as the consequent accumulation of heat
could compromise the cooking and even damage the enamel.
• Clean the glass door using damp cloth and dry it with a so cloth.
• Do not use harsh abrasive cleaners or sharp metal scrapers to clean the oven door glass since
they can scratch the surface, which may result in shattering of the glass.
DOOR REMOVAL
Your oven is fitted with a removable door. To
remove the door open the door fully, engage
the doorstop [B] on the le and right hinge.
[A] Carefully start to close the door, the door
will start to release from the hinge supports
the door can be then removed. When
reinstalling the door ensure the hinges are
slid into their slots (C) fully engages in the
base of the hinge support.
Electric Oven User Manual Page 13
A
C
B
A
C
B

Page 14 Electric Oven User Manual
Maintaining your Oven
Lamp Replacement
WARNING // Ensure that the appliance is completely cool and that the power to the unit has
been switched.
Your oven is fitted with E14 15W oven lamps (300°C). Replacement lamps can be purchased from
your nearest service centre. To remove the lamp, twist the cover in an anti-clockwise direction.
Unscrew the lamp and replace it with a new lamp. Replace the cover.
Adjusting the shelf/tray position
When adjusting or positioning your shelf, please
ensure the following:
• Ensure that the shelf / tray is located between
the two wire siderack guides. (see point 1)
• The shelf stops should be facing downwards and
towards the rear. (see point 2)
• The guard rail should always be located at the
rear of the oven (see point 3)
1
2
3

Notes
Electric Oven User Manual Page 15

CONTACT
DETAILS
Version 5.0
Table of contents
Other Tisira Oven manuals


