Tisira Slim Series User manual

ASC60AX-L | ASC90AX-L
ACT60AX-L | ACT90AX-L
USER MANUAL
CANOPY RANGE HOODS - SLIM LINE
ACS60AX-L, ACS90AX-L, ACT60AX-L, ACT90AX-L,
ACRH91BIX
IMPORTANT // Please ensure that you read through this manual prior to installation and use.
This user manual contains important information to ensure optimal performance and keep
you safe. Please retain your proof of purchase, as this will be needed in the event that you
require a warranty service. Remember to keep this user manual for future reference.

Page 2CANOPY HOODS - SLIM LINE
CONTENTS
Contents 2
Warning & Safety Instructions 3
Product Overview 4
Electrical Connection 6
Installation 7
Operating Instructions 8
Maintaning your Rangehood 9
Proof of Purchase 10
Notes 11
Contact Details 12

Page 3
CANOPY HOODS - SLIM LINE
WARNING & SAFETY
INFORMATION
• This appliance is intended for indoor do-
mestic use only. It is not suitable for outdoor
kitchens. This appliance complies with all
of the relevant local and national standards.
Inappropriate use can lead to personal injury
and cause damage to property.
• To avoid risk of injury or damage please read
these instructions carefully before installing
and operating this appliance.
• It is important to keep these instructions in a
safe place for future reference and to ensure
that all users are familiar with the operations
and safety precautions with this appliance.
• This appliance is not intended for use by
persons (including children) with reduced
physical, sensory, or mental capabilities, or
a lack of experience and knowledge, unless
they have been given supervision or instruc-
tion concerning use of the appliance by a
person responsible for their safety.
• Young children should be supervised to en-
sure that they do not play with the appliance .
• Please be aware that the halogen lamps
may get very hot during use and the may
retain their heat for some time after the unit is
switched off.
• There should be adequate ventilation of the
room when the rangehood is used at the
same time as appliances burning gas or
other fuels.
• IMPORTANT // Read the information
provided about cleaning of your appliance,
methods and frequency.
• There is a fire risk if the cleaning procedures
are not adhered to.
• Do not flambé under the rangehood.
• Exhaust air must not be discharged into an
existing flue which is used for exhausting
fumes from the appliance burning gas or
other fuels.
• The minimum distance between the hob
surface and the lowest part of the rangehood
is 600mm. This distance shall be at least
650mm, if the rangehood is installed over
a gas hob. If the instructions for the hob
specify a greater distance this must taken
into account.
• Due attention should be given to ensure that
any applicable regulations concerning the
discharge of the exhaust are adhered to.
• If the supply cord of this appliance is dam-
aged, it must only be replaced by the man-
ufacturer or it’s service agent or a similarly
qualified person in order to avoid a hazard.
Page 4CANOPY HOODS - SLIM LINE
3 4 51 2
0
4321
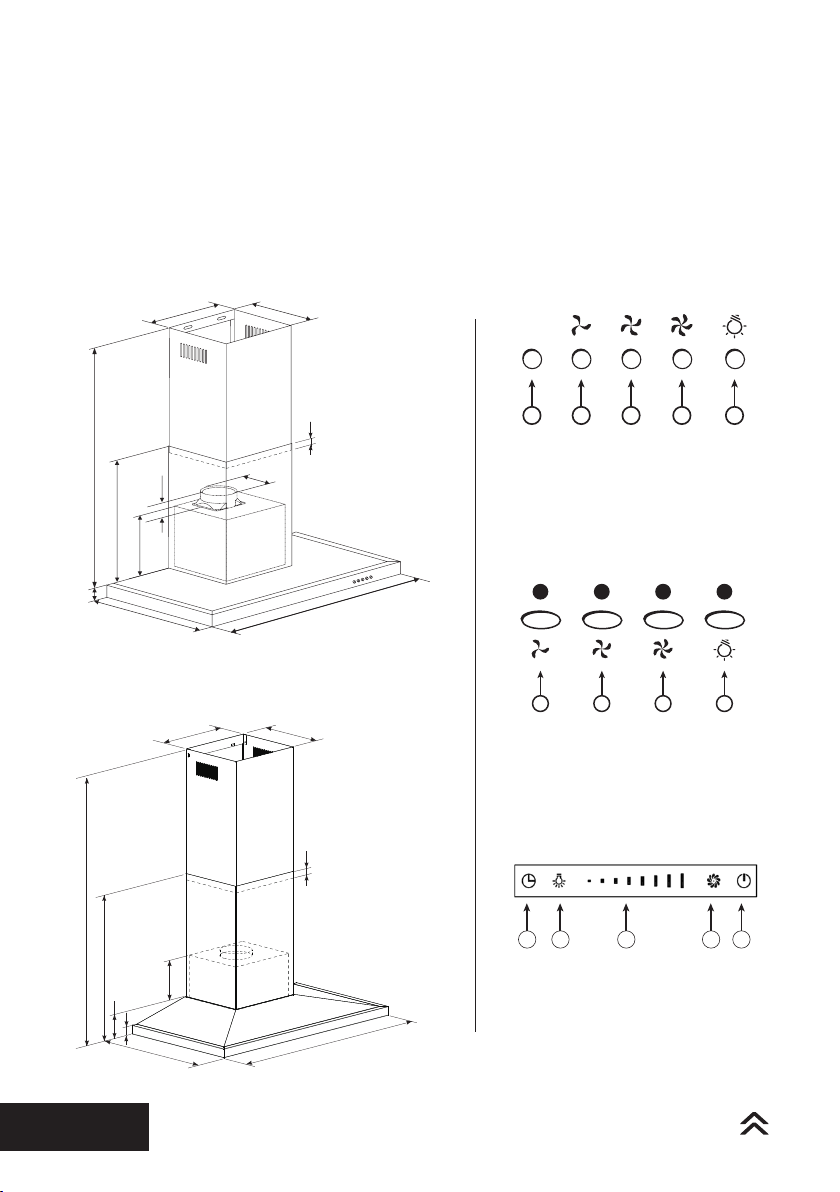
1. On/off
2. Low speed
3. Medium speed
4. High speed
5. Light
1. Low speed
2. Medium speed
3. High speed
4. Light
PRODUCT
OVERVIEW
40/*50
500- 980
275
303
600/ 900
500 / *505
230
60
Ф150
00
5
20
minimal
overlap
50 0
60 0 / 900
172
35
58 5-1055
58 5
95
27 2
31 2
20
minimal
overlap
*505mm including glass control panel - ACRH91BIX
*50mm fascia height - ACRH91BIX
PUSH BUTTON CONTROLS
ELECTRONIC CONTROLS
TOUCH CONTROLS
3 4 51 2
1. Timer
2. Light
3. Speed Slide Control
4. Fan Speed5.
5. On/off

Page 5
CANOPY HOODS - SLIM LINE
ELECTRICAL
CONNECTION
NOTICE: This appliance must be connected
only by a licensed electrician and installed in
accordance with the manufacturers instructions.
• Installation, repairs and other work by unqual-
ified persons could be dangerous, for which
the manufacturer cannot be held liable.
• Ensure power is not supplied to the appli-
ance until after installation or repair work has
been carried out.
• Do not connect the appliance to the mains
electricity supply by an extension lead. These
do not guarantee the required safety of the
appliance.
• The connection data is given on the data
plate. This is visible when the grease filters
have been removed. Ensure that this data
matches the household mains supply.
• Connection of this appliance should be made
via a suitable isolator or a double pole fused
spur connection unit which complies with
national and local safety regulations and the
On-Off switch should be easily accessible
after the appliance has been built in.
• When switched off there must be an all-pole
contact gap of 3 mm in the switch (including
switch, fuses and relays according to EN
60335).
• If the switch is not accessible after instal-
lation (depending on country), an additional
means of disconnection must be provided for
all poles.
• For extra safety it is advisable to install a suit-
able residual current device (RCD). Contact a
qualified electrician for advice.
IMPORTANT: This appliance is supplied for
connection to a 230V~50Hz supply.
The wires in the mains lead are coloured in
accordance with the following code:
Green/Yellow = Earth
Blue = Neutral
Brown = Live
WARNING: THIS APPLIANCE MUST BE
EARTHED

Page 6CANOPY HOODS - SLIM LINE
INSTALLATION
Height of Wall Canopy
The chimney is telescopic and is designed for
hood installations between 650 to 750 mm
above the cooking surface.
Select the desired installation height of the wall
canopy.
Any installation above 750 mm will compromise
the extraction performance.
For optimal efficiency, use smooth-wall, solid
galvanized or plastic ducting for reduced noise
and increased airflow.
Flexible ducting should only be used as a last
resort (ie in difficult installations) and if used,
ensure that it is pulled tight.
The smoother, straighter and shorter the
ducting the quieter and more efficient the wall
canopy will perform.
Preparing the Wall Canopy for
Installation
Please read all the instructions carefully before
installing the wall canopy.
Remove the filters from the canopy to allow
access to wall mounting holes.
To remove the filters, pull the relative catch,
tilting it downwards until it disengages from
the supports. Reverse these instructions when
refitting the filters.
Prior to drilling any holes, check that the area
behind the surface to be drilled is clear of any
electrical cables or pipes etc.
Stainless Steel/Iridium is very easily damaged
during installation if abraded or knocked by
tools.
Whenever possible, protect the top of the cook-
top with cardboard or the like to prevent
damage on installation.
Page 7
CANOPY HOODS - SLIM LINE
INSTALLATION
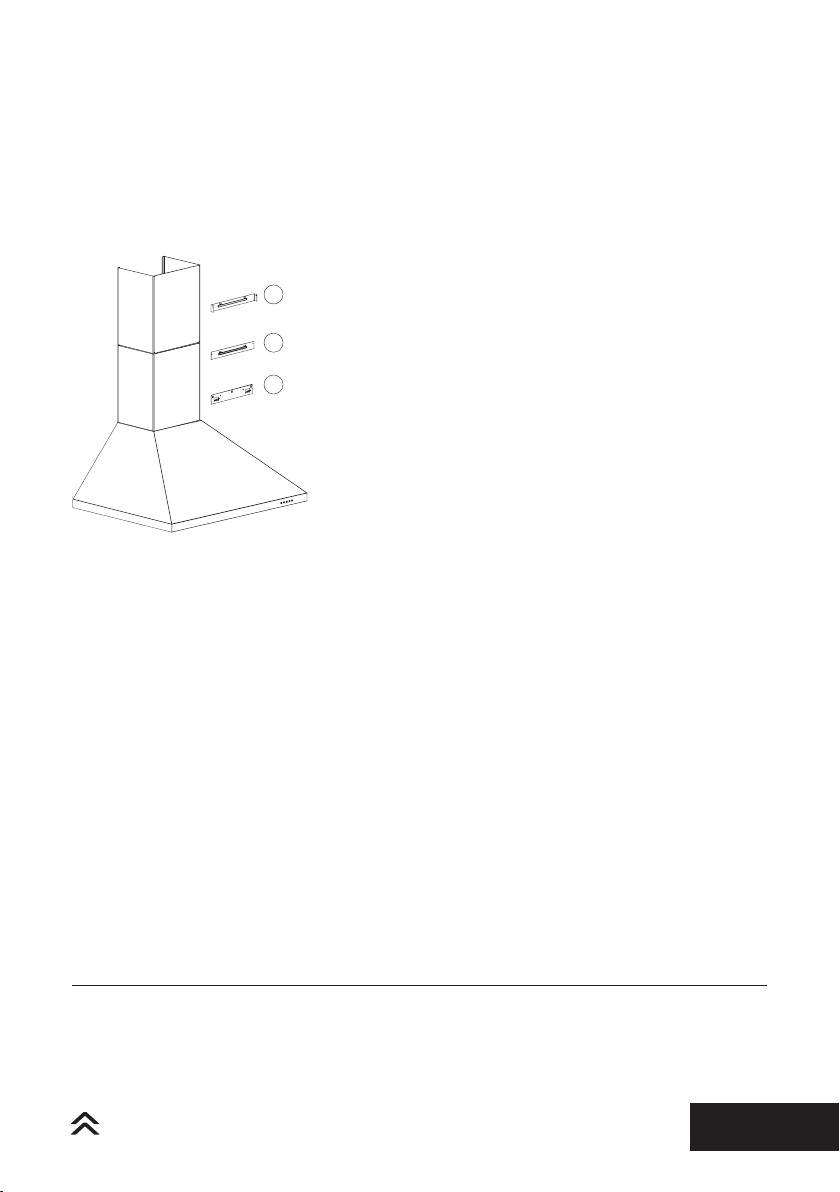
SLIM STANDARD & T-SHAPE CANOPIES
1. Mounting to a stud is recommended. However if
mounting to other wall types different fasteners will be
required.
2. Position the canopy mounting bracket (C) in the
required position. Mark and drill the pilot holes. Screw
the bracket to the wall, ensuring that the bracket
is level as this will determine the final level of the
rangehood.
3. Carefully position the rangehood body on the bracket.
4. Position the flue cover mounting brackets (A-B) in the
required position. Mark and drill the pilot holes. Screw
the brackets to the wall.
5. Attach the ducting to the rangehood and duct
according to your requirements (external ducting or
recirculating).
6. Install the flue covers and secure the top flue cover to
the flue bracket with the provided screws.
7. Refit the filters and power the unit.
A
B
C
WARNING: Do not penetrate any screws into the rangehood as this may result in electrical hazards.
Failure to install the screws or fixing device in accordance with these instructions may result in
electrical hazards.
Page 8CANOPY HOODS - SLIM LINE
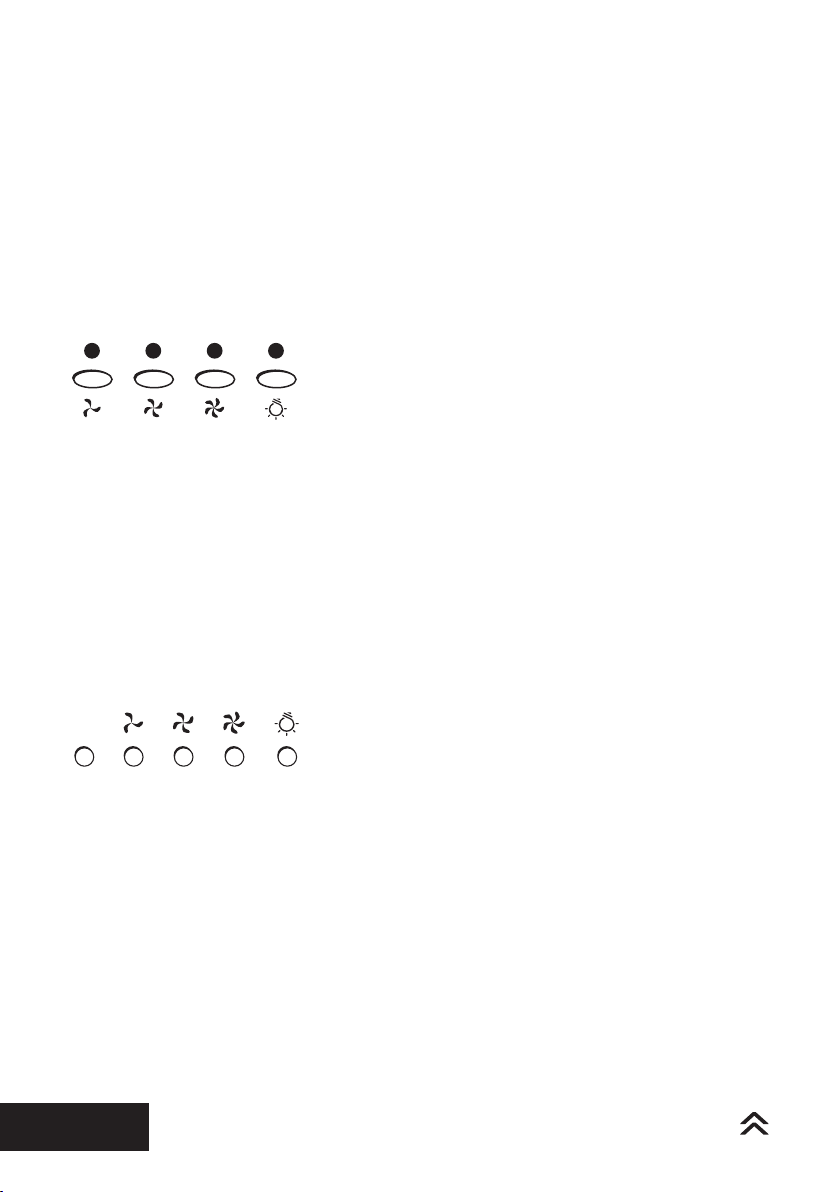
ELECTRONIC
TO TURN THE FAN ON
Press the required speed button once, the fan will turn on and run at the required speed.
The light above the button will illuminate to indicate the selected speed.
TO TURN THE FAN OFF
Press the fan speed button beneath the illuminated light. The same button used to turn the
fan on, will turn the fan off.
TO USE THE LIGHT
The light can be used by pressing the button above light symbol once. The light is switched
off by pressing the same button again.
PUSH BUTTON CONTROLS
0
TO TURN THE FAN ON
Press the required speed button once, the fan will turn on and run at the required speed.
The selected button will remain depressed to indicate that it has been selected.
TO TURN THE FAN OFF
Press the first button, the fan will then stop.
TO USE THE LIGHT
The light can be used by pressing the button above light symbol once. The light is switched
off by pressing the same button again.
OPERATING
INSTRUCTIONS

Page 9
CANOPY HOODS - SLIM LINE
TOUCH CONTROLS
Timer Light Slide Control Speed Power
TO TURN THE FAN ON and OFF
1. Touch the Power symbol . The backlight will come on and stay on for 5 seconds if no opera-
tion is selected before the range hood enters standby mode.
2. Touch any symbol to exit standby mode.
3. Touch the fan symbol , the motor will turn on.
4. Touch the fan symbol again and the motor will turn off.
NOTE: If you turn the range hood off without stoping the fan. The fan speed in which the range hood
was operating at the moment it was turned off will be recorded and this fan speed will be set as the
default speed for the next time the range hood is turned back on.
Alt. 1 - Touch the Power symbol for 2 seconds and the fan will start operating at low speed.
Alt. 2 - If you touch and hold the Power symbol for 2 seconds again, the fan will stop.
TO CONTROL THE FAN SPEED
1. Touch and slide your fingers over the slide controls to increase or decrease the fan speed.
NOTE: The fan can be set to four (4) different speeds.
TO USE THE LIGHT
1. When the fan is turned on, the lights will come on in 8-10s.
2. Touch the light symbol to turn the lights on/off.
NOTE: The light intensity can be control using the slide controls.
1. Touch the light symbol and the slide bars will be flashing .
OPERATING
INSTRUCTIONS

Page 10 CANOPY HOODS - SLIM LINE
OPERATING
INSTRUCTIONS
TOUCH CONTROLS
Timer Light Slide Control Speed Power
2. Touch and slide your fingers over the slide controls to increase or decrease the light intensity.
NOTE: The light can be set to eight different intensity levels. The slide bars will stop flashing after 15s.
TO USE THE TIMER
1. Touch the timer symbol while the light or fan motor is in operation.
2. The range hood will enter the timer configuration mode.
3. The slide bars will be flashing .
4. Touch and slide your fingers over the slide controls to increase or decrease the timer time.
NOTE: There are 8 different times that can be set for your timer. Each bar of the slide controls corre-
spond to 5min.
5 10 15 20 25 30 35 40min
5. Confirm the time selection by pressing the timer symbol . Alternatively the timer will be set
automatically after 5s in standby.
6. Both light and motor will be turned off once the timer reaches its set time.
NOTE: The next time you press the timer symbol while the light or fan motor is in operation, the
timer will be defaulted to the latest time selection. If that is the desired time, simply wait for 5s without
touching any of the comands to allow the timer to be automatically set
NOTE: The timer will be cancelled automatically if the fan or light internsity are changed.

Page 11
CANOPY HOODS - SLIM LINE
IMPORTANT: Switch off and unplug
the rangehood at the powerpoint before
undertaking any cleaning or maintenance on
the unit.
LED LIGHT REPLACEMENT
220-240 Volts/2 Watts
The entire LED light assembly needs to be
replaced (light board, metal case and lead) as
one piece.
1. Switch off the power to the canopy hood and
remove the filter panles to get access to the
interior of the unit.
2. Follow the LED lamp lead (approximately
30cm) from the back of the light case to find a
white connector. Disconect the lead from the
internal wiring of the range hood.
3. The metal LED light case is kept in place by
two spring levers located at the back of the light
case. Pushing the light case down from the
interior of the unit will allow you to completely
remove the lights.
4. Repeat these steps in reverse to install the
replacement LED light.
GENERAL MAINTENANCE
To prevent any surface damage never use any
abrasive products or products that contain
soda, acids, chlorides or solvents.
To clean the surface of the appliance use a
mild detergent in warm water, with a soft
non-abrasive cloth.
Only use a damp cloth as use of excessive water
can penetrate the unit and cause damage.Dry
surface thoroughly after cleaning with a
soft cloth to prevent marking of the surfaces.
FILTER MAINTENANCE
To ensure that the rangehood performs at it’s
best, filters need to be cleaned cleaned at least
monthly or more frequently with heavy use
The filters can be cleaned using hot soapy
water and a soft nylon brush or placed in a
dishwasher.
NOTE: Cleaning the filters in the dishwasher
may cause permanent discoloration of the
surface. This does not in any way affect the
performance of the filters.
Charcoal filters cannot be cleaned or reused.
Replace filters every 3-6months dependant on
use and cooking style. Please dispose of used
filters responsibly.
NOTE: Oversaturated filters are a fire hazard
so regular cleaning/replacement is a must.
MAINTAINING YOUR
RANGEHOOD
Page 12 CANOPY HOODS - SLIM LINE
PROOF OF
PURCHASE
ATTACH YOUR PROOF OF PURCHASE
FOR FUTURE REFERENCE

Page 13
CANOPY HOODS - SLIM LINE
NOTES

Version 2.1
CONTACT DETAILS
AUSTRALIA
ARISIT PTY LIMITED
40-44 Mark Anthony Drive
Dandenong South, VIC 3175
Australia
Ph 1300 815 589
FX (03) 9768 0838
NEW ZEALAND
ARISIT PTY LIMITED
PO Box 68-140
Newton, Auckland
1145
New Zealand
Ph (09) 306 1020
FX (09) 302 0077
SLIM LINE CANOPY
This manual suits for next models
5
Table of contents
Other Tisira Ventilation Hood manuals


