TK TrueBike User manual
T H E T R U E B I K E
U S E R M A N U A L | E N G L I S H

INTRODUCTION AND OVERVIEW
1.TRUEBIKE WELCOME SCREEN
2.NAVIGATING THE USER INTERFACE
3.FIRST START-UP
3.1 Connect to your WIFI
4.TRUEBIKE MENU
4.1 Train
4.2 Program
4.3 History
4.4 Settings
4.5 About
5.CONNECTIONS
6.TROUBLESHOOTING&SUPPORT
6.1 Error Messages
6.2 Special Considerations
6.3 Support
U S E R M A N U A L | E N
I N D E X
3
5
4
5
4
5
6
11
12
13
13
15
15
15
15
14

U S E R M A N U A L | E N
INTRODUCTION
Welcome to TrueKinetix and congratulations on your new TrueBike, the first robotized indoor training
bike. Please make sure that you have read, executed and finished the assemble manual completely and
the TrueBike is installed properly.
This User Manual (UM) provides the information necessary for owners/users/renters to use the
TrueBike. This UM TrueBike will explain how to use your TrueBike and guide you through all the settings
and features. The purpose of this manual is to explain how to optimize the use of the TrueBike and
explain every element of the bike, screen and platform. If you experience any problems while using the
TrueBike, please read how to conact the Support at the end of this manual.
This manual is written for the owner/user/renter of the TrueBike. If, during the development process of
the TrueBike, changes in usage and the manual occur, we will inform you as you have indicated to be
informed in the privacy policy.
OVERVIEW
The TrueBike is the first robotized indoor cycling trainer. The TrueBike should be used as an indoor
cycling trainer. This document provides screenshots and corresponding narrative to describe how to
use the TrueBike system. Fields or buttons to be acted upon are indicated with quotation marks in the
manual.
Note: The term ‘user’ is used throughout this document to refer to a person who requires and/or has
acquired access to the TrueBike.
Cautions & Warnings
When you turn on your TrueBike, look out for the following warning: ‘Your battery is low’. If this
message is shown, please connect your TrueBike to a power socket. Before you start training, take care
of the correct positioning of the saddle and the handlebars, both vertically and horizontally, to avoid
physical discomfort and risk of injury.
After using the TrueBike:
- Make sure to unplug the external power supply, to prevent the battery from overloading.
- Switch OFF the bike.
3

U S E R M A N U A L | E N
1. Change Settings PIN: Change the pin for access System Settings.
2. WIFI Setup: Connect to or change the WIFI network (see more 3.1).
3. UserDeletion: Click here to delete any user you want.
1. TRUEBIKE WELCOME SCREEN
It’s time to start using your TrueBike! After finishing the set-up manual you are ready to discover all the
features of the TrueBike. Continue reading and enjoy your first TrueBike experience. After switching on
the TrueBike (the on/off button is red and located at the right side of the motor housing), you will first,
after a boot sequence of about 30 seconds, see the Home Screen of the TrueBike.
2. NAVIGATING THE USER INTERFACE
To select anything on the display, use the 9 buttons on the keypad of the TrueBike. They correspond to
the 9 buttons you see on the screen. If you press the middle button ‘Enter’ on your keypad, the ‘Select a
User’ screen will occur. Follow the instructions.
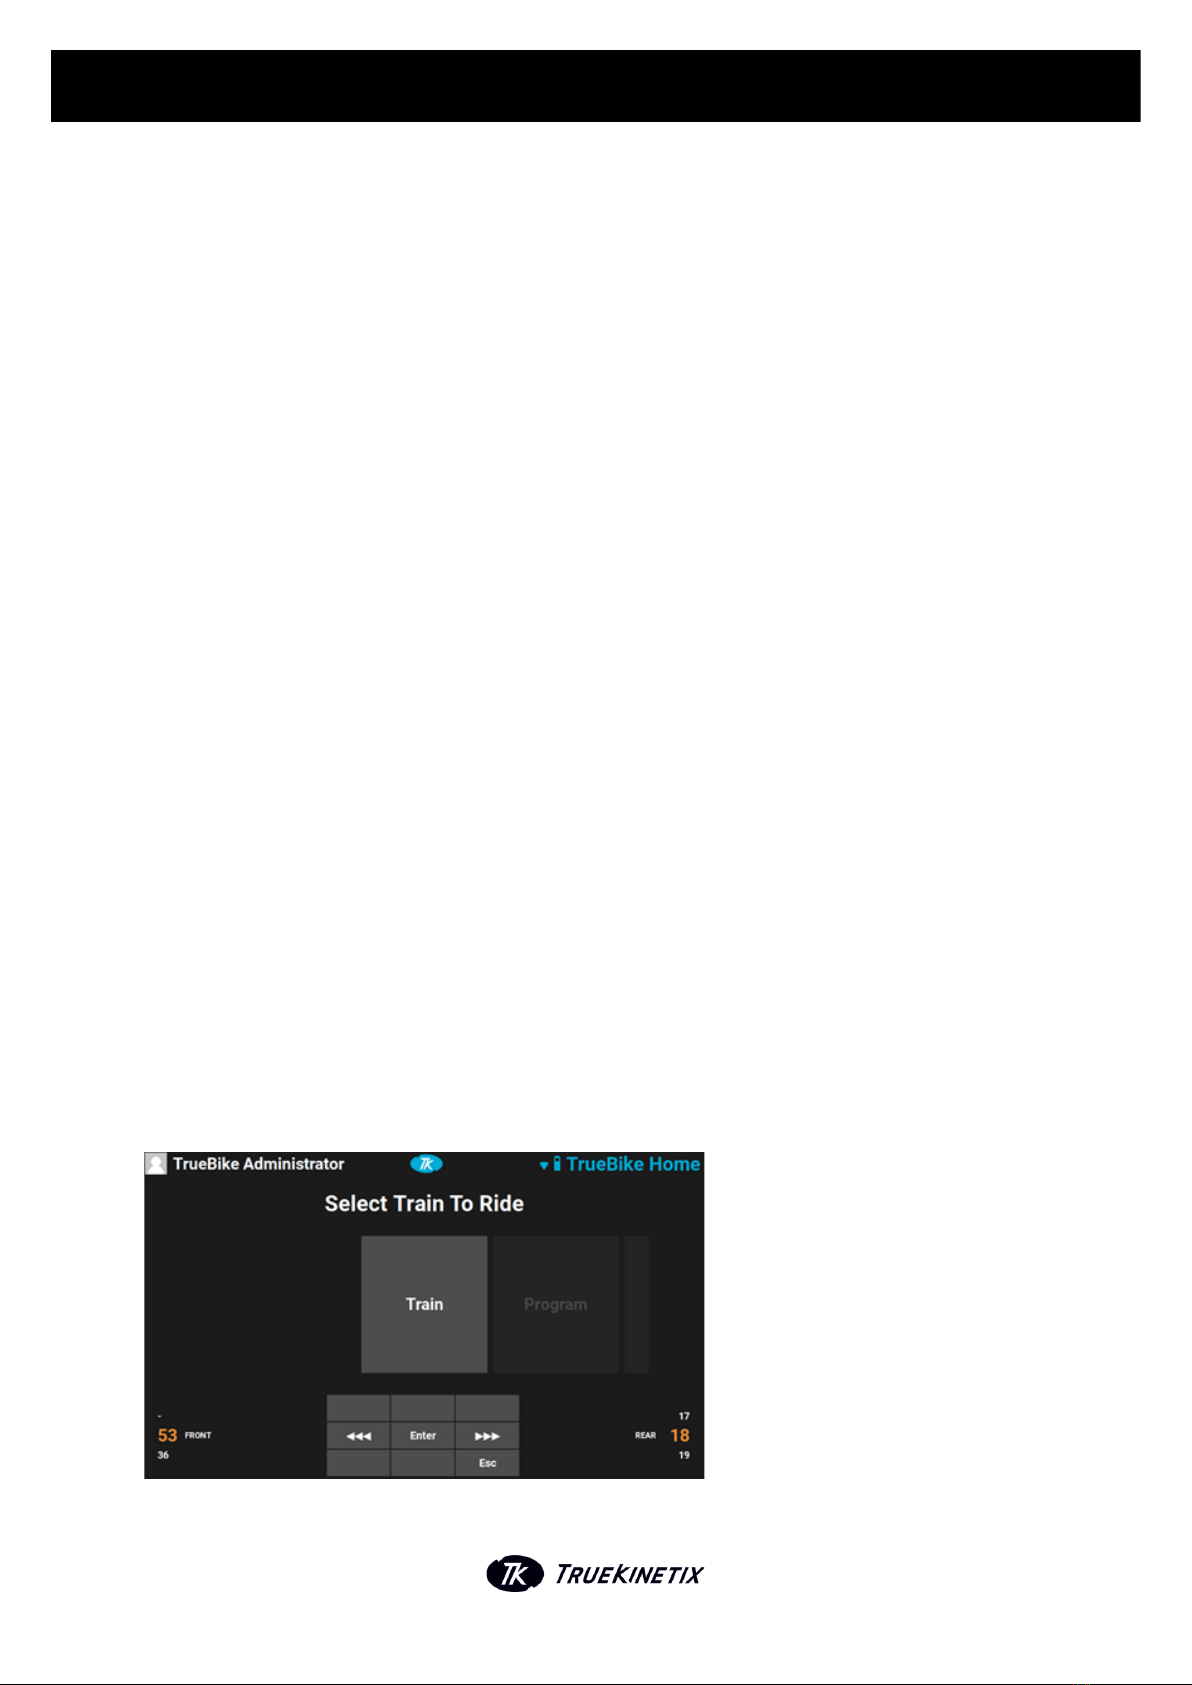
3. FIRST START-UP
In the “Select A User” screen, you can select:
Sign In: Sign into your TrueBike account with your username and pin that you have created via
https://athletes.truekinetix.com/.
Guest:The personal information from the guest user cannot be changed. This account should only be
used by users without a personalized account.
System Settings:In the System Settings you can change the general settings, such as WIFI settings.
You need a pin to enter the System Settings. When you receive your TrueBike, this pin will be set on
‘0000’ (four times zero). We recommend to change this pin when your TrueBike is in a public place with
more users to prevent them from changing important settings in System Settings. The user with the pin
for System Settings has the rights to:
4. Factory reset: Click here to delete all the data on your TrueBike. Including user-, bike- and setup-
data. When you have been connected to the internet, the data you will delete with the 'Factory Reset'
will still be accessible online.
5. Voltage calibration.
4
3.1.CONNECT TO YOUR WIFI
Before you can sign in on your TrueBike with your own account, you need to be connected to your WIFI
network. Use the keypad to navigate to the ‘System Settings’ and press enter. Fill in the pin to enter
‘System Settings’ and use the arrows to go to 'Select Network'. Press the ' > ' arrow and the TrueBike will
start scanning and searching for available networks (this may take a few seconds). Select your WIFI
network from the list shown and press ‘Enter’. Fill in the WIFI password for this network by using the up
and down arrows on the keypad and press 'Done'. If you want to add an extra field, press the ' > ' arrow. If
you want to delete a field, use the down arrow to go back to the beginning (one field before the 'a'). If
your password is not correct or there is no WIFI, a cross will be shown in front of the connection-icon at
the top of the screen. When the system is still searching for a connection, a question mark will be
shown.
Important: To connect to a WIFI network, your WIFI network needs to be visible. If your WIFI network is
hidden, the TrueBike won't be able to connect to it.
4. TRUEBIKE MENU
The Home Menu contains these options:
4.1 Train
4.2 Program
4.3 History
4.4 Settings
4.5 System
After creating your user profile, you will be directed to the ‘Select Train to Ride’ screen. If you want to
start a training session, select 'Train', then ‘Enter’, and go to the 'Training' screen.
U S E R M A N U A L | E N
5
U S E R M A N U A L | E N
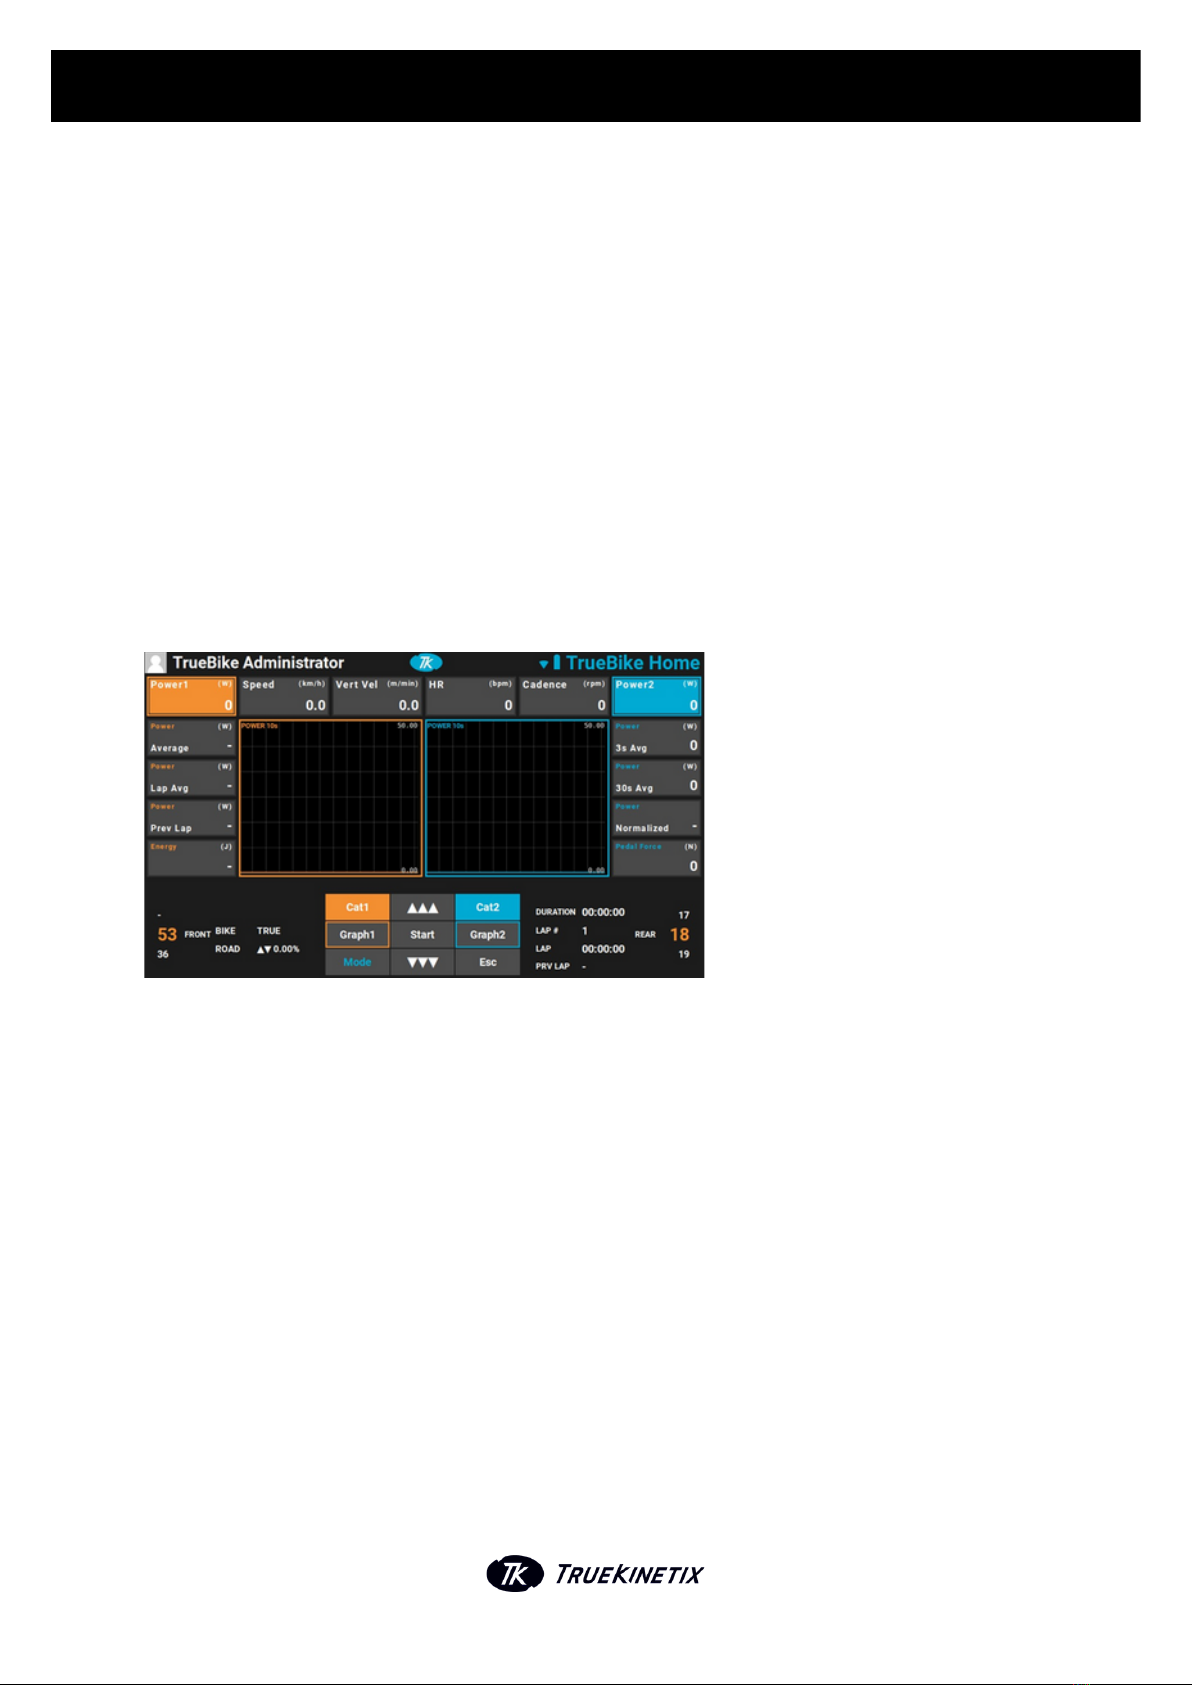
4.1. TRAIN
When you press ‘Train’, you will enter the training screen. There are six main categories shown on the
top of the screen.
From left to right the main categories are shown:
Power 1 -> W (wattage) = Average 10 sec power
Speed -> Km/h (kilometers per hour) = Instant speed
Vert Vel -> M/min (meter per minute) = Vertical displacement per minute
HR -> Bpm (beats per minute) = Heartbeats per minute
Cadence -> Rpm (revolutions per minute) = Crank revolutions per minute
Power 2 -> W (wattage) = Average 10 sec power
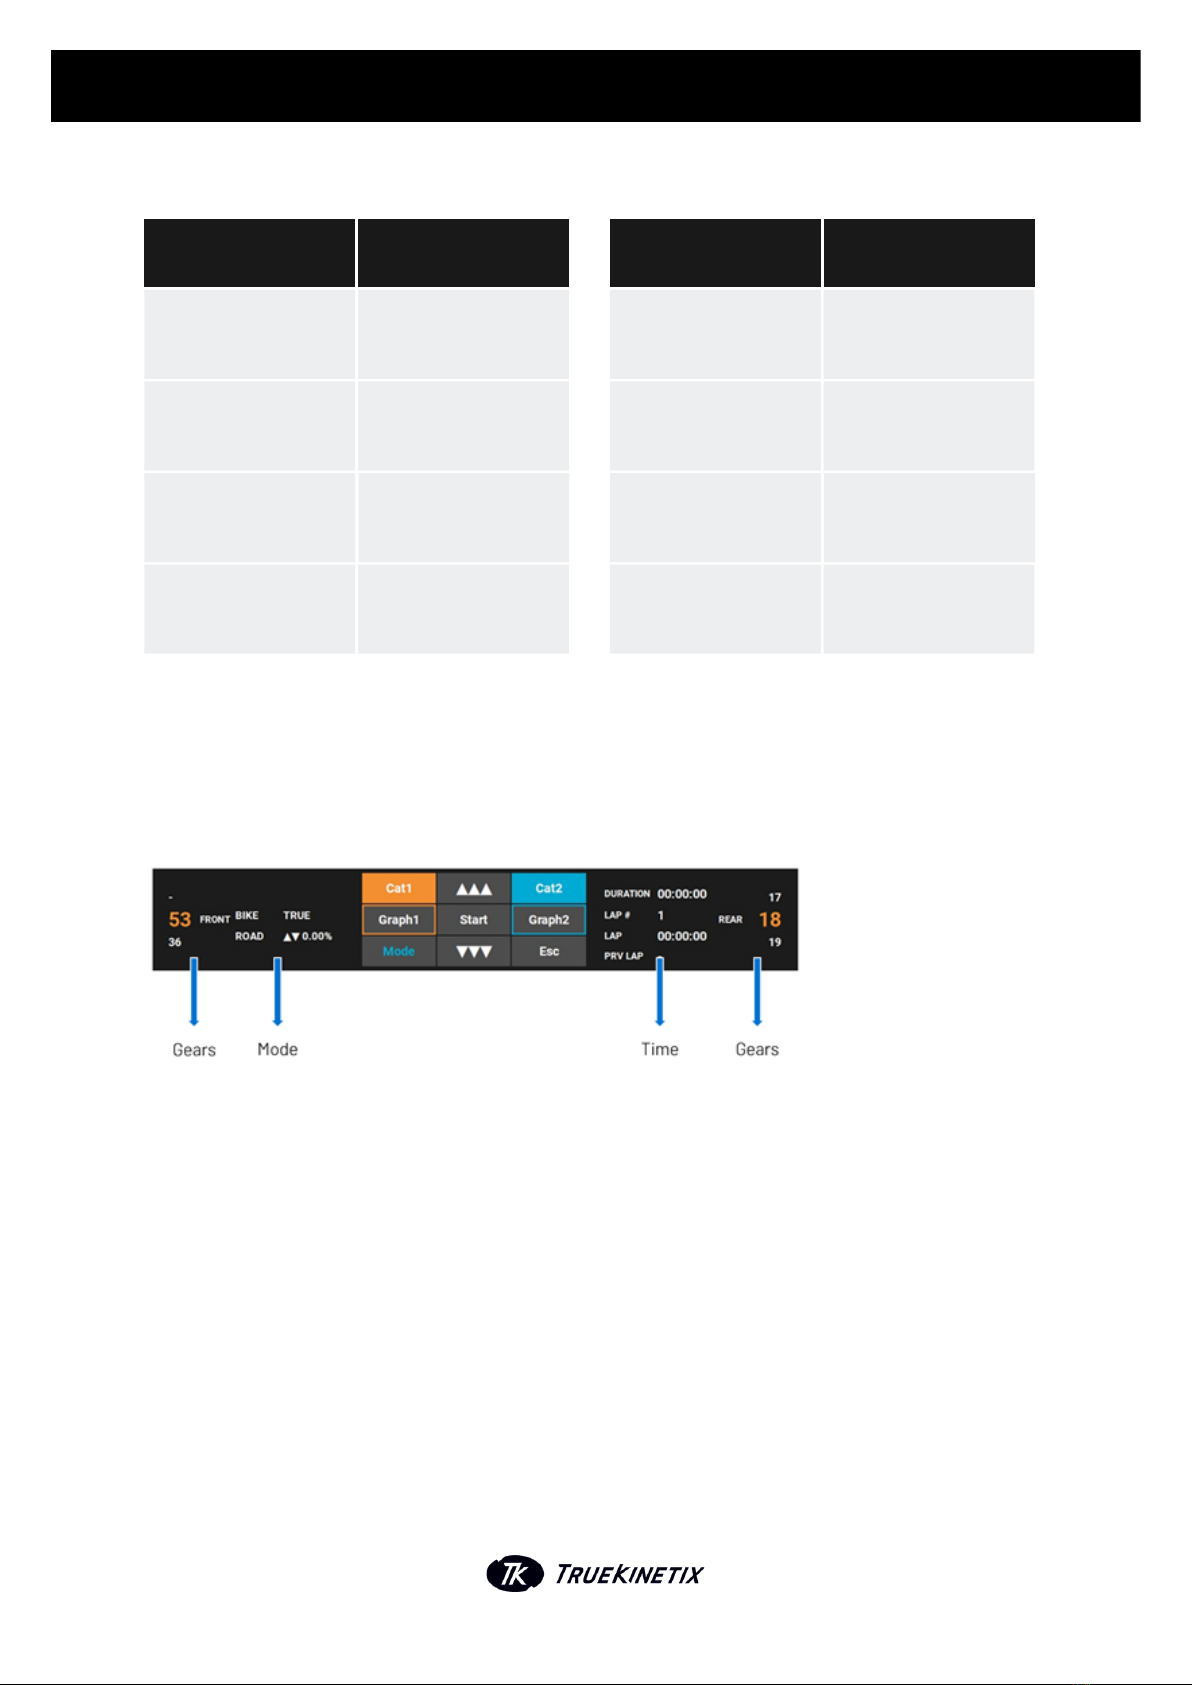
Navigating through your training screen
The 9 buttons on top of the keypad correspond with the 9 buttons you see on the screen.
Cat1 and Cat2
To navigate through the main categories, press Cat1 or Cat2. You can select two main categories, one
will be shown in a graph on the left side of your screen and one on the right side. When you select a main
category with the buttons Cat1 or Cat2, the square of the chosen category will turn completely orange
or blue. These selected squares are always on the top left or right corner.
6

U S E R M A N U A L | E N
Graph1 and Graph2
If you have chosen your main category, you can select your subcategory by pressing Graph1 or Graph2.
The selection system is clockwise. If you select a subcategory, the edge of the square will become
orange or blue depending on which button you are using (Graph1 or Graph2). The graph of the
corresponding subcategory will be visible.
Mode
Press ‘Mode’ if you want to change the mode of the bike that is shown in the lower left side of the screen
(TRUE or SPIN, POWER and ROAD).
Esc and Lap
After pressing 'Start', the ‘Esc’ button will change into the ‘Lap’ button. Press ‘Esc’ if you want to return
to the previous screen. Press ‘Lap’ if you want to go to the next lap.
Stop
Press ‘Stop’ if you want to stop your training session.
7
U S E R M A N U A L | E N
Power over 10 secondsPower 1 (W)
Power Average (W)
Power Lap Average (W)
Power Previous
Lap (W)
Energy (J)
Average Power of the
whole session
Average Power of the
current lap
Average Power of the
whole session
Total energy expenditure
of workout in Joules
Subcategories
When you select a main category, the subcategories will be shown below:
Power over 10 secondsPower 2 (W)
Power 3s Avg (W)
Power 30s Avg (W)
Power Previous
Lap (W)
Pedal Force (N)
Average 3 second Power
Average 30 seconds
Power
Average Power of the
whole session
Force on pedal
Instant speed in km/h
Speed (km/h)
Speed avg (km/h)
Speed Lap Average (W)
Speed Previous Lap
(km/h)
Distance (km)
Average Speed of the
whole session
Average Speed of the
current lap
Average Speed of the
whole session
Total distance traveled
HR in beats per minuteHR (bpm)
HR Average (bpm)
HR lap Avg (bpm)
HR Previous Lap (bpm)
Intensity
Average HR of whole
session
Average HR of the current
lap
Average HR of the
previous lap
Not available yet
8
U S E R M A N U A L | E N
Amount of revolutions per
minute
Cadence (rpm)
Cadence Average
Cadence Lap Average (W)
Cadence Previous Lap (W)
Balance
Average Cadence of the
whole session
Average Cadence of the
current lap
Average Cadence of the
previous lap
Not available yet
Vertical displacement per
minute
Vertical Velocity
(m/min)
Vert Vel Lap Average
(m/min)
Vert Vel Prev Lap Avg
(m/min)
Incline (%)
Elevation (m)
Average vertical
displacement p/m whole
session
Average vertical
displacement p/m previous
lap
Bottom part of the screen
The bottom part of the screen shows the following things:
Gears
The gear will start in 53/18. The shifters can be found on your handlebar. Front gear: 2 buttons at the left
to change the front 'chainrings' and 2 buttons at the right to change the gear on your 'cassette'. You can
change your gear set in your TrueAthletes account.
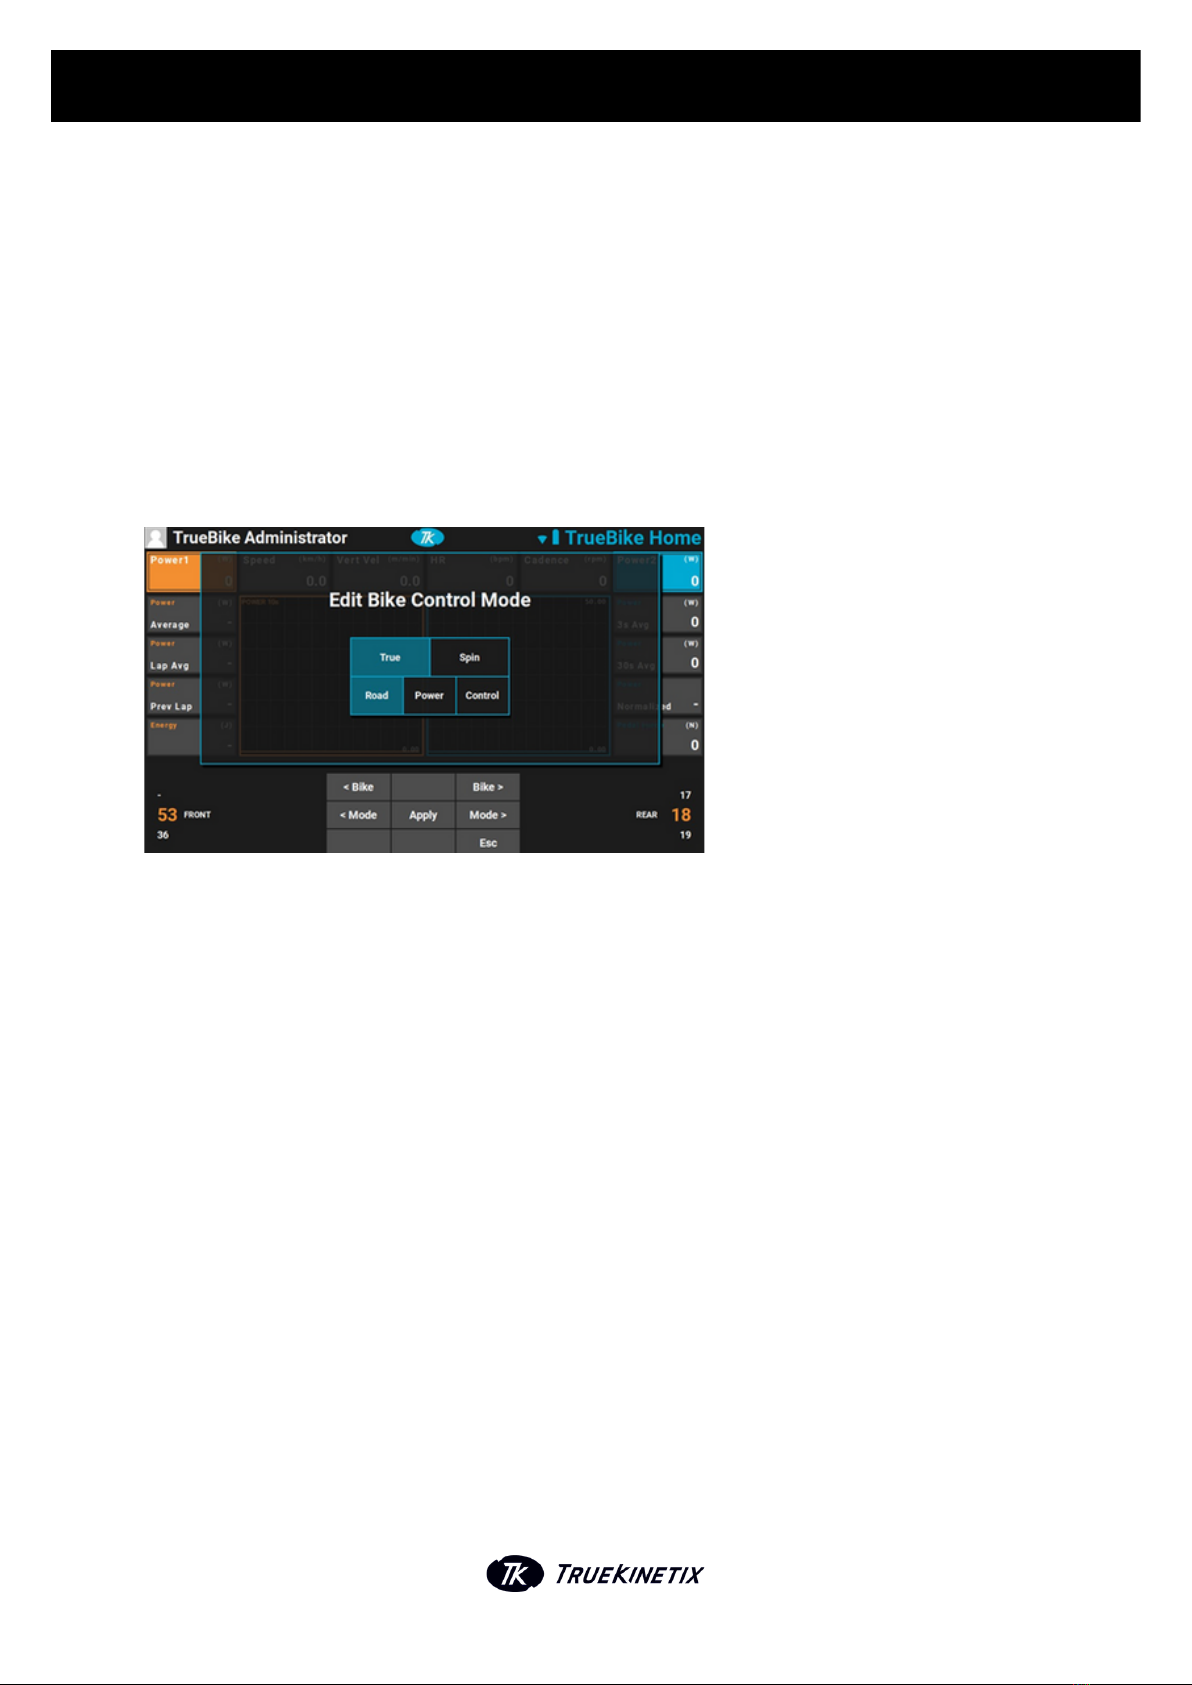
Bike mode
- True (=TrueBike).
- Spin (=spinning, simulation of a spinbike) mode.
Incline in percentage
Average vertical
displacement in meters
9
U S E R M A N U A L | E N
Type of training
- Road-mode: In this mode you can train and change the hill whenever you want. As a percentage
from +15% to -15%.
- Power: load-restricted mode in Watts.
- Control: mode in which you are controlled by external software.
You can change the ‘Mode’ by using the mode button as one of the 9 buttons on your keypad. When you
press ‘Mode’ the screen below will be shown:
To change the settings of your Bike (True or Spin), use the upper left and right button of your keypad
(shown on your screen as ‘< Bike’ and ‘Bike >’). To change the ‘Mode’ setting, press the middle left and
right button. You can choose between ‘Road’, ‘Power’ and ‘Control’. Press ‘Apply’ when you are done with
editing your Bike Control Mode.
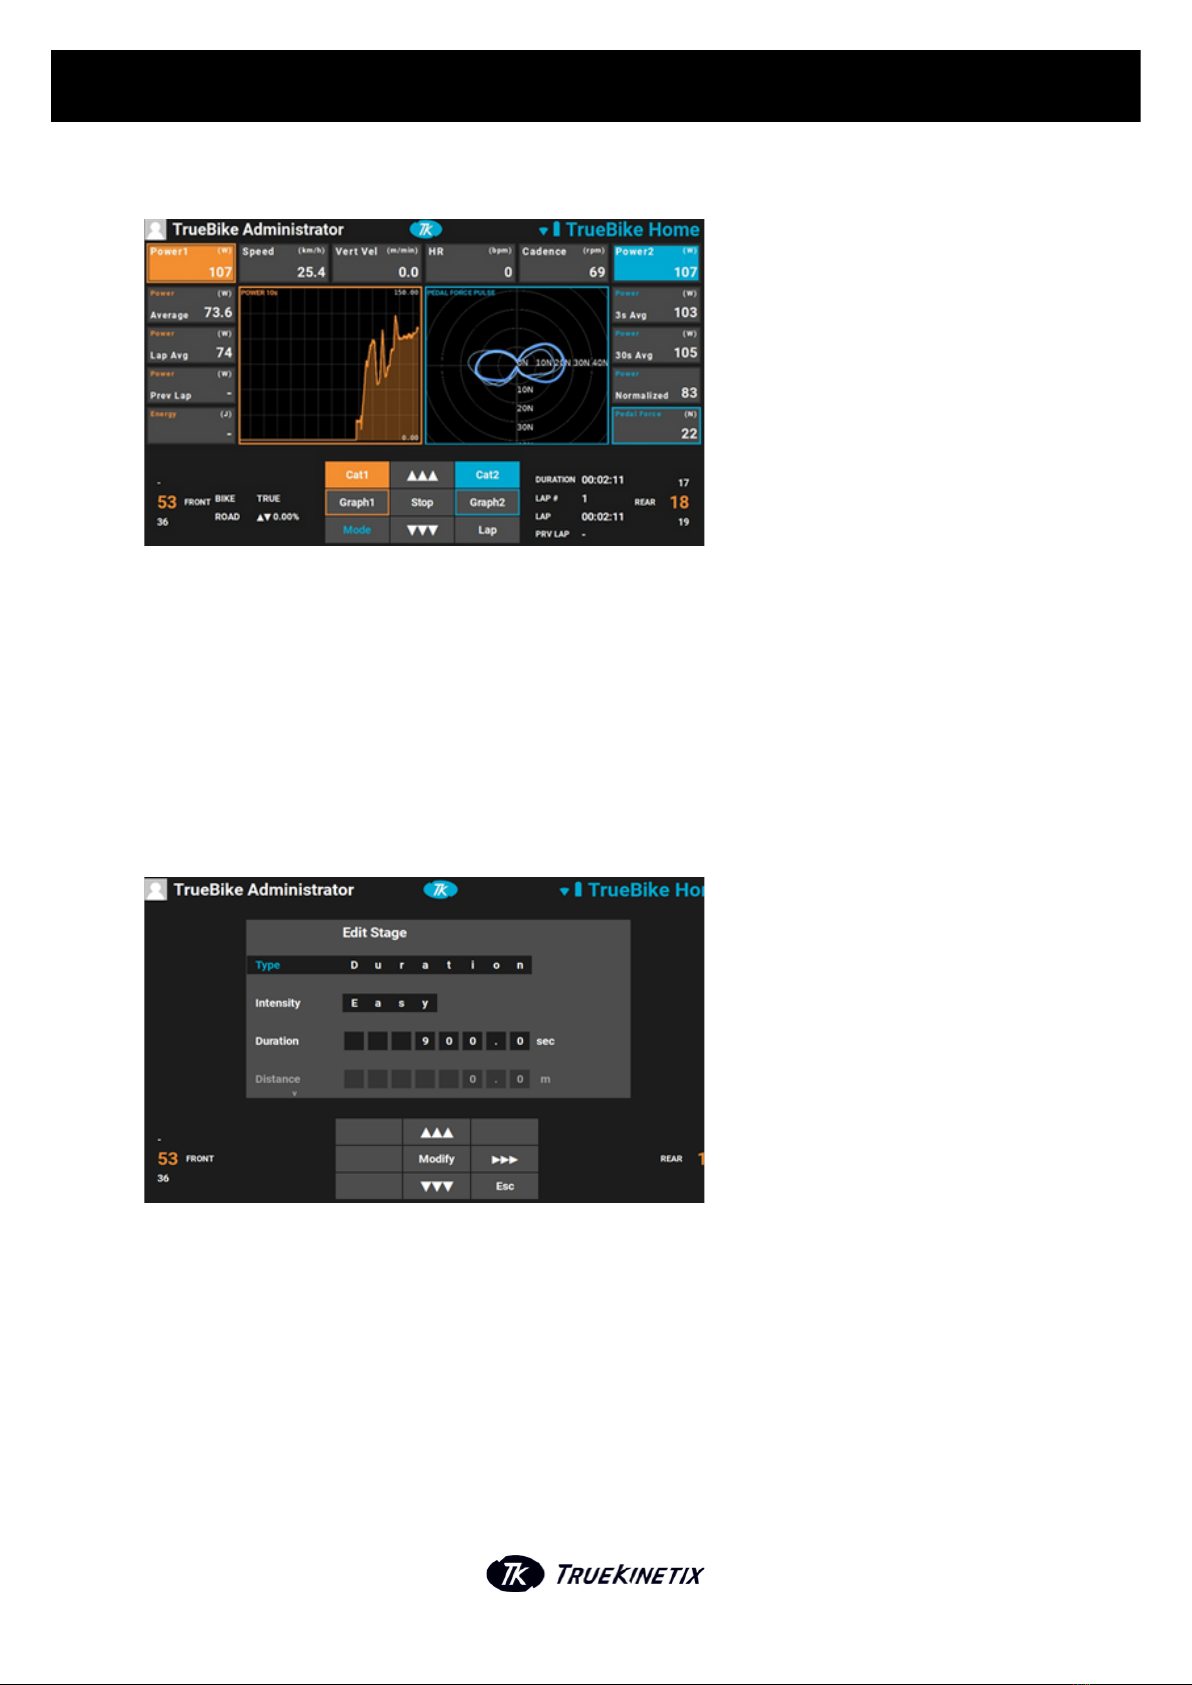
Press start to train
Your training will start after pressing ‘Start’. On the next page you can find an example of a training
screen. Every graph represents a selected category. The scale of the graph is automatically adapted to
your results. In the picture on the next page, the right graph shows the Pedal Force of your left and right
leg/pedal and the left graph shows the Power1.
1 0
U S E R M A N U A L | E N
4.2. CREATE PROGRAM
Next to ‘Train’ in your Home Menu, you will find ‘Program’. Select ‘Program’ if you want to select an
existing workout, choose it from the list. If you want to add a new workout, please select ‘Add new
workout’ by using the buttons on your panel. When selecting ‘Add new workout’ you will see a screen in
which you can start making your own training program.
First give your program a name by using the buttons on your panel. Navigate to ‘Add Event’ to start
editing/making your training and press ‘Select’. After pressing ‘Select’, the screen below will be shown.
In this screen, you can personalize a stage of your Program. The following options and subcategories
can be changed:
A. Type (the main purpose/objective of the stage of event)
- Duration
- Distance
- Elevation
- Energy
1 1

U S E R M A N U A L | E N
B. Intensity (the intensity of the stage of event)
- WarmUp
- CoolDown
- Easy
- Moderate
- Hard
- Sprint
C. Duration (how long the workout will last)
D. Distance (distance that will be covered during the workout)
E. Elevation (elevation in meters that will be covered during the workout)
F. Energy (energy expenditure in Joules during the workout)
G. Power (power during the workout)
H. Hill (% of the hill)
Be aware of the limitations in choosing your type of workout: If you choose ‘Elevation’, you are can only
change the ‘Hill’ option and not ‘Power’. When you select ‘Energy’, you can only change ‘Power’ and not
Hill’. Press ‘Modify’ when you have finished filling in all the data.
4.3. HISTORY
After you finish and save your session, the data will be uploaded to your TrueAthletes account (only
when you are connected to the WIFI). Log in to your account, click on the training you want to see and
analyse your data easily.
If you want to see your training data on the bike herself, you can go to ‘History’ in your Home screen. A
list of your training sessions will appear. Use the buttons to select a date to view a particular training
session with all the graphs and data. It initially shows the whole session, but you can also select
individual laps to look at by using the navigating buttons on your keypad. All the main categories, shown
at the top of the screen, can be displayed in a graph.
1 2

U S E R M A N U A L | E N
4.4. SETTINGS
To change your bike specific settings, go back to the Home Menu and select Settings. When you select
‘Settings’, the menu with the following options will occur:
Personal Info: In ‘Personal Info’ you can change your weight and maximal Heartrate.
Interface: Information about your TrueBike interface.
Support VPN: You will need this option when TrueKinetix needs to connect with your TrueBike for
support or other questions.
ANT+ Devices: Press here to connect your ANT+ Device with the TrueBike (see below).
Remove User: If you want to remove yourself as a user, please use this option.
Connect your ANT+ Device
Select ‘Devices’ and press ‘Enter’. If you have added HR monitors before, the device will be shown in a
list. If this is the first time or you want to connect another device, you need to select ‘Scan for new
device’ and wait till the system has found your device. Select your device and connect. Now your device
is connected. The ANT+ ID will be saved to your account, so next time you will not have to do a new scan.
In your TrueAthletes account you can find all the connected devices. Only in your online account, you
can change the name or delete the connected devices.
4.5. ABOUT
In 'About' you can find info about your TrueBike. You can also enter the System Settings if you use the
PIN.
1 3
U S E R M A N U A L | E N
5. CONNECTIONS
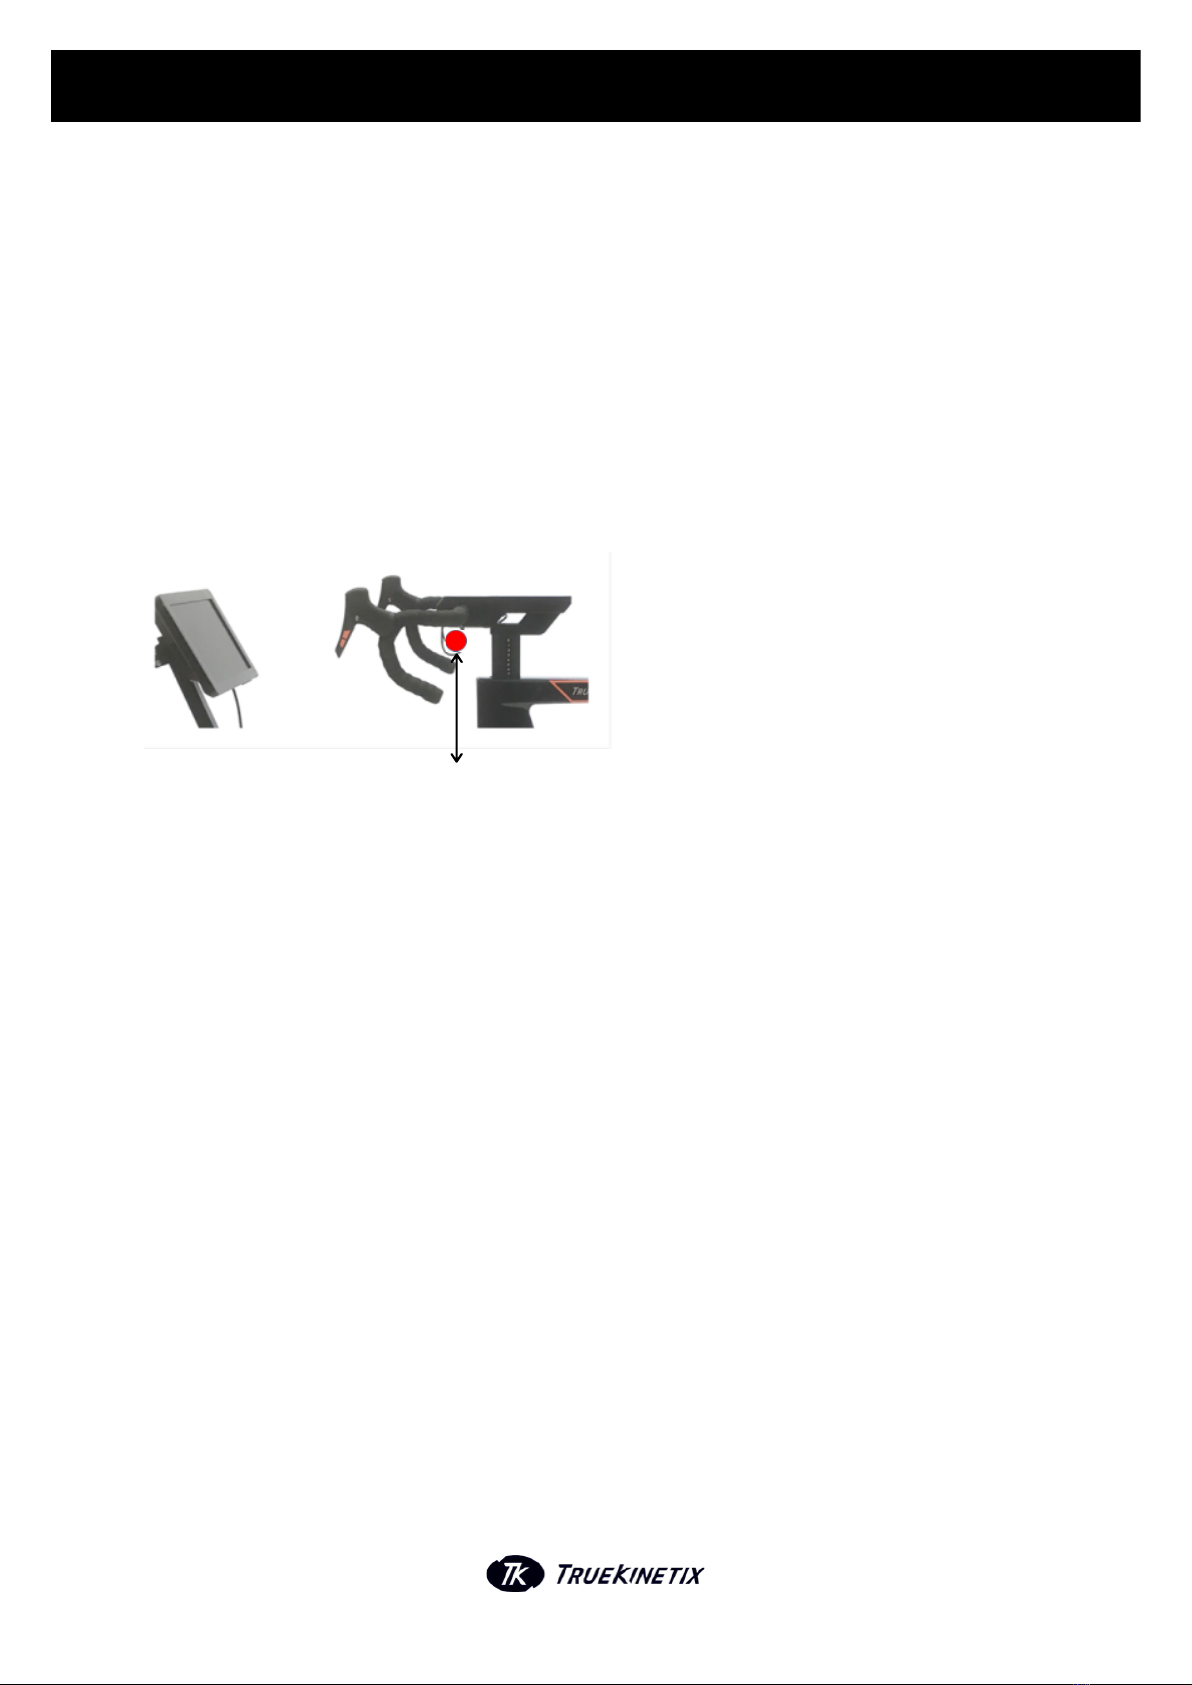
5.1. SPORTS WATCH
If you want to connect your watch with the TrueBike, your TrueBike needs to be in Train Mode. When
you are in Train Mode, you need to hold your watch just under the handlebar of your TrueBike (keep it
where the circle is located in the picture below) and follow the instructions on your watch.
5.2. ZWIFT
In ‘Settings’ you can find ‘Interface’. The interface shows you the BikeID of your TrueBike. You will need
this when you log in to your Zwift account. If you want to connect to Zwift, you need to open the Train
screen on your TrueBike. Start the Zwift program on your computer/laptop/ipad/phone and Zwift will
search for available connections. Select your TrueBikeID from the list and connect. After connecting in
Zwift, the TrueBike will ask you if you want to connect to an external controller. Select 'YES' and the
mode of the TrueBike will go to ‘CONTROL’. You are now connected to Zwift and you can start your
training. Make sure to press 'Start' to start your training on your TrueBike and analyse the data later.
Enjoy your ride!
Device
1 4

6. SUPPORT
We are continually optimizing the TrueBike and trying to give you the best TrueBike experience. We aim
for a trouble- and fault-free TrueBike and we will do everything to accomplish this aim. In spite of all the
effort we put in to achieving this aim, it is possible that you will experience a problem while using the
TrueBike. If errors or other problems do occur we will try to help you in a way that is suitable for you.
This might be by following the steps for solving one of our Frequently Asked Questions. A list of those
questions and solutions can be found on www.truekinetix.com/faq/. If your question and/or solution is
not in the Frequently Asked Questions list, please contact the helpdesk on the website or send an email
6.1. ERROR MESSAGES
If an error occurs on the screen, stop using the TrueBike and follow the steps on the support desk at
www.truekinetix.com/contact/, send an email to [email protected] or call with the contact
number for support below for help.
U S E R M A N U A L | E N
6.2. SPECIAL CONSIDERATIONS
The TrueBike should be used as explained above. If you do not and a problem occurs, we are not
responsible for any consequences and/or costs associated with this. Naturally, we want you to have an
optimal experience with the TrueBike and we will do everything in our power to help you solve any
problems. Unfortunately, we cannot guarantee a solution if the TrueBike is not used as explained above.
6.3. SUPPORT CONTACT
If the TrueBike does not work as it should, please view the Frequently Asked Questions (FAQ) list on
www.truekinetix.com/faq/. If your question and solution is not in the list, please contact the support
platform on https://truekinetix.com/contact/.
Contact& TrueBike Support
Phone +31 6 48 36 30 19
Email [email protected]
1 5
Table of contents
Popular Exercise Bike manuals by other brands


Efitment
Efitment IC033 user manual

Life Span
Life Span SP-870 M3 user manual

HEALTH RIDER
HEALTH RIDER Health Rider R1000t Bike Manuale d'istruzioni

Pro-Form
Pro-Form PFEX15914.0 user manual

In Shape
In Shape 17437 instruction manual

CARDIOSTRONG
CARDIOSTRONG Ergometer BX50 Assembly and operating instructions