TKS Kuhn FeedMixer User manual

TKS Operator’s manual
1
988876TKS Kuhn FeedMixer EN, 2016
Operator’s manual
TKS
Kuhn FeedMixer
From serialno.: 022 -

TKS Operator’s manual
2
We,
T. Kverneland & Sønner AS,
Kvernelandsvegen 100
N-4355 Kverneland
Norway
declare that the product:
TKS Kuhn - CENTRAMIX
has been built in conformity with the Machine Directive 2006/42/EC and meets the
relevant fundamental health and safety requirements.
Kverneland, 9 September 2016
Tønnes Helge Kverneland
General Manager
Enter the serial number
of the machine here :
T. Kverneland & Sønner AS, manufacturer of agricultural products, reserves the right
to change the design and/ or specifi cation of its products without prior warning.
This does not imply any obligation to modify previously supplied machines.
1 General safety instructions
1.1 CE - Declaration of conformity

TKS Operator’s manual
3
1.2 Guarantee
This TKS product is guaranteed against manufacturing and material defects for one year.
If the owner wishes a defect to be covered by the product guarantee, he or his representative must
inform the dealer of this when ordering parts and/ or repairs. Claims must be reported within the
guarantee period.
The dealer must complete a claims form for each case covered by a guarantee and send it to TKS
or TKS’s distributor/ importer within the 10th of the month following the one in which the defect was
reported.
The defective parts shall be marked with the claim number and be kept for up to 6 months so that
TKS or TKS’s distributor/ importer can inspect them.
Since TKS products are used outside the manufacturer’s control, we can only guarantee the
product quality, and not that it will perform its function, nor are we liable for any consequential
damage.
The guarantee is not valid if:
a) third party spare parts are used, or the product is repaired or altered without the
approval of TKS
b) the operating and servicing instructions have not been followed.
c) the machine has been used for other purposes than those for which it is designed.
The guarantee does not cover damage due to normal wear and tear.
Offi cial safety regulations specify requirements that apply to the users/ owners and manufacturers
of this machine, relating to the careful review of safety hazards that may arise when this type of
machine is used correctly. Therefore, TKS and our importer/ distributor are not responsible for the
functioning of components that are not shown in the spare parts catalogue for this product.
TKS reserves the right to change the design of the product without this implying any obligations in
relation to previously supplied machines.
NB! It must be possible to identify all enquiries relating to this product by the product’s serial
number; see page 9 on Machine identifi cation.

TKS Operator’s manual
4
Content
1 GENERAL SAFETY INSTRUCTIONS . . . . . . . . . . . . . . . . . . . . . . . . . . . . . . . . . 2
2 FUNCTION . . . . . . . . . . . . . . . . . . . . . . . . . . . . . . . . . . . . . . . . . . . . . . . . . . . . . 20
3 POSITIONING AND INSTALLATION . . . . . . . . . . . . . . . . . . . . . . . . . . . . . . . . . 24
4 USING FEEDMIXER . . . . . . . . . . . . . . . . . . . . . . . . . . . . . . . . . . . . . . . . . . . . . . 28
5 TROUBLESHOOTING . . . . . . . . . . . . . . . . . . . . . . . . . . . . . . . . . . . . . . . . . . . . 32
6 MAINTENANCE AND CARE . . . . . . . . . . . . . . . . . . . . . . . . . . . . . . . . . . . . . . . 33
7 LOADING CELL AMPLIFIER . . . . . . . . . . . . . . . . . . . . . . . . . . . . . . . . . . . . . . . 43
1 General safety instructions . . . . . . . . . . . . . . . . . . . . . . . . . . . . . . . . . . . . . . . . 2
1.1 CE - Declaration of conformity. . . . . . . . . . . . . . . . . . . . . . . . . . . . . . . . . . . . . . . . . . . 2
1.2 Guarantee . . . . . . . . . . . . . . . . . . . . . . . . . . . . . . . . . . . . . . . . . . . . . . . . . . . . . . . . . . 3
1.3 Introduction . . . . . . . . . . . . . . . . . . . . . . . . . . . . . . . . . . . . . . . . . . . . . . . . . . . . . . . . . 7
1.4 FeedMixer . . . . . . . . . . . . . . . . . . . . . . . . . . . . . . . . . . . . . . . . . . . . . . . . . . . . . . . . . . 8
1.4.1 Model description and area of use . . . . . . . . . . . . . . . . . . . . . . . . . . . . . . . . . . . 8
1.4.2 Machine identifi cation . . . . . . . . . . . . . . . . . . . . . . . . . . . . . . . . . . . . . . . . . . . . . 9
1.4.3 Technical data. . . . . . . . . . . . . . . . . . . . . . . . . . . . . . . . . . . . . . . . . . . . . . . . . . 10
1.4.4 Technical description . . . . . . . . . . . . . . . . . . . . . . . . . . . . . . . . . . . . . . . . . . . . 12
1.5 Safety . . . . . . . . . . . . . . . . . . . . . . . . . . . . . . . . . . . . . . . . . . . . . . . . . . . . . . . . . . . . 14
1.5.1 General safety instruction. . . . . . . . . . . . . . . . . . . . . . . . . . . . . . . . . . . . . . . . . 14
1.5.2 Additional safety instructions . . . . . . . . . . . . . . . . . . . . . . . . . . . . . . . . . . . . . . 16
1.5.3 Overview of safety risks . . . . . . . . . . . . . . . . . . . . . . . . . . . . . . . . . . . . . . . . . . 17
1.5.4 Lifting the machine . . . . . . . . . . . . . . . . . . . . . . . . . . . . . . . . . . . . . . . . . . . . . . 18
1.5.5 New machine - caution. . . . . . . . . . . . . . . . . . . . . . . . . . . . . . . . . . . . . . . . . . . 18
1.5.6 Lifting point . . . . . . . . . . . . . . . . . . . . . . . . . . . . . . . . . . . . . . . . . . . . . . . . . . . . 19

TKS Operator’s manual
5
2 Function . . . . . . . . . . . . . . . . . . . . . . . . . . . . . . . . . . . . . . . . . . . . . . . . . . . . . . . 20
2.1 Auger . . . . . . . . . . . . . . . . . . . . . . . . . . . . . . . . . . . . . . . . . . . . . . . . . . . . . . . . . . . . . 20
2.2 Knives . . . . . . . . . . . . . . . . . . . . . . . . . . . . . . . . . . . . . . . . . . . . . . . . . . . . . . . . . . . . 20
2.3 Overfl ow extension . . . . . . . . . . . . . . . . . . . . . . . . . . . . . . . . . . . . . . . . . . . . . . . . . . 21
2.4 Counter knives. . . . . . . . . . . . . . . . . . . . . . . . . . . . . . . . . . . . . . . . . . . . . . . . . . . . . . 22
2.5 Door location . . . . . . . . . . . . . . . . . . . . . . . . . . . . . . . . . . . . . . . . . . . . . . . . . . . . . . . 23
2.6 Ladder . . . . . . . . . . . . . . . . . . . . . . . . . . . . . . . . . . . . . . . . . . . . . . . . . . . . . . . . . . . . 23
3 Positioning and installation . . . . . . . . . . . . . . . . . . . . . . . . . . . . . . . . . . . . . . . 24
3.1 Installation . . . . . . . . . . . . . . . . . . . . . . . . . . . . . . . . . . . . . . . . . . . . . . . . . . . . . . . . . 25
3.2 Check gear oil level . . . . . . . . . . . . . . . . . . . . . . . . . . . . . . . . . . . . . . . . . . . . . . . . . . 25
3.3 Remote control of the feedout process . . . . . . . . . . . . . . . . . . . . . . . . . . . . . . . . . . . 27
4 Using FeedMixer . . . . . . . . . . . . . . . . . . . . . . . . . . . . . . . . . . . . . . . . . . . . . . . . 28
4.1 Loading . . . . . . . . . . . . . . . . . . . . . . . . . . . . . . . . . . . . . . . . . . . . . . . . . . . . . . . . . . . 28
4.2 Loading sequence . . . . . . . . . . . . . . . . . . . . . . . . . . . . . . . . . . . . . . . . . . . . . . . . . . . 29
4.3 Feed quantities . . . . . . . . . . . . . . . . . . . . . . . . . . . . . . . . . . . . . . . . . . . . . . . . . . . . . 30
4.4 Mixing . . . . . . . . . . . . . . . . . . . . . . . . . . . . . . . . . . . . . . . . . . . . . . . . . . . . . . . . . . . . 30
4.5 Warning sounds. . . . . . . . . . . . . . . . . . . . . . . . . . . . . . . . . . . . . . . . . . . . . . . . . . . . . 30
5 Troubleshooting . . . . . . . . . . . . . . . . . . . . . . . . . . . . . . . . . . . . . . . . . . . . . . . . 32

TKS Operator’s manual
6
6 Maintenance and care. . . . . . . . . . . . . . . . . . . . . . . . . . . . . . . . . . . . . . . . . . . . 33
6.1 General safety instructions . . . . . . . . . . . . . . . . . . . . . . . . . . . . . . . . . . . . . . . . . . . . 33
6.2 Recommended bolt torque . . . . . . . . . . . . . . . . . . . . . . . . . . . . . . . . . . . . . . . . . . . .34
6.3 Cleaning . . . . . . . . . . . . . . . . . . . . . . . . . . . . . . . . . . . . . . . . . . . . . . . . . . . . . . . . . .34
6.4 FeedMixer – operation. . . . . . . . . . . . . . . . . . . . . . . . . . . . . . . . . . . . . . . . . . . . . . . . 35
6.5 Shear bolt protection . . . . . . . . . . . . . . . . . . . . . . . . . . . . . . . . . . . . . . . . . . . . . . . . . 35
6.6 The auger knives. . . . . . . . . . . . . . . . . . . . . . . . . . . . . . . . . . . . . . . . . . . . . . . . . . . .36
6.7 Lubrication. . . . . . . . . . . . . . . . . . . . . . . . . . . . . . . . . . . . . . . . . . . . . . . . . . . . . . . . .38
6.8 Oil change . . . . . . . . . . . . . . . . . . . . . . . . . . . . . . . . . . . . . . . . . . . . . . . . . . . . . . . . .39
6.9 Filling with a pump. . . . . . . . . . . . . . . . . . . . . . . . . . . . . . . . . . . . . . . . . . . . . . . . . . .40
6.10 Lubrication table . . . . . . . . . . . . . . . . . . . . . . . . . . . . . . . . . . . . . . . . . . . . . . . . . . . 41
6.11 Oil change gear motor . . . . . . . . . . . . . . . . . . . . . . . . . . . . . . . . . . . . . . . . . . . . . . . 41
6.12 Lubricating the power transmission shaft . . . . . . . . . . . . . . . . . . . . . . . . . . . . . . . .42
7 Loading cell amplifi er . . . . . . . . . . . . . . . . . . . . . . . . . . . . . . . . . . . . . . . . . . . . 43
8 Recycling - waste to resource - . . . . . . . . . . . . . . . . . . . . . . . . . . . . . . . . . . . . 44
Notes . . . . . . . . . . . . . . . . . . . . . . . . . . . . . . . . . . . . . . . . . . . . . . . . . . . . . . . . . . . . . . . . . 45

TKS Operator’s manual
7
1.3 Introduction
Congratulations on buying your new TKS product. You have chosen a functional, high quality
product. A network of helpful dealers will be able to advise you on its use, as well as provide
servicing and spare parts.
All TKS products are designed, tested and built in close cooperation with farmers and machine
workshops to ensure optimal effi ciency and reliability.
Please read this instruction manual carefully and familiarise yourself with the machine‘s manner
of operation before starting to use it. There are many conditions and variables that can aff ect the
machine’s functionality and manner of operation. It is therefore vital that you consider all known
conditions and adapt usage according to these. A good understanding of the machine‘s manner of
operation and performance, together with a high degree of knowledge with regard to feeding and
feed types/consistencies will ensure the best possible result. The machine is a highly advanced
feed robot that operates without the need for supervision and must be used in accordance with the
applicable instructions from the manufacturer and other regulations in force at any given time.
By being thorough and making the necessary adaptations to local conditions, you will ensure the
best possible results.
Yours faithfully
T. Kverneland & Sønner AS
T. Kverneland & Sønner AS,
Kvernelandsvegen 100
N-4355 Kverneland
Norway
www.tks-as.no
Mail : [email protected]
Phone : + 47 51 77 05 00
Fax : + 47 51 48 72 28

TKS Operator’s manual
8
1.4 FeedMixer
1.4.1 Model description and area of use
FeedMixer is designed for cutting silage, round bales, square bales and most types of forage.
It cuts most types of round bales and silage. The cut depends on the consistency and type of feed.
FeedMixer is particularly useful for creating a good mix in a short time.
It is therefore suitable for mixing full feed, which often involves mixing feed types of very
diff erent consistency and character.
It is important that fi ner ingredients and smaller quantities are mixed quickly before the structure of
the feed is damaged. With its powerful motor and augerdesign, you will quickly obtain a loose and
homogeneous material that can be easily dispensed from all types of feed carts or
belts.
FeedMixer has vertical augers that produce a fi ne material in which the structure of the feed is
retained. It is particularly important with pre-dried material that the feed is not
compressed into wet lumps. This will reduce the feed intake to the animals.
To achieve the best possible result, more time and involvement is required than “traditional”
feedout methods. The quantities of individual feed types and the duration of the mixing process
must remain the same each time mixing is performed if composition and consistency are to remain
uniform – otherwise feed intake and production will be aff ected.
All functions are electrically operated. The counter knives are moved in position during mixing and
retracted during the discharging process.
Where FeedMixer has to discharging several times a day, the door is closed between each
operation.
FeedMixer can be equipped with a sensor that reset mixing time, when a new bale is loaded into
the machine while mixing process initiated
When weight system record loads under 200 kg in the mixer while discharging, the rotational
speed increases in order to clean the augers and threw off the rest of the feed.
FeedMixer can be supplied in sizes from 4 to 45 m3. Sizes of 8–15 m3 are supplied with one auger,
while sizes of 18–30 m3 are supplied with two augers. The electrical control system controls all
functions, and it has been confi gured for operating a conveyor belt. The mixing motor is controlled
by frequency inverter, enabling a soft start-up and stop.
The controller also includes measurement of power consumption, so you can keep an eye on what
it costs to use FeedMixer for a day, a week or a month, for instance. An electrical
stationary mixer is signifi cantly cheaper to run than tractor-powered models.
NB: The instructions given in this operator’s manual apply to standard operating conditions.
Individual circumstances may arise at the premises of the user that deviate from the
instructions provided here.
The need to make changes to the machines and equipment as a result of such
circumstances shall not constitute grounds for making a claim against the manufacturer or supplier.
Climate, temperature, grass types, time of cutting, cutting/pressing equipment and
conservation methods are some factors that may aff ect the functionality and performance of the
machine. It is important to adapt and adjust the machine to suit local conditions in order to achieve
the best possible result.
Chapter 1 describes the design of the machine and the functions of its individual components.
FeedMixer is occasionally pictured with optional equipment fi tted. Any optional equipment is
labelled as such in this instruction manual and can be supplied at an additional cost.
ICM_02
TKS Operator’s manual
9
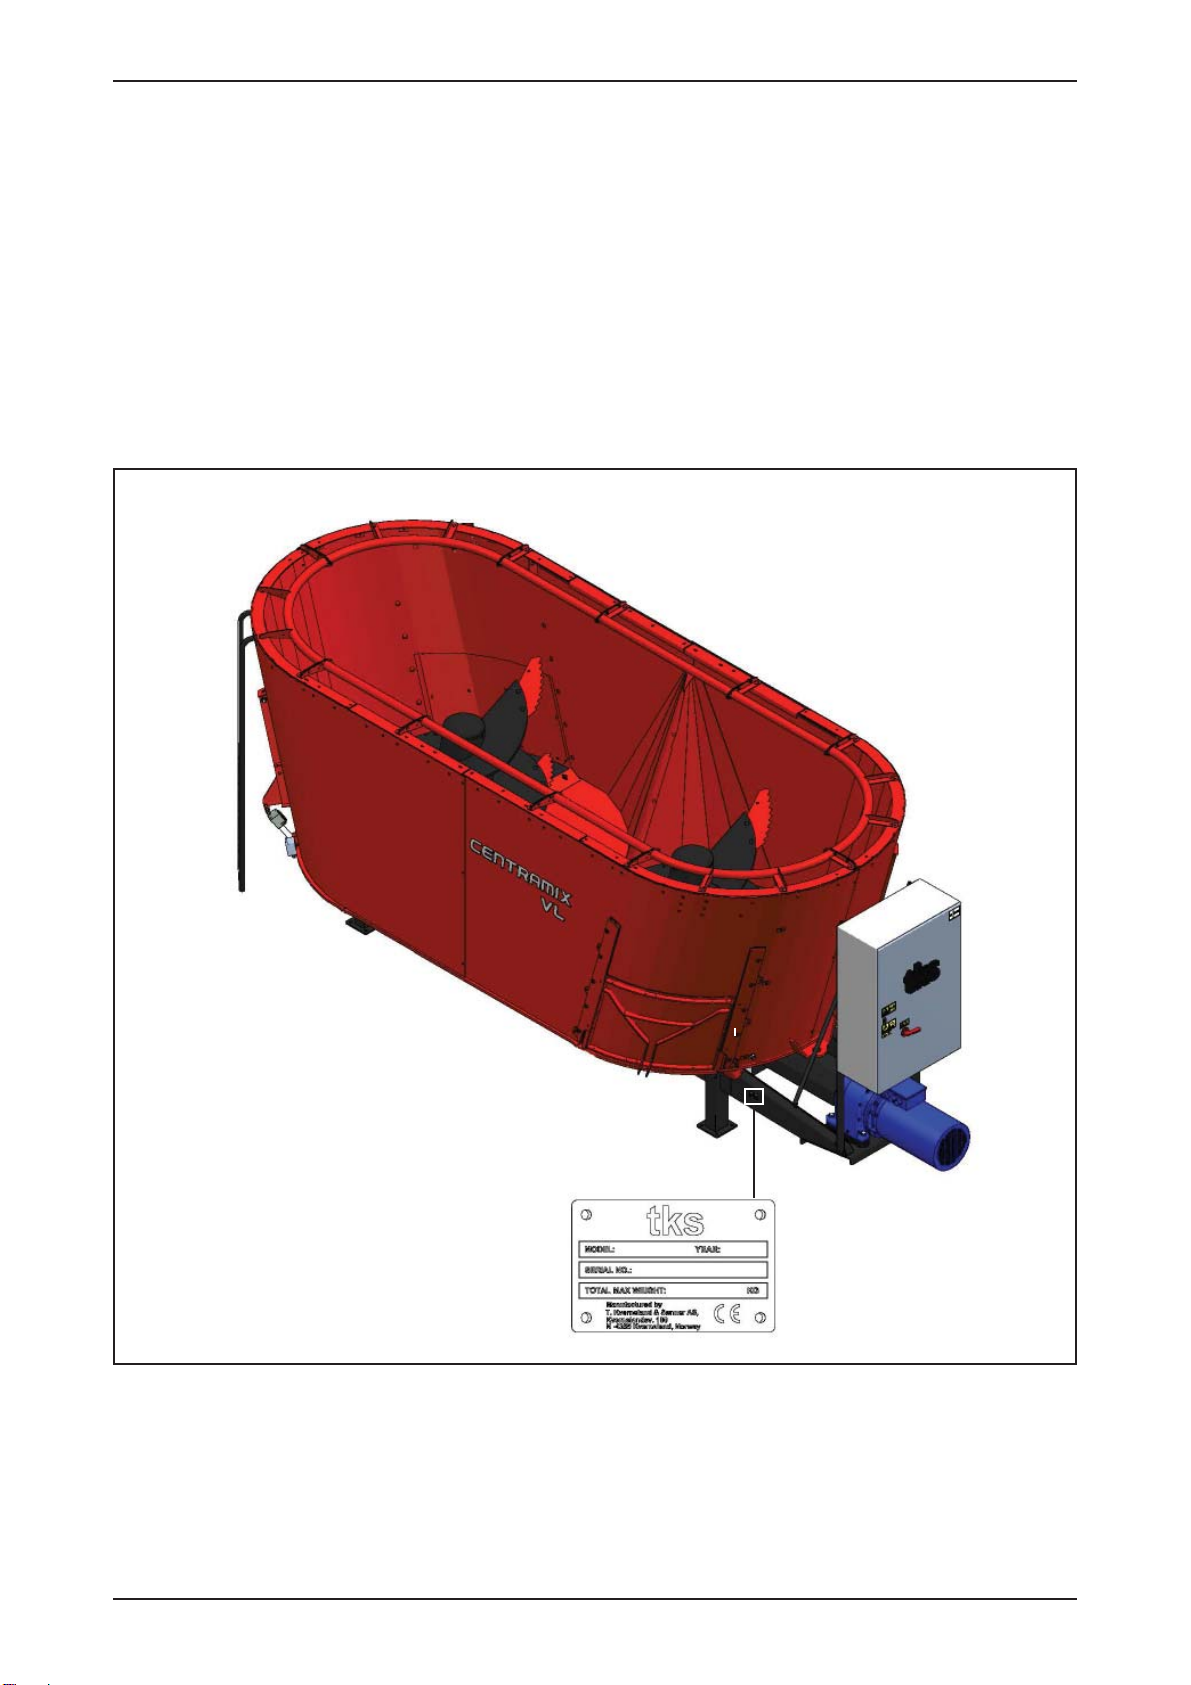
1.4.2 Machine identification
The machine’s serial number and the address of the manufacturer are written on the machine.
See the illustration on this page.
Please use the information on the name plate when making any enquiries about spare parts or
servicing.
This product is CE marked. This mark, along with the associated written EU confi rmation, means
that the product fulfi ls current health and safety requirements, and complies with the following
directives: Machine Directive 2006/42/EC

TKS Operator’s manual
10
1.4.3 Technical data
Size in
m3
Auger
Type 80 VC
w/end door
Lenght
A
Height
B
Height
C
Lenght
with
control
panel
D
Height
with
legs
E
Load
Kg
Motor
kW
91S 3325 1691 2472 4157 2466 3455 22
11 1S 3350 1973 2487 4177 2748 3550 30
13 1S 3504 2242 2472 4177 3013 3660 30
15 1S 3583 2373 2471 4187 3143 3720 37
18 2S 5707 1690 2481 6573 2368 6060 37
22 2S 5760 1973 2481 6573 2651 6190 37
25 2S 5913 2243 2481 6573 2921 6340 37
27 2S 5987 2373 2481 6630 3051 6450 45
30 2S 6168 2562 2487 6731 3240 6385 45
28 3S 7995 1975 2810 8395 2575 9000 45
33 3S 8110 2245 2740 8510 2845 9500 45
39 3S 8260 2375 2862 8660 2975 10000 55
45 3S 8335 2525 2876 8735 3125 10500 55
27 2S 5987 2373 2481 6630 3051 6440 45

ICM_03
ICM_04
TKS Operator’s manual
11
Measure - FeedMixer

5
74
2
3
8
1
6
9
TKS Operator’s manual
12
1.4.4 Technical description
1 Mixing hopper
2 Extension kit
3 Auger
4 Weighting cell
5 Gear unit
6 El. cabinet
7 Gear motor
8 Feedout chute
9 Counter knives with activator

A
B
ICM_10
ICM_15
TKS Operator’s manual
13
Equipment:
A Loading cell
B Counter knife with activator
Equipement entièrement assemblé

TKS Operator’s manual
14
1.5
Safety Please pay particular attention to this symbol. It
designates a safety risk, and describes
precautions that must be taken to avoid
accidents.
Before operating, adjusting or repairing the
machine, the user, technician or owner should
familiarise himself with the safety instructions
contained in this installation manual.
Safety at work is your responsibility!
Please read and understand these general
safety instructions.
1.5.1
General safety instructions In order to be able to load the bale into the
hopper, the machine must be open.This means
that people may come into contact with moving
parts if they are standing in the immediate
vicinity of the machine while it is in use.
Warning! Once the auger is running, never
lean over the top edge of FeedMixer or enter
the hopper when the machine is operating.
If the machine is placed in a sunken fl oor, the
distance from the fl oor to the top of FeedMixer
must not be less than 1.5 m.
It is a conditional requirement of using the
machine that no one must be in the immediate
vicinity of the machine during use.
In addition, in terms of machine type,
FeedMixer is of conventional agricultural design
and, from a safety perspective, the solutions
choosen are considered to be on a par with or
superior to existing products on the market.
Use of the machine
The machine must only be used for the purpose
for which it is designed.
Operating
The machine operator must remain at the end
of the machine where the control box and the
associated operating panel are mounted.
Supervision
The owner/operator must ensure that the area
is suffi ciently signposted and that there is no
unauthorised access.

TKS Operator’s manual
15
The machine’s method of operation
The operator must familiarise himself with the
machine’s method of operation and function so
that the machine can be used in a safe and
appropriate manner.
Keep a safe distance
Humans and animals must be kept away from
the machine when it is in operation.
Keep your distance from working, rotating
and moving parts.
Think safety at work
Never climb on the machine while it is operat-
ing.
When performing maintenance, the power
supply must be disconnected
Warning – audio and illuminated
indicator
The control system (software) has been
updated for safe start-up. A built-in buzzer
sounds for 30 seconds before start-up of the
machine. This audio signal is accompanied by a
light signal that fl ashes during the entire period
of operation.
Protective guards
Check that all guards are in place and installed
correctly. Do not start the machine until this has
been done. Damaged guards must be repaired
or replaced immediately.
Spare parts
For safety reasons we recommend that you
only use original spare parts. The use of
third-party spares invalidates the product
guarantee.
Maintenance
Ensure that the machine is properly maintained
and is kept in good condition. Never attempt to
change the mechanical workings of the ma-
chine.
The area in which the machine is
operating
Must be physically sealed off or locked to
prevent danger to humans or animals.
Control panel
The power supply must be cut off before
opening the panel.

TKS Operator’s manual
16
1.5.2
Additional safety
instructions
The machine is marked with a warning
signs. If these signs are damaged, they must
be replaced. The order number is shown on the
illustrations in this section.
Side 17 for their location on the machine.
Warning sign UH220532 (Fig. 1)
Be careful! Ensure that you read and
understand the instruction manual before using
the machine, and before making any
adjustments or performing any maintenance.
Warning sign UH220536 (Fig. 2)
Risk of crushing hand.
Keep away from the counter knives.
Warning sign 988346 (Fig. 3)
The main power switch must be secured by a
padlock.
Work should only be performed by
authorised personnel.
Warning sign UH220534 (Fig. 4)
Disconnect all electrical connections before
carrying out welding work or maintenance.
Fig. 3
Fig. 2
Fig. 1
Fig. 4

UH220532
UH220534
988346
988346
UH220536
TKS Operator’s manual
17
1.5.3 Overview of safety risks

TKS Operator’s manual
18
1.5.4
Lifting the machine The lifting straps are attached to the points
screwed into the bottom of FeedMixer.
See Fig. 5
Use an extra strap to help keep the machine in
position.
Caution!
Never stand underneath a suspended load.
Any persons carrying out lifting operations must
of course have the appropriate qualifi cations/
skills.
Be careful!
Keep your distance when moving the machine.
Ensure that there are no persons underneath or
near the machine during lifting.
1.5.5
New machine - caution Read the operator’s manual
Be particularly careful when starting a new
machine for the fi rst time. Installation faults,
incorrect operation, etc. may lead to expensive
repairs and loss of earnings. The TKS product
guarantee does not cover damage resulting
from failure to follow the recommendations
contained in the instruction manual.
Please pay particular attention to this symbol.
It is used to highlight important information, to
help prevent incorrect installation and
operation.
Pay particular attention to the following
when commissioning a new machine:
• Check that the machine is correctly installed
and that it is not damaged. Check to make
sure that electrical cables are long enough,
and positioned in such a way that they can
track the movements of the machine without
being damaged.
UH220307
ICM_09
ICM_22
A
TKS Operator’s manual
19
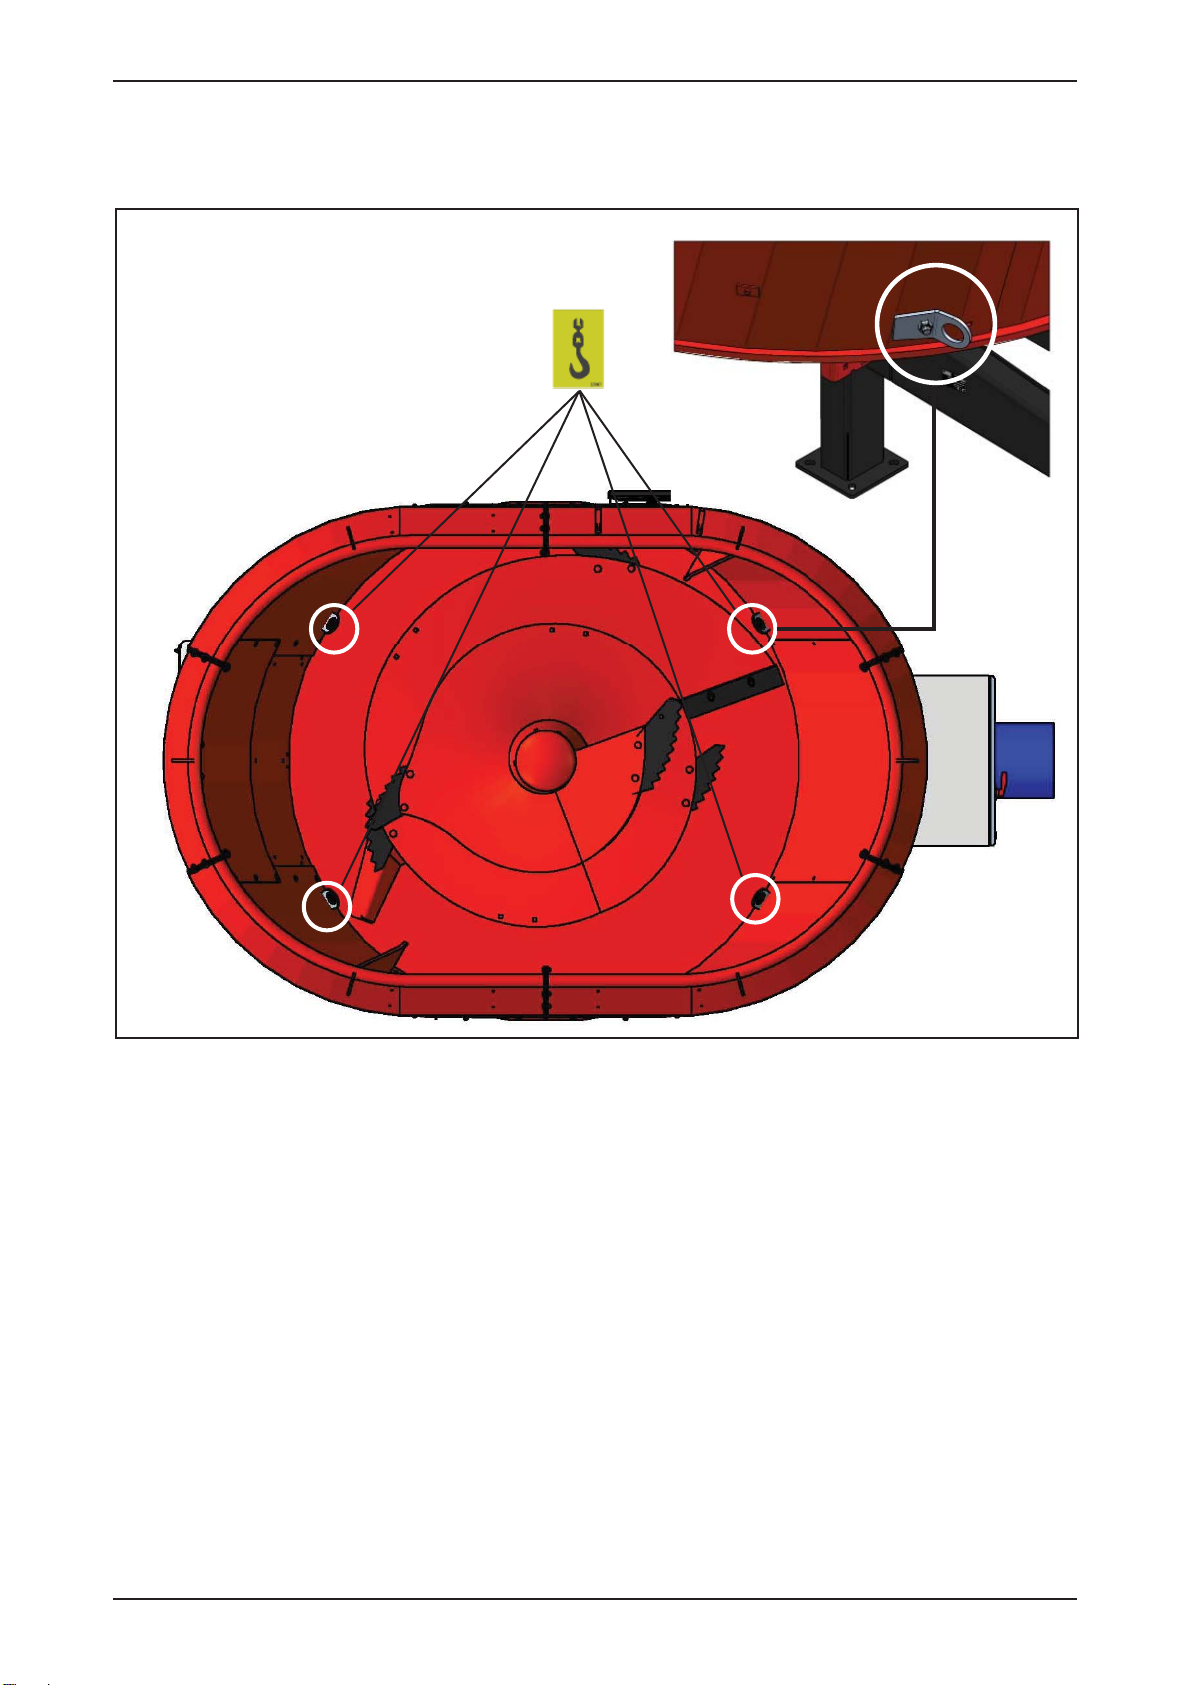
1.5.6 Lifting point
Fig. 5
Lifting point
Detach the four lifting points (A) after the machine is hoisted into place, and fi t them to the outside
of FeedMixer for subsequent use as and when needed. See Fig. 5

5
3
2
4
1
TKS Operator’s manual
20
2 Function
2.1 Auger
There is a shear bolt connection between
the lay shaft and the planet gear.
If the machine becomes overloaded the
shear bolt will shear, thus stopping power
transmission to the auger.
During the mixing process, the auger transports
the feed upwards to the middle of the mixing
hopper.
The feed then falls off the mixing auger and a
mixing cycle is created.
2.2 Knives The auger (2), which is equipped with knives
(1), fi nely chops up the feed constituents that
have been loaded into the mixing hopper.
A discharging arm (3) together with the blades
of the auger ensure a more stable and even
discharging process.
See Fig. 7
The knives on the auger can be set to an
aggressive position (4) or a normal
position (5). The adjustable knives allow the
mixing system to be adjusted to suit
individual operating conditions at the company
and the structure of the feed constituents.
Aggressive = short mixing time, higher power
consumption.
Normal = longer mixing time, lower power
consumption.
(E.g. if the fuses are smaller)
Fig. 6
Fig. 7
Table of contents
Other TKS Farm Equipment manuals


Popular Farm Equipment manuals by other brands


MacDon
MacDon 2000-B Operator's manual

Osborne
Osborne Big Wheel RN1 Series Assembly & operating instructions

Gaspardo
Gaspardo ELEFANTE Use and maintenance

Unverferth
Unverferth BLU-JET AT4615 manual

DuraTech Industries
DuraTech Industries HAYBUSTER CMF-1150 Operating Instructions and Parts Reference

Amazone
Amazone CatrosXL 4003-2 Original operating manual