TKS K2 CombiCutter User manual
TKS Operator's manual
1
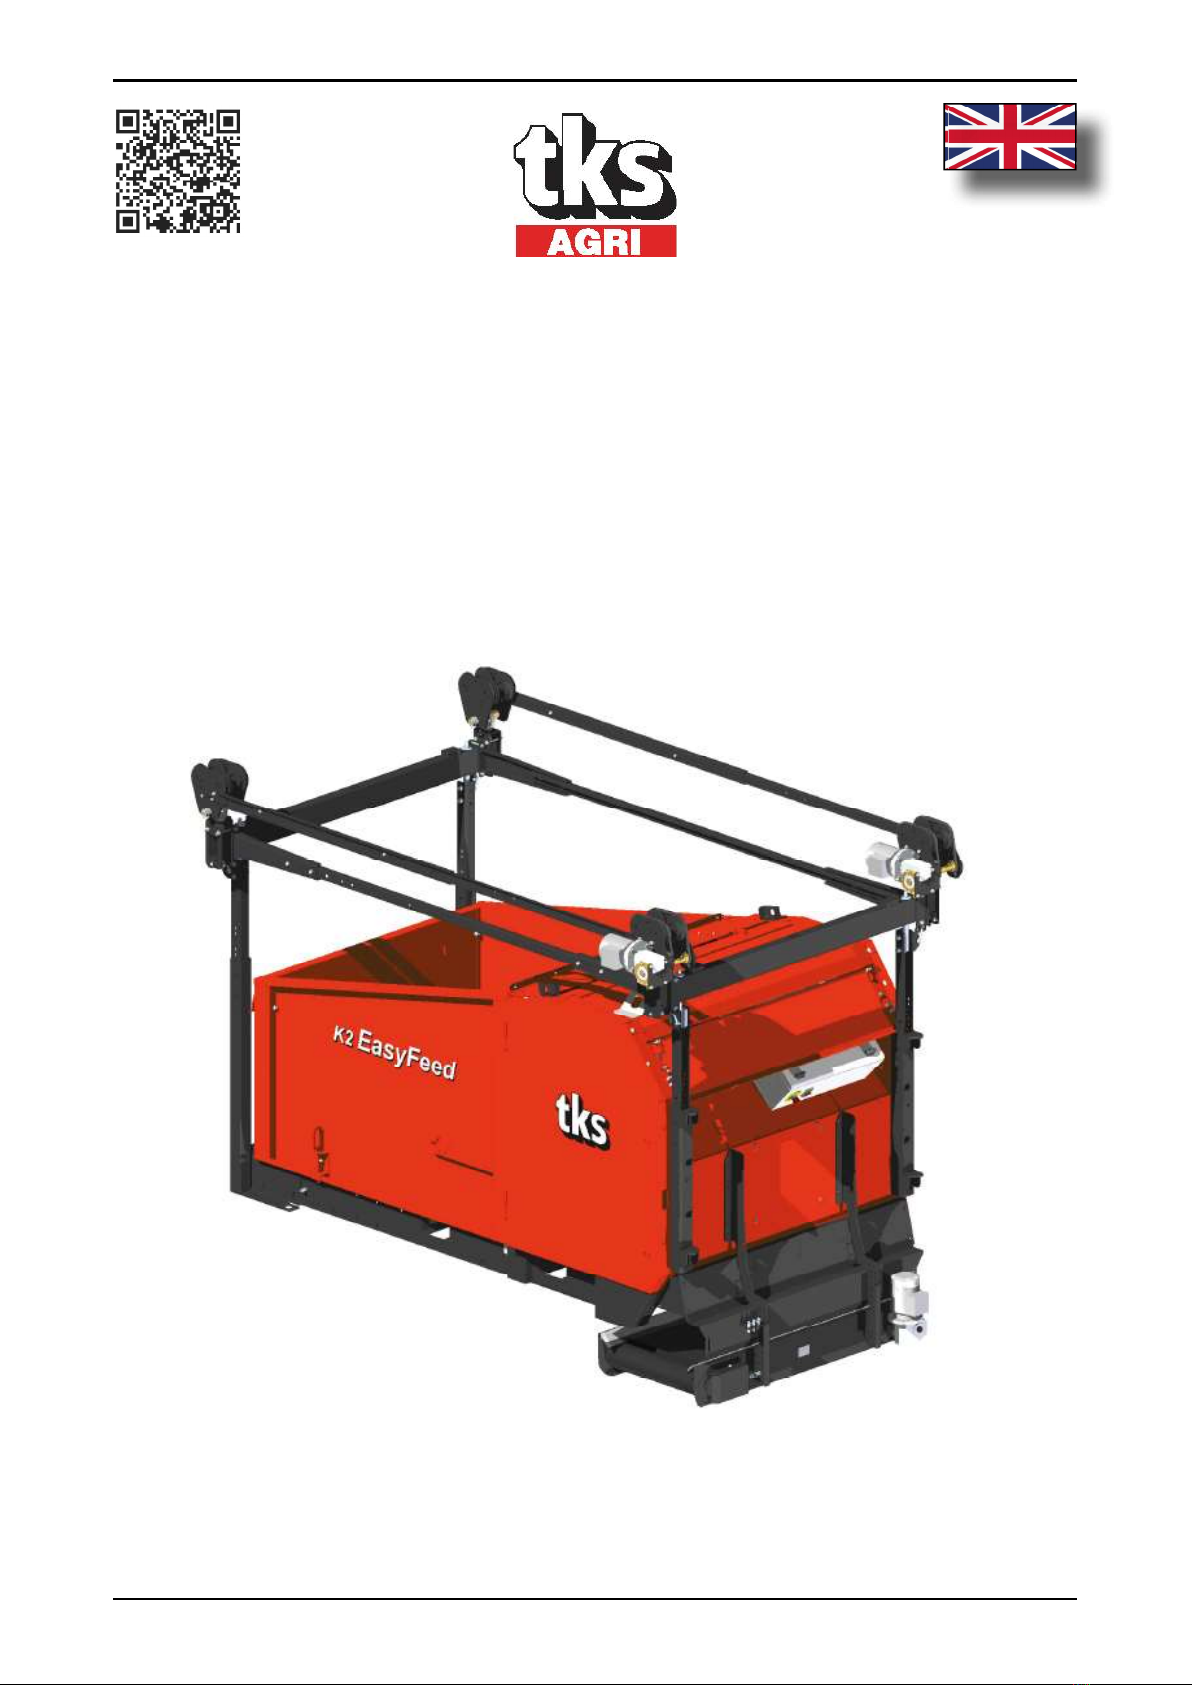
K2 EasyFeed Multifi ll V1.9 2022 EN 989053
Operator's manual
K2
EasyFeed Multifi ll

TKS Operator's manual
2
Content
1 GENERAL SAFETY INSTRUCTIONS. . . . . . . . . . . . . . . . . . . . . . . . . . . . . . . . . . . . . . . 6
2 USING THE CONTROL BOX . . . . . . . . . . . . . . . . . . . . . . . . . . . . . . . . . . . . . . . . . . . .15
3 OPERATION . . . . . . . . . . . . . . . . . . . . . . . . . . . . . . . . . . . . . . . . . . . . . . . . . . . . . . . . . 20
4 ALARM AND TROUBLESHOOTING . . . . . . . . . . . . . . . . . . . . . . . . . . . . . . . . . . . . . . 55
5 RECYCLING - WASTE TO RESOURCE -. . . . . . . . . . . . . . . . . . . . . . . . . . . . . . . . . . . 62
1 General safety instructions . . . . . . . . . . . . . . . . . . . . . . . . . . . . . . . . . . . . . . . . 6
1.1 CE - Declaration of conformity. . . . . . . . . . . . . . . . . . . . . . . . . . . . . . . . . . . . . . . . . . . 6
1.2 Garantee . . . . . . . . . . . . . . . . . . . . . . . . . . . . . . . . . . . . . . . . . . . . . . . . . . . . . . . . . . . 7
1.3 Introduction . . . . . . . . . . . . . . . . . . . . . . . . . . . . . . . . . . . . . . . . . . . . . . . . . . . . . . . . . 8
1.4 Safety . . . . . . . . . . . . . . . . . . . . . . . . . . . . . . . . . . . . . . . . . . . . . . . . . . . . . . . . . . . . 10
1.4.1 General safety instructions. . . . . . . . . . . . . . . . . . . . . . . . . . . . . . . . . . . . . . . . 10
1.4.2 Additional safety instructions . . . . . . . . . . . . . . . . . . . . . . . . . . . . . . . . . . . . . . 12
1.4.3 Overview of safety risks . . . . . . . . . . . . . . . . . . . . . . . . . . . . . . . . . . . . . . . . . . 13
1.4.4 Lifting the machine with a crane. . . . . . . . . . . . . . . . . . . . . . . . . . . . . . . . . . . . 14
1.4.5 New machine caution . . . . . . . . . . . . . . . . . . . . . . . . . . . . . . . . . . . . . . . . . . . . 14
2 Using the control box . . . . . . . . . . . . . . . . . . . . . . . . . . . . . . . . . . . . . . . . . . . . 15
2.1 Constituent parts – radiocontrolled remote operation . . . . . . . . . . . . . . . . . . . . . . . . 15
2.2 Location and connection . . . . . . . . . . . . . . . . . . . . . . . . . . . . . . . . . . . . . . . . . . . . . . 15
2.3 Battery . . . . . . . . . . . . . . . . . . . . . . . . . . . . . . . . . . . . . . . . . . . . . . . . . . . . . . . . . . . . 15
2.4 Screen . . . . . . . . . . . . . . . . . . . . . . . . . . . . . . . . . . . . . . . . . . . . . . . . . . . . . . . . . . . . 15
2.5 Warranty . . . . . . . . . . . . . . . . . . . . . . . . . . . . . . . . . . . . . . . . . . . . . . . . . . . . . . . . . . 15
2.6 Password. . . . . . . . . . . . . . . . . . . . . . . . . . . . . . . . . . . . . . . . . . . . . . . . . . . . . . . . . .16
2.7 Numeric keypad. . . . . . . . . . . . . . . . . . . . . . . . . . . . . . . . . . . . . . . . . . . . . . . . . . . . .17
2.8 Alphabetic keypad . . . . . . . . . . . . . . . . . . . . . . . . . . . . . . . . . . . . . . . . . . . . . . . . . . .17

TKS Operator's manual
3
2.9 Selecting values . . . . . . . . . . . . . . . . . . . . . . . . . . . . . . . . . . . . . . . . . . . . . . . . . . . .18
2.10 On/Off button. . . . . . . . . . . . . . . . . . . . . . . . . . . . . . . . . . . . . . . . . . . . . . . . . . . . . . 18
2.11 Close windows. . . . . . . . . . . . . . . . . . . . . . . . . . . . . . . . . . . . . . . . . . . . . . . . . . . . . 18
2.12 Manual button on cabinet or panel control . . . . . . . . . . . . . . . . . . . . . . . . . . . . . . . 19
3 Operation . . . . . . . . . . . . . . . . . . . . . . . . . . . . . . . . . . . . . . . . . . . . . . . . . . . . . . 20
3.1 Home screen . . . . . . . . . . . . . . . . . . . . . . . . . . . . . . . . . . . . . . . . . . . . . . . . . . . . . . . 20
3.2 Set the clock . . . . . . . . . . . . . . . . . . . . . . . . . . . . . . . . . . . . . . . . . . . . . . . . . . . . . . .21
3.3 Single sequence settings. . . . . . . . . . . . . . . . . . . . . . . . . . . . . . . . . . . . . . . . . . . . . . 21
3.3.1 Sequence/group without weight, without "Grain" and without "Multifi ll". . . . . . . 21
3.3.2 Sequence with weight, with grain without "Multifi ll". . . . . . . . . . . . . . . . . . . . . . 22
3.3.3 Sequence with weight, with grain with "Multifi ll". . . . . . . . . . . . . . . . . . . . . . . . . 22
3.3.4 Sequence Options. . . . . . . . . . . . . . . . . . . . . . . . . . . . . . . . . . . . . . . . . . . . . . . 22
3.3.4.1 Command "Fill" . . . . . . . . . . . . . . . . . . . . . . . . . . . . . . . . . . . . . . . . . . . .24
3.3.4.2 Command "Deliver feed" . . . . . . . . . . . . . . . . . . . . . . . . . . . . . . . . . . . . . 26
3.3.4.3 Command "Feeding grain 1" and "Feeding grain 2" . . . . . . . . . . . . . . . . 28
3.3.4.4 Command "Go to" . . . . . . . . . . . . . . . . . . . . . . . . . . . . . . . . . . . . . . . . . .30
3.3.4.5 Command "Pause" . . . . . . . . . . . . . . . . . . . . . . . . . . . . . . . . . . . . . . . . .31
3.3.4.6 Command "Run sequence" . . . . . . . . . . . . . . . . . . . . . . . . . . . . . . . . . . . 32
3.3.4.7 Delete command line. . . . . . . . . . . . . . . . . . . . . . . . . . . . . . . . . . . . . . . . 33
3.3.4.8 Floating command line . . . . . . . . . . . . . . . . . . . . . . . . . . . . . . . . . . . . . . 33
3.3.4.9 Generally about sequence. . . . . . . . . . . . . . . . . . . . . . . . . . . . . . . . . . . . 33
3.3.5 Schedule . . . . . . . . . . . . . . . . . . . . . . . . . . . . . . . . . . . . . . . . . . . . . . . . . . . . . . 34
3.3.6 Options . . . . . . . . . . . . . . . . . . . . . . . . . . . . . . . . . . . . . . . . . . . . . . . . . . . . . . .34
3.4 Feed now function . . . . . . . . . . . . . . . . . . . . . . . . . . . . . . . . . . . . . . . . . . . . . . . . . .35
3.4.1 EasyFeed - Press once for the feeding of several groups . . . . . . . . . . . . . . . . 35
3.4.2 Changing and starting EasyFeed . . . . . . . . . . . . . . . . . . . . . . . . . . . . . . . . . . . 35

TKS Operator's manual
4
3.5 Menu. . . . . . . . . . . . . . . . . . . . . . . . . . . . . . . . . . . . . . . . . . . . . . . . . . . . . . . . . . . . . 36
3.5.1 Defi ne groups . . . . . . . . . . . . . . . . . . . . . . . . . . . . . . . . . . . . . . . . . . . . . . . . . . 36
3.5.2 Forage settings. . . . . . . . . . . . . . . . . . . . . . . . . . . . . . . . . . . . . . . . . . . . . . . . . 37
3.5.2.1 Manual fi lling. . . . . . . . . . . . . . . . . . . . . . . . . . . . . . . . . . . . . . . . . . . . . .37
3.5.2.2 Filling from the top . . . . . . . . . . . . . . . . . . . . . . . . . . . . . . . . . . . . . . . . . 37
3.5.2.3 Filling from Magazine side 1. . . . . . . . . . . . . . . . . . . . . . . . . . . . . . . . . .38
3.5.2.4 Forage settings MULTIFILL . . . . . . . . . . . . . . . . . . . . . . . . . . . . . . . . . .39
3.5.3 Grain settings . . . . . . . . . . . . . . . . . . . . . . . . . . . . . . . . . . . . . . . . . . . . . . . . . .40
3.5.4 Cutter settings Side 1 . . . . . . . . . . . . . . . . . . . . . . . . . . . . . . . . . . . . . . . . . . . . 41
3.5.5 System menu . . . . . . . . . . . . . . . . . . . . . . . . . . . . . . . . . . . . . . . . . . . . . . . . . . 42
3.5.5.1 Calibration . . . . . . . . . . . . . . . . . . . . . . . . . . . . . . . . . . . . . . . . . . . . . . .43
3.5.5.2 Reduced speed . . . . . . . . . . . . . . . . . . . . . . . . . . . . . . . . . . . . . . . . . . . 44
3.5.5.3 Inputs and outputs . . . . . . . . . . . . . . . . . . . . . . . . . . . . . . . . . . . . . . . . . 45
3.5.5.4 Options . . . . . . . . . . . . . . . . . . . . . . . . . . . . . . . . . . . . . . . . . . . . . . . . . . 45
3.5.5.5 Brush settings. . . . . . . . . . . . . . . . . . . . . . . . . . . . . . . . . . . . . . . . . . . . . 46
3.5.5.6 Factory settings . . . . . . . . . . . . . . . . . . . . . . . . . . . . . . . . . . . . . . . . . . . 47
3.6 Language settings . . . . . . . . . . . . . . . . . . . . . . . . . . . . . . . . . . . . . . . . . . . . . . . . . .47
3.7 Time counter / Maintenance . . . . . . . . . . . . . . . . . . . . . . . . . . . . . . . . . . . . . . . . . . 48
3.8 Alarms log . . . . . . . . . . . . . . . . . . . . . . . . . . . . . . . . . . . . . . . . . . . . . . . . . . . . . . . . 48
3.9 Multi-fi lling settings . . . . . . . . . . . . . . . . . . . . . . . . . . . . . . . . . . . . . . . . . . . . . . . . . . 49
3.9.1 Filling point settings. . . . . . . . . . . . . . . . . . . . . . . . . . . . . . . . . . . . . . . . . . . . . 49
3.9.2 Conveyor settings . . . . . . . . . . . . . . . . . . . . . . . . . . . . . . . . . . . . . . . . . . . . . . 51
3.9.3 PLC inputs / outputs . . . . . . . . . . . . . . . . . . . . . . . . . . . . . . . . . . . . . . . . . . . . 51
3.9.4 Filling point settings. . . . . . . . . . . . . . . . . . . . . . . . . . . . . . . . . . . . . . . . . . . . . 52
3.10 Manual Operation. . . . . . . . . . . . . . . . . . . . . . . . . . . . . . . . . . . . . . . . . . . . . . . . . . 53
3.11 Filling . . . . . . . . . . . . . . . . . . . . . . . . . . . . . . . . . . . . . . . . . . . . . . . . . . . . . . . . . . .54

TKS Operator's manual
5
4 Alarms and troubleshooting. . . . . . . . . . . . . . . . . . . . . . . . . . . . . . . . . . . . . . . 55
4.1 Alarms and controlbox . . . . . . . . . . . . . . . . . . . . . . . . . . . . . . . . . . . . . . . . . . . . . . .55
5 Recycling - waste to resource - . . . . . . . . . . . . . . . . . . . . . . . . . . . . . . . . . . . . 62
Notes . . . . . . . . . . . . . . . . . . . . . . . . . . . . . . . . . . . . . . . . . . . . . . . . . . . . . . . . . . . . . . . . . 63

TKS Operator's manual
6
1 General safety instructions
Wi,
TKS Agri AS,
Kvernelandsvegen 100
N-4355 Kverneland
Norway
declare that the product:
TKS - K2 EasyFeed Multifi ll
has been built in conformity with the Machine Directive and meets the relevant fundamental health
and safety requirements.
Kverneland, 15 September 2022
Atle Sjølyst - Kverneland
General Manager
Enter the serial number
on the machine:
TKS Agri AS, manufacturer of agricultural products, reserves the right to change the design and/ or
specifi cations of its products without prior warning.
This does not imply any obligation to modify previously supplied machines.
1.1 CE - Declaration of conformity

TKS Operator's manual
7
1.2 Garantee
This TKS product is guaranteed against manufacturing and material defects for one year.
If the owner wishes a defect to be covered by the product guarantee, he or his representative must
inform the dealer of this when ordering parts and/or repairs. Claims must be reported within the
guarantee period.
The dealer must complete a claims form for each case covered by a guarantee and send it to
TKS or TKS’s distributor/importer within the 10th of the month following the one in which the defect
was reported. The defective parts shall be marked with the claim number and be kept for up to 6
months so that TKS or TKS’s distributor/importer can inspect them.
Since TKS products are used outside the manufacturer’s control, we can only guarantee the
product quality, and not that it will perform its function, nor are we liable for any resulting damage.
The guarantee is not valid if:
a) third-party spare parts are used, or the product is repaired or altered without the
approval of TKS
b) the operating and servicing instructions have not been followed
c) the machine has been used for other purposes than those for which it is designed
The guarantee does not cover damage due to normal wear and tear
Offi cial safety regulations specify requirements that apply to the manufacturers of this machine
relating to the careful review of safety hazards that may arise when this type of machine is used
correctly. Therefore, TKS and our importer/distributor are not responsible for the functioning of
components that are not shown in the spare-parts catalogue for this product.
TKS reserves the right to change the design of the product without this implying any obligations in
relation to previously supplied machines.
NB! It must be possible to identify all enquiries relating to this product by the product’s serial
number.

TKS Agri AS,
Kvernelandsvegen 100
N-4355 Kverneland
Norway
www.tks-as.no
e-post : post@tks-as.no
Phone : + 47 51 77 05 00
TKS Operator's manual
8
1.3 Introduction
Congratulations on buying your new TKS product. You have chosen a functional, high quality
product. All TKS products are designed and built in close cooperation with farmers to ensure
optimal effi ciency and reliability.
Please read this instruction manual carefully, and familiarise yourself with the machine’s manner
of operation before starting to use it. The machine is a highly advanced feed machine that operates
unattended. It must be used in accordance with the relevant manufacturer instructions and other
regulations.
Many diff erent factors and variables can aff ect the performance and method of operation of the
machine
It is therefore very important to assess all known factors and adapt the way in which the machine is
used accordingly.
A good understanding of the machine’s method of operation and performance, together with a
sound knowledge of feeding and feed types/consistency will ensure the best results.
Best Regards
TKS AS

TKS Operator's manual
9

TKS Operator's manual
10
1.4
Safety
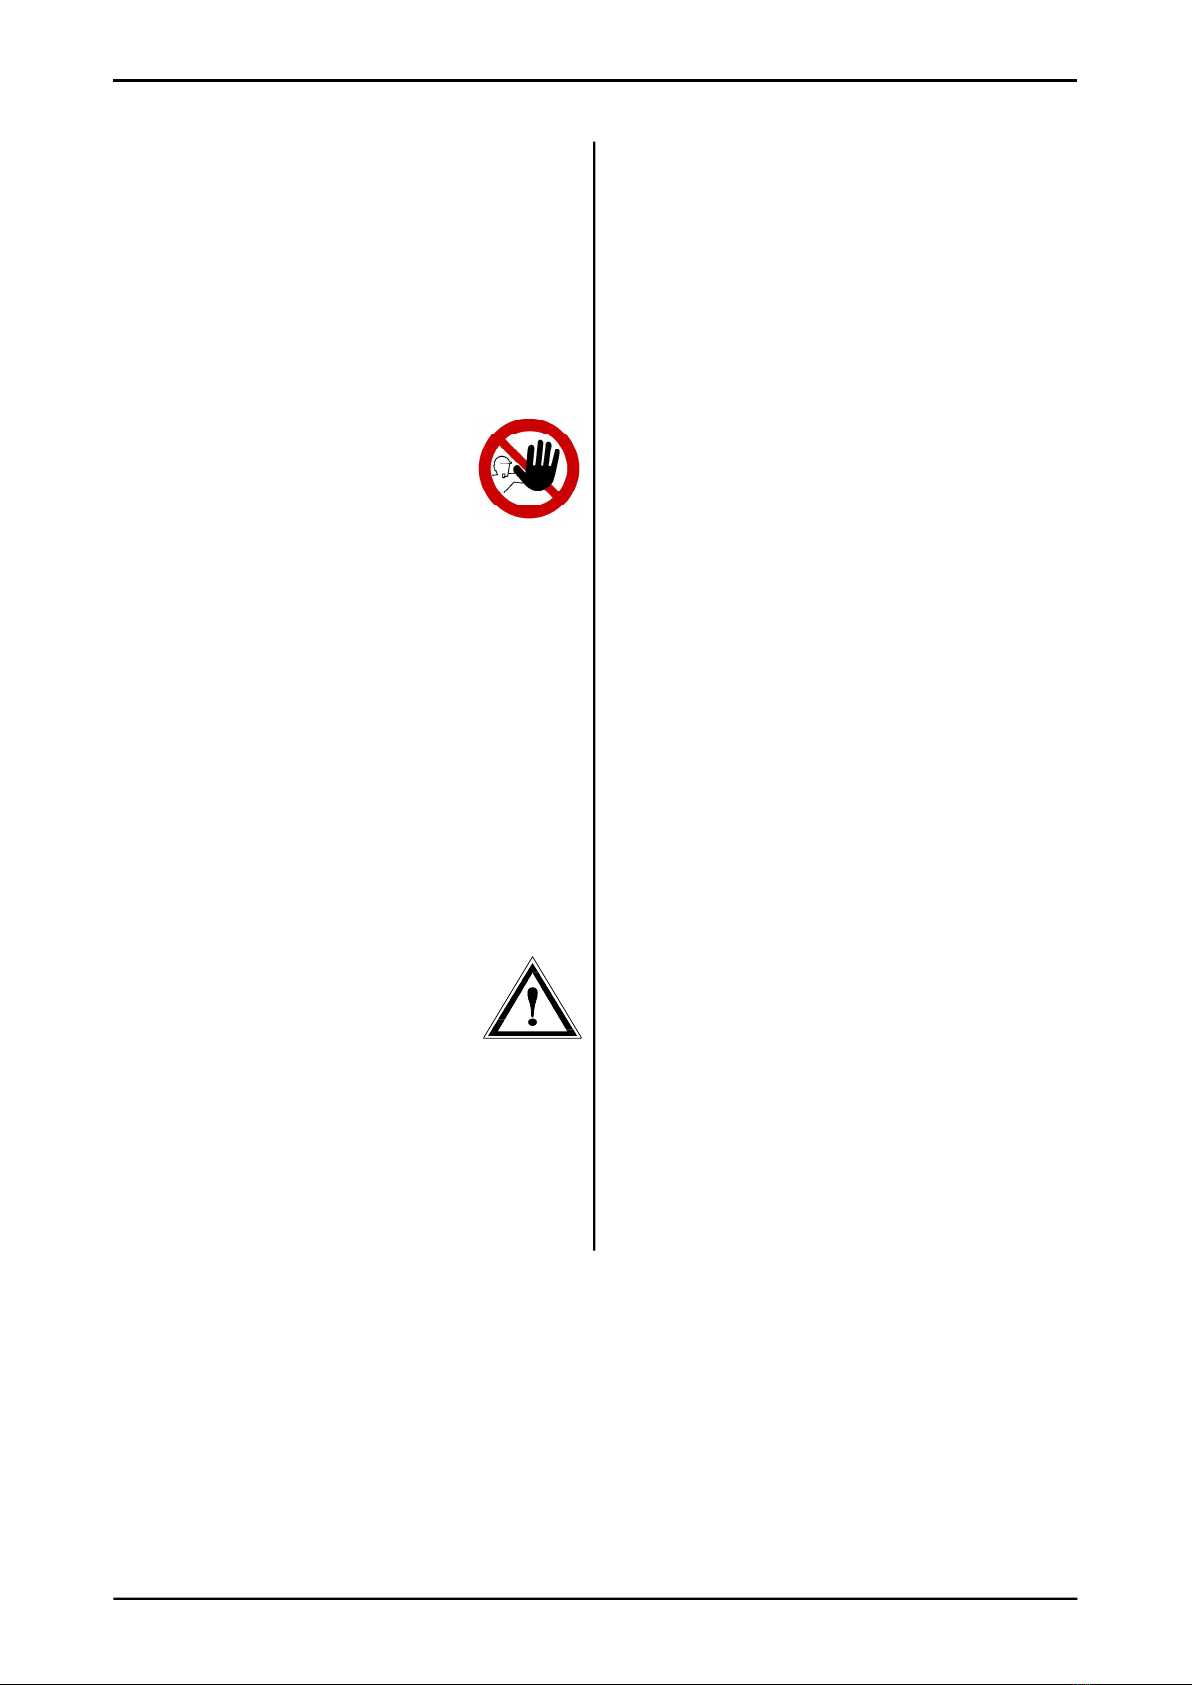
Please pay particular attention to this symbol.
It designates a safety risk, and describes
precautions that must be taken to avoid
accidents
Before operating, adjusting or repairing the
machine, the user, technician or owner should
familiarise himself with the safety instructions
contained in this installation manual.
Be alert and take precautions when working
with agricultural machinery. Read and observe
the safety instructions in this instruction manual.
Safety at work is your responsibility!
1.4.1
General safety -
instructions
Please read and understand these general
safety instructions.
There is a risk of stones being thrown
upwards and backwards when the machine
is in operation.
Use of the machine
The machine must only be used for the
purpose for which it is designed.
The machine’s method of operation
The operator must familiarise himself with the
machine’s method of operation and function so
that the machine can be used in a safe and
appropriate manner.
Providing notifi cation in the barn
The operator must familiarise himself with how
the machine works and functions, so that it can
be used safely and properly
Keep a safe distance
Humans and animals must be kept away from
the machine when it is in operation.
Keep your distance from working, rotating and
moving parts
Be safety conscious
Never enter the machine when it is in operation.
When performing maintenance, disconnect the
power supply.
Protective guards
Check that all guards are in good order and
installed correctly. Do not start the machine until
this has been done. Damaged guards must be
repaired or replaced immediately
TKS Operator's manual
11
Warning-lights
Warning lights installed on the machine must be
visible from all areas of the barn
Alarm
Ensure that the installed alarm sounds
15 seconds before start (delayed start).
Do not enter the area between the Magazine
and the machine before.
Warning sign
The supplied symbolic warning signs
“No access for unauthorised persons”
be attached to all doors into the barn.
Attention! The machinery starts
automatically.
Spare parts
For safety reasons we recommend that you
only use original spare parts. The use of
third-party spares invalidates the product
guarantee.
Maintenance
Ensure that the machine is properly maintained
and is kept in good condition. Never attempt to
change the mechanical workings of the
machine.
The area in which the machine is operating
Must be physically sealed off or locked to
prevent danger to humans or animals.
Control panel
The power supply must be cut off before
opening the panel.
Emergency stop
Emergency stop switches are located at the
front and the back of the machine.
These buttons are red.

TKS Operator's manual
12
1.4.2
Additional safety -
instructions
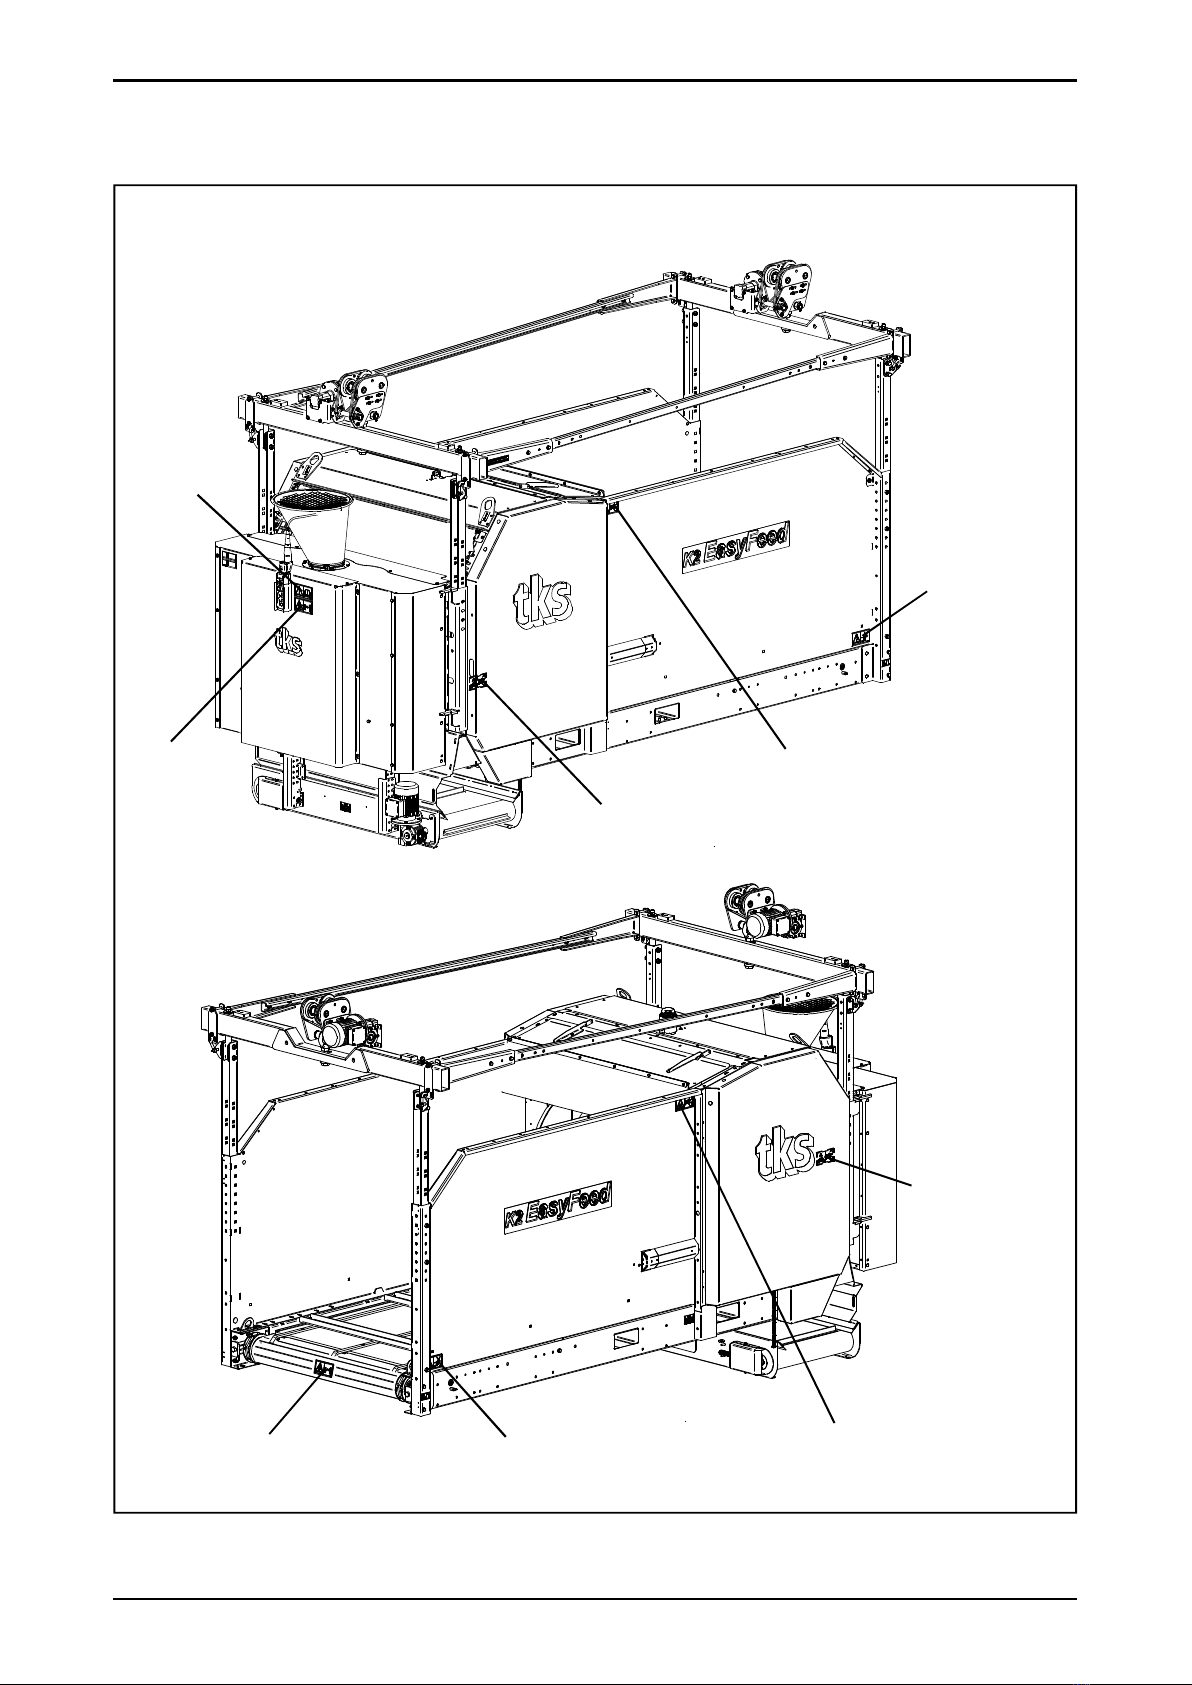
The machine is marked with a warning
signs. If these signs are damaged, they must
be replaced. The order number is shown on the
illustrations in this section.
Se Fig. 6 for their location on the machine
Warning sign UH220532 (Fig. 1)
Ensure that you read and understand the
instruction manual before using the machine,
and before making any adjustments or
performing any maintenance.
Warning sign UH220544 (Fig. 2)
Crush hazard. Keep clear of the area between
the machine and Magazine R2. Keep a safe
distance from the feed cart because it may start
automatically.
Warning sign UH220526 (Fig. 3)
You may damage your fi ngers if you trap them
between the chain and the chain wheel.
Warning sign UH220527 (Fig. 4)
Risk of cutting your hand. There is a risk of
cutting your hand on the drum’s knives when
the drum is in operation.
Warning sign UH220539 (Fig. 5)
Risk of breaking your fi ngers.
You risk breaking your fi ngers if you trap them
between the conveyor and the base.
Fig. 1
Fig. 2
Fig. 3
Fig. 4
Fig. 5
UH220532
UH220544
UH220526
UH220539
UH220527
UH220526
UH220544
UH220539
UH220527
IEF_1b
IEF_1
TKS Operator's manual
13
1.4.3 Overview of safety risks
Fig. 6
TKS Operator's manual
14
1.4.4
Lifting the machine
with a crane Only use approved lifting equipment.
The weight of the machine is listed in the
section “Technical Data”. For location of lifting
point see Fig. 7
Caution!
Ensure that no-one is under or close to the
machine when it is being lifted.
Lift the machine using a strap attached to the
main frame of the machine, so that the lift is
balanced.
Check that the straps are properly fi xed before
starting the lift.
Use an extra strap to help keep the machine in
position
1.4.5
New machine caution Read the operator’s manual
Be particularly careful when starting a new
machine for the fi rst time. Installation faults,
incorrect operation, etc. may lead to expensive
repairs and loss of earnings. The TKS product
guarantee does not cover damage resulting
from failure to follow the recommendations
contained in the instruction manual.
Please pay particular attention to this symbol.
It is used to highlight important information, to
help prevent incorrect installation and
operation.
Pay particular attention to the following
when commissioning a new machine:
Check that the machine is correctly installed
and that it is not damaged.
Lubricate the machine where shown in
chapter 5 Maintenance
Remember that the operator has a
responsibility to ensure that your product is
properly and securely installed.

IEF_37
C
F
D
G
E
A
B
TKS Operator's manual
15
2 Using the control box 2.1 Constituent parts – radio-
controlled remote operation
A – Attachment handle. Can be
swung down for better viewing when th
control box is positioned on a fl at surface.
B – Screen 5.6”
C – Charging contact
D – On/Off switch
E – Grip
F – Charging cable
G – Wall plate (screws not included)
2.2 Location and connection
Mount the wall plate in an appropriate place.
The control box is not waterproof and must not
be exposed to water splash or placed in an en-
vironment with condensation. It is a good idea
to place the control box close to the machine’s
parking position or in an offi ce from where you
can see the machine. A socket for the charging
cable should be in the immediate vicinity.
2.3 Battery
The control box has a battery included.
This is maintenance-free. The battery should
be charged at all times. The battery charger
has automatic charge limits, and can always be
connected to the control box and the mains.
The feed machine runs in accordance with the
program stored in the machine’s control box.
It is a good idea to turn off the screen to save
battery power.
2.4 Screen
Turn on the screen. The start-up screen is
displayed.
The control has a touch screen. You can press
it with your fi nger or using a special pen. Only
one press at a time. Do not press too hard, as
this can damage the screen. If the screen has
not been active for a few minutes, it will enter
screen saver mode. The screen will be off in
this mode. Press any part of the screen to
reactivate it.
NB! Clean the screen using a moist cloth.
2.5 Warranty
The warranty will lapse if the control box is
opened.
Fig. 28

TKS Operator's manual
16
Fig. 29
2.6 Password
• Remote operation is protected against
unwanted use.
• Enter a PASSWORD each time the screen is
turned on.
• The password is: 1324
• Confirm with OK
• Delete keystroke error with <-
See Fig. 29

TKS Operator's manual
17
Fig. 30
Fig. 31
2.7 Numeric keypad
Values in fi elds with blue borders can be
changed. Press on the number and a numeric
keypad will appear on the screen.
The Max/Min value that can be entered in this
fi eld is shown at the top of the window. Enter a
new value using the numeric keypad.
If an incorrect value is entered, press the
<─ key and delete the most recently entered
number. Press CLR to delete everything.
To enter a negative value, press – before the
value. Once you have selected a value, press
the ENTER button.
This will save the value and close the keypad
window.
To cancel, press X in the upper right-hand
corner. The old value will continue to be active.
To enter times in the feed dispensing schedule
window, begin by entering hours – then press
period. Now enter minutes.
Make sure that the time is correct.
For example, if you enter 12.65, this will be
ignored – enter 13.05 instead.
2.8 Alphabetic keypad
When you enter values with text (e.g. name of
animal) the screen will display an alphabetic
keypad:
When editing a text fi eld, the old text is
displayed on the screen.
New text can be entered, and the old text will
disappear.
Use the Caps button to switch between
uppercase and lowercase letters.
Press the BACK button to remove the last
symbol registered, or press Clear to delete all
text, then enter the new text.
Note that there is a limit on the number of
letters in the fi eld. The fi rst letters will be
deleted if a long string of text is entered.
When the text has been entered, press the
ENT button. This will save the text and the
keypad window closes.
If you want to cancel, press the X or Esc button
and the old value will remain active.

TKS Operator's manual
18
Fig. 32
Fig. 33
2.9 Selecting values
Selecting pre-programmed values from a
list.
• Open the list – Press the value or the down
arrow
• Select a value from the list
2.10 On/Off button
Activated or deactivated a function using the
on/off key.
• Blank – deactivated
• Ticked – activated
2.11 Close windows
All menus or windows on the screen can be
closed using the cross on a red background in
the upper right-hand corner.
Fig. 34

A
B
C
D
IEF_01
IEF_03
B A
C
D
TKS Operator's manual
19
2.12 Manual button on cabinet or
panel control
Used to dispense feed when the control box is
in use.
When using this, take care to avoid getting
trapped between the machine and
the feed tray or the fi ttings.
A – button for enabling and stop
B – emergency stop switch
C – button for driving machine backwards and
start dispensing feed to the left side
D – button for driving machine forwards and
start dispensing feed to the right side
Note! Operation must always be enabled
before use. Press button A and hold down for
two seconds.
• Drive the machine forwards with button D
and backwards with button C. The machine
only moves when the button is held down.
• Start dispensing feed to the left. Hold button
A down and press button C at the same time.
Release button A.
• Start dispensing feed to the right. Hold
button A down and press button D at the
same time. Release button A.
• Drum, conveyor belt and side dispenser start
up in sequence. Dispense feed by driving
forwards and backwards with buttons
D and C.
• Stop dispensing feed. Press button A.
• Drum, conveyor belt and side dispenser stop
in sequence.
• On a machine without side dispensers, the
feed dispensing process starts in a similar
manner. Hold button A down and press
buttons C or D at the same time. Release
button A.
• Stop dispensing feed. Press button A.
Fig. 35

TKS Operator's manual
20
3 Operation
3.1 Home screen
The main screen appears when EasyFeed is at
rest.
A - Information bar
• Displayed on all screens
• The text indicates what EasyFeed is
currently doing
• Position sign and the machine’s current
position
• Weight symbol and weight of the contents of
the machine in kg
• Clock
• The clock is displayed in green when Auto
ON is enabled
B - Programmable groups 1-20
• Full line – the group is enabled
• Dashed line – the group is not in use,
disabled
• Displays group name
• Displays the next time for Auto dispensing
Pressing on either group opens
Group settings. Se side 22
• When groups 11–20 are programmed, an
arrow key to switch display between groups
1–10 and 11–20 appears
C - Feeding keys
• Feed now (blue) This is used to feed 1 group
with adjustable quantities.
• EasyFeed (yellow) This is used to feed
multiple groups with programmed settings
Se side 38
• Auto (green) This is used to automatically
turn timed feed dispensing on and off .
• Hold the keys down for 3 seconds.
D - Keys for menu and manual operation
• Menu key opens the menu for machine
settings.
• Stop key – stops everything. See side 39
• Activating
• Manual key - Opens window to operate
manual feed dispensing. Se side 53
• Status indicator key – Opens window for
alarms. See side 54
- OK (green) - all clear
- Warning (yellow) - alarm has been tripped,
but the machine can still run
- Stop (red) - the machine is stopped
Fig. 36
A
B
C
D
Fig. 37
Other manuals for K2 CombiCutter
1
Table of contents
Other TKS Farm Equipment manuals


Popular Farm Equipment manuals by other brands


Agri-Fab
Agri-Fab SmartLink 45-0453 owner's manual

AGROdeviate
AGROdeviate Hawkins Corn Reel installation manual

Farmet
Farmet SOFTER 3 operating manual

360 Yield
360 Yield 360 Y-DROP JOHN DEERE 4720 instruction manual

Smithco
Smithco V-STAR 94-201 Service manual

Unverferth
Unverferth Killbros SeedVeyor 102 manual