TKS R2 Guide
TKS
1
988732R2 Reservoir EN, issue 1, 2010-08
Operator’s manual -
Spare parts list
R2
Reservoir

TKSTKS
2
CE - Certicate of conformity
We,
T. Kverneland & Sønner AS,
Kvernelandsvegen 100
N-4355 Kverneland
Norge
declare that the product:
TKS - R2 Reservoir
has been built in conformity with the Machine Directive 2006/42/EC and meets the
relevant fundamental health and safety requirements.
Kverneland, 20 August 2010
Tønnes Helge Kverneland
General manager
Enter the serial number
of the machine here:
T. Kverneland & Sønner AS, manufacturer of agricultural products, reserves the right
to change the design and/ or specication of its products without prior warning.
This does not imply any obligation to modify previously supplied machines.

TKS
3
Guarantee
This TKS product is guaranteed against manufacturing and material defects for one year.
If the owner wishes a defect to be covered by the product guarantee, he or his representative must
inform the dealer of this when ordering parts and/ or repairs.
Claims must be reported within the guarantee period.
The dealer must complete a claims form for each case covered by a guarantee and send it to TKS
or TKS’s distributor/ importer within the 10th of the month following the one in which the defect was
reported.
The defective parts shall be marked with the claim number and be kept for up to 6 months so that
TKS or TKS’s distributor/ importer can inspect them.
Since TKS products are used outside the manufacturer’s control, we can only guarantee the
product quality, and not that it will perform its function, nor are we liable for any consequential
damage.
The guarantee is not valid if:
a) third party spare parts are used, or the product is repaired or altered without the
approval of TKS.
b) the operating and servicing instructions have not been followed.
c) the machine has been used for other purposes than those for which it is designed.
The guarantee does not cover damage due to normal wear and tear.
Ofcial safety regulations specify requirements that apply to the users/ owners and manufacturers
of this machine, relating to the careful review of safety hazards that may arise when this type of
machine is used correctly.
Therefore, TKS and our importer/ distributor are not responsible for the functioning of components
that are not shown in the spare parts catalogue for this product. TKS reserves the right to change
the design of the product without this implying any obligations in relation to previously supplied
machines.
NB! It must be possible to identify all enquiries relating to this product by the product’s serial
number; see page 7 on Machine identication.

TKSTKS
4
Content
CE - Certicate of conformity . . . . 2
Guarantee................... 3
Introduction.................. 6
Machine identication.......... 7
Dimensions R2 Reservoir....... 8
Technical data............... 17
Model description ............ 18
Safety ..................... 19
1 Installing the rails................25
1.1 Recommended rail sizes on .........
1-rail suspension ................26
1.2 Recommended rail sizes on .........
2-rails suspension . . . . . . . . . . . . . . . 26
2 Installation and use of Reservoir R2 27
2.1 Installing the Reservoir in conjunction
with stationary cutter . . . . . . . . . . . . 28
2.2 Use of stationary Reservoir in .......
conjunction with stationary cutter ..28
2.3 Installing the Reservoir on rails in . . . .
conjunction with cutter...........29
2.4 Use of Reservoir on rails in ........
conjunction with cutter ..........29
2.5 Installing stationary Reservoir in . . . . .
conjunction with ceiling-mounted . . . . .
cutter.........................30
2.6 Use of stationary Reservoir in .......
conjunction with ceiling-mounted.....
cutter . . . . . . . . . . . . . . . . . . . . . . . . 30
3 Installing the power supply ........32
3.1 Check list before starting the ........
machine ......................32
4 Controls K2/R2...................33
5 Circuit diagram ..................34
6 Controls R2/K2 FeedRobot ........40
7 Model description and use of ........
spreader unit ....................43
8 Using the machine with spreader .....
unit............................45
9 Main measurements for machine . . . . .
with spreader ....................46
10 Width adjustment on spreader unit . 47
11 Remote control ..................48
12 ECS Electrical documentation .......
for R2 ..........................49
13 Circuit diagram ..................50
13.1 Circuit diagram for input and .......
distribution ....................50
13.2 Circuit diagram for PLS module....51
13.3 Circuit diagram for photocell ......52

TKS
5
14 Maintenance and care ............53
Recycling - waste to resource -.....56
Notes .............................57
Spare parts list R2 Reservoir .........58

TKSTKS
6
Introduction
Congratulations on buying your new TKS product. You have chosen a functional, high quality
product. A network of helpful dealers will be able to advise you on its use, as well as provide
servicing and spare parts.
All TKS products are designed, tested and built in close cooperation with farmers and machine
workshops to ensure optimal efciency and reliability.
Please read this instruction manual carefully and familiarise yourself with the machine‘s manner
of operation before starting to use it. There are many conditions and variables that can affect the
machine’s functionality and manner of operation. It is therefore vital that you consider all known
conditions and adapt usage according to these. A good understanding of the machine‘s manner of
operation and performance, together with a high degree of knowledge with regard to feeding and
feed types/consistencies will ensure the best possible result. The machine is a highly advanced
feed robot that operates without the need for supervision and must be used in accordance with the
applicable instructions from the manufacturer and other regulations in force at any given time.
By being thorough and making the necessary adaptations to local conditions, you will ensure the
best possible results.
Yours faithfully
T. Kverneland & Sønner AS
MEKANISKE
T. Kverneland & Sønner AS,
Kvernelandsvegen 100
N-4355 Kverneland
Norway
www.tks-as.no
Phone : + 47 51 77 05 00
Fax : + 47 51 48 72 28

TKS
7
Machine identication
The machine’s serial number and the address of the manufacturer are written on the machine.
See the illustration on this page.
Please use the information on the name plate when making any enquiries about spare parts or
servicing.
This product is CE marked. This mark, along with the associated written EU conrmation, means
that the product fulls current health and safety requirements, and complies with the following
directives: Machine Directive 2006/42/EC
IR2_02

TKS
3430
2470
530
1060 300
Kan justeres 400 mm i høyde,
og settes for hver 50 mm
Laveste høyde
1490
1490
3430
2470
2960
TKS
8
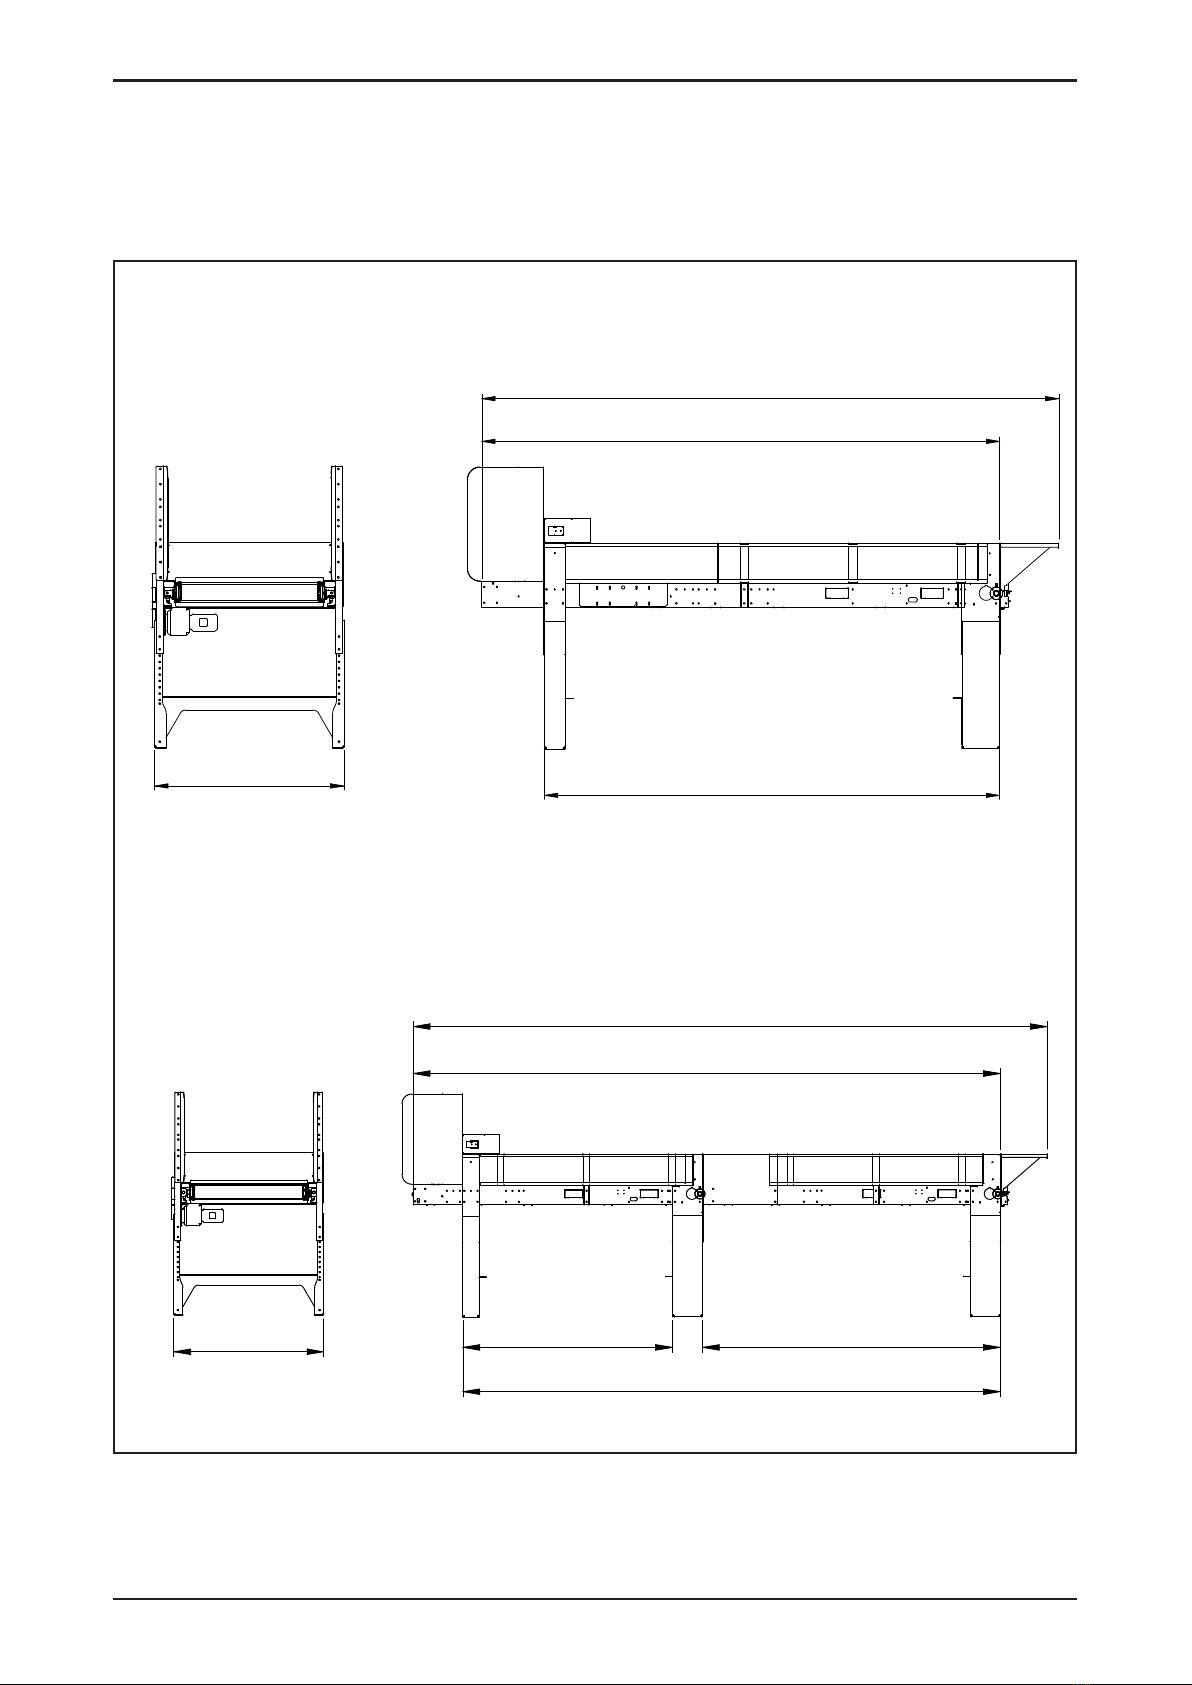
Dimensions R2 Reservoir
All measurements are in mm
R2 Reservoir autolling 3m
R2 Reservoir stationary 3m
IR2_13
IR2_06
TKS
1490
4550
4080
3590
1490 29702090
5360
6320
5850
9
R2 Reservoir 3m + 1m
R2 Reservoir 3m + 3m
IR2_07
IR2_08

TKS
500
TKS
10
IR2_24
IR2_25
K2/R2 with frame, side dispenser with weight
R2 Reservoir stationary lling

TKS
1000-1200
750-950
1100
1360
11
K2_53
K2_54
K2/R2 with frame, side dispenser
K2/R2 with frame, side dispenser and conveyor

TKS
1
3
2
4
TKS
12
K2 with weighing cell unit
K2_55
Wiring diagram, Junction box
1Weighing cell amplier
2 Weighing cell foot
3 Junction box 4 weighing
4 10 m cable, shielded 4x0.25

TKS
13
Conguring the weighing cell amplier
Conrm all choices by pressing both keys simultaneously.
Reset by ipping all dipswitches up and pressing both keys simultaneously, then press all
switches down except for no. 8
Code Value Function
3 15 Middlings
4 150 Max. change in kg
23 4 Number of weighing cells
26 2000 Weighing cell capacity 2,000 kg
34 U U = 0-10V
38 6000 Max. weight on cart in kg
24 2 Converts millivolts to kg; can be changed to show the correct weight
22 Value Enter value shown on the display + 100 kg
49 7 Speed of weight measurement
If all you see are dashes when you plug in the display, swap cables 2 and 3

TKS
1
2
3
4
TKS
14
R2 with weighing cell unit
K2_56
Wiring diagram, Junction box 2
1 Lug for making connection
2 Weighing cell foot 2T
3 Junction box 4 weighing
4 10 m cable, shielded 4x0.25

TKS
15
Conguring the weighing cell amplier
Conrm all choices by pressing both keys simultaneously.
Reset by ipping all dipswitches up and pressing both keys simultaneously, then press all
switches down except for no. 8.
Kode Value Function
3 15 Middlings
4 150 Max. change in kg
23 6 Number of weighing cells
26 2000 Weighing cell capacity 2,000 kg
34 U U = 0-10V
38 6000 Max. weight on cart in kg
24 2 Converts millivolts to kg; can be changed to show the correct weight
22 Value Enter value shown on the display + 100 kg
49 7 Speed of weight measurement
If all you see are dashes when you plug in the display, swap cables 2 and 3.

TKS
240
450
6800
3300
2680
250
300
300
2200
300
2950
550
3620
1300
Min.
TKS
16
R2 Reservoir suspension, double-rail
R2 Reservoir stationary, together with K2 on rails
IR2_11
NB! The round bale must go underneath the crossbeam on the suspension.
IR2_10

TKS
17
Technical data
WEIGHT R2 RESERVOIR 590 Kg
POWER
LOOR BELT 0,75 KW
ELECTRICITY
CONTROL CURRENT 24 V (DC)
VOLTAGE 230/240 V (N/BY 400V)
VOLTAGE TOLERANCE +/- 10%

TKSTKS
18
Model description and area of use
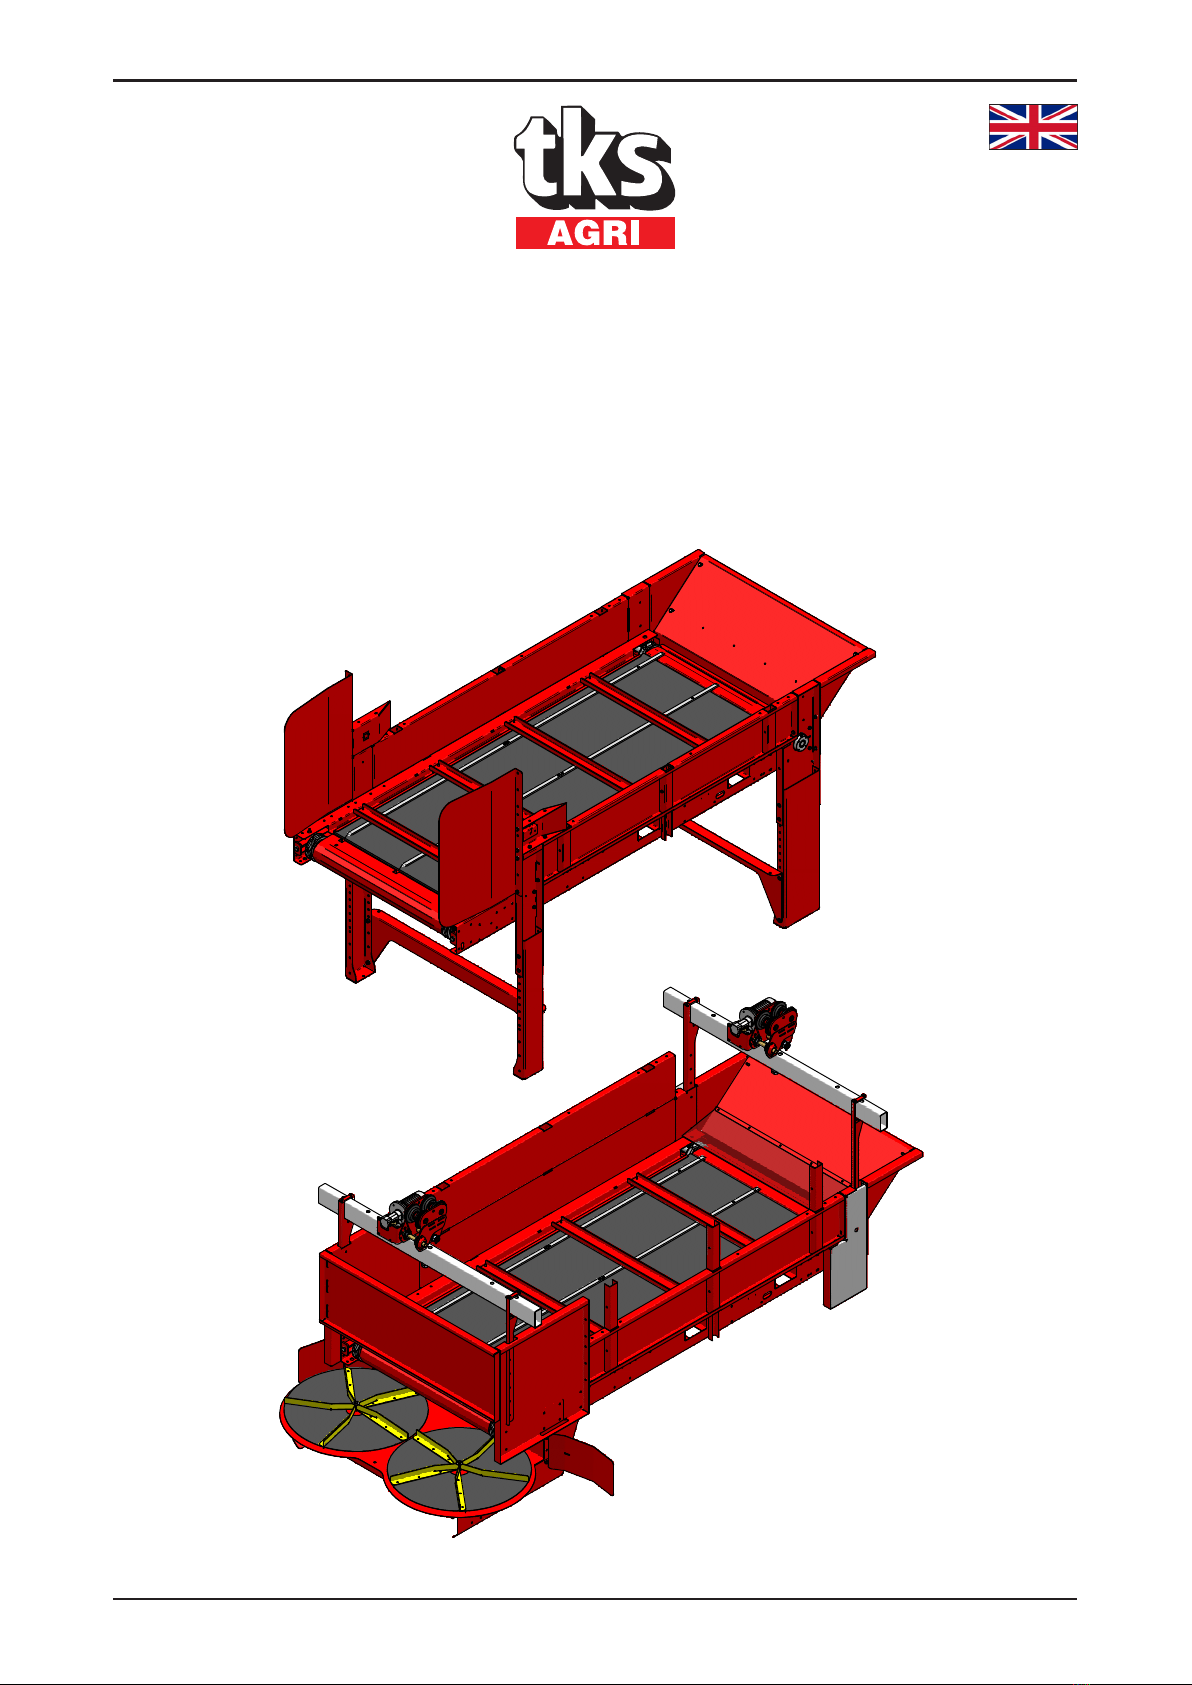
The TKS R2 Reservoir is an add-on unit for use with K2 CombiCutter and TKS Robot carriages.
The Reservoir can be used for storing feed for up to 24 hours.
It is suitable for round/square bales, blocks from silage pits and for silage loads.
The Reservoir can be supplied in different sizes holding from 2 to 6 round bales and is suitable for
most uses.
It is important to take size into account when choosing a reservoir so that it is capable of storing
feed for a full 24 hours. The R2 Reservoir can therefore be supplied as a stationary unit or on rails
for use in combination with a cutter.
Operation
The Reservoir is operated using one or two geared motors, depending on the size of the Reservoir.
Round bales and silage can be loaded into the machine from the rear and from both sides.
The pendant control is located at the front of the Reservoir but can be pulled out during operation
in order to operate the reservoir while also monitoring the mass.
A separate operating panel is supplied for use in combination with TKS Robot carriages and should
be installed in a suitable location.
NOTE! The recommendations contained in this instruction manual are based on normal use.
Individual users may encounter situations that require a different approach from the guidelines
given here. Changes to the machine and equipment as a result of such situations do not give
grounds for claims against the manufacturer or supplier.
Accessories:
Extension 1m and 3m
Ceiling-mounted
TKS
19
Safety Please pay particular attention to this symbol. It
means that there is a safety risk, and describes
precautions that should be taken in order to
avoid accidents.
Before operating, adjusting or repairing the
machine, the user, technician or owner should
familiarise himself with the safety instructions
contained in this installation manual.
Pay attention and be careful when handling
agricultural machinery. Read and take note of
the safety instructions in this manual.
Safety at work is your responsibility!
General safety
instructions
Please read and understand these general
safety instructions.
Use of the machine
The machine must only be used for the purpose
for which it is designed.
Operation
The operator of the machine must stay at the
end of the machine where the control panel is
located.
Supervision
The operator should monitor the machine
continually before start-up and during operation.
This is very important in order to ensure opti-
mum operating safety.
How the machine works
The operator must familiarise himself with how
the machine works and functions, so that it can
be used safely and properly.
Keep a safe distance
Humans and animals must be kept away from
the machine when it is in operation.
Keep your distance from working, rotating and
moving parts.
Be safety conscious
Never enter the machine when it is in operation.
When performing maintenance, disconnect the
power supply.

TKSTKS
20
Shields
Check that all shields are sound and correctly
installed. Do not start the machine before doing
this.
Damaged screens must be repaired or replaced
immediately.
Spare parts
Check that all shields are sound and correctly
installed. Do not start the machine before doing
this. Damaged screens must be repaired or
replaced immediately.
Maintenance
Ensure that the machine is properly maintained
and is kept in good condition. Never attempt to
change the mechanical workings of the
machine.
Control panel
The power supply must be cut off before
opening the panel.
This manual suits for next models
1
Table of contents
Other TKS Farm Equipment manuals


Popular Farm Equipment manuals by other brands

Farm King
Farm King BW150 Operator and parts manual

Powder River
Powder River 008-00100 Assembly and operation instructions

Stark
Stark TL7400 Operation and maintenance manual

Meijer Holland
Meijer Holland Meijer KM 8 manual

Arrowquip
Arrowquip Q-POWER 107 Series product manual

Landoll
Landoll 2510 Series Operator's manual


