TMEZON MZ-WF430BA User manual

Wireless NVR Kit Manual
1
Product Manual
Wireless NVR Kit

Wireless NVR Kit Manual
2
Before You Install............................................................................................................................................................. 1
1.Product features overview...........................................................................................................................................1
1.1 Product introduction.......................................................................................................................................... 1
1.2 Product parameters.................................................................................................................................. 1
1.3 Functional features............................................................................................................................................3
2.Operation explanation..................................................................................................................................................4
2.1 The front panel explanation............................................................................................................................. 4
2.2 Rear Panel Interface explanation................................................................................................................... 4
2.3 Mouse operation instructions.......................................................................................................................... 5
2.4 Input method instructions.................................................................................................................................5
2.5 Interface specification.......................................................................................................................................6
2.5.1Interface elements specification........................................................................................................... 6
2.5.2 Commonly used buttons instructions................................................................................................. 6
2.6 Menu explanation.............................................................................................................................................. 6
3. Installation and connection........................................................................................................................................ 7
3.1 Installation Notice.............................................................................................................................................. 7
3.2 Preparation before installation........................................................................................................................ 7
3.3 The camera placed in the default location.................................................................................................... 9
4. System function introduction................................................................................................................................... 10
4.1 Starting up / login / logout / restart / close screen output / shutdown.................................................... 10
4.1.1 Starting up.............................................................................................................................................10
4.1.2 Login.......................................................................................................................................................11
4.1.3 Logout.................................................................................................................................................... 12
4.1.4 Restart................................................................................................................................................... 12
4.1.5 Close the screen output......................................................................................................................12
4.1.6 Shut down............................................................................................................................................. 12
4.2 Boot wizard.......................................................................................................................................................12
4.3 Video management.........................................................................................................................................14
4.3.1 Search for device................................................................................................................................. 14
4.3.2 Add device.............................................................................................................................................15
4.3.3 Advanced setups..................................................................................................................................16
4.3.4 Delete device........................................................................................................................................ 16
4.3.5 Repeater setup.....................................................................................................................................17
4.3.6 Edit Channel......................................................................................................................................... 19
4.3.7.Encoding setup.....................................................................................................................................19
4.3.8 Stream value.........................................................................................................................................20
4.3.9 Channel details.....................................................................................................................................20
4.3.10 Channel OSD..................................................................................................................................... 21
4.3.11 Camera................................................................................................................................................ 22
4.4 Network setup.................................................................................................................................................. 22
4.4.1 Network setup.......................................................................................................................................22
4.4.2 Dynamic domain name....................................................................................................................... 24
4.4.4 E-Mail..................................................................................................................................................... 25
4.4.5 PPPoE................................................................................................................................................... 26
4.4.6 3G........................................................................................................................................................... 27
4.4.7 Wireless setup...................................................................................................................................... 27

Wireless NVR Kit Manual
3
4.5 PTZ setup......................................................................................................................................................... 28
4.5.1 PTZ parameter setup.......................................................................................................................... 28
4.5.2 PTZ control operation..........................................................................................................................29
4.5.3 PTZ automatic cruise setup............................................................................................................... 29
4.6 Recording......................................................................................................................................................... 30
4.6.1 Manual recording................................................................................................................................. 30
4.6.2 Timed recording................................................................................................................................... 30
4.6.3 Motion detection recording.................................................................................................................31
4.6.4 Alarm recording.................................................................................................................................... 32
4.7 Video playback.................................................................................................................................................33
4.7.1 Fast playback........................................................................................................................................33
4.7.2 Regular playback................................................................................................................................. 33
4.8 Video backup................................................................................................................................................... 34
4.9 Alarm..................................................................................................................................................................35
4.9.1 Motion detection alarm........................................................................................................................35
4.9.2 Video loss alarm...................................................................................................................................36
4.10 General Setups..............................................................................................................................................37
4.10.1 General Setups.................................................................................................................................. 37
4.10.2Time setup............................................................................................................................................38
4.10.3 Screen setup...................................................................................................................................... 38
4.10.4 Hard disk setup.................................................................................................................................. 39
4.10.5 Exception setup................................................................................................................................. 40
4.11 Equipment maintenance and management..............................................................................................41
4.11.1 System message................................................................................................................................41
4.11.2 User Management............................................................................................................................. 43
4.11.3 Restore to the factory setting...........................................................................................................45
4.11.4 System maintenance.........................................................................................................................46
4.11.5 Software upgrade...............................................................................................................................46
4.11.6 IPC Maintenance................................................................................................................................47
5.1 Introduction.......................................................................................................................................................48
5.2 LAN access...................................................................................................................................................... 49
5.2.1 Log in..................................................................................................................................................... 49
5.2.2 Preview.................................................................................................................................................. 50
5.2.3 Playback................................................................................................................................................ 51
5.2.4 Configuration........................................................................................................................................ 51
5.3 E-see net access.............................................................................................................................................52
5.3.1 E-see net ID login................................................................................................................................ 52
5.3.2 Username login.................................................................................................................................... 53
6.Mobile access..............................................................................................................................................................54
7.Appendix.......................................................................................................................................................................59
7.1Hard disk capacity unit conversion................................................................................................................59
7.2 Video required capacity calculation..............................................................................................................60
8 Q & A:........................................................................................................................................................................... 60

Wireless NVR Kit Manual
1
Before You Install
We appreciate your support to TMEZON. If you have any problem or concerns about the system, please
feel free to contact us with Technical support Email address: support@tmezon.com (Please kindly
attach the item link you placed order with, so that we can solve the trouble for you as soon as possible.)
About default
Device factory default super administrator account:admin.
The Admin’s default factory password is empty.
Device factory default IPv4 address:192.168.1.114.
When the hard disk video is recorded fully, the factory defaults to overwrite the previous video data.
Device factory default enable boot wizard.
The Phone APP for the system is IP PRO
1.Product features overview
1.1 Product introduction
The MZ-WF430BA NVR is one of a Juan new generation of NVR (Network Video Recorder) products,
which supports wireless WIFI network video access, supports maximum 1080P wireless real-time video
preview, video encoding and playback operation. Using a number of high-tech, such as video and audio
code technology, embedded system technology, storage technology, network technology, wireless network
technology. It can be widely used in home, shops, offices, villas and other areas of security. No wiring, easy
to install.
1.2 Product parameters
Wireless NVR Specification
Model
MZ-WF430BA
Video input
4ch D1/960H720P/960P/1080P
HDMI Output
1ch,Resolution:1024x768, 1280x1024,1366x768, 1440x900, 1920x1080
VGA Output
1ch,Resolution:1024x768,1280x1024,1366x768, 1440x900,1920x1080p
Resolution
D1/960H/720P/960P/1080P
Playback
4ch

Wireless NVR Kit Manual
2
Recording
Manual,time,motion dection,alarm
Storage
1 SATA
Storage capacity
6TB for each HDD
Network interface
1 RJ45 10M/100M,2 WIFI connector
USB interface
1 USB2.0
Audio interface
3.5 inch headphone jack(Optional)
Power consumption
≤5W
working temperature
-10℃--+55℃
Working humidity
10%--90%RH
Dimension(mm)
258mm×210mm×42mm
Power consumption
≤5W
Power
DC 12V 2A
WIFI Camera Specification
Technical
Parameters
Model
PA3010-W
PA3013-W
PA3020-W
Sensor
1/4” Progressive
Scan Sensor
1/3” Progressive
Scan Sensor
1/3” Progressive Scan Sensor
Signal System
PAL/NTSC
Resolution
1280 x 720 16 : 9
High Defination
1280 x 960 4 : 3
High Defination
1920 x 1080 16 : 9 High Defination
Minimum illumination
Color: 0.1 Lux; B/W: 0.01 Lux
Shutter
1/25s to 1/25,000s
Lens
4/6mm
OSD
Date Time & Title
White Balance
Auto
Day&Night
IR cut filter with auto switch
3D-DNR
Auto
Mirror/Flip
On / Off
smart stream
Dual-stream:
1280x720@15fps
640x360@15fps
Dual-stream:
1280x960@15fps
640x360@15fps
Dual-stream:
1920x1080@15fps
640x480@15fps
Signal /noise rate
> 39.1 Db
Interface
RJ45 / WIFI 802.11b/g/n
General
Specification
Anti-thunder Level
Standard IEC61000-4-5
Working
Temperature/Humidity
-10℃to +50℃/ 30% to 80% RH
Working
Temperature/Humidity
-20℃to +60℃/ 20% to 90% RH
Power Input
DC12V-1A
Power consumption
≤6W
Size
66*180mm
Weight
500g

Wireless NVR Kit Manual
3
Level of Protection
IP66
1.3 Functional features
• H.264,4CH real-time D1,1080P wireless NVR;
• Built-in high-performance and high-stability wireless Wi-Fi routing module, supports 802.11b / g / n
protocol, 150Mbps;
• Can automatically access the Wi-Fi network camera through the network cable;
• Video preview / recording / playback / backup;
• User-friendly (wireless simple matching, setup wizard, commonly used function menu, E-see net );
• Support ONVIF、N1 and IPC Access protocol;
• Supported network service functions:P2P,DHCP,DDNS,PPPoE, E-Mail,FTP and so on;
• Support a variety of alarm triggering (video loss / motion detection, etc.) and alarm output (voice / E-Mail
/ FTP, etc.);
• Support Android / Apple mobile (or tablet) remote (LAN and Internet) access and control;
• Support PC (client or browser) remote (LAN and Internet) access and control;
• Support IPC configuration (coding control, image adjustment, OSD display, etc.);
• Match with the IPC to support video motion detection;
• Collaborate with IPC to support video masking;
• Support user rights management;

Wireless NVR Kit Manual
4
2.Operation explanation
2.1 The front panel explanation
Figure 1
1.POW:Power indicator light
4.HDD:Hard disk indicator light
2.2 Rear Panel Interface explanation

Wireless NVR Kit Manual
5
Figure 2
2.3 Mouse operation instructions
Mouse
Actio
effect
Example
Left key
Click
once
Select the target
1, option button, drop down box, list box, check box,
radio button
Click
twice
Window zoom
1, switch between a single interface and the
multi-interface in previewing 2, add device
Drag
Set the area
1, set the motion detection area 2, select the
electronic amplification area
Middle key
Scroll
Change the content
1, change the contents of the drop-down box 2,
When zoom previewing, switch channel interface
orderly
Right key
Click
once
Logout
1, close the interface 2, showing the shortcut menu in
the main interface
2.4 Input method instructions
Figure 3
Name
Key instructions
Function instructions
Number
0~9
Input number 0~9
Character
- / . _ * # @
Enter the punctuation
Capital / lower
case
caps
Letter case switch
Backspace
←
Remove the character before cursor

Wireless NVR Kit Manual
6
2.5 Interface specification
2.5.1Interface elements specification
Name
Operation
Operation function
Example
Button
click on the left
mouse
Save or cancel
Application, confirmation, cancellation
Open the
sub-interface
Edit, set
Edit box
click on the left
mouse
Modify
Change Password
Drop down
box
click on the left
mouse
Select
Choose a language
List box
click on the left
mouse
View
Channel information
Check box
click on the left
mouse
Choose or cancel
Boot wizard display, display E-seenet when
previewing
Text
No
Instructions
Title, name
2.5.2 Commonly used buttons instructions
Name
Icon
Explanation
OK
Save the operation and take effect, close the operation interface.
Cancel
Cancel the operation just made
Apply
Save the operation and take effect, do not close the user interface.
Copy to
Copy the settings of this channel to other or all channels.
2.6 Menu explanation
System setup:Regular setup, video setup, network setup, system management
Right-click menu: Screen selection, video playback, video backup, PTZ control, color adjustment, output
volume, manual recording, system setups, setup wizard, camera add, system logout

Wireless NVR Kit Manual
7
3. Installation and connection
3.1 Installation Notice
Note the following when installing:
1, In order to extend the life of the machine, the device should be away from water, high temperature, dust
environment, and placed in a well ventilated place.
2, Please use the SATA hard drive, USB device, mouse device buying from proper channels.
3, Before use, please ensure that the network high-definition video recorder grounded correctly, the power
supply can not exceed the power supply normal operating voltage range.
3.2 Preparation before installation
1, Determine the installation location of the NVR
It is recommended that the NVR be placed in the center of the monitoring area, and the installation
position of the IPC (wireless camera) and NVR should avoid the obstacle as much as possible. When the
4-channel video are connected at the same time and there is no obstacle between the NVR and the IPC,
the IPC is placed in a spherical coverage area with a radius of 60 m with NVR as a center of gravity. The
radius is reduced to 30 meters when there are one wall between the NVR and the ipc. When there are two
walls, it reduced to 15 meters radius (coverage affected by the physical properties of the obstacles and the
surrounding environment, this data is for reference only)
1, Connection steps
1、Connecting the NVR with the mouse and the display firstly, turn on the power of the NVR and the IPC,
then connect the NVR to the IPC with the cable. Right click on the mouse -> click on adding camera->
delete all channels (Note: if only delete some bad channels, can click to delete the channel to delete the
specified channel) -> code matching -> "start code matching?" Click Yes -> Show "on the code matching" ->
NVR monitor screen shows that the success of the code matching(note: More than one camera can make
code matching at the same time). If notify the code matching fails, click "Refresh". If there is no indication
that any network cable is bad, please re-connect to the code matching operation. -> disconnect the network
cable to see if the screen is normal, the screen normal means that the wireless camera add successfully ->
when all the wireless camera added to the NVR means that the preparatory work is completed. (Figure 5.1,
Figure 5.2, Figure 5.3, Figure 5.4)
2、Make sure the wireless NVR kit is working properly
NVR connection monitor, all the IPC installed around the NVR (Note: need to connect the antenna),

Wireless NVR Kit Manual
8
power all the device to complete the second step, when all the IPC video show on the NVR monitor, that
means the kit is working properly, can be installed to a predetermined location.
1, Unplug your NVR from power,unscrew and remove the top cover.
2, Connect the SATA power and data cables from the NVR to the corresponding ports on your HDD (as
shown).
3, Holding the hard drive and the NVR ,gently turn it over and line up the holes on the hard drive with the
holes on the NVR. using a Phillips screwdriver, screw the provided screws into the holes assemble the
cover.
Figure 5.1

Wireless NVR Kit Manual
9
Figure5.2 Figure 5.3
Figure 5.4
3.3 The camera placed in the default location
1,In the effective coverage of the wireless signal, install wireless camera to the default location, and
provide 12V power supply;
2,Power the wireless camera for 1 minute or so, you can see the video in the NVR monitor;
3,If do not show the image, indicating that the distance is too far so need to shorten the distance.

Wireless NVR Kit Manual
10
NVR antenna transmit signal to the surrounding divergence. NVR and IPC antenna at the same height and
parallel is the best. If not the same height, IPC antenna should be tangent with the sphere of the NVR
spherical center, and can not let the antenna Direct to NVR.
4. System function introduction
4.1 Starting up / login / logout / restart / close screen output /
shutdown
4.1.1 Starting up
Note:
Please make sure that the access voltage matches the requirements of the NVR and that the NVR
ground is well grounded.
When power supply is abnormal, it will cause the hard disk video recorder can not work, or even
damage the NVR, it is recommended to use the stable power supply (12V2A for NVR)
Explanation
Wireless NVR Kit Manual
11
Before starting up, make sure that the display or monitor is connected to the video output of the device.
Specific starting up steps are as follows:
1, Plug in the power, the front panel power indicator is red.
2, Turn on the rear panel power switch or tap the front panel power "On" key. The device
starts to start, as shown in the following figure:
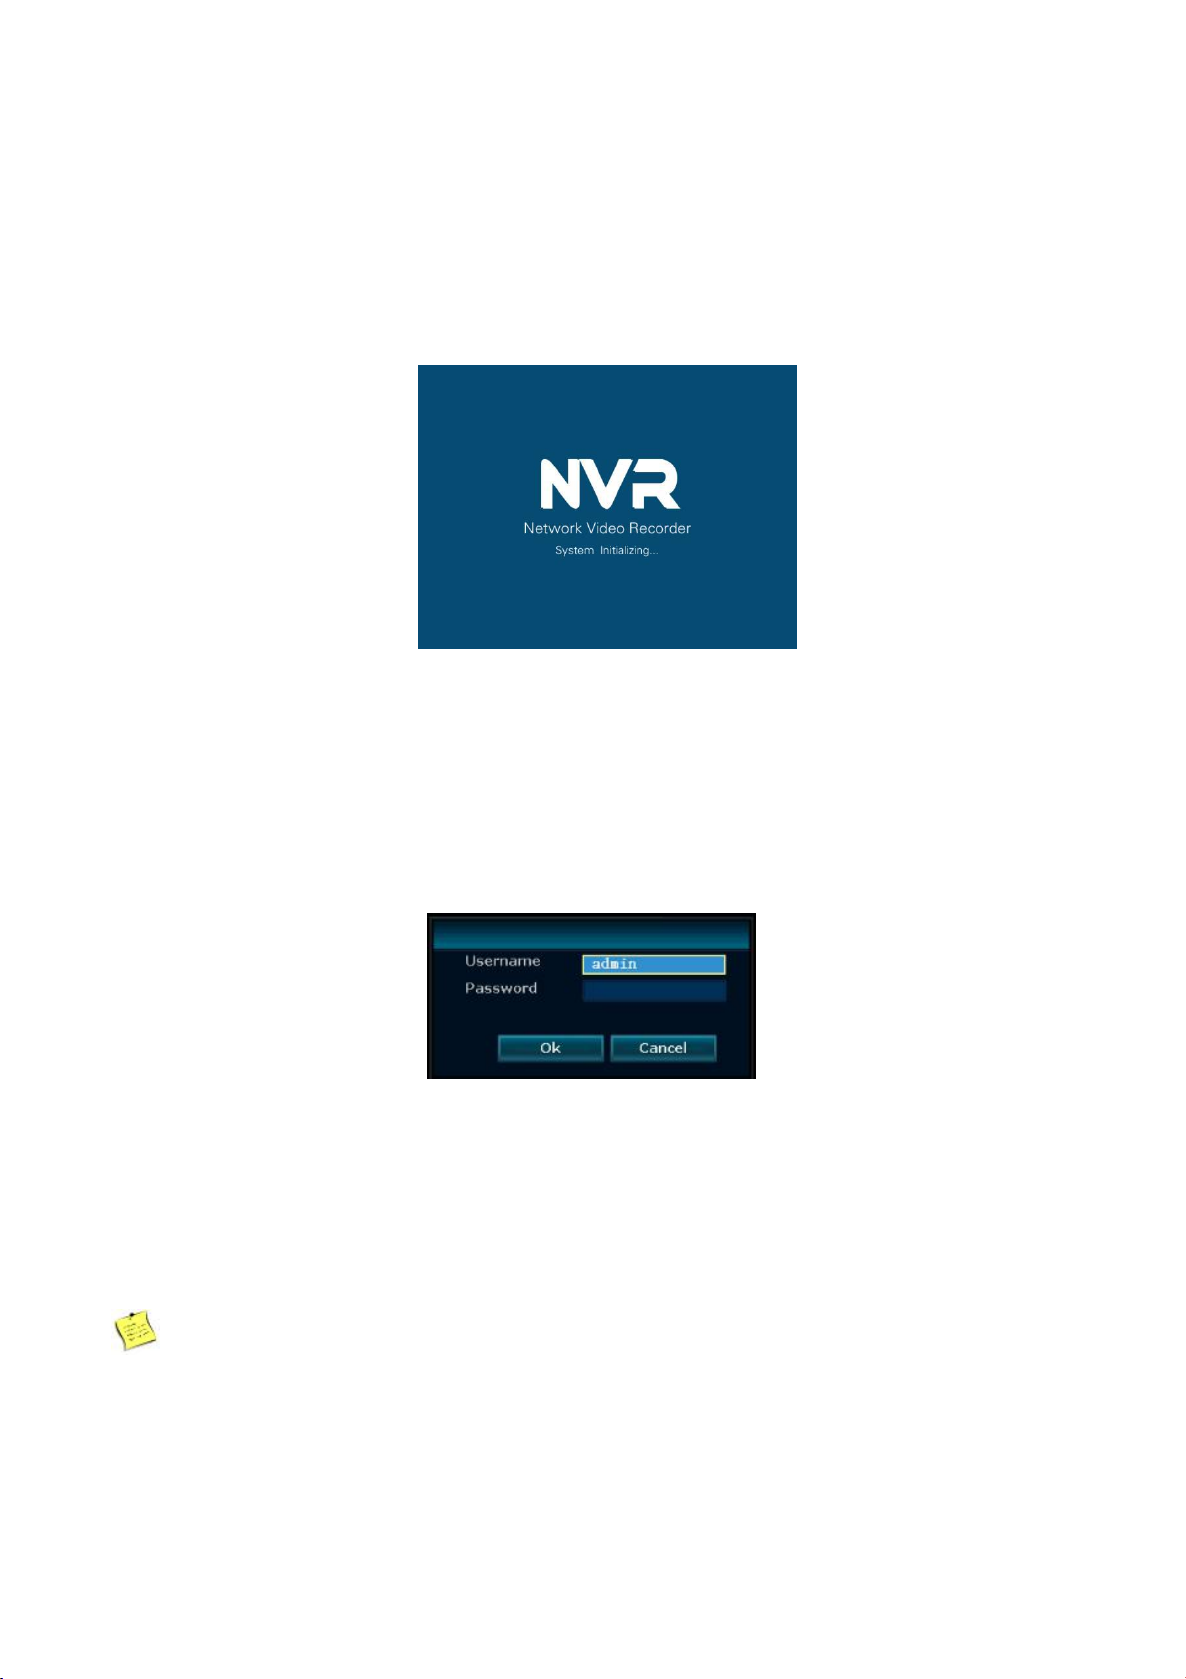
4.1.2 Login
When the system is powered on and started, after waiting for the system to initialize, the system will
automatically pop up the login interface. As shown below. The user needs to complete the login before
proceeding.
Steps:
1,Using the left mouse button click the user name edit box, and enter the local login user name, the default
factory settings for the user name is admin.
2,Using the left mouse button click the password edit box, and enter the local login password, the default
factory settings password is empty, that mean do not need filled out.
3,Using the left mouse button to click "OK" to complete the login.
Explanation
Password can be composed of numbers, characters, operators and points, *, #, the length can not
exceed 10 characters.

Wireless NVR Kit Manual
12
4.1.3 Logout
If the users need to log out the process, you can right-click shortcut menu, select to exit system. Click the
user to log off, then you can complete. As shown below.
if the user needs to log off automatically, in the system settings -> General settings, you can set open the
automatic logout state. The system will automatically log off the system in 1 minute without the operation.
When re-operation, you need to re-enter the user name and password.
4.1.4 Restart
If the users need to restart the machine when using, right-click shortcut menu, select the exit system, click
the system to complete the restart.
4.1.5 Close the screen output
If the user need to close the screen output when using, right-click shortcut menu, select the exit system,
click to close the screen output to complete.
4.1.6 Shut down
If you need to shut down the system, you can right-click the shortcut menu, choose to exit the system. Click
to close the system to complete.
4.2 Boot wizard
After the successful login, the system will automatically open the "Setup Wizard" interface, guide the user
to set the basic settings, so that the device can work properly.
Steps:
1, set the wizard. You can set whether to turn on the boot wizard. Set the interface as shown below, after
the operation is complete, left click on the next button.

Wireless NVR Kit Manual
13
2, general setup. Can set the system city, time, language, key type, the status of the remote control, remote
control code. The interface is shown below. After the operation is complete, click the Next button.
3, Network settings. You can choose to automatically obtain IP address, manually set the IP address,
gateway, mask, PPPoE and other operations. Operation interface as shown below, after the operation is
complete, click the next step to continue the wizard setup, if you want to return to the third step, select the
last step.

Wireless NVR Kit Manual
14
4, hard disk setup. Can display the current list of hard disk, including the model, capacity, usage, status,
formatting status. If you want to format the hard disk, you can select the corresponding hard disk, then click
the format button. Wait a moment, you can format the selected hard disk, the hard disk format status will
also be displayed as "formatted." Operation interface as shown below. After the completion of the operation,
click Finish to complete all of the above setups. If you want to return to step five, then select the last step, if
click cancel, the above setups will not take effect.
4.3 Video management
4.3.1 Search for device
Function instructions:Used to search all IPC devices in the same network segment.
Steps:Right-click the system main interface, in the pop-up menu, click the "camera adding" sub-menu,
select "video management", enter the video management interface, and click the "refresh" button to
complete the search IPC device operation The figure looks like this:

Wireless NVR Kit Manual
15
4.3.2 Add device
Function instructions:Used to add the searched IPC device.
Operation steps:
1. Code matching instructions:
Here is a video link about how to match code: https://youtu.be/F2Nr__dSewA
The code matching is mainly for matching NVR with IPC and sending NVR WiFi account name and
password to the IPC, so that IPC automatically connected with NVR. Through the wireless way to do the
video transmission, before the code matching, please remove the bad channel first; (the IPC in the kit do
not need this operation, when needing to connect the new IPC or after NVR ESSID and password
modification will need this operation)
2: Code matching methods:
First connect the wireless camera to any LAN port of the NVR with the network cable in the accessory box
and the method to code matching interface is: main menu (right lick the mouse) -> video management ->
code match. In the pop-up whether to do the code matching interface click on the "yes" to do the code
matching operation. Then please be patient waiting for the code results;If the code matching fails, please
click "Refresh". If no device is indicated then it means the network cable is poor contact. Please
re-connect to do the code matching operation.
3: Fast adding:
After the fast adding, the camera and NVR must be connected through the network cable to see the image

Wireless NVR Kit Manual
16
and to achieve cable transmission.
Fast adding method: the main menu (right click the mouse) -> video management -> Fast adding
Through the network cable to connect NVR and IPC, click search, video management interface will show
the information that the NVR normally communicated with IPC. Click on fast adding, the system will
automatically add the IPC which can work properly in idle channel, the monitor will display the IPC video
signal. When working, can not unplug the cable. If the four channels are idle, using four cable connected to
the four IPC, after fast adding, the monitor will display IPC video signal.
Explanation
Using fast adding function, the system will search all devices within the LAN and support automatic
allocation of IP addresses.
4.3.3 Advanced setups
Function setup:Support multi-network segment search, allowing repeated adding, smart adding.
Steps:Right-click the system main interface, in the pop-up right-click menu, select "Video Management". In
the open video management interface, click Advanced Setups, as shown below:
Explanation
Use supporting multi-segment search function, the system can search the camera which do not in the
same network segment with NVR.
Using the Allowing Duplicate Add feature, the system will allow you to repeat adding the same camera
to multiple channels.
With the Intelligent Addition feature, when the system detects the IP address of the ip camera is
abnormal(including IP conflicts or IPC is not in the same network segment as the NVR),it will allocate a
new legal IP address to the IP camera.
4.3.4 Delete device
Function explanation:Used to delete an added device.
Steps:

Wireless NVR Kit Manual
17
1, Right click on the main interface of the system, in the pop-up right-click menu selecting"Video
Management". After entering the video management interface, click to select any of the IPC device
information which has been added;
2, Click the "Delete Channel" button to delete the selected single IPC device, and the system automatically
disconnects the device's monitoring screen. As shown below:
Explanation
Click "delete all" button to achieve fast deleting all the added IPC device.
4.3.5 Repeater setup
Function description: In the repeater setup page, first, set up any IPC and connected to one of the IPC,
and then making the IPC connected to the NVR to realize repeater function. Thereby increasing the
wireless transmission distance and extending the covering rage of wireless kit.
Steps:
1, Right click on NVR’S GUI, left click “video management”→ then left click “repeater”
2, Add repeater : As picture shown below, click icon + besides channel 3, choose other channel.
Table of contents
Popular Network Hardware manuals by other brands


TVT Digital
TVT Digital TD-3104H1-4P-B1 quick start guide

Arista
Arista CCA-ETM-Q6E quick start guide

SMC Networks
SMC Networks EX500 Series Technical instruction manual

Airspan
Airspan AS3010 Hardware installation guide

Cabletron Systems
Cabletron Systems SSIM-T5-04 installation guide

TP-Link
TP-Link Archer AX21 installation guide

Infolock
Infolock Insight DLP Director 2200 Hardware installation guide

pathway
pathway Pathport 1011 Installer's guide

Eneo
Eneo IER-28R160005A Quick installation guide

FLIR
FLIR DNR200V Series instruction manual

Buffalo Tech
Buffalo Tech TeraStation 5000 user manual

Matrix Switch Corporation
Matrix Switch Corporation MSC-HD44DEL product manual