TMI Products vk61 User manual

English
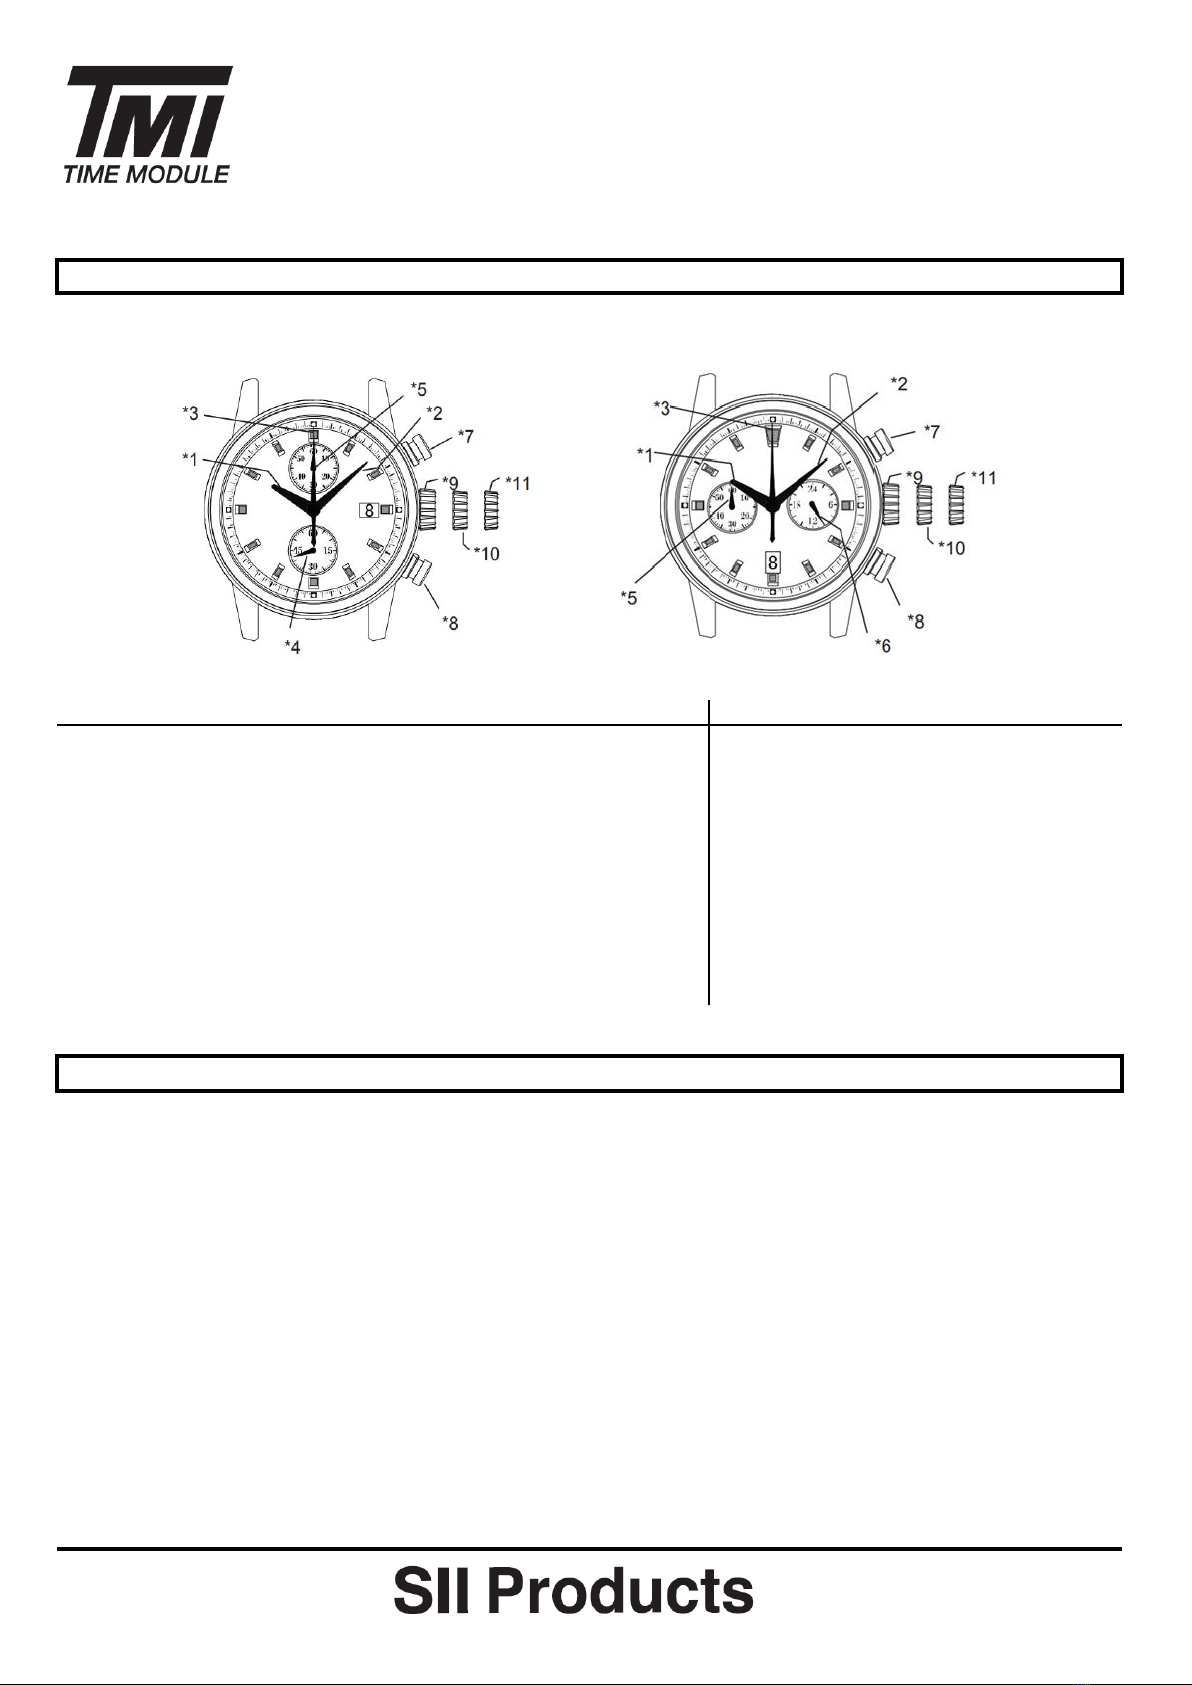
VK61 VK64
*1 : Hour hand O O
*2 : Minute hand O O
*3 : Center 1/5 chronograph second hand O O
*4 : Small second hand O (6H) X
*5 : Chronograph minute hand (60 minute) O (12H) O (9H)
*6 : 24 hour hand X O (3H)
*7 : Button A (START/ STOP) O O
*8 : Button B (RESET) O O
*9 : Crown at normal position O O
*10 : Crown at first position (Date setting) O O
*11 : Crown at second position (Time setting) O O
Set the time
1) Pull out the crown to the second click position.
2) Turn the crown to set hour and minute hand (Check that AM / PM is set correctly)
3) Push the crown back into the normal position.
* If the crown is pulled to the second position while the chronograph is started, the chronograph hands will
continue to move. This is not malfunction.
Set the date
1) Pull out the crown to the first click position.
2) Turn the crown clockwise for date setting
* Do not set the date between 9:00PM and 3:00AM, otherwise the day may not change properly. If it is
necessary to set the date during that time period, first change the time to any time outside it, set the date
and then reset the correct time.
3) Push the crown back into the normal position.
TIME SETTING
Operation Manual
VK61 / VK64
DISPLAY AND CROWN/ BUTTON OPERATION
[ VK61 ]
[ VK64 ]

English
Method 1
1) Set the crown to the normal position
2) Touch the AC terminal of circuit block and the switch spring with conductive
tweezers to reset the circuit.
3) The small second hand will move at two-second interval for 10 seconds as a
demonstration. (VK61 only)
Method 2
1) Pull out the crown to the second click position.
2) Press the button B for two seconds and release the button.
3) Push the crown back to the normal position.
4) The small second hand will move at two-second interval for 10 seconds as a demonstration (VK61 only)
* If the crown is operated within the 10 seconds, the two-second interval movement will not be activated
(VK61 only)
* It is not necessary to set the chronograph hands after the battery is exchanged. If the chronograph hand
positions are incorrect, follow below procedure all the chronograph hands will be reset to "0" position.
[ Standard measurement : e.g. 100m race ]
Press the buttons in the following order : A A B
*
The chronograph can measure up to 60 minutes and chronograph stops after a measurement for 60 minutes.
* After the maximum measurement time finished, to restart the chronograph function :
VK61 / VK64 : Press button A
*
During the chronograph operation, button B (reset) can be pushed. It will not cause any problem.
Operation Manual
VK61 / VK64
HOW TO RESET (AFTER BATTERY CHANGE)
Button A
Button A
Button B
(START)
(STOP)
(RESET)
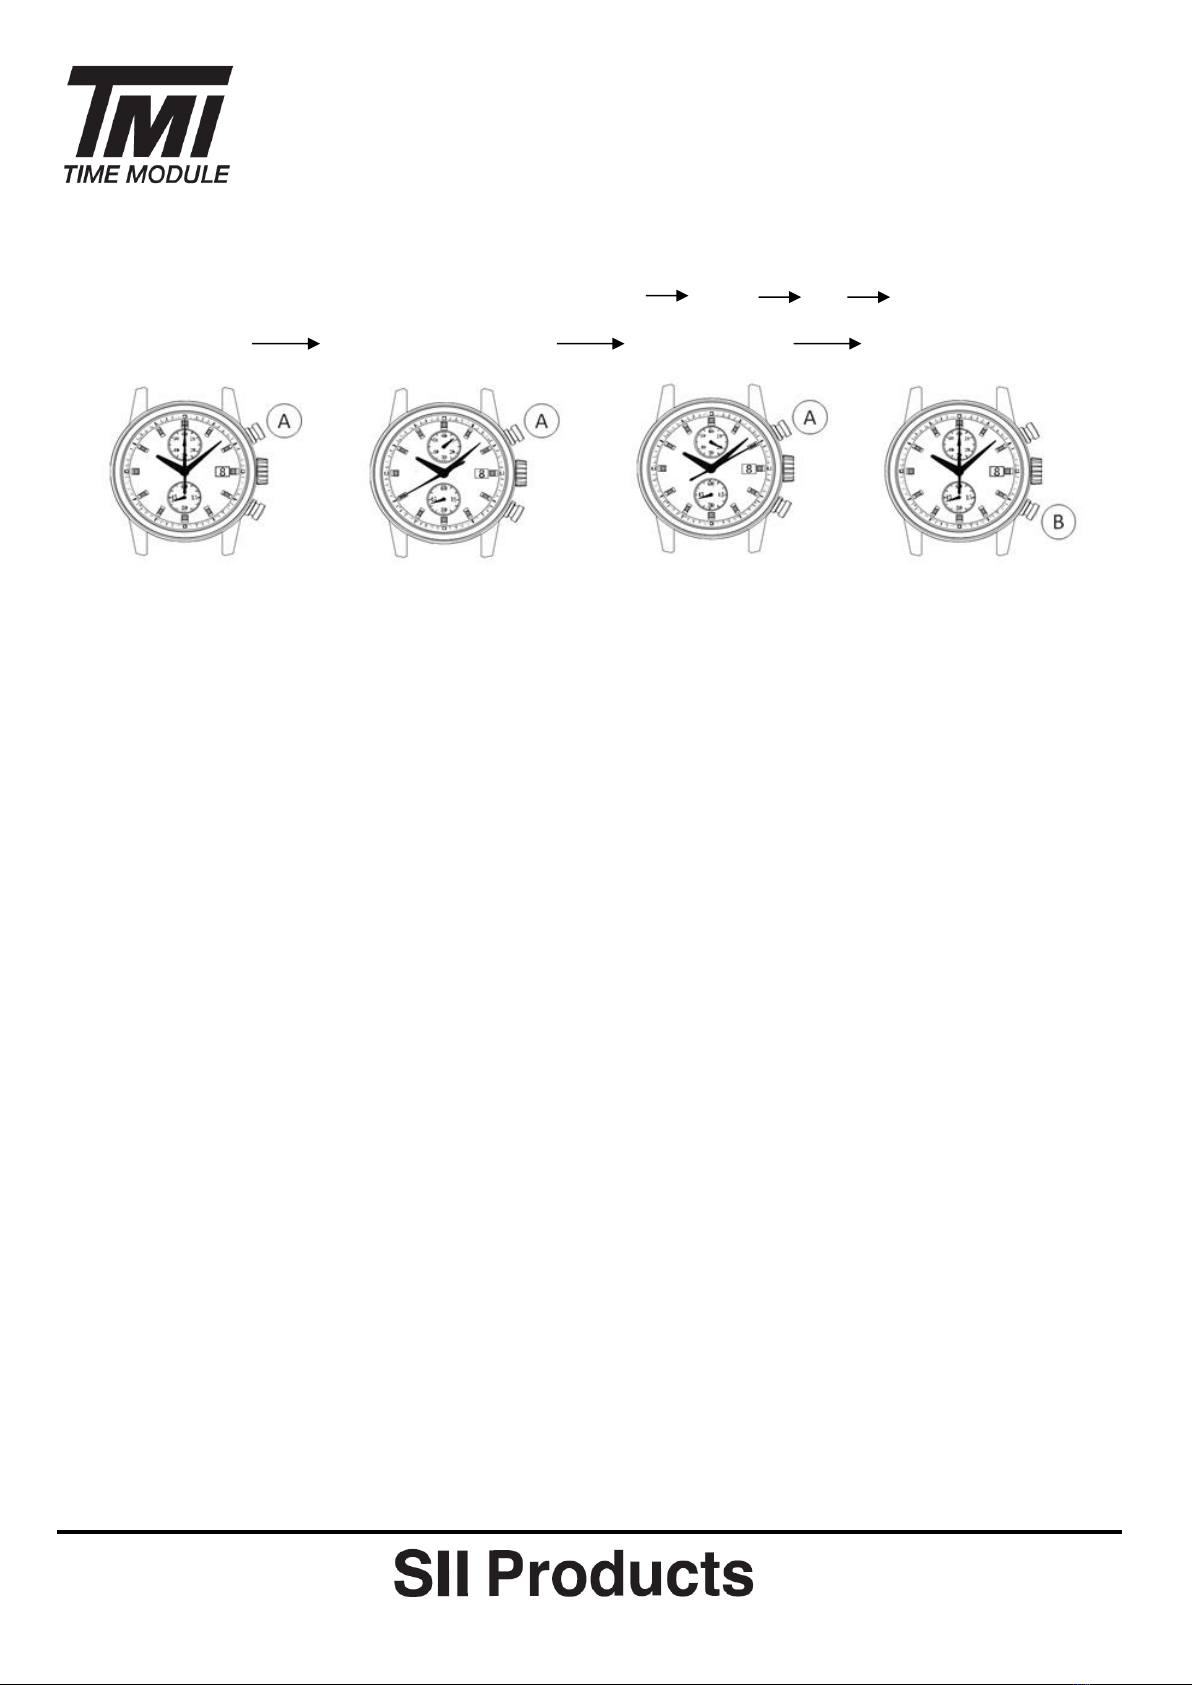
HOW TO USE THE CHRONOGRAPH
START
STOP (Finish)
RESET
* Press button A to start the
chronograph. The
chronograph hands will start
moving.
(20 minutes 10 seconds)
* Press button B to reset the
chronograph. All the
chronograph hands will be
reset to "0" position.
* Press button A again to stop
the chronograph. The
chronograph hands stop to
indicate the elapsed time.

English
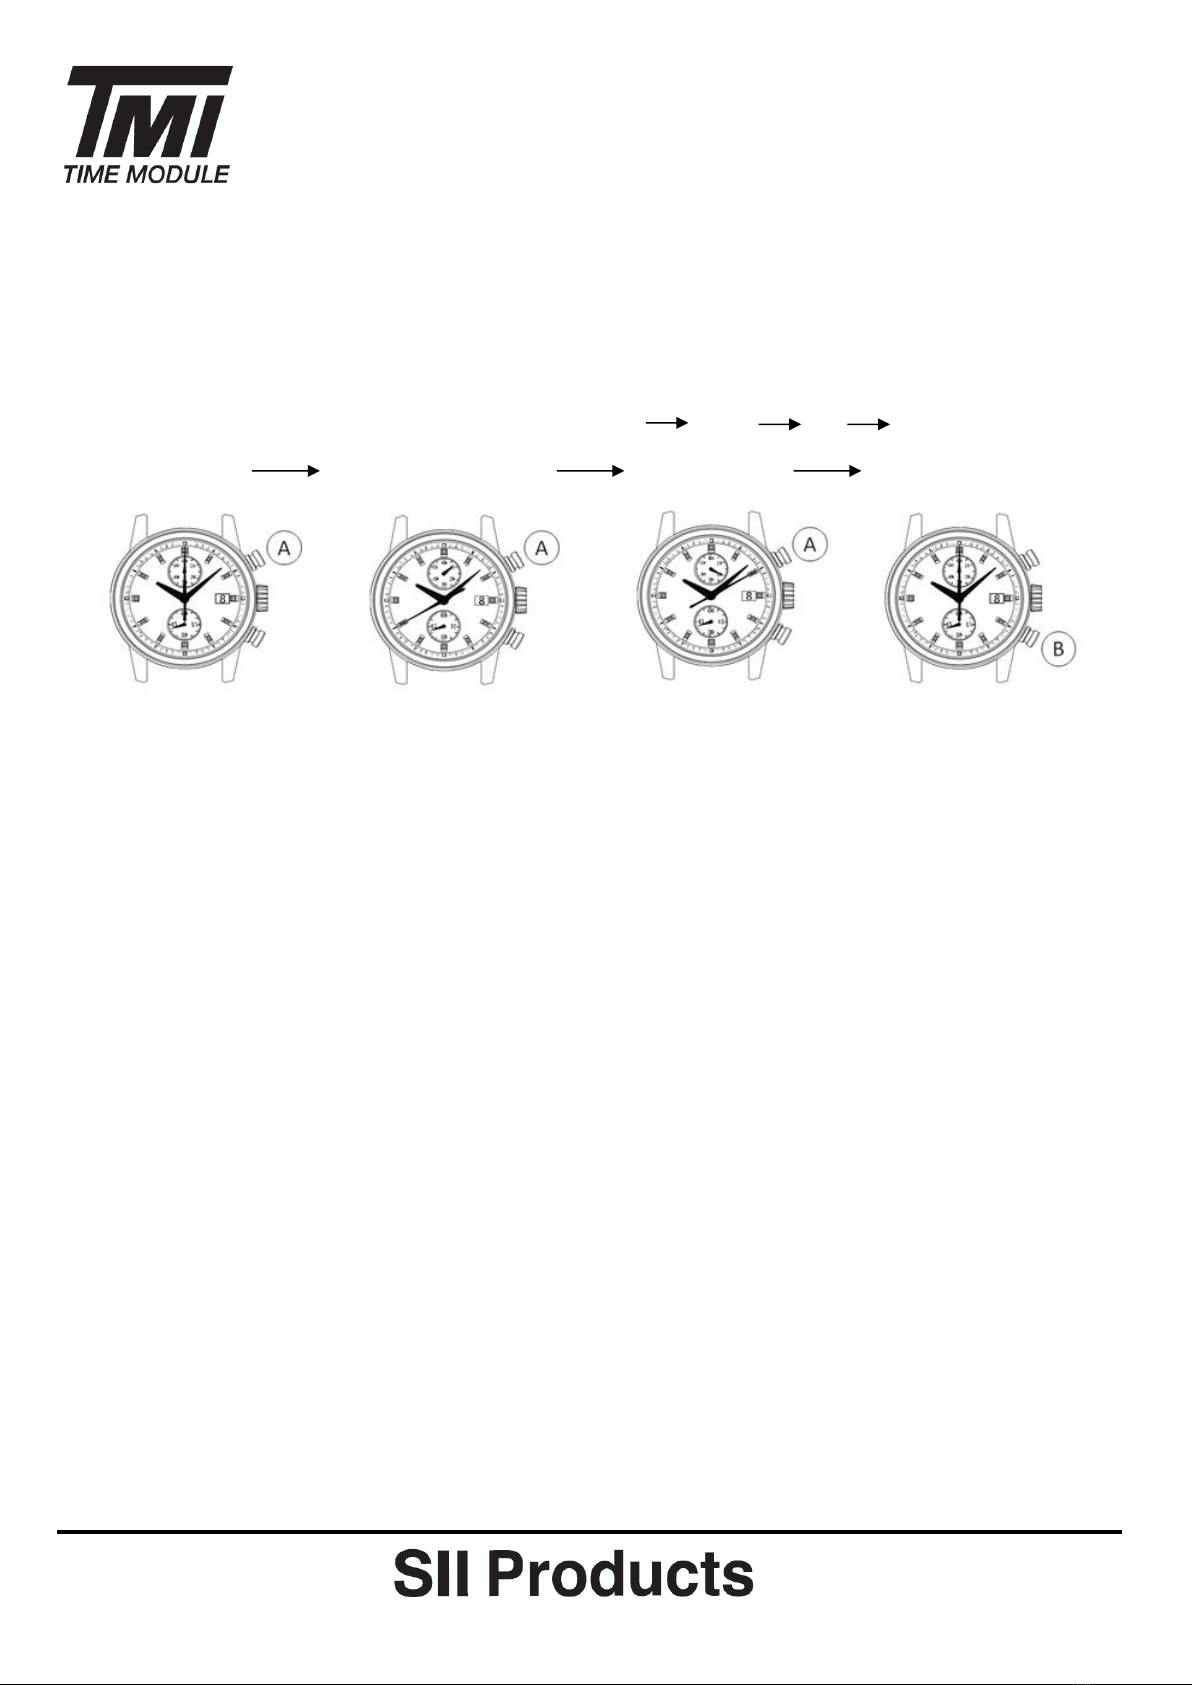
[ Accumulated elapsed time measurement : e.g. baseketball game ]
Press the buttons in the following order: A A/A… A B
START STOP / RESTART STOP RESET
* Restart and stop of the chronograph can be repeated as many times as necessary by pressing button A.
VK61 / VK64
(8 minute 40 seconds)
(20 minute 10 seconds)
Operation Manual

繁體中文
VK61 VK64
*1 : 時針 O O
*2 : 分針 O O
*3 : 中央秒錶1/5秒指針 O O
*4 : 小秒針 O (6H) X
*5 : 秒錶分針 (60分鐘) O (12H) O (9H)
*6 : 24小時指針 X O (3H)
*7 : 按鈕A (開始/停止秒錶) O O
*8 : 按鈕B (重設秒錶) O O
*9 : 錶冠於原位 O O
*10 : 錶冠於位置一(日曆設定) O O
*11 : 錶冠於位置二(時間設定) O O
設定時間
1) 拔出錶冠至位置二
2) 旋轉錶冠以設定時針和分針 (檢查是否正確設定上/下午時間)
3) 把錶冠推回原位
*當秒錶功能正運作時,把錶冠推出至位置二不會令秒錶指針停止運行,這並非機能失常
設定日期
1) 拔出錶冠至位置一
2) 順時針方向旋轉錶冠以調校日曆
*請勿在9:00PM 至3:00AM設定日期,否則,日曆轉換可能會出現異常。如須在該段時間設定日期,請先把時
間更改為上述時段以外的時間,再設定日期,然後重設正確時間
3) 把錶冠推回原位
時間設定
机芯操作手册
VK61 / VK64
時間顯示及錶冠/按鈕操作
[ VK61 ]
[ VK64 ]

繁體中文
方法一
1) 錶冠於原位
2) 以導電鑷子接觸電路板的"AC"端及按掣彈簧(即"正極片"),重設電路板
3) 小秒針會以每兩秒鐘走一格的方式運行十秒,表示重設完成 (VK61)
方法二
1) 拔出錶冠至位置二
2) 按下按鈕B兩秒, 然後釋放按鈕
3) 把錶冠推回原位
4) 小秒針會以每兩秒鐘走一格的方式運行十秒,表示重設完成 (VK61)
*在那十秒內操作錶冠的話,每兩秒鐘走一格的小秒針示範動作將不會被啟動 (VK61)
*更換電池後不用調校秒錶指針。如秒錶指針位置不正確,循以下步驟把它們重設回"0"位置
[ 一般計時記錄 : 例如100米賽跑 ]
循以下次序按下按鈕 : A A B
*秒錶的最大測時時限為60分鐘,時限過後秒錶停止運作
*在最大測時時限結束後,重新啟動秒錶功能:
VK61 / VK64 : 按下按鈕A
*在秒錶運作時,可以按下按鈕B(重設按鈕),這不會影響功能運作
机芯操作手册
VK61 / VK64
如何重設(更換電池後)
按鈕 A
按鈕 A
按鈕 B
(開始)
(停止)
(重設)
如何操作秒錶
開始
停止 (結束)
重設
* 按下按鈕A啟動秒錶功能。秒錶
指針會開始運作
(20 分 10 秒)
* 按下按鈕B,重設秒錶,所有秒
錶指針回歸"0"位置
* 再按下按鈕A,停止秒錶運作。
秒錶指針顯示結束時間

繁體中文
[ 累積時間記錄:例如籃球比賽 ]
循以下次序按下按鈕: AA/A… A B
開始 停止/重新開始 停止 重設
*可隨需要多次按下按鈕A以重新開始及停止秒錶功能
(8分40秒)
(20分10秒)
机芯操作手册
VK61 / VK64

简体中文
VK61 VK64
*1 : 时针 O O
*2 : 分针 O O
*3 : 中央秒表1/5秒指针 O O
*4 : 小秒针 O (6H) X
*5 : 秒表分针 (60分钟) O (12H) O (9H)
*6 : 24小时指针 X O (3H)
*7 : 按钮A (开始/停止秒表) O O
*8 : 按钮B (重设秒表) O O
*9 : 表冠于原位 O O
*10 : 表冠于位置一(日历设定) O O
*11 : 表冠于位置二(时间设定) O O
设定时间
1) 拔出表冠至位置二
2) 旋转表冠以设定时针和分针 (检查是否正确设定上/下午时间)
3) 把表冠推回原位
*当秒表功能正运作时,把表冠推出至位置二不会令秒表指针停止运行,这并非机能失常
设定日期
1) 拔出表冠至位置一
2) 顺时针方向旋转表冠以调校日历
*请勿在9:00PM 至3:00AM设定日期,否则,日历转换可能会出现异常。如须在该段时间设定日期,请先把时
间更改为上述时段以外的时间,再设定日期,然后重设正确时间
3) 把表冠推回原位
[ VK61 ]
[ VK64 ]
时间设定
机芯操作手册
VK61 / VK64
时间显示及表冠/按钮操作

简体中文
方法一
1) 表冠于原位
2) 以导电镊子接触电路板的"AC"端及按掣弹簧(即"正极片"),重设电路板
3) 小秒针会以每两秒钟走一格的方式运行十秒,表示重设完成 (VK61)
方法二
1) 拔出表冠至位置二
2) 按下按钮B两秒, 然后释放按钮
3) 把表冠推回原位
4) 小秒针会以每两秒钟走一格的方式运行十秒,表示重设完成 (VK61)
*在那十秒内操作表冠的话,每两秒钟走一格的小秒针示范动作将不会被启动 (VK61)
*更换电池后不用调校秒表指针。如秒表指针位置不正确,循以下步骤把它们重设回"0"位置
[ 一般计时记录 : 例如100米赛跑 ]
循以下次序按下按钮 : A A B
*秒表的最大测时时限为60分钟,时限过后秒表停止运作
*在最大测时时限结束后,重新启动秒表功能:
VK61 / VK64 : 按下按钮A
*在秒表运作时,可以按下按钮B(重设按钮),这不会影响功能运作
如何操作秒表
* 按下按钮A启动秒表功能。秒表
指针会开始运作
(20 分 10 秒)
* 按下按钮B,重设秒表,所有秒
表指针回归"0"位置
开始
停止 (结束)
重设
* 再按下按钮A,停止秒表运作。
秒表指针显示结束时间
机芯操作手册
VK61 / VK64
如何重设(更换电池后)
按钮 A
按钮 A
按钮 B
(开始)
(停止)
(重设)
简体中文
[ 累积时间记录:例如篮球比赛 ]
循以下次序按下按钮: AA/A… A B
开始 停止/重新开始 停止 重设
*可随需要多次按下按钮A以重新开始及停止秒表功能
(8分40秒)
(20分10秒)
机芯操作手册
VK61 / VK64

Spanish
VK61 VK64
*1 : Manecilla de las horas O O
*2 : Minutero O O
*3 : Segundero con Cronógrafo de 1/5 en el centro O O
*4 : Pequeño segundero O (6H) X
*5 : Minutero del Cronógrafo (60 minutos) O (12H) O (9H)
*6 : Manecilla de 24 horas X O (3H)
*7 : Botón A (INICIO/PARADA) O O
*8 : Botón B (REAJUSTE) O O
*9 : Corona en posición normal O O
*10 : Corona em primera posición (ajuste de Fecha) O O
*11 : Corona en segunda posición (Ajuste de la hora) O O
Ajuste de la Hora
1) Tire de la corona hasta oír un click en la segunda posición
2) Gire la corona para ajustar la hora y el minutero (Compruebe que tanto AM/PM estén ajustados
correctamente).
3) Vuelva a poner la corona a su posición normal.
*Si tira de la corona hacia la segunda posición mientras el cronógrafo está funcionando, las manecillas
del cronógrafo seguirán moviéndose. No significa que el aparato no funcione.
Ajuste la Fecha
1) Tire de la corona hasta oír un click en la primera posición
2) Gire la corona en sentido de las agujas del reloj para ajuste de la fecha
*No ajuste la fecha entre las 9:00PM y las 3:00AM ya que esto haría que el día no cambiara
correctamente. Si es necesario ajustar la fecha durante ese periodo, primero cambie la hora fuera de
este rango, ajuste la fecha y luego vuelva a poner la hora correcta.
3) Vuelva a poner la corona a su posición normal.
Ajuste de la Hora
INSTRUCCIONES DE OPERACIÓN
VK61 / VK64
Pantalla y Corona/Funcionamiento de los controles
[ VK61 ]
[ VK64 ]

Spanish
Método 1
1) Ajuste la corona a su posición normal
2) Toque el terminal AC del circuito y el muelle del interruptor con unas pinzas
conductivas para reajustar el circuito.
3) El pequeño segundero se moverá a intervalos de 2 segundos durante 10
segundos como demostración. (VK61)
Método 2
1) Tire de la corona hasta oír un clic en la segunda posición
2) Presiones el botón B durante 2 segundos y suéltelo
3) Vuelva a poner la corona a su posición normal.
4) El pequeño segundero se moverá a intervalos de 2 segundos durante 10 segundos como
demostración. (VK61 only)
*Si toca la corona durante ese intervalo de 10 segundos, no se activará el movimiento de intervalo de
dos segundos. (VK61 only)
*No es necesario ajustar las manecillas del cronógrafo una vez haya cambiado las pilas. SI la posición
de las manecillas del cronógrafo es incorrecta, siguiendo el procedimiento descrito más abajo, todas
las manecillas volverán a reajustarse a posición "0".
[ Medición estándar : e.g. 100m carrera ]
Presione los botones en el orden siguiente : A A B
INSTRUCCIONES DE OPERACIÓN
VK61 / VK64
Como reajustar (después de un cambio de pilas)
Botón A
Botón A
Botón B
(Inicio)
(Parada)
(Reajuste)
Cómo utilizar el cronógrafo
Inicio
Parada
Reajuste
* Presione el botón A para
iniciar el cronógrafo. Empezar á
n a moverse las manecillas.
(20 minutos 10 segundos)
* Presione el botón B para
reajustar el cronógrafo. Todas
las manecillas volverán a la
posición "0".
* Presione el botón A para
detener el cronógrafo. Las
manecillas del cronógrafo se
detienen para indicar el tiempo
transcurrido.
Spanish
*El cronógrafo puede medir hasta 60 minutos y se detiene tras una medición de 60 minutos.
*Una vez ha finalizado la medición máxima, para reiniciar la función de cronógrafo :
VK61 / VK64 : Presione el botón A
*Durante el funcionamiento del cronógrafo, puede presionar el botón B (reajuste)
[ Medición de tiempo transcurrido acumulado:e.g. un partido de baloncesto ]
Presione los botones en el orden siguiente : A A/A… A B
Inicio Parada / Reinicio Parada
RESET
Reajuste
*El reinicio y parada del cronógrafo se puede repetir tantas veces como sea necesario presionando
el botón A.
(8 minutos 40 segundos)
(20 minutos 10 segundos)
INSTRUCCIONES DE OPERACIÓN
VK61 / VK64

German
VK61 VK64
*1 : Stundenzeiger O O
*2 : Minutenzeiger O O
*3 : Mittlerer 1/5-Sekunden-Stoppuhrzeiger O O
*4 : Kleiner Sekundenzeiger O (6H) X
*5 : Chronograph-Minutenzeiger (60 Minuten) O (12H) O (9H)
*6 : 24 Stunden-Zeiger X O (3H)
*7 : Funktionstaste A (START/STOPP) O O
*8 : Funktionstaste B (ZURÜCKSTELLEN) O O
*9 : Krone in normaler Position O O
*10 : Krone in der ersten Position (Datumseinstellung) O O
*11 : Krone in der zweiten Position (Zeiteinstellung) O O
Einstellen der Zeit
1) Die Krone herausziehen, bis sie in der zweiten Position einrastet.
2) Zum Einstellen des Stunden- und Minutenzeigers die Krone drehen. (Überprüfen, dass AM/PM, also die
Zeit vormittags bzw, nachmittags, richtig eingestellt ist.)
3) Die Krone wieder in die normale Position zurückdrücken.
* Wird die Krone bei laufender Stoppuhr auf die zweite Position herausgezogen, bewegen sich die Zeiger
des Chronographen weiter - es handelt sich hierbei nicht um eine Fehlfunktion.
Einstellen der Datums
1) Die Krone herausziehen, bis sie in der ersten Position einrastet.
2) Zum Einstellen des Datums die Krone im Uhrzeigersinn drehen.
* Das Datum sollte nicht zwischen 21.00 und 03.00 Uhr eingestellt werden, da in diesem Fall der Tag
unter Umständen nicht richtig angezeigt wird. Sollte es nötig sein, das Datum in diesem Zeitraum
einzustellen, die Zeit zuerst auf einen Wert auβerhalb dieses Zeitraums einstellen, dann das Datum
einstellen und danach wieder die richtige Zeit einstellen.
3) Die Krone wieder in die normale Position zurückdrücken.
Zeiteinstellung
BEDIENUNG
VK61 / VK64
Anzeige und Krone/Funktionstastenbedienung
[ VK61 ]
[ VK64 ]

German
Methode 1
1) Die Krone auf die normale Position stellen.
2) Die AC-Anschlussklemme des Schaltungsblocks und die Schaltfeder mit
einer leitfähigen Pinzette berühren, um die Schaltung zurückzustellen.
3) Zur Demonstration bewegt sich der kleine Sekundenzeiger 10 Sekunden
lang in zwei-Sekunden-intervallen. (VK61)
Methode 2
1) Die Krone herausziehen, bis sie in der zweiten Position einrastet.
2) Die Funktionstaste B zwei Sekunden lang gedrückt halten, dann loslassen.
3) Die Krone wieder in die normale Position zurückdrücken.
4) Zur Demonstration bewegt sich der kleine Sekundenzeiger 10 Sekunden lang in
zwei-Sekunden-intervallen. (VK61)
* Wird die Krone innerhalb dieser 10 Sekunden bewegt, wird die Bewegung in zwei-Sekunden-Intervallen
nicht aktiviert. (VK61)
*Es ist nicht nötig, die Zeiger der Stoppuhr nach einem Batteriewechsel einzustellen. Befinden sich die
Chronograph-Zeiger nicht in der richtigen Position, wie nachfolgend beschrieben vorgehen, und die
Chronograph-Zeiger werden auf die Position "0" zurückgestellt.
[ Normale Messung : z.B. 100m-Rennen ]
Die Funktionstasten in folgender Reihenfolge drücken: A A B
* Zum Starten der Stoppuhr die
Funktionstaste A drücken. Die
Chronograph-Zeiger beginnen
zu laufen.
(20 Minuten 10 Sekunden)
* Zum Zurücksetzen der
Stoppuhr die Funktionstaste B
drücken. Alle Chronograph-
Zeiger werden auf die Position
"0" zurückgestellt.
* Zum Anhalten der Stoppuhr
die Funktionstaste A erneut drü
cken. Die Chronograph-Zeiger
bleiben stehen und zeigen die
abgelaufene Zeit an.
(Start)
(Stopp)
(Zurückstellen)
Bedienung der Stoppuhr
Start
Stopp
Zurückstellen
BEDIENUNG
VK61 / VK64
Zurückstellen (nach dem Batteriewechsel)
Funktionstaste A
Funktionstaste A
Funktionstaste B

German
*Die Stoppuhr kann bis zu 60 Minuten erfassen, und die Stoppuhr hält nach der Erfassung von 60 Minuten.
* Nach Ablaufen der maximalen Messzeit die Stoppuhr-Funktion wie folgt neu starten:
VK61 / VK64 : Funktionstaste A drücken.
*Die Funktionstaste B (zurücksetzen) kann bei laufender Stoppuhr gedrückt werden. Dies verursacht
keine Probleme.
[ Aufaddierende Messung: z.B. Basketballspiel ]
Die Funktionstasten in folgender Reihenfolge drücken: AA/A… A B
Start Stopp / neustart Stopp Zurückstellen
*Stoppen und Neustart der Stoppuhr durch Drücken der Funktionstaste A kann so oft wie nötig
wiederholt werden.
(8 Minuten 40 Sekunden)
(20 Minuten 10 Sekunden)
BEDIENUNG
VK61 / VK64

French
VK61 VK64
*1 : Aiguille des heures O O
*2 : Aiguille des minutes O O
*3 : Aiguille des secondes centre chronographe 1/5 O O
*4 : Petite aiguille des secondes O (6H) X
*5 : Aiguille des minutes du chronographe (60 minutes) O (12H) O (9H)
*6 : Aiguille 24 heures X O (3H)
*7 : Commande A (MARCHE/ARRET) O O
*8 : Commadne B (REENCLENCHEMENT) O O
*9 : Couronne en position normale O O
*10 : Couronne en première position (Réglage de la date) O O
*11 : Couronne en deuxième position (Réglage de l'heure) O O
Régler l'heure
1)
Tirer la couronne jusqu'au deuxième déclic
2) Tourner la couronne pour régler les aiguilles des heures et des minutes (s'assurer du bon réglage AM/PM)
3)
Remettre la couronne en position normale.
*Si la couronne est tirée en deuxième position alors que le chronographe est en marche, les aiguilles de ce
dernier continuent à bouger. Ceci n'est pas un signe de mauvais fonctionnement.
Régler la date
1) Tirer la couronne jusqu'au premier déclic.
2) Tourner la couronne dans le sens des aiguilles d'une montre pour régler la date.
*Ne pas régler la date entre 21h et 3h, sinon le jour risque de ne pas être changé correctement. S'il est
nécessaire de régler la date durant cette plage horaire, commencer par changer l'heure sur une heure
en-dehors de cette plage, régler la date, puis régler l'heure correcte.
3)
Remettre la couronne en position normale.
Réglage de l'heure
Fonctionnement
VK61 / VK64
Affichage et fonctionnement de la commande/couronne
[ VK61 ]
[ VK64 ]

French
Méthode 1
1) Régler la couronne en position normale.
2) Toucher la borne CA du block du circuit et le ressort de l'interrupteur avec des
pinces conductrices pur réenclencher le circuit.
3) La petite aiguille des secondes se déplace par intervalles de 2 secondes
pendant 10 secondes à titre de démonstration. (VK61)
Méthode 2
1)
Tirer la couronne jusqu'au deuxième déclic
2) Appuyer sur la commande B pendant deux secondes, puis lâcher la commande.
3)
Remettre la couronne en position normale.
4) La petite aiguille des secondes se déplace par intervalles de 2 secondes pendant 10 secondes à titre
de démonstration. (VK61)
*Si la couronne est bougée durant les 10 secondes, le mouvement à intervalles de deux secondes ne
sera pas activé. (VK61)
*Il n'est pas nécessaire de régler les aiguilles du chronographe après avoir changé la pile. Si la position
des aiguilles du chronographe est incorrecte, suivant la procédure ci-dessous, toutes les aiguilles du
chronographe seront remises à "0".
[ Relevé standard: par ex. Course du 100m ]
Appuyer sur les commandes dans l'ordre suivant: A A B
Fonctionnement
VK61 / VK64
Comment réenclencher (après un changement de pile)
Commande A
Commande A
Commande B
(Marche)
(Arrêt)
(Réenclenchement)
Comment utiliser le chronographe
Marche
Arrêt
Réenclenchement
* Appuyer sur la commande A
pour mettre le chronographe
en marche. Les aiguilles de ce
dernier se mettront en marche.
(20 minutes 10 secondes)
* Appuyer sur la commande B
pour réenclencher le
chronographe. Toutes les
aiguilles du chronographe se
remettront à "0".
* Appuyer encore une fois sur
la commande A pour arrêter le
chronographe. Les aiguilles du
chrono. S'arrêtent pour
indiquer le temps écouté.

French
*Le chronographe peut chronométrer jusqu'à 60 minutes et le chronographe s'arrête un chronométrage
de jusqu'à 60 minutes.
*Une fois que le temps relevé maximum est terminé, pour relancer la fonction de chronographe:
VK61 / VK64 : Appuyer sur la commande A
*Quand le chronographe est en marche, on peut appuyer sur la commande B (réenclenchement). Ceci ne
pose aucun problème.
[ Relevé du temps écoulé accumulé: par ex. Basketball ]
Appuyer sur les commandes dans l'ordre suivant: A A/A… A B
Marche Réenclenchement
*Pour remettre en marche et arrêter le chronographe autant de fois qu'il est nécessaire, appuyer sur la
commande A.
VK61 / VK64
Fonctionnement
(8 minutes 40 secondes)
(20 minutes 10 secondes)
Remise en Marche
Arrêt/
Arrêt
Italian
VK61 VK64
*1 : Lancetta ore O O
*2 : Lancetta minuti O O
*3 : Lancetta secondi cronografo 1/5 centrale O O
*4 : Lancetta secondi piccola O (6H) X
*5 : Lancetta minuti cronografo (60 minuti) O (12H) O (9H)
*6 : Lancetta 24 ore X O (3H)
*7 : Pulsante A (AVVIO / STOP) O O
*8 : Pulsante B (RESET) O O
*9 : Corona nella posizione normale O O
*10 : Corona nella prima posizione (imposta Data) O O
*11 : Corona nella seconda posizione (imposta Ora) O O
Regola l'ora
1) Sfilare la corona nella seconda posizione di scatto.
2) Ruotare la corona per regolare le lancette di ora e minuti (verificare che AM / PM sia impostato
correttamente).
3) Premere la corona per riportarla nella posizione normale.
* Se si sfila la corona nella seconda posizione in fase di avvio del cronografo, le lancette di questo
continueranno a muoversi. Non si tratta pertanto di un malfunzionamento.
Impostazione Data
1) Sfilare la corona nella prima posizione di scatto.
2) Ruotare in senso orario per impostare la data.
*Non regolare la data tra le 9:00PM e le 3:00AM, poichél'impostazione del giorno potrebbe
risultare errata. All'occorrenza regolare la data durante questo periodo; impostare prima un'ora
diversa da quella desiderata, impostare la data e quindi impostare l'ora corretta.
3) Premere la corona per riportarla nella posizione normale.
Impostazione Ora
FUNZIONAMENTO
VK61 / VK64
Display e corona / Funzionamento dei pulsanti
[ VK61 ]
[ VK64 ]

Italian
Metodo 1
1) Regolare la corona nella posizione normale.
2) Per resettare il circuito, toccare il terminale AC del blocco circuito e la
molla dell'interruttore con delle pinzette conduttive.
3) La lancetta piccola dei secondi si muoverà, a titolo dimostrativo, per
10 secondi a intervalli di 2 secondi. (VK61)
Metodo 2
1) Sfilare la corona nella seconda posizione di scatto.
2) Premere il pulsante B per due secondi, quindi rilasciarlo.
3) Premere la corona per riportarla nella posizione normale.
4) La lancetta piccola dei secondi si muoverà, a scopo dimostrativo, per 10 secondi a intervalli di
2 secondi (VK61).
*Se si aziona la corona entro i 10 secondi, il movimento a intervalli di 2 secondi non si attiverà.
(VK61)
*Non è necessario regolare le lancette del cronografo dopo la sostituzione della pila. Se le
posizioni delle lancette del cronografo risultano errate, seguire la procedura qui di seguito per
resettare (posizione "0") tutte le lancette.
[ Misurazione standard: es. corsa di 100 mt ]
Premere i pulsanti nel seguente ordine: A A B
FUNZIONAMENTO
VK61 / VK64
Come eseguire il reset (dopo la sostituzione della pila)
Pulsante A
Pulsante A
Pulsante B
(Avvio)
(Stop)
(Reset)
Come usare il cronografo
Avvio
Stop
Reset
* Per avviare il cronografo,
premere il pulsante A. Le
lancette del cronografo iniziano
a muoversi.
(20 minuti 10 secondi)
* Premere il pulsante B per
azzerare il cronografo. Tutte le
lancette ritornano alla
posizione "0".
* Premere nuovamente il
pulsante A per arrestare il
cronografo; le lancette si
fermano per indicare il tempo
trascorso.
Other manuals for vk61
3
This manual suits for next models
1
Table of contents
Languages:
Popular Accessories manuals by other brands


Gira
Gira Observer 70 manual

Becker
Becker Centronic SensorControl SC211-II Assembly and operation instructions

Woodstock
Woodstock Shop Fox Fence W1410 operating manual

Richelieu
Richelieu DS86101P1A1C90 Installation sheet

WATSON INDUSTRIES
WATSON INDUSTRIES ADS-C232-3AD owner's manual

AND
AND AD-4412-CW instruction manual