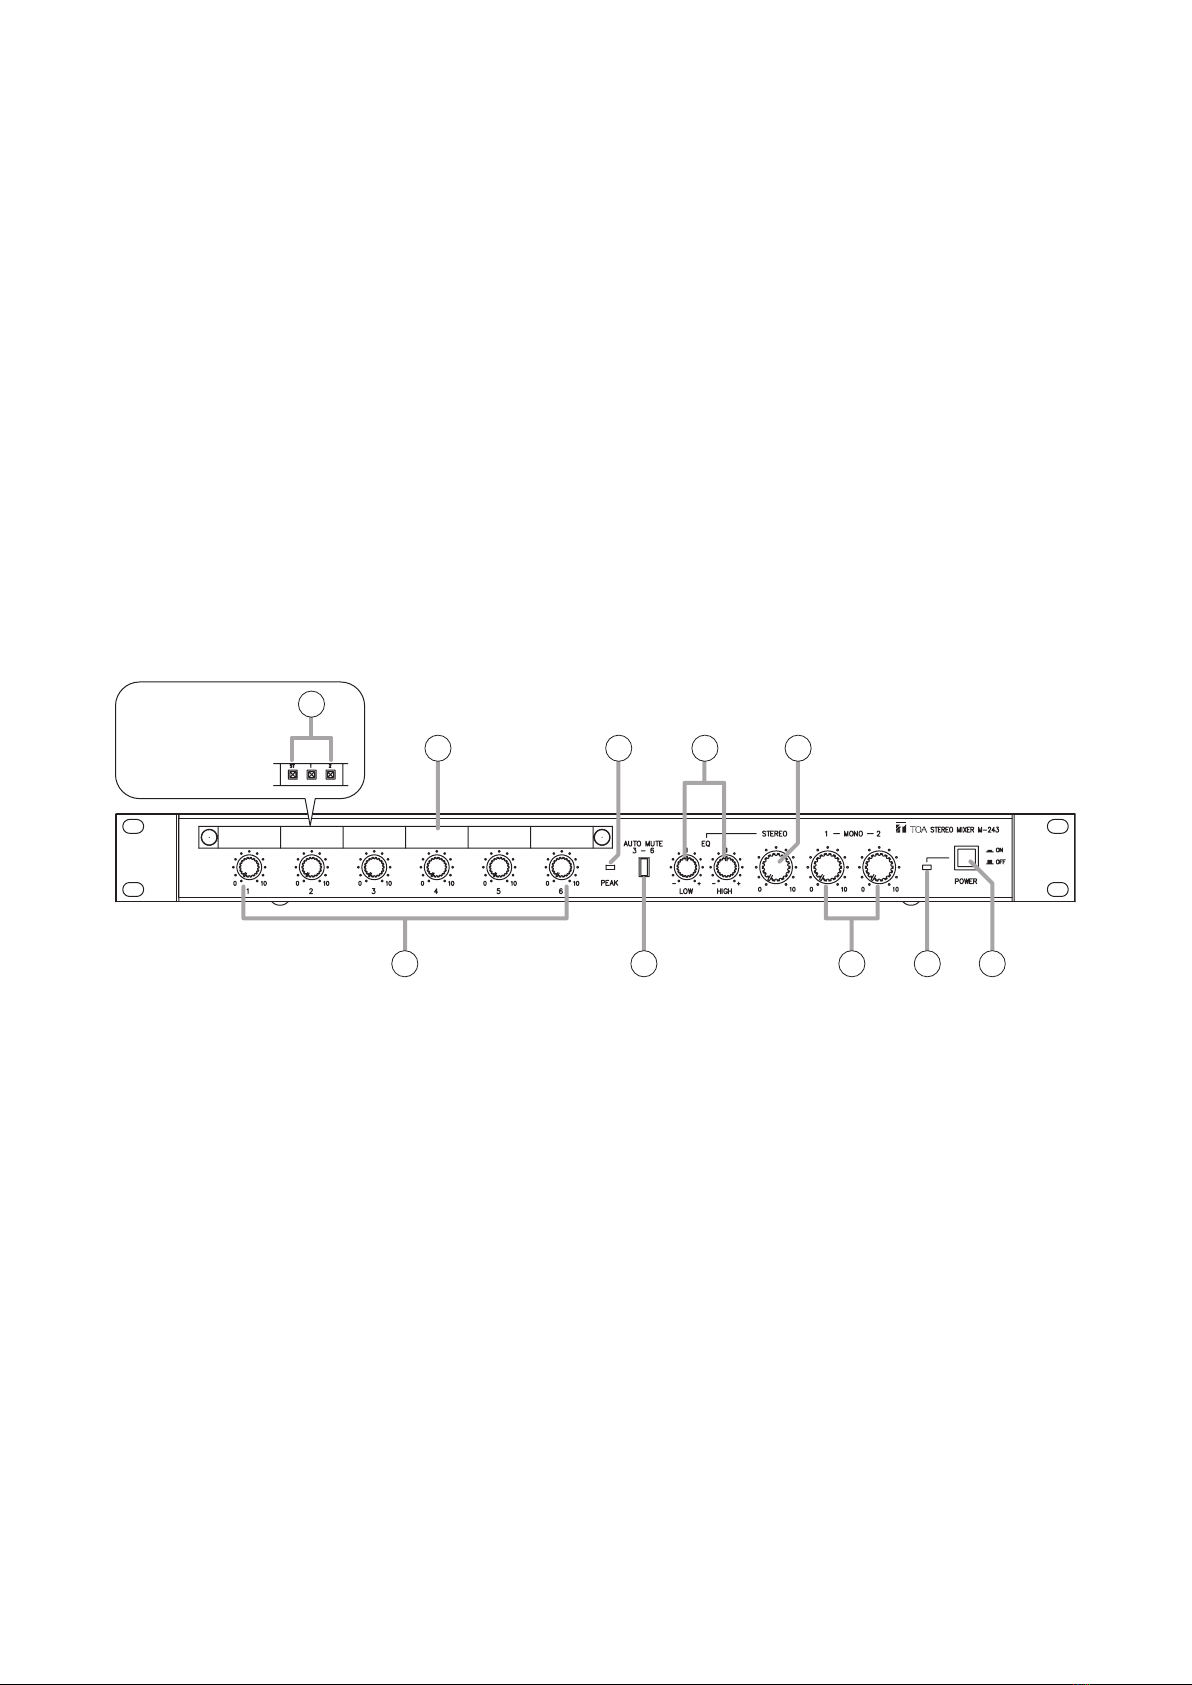
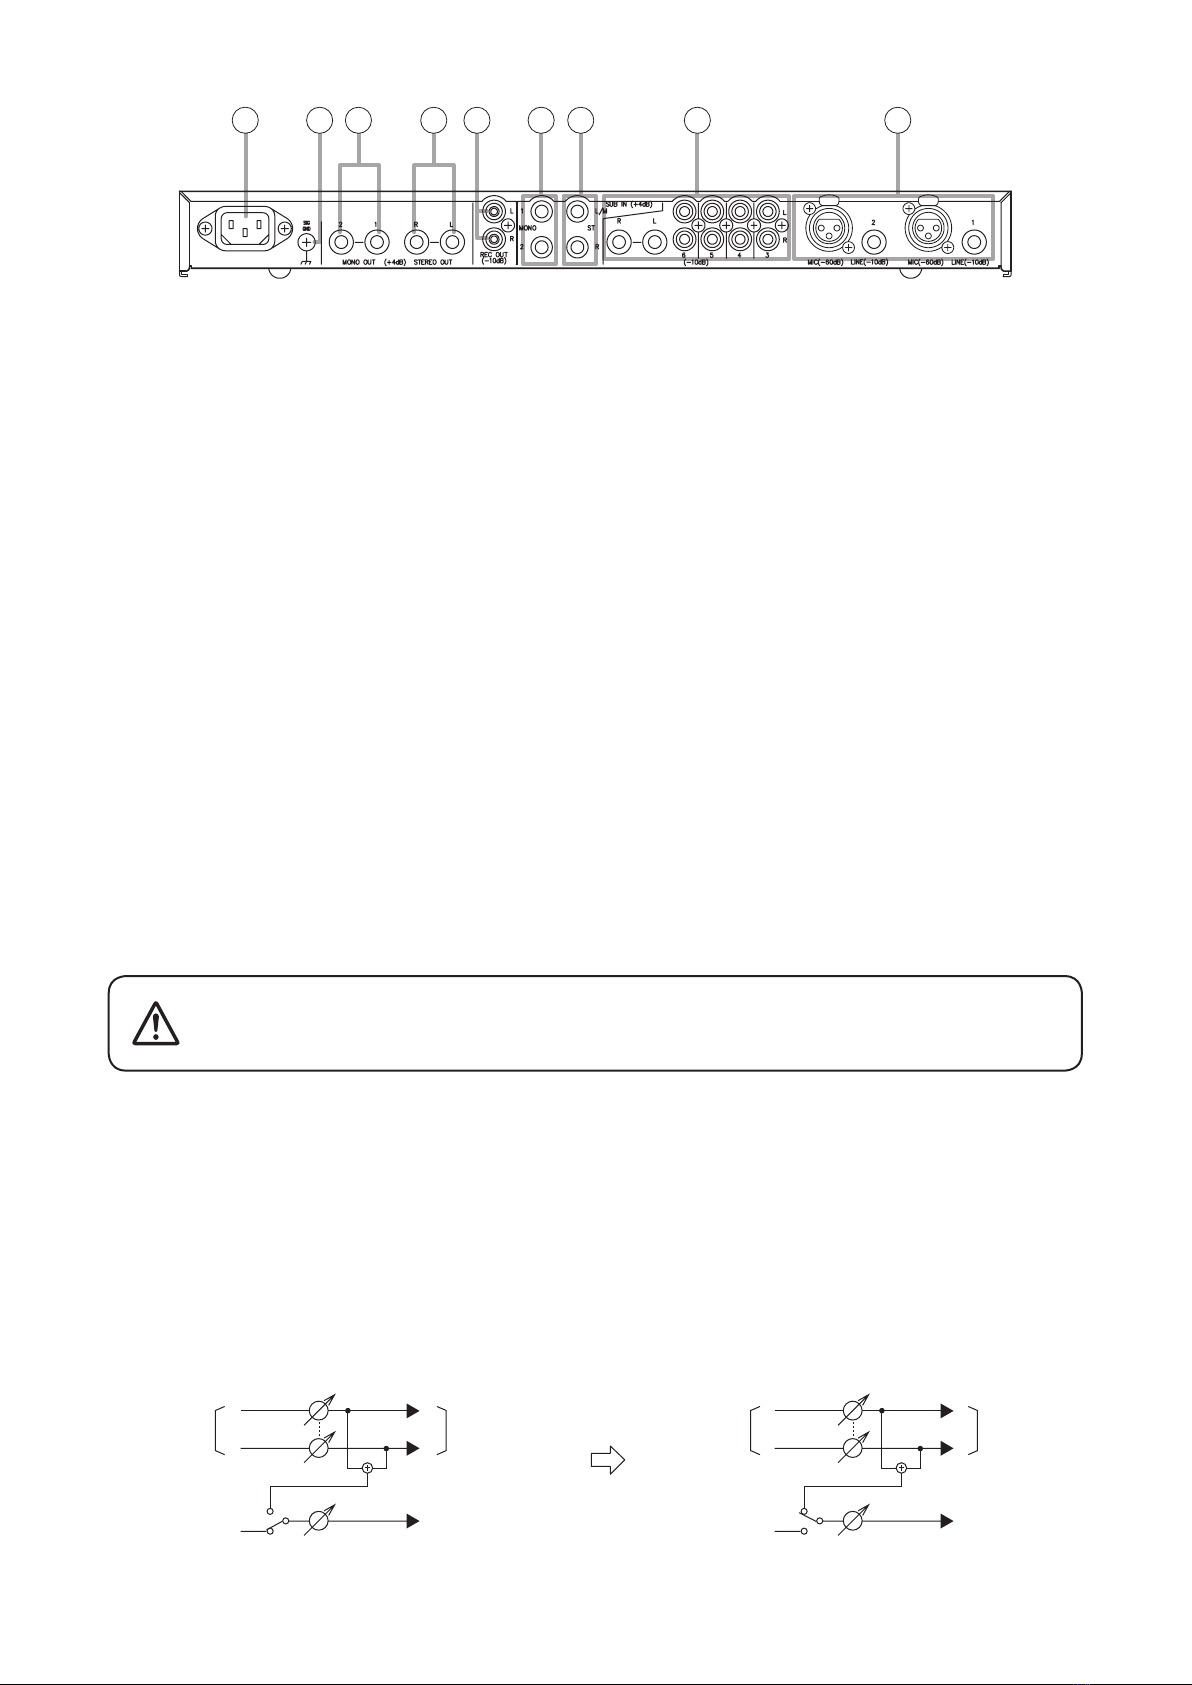
Toa M-243 User manual

OPERATING INSTRUCTIONS
STEREO MIXER M-243
Thank you for purchasing TOA’s Stereo Mixer.
Please carefully follow the instructions in this manual to ensure long, trouble-free use of your equipment.
TABLE OF CONTENTS
1. IMPORTANT SAFETY INSTRUCTIONS .... 2
2. SAFETY PRECAUTIONS ............................. 3
3. GENERAL DESCRIPTION ........................... 4
4. FEATURES ................................................... 4
5. NOMENCLATURE AND FUNCTIONS ......... 5
Front ............................................................... 5
Rear ............................................................... 6
6. INTERNAL SWITCH SETTINGS ................. 6
7. BLOCK AND LEVEL DIAGRAMS ................ 7
8. DIMENSIONAL DIAGRAM .......................... 7
9. SPECIFICATIONS ........................................ 8
Accessories ................................................... 8

2
• Lirecesinstructions.
• Conserver ces instructions pour référence
ultérieure.
• Respectertouslesavertissements.
• Suivretouteslesinstructions.
• Nepasutilisercetappareilàproximitéd'eau.
• Nettoyeruniquementàl'aided'unchiffonsec.
• Nepasobstruerlesoricesdeventilation.Installer
conformémentauxinstructionsdufabricant.
• Nepasinstalleràproximitédesourcesdechaleur
tellesquedesradiateurs,desregistresthermiques,
des chaudières ou d'autres appareils (notamment
desamplicateurs)produisantdelachaleur.
• Ne pas contourner la fonction de sécurité de la che
polariséeoudemiseàlaterre.Unechepolariséeest
équipéededeuxbroches,dontl'uneestpluslargeque
l'autre.Unechedemiseàlaterreestéquipéededeux
brochesetd'unetroisièmepourlamiseàlaterre.Cette
dernière,lapluslarge,estprévueàdesnsdesécurité.
Si la che fournie ne peut être insérée dans la prise
électriquesouhaitée,consulterunélectricienpourfaire
remplacercettedernière.
• Protéger le cordon d'alimentation pour éviter qu'il
nesoitpiétinéoupincé,notammentauniveaudes
ches, des prises de courant ou de son point de
sortiedel'appareil.
• Utiliseruniquementlesaccessoiresspéciésparle
fabricant.
•
Utiliser uniquement avec le
chariot, support, trépied, la patte
demontage ou latablespéciés
par le fabricant ou vendus avec
l'appareil. En cas d'utilisation
d'un chariot, manipuler la
combinaison chariot/appareil
pour éviter les blessures dues à
unrenversement.
• Débrancher cet appareil pendant les orages ainsi
que lorsqu'il reste inutilisé pendant une période
prolongée.
• Lamaintenancedel'appareildoitêtreconéeàun
technicien après-vente qualié. Une maintenance
s'avère nécessaire si l'appareil est endommagé
(auniveauducordond'alimentationoudelache),
aétémouillé par unliquide,un objetesttombéà
l'intérieur,s'ilaétéexposéàlapluieoul'humidité,
s'ilnefonctionnepasnormalementous'ilesttombé.
• Readtheseinstructions.
• Keep these instructions.
• Heedallwarnings.
• Follow all instructions.
• Donotusethisapparatusnearwater.
• Cleanonlywithdrycloth.
• Do not block any ventilation openings. Install in
accordancewiththemanufacturer'sinstructions.
• Do not install near any heat sources such as
radiators,heatregisters,stoves,orotherapparatus
(includingamplifiers)thatproduceheat.
• Do not defeat the safety purpose of the polarized
or grounding-type plug. A polarized plug has two
bladeswithonewiderthantheother.Agrounding
type plug has two blades and a third grounding
prong. The wide blade or the third prong are
providedforyoursafety.Iftheprovidedplugdoes
not fit into your outlet, consult an electrician for
replacement of the obsolete outlet.
• Protect the power cord from being walked on
or pinched particularly at plugs, convenience
receptacles,andthepointwheretheyexitfromthe
apparatus.
• Onlyuseattachments/accessoriesspecifiedbythe
manufacturer.
• Use only with the cart, stand,
tripod,bracket,ortablespecified
bythemanufacturer,orsoldwith
the apparatus. When a cart is
used, use caution when moving
the cart/apparatus combination
toavoidinjuryfromtip-over.
• Unplug this apparatus during lightning storms or
whenunusedforlongperiodsoftime.
• Refer all servicing to qualified service personnel.
Servicingisrequiredwhentheapparatushasbeen
damagedinanyway,suchaspower-supplycordor
plugisdamaged,liquidhasbeenspilledorobjects
have fallen into the apparatus, the apparatus has
beenexposedtorainormoisture,doesnotoperate
normally,orhasbeendropped.
1. IMPORTANT SAFETY INSTRUCTIONS
INSTRUCTIONS ESSENTIELLES POUR LA SÉCURITÉ

3
2. SAFETY PRECAUTIONS
• Beforeinstallationoruse,besure to carefullyreadallthe instructionsinthissectionforcorrectandsafe
operation.
• Besuretofollowalltheprecautionaryinstructionsinthissection,whichcontainimportantwarningsand/or
cautionsregardingsafety.
• Afterreading,keepthismanualhandyforfuturereference.
Safety Symbol and Message Conventions
Safetysymbolsandmessagesdescribedbelowareusedinthismanualtopreventbodilyinjuryandproperty
damage which could result from mishandling. Before operating your product, read this manual rst and
understandthesafetysymbolsandmessagessoyouarethoroughlyawareofthepotentialsafetyhazards.
Indicatesapotentiallyhazardoussituationwhich,ifmishandled,could
resultindeathorseriouspersonalinjury.
Indicatesapotentiallyhazardoussituationwhich,ifmishandled,could
resultinmoderateorminorpersonalinjury,and/orpropertydamage.
WARNING
CAUTION
When Installing the Unit
Lors de l’installation de l’appareil
• Do not expose the unit to rain or an environment
whereitmaybesplashedbywaterorotherliquids,
asdoingsomayresultinreorelectricshock.
• Nepasexposerl’appareilàlapluieetleprotégerde
toutcontactavecdel’eauoud’autresliquidesan
d’éviterunincendieouuneélectrocution.
• Use the unit only with the voltage specied on
theunit.Usingavoltagehigherthanthatwhichis
speciedmayresultinreorelectricshock.
• Do not cut, kink, otherwise damage nor modify
thepowersupplycord.Inaddition,avoidusingthe
powercordincloseproximitytoheaters,andnever
placeheavyobjects--includingtheunititself--on
the power cord, as doing so may result in re or
electric shock.
• Since the unit is designed for in-door use, do not
installitoutdoors.Whenitgetswetwithrain,there
isadangerofelectricshock.
•Theapparatusshallbeconnectedtoamainssocket
outletwithaprotectiveearthingconnection.
• The socket-outlet shall be installed near the
equipmentandtheplugshallbeeasilyaccessible.
When the Unit is in Use
• Should the following irregularity be found during
use,immediately switch offthepower,disconnect
the power supply plug from the AC outlet and
contactyournearestTOAdealer.Makenofurther
attempttooperatetheunitinthisconditionasthis
maycausereorelectricshock.
· If you detect smoke or a strange smell coming
from the unit.
· Ifwateroranymetallicobjectgetsintotheunit
· Iftheunitfalls,ortheunitcasebreaks
· Ifthepowersupplycordisdamaged(exposureof
thecore,disconnection,etc.)
· Ifitismalfunctioning(notonesounds.)
• Topreventareorelectricshock,neveropennor
remove the unit case as there are high voltage
components inside the unit. Refer all servicing to
qualiedservicepersonnel.
• Do not place cups, bowls, or other containers of
liquidormetallicobjectsontopoftheunit.Ifthey
accidentallyspillintotheunit,thismaycauseare
or electric shock.
• Donotinsertnordropmetallicobjectsorammable
materialsintheventilationslotsoftheunit'scover,
asthismayresultinreorelectricshock.
CAUTION
When Installing the Unit
• Never plug in nor remove the power supply plug
with wet hands, as doing so may cause el
ectric
shock.
• Whenunpluggingthepowersupplycord,besureto
graspthepowersupplyplug;neverpullonthecord
AVERTISSEMENT
WARNING

4
itself. Operating the unit with a damaged power
supplycordmaycauseareorelectricshock.
• Whenmovingtheunit,besuretoremoveitspower
supply cord from the wall outlet. Moving the unit
with the power cord connected to the outlet may
causedamagetothepowercord,resultinginreor
electricshock.Whenremovingthepowercord,be
suretoholditsplugtopull.
• Avoidinstallingtheunitinhumidordustylocations,
inlocationsexposedtothedirectsunlight,nearthe
heaters, or in locations generating sooty smoke
or steam as doing otherwise may result in re or
electric shock.
• Besuretofollowtheinstructionsbelowwhenrack-
mountingtheunit.Failuretodosomaycauseare
orpersonalinjury.
· Installtheequipmentrackonastable,hardoor.
Fix it with anchor bolts or take other arrangements
topreventitfromfallingdown.
· Whenconnectingtheunit'spowercordtoanAC
outlet, use the AC outlet with current capacity
allowable to the unit.
· Thesuppliedrack-mountingscrewscanbeused
fortheTOAequipmentrackonly.Donotusethem
for other racks.
When the Unit is in Use
• If dust accumulates on the power supply plug or
in the wall AC outlet, a re may result. Clean it
periodically.Inaddition,insert thepluginthe wall
outlet securely.
• Switchoffthepower,andunplugthepowersupply
plug from theACoutlet for safety purposes when
cleaningorleavingtheunitunusedfor10daysor
more.Doingotherwisemaycauseareorelectric
shock.
L’éclairaccompagnéd’unsymbolereprésentantunepointedeècheàl’intérieurd’untriangleéquilatéral
avertitl’utilisateurdelaprésenced’une“tensiondangereuse”àl’intérieurdel’enceintedutéléviseur,
dontlamagnitudepeutêtresufsantepourconstituerunrisquedechocélectriquepourlespersonnes.
Le point d’exclamation à l’intérieur d’un triangle équilatéral avertit l’utilisateur de l’existence
d’instructionsd’utilisationetd’entretien(réparation)dansladocumentationfournieavecl’appareil.
3. GENERAL DESCRIPTION
TheM-243isastereomixerequippedwith2monauralinputs,4stereoinputs,1stereooutput,and2monaural
outputs.ItcanbemountedinanEIAcomponentrack(1Usize*).
*1Usize=44.5mmor1.75"(standardsize)
Thelightingashwitharrowheadsymbol,withinanequilateraltriangle,isintended
toalerttheusertothepresenceofuninsulated"dangerousvoltage"withintheproduct'senclosure
thatmaybeofsufcientmagnitudetoconstituteariskofelectricshocktopersons.
Theexclamationpointwithinanequilateraltriangleisintendedtoalerttheuser tothe presence
ofimportantoperationandmaintenance(servicing)instructionintheliteratureaccompanyingthe
appliance.

5
4 5 6 7
1
28 9
10
Inside of the
protective cover
3
5. NOMENCLATURE AND FUNCTIONS
[Front]
1. Power switch
Powerisswitchedonandoffwitheachdepression
of this switch.
2. Power indicator
LightswhenthepowerswitchissettoON.
3. Assignment keys [ST, 1, 2]
Select one of the following output destinations
to which the post-fader input signals are routed.
Signalsareoutputwhenpressed.
ST: Stereo output
1: MONO1output
2: MONO2output
4. Protective cover
Used to protect the setting position of the
assignmentkeys(3)fromaccidentaloperation.
Itcanbeusedasawritingplate.
5. Peak indicator
Lightswhentheoutputsignalreaches3dBbelow
clipping.Besuretoadjusteachinputlevelsothat
thePeakindicatordoesnotlightcontinuously.
6. Equalizer controls [EQ: LOW & HIGH]
Adjuststereooutputsignaltone.
LOW: Lowfrequencyadjustment(20Hz,±15
dBshelving)
HIGH:Highfrequencyadjustment(20kHz,
±15dBshelving)
7. Stereo output level control
Adjustsstereooutputlevel.
8. Input level controls [1 – 6]
(1 – 2: Monaural input, 3 – 6: Stereo input)
Adjusttheinputlevelofeachchannel.
9. Mute key
Activatesmutingwhenpressed.(Indicatorlights.)
[Muting function]
This function works only for the stereo output
channels. Attenuates the signals applied to
Channels3through6bydetectingsignalsapplied
toChannel1or2.(Thisfunctiondoesnotworkfor
themonauraloutputsignal.)
10. Monaural output level controls
Adjustmonauraloutputlevel.
4. FEATURES
• 2monauralinputs,4stereoinputs,1stereooutput,and2monauraloutputs.Assignableeachinputsignalto
3outputchannelsindividually.
• Sub-inputterminalsforstereooutputchannelandeachof2monauraloutputchannels.
• Microphone input or lineinputformonaural inputselectabledependingon thesignallevel.Built-inlimiter
circuitryeliminatesdistortionunderexcessiveinputlevels.High-passlteraswellasPAD(onlyforMICinput)
inthemonaurallineavailablebytheinternalswitchsettings.
• Peakindicatortodetectclipping.
• An"AutomaticMuting"circuitautomaticallymutesthestereooutputsignalbydetectingthemonauralinput
signal.(ON/OFFswitchable)
• Arecordingoutputandequalizer(highandlowfrequencies)forthestereooutputchannel.
• 2channelmonauraloutputsusableassumoutputsforthestereooutputchannelindividuallybytheinternal
switch setting.
• Protectivecoverforprotectingthesettingpositionofeachinputusableasawritingplate.
• Knobs supplied in different colors and size easily replaceable depending on the intended use, improving
operability of the unit.

6
L
R
L
STEREO BUS
MONO 1 (2)
SWITCH
MONO 1 (2)
BUS
RSTEREO OUT
MONO 1 (2) OUT
[Factory default setting] [After the change]
L
R
L
STEREO BUS
MONO 1 (2)
SWITCH
ST SUM
MONO 1 (2)
BUS
RSTEREO OUT
MONO 1 (2) OUT
Change in setting
6. INTERNAL SWITCH SETTINGS
11 12 13 14 15 16 17 18 19
[Rear]
11. AC inlet
Connectthesuppliedpowercord.
12. Functional earth terminal
Hum noise may be generated when external
equipment is connected to the unit. Connecting
this terminal to the functional earth terminal of the
externalequipmentmayreducethehumnoise.
Note: Thisterminalisnotforprotectiveearth.
13. Monaural output jacks
Function as sum output for the stereo output
channel by the internal switch setting. (Refer to
section"6.INTERNALSWITCHSETTINGS.")
14. Stereo output jacks
15. Recording output jacks
Output the signal from the stereo output bus for
recording.
16. Monaural sub-input terminals
Signals from these terminals are sent to each
monauraloutputbus(Mono1andMono2).
17. Stereo sub-input terminals
Signals from these terminals are sent to stereo
output bus. Connecting the signal to only "L"
permitsittobeinputtoboth"L"and"R."
18. Stereo input terminals (3 – 6)
OnlyCH6'sRCAjacksareinternallyconnectedin
paralleltophonejacks.
19. Monaural input terminals (1, 2)
SelecteitherMICorLINEforconnection.Ifboth
areconnected,LINEinputtakesprecedence.
Thefunctionsbelowcanbemadeavailablebychangingtheswitchsettingsinsidetheunit.
(1)"PAD"switch:Settothe"IN"positiontoinsertPAD(20dB)inthemonauralinput(microphoneinput).
(2)"HPF"switch:Settothe"IN"positiontoinsertHighpasslter(300Hz,–6dB/oct)inthemonauralinput.
(3)"GND"switch:Whentheunitisconnectedtoexternalequipment,agroundmaycreatealoop,potentially
generatinganoise(hum).Insuchcases,setthisswitchtotheLIFTpositiontocutoffthegroundloop.
(4)"MONO1"and"MONO2"switches:Settothe"STSUM"positiontochangeeachmonauraloutputtostereo
sum output for the stereo output channel.
This work should only be performed by a qualified professional
electrician. If users openthe unit caseor modifythe unit, this may
cause fire or electric shock.
WARNING

7
8. DIMENSIONAL DIAGRAM
466 (18.35)
419 (16.5)
483 (19.02)
280 (11.02)
301.8 (11.88)
7 x 10
(0.28 x 0.39)
46
(1.81)
15
(0.59)
31.8
(1.25)
44
(1.73)
Unit:mm(in)
7. BLOCK AND LEVEL DIAGRAMS
CH1, CH2
(MONO INPUT)
LINE
–10 dB
REC
OUT
-
10 dB
STEREO
OUT
+4 dB
MONO
OUT
+4 dB
MIC
–60 dB
CH3 – CH6
(STEREO
INPUT)
–10 dB
STEREO
SUB INPUT
+4 dB
MONO
SUB INPUT
+4 dB
L
LR12
1
2
+20
(dB) (dB)
+10
–10
–20
–30
–40
–50
–60
0
R
R
MONO
CH6
L
L
R
L
R
1
2
R
ST
ST
CH1
CH2
1
1
2
2
ON/
OFF
PAD
(20 dB)*MUTE
BUS
BUS
STEREO MONO
ST SUM
POWER ON
MUTE
MONO 1*
MONO 2*
*INTERNAL SWITCH
PEAK LED TURN ON (+17 dB)
CLIP LEVEL (+20 dB)
MONO OUT
STEREO OUT
REC OUT
(+4 dB)
(+4 dB)
(
-
10 dB)
(IN/OUT)*
CH6
BA
BA
BA
BA
SA
SA
SA
SA
SA
SA
SA
SA
HA
HA
HA
EBA
PAD
PAD
VOL
VOL
HPF
MONO 1
PEAK
LOW HIGH
MONO 2
MUTE
LIMIT
STEREO
ASSIGN
ASSIGN
MUTE
CONTROL
LA
LA
LA
LA
LA
LA
EQ
EQ
HA
+20
+10
–10
0
MIC/PAD
(–40 dB)
MIC
(–60 dB)
STEREO IN (–10 dB)
LINE (–10 dB)
SUB IN
(+4 dB)

9. SPECIFICATIONS
Power Source M-243L: 120VAC,60Hz
M-243301H: 220–240VAC,50/60Hz
PowerConsumption M-243L: 10W
M-243301H: 12W
MonauralInput Line: –10dB*,10kΩ,unbalanced,φ6.3mmphonejack(2P)
Mic: –60dB*,1kΩ,balanced,3-pinXLRconnector
Mic(Pad): –40dB*,1kΩ,balanced,3-pinXLRconnector
StereoInput(L,R) –10dB*,10kΩ,unbalanced,RCAjack
AuxiliaryStereoInput +4dB*,50kΩ,unbalanced,φ6.3mmphonejack(2P)
StereoOutput(L,R) +4dB*,1kΩ,unbalanced,φ6.3mmphonejack(2P)
Monaural Output +4dB*,1kΩ,unbalanced,φ6.3mmphonejack(2P)
RECOutput(L,R) –10dB*,1kΩ,unbalanced,RCAjack
Frequency Response 20Hz–20kHz(+1,–2dB)
T.H.D. 0.01%orless(1kHz,ratedinput/output)
NoiseLevel(IHF-A) Whenallvolumecontrolsareinminimumposition.
Stereooutput(L,R): –105dB*orless
MonauralOutput(1,2): –98dB*orless
Whenthestereo,monaural(1,2)areinmaximumposition
Stereooutput(L,R): –94dB*orless
MonauralOutput(1,2): –95dB*orless
Finish Front Panel: Alumite, black
Case: Steel,black
Dimensions 483(w)x46(h)x301.8(d)mm(19.02"x1.81"x11.88")
Weight 3.8kg(8.38lb)
*0dB=0.775Vrms
Note: Thedesignandspecicationsaresubjecttochangewithoutnoticeforimprovement.
• Accessories
Powercord(2mor6.56ft)........................ 1
Rackmountingscrew(5x20)................... 4
Rubber foot ................................................ 4
Knob(blue,small) ..................................... 2
Knob(red,small) ....................................... 2
Knob(blue,large) ......................................1
Knob(red,large)........................................ 1
URL:http://www.toa.jp/
133-02-00051-01
Traceability Information for Europe
Manufacturer:
TOACorporation
7-2-1,Minatojima-Nakamachi,Chuo-ku,Kobe,Hyogo,
Japan
Authorizedrepresentative:
TOAElectronicsEuropeGmbH
Suederstrasse282,20537Hamburg,
Germany
Table of contents
Other Toa Music Mixer manuals