Toa TZ-606W AS User manual

TOA Corporation
INSTRUCTION MANUAL
COLUMN SPEAKER
TZ-206B AS TZ-206W AS
TZ-406B AS TZ-406W AS
TZ-606B AS TZ-606W AS
Thank you for your confidence in our product.
Please follow the instructions stated in the manual carefully to ensure proper installation and to prevent any damage
to the equipment. This is important for longer duration of your equipment.
TOA Corporation
533
-
06
-
221
-
20
Traceability Information for Europe (EMC directive 2004/108/EC)
Manufacturer:
TOA Corporation
7-2-1, Minatojima Nakamachi, Chuo-Ku, Kobe, Hyogo,
Japan
Authorized representative:
TOA Electrics Europe GmBH
Suederstrasse 282, 20537 Hamburg,
Germany
URL: http://www.toa.jp/

1. SAFETY PRECAUTIONS
●Prior to installation or use of the speaker u nit, please read carefully the instruction manuals.
●You must thoroughly understand the safety precautions and important safety warnings stated in the
Instruction manual.
•
After reading, please keep the instruction manual for future use at any time.
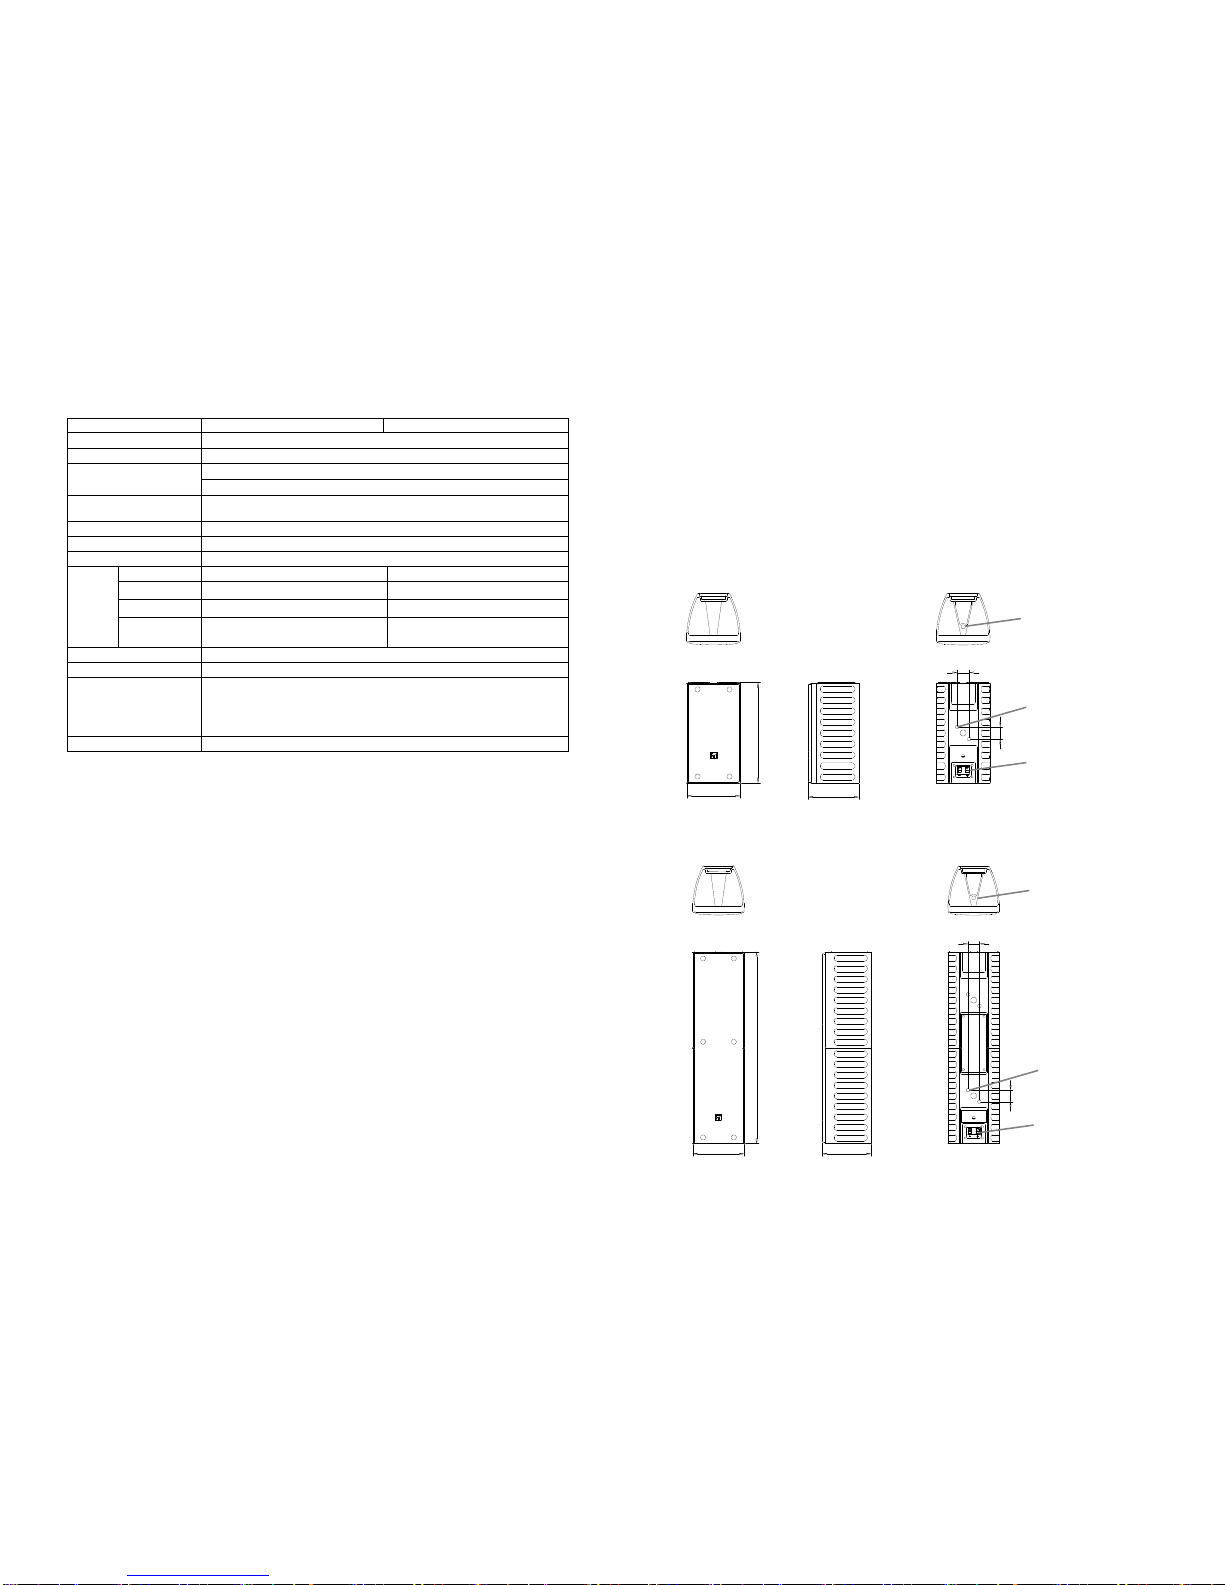
6.3. TZ-606B AS and TZ-606W AS
Model No. TZ-606B AS TZ-606W AS
Enclosure Sealed type
Rated Input 60 W
Rated Impedance 100V line: 170Ω(60W), 330Ω(30W), 670Ω(15W), 1.3kΩ(7.5W)
70V line: 170Ω(30W), 330Ω(15W), 670Ω(7.5W), 1.3kΩ(3.8W)
Sensitivity 95 dB (1W, 1m)
Frequency Response 150 – 16,000Hz
Speaker Component 10 cm(4”) cone-type x 6
Input Terminals Push-in terminals
Finish
Enclosure HIPS, black HIPS, white
Punched Net Surface-treated steel plate, black, paint Surface-treated steel plate, white, paint
Speaker Bracket Aluminum die-cast, black, paint Aluminum die-cast, white, paint
Joint Bracket
Wall Bracket Steel plate, t1.6, black, paint Steel plate, t1.6, white, paint
Dimensions 135 (W) x 746 (H) x 128 (D) mm (5.31” X 29.37” X 5.04”)
Weight 5.5 kg (12.12 lb) unit only
Accessories
Speaker bracket … 1, Joint bracket … 1, Wall bracket … 1, Fixing bolt M5 x 60 … 1,
Hexagon bolt M6 x 12 (with plain washer and spring washer) … 2,
Machine screw M5 x 20 (with plain washer and spring washer) … 2
Hexagon bolt M8 x 15 … 1
Option Speaker stand: ST-16A
Note: The design and specifications are subject to change without notice for product improvement.
WARNING
WARNINGWARNING
WARNING
CAUTIO
CAUTIOCAUTIO
CAUTIO
N
NN
N
Indicates a dangerous situation, improper action may result in
death or serious injury.
Indicates potential danger, improper action may result in minor
injury or equipment damage.
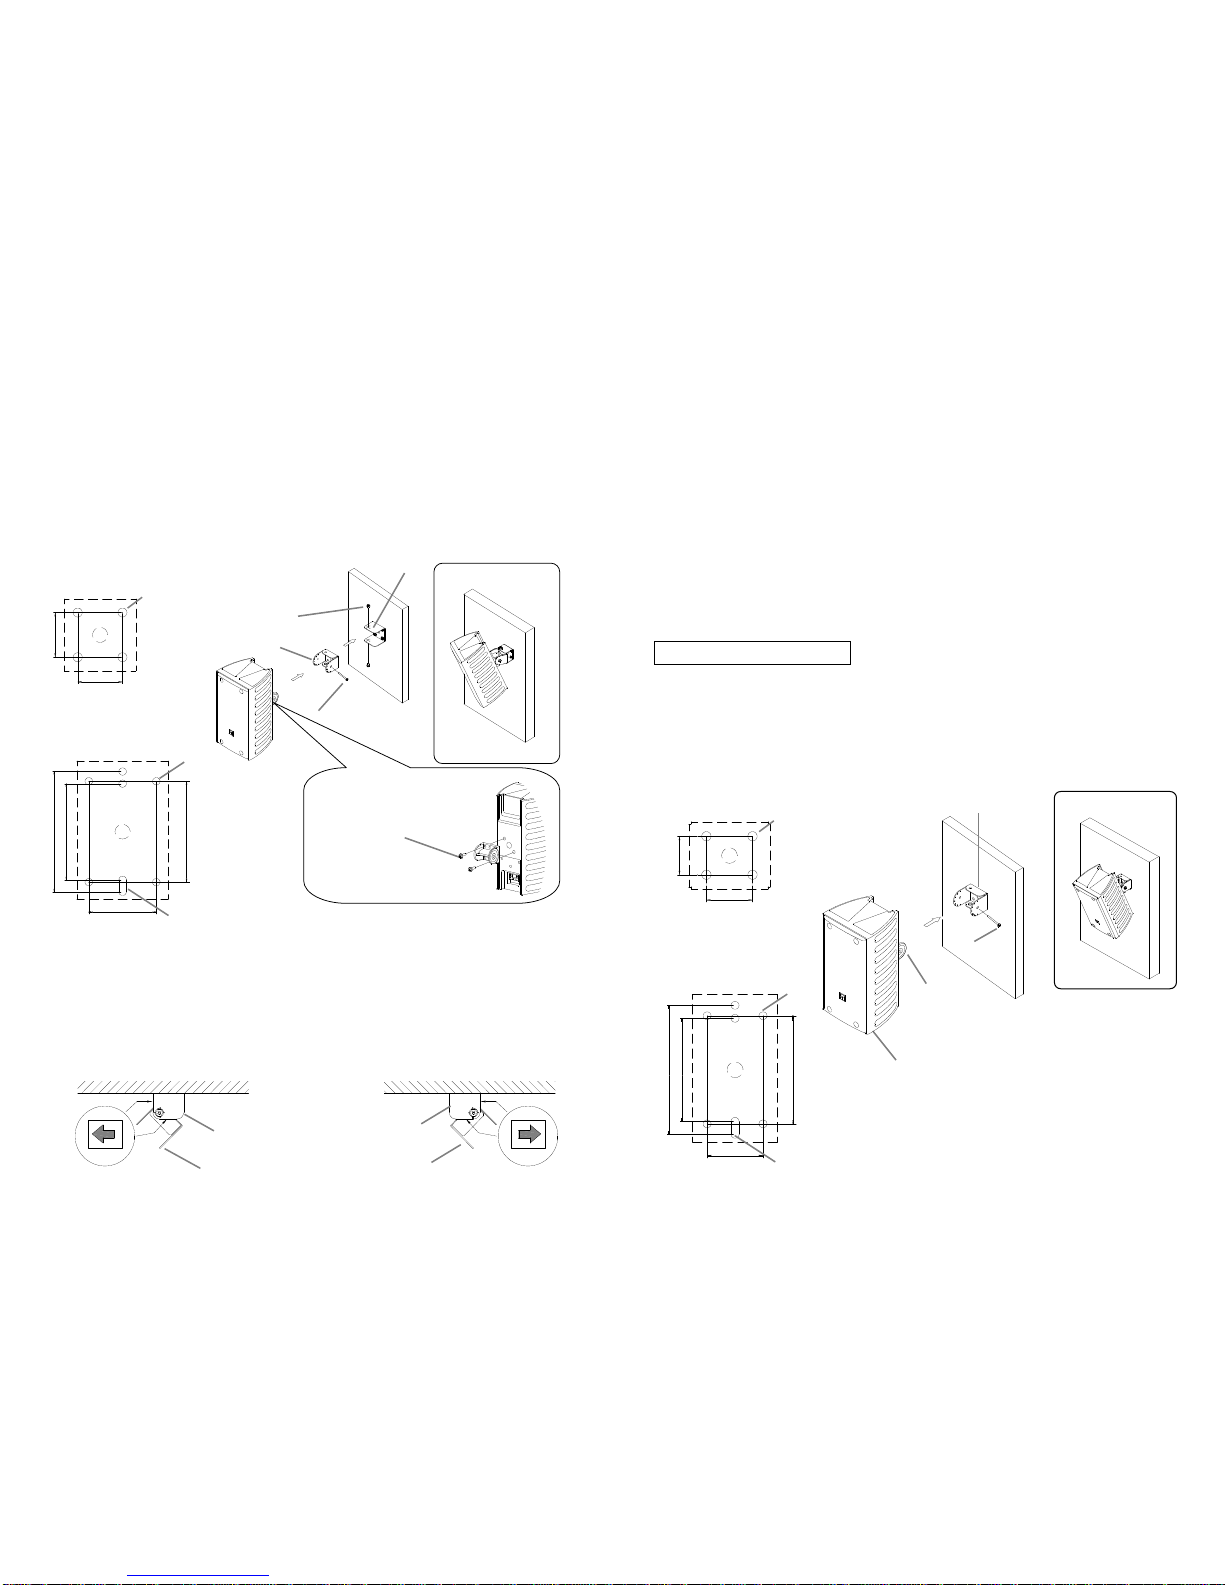
Installing the speaker unit with mounting brackets
•Mount the unit on a location strong enough to
support the weight of the unit and mounting
bracket. Doing otherwise may cause the speaker
unit to fall and result in personal injury / equipment
damage.
•
Do not apply other methods to mount the
Mounting Bracket other than the method
specified in the instruction manual. Speaker unit
may fall and cause personal injury.
•Use the screw compatible with the composition and
structure of the wall. Doing otherwise may cause
the speaker to fall and result in personal injury.
•Tighten each screw securely. Ensure no loose bolt
after speaker unit is mounted to prevent it from
falling and causing personal injury.
•Do not mount on a location exposed to constant
vibration because it may dismount or drop the
speaker.
•The speaker is designed for in-door use therefore
do not use it outdoors. Doing otherwise may bring
damage to the speaker or cause it to fall, resulting
in personal injury. If the speaker is wet due to rain,
it may cause short circuit.
•Do not apply anti-rust lubricant as it will damage the
plastic (resin) or rubber surface when applied and
cause the speaker unit to fall, resulting in personal
injury.
•Do not mount the unit in a humid room or poor
ventilation. Bracket will easily get rusty if mounted
in such a location, causing the speaker unit to fall
and resulting in personal injury.
When mounting Speaker Unit
•At least 2 people are required to lift it up or put it
into the box. If the unit topples, it may cause
personal injury.
•Avoid the sharp edge of the unit to prevent any
injury.
•To prevent short-circuit, ensure amplifier is
TURNED OFF when connecting it to the speaker
unit.
When Speaker Unit is in use (turned on)
•Do not place any heavy object on the speaker
which may cause the speaker to fall, resulting in
personal injury or damage to the unit. The
respective object will also fall and cause harm to
others.
•Do not operate the speaker for an extended
period of time with distorted sound. This indicates
improper operation and it may cause heat and
fire.
•Do not sit, stand or hang on the speaker unit.
Doing so may cause the speaker unit to fall,
resulting in personal injury or damage to the unit.
•Conduct regular check to detect any damage to
the unit or corrosion to the mounting bracket as
early as possible. Failure to do so may cause the
speaker to fall, resulting in personal injury.
CAUTI
CAUTICAUTI
CAUTION
ONON
ON
2
11

6.2. TZ-406B AS and TZ-406W AS
Model No. TZ-406B AS TZ-406W AS
Enclosure Sealed type
Rated Input 40 W
Rated Impedance 100V line: 250Ω(40W), 500Ω(20W), 1kΩ(10W), 2kΩ(5W)
70V line: 250Ω(20W), 500Ω(10W), 1kΩ(5W), 2kΩ(2.5W)
Sensitivity 93 dB (1W, 1m)
Frequency Response 150 – 16,000Hz
Speaker Component 10 cm(4”) cone-type x 4
Input Terminals Push-in terminals
Finish
Enclosure HIPS, black HIPS, white
Punched Net Surface-treated steel plate, black, paint Surface-treated steel plate, white, paint
Speaker Bracket Aluminum die-cast, black, paint Aluminum die-cast, white, paint
Joint Bracket
Wall Bracket Steel plate, t1.6, black, paint Steel plate, t1.6, white, paint
Dimensions 135 (W) x 498 (H) x 128 (D) mm (5.31” X 19.6” X 5.04”)
Weight 3.5 kg (7.71 lb) unit only
Accessories
Speaker bracket … 1, Joint bracket … 1, Wall bracket … 1, Fixing bolt M5 x 60 … 1,
Hexagon bolt M6 x 12 (with plain washer and spring washer) … 2,
Machine screw M5 x 20 (with plain washer and spring washer) … 2,
Hexagon bolt M8 x 15 … 1
Option Speaker stand: ST-16A
2. GENERAL DESCRIPTION
•Column Speaker is suitably designed for in-door use.
•Its wide frequency and high-pitch sound makes it very efficient for use in a spacious room.
•The speaker unit is designed to reproduce sound with good clarity and high input power capacity.
•The plastic column speaker comes with speaker bracket as accessories.
•The speaker bracket offers better installation flexibility
3. SPEAKER DIMENSIONAL DIAGRAM
3.1. TZ-206B AS / TZ-206W AS
3.2. TZ-406B AS/ TZ-406W AS
10
250
30
30
135 128
[Top] [Below]
[Front] [Rear]
[Side]
Unit: mm
M5 Screw hole
(Bolt’s length max. 13mm)
For Bracket mounting
Input Terminal
M8 Screw hole
(Bolt’s length max. 10mm)
To be mounted on the stand
498
30
30
135 128
[Top] [Below]
[Front] [Rear]
[Side]
M8 Screw hole
(Bolt’s length max. 10mm)
To be mounted on the stand
M5 Screw hole
(Bolt’s length max. 13mm)
For Bracket mounting
Input Terminal
3

3.3. TZ-606B AS/TZ-606W AS
4. HOW TO ADJUST IMPEDANCE
To adjust impedance, use standard screwdriver to turn the rotary switch located at the back of the
speaker to the desired input power.
Note : Rotary switch is set at position
500Ω/ 20W (TZ-206B AS, TZ-206W AS)
250Ω/ 40W (TZ-406B AS, TZ-406W AS)
170Ω/ 60W (TZ-606B AS, TZ-606W AS)
Important!
Failure to follow the instruction manual may cause damage to the speaker or amplifier.
6. SPECIFICATION
6.1. TZ-206B AS and TZ-206W AS
Model No. TZ-206B AS TZ-206W AS
Enclosure Sealed type
Rated Input 20 W
Rated Impedance 100V line: 500Ω(20W), 1kΩ(10W), 2kΩ(5W), 4kΩ(2.5W)
70V line: 500Ω(10W), 1kΩ(5W), 2kΩ(2.5W), 4kΩ(1.3W)
Sensitivity 90 dB (1W, 1m)
Frequency Response 150 – 16,000Hz
Speaker Component 10 cm(4”) cone-type x 2
Input Terminals Push-in terminals
Enclosure
Enclosure HIPS, black HIPS, white
Punched Net Surface-treated steel plate, black, paint Surface-treated steel plate, white, paint
Speaker Bracket Aluminum die-cast, black, paint Aluminum die-cast, white, paint
Joint Bracket
Wall Bracket Steel plate, t1.6, black, paint Steel plate, t1.6, white, paint
Dimensions 135 (w) x 250 (h) x 128 (d) mm (5.31” X 9.84” X 5.04”)
Weight 1.9 kg (4.18 lb) unit only
Accessories
Speaker bracket … 1, Joint bracket … 1, Wall bracket … 1, Fixing bolt M5 x 60 … 1,
Hexagon bolt M6 x 12 (with plain washer and spring washer) … 2,
Machine screw M5 x 20 (with plain washer and spring washer) … 2,
Hexagon bolt M8 x 15 … 1
Option Speaker stand: ST-16A
[Top] [Below] M8 Screw hole
(Bolt’s length max. 10mm)
To be mounted on the stand
M5 Screw hole
(Bolt’s length max. 13mm)
For Bracket mounting
Input Terminal
[Rear][Side]
[Front]
30
30
135 128
746
4
Figure of model: TZ-206 series
9

Speaker unit (rear)
RED
BLACK
Input terminal
1 mm
30°
o
3 °
3 °
o
5.4. MOUNTING ON STAND SPEAKER
The speaker unit can also be mounted on speaker stand of TOA model ST-16A (optional). Illustration below shows
the mounting method of unit on speaker stand.
Step 1. Mount speaker unit onto speaker stand bracket (ST-16A) with the bolt and spacer provided together
with the other Accessories stand (ST-16A).
Step 2. Connect speaker cable to input terminal.
Note:
For further details on mounting method of bracket to speaker stand and the use of speaker stand mounting,
please refer to the attached mounting instruction manual with ST-16A Speaker Stand.
5. INSTALLATION
5.1. Use the Bracket provided
The speaker unit is equipped with mounting brackets as shown below. Use the brackets according to the desired
mounting location and application.
Bracket for TZ-206 and TZ-406 Series model
Bracket for TZ-606 Series model
[Speaker bracket] [Joint bracket] [Wall bracket]
5.2. Connecting Speaker Cables
8
[Mounting Example]
Figure of model: TZ-206 series
[Speaker Bracket] [Joint Bracket] [Wall Bracket]
[Input terminal polarity] [Stripped conductor of cable]
5
Bracket
(supplied with the ST-16A)
Hexagon bolt M8 x 15
(Accessories)
ST-16A (option)
Speaker unit

Arrow label°Arrow label°
30mm
30mm
45mm
7 mm
66.7mm
83.5mm
Fixing bolt
M5 x 60
Joint bracket
Speaker bracket
Speaker unit
4
6
25mm
30mm
36mm
7 mm
66.7mm
83.5mm
5.3. Mounting of Bracket to Speaker
Adjusting horizontal and vertical angles
Mounting of bracket to speaker is illustrated in the pictures below. Screws to mount the bracket to the speaker are
provided as accessories when you purchase the speaker unit.
* Vertical mounting with maximum angle of 30°above the ground
* Horizontal max 70°,Vertical: max. 22.5°above the ground (TZ-206 and TZ-406 Series)
* Horizontal max 60°,Vertical: max. 30°above the g round (TZ-606 Series)
Step 1. Mount Wall Bracket onto the wall.
Align the arrow label direction with the front horizontal direction (left or right) of speaker.
Note: The required tools to mount the wall bracket are not provided
Arrow label direction (top-view from bracket)
[Facing to the left] [Facing to the right]
Step 2. Attach the joint bracket to the wall bracket with the provided screw, adjust the angle of
horizontal speaker and tighten the screw.
Note: Align the arrow direction on the wall bracket and joint bracket.
Step 3. Attach the bracket to the rear of the speaker with the provided screw.
Note: Attach the speaker bracket according to the speaker’s direction
Step 4. Mount the speaker to joint bracket by inserting the speaker bracket into the joint bracket and
temporarily loosening the fixing bolt.
Step 5. Connect the speaker cable to input terminal..
Step 6. Adjust the speaker’s vertical angle and tighten the fixing bolt.
Speaker’s angle is adjustable at 7.5°.
Note: The closed surface of the speaker bracket and joint bracket is design to lock each other.
Ensure both sides are attached securely after mounting.
Use the joint bracket and speaker bracket. Mount joint bracket onto the wall. After mounting joint bracket, follow
steps 3 – 6 above. This arrangement will allow the speaker to be mounted in a vertical direction only*.
* Vertical mount: max. 22.50°above the ground.
Note: Equipment to mount joint bracket is not provided.
[Size of joint bracket mounting] [Mounting Example]
TZ-206 and TZ-406 Series
TZ-606 Series
[Bracket wall hole size]
TZ-206 and TZ-406 Series
Machine screw M5x20mm with
washer and spring washer
3
TZ-606 Series
6
[Mounting Example]
Figure of model: TZ-206 series
Joint
bracket
Wall bracket
Joint
bracket
Wall
bracket
1
4
6
Hexagon bolt M6 x 12 with
washer and spring washer
Joint Bracket
2
Wall Bracket
Fixing bolt M5 x 60
4
-
Ф6mm
6
-
Ф
5
mm
(5 x 13.4mm)
7
Mount the speaker onto wall surface
Figure of model: TZ-206 series
6
-
Ф
5
mm
4
-
Ф6mm
(5 x 13.4mm)
This manual suits for next models
5
Table of contents
Other Toa Speakers manuals