Tobii Pro Nano User manual

Tobii Pro Nano
User Manual

Tobii Pro Nano User Manual
v2.3
December 2022
All rights reserved.
Copyright © Tobii AB (publ)
The information contained in this document is proprietary to
Tobii AB. Any reproduction in part or whole without prior written
authorization by Tobii AB is prohibited.
Products that are referred to in this document may be either trade-
marks and/or registered trademarks of the respective owners. The
publisher and the author make no claim to these trademarks.
While every precaution has been taken in the preparation of this
document, the publisher and the author assume no responsibility for
errors or omissions, or for damages resulting from the use of
information contained in this document or from the use of programs
and source code that may accompany it. In no event shall the
publisher and the author be liable for any loss of profit or any other
commercial damage caused or alleged to have been caused directly
or indirectly by this document.
Content subject to change without notice.
Please visit Tobii Connect for updated versions of this document.

Tobii Pro Nano User Manual v2.3 3
Table of Contents
1 Introduction 5
1.1 Intended use 5
1.2 Symbols used in this document 6
1.3 What’s in the box 6
1.4 How Tobii Pro Nano works 6
1.5 Tobii Pro Eye Tracker Manager 6
2 Safety 8
2.1 Mounting warning 8
2.2 Emergency warning 8
2.3 Epilepsy warning 8
2.4 Infrared warning 8
2.5 Magnetic field warning 9
2.6 Child safety 9
2.7 Electricity 9
2.8 Accessories 9
2.9 Third party 9
3 Software and System Requirements 10
3.1 System requirements 10
3.2 Tobii Pro Nano compatibility — Windows 10
3.3 Tobii Pro Nano compatibility — macOS 10
4 Additional Tobii products & accessories 11
4.1 Additional software options 11
4.2 Compatible accessories 11
5 Set Up Your Tobii Pro Eye Tracker 12
5.1 Download and install Tobii Pro Eye Tracker Manager 12
5.2 Install the eye tracker in Tobii Pro Eye Tracker Manager 12
5.3 Mount the eye tracker on a laptop or monitor 13
5.4 Display setup in Tobii Pro Eye Tracker Manager 14
5.5 Calibration 15
5.5.1 What calibration does 15
5.5.2 Additional information for experienced users 15
5.6 Detach the eye tracker 16
6 Display Setups 17
6.1 Standard setup 17
6.2 Tips for setting up the eye tracker display 17
6.3 Set up with a tripod 17
7 Start Experimenting 19
7.1 Start eye tracking 19
7.2 Tobii Pro Lab 19
7.3 Keep your eye tracker software and display setup updated 19
8 Product Care 21
8.1 Transportation and storage 21
8.2 Cleaning 21
8.3 Disposal of the eye tracker 21

Tobii Pro Nano User Manual v2.3 4
8.4 Limitation of liability 21
9 Technical Specifications 22
9.1 Eye tracking specifications 22
9.2 Setup 22
9.3 Software compatibility 23
9.4 Hardware versions 23
9.5 Tobii Pro Nano eye tracker specifications 23
10 Compliance Information 24
10.1 EU Compliance 24
10.1.1 CE statement 24
10.1.2 Other EU directives and regulations 24
10.2 FCC interference statement 24
10.3 ISED statement 25
10.4 Australia and New Zealand compliance 25
10.5 Korea compliance 25
10.6 Safety compliance 25
10.7 EMC compliance 26
10.8 RoHS compliance 26
10.9 Waste disposal and recycling 26
Appendix A Customer Care, training, and warranty 27
A1 Customer care 27
A1.1 Get help 27
A2 Training and education services 27
A3 Warranty information 27
Appendix B Limitations and considerations 28
B1 Intended use 28
B2 Light conditions 28
B3 Eyelashes 28
B4 Droopy eyelids 28
Appendix C Glossary 29

Tobii Pro Nano User Manual v2.3 5
1 Introduction
Tobii Pro Nano welcomes you to the world of eye-tracking studies. Tobii Pro Nano is a small and
portable eye tracker that you can use for studies on laptops, monitors up to 24ʺ * (16:9), mobile
devices (using the mobile device stand), real-world interfaces, projections, simulators, and TV
screens. It is designed for portability, versatility and ease of use.
Tobii Pro Nano is our smallest, most light-weight research grade eye tracker, featuring the latest
technology advancements from Tobii. The device measures 170 mm (6.69’’) long and weights 59
grams (2.1 oz.), and uses a sampling rate of 60 Hz. The design also serves as an introduction to
extensive studies into human behavior for educational and research purposes.
Use Tobii Pro Nano on:
lWindows and Mac computers with an optimal screen size of up to 24″ * (16:9)
lMobile devices, with our Mobile Device Stand
lReal-world setups like physical objects and social interactions, with the Tripod Stand
lProjections, simulators, and larger screens, with the Tripod Stand
* For larger screens, the limiting parameter is the quality of the gaze accuracy at the upper
corners of the screen when the user sits close to the screen.
1.1 Intended use
Tobii Pro Nano is primarily intended for fixation-based eye tracking studies on Windows and
Macintosh laptops and Windows tablets. The Tobii Pro Nano system has been tested and proven
capable of tracking a large proportion of the population, regardless of gender and ethnicity, with
very high accuracy and precision on portable screens. Its discrete appearance, with fully embed-
ded processing of eye-tracking data, enables flexible and unobtrusive data collection methods.
The eye tracker’s mounting plates enable easy attachment to various screens and the device is
connected via a USB 2.0 port to your Windows or Mac computer.
Tobii Pro Nano is perfect for any researcher who wants to get started with or explore quality eye
tracking as a research method for fixation-based eye tracking studies in:
lPsychology and cognition
lPackage design in marketing research
lUser interface design and development
Tobii Pro Nano is our smallest research-graded eye tracker designed for portable labs doing data
collection in the field:
lMake your own portable research lab that fits in a backpack
lCollect data wherever your participants are, for instance at universities, hospitals, and pub-
lic spaces

Tobii Pro Nano User Manual v2.3 6
Tobii Pro Nano is well-suited for equipping universities with portable eye tracking solutions that
enable students to test eye tracking and build knowledge how the technology can be used in dif-
ferent fields, answer research questions and enhance commercial endeavors.
1.2 Symbols used in this document
Three different symbols are used in this document:
The Information symbol means something is important or needs special attention.
The Tip symbol denotes additional information that can make a process or function
easier.
The Warning symbol means there is a possible risk of harm if the warning is ignored.
1.3 What’s in the box
lTobii Pro Nano Eye Tracker
lUSB 2 extension cable (1 m)
lTravel case
lSafety and Compliance and Installation Guide
l2 cleaning wipes for cleaning the screen bezel before affixing the mounting plate
l4 mounting plates with non-permanent adhesive for attaching the eye tracker to a screen
bezel
1.4 How Tobii Pro Nano works
During eye tracking, Tobii Pro Nano uses infrared illuminators to generate reflection patterns on
the corneas of the participant’s eyes. These reflection patterns, together with other visual data
about the participant, are collected by image sensors. Sophisticated image processing algorithms
identify relevant features, including the eyes and the corneal reflection patterns. The Tobii Pro
Nano is a single camera system that uses a combination of dark and bright pupil tracking. Com-
plex mathematics is used to calculate the 3D position of each eyeball, and finally the gaze point;
in other words, where the participant is looking.
1.5 Tobii Pro Eye Tracker Manager
Tobii Pro Eye Tracker Manager is free software available on Tobii Connect.
Tobii Pro Eye Tracker Manager helps you manage your Tobii Pro eye tracker. It lets you see
which eye tracker firmware and software versions you are running and also facilitates updates
(where applicable). It provides:

Tobii Pro Nano User Manual v2.3 7
lDrivers and Firmware installation or updates
lDisplay setup
lEye tracking mode selection
lPositioning guide
lUser calibration
lGaze visualization1
lEye images2
References in product documentation to Tobii Pro Eye Tracker Manager refer to the
latest version available on Tobii Pro’s website.
1Gaze visualization in Tobii Pro Eye Tracker Manager lets you quickly evaluate the quality of the eye tracking data. The Gaze visu-
alization overlaps data only on the Tobii Pro Eye Tracker Manager screen while Tobii Pro Eye Tracker Manager is open.
2Applicable when Tobii Pro Eye Tracker Manager is used with eye trackers that support eye images (Tobii Pro Spectrum and Tobii
Pro Fusion).

Tobii Pro Nano User Manual v2.3 8
2 Safety
2.1 Mounting warning
Tobii Pro eye trackers should be mounted according to the instructions of the
approved mounts used.
The mounting bracket is designed for adhesion to a wide variety of surfaces, such as
monitors or laptop screens. It is also designed for clean removability. Failure to follow
the recommended removal instructions can result in damage to both the mon-
itor/laptop and the mounting bracket. Do not mount the eye tracker on monitors posi-
tioned above the head or face of a user, as it might fall.
2.2 Emergency warning
Tobii Pro eye trackers are designed to be used only for research purposes. Be aware
that due to the low, but possible risk of failure or distraction, the eye tracker should not
be relied upon or used in dangerous or critical situations.
2.3 Epilepsy warning
Some people with photosensitive epilepsy are susceptible to epileptic seizures or loss
of consciousness when exposed to certain flashing lights or light patterns in everyday
life. This may happen even if the person has no medical history of epilepsy or has
never had any epileptic seizures.
A person with photosensitive epilepsy would also be likely to have problems with TV
screens, some arcade games, and flickering fluorescent bulbs. Such people may have
a seizure while watching certain images or patterns on a monitor, or even when
exposed to the light sources of an eye tracker. It is estimated that about 3-5% of
people with epilepsy have this type of photosensitive epilepsy. Many people with pho-
tosensitive epilepsy experience an “aura” or feel odd sensations before the seizure
occurs. If you feel odd during use, move your eyes away from the eye tracker.
2.4 Infrared warning
When activated, the Tobii Pro eye tracker emits pulsed infrared (IR) light. Certain med-
ical devices are susceptible to disturbance by IR light and/or radiation. Do not use the
eye tracker in the vicinity of these kinds of susceptible medical devices, as their accur-
acy or proper functionality could be inhibited. Do not stare into the LED lights at a close
distance (<15cm).
Tobii Pro Nano User Manual v2.3 9
2.5 Magnetic field warning
This Tobii Pro eye tracker contains magnets. Magnetic fields may interfere with the
function of cardiac pacemakers and implantable cardioverter defibrillators. As a gen-
eral rule, maintain a minimum distance of 6 inches (15 centimeters) between any item
with magnets and your heart device.
2.6 Child safety
A Tobii Pro eye tracker is an advanced computer system and electronic device. As
such, it is composed of numerous separate, assembled parts. In the hands of a child,
some of these parts have the possibility of being separated from the device, possibly
resulting in a choking hazard or other danger to the child.
Young children should not have access to, nor use of the device or its accessories
without parental or guardian supervision.
2.7 Electricity
Do not open the casing of the Tobii Pro eye tracker, this could expose you to poten-
tially hazardous electrical voltage. The device contains no user-serviceable parts. Non-
compliance will result in loss of warranty! Contact Tobii Customer Care if your eye
tracker is not working properly.
2.8 Accessories
Only use accessories provided by or approved by Tobii AB.
2.9 Third party
Any use of a Tobii Pro eye tracker outside the intended use and together with any
third-party software or hardware that changes the intended use is a risk, and Tobii AB
can not take any responsibility in these situations.

Tobii Pro Nano User Manual v2.3 10
3 Software and System Requirements
Tobii Pro Nano is connected to a computer via a standard USB 2.0 interface. All eye tracking
processing is done in the internal Eye Chip.
3.1 System requirements
Operating system Windows 10 and 11, Professional or Enterprise editions
macOS 10.15 Catalina and 12 Monterey
CPU 1 GHz, 2 cores
RAM 2 GB RAM memory
Note: Software for eye-tracking research might require
higher RAM
Connectors USB 2.0 Type A
3.2 Tobii Pro Nano compatibility — Windows
Platform support Windows 10 and 11, Professional or Enterprise editions
Tobii Pro Software support Tobii Pro Lab version 1.101 or newer
Tobii Pro Eye Tracker Manager version 2.0 or newer
SDK support Tobii Pro SDK version 1.7 or newer
3.3 Tobii Pro Nano compatibility — macOS
Platform support macOS 10.15 Catalina and 12 Monterey
Tobii Pro Software support Tobii Pro Eye Tracker Manager version 2.0 or newer
SDK support Tobii Pro SDK version 1.7 or newer

Tobii Pro Nano User Manual v2.3 11
4 Additional Tobii products & accessories
4.1 Additional software options
Tobii Pro Lab
www.tobii.com/products/software/behavior-
research-software/tobii-pro-lab
Tobii Pro Lab is a comprehensive research
software platform for eye tracking designed to
meet the highest demands on different
research scenarios with exact timing accur-
acy. This software offers an efficient workflow,
making it easy to design experiments, record
data, analyze and visualize eye tracking data,
and to sync this data with other biometric data
streams.
Tobii Pro SDK
www.tobii.com/products/software/applications-
and-developer-kits/tobii-pro-sdk/
Tobii Pro SDK offers a broad set of tools that
makes it simple to develop a variety of niche
applications or scripts across multiple plat-
forms, using a wide range of programming lan-
guages. This SDK gives the researcher
access to the full set of relevant gaze data
streams, such as 3D eye coordinates, raw
data, pupil data, etc.
Third-party software This term refers to any application built on
Tobii Pro SDK.
4.2 Compatible accessories
lMobile Device Stand
lAdditional Mounting Brackets
lTobii Pro Tripod Stand
Learn more about Tobii Pro Nano accessories available for purchase on tobii.com.

Tobii Pro Nano User Manual v2.3 12
5 Set Up Your Tobii Pro Eye Tracker
At the end of this setup, you will have a verified installation that is ready for use. Begin setting up
your Tobii Pro Nano by unpacking the eye tracker.
Read more about setting up and installing your eye tracker in the Tobii Connect.
5.1 Download and install Tobii Pro Eye Tracker Manager
The first step is to get the free application, Tobii Pro Eye Tracker Manager on your computer. Set-
ting up your eye tracker involves installing the necessary drivers and software on your computer
and Tobii Pro Eye Tracker Manager makes this much easier. Read more in Tobii Pro Eye Tracker
Manager.
Your eye tracker does
not
need to be connected to the computer to install Tobii Pro
Eye Tracker Manager.
1. Before starting, double-check the Tobii Pro Nano's System requirements.
2. Download Tobii Pro Eye Tracker Manager from Tobii Connect.
3. Install Tobii Pro Eye Tracker Manager.
4. Proceed to the next step.
For more information about setting up Tobii Pro Nano and using Tobii Pro Eye Tracker Manager,
visit theTobii Connect.
This document assumes the use of Tobii Pro Eye Tracker Manager 2.0 or later.
5.2 Install the eye tracker in Tobii Pro Eye Tracker Manager
Now we need to make sure your computer can talk to your eye tracker. This is necessary for
downloading the applicable drivers and updates.
1. Open Tobii Pro Eye Tracker Manager if it is not already running.
2. Connect the Tobii Pro Nano’s USB cable to a USB port on your computer. Don’t mount
(affix to the computer) the eye tracker just yet, merely plug in the USB and lay the eye
tracker beside the computer until you know everything’s working.
3. If your Tobii Pro Nano is connected to the USB port but doesn’t appear in the list of con-
nected eye trackers, click the plus (+) symbol in the upper right corner to install (or re-
install in some cases) the required drivers. Sometimes restarting Tobii Pro Eye Tracker
Manager is necessary.
4. Select Tobii Pro Nano and select the Install button.

Tobii Pro Nano User Manual v2.3 13
5. Follow the prompts in Tobii Pro Eye Tracker Manager to finish installation.
6. Proceed to the next step.
5.3 Mount the eye tracker on a laptop or monitor
To ensure quality in eye tracking data, your eye tracker hardware package includes several
mounting plates that can be affixed to a laptop or monitor. You can easily snap the eye tracker on
and off the screen bezel using the magnetic mounting plate. The mounting plate sticks to the
frame with a special adhesive that doesn’t damage the underlying surface when the mounting
plate is removed. For more information, read Detach the eye tracker.
What to do:
1. Check that your eye tracker is detected and displayed as a “card” in Tobii Pro Eye Tracker
Manager. Expand your eye tracker’s “card” in Tobii Pro Eye Tracker Manager to see that
the serial number of your eye tracker matches the number displayed.
2. You can leave your eye tracker USB connected and beside your computer
or
you can dis-
connect it while attaching the mounting hardware.
3. Find the center of the screen and clean the bezel.
Important! If you plan to attach the eye tracker to a laptop, make sure the laptop
can close with the magnetic mounting plate attached. Some laptops have very
little space when closed and this could damage the screen.
4. Peel the adhesive tape off the mounting plate and mount it on the bezel. Press the bracket
against the bezel for 30 seconds and leave it there for one hour before attaching the eye
tracker.
Figure 1. Align the mounting bracket properly. The magnet holds the eye
tracker firmly in place when the slots are lined up correctly.

Tobii Pro Nano User Manual v2.3 14
5. Attach the eye tracker and make sure that it aligns properly with the mounting plate. The
magnet holds the eye tracker firmly in place when the slots are lined up properly.
Figure 2. Place the mounting bracket on the bezel so that Tobii Pro Nano is as close
to the bottom of the screen as possible without covering the screen.
6. If Tobii Pro Nano is not connected, plug in the USB cable to the correct USB port in your
computer.
7. Proceed to the next step.
5.4 Display setup in Tobii Pro Eye Tracker Manager
Now your computer needs to understand where the eye tracker is in relation to the screen.
1. Open Tobii Pro Eye Tracker Manager if it’s not already opened and select your eye
tracker.
2. On the Overview tab, locate Display Setup and select the ellipsis button to expand the
menu. On the dropdown menu, select New.
3. Select the display setup you’re using and select the Next button.
4. Follow the instructions in each configuration step.
5. To confirm that the eye tracker can detect your eyes, enable the Position Guide at the bot-
tom left of Tobii Pro Eye Tracker Manager. Once activated, you should be able to see two
circles in a face contour.
6. In the next step, you will test your setup by performing a calibration. See Calibration.
You can always return to Tobii Pro Eye Tracker Manager and use it when you change
computers or screens or when you wish to redo a setup.
Tobii Pro Nano User Manual v2.3 15
5.5 Calibration
When you are done configuring your eye tracker, you should run a calibration to test if the eye
tracker is mapping the gaze points correctly to your display.
How to test your eye tracking setup:
1. Make sure the eye tracker is attached to the monitor and connected to your computer.
Open Tobii Pro Eye Tracker Manager. For more information, read
Tobii Pro Eye Tracker
Manager
.
2. By now, you should have also tested your setup as described in Display setup in Tobii Pro
Eye Tracker Manager.
3. Select the Calibrate button in Tobii Pro Eye Tracker Manager and follow the on-screen
instructions.
4. Evaluate your calibration results.
Large systematic errors i.e. a large distance between the average gaze point and the tar-
get gaze point may be indicative of a configuration error. No calibration feedback data on
the targets located on the top of the screen may indicate that there is a mismatch between
the screen size and eye tracker configuration. Select the Recalibrate button to improve a
calibration. Select the Use Calibration button when you are satisfied with the your cal-
ibration.
5.5.1 What calibration does
The human eye shows a natural individual variation in its shape and geometry. For example, the
exact location of the fovea, the area responsible for the part of the visual field that we perceive in
focus and full color, varies from individual to individual. Tobii Pro Eye Trackers use an individual
calibration procedure to optimize their gaze estimation algorithms (i.e. the 3D eye model) and
account for this variation. The end result of this optimization is a fully-customized and more accur-
ate gaze point calculation.
You can do basic calibration in Tobii Pro Eye Tracker Manager. There is more functionality, includ-
ing calibration validation, in Tobii Pro Lab.
You can find more information on Tobii Connect about calibration and performing a calibration
and validation in Tobii Pro Lab.
5.5.2 Additional information for experienced users
A participant can be calibrated with Tobii Pro Nano even when only one eye was suc-
cessfully calibrated. That calibration gets copied to the “failed” eye as well, and this
might cause poor data for that eye.
Tobii Pro Nano produces only one vector for the calibration results, thereby providing
information on the average estimated accuracy, but not on the estimated precision.
Use the Left and Right eyes results in Tobii Pro Eye Tracker Manager and/or Tobii Pro
Lab to determine whether both eyes were calibrated successfully. You can also
choose to analyze the data only for the eye that successfully calibrated.

Tobii Pro Nano User Manual v2.3 16
5.6 Detach the eye tracker
To temporarily remove the eye tracker, pull it away from the magnetic mounting plate and leave
the magnetic plate in place.
To permanently remove the magnetic mounting plate, you must remove the non-permanent but
strong adhesive that fastens your eye tracker mounting plate to the screen bezel. Since it is fairly
strong, you may not be able to take it away with only your fingers. If you want to remove it, we
recommend using something very thin such as dental floss or a thin thread, a guitar pick, or a
credit card. Use this to slide between the mounting plate and the computer bezel (or whatever it is
attached to). As you slide it behind the mounting plate, gently bend the mounting plate backwards
so that it detaches.
Tobii Pro Nano User Manual v2.3 17
6 Display Setups
6.1 Standard setup
The standard setup for using the Tobii Pro Nano is with a screen up to 24" *. The eye tracker is
attached below the screen whether it is a laptop screen or separate monitor.
* For larger screens, the limiting parameter is the quality of the gaze accuracy at the upper
corners of the screen when the user sits close to the screen.
6.2 Tips for setting up the eye tracker display
If the screen bezel is thinner than the width of the eye tracker, affix the mounting plate as low as
possible on the screen frame, or directly on the screen.
lDon’t use this setup if you intend to put stimuli in the lower part of the screen, as the eye
tracker might cover them.
lWe recommend that you remove the mounting plate before closing the lid of the laptop.
lUse Tobii Pro Eye Tracker Manager’s Display Setup — Advanced function to select a neg-
ative value for the height distance between the top of the eye tracker and the bottom of the
display screen. Alternatively, use the tripod accessory and mount the eye tracker away
from the screen.
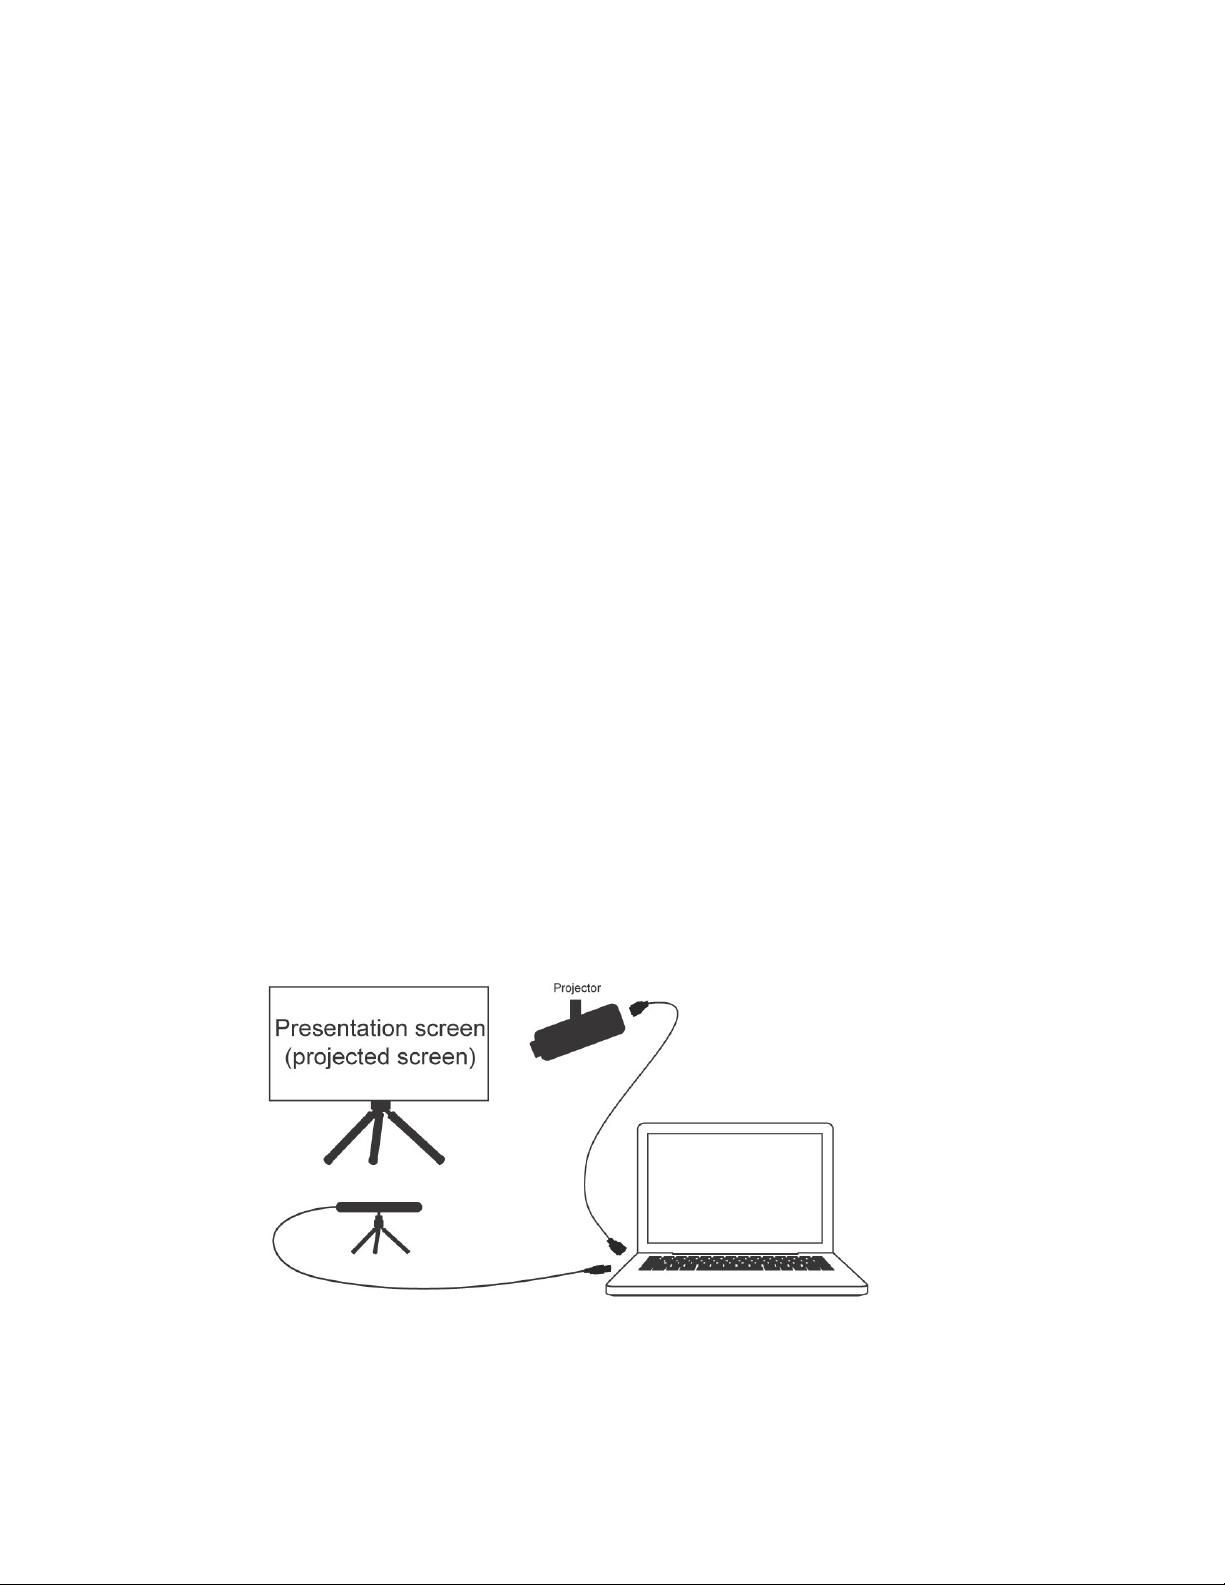
6.3 Set up with a tripod
Figure 3. Set up with a tripod

Tobii Pro Nano User Manual v2.3 18
If you want to use a wider screen, the hardware is set up in a slightly different manner:
1. Select a suitable location and set up the screen.
2. Set up the projector and connect it to the laptop.
3. Mount the eye tracker on a separate tripod and connect it to the laptop.
4. Use Tobii Pro Eye Tracker Manager’s Advanced Setup to ensure that the eye tracker can
detect the participant’s eyes. Select New in the drop-down Display Setup menu and follow
the steps.
5. Give your screen configuration a name so that you can reuse the settings later. Type it in
the Display Setup Name text box, then click the Save button. Your configuration is now
available and selected in the Display setup drop-down menu.
6. Test the screen configuration by performing a calibration. If you are tracking a physical
plane instead of a screen, the calibration must be done in Tobii Pro Lab.
For more detailed instructions, read the Tobii Learn article Using Pro Eye Tracker Manager to con-
figure the eye tracker.
You must measure and specify all the parameters as accurately as possible to main-
tain good eye tracking data quality.
Tobii Pro Nano User Manual v2.3 19
7 Start Experimenting
Now that your eye tracker is up and running, you can move to the eye tracking software you will
use. Tobii recommends Tobii Pro Lab and Additional software options.
You can always return to Tobii Pro Eye Tracker Manager and use it when you change
computers or screens or want to redo a setup.
7.1 Start eye tracking
To see where the participant’s focus is, open Tobii Pro Eye Tracker Manager and activate Gaze
Tracing by toggling the Gaze Visualization switch on the Overview tab. A hazy blob appears on
the screen, indicating where attention is focused. Use this functionality to verify that your eye
tracker is running, that the display is correctly set up, and that your eye tracker is calibrated.
7.2 Tobii Pro Lab
Tobii Pro Lab provides a comprehensive platform for the recording and analysis of eye gaze data,
which helps in the interpretation of human behavior, consumer responses, and psychology. Com-
bining simple preparation for testing procedures and advanced tools for Visualization and ana-
lysis, eye-tracking data is easily processed for useful comparison, interpretation, and
presentation. A broad range of studies are supported, from usability testing and market research,
to psychology and oculomotor physiological experiments. Tobii Pro Lab’s intuitive workflow,
along with its advanced analysis tools, enables large and small studies in a timely and cost-effi-
cient way without the need for extensive training.
In addition to offering powerful analysis tools, Tobii Pro Lab is also designed to work with other
software commonly used for recording and analyzing data. This is done by synchronizing with
recording software using TTL, as well as by enabling data exports in standardized formats, for
example for Microsoft Excel, Matlab, and SPSS.
7.3 Keep your eye tracker software and display setup updated
Updates
From time to time, Tobii Pro releases updates for an eye tracker’s applicable driver and firmware
in order to improve performance and/or introduce new functionalities. Please check the Tobii Pro
website regularly for news and information about updates about your eye tracker. We recommend
that you activate updates and notifications in Pro Eye Tracker Manager.
How to activate notifications and updates in Pro Eye Tracker Manager:
1. Click to expand the drop-down list at the top of Pro Eye Tracker Manager.
2. Toggle the switches for notifications. Orange means they are activated.
3. If a software update is available, the available update has a clickable orange link.
4. Select an interface language. The default is English.

Tobii Pro Nano User Manual v2.3 20
Display setup updates
Use Pro Eye Tracker Manager whenever you change computers or display setups.
All references to Pro Eye Tracker Manager assume that you are using the latest ver-
sion of this free software.
Other manuals for Pro Nano
1
Table of contents
Other Tobii Accessories manuals


