Tobii PCEye Go User manual

UUsseerr’’ss MMaannuuaall
TToobbiiii PPCCEEyyee GGoo

Tobii PCEye Go User’s manual
Version 2.1.1
09/2013
All rights reser ed.
© Tobii Technology AB
The information contained in this document is proprietary to
Tobii Technology. Any reproduction in part or whole without
prior written authorization by Tobii Technology is prohibited.
Products that are referred to in this document may be either
trademarks and/or registered trademarks of the respecti e
owners. The publisher and the author make no claim to these
trademarks.
While e ery precaution has been taken in the preparation of
this document, the publisher and the author assume no
responsibility for errors or omissions, or for damages resulting
from the use of information contained in this document or
from the use of programs and source code that may
accompany it. In no e ent shall the publisher and the author
be liable for any loss of profit or any other commercial
damage caused or alleged to ha e been caused directly or
indirectly by this document.
Content subject to change without notice.
Please check Tobii web site www.tobii.com for updated
ersions of this document.
The following products are protected by U.S. Patent 7,572,008:
•Tobii PCEye Go
You can locate the Type of Tobii PCEye Go de ice on the label on the back side.

Table of Contents
11 IInnttrroodduuccttiioonn.................................................................................................................................................................................................................................................................... 11
1.1 Explanation of Admonitions......................................................................................................1
1.2 Intended Use .........................................................................................................................1
1.3 Package Contents..................................................................................................................2
22 SSaaffeettyy........................................................................................................................................................................................................................................................................................ 33
2.1 Mounting Warning..................................................................................................................3
2.2 Emergency Warning ...............................................................................................................3
2.3 Infrared Warning ....................................................................................................................3
2.4 Epilepsy Warning ...................................................................................................................3
2.5 Magnetic Field Warning ..........................................................................................................3
2.6 Child Safety...........................................................................................................................4
2.7 Do not Open the Tobii PCEyeGo.............................................................................................4
2.8 Gaze Interaction.....................................................................................................................4
33 GGeettttiinngg SSttaarrtteedd ........................................................................................................................................................................................................................................................ 55
3.1 The Tobii PCEye Go Installation Guide ......................................................................................5
3.2 Mounting the Tobii PCEye Go to your Monitor/Laptop .................................................................5
3.3 The Tobii PCEye Go Configuration Guide..................................................................................6
3.4 Software Updates ..................................................................................................................8
44 UUssiinngg tthhee TToobbiiii PPCCEEyyee GGoo...................................................................................................................................................................................................................... 99
4.1 Positioning ............................................................................................................................9
4.1.1 Track Box...............................................................................................................9
4.1.2 Track Status Viewer...............................................................................................10
4.1.2.1 Showing Track Status.......................................................................10
4.1.3 Positioning Guide..................................................................................................10
4.2 Using Windows Control ........................................................................................................11
4.2.1 Windows Control Type ..........................................................................................11
4.2.2 Starting and Disabling Tobii Windows Control...........................................................12
4.2.3 Using Gaze Selection ............................................................................................12
4.2.3.1 Gaze Selection Taskbar ....................................................................12
4.2.3.2 Task Buttons....................................................................................14
4.2.3.3 Functions O erlay in Windows 7 ........................................................15
4.2.3.4 Functions O erlay in Windows 8 ........................................................15
4.2.3.4.1 Snap Window/Close App ...........................................17
4.2.3.5 Selection Methods —Gaze and Switch...............................................19
4.2.3.5.1 Sticky Tasks & Default Left Click / Tap for
Switch .....................................................................19
4.2.3.5.2 Acti ating a Task with a Keyboard button instead of a
Switch .....................................................................20
4.2.3.6 Gaze Keyboard ................................................................................20
4.2.3.7 Gaze Selection in Combination with Region Based Keyboards ...............21
4.2.4 Using Mouse Emulation..........................................................................................21
4.2.4.1 Placing the Mouse Emulation Menu.....................................................22
4.2.4.2 Clicking with Windows Control in Mouse Emulation Mode .....................22
4.2.4.3 Magnifying with Windows Control in Mouse Emulation Mode .................22
4.2.4.4 Selecting Mouse Emulation Functions .................................................22
4.2.4.5 Pausing Windows Control in Mouse Emulation Mode............................23
4.2.4.6 Scrolling with Windows Control in Mouse Emulation Mode ....................23

4.3 Pause/Resume Gaze Interaction.............................................................................................24
55 TToobbiiii GGaazzee IInntteerraaccttiioonn SSeettttiinnggss ................................................................................................................................................................................................2255
5.1 Accessing the Tobii Gaze Interaction Settings..........................................................................25
5.2 Calibration...........................................................................................................................25
5.2.1 Starting Calibration................................................................................................26
5.2.2 Interrupting Calibration...........................................................................................26
5.2.3 Customizing Acti e Eye..........................................................................................26
5.2.4 Impro ing Calibration Point(s) .................................................................................27
5.2.5 Remo ing Calibration Point(s).................................................................................28
5.2.6 Customizing the Calibration....................................................................................28
5.2.7 Customizing the Calibration Area.............................................................................29
5.3 Interaction...........................................................................................................................30
5.4 User Profile..........................................................................................................................31
5.4.1 Creating a New Profile...........................................................................................31
5.4.2 Selecting Current User Profile.................................................................................32
5.4.3 Deleting a Profile...................................................................................................32
5.5 Windows Control.................................................................................................................32
5.5.1 Auto Start ............................................................................................................32
5.5.2 Windows Control Type ..........................................................................................32
5.5.2.1 Gaze Selection ................................................................................33
5.5.2.2 Mouse Emulation..............................................................................33
5.5.2.2.1 Mouse Control Speed ................................................33
5.5.2.2.2 Magnifier Size and Zoom ............................................34
5.5.2.2.3 Auto Switch from Right to Left Click.............................34
5.5.2.2.4 Turn off Scroll Functionality .........................................34
5.5.2.2.5 Custom Cursors........................................................34
5.6 System Settings...................................................................................................................35
5.6.1 System Off-Screen Menu.......................................................................................35
5.6.2 Positioning Guide..................................................................................................35
5.7 System Information...............................................................................................................36
5.7.1 Upgrade Eye Tracker Firmware ...............................................................................36
66 GGaazzee SSeelleeccttiioonn SSeettttiinnggss........................................................................................................................................................................................................................3377
6.1 The General Settings Tab ......................................................................................................37
6.2 The Keyboard Settings Tab....................................................................................................38
6.3 The Taskbar Settings Tab ......................................................................................................38
6.3.1 Maximize Left Click/Tap..........................................................................................39
77 PPrroodduucctt CCaarree............................................................................................................................................................................................................................................................4400
7.1 Temperature & Humidity........................................................................................................40
7.1.1 General Use .........................................................................................................40
7.1.2 Transportation and Storage ....................................................................................40
7.2 Cleaning .............................................................................................................................40
7.3 Transporting the Tobii PCEyeGo ...........................................................................................40
7.4 Disposing of the Tobii PCEyeGo............................................................................................40
AAppppeennddiixx AA SSuuppppoorrtt aanndd WWaarrrraannttyy................................................................................................................................................................................................4411
AAppppeennddiixx BB CCoommpplliiaannccee IInnffoorrmmaattiioonn..........................................................................................................................................................................................4422
AAppppeennddiixx CC TThhiirrdd PPaarrttyy AAcccceessssoorriieess..........................................................................................................................................................................................4433
AAppppeennddiixx DD TTeecchhnniiccaall SSppeecciiffiiccaattiioonnss........................................................................................................................................................................................4444

1 Introduction
Thank you for purchasing a Tobii PCEye Go de ice from Tobii Technology!
To ensure the optimal performance of this product, please take the time to read this manual carefully.
1.1 Explanation of Admonitions
In this manual we use three (3) le els of admonitions as follows:
Is used for notifying the user of something important or of something that needs special attention.
Is used to inform of something that could cause harm to, or malfunction of, the equipment.
Is used to inform of something where there could concei ably be a risk of harm to the user if the Warning is ignored.
1.2 Intended Use
The Tobii PCEye Go is a clip-on eye tracker that lets you access and control your computer using only your eyes only. Simply
look at the computer screen and select commands by blinking, dwelling or clicking a switch.
Alternati ely, control the mouse cursor with your eye mo ements
The Tobii PCEye Go fits snuggly on your laptop, docks under retail computer screens and can also be inserted into a Tobii Eye-
Mobile bracket and mounted to certain Tablets.
The Tobii PCEye Go gi es you a fast, accurate, and hands free way of accessing the many ways a computer can enrich your life.
You can pursue your interests and education, express yourself artistically, stay entertained as well as control your TV, DVD, lights
and other de ices in your surroundings1.
It is also aluable to help you to re-enter the workplace, to stay in touch with friends and family, to meet new people and to inter-
act with your children.
The Tobii PCEye Go is intended to be used in an indoor en ironment.
For more information about Screen Sizes, see
Appendix D Technical Specifications
.
FFiigguurree 11..11 Tobii PCEye Go
Do not co er the front of the Tobii PCEye Go in any way (with decorations, Post-Its, etc.) as Gaze Interaction will be
compromised.
Using an anti irus program is strongly recommended.
Tobii PCEye GoUser’s manual .2.1.1 - en-US 1 Introduction 1
1. Requires an En ironmental Control Unit (ECU) and separate senders and recei ers, not included with the Tobii PCEye Go.

1.3 Package Contents
•Tobii PCEye Go
•USB stick with installation script, manuals, and necessary software
•Carrying Case
•Magnetic Mounting Plates 3x3 for Tobii PCEye Go
•Mounting Instruction
•USB Extension Cable
•Cleaning Wipe
Only use the items included in the Tobii PCEye Go package, those described in the product documentation and other
appro ed Tobii Accessories in conjunction with the Tobii PCEye Go.
21 Introduction Tobii PCEye Go User’s manual .2.1.1 - en-US

2 Safety
The Tobii PCEye Go has been tested and appro ed as compliant to all the Specifications and Standards listed in the
Appendix
B Compliance Information, page 42
in this manual and in the
Appendix D Technical Specifications, page 44
– including, but not
limited to, the Medical De ice Directi e (MDD) 93/42/EEC.Ne ertheless, in order to ensure safe operation of your
Tobii PCEye Go de ice, there are a few safety warnings to bear in mind:
2.1 Mounting arning
The Tobii PCEye Go should be mounted according to MANUFACTURER instructions of appro ed mounts.
Tobii Technology or its agents are not liable for damage or injuries to a person or its property due to a Tobii PCEye Go
falling from a mounted configuration. The mounting of a Tobii PCEye Go is done entirely at the user’s own risk.
The double sided tape supplied with the adhesi e Magnetic Mounting Plates is designed to permanently attach the
bracket to the monitor/laptop. Attempting to remo e the bracket after attaching it using the supplied tape can result in
damage both to the monitor/laptop and the bracket.
Do not lick the tape or place any part of the tape or Magnetic Mounting Plate in one's mouth.
Do not mount the Tobii PCEye Go on monitors positioned abo e the head or face of a users unless using a dedicated
"fixed mounting" solution.
2.2 Emergency arning
Be aware that due to the low, but possible, risk of failure, the Tobii PCEye Go should not be relied upon exclusi ely as
an audio communications, or an en ironmental control, de ice in emergencies, as well as in dangerous, or otherwise
important, situations. Do not rely on the de ice for emergency calls or banking transactions. We recommend ha ing
multiple ways to communicate in emergency situations. Banking transactions should only be carried out with a system
recommended by, and appro ed according to the standards of, your bank.
2.3 Infrared arning
When acti ated, the Tobii PCEye Go emits pulsed infrared (IR) light. Certain medical de ices are susceptible to dis-
turbance by IR light and/or radiation. Do not use the Tobii PCEye Go when in the icinity of such susceptible medical
de ices as their accuracy or proper functionality could be inhibited.
2.4 Epilepsy arning
Some people with PPhhoottoosseennssiittii ee EEppiilleeppssyy are susceptible to epileptic seizures or loss of consciousness when ex-
posed to certain flashing lights or light patterns in e eryday life. This may happen e en if the person has no medical his-
tory of epilepsy or has ne er had any epileptic seizures.
A person with Photosensiti e Epilepsy would also be likely to ha e problems with TV screens, some arcade games,
and flickering fluorescent bulbs. Such people may ha e a seizure while watching certain images or patterns on a moni-
tor, or e en when exposed to the light sources of an eye tracker. It is estimated that about 3-5% of people with epi-
lepsy ha e this type of Photosensiti e Epilepsy. Many people with Photosensiti e Epilepsy experience an "aura" or feel
odd sensations before the seizure occurs. If you feel odd during use, mo e your eyes away from the eye tracker.
2.5 Magnetic Field arning
The Tobii PCEye Go Magnetic Mounting Plates contains magnets. Magnetic fields may interfere with the function of
cardiac pacemakers and implantable cardio erter-defibrillators. As a general rule, maintain a minimum distance of 6 in-
ches (15 centimeters) between any item with magnets and your heart de ice.
The magnets can also shut off the monitor on a laptop if the laptop is equipped with a magnetic sensor to switch off
the monitor when closing the laptop. If this happens, shut of the sensor on the laptop.
Tobii PCEye GoUser’s manual .2.1.1 - en-US 2 Safety 3

2.6 Child Safety
The Tobii PCEye Go is an ad anced computer system and electronic de ice. As such it is composed of numerous
separate, assembled parts. In the hands of a child certain of these parts ha e the possibility of being separated from
the de ice, possibly constituting a choking hazard or another danger to the child.
Young children should not ha e access to, or the use of, the de ice without parental or guardian super ision.
2.7 Do not Open the Tobii PCEye Go
Non-compliance will result in loss of Warranty! There are no user ser iceable components inside. Contact
Tobii Support if your Tobii PCEye Go is not working properly.
2.8 Gaze Interaction
Some people may experience a certain amount of fatigue (due to intentional eye focusing and hard concentration) or
e en a dryness of the eyes (due to less frequent blinking) when first getting used to Gaze Interaction. If you are experi-
encing fatigue or dry eyes start off slowly and limit the length of your Gaze Interaction sessions to your comfort le el.
Remoisturizing eye drops can be helpful to combat dryness.
42 Safety Tobii PCEye Go User’s manual .2.1.1 - en-US

3 Getting Started
To start using Gaze Interaction, you must first install the necessary software and dri ers from the included USB-stick, mount the
Tobii PCEye Go de ice to its Magnetic Mounting Plates and attach it properly to your de ice.
Install the software FIRST before connecting the Tobii PCEye Go de ice to your computer.
Works with PC computers running on a Windows operating system ONLY (Windows Vista, Windows 7 or Window
8).
Be aware that there is no irus protection included with the Tobii PCEye Go Software. Be sure to ha e proper irus
protection installed on your computer to safeguard against malfunctions.
The Installation Guide will install the necessary software and dri ers for the Tobii PCEye Go.
Will only be run once on each de ice a Tobii PCEye Go is to be attached to.
The Configuration Guide will assist in configuration of the Tobii PCEye Go.
Can be run se eral times to change the configuration for the Tobii PCEye Go on the de ice (such as to change moni-
tors and/or screen sizes).
3.1 The Tobii PCEye Go Installation Guide
The Tobii PCEye Go IInnssttaallllaattiioonn GGuuiiddee will help you to get started using Gaze Interaction with your computer. It will guide you
through the installation of the necessary software for the Tobii PCEye Go and pro ide Licensing information
1. Insert the included USB-stick into your computer’s USB port.
2. Open the USB-stick directory.
3. Run PCEye.exe
4. Follow the instructions within the IInnssttaallllaattiioonn GGuuiiddee, selecting NNeexxtt to proceed.
3.2 Mounting the Tobii PCEye Go to your Monitor/Laptop
Wait 11 hhoouurr for the glue on the Magnetic Mounting Plate(s) to sseett before attaching the Tobii PCEye Go to the Mag-
netic Mounting Plate(s) on the screen / monitor.
Tobii PCEye GoUser’s manual .2.1.1 - en-US 3 Getting Started 5
To mount the Tobii PCEye Go properly to your computer follow the instructions in the software IInnssttaallllaattiioonn GGuuiiddee (also present
in the software CCoonnffiigguurraattiioonn GGuuiiddee) and use the included TToobbiiii PPCCEEyyee GGoo MMoouunnttiinngg GGuuiiddee.
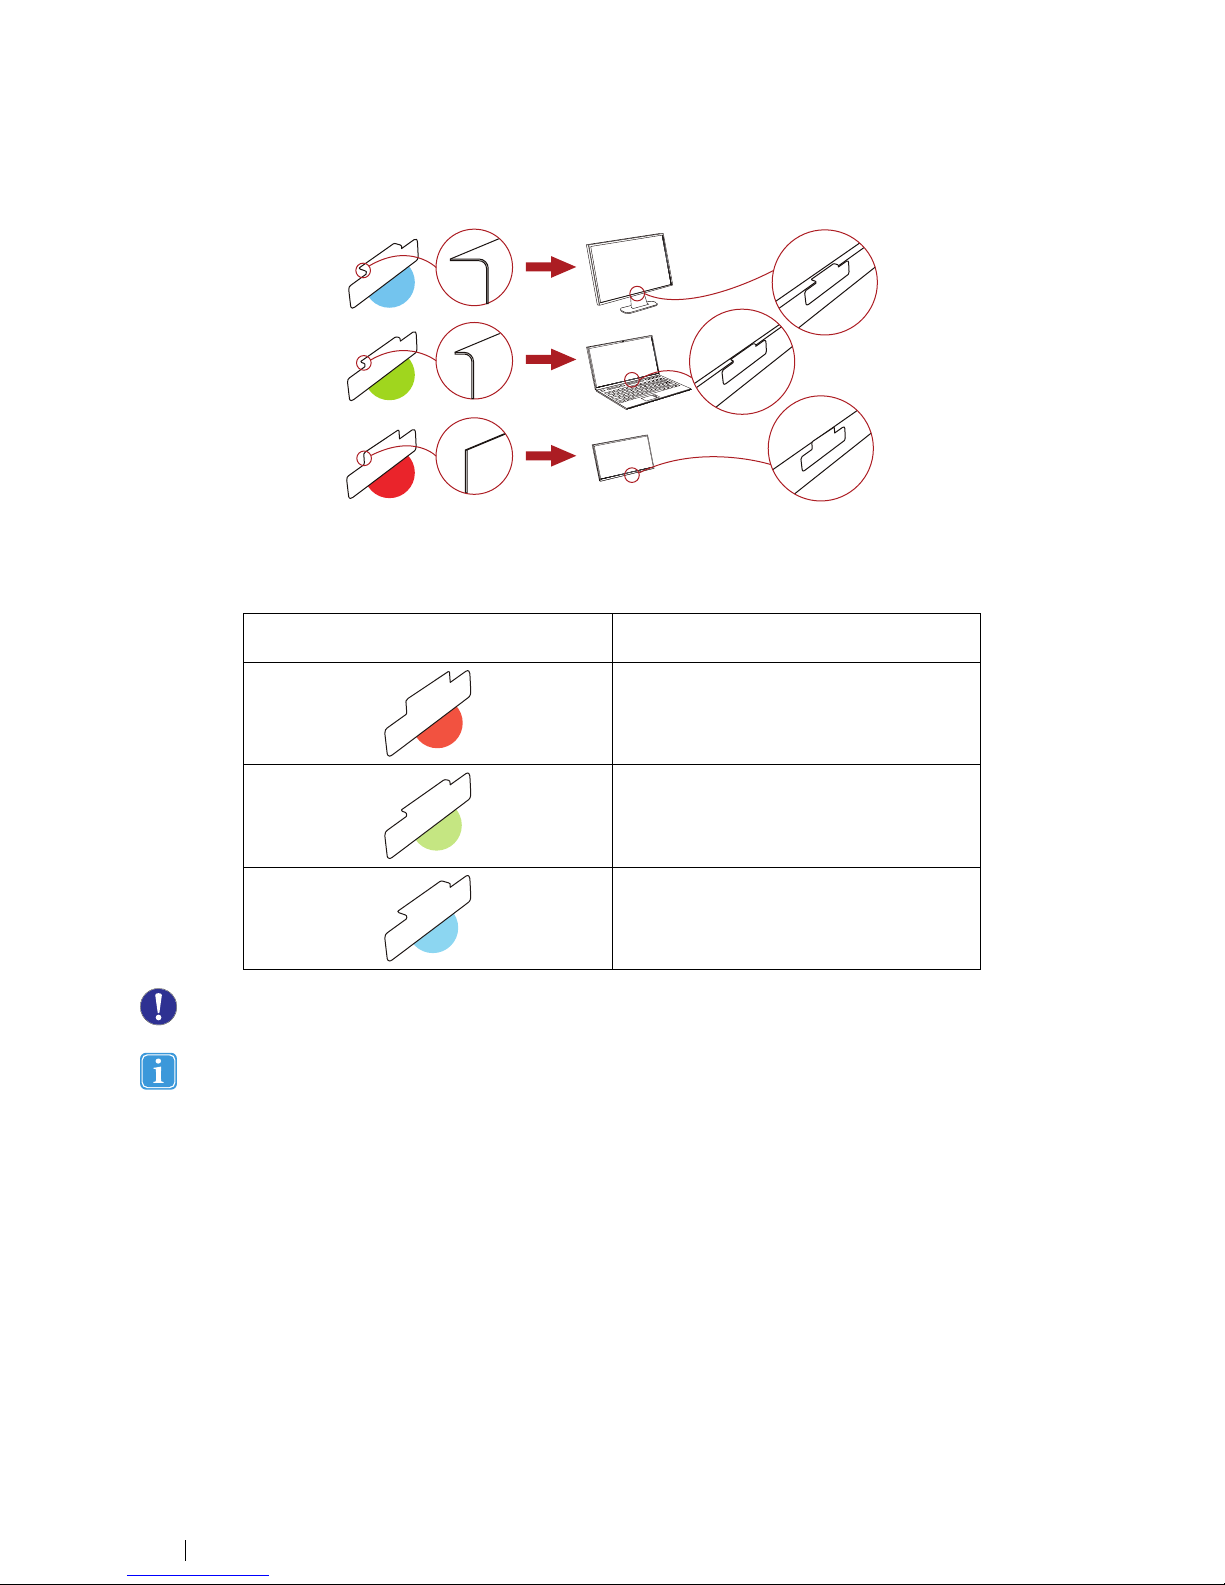
FFiigguurree 33..11 Which Magnetic Mounting Plate goes to Which Screen/Monitor Type
The depth of the lip on the bezel (frame) of the screen/monitor determines which Magnetic Mount-
ing Plate should be used. The “lip”is the region between the bezel and the acti e screen area.
CCoolloorr MMaarrkkiinnggss ffoorr MMaaggnneettiicc MMoouunnttiinngg
PPllaatteess
LLiipp SSiizzee bbeettwweeeenn tthhee BBeezzeell aanndd tthhee AAccttii ee
SSccrreeeenn AArreeaa
No lip
Small lip
Large lip
Wait 11 hhoouurr for the glue on the Magnetic Mounting Plate(s) to sseett before attaching the Tobii PCEye Go to the Mag-
netic Mounting Plate(s) on the screen / monitor.
If the included extension cable for the Tobii PCEye Go is too short, use a “Powered USB”Hub or Port for best
performance.
5. After you ha e mounted the Tobii PCEye Go properly, attach the USB connector to your computer.
6. The Tobii PCEye Go Configuration Guide will open automatically.
3.3 The Tobii PCEye Go Configuration Guide
Upon restarting your computer after running the Tobii PCEye Go IInnssttaallllaattiioonn GGuuiiddee, attaching the Magnetic Mounting Plate(s)
63 Getting Started Tobii PCEye Go User’s manual .2.1.1 - en-US

and Tobii PCEye Go to your computer and connecting the USB cable, the Tobii PCEye Go CCoonnffiigguurraattiioonn GGuuiiddee will open
automatically.
The Configuration Guide will help you to get started using Gaze Interaction on your computer.
It will assist you in the areas of:
•Monitor choice and screen size
•Positioning
•Calibration
•Settings
Follow the instructions on each page of the CCoonnffiigguurraattiioonn GGuuiiddee, select NNeexxtt to mo e to the next page of the Guide.
Pay particular attention to the SSccrreeeenn page and the CCaalliibbrraattiioonn page of the Configuration Guide. In both cases you
must complete the information, or tasks, requested of you before you are able to select NNeexxtt.
On the SSccrreeeenn page be sure to measure the actual blue lines making up the triangle on the screen with the included ruler on the
side of the Tobii PCEye Go Mounting Guide and fill in their numbers in the spaces pro ided. Then select Sa e.
Tobii PCEye GoUser’s manual .2.1.1 - en-US 3 Getting Started 7

DO NOT attempt to measure the physical screen size of your computer. The numbers of the measured lines from the
triangle will be extrapolated into the size of the physical screen by the software.
On the CCaalliibbrraattiioonn page, you must calibrate before mo ing on to the next page. Follow the instructions and select CCaalliibbrraattee.
Without calibration, you will be unable to finish the CCoonnffiigguurraattiioonn GGuuiiddee and Gaze Interaction will not work properly on your
computer.
•Select Finish on the final page of the CCoonnffiigguurraattiioonn GGuuiiddee and your settings and configurations will be sa ed for future
use.
The CCoonnffiigguurraattiioonn GGuuiiddee will automatically launch if configuration changes to your system ha e been detected.
All future settings, profile control, and calibrations will be controlled by, and can be accessed from, TToobbiiii GGaazzee IInntteerraaccttiioonn SSeett--
ttiinnggss(see
4 Using the Tobii PCEye Go, page 9
for information about TToobbiiii GGaazzee IInntteerraaccttiioonn SSeettttiinnggss)
3.4 Software Updates
To check for software updates for the Tobii PCEye Go, please isit the Tobii website: http://www.tobii.com
83 Getting Started Tobii PCEye Go User’s manual .2.1.1 - en-US
4 Using the Tobii PCEye Go
4.1 Positioning
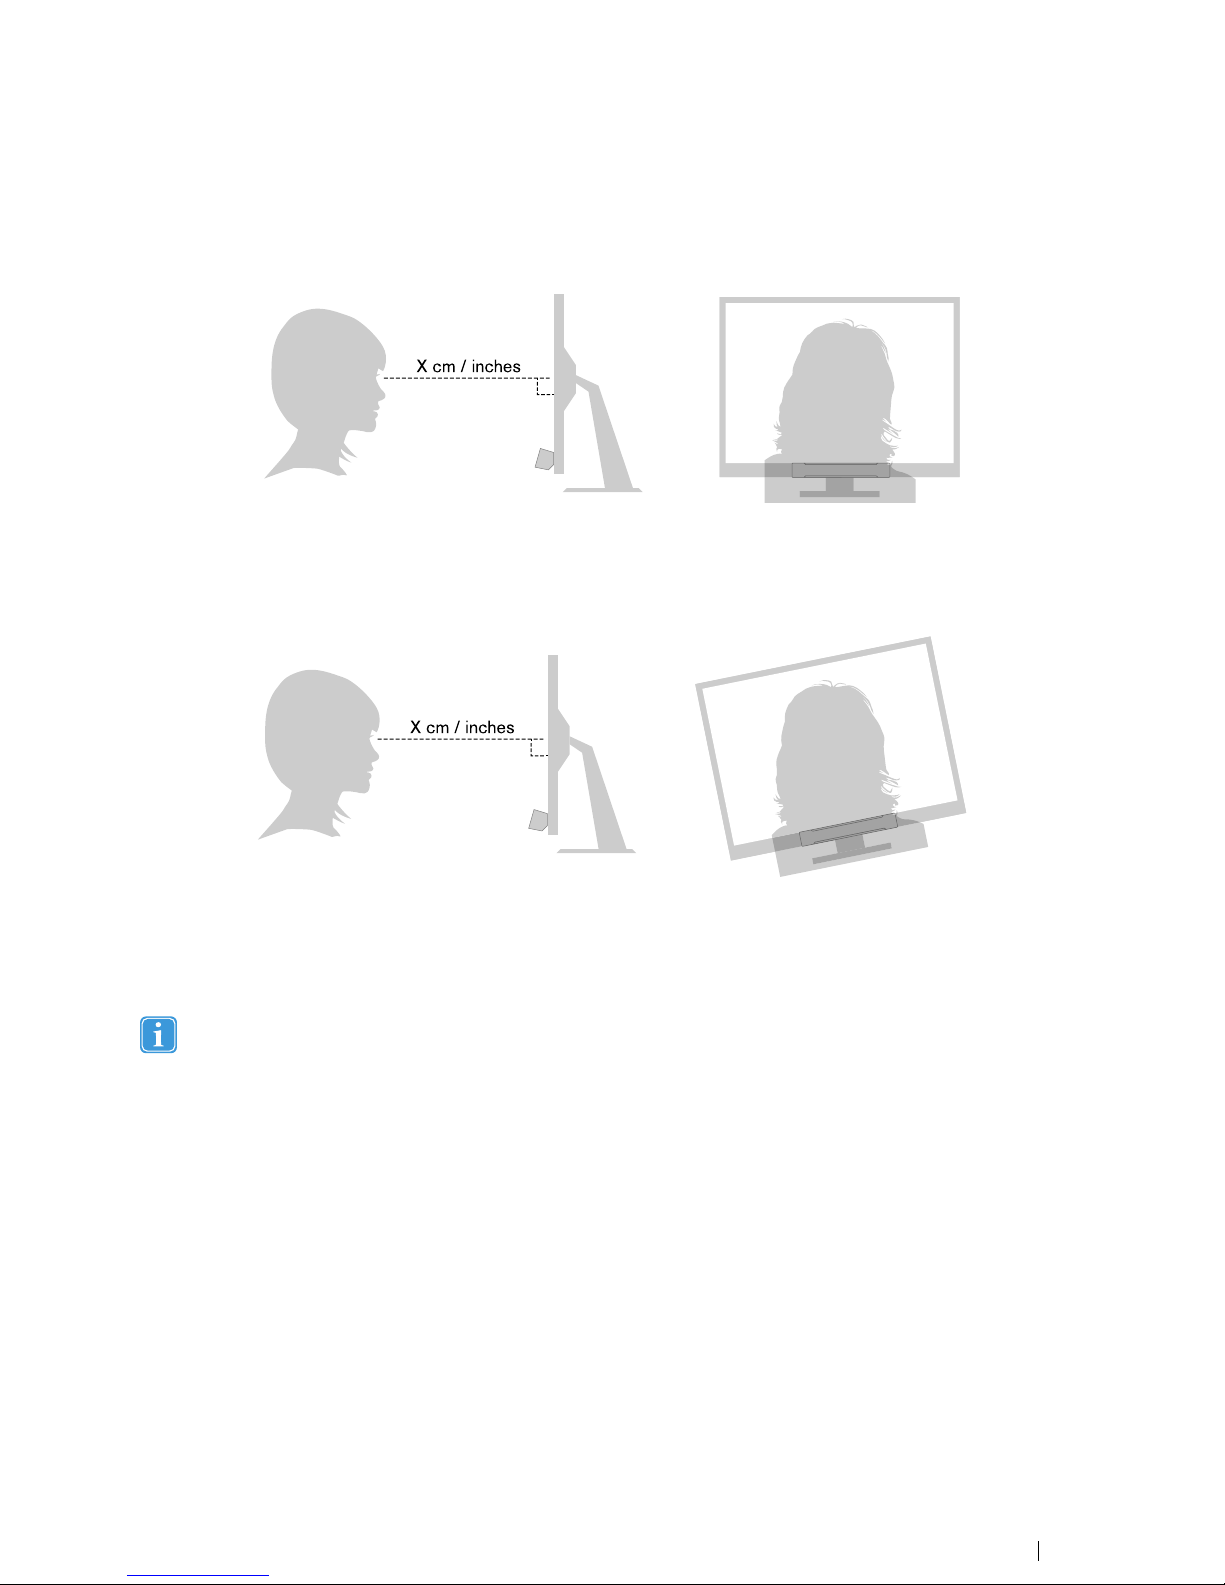
X cm / inches
FFiigguurree 44..11 Positioning
The mounted Tobii PCEye Go attached to its Magnetic Mounting Plates and to your de ice is designed to work optimally when it
is parallel to the user’s eyes at a distance from about 45 —90 cm (18 to 35 inches) for Tobii PCEye Go, see
Figure 4.1 Position-
ing, page 9
or
Figure 4.2 Positioning when Users Leaning Sideways or Those Lying Down, page 9
.
X cm / inches
FFiigguurree 44..22 Positioning hen Users Leaning Side ays or Those Lying Do n
This means that for those users leaning sideways or those lying down the Tobii PCEye Go with monitor and computer de ice al-
so needs to be tilted in order to keep the users eyes parallel to the screen and at the optimal distance, see
Figure 4.2 Positioning
when Users Leaning Sideways or Those Lying Down, page 9
.
Make sure the user is placed comfortably in relation to the optimal positioning of, and distance from, the unit. Be aware
also that the user’s comfort, as well as the Gaze Interaction performance, will be enhanced if the sun is not shining di-
rectly on the screen or into the user’s eyes.
The optimal distance that a user should be from the Tobii PCEye Go mounted on a monitor/laptop differs depending on the size
of the screen. The user should be positioned at the optimal distance to allow for the best possible Gaze Interaction.
Generally, the larger the size of the screen, the greater the distance the user should be from the Eye Tracker / Screen combina-
tion for optimal Gaze Interaction.
Smaller than a 10 inch screen and larger than a 27 inch screen should not be used for optimal Gaze Interaction, for more infor-
mation see
Appendix D Technical Specifications, page 44
.
4.1.1 Track Box
The Tobii PCEye Go allows for extensi e Freedom of Head Mo ement. Once the Tobii PCEye Go is properly calibrated and
placed in front of the user, no further adjustments are required.
The Tobii PCEye Go produces an industry leading sized track box with the approximate dimensions of 30 cm × 20 cm × 20 cm
/ 11.8 in × 7.9 in × 7.9 in (Width × Height × Depth). The Track Box is an in isible box positioned approximately 60 cm (23.5 in)
straight out from a point just abo e the middle of the screen.
Tobii PCEye GoUser’s manual .2.1.1 - en-US 4 Using the Tobii PCEye Go 9
At 70 cm (27.5 in) the Tobii PCEye Go allows for lateral Freedom of Head Mo ement in an area of about 50 × 36 cm (20 × 14
in).
In order to function properly for Gaze Interaction the user needs at least one eye in the track box at all times.
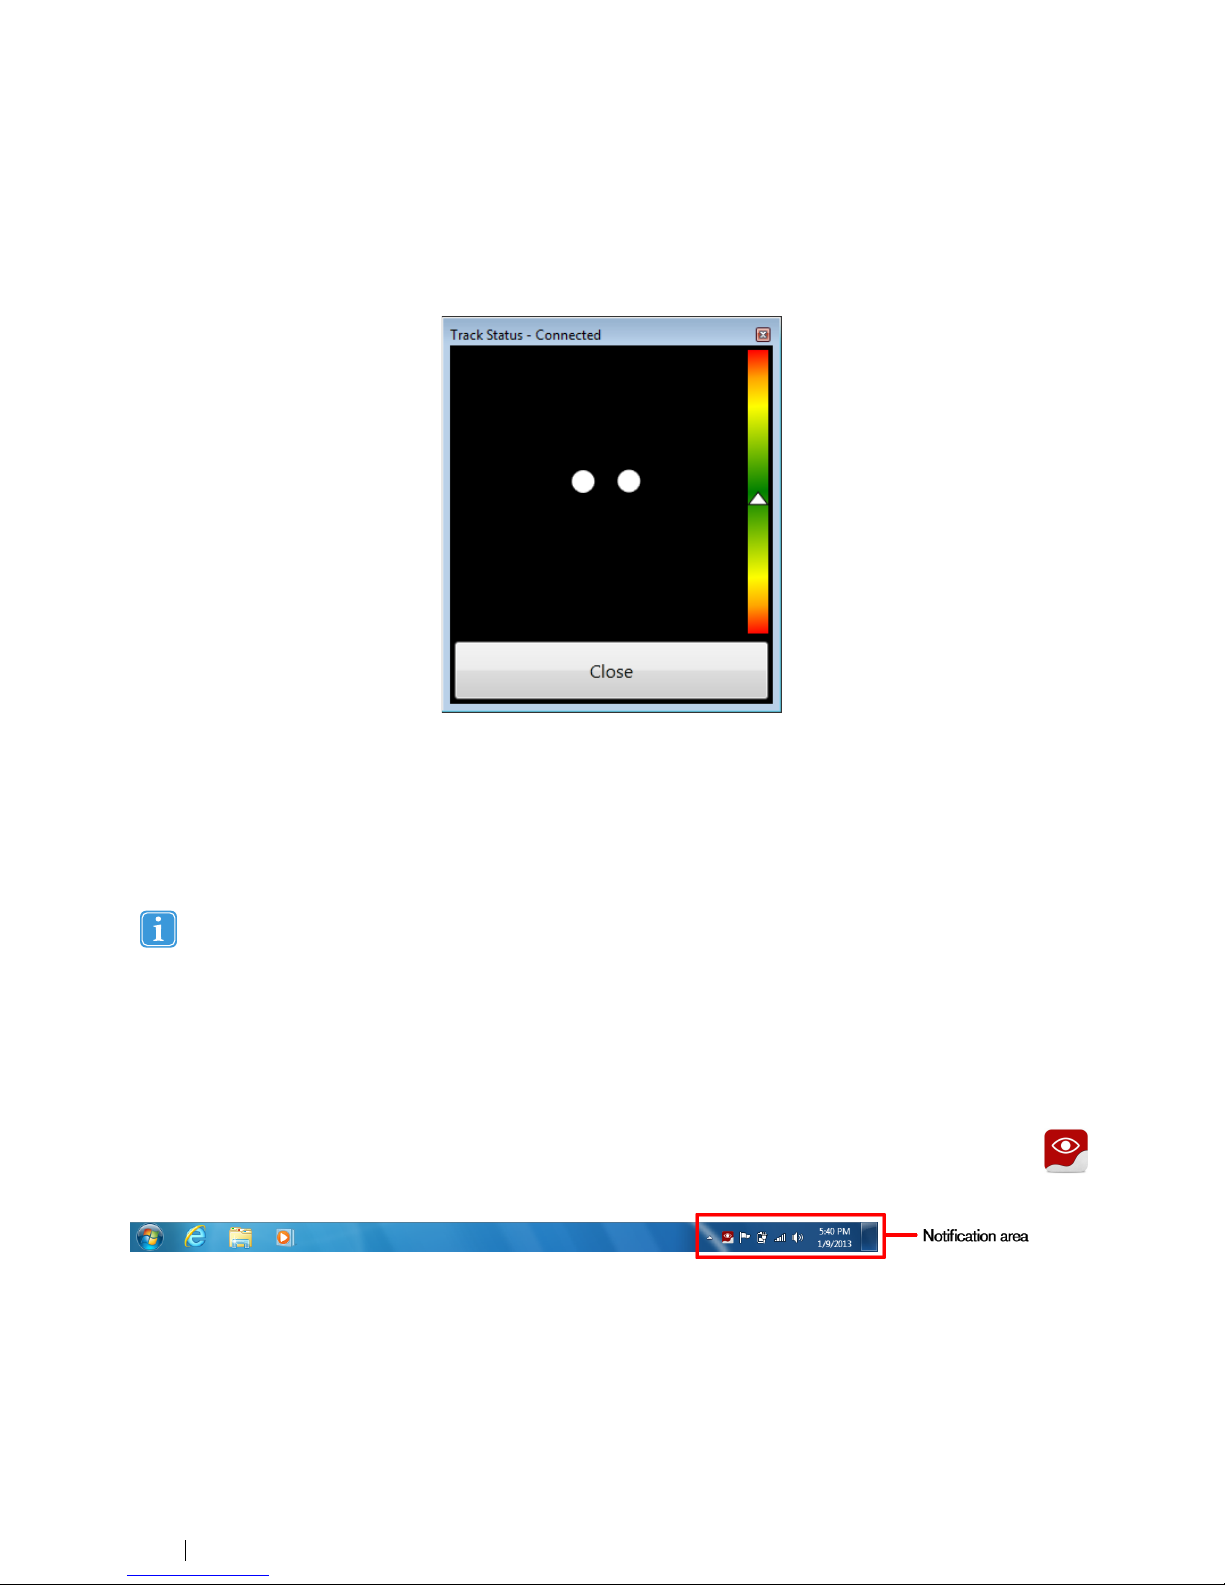
4.1.2 Track Status Viewer
Use the Track Status iewer (see
4.1.2.1 Showing Track Status, page 10
for more information on how to open the Track Status
iewer) to help determine the optimal height and horizontal positioning for Gaze Interaction with the Tobii PCEye Go.
•Ideally, the two dots that represent the user’s eyes should be in the middle of the Track Status iewer.
•Use the distance meter on the right hand side of the Track Status iewer to determine the optimal distance the user
should be from the Tobii PCEye Go.
•The white triangle in the distance meter should ho er near the center, within the green, when the optimal distance from
the Tobii PCEye Go is reached.
For information about calibration of the Tobii PCEye Go see
5.2 Calibration, page 25
. Also check the lighting condi-
tions, related to what is mentioned abo e, when calibrating.
4.1.2.1 Sho ing Track Status
The track status iewer is a window/dialog where you can erify that the Gaze Interaction recognizes your eyes and that you are
well positioned in front of the de ice.
Open the track status iewer in one of the following ways:
•Open TToobbiiii GGaazzee IInntteerraaccttiioonn SSeettttiinnggss >> CCaalliibbrraattiioonn and select the TTrraacckk ssttaattuuss button.
•Right-click (long-hold finger on icon for touch screen right clicking) on the TToobbiiii GGaazzee IInntteerraaccttiioonn SSeettttiinnggss icon,
,
in the Notification area and select SShhooww ttrraacckk ssttaattuuss.
4.1.3 Positioning Guide
For extra assistance in positioning, there is a PPoossiittiioonniinngg gguuiiddee that will show itself automatically in the bottom-right corner of
your monitor.
The PPoossiittiioonniinngg gguuiiddee is a isual guide that combines the function of the Track Status iewer with six different image based in-
structions to help the user with correct positioning.
10 4 Using the Tobii PCEye Go Tobii PCEye Go User’s manual .2.1.1 - en-US

The 6 instructions direct the user to:
1. Mo e head down.
2. Mo e head up.
3. Mo e head to the right.
4. Mo e head to the left.
5. Mo e head closer to the monitor.
6. Mo e head farther away from the monitor
Mo e head closer to the monitor. Mo e head to the right.
The PPoossiittiioonniinngg gguuiiddee will automatically disappear when the user’s positioning is impro ed in the way that is directed by the
guide.
Some users may not want the PPoossiittiioonniinngg gguuiiddee to pop up e ery time their eyes lea e optimal positioning.
To turn On or Off the automatic PPoossiittiioonniinngg gguuiiddee, see
5.6 System Settings, page 35
4.2 Using indows Control
Windows Control allows you to access the desktop and all applications of your Windows computer with Gaze Interaction.
4.2.1 Windows Control Type
Windows Control can be used in two different modes
•Gaze Selection
•Mouse Emulation
To select which type of Windows Control you wish to use and to customize Windows Control:
•Open TToobbiiii GGaazzee IInntteerraaccttiioonn SSeettttiinnggss >> WWiinnddoowwss CCoonnttrrooll, see
5.5 Windows Control, page 32
•Select your preferred type of Windows Control under WWiinnddoowwss CCoonnttrrooll TTyyppee
Tobii PCEye GoUser’s manual .2.1.1 - en-US 4 Using the Tobii PCEye Go 11

4.2.2 Starting and Disabling Tobii Windows Control
To start Windows Control, right-click on the TToobbiiii GGaazzee IInntteerraaccttiioonn SSeettttiinnggss icon,
, in the Notification area and select
EEnnaabbllee WWiinnddoowwss CCoonnttrrooll.
Or
Double-click on the TToobbiiii WWiinnddoowwss CCoonnttrrooll shortcut on the desktop, , This will immediately start Windows Control.
To disable Windows Control, right-click on the TToobbiiii GGaazzee IInntteerraaccttiioonn SSeettttiinnggss icon, , in the Notification area and select
DDiissaabbllee WWiinnddoowwss CCoonnttrrooll.
You can also start Windows Control from Tobii Communicator or alternati e communication software, which has implemented
the functions pro ided by the Tobii Eye Control SDK
AAuuttoo ssttaarrtt
•Open TToobbiiii GGaazzee IInntteerraaccttiioonn SSeettttiinnggss >> WWiinnddoowwss CCoonnttrrooll.
•Check the AAuuttoo ssttaarrtt wwiinnddoowwss ccoonnttrrooll aatt bboooott check box if you want Windows Control to auto start when the
Tobii Gaze Interaction Software starts.
4.2.3 Using Gaze Selection
The Gaze Selection mode of Windows Control makes it possible for the user to control a standard Windows desktop operating
system with a two step selection method which reduces the risks of unwanted clicks. It also pre ents the following of the mouse
cursor with your gaze as opposed to the controlling of it (there is no floating mouse cursor in Gaze Selection).
1. The first step is to select the desired Task from the docked Taskbar by looking at it.
2. The second step is to look at the desired portion of the screen (or icon on the screen) where you want to execute the
Task. An automatic zoom function is enabled, ending in the selection of the icon or execution of the task.
4.2.3.1 Gaze Selection Taskbar
At the top of the Gaze Selection Taskbar there is a Track Status iewer. It allows you to erify that the eye tracker recognizes your
eyes and that you are well positioned in front of the de ice.
The Task Buttons in the Gaze Selection Taskbar can be in three different modes as shown in
Figure 4.3 The Modes for the Gaze
Selection Taskbar, page 13
.
•NNoorrmmaall ((UUnnsseelleecctteedd)) - No Task Button for Gaze Selection is chosen.
•PPrriimmaarryy SSeelleeccttiioonn ((BBlluuee//bbllaacckk)) - The marked Task Button is selected and the Task will be executed after the automatic
zoom when the user looks at the desired position on the screen or icon on it. If the selection method is set to Switch in
the Gaze Selection Settings Dialog, the chosen Task Button will still remain acti e after executing the Task.
The Functions O erlay Task will not perform any zooming. When selecting Functions O erlay with Primary Se-
lection, the Functions Areas/Commands will be acti e but not isible.
•SSeeccoonnddaarryy SSeelleeccttiioonn((BBlluuee//wwhhiittee)) - Same as PPrriimmaarryy SSeelleeccttiioonn but with a higher precision. PPrriimmaarryy SSeelleeccttiioonn
means that the zoom will progress deeper before the final execution of the Task, making the desired portion of the screen
bigger and easier to select within. Acti ate this mode by resting your gaze on the Task Button until the color changes ac-
cording to the image below.
12 4 Using the Tobii PCEye Go Tobii PCEye Go User’s manual .2.1.1 - en-US

The Functions O erlay Task will not perform any zooming. When selecting Functions O erlay with Secondary
Selection, the Functions will be acti e and the areas of each Function will be isible to the user.
In Windows 8 the colors on the Taskbar will adapt to Windows settings.
The Functions O erlay will not perform any zoom, some other tasks won't either in some situations (scroll, settings,
keyboard).
Normal
Gaze Drag &Drop
Gaze Keyboard
Left Click / Tap
Double Click
Right Click
Settings
TrackStatus
Gaze Drag &Drop
Gaze Keyboard
Left Click / Tap
Double Click
Functions Overlay Functions Overlay
Right Click
Settings
TrackStatus
Primary Selection Secondary Selection
Gaze Scroll Gaze Scroll
FFiigguurree 44..33 The Modes for the Gaze Selection Taskbar
Tobii PCEye GoUser’s manual .2.1.1 - en-US 4 Using the Tobii PCEye Go 13

4.2.3.2 Task Buttons
TTaasskk BBuuttttoonn AAccttiioonn DDeessccrriippttiioonn
Gaze Drag & Drop Task that performs two "clicks", where the first one represents the
starting position for the drag and the second the drop position (to
mo e objects or select areas).
•Select the Task
•Look at the object you want to mo e or the starting point for the
area selection
•Execute the Gaze Selection (first "click") by Switch or Gaze
•Look immediately at the drop position for the object or end point
for the area selection.
•Execute the second "click" by Switch or Gaze
Gaze Scroll Task that, if performed on a scrollable window, enables a gaze-con-
trolled way to scroll the page
•Select the Task
•Look at any scrollable area and hold your gaze, the Gaze Scroll
icon will appear where you looked
•Look abo e the icon to scroll up
•Look below the icon to scroll down
•Look to the left of the icon to scroll left
•Look to the right of the icon to scroll right
•While scrolling, look back at the icon (on the screen, not the
Taskbar icon) to toggle between up/down or left/right
•Look back at the Gaze Selection Taskbar (or outside of the
screen) to end scrolling
Use the Gaze Scroll Task to scroll ertically and horizontally
in Modern UI apps and the Modern UI Windows Start
Screen.
Left Click / Tap Task that performs a single left-click, or for touch based de ices, the
equi alent of a single finger Tap. When in Switch mode Left CLick /
Tap is Default on and Sticky" (see
4.2.3.5.1 Sticky Tasks & Default
Left Click / Tap for Switch, page 19
)
Functions O erlay Task that acti ates the Functions O erlay. Primary Selection acti ates
the Functions O erlay. Secondary Selection acti ates the Functions
O erlay and makes it (and its indi idual Functions and areas) isible
o er the top of anything else on the screen to assist in selecting them.
The indi idual Functions a ailable on the Functions O erlay are differ-
ent for Windows 7 (see
4.2.3.3 Functions O erlay in Windows 7,
page 15
) and Windows 8 (see
4.2.3.4 Functions O erlay in Windows
8, page 15
).
Right Click Task that performs a single right-click
Double Click Task that performs a double left-click. When in Switch mode Double
Click is a "sticky Task" (see
4.2.3.5.1 Sticky Tasks & Default Left Click
/ Tap for Switch, page 19
)
Gaze Keyboard Task that opens an on-screen Gaze enabled keyboard for Gaze
typing
Settings Task that opens the Gaze Selection Settings Dialog
For more information, see
6 Gaze Selection Settings, page 37
14 4 Using the Tobii PCEye Go Tobii PCEye Go User’s manual .2.1.1 - en-US

4.2.3.3 Functions Overlay in Windo s 7
When selecting the Functions O erlay with PPrriimmaarryy SSeelleeccttiioonn, the Functions will be acti e but not isible.
When selecting the Functions O erlay with SSeeccoonnddaarryy SSeelleeccttiioonn, the Functions will be acti e and the areas of each Function
will be isible to the user.
The Functions O erlay will not perform any zoom.
FFuunnccttiioonnss AAccttiioonn DDeessccrriippttiioonn
App Switcher Function that opens the App Switcher bar, same as Alt-Tab command
on a regular keyboard.
Hide Taskbar Function that hides the Taskbar for Full Screen iew. To Bring back
the Taskbar, select or depending on which side the
Taskbar is located.
Windows Button Function that call up the Windows Start Menu.
Mo e Taskbar Function that mo es the Taskbar from right/left.
4.2.3.4 Functions Overlay in Windo s 8
Windows 8 Gaze Selection is a re olutionary new method of Gaze Interaction. It is expressly created for the modern and intuiti e
touch enabled en ironment of tablets, as well for maximizing and enhancing the complete Gaze Interaction experience of ultra-
books, laptops, and desktop PCs.
It is created as a wholistic, full OS control, Gaze Interaction solution; enabling fully hands-free control of your Windows 8 OS.
From emulated touch gestures, click types, taps and side swipes, to Charms and split screen Snapping. From real "Gaze-on/
Hands-off" multitasking to true access and control of all a ailable legacy or current Desktop applications and settings.
Windows 8 Gaze Selection opens the tens of thousands of the current, social, professional, entertaining and educational Win-
dows 8 Modern Apps to Eye Controlled use.
Built around making use of the intuiti e power of Microsoft's new touch-centric interface for Windows 8 touch screen de ices,
the new Gaze Selection brings hands free use into the modern consumer computer en ironment.
Tobii PCEye GoUser’s manual .2.1.1 - en-US 4 Using the Tobii PCEye Go 15

While it is centrally built around fully hands-free use cases, Gaze Selection is also made for e en faster access with Switches, as
well as being completely touch (and mouse) enabled for multimodal input and third party assistance.
When selecting the Functions O erlay with PPrriimmaarryy SSeelleeccttiioonn, the Functions Areas/Commands will be acti e but not isible.
When selecting the Functions O erlay with SSeeccoonnddaarryy SSeelleeccttiioonn, the Functions will be acti e and the areas of each Function
will be isible to the user.
The Functions O erlay will not perform any zoom.
FFuunnccttiioonnss AAccttiioonn DDeessccrriippttiioonn
App Switcher Function that opens the App Switcher bar where all running Modern
User Interface (UI) Apps are isible including the Desktop.
All software running in the Desktop, will not be isible here.
They are only isible from the Desktop.
The App Switcher will not show if there is only one or less
Apps open.
Show App Bar Function that makes the App Bar for acti e App isible. The App Bar
is context based for the acti e App and therefore will consist of differ-
ent actions for each App.
Charms Menu Function that opens the Charms Menu.
Mo e Taskbar Function that mo es the Taskbar from right/left.
16 4 Using the Tobii PCEye Go Tobii PCEye Go User’s manual .2.1.1 - en-US
Table of contents
Other Tobii Computer Accessories manuals


