Universal JUNIOR ATB Guide

JUNIOR
ATB
OWNER’S MANUAL
& MAINTENANCE
GUIDE

DESCRIPTION OF
BICYCLE PARTS
1. Seat Post
2. Saddle
3. Front Brake Lever (right)
4. Handle Bars
5. Rear Brake Lever (left)
6. Brake Cables
7. Front Reflector
8. Brake Pads
9. Fork Protector (Packaging)
10.Front Wheel
11.Pedals
12.Pedal Arm (left)
13.Pedal Arm (right)
14.Chain
15.Rear Wheel
16.Rear Axle
17.Rear Reflector
18.Multi-sized Spanner
19.Allen (Hexagonal) Key
20.Stabilisers
1
NOTE: This is a general guide for assembly of all Universal Junior ATB Bicycles.
Therefore, not all parts pictured are available on all models.
14
15
16
17
1
7
2
6
11
18
6
13
34 5
7
8
10
12
919
20

CONTENTS
DESCRIPTION OF BICYCLE PARTS 1
CONTENTS 2
SAFETY 3
ASSEMBLY: 5
Unpacking Your Bicycle 5
Attaching the Stabilisers (if supplied) 6
Attaching the Handlebars 7
Attaching the Saddle 8
Attaching the Pedals 11
BEFORE USE: 12
Checking and Adjusting your Bicycle 12
User Precautions 13
Using your Bicycle 15
AFTER USE: 16
Maintenance 16
Replacement Parts / Spares 22
2

SAFETY
Good Cycling is Safe Cycling
When riding keep to the left of the road (in
United Kingdom).
• Know and observe all laws appertaining to bicycles (the Highway
Code).
• Always hold the handlebars and keep your feet on the pedals.
• Slow down at road junctions and look both ways before crossing.
• Give clear hand signals in good time to warn other road users of
your intentions.
• Give way to pedestrians and to motor vehicles.
• Watch out for vehicles pulling in or out of traffic and for doors
opening on parked cars.
• Always use bike paths or cycle tracks when available.
•Wet Weather and icy conditions can affect the efficiency of the
brakes. Therefore speeds should be reduced to a minimum and
water dispelled from the braking surfaces by applying the brakes well
in advance of anticipated stops.
•On unpaved roads or footpaths, take care to ride at a speed to suit
the conditions. Be particularly careful when riding on uneven
surfaces, loose sand and gravel. Watch out for pot holes.
•Do not ride more than two abreast. Ride in single file on busy or
narrow roads.
•Do not weave or swerve in and out of traffic.
•Do not hang anything over the handlebars, as this will impede the
steering of the bicycle.
•Do not hold onto another vehicle or cyclist.
•Do not ride too close behind another vehicle.
•IMPORTANT: Have a sounding device (i.e. a bell or horn) fitted
to our bicycle to warn others of your approach.
•Wear suitable clothing. This includes an approved helmet.
•If in doubt about the efficiency of your brakes, or the comfort of your
riding position, ask your dealer to make the necessary adjustments.
•If the handlebar grips become loose, ask your local service dealer to
secure them with a suitable adhesive or replace them. Do not ride
with loose hand grips.
Cycling at Night
•For your safety and protection, it is a legal requirement to have a
front white light and a rear red light, in addition to front, side and
pedal reflectors which must be
(a) Firmly secured in the correct position
(b) Clean at all times
(c) Clearly visible at all times
(d) Replaced if damaged
•Reduce speed when it is dark. Hazards are much harder to see.
•If possible, ride on roads and paths that are familiar to you. Terrain
that is unfamiliar may be dangerous at night.
•Whenever possible use well lit roads.
•It is a good idea to wear bright/reflective clothing and a helmet for
night time riding.
3

IMPORTANT
READY FOR THE ROAD
Few things equal the thrill of owning a brand new UNIVERSAL bicycle, especially a
handsome precision built, high quality machine like yours. We, its manufacturers are very
proud of it. It is the product of many years research and development and we are confident
that, with reasonable care and regular maintenance (see page 16) - oiling, cleaning, checking
and adjusting, it will give you many years of enjoyable cycling. In the pages which follow, we
describe (with the help of a few simple pictures and diagrams) how to enjoy your bicycle
and how to keep it in a safe operating condition, and ready for riding at all times.
WARNING
It is important to read this Owners Manual thoroughly, noting in particularly the assembly
and working instructions, safety checks and maintenance details. Failure to observe these
could expose the rider to risk of injury and may damage the bicycle.
4

ASSEMBLY
IMPORTANT
UNPACKING YOUR BICYCLE
Completely remove the staples from the carton and discard. Remove all components and
carefully examine the carton for any remaining loose parts. Identify all components
before starting to assemble. Keep all plastic bags out of the reach of children and dispose
of at once. Fully assemble the bicycle before discarding the carton.
5

Attaching the Stabilisers (if supplied)
Ensuring that your bicycle is standing on a flat surface, slide the stabiliser bracket, followed
by the stabiliser arm, onto the protruding end of the rear wheel axle. Attach the outer axle
nut by hand and tighten using the multi-sized spanner. Do not loosen the inner axle nut.
Repeat this procedure for the other stabiliser.
1. Multi-Sized Spanner
2. Stabiliser Wheel
3. Stabiliser Arm
4. Rear Wheel Axle
5. Outer Axle Nut
To adjust the stabiliser height, use the multi-sized spanner to loosen the outer axle nut,
and slide the stabiliser arm up or down into the desired position. Re-tighten the outer
axle nut to secure into place.
1. Stabiliser Arm
2. Outer Axle Nut
3. Rear Wheel Axle
Initially, when teaching a child to ride a bicycle, there should not be a great deal of side to
side movement of the cycle. The stabilisers should be set so that both stabilisers and the
rear wheel touch the ground together. When a child becomes more confident, the
stabiliser arms / wheels can be raised so increasing the amount the bicycle can rock from
side to side.
If the stabilisers are removed, it is important that the outer axle nuts are replaced onto the
rear axle and securely tightened.
6
23
1
54
1
2
3
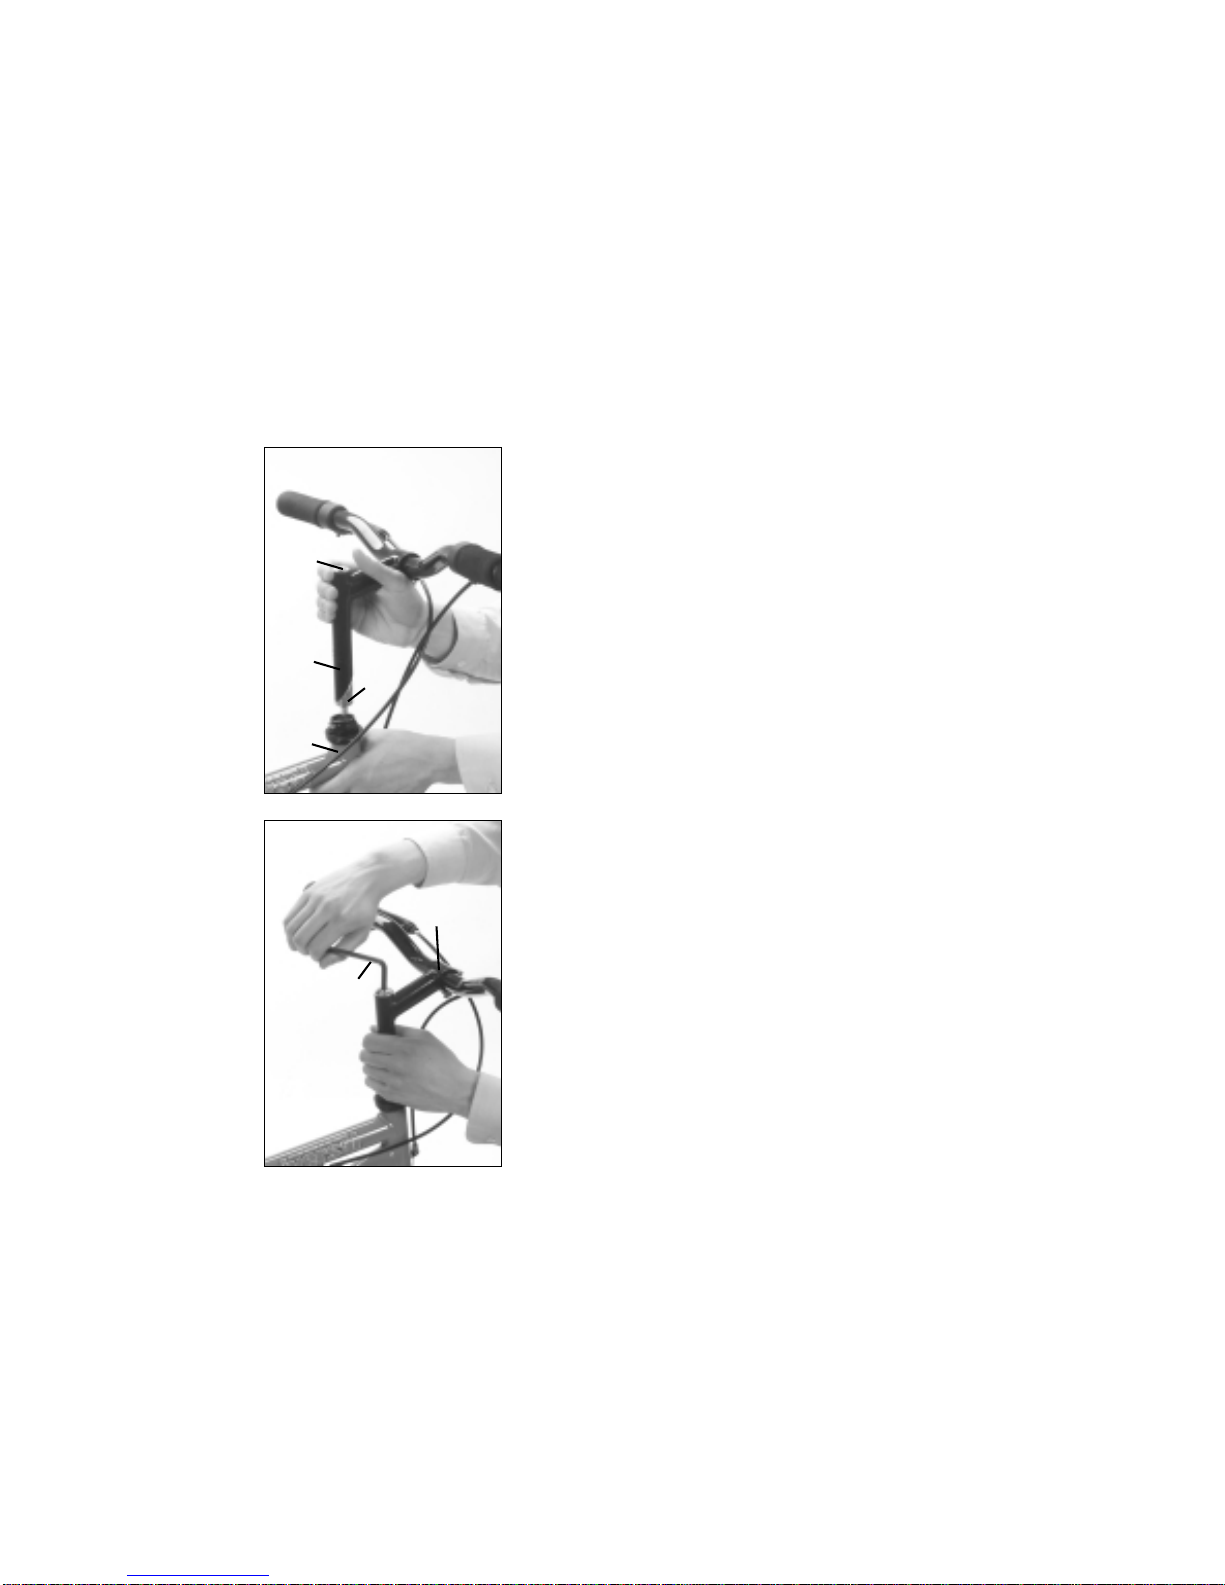
ATTACHING THE HANDLE BARS
1. Expander Bolt
2. Wedge Nut
3. Head Tube
4. Handlebar Stem
Ensuring that the brake cables do not tangle and that the forks are facing forwards,
(curving away from the frame / bike) gently lower the handlebar stem into the headset /
head tube.
1. Handlebars
2. Allen Key (Hexagonal Key)
Ensuring that the handlebars are inserted beyond the minimum insertion mark, set the
handlebars at the required height and use the allen key to secure into place.
7
1
42
3
1
2

ATTACHING THE SADDLE
1. Saddle
2. Seat Post
3. Spanner
4. Seat Clamp Nut
5. Allen Key (Hexagonal Key)
Firmly push the narrow end of the seat post into the hole on the underside of the saddle,
and tighten using the spanner.
Insert the seat post (with saddle attached) into the main frame ensuring that it is inserted
beyond the minimum insert mark.
Fasten into place using the allen key to tighten the clamp bolt.
8
4
32
1
2
1
5
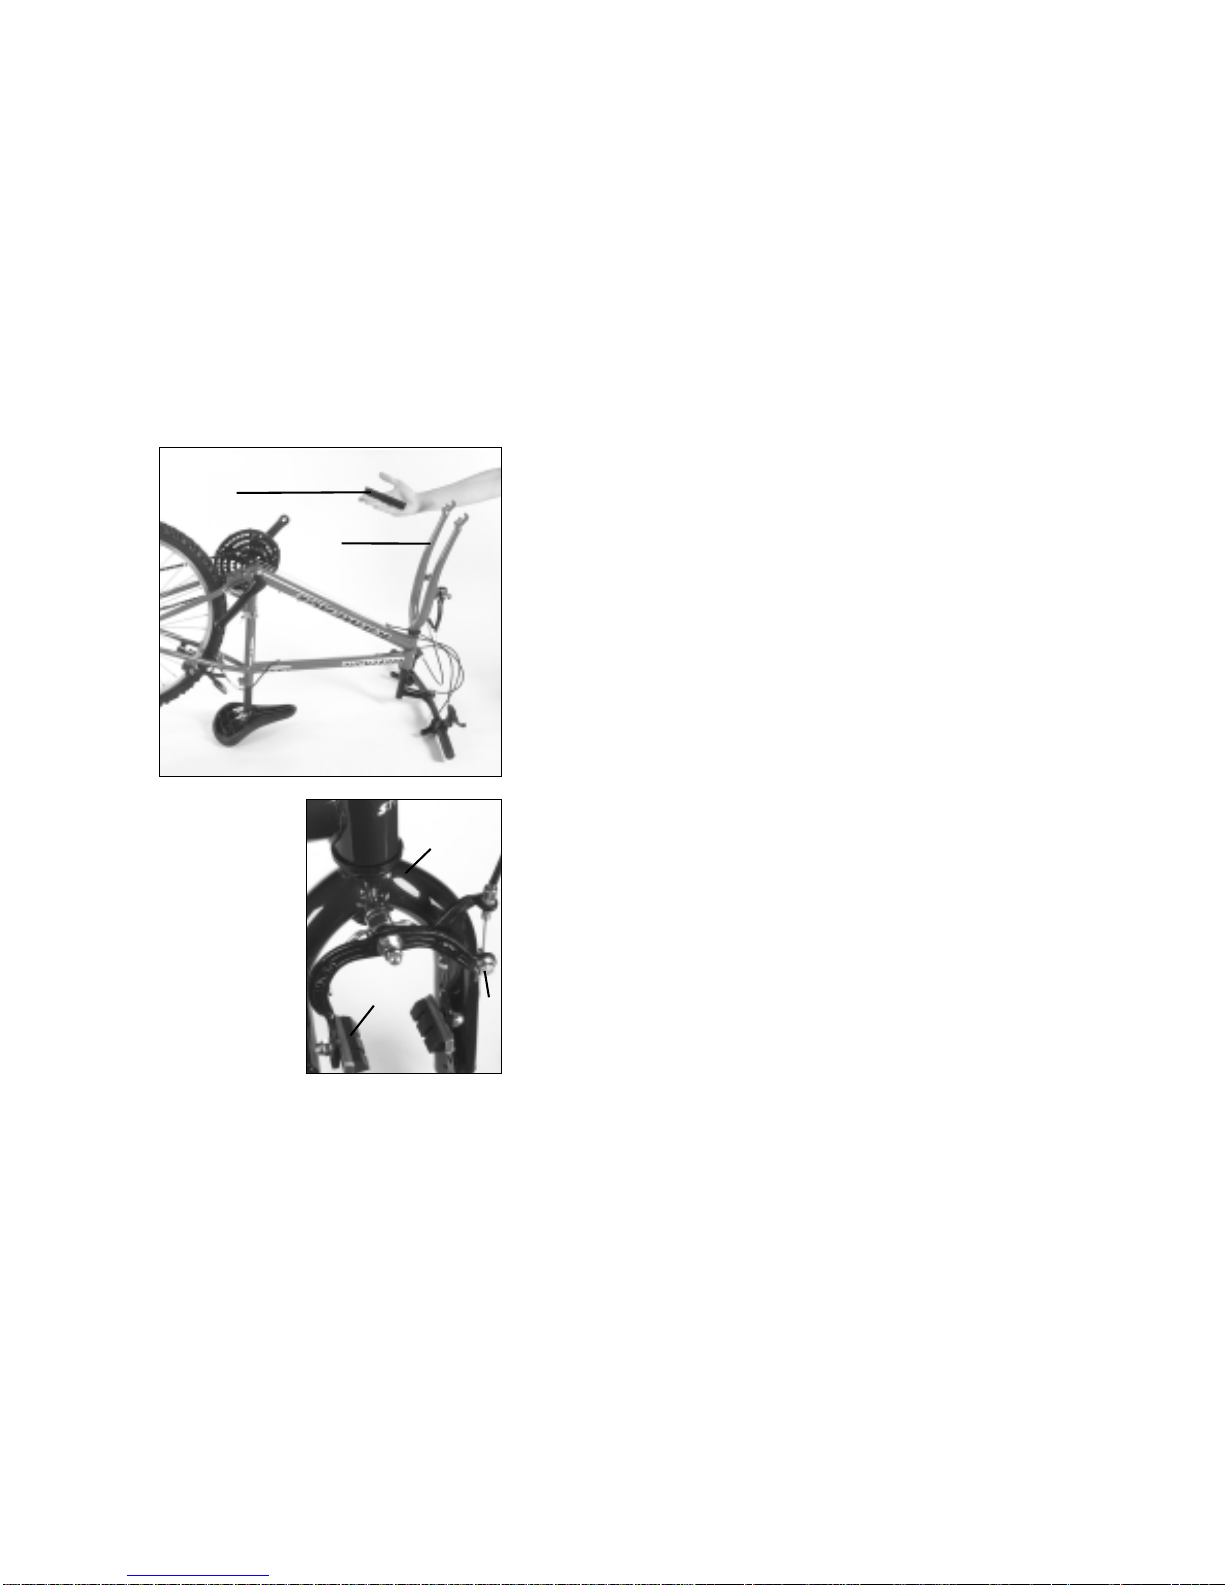
ATTACHING THE FRONT WHEEL
1. Fork
2. Fork Protector
Turn the cycle upside down so it is resting on its saddle and handlebars. Remove the fork
protector from the fork drop outs.
1. Fork
2. Front Brake Blocks
3. Pinch Bolt Nut
Using the multi-sized spanner, loosen the pinch bolt nut on the front brake to allow
enough room between the brake blocks for the front wheel to slide between. This can
also be accomplished by letting some air out of the front tyre and squeezing the tyre with
your fingers in between the brake blocks.
9
2
1
2
1
3
Table of contents


