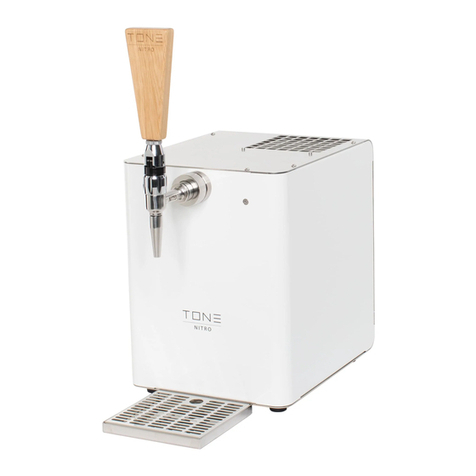
Tone NITRO User manual

TONE NITRO

.
1 32
Contents
Page
Seite
1 Implementation
1.1 Introduction
1.2 Mode of operation
1.3 Specifications
1.4 EG Declaration of conformity
1.5 FDA Declaration of conformity
2 Safety instructions
2.1 General safety instructions
2.2 Danger of electric
2.3 Danger of excessive system pressure
2.4 Danger of operating refrigeration
2.5 Danger of operating heating-
2.6 Danger of rotating parts
2.7 Danger of sheet-metal edges
3 Requirements for the setup location
3.1 General requirements
3.2 Electrical connections
3.3 Setup location
4 Installation
4.1 Illustration
4.2 Items delivered
4.3 Bag-in-Box & Nitro Canister
5 Commissioning and Decommissioning
5.1 Commissioning
5.1.1 Commissioning (Step-by-step)
5.1.2 First time Installation
5.1.3 Connection of Bag-in-Box
5.1.4 Start-up the device
5.1.5 Adjusting the air supply for foaming
5.1.6 Adjusting the cooling
5.1.7 NITRO or PUR(e)-Mode
5.2 Daily Operation ending
5.3 Daily check
6 Hygiene, cleaning and maintaining
6.1 Hygienic handling
6.2 Idle time without operation
6.3 Cleaning
6.3.1 Cleaning protocol
6.3.2 Daily Operating ending
6.3.3 Cleaning of Tap unit
6.3.4 Daily cleaning of perlator unit
6.3.5 Filling the cleaning canister
6.3.6 Chemical cleaning
6.4 Maintaining
6.5 Maintenance step A: O-Ring / Nozzle
6.6 Maintenance step B: Chemical purification
7. Flow diagram and circuit diagram
7.1 Flow diagram
7.2 circuit diagram
8. Ersatz- und Verschleißteilliste
9. EG declaration of conformity
10 Part list
11 Trouble shooting
12 Contact data and service
1
1.1
1.2
1.3
1.4 EG
1.5 FDA
2
2.1
2.2
2.3
2.4
2.5
2.6
2.7
3
3.1
3.2
3.3
4.
4.1
4.2
4.3 -- -
5.
5.1
5.1.1 ()
5.1.2
5.1.3 “--”
5.1.4
5.1.5
5.1.6
5.1.7 NITRO Pur()-
5.2
5.3
6 ,
6.1
6.2
6.3
6.3.1
6.3.2
6.3.3
6.3.4
6.3.5
6.3.6
6.4 .
6.5 . :
/
6.6 . B:
7. -
7.1 -
7.2
8.
9. EG
10
11
12
2
3
3
3
3
3
4
4
5
5
5
5
5
5
6
6
6
6
7
7
8
9
11
11
11
12
13
14
15
16
16
16
16
17
17
17
18
18
19
19
19
20
21
22
22
22
23
23
23
24
28
29
30
31
32

. 2 32
1 Implementation /
1.1 Introduction /
Dear Valued Customer!
Thank you for choosing TONE NITRO.
Please read and retain these operating
instructions!
Check the device for transport damage
immediately after delivery. As the
circumstances require contact the
manufacturer or shipping company. The
warranty excludes all damage attributable to
improper use.
Errors and technical changes excepted.
Gebrueder Schultes GmbH & Co. KG /
Schultes Maschinenbau GmbH constantly
extends their products according to the
corporate policy. Schultes Maschinenbau
GmbH reserves the right to make changes to
the product describes in this technical
documentation without prior notice.
Reprints of any kind without prior written
authorization by Gebrueder Schultes GmbH &
Co. KG / Schultes Maschinenbau GmbH are
strictly prohibited.
All mentioned brands and names in this
technical documentation refer to the relevant
companies and their products. Gebrueder
Schultes GmbH & Co. KG / Schultes
Maschinenbau GmbH claims no right of
possession to brands and names but their
own.
Please read this manual carefully before
operating and retain it for future reference!
!
, TONE NITRO.
,
!
.
(
), -
.
,
.
.
Gebrueder Schultes GmbH & Co. KG / Schultes
Maschinenbau GmbH
. Schultes
Maschinenbau GmbH
,
,
.
Gebrueder Schultes GmbH & Co. KG / Schultes
Maschinenbau GmbH .
.
Gebrueder Schultes GmbH &Co. KG / Schultes
Maschinenbau GmbH
,
.
,
.
:
, ,
.
Information sign:
Information.
I :
.
Warning sign:
Attention!
:
!
Mandatory sign:
Please ensure that you read
this information carefully

. 3 32
1.2 Mode of operation /
The TONE NITRO unites diverse functions in a
single device:
§ Suction of Cold brew from an
unpressurized vessel
(= Bag-In-Box)
§ Nitrogenation
§ Refrigeration of Cold brew in an
integrated cooling unit
§ Drawing according to Stout-style
TONE NITRO
:
*
(= --)
*
*
* -
1.3 Specifications /
Continuous output capacity
at 17°C
à
7°C
40 l / h
Continuous output capacity
at 22°C
à
7°C
15 l / h
Built in compressor
Yes
Minimal cooling capacity
4 °C
Cold brew tapping
temperature
5°-8°C (+/- 2°C)
Required cooling time
2 – 4 min.
Supply voltage
230 V / 50 Hz
Coolant
R – 134a
Electric power
300 W
Weight
23,5 kg
Measurements
B: 26 cm
T: 32 cm + 12,5
cm (=Spigots)
H: 35 cm
17 ° C
à
7°C
40 /
22°C
à
7°C
15 /
4 °C
5°-8°C (+/- 2°C)
2 – 4 .
230 / 50
R – 134a
300
:
23,5
:
: 26
: 32 cm + 12,5
: 35
Note: No external nitrogen bottle is required as the
device uses atmospheric nitrogen.
:
, ..
1.4 EG Declaration of conformity / EG -
This device conforms to the stipulations of the
following directives:
• EMC directive 2014/30/EU
• LVD directive 2014/35/EU
§ EMV- 2014/30/EU
§ NSP- 2014/35/EU
1.5 FDA Declaration of conformity / FDA -
All parts in contact with the medium and sealing
compounds used in the TONE NITRO conform to
the requirements of the FDA (Food and Drug
Administration).
,
,
TONE NITRO, FDA
(Food and Drug Administration).

. 4 32
2 Safety instructions /
2.1 General safety instructions /
The construction of this device corresponds with
state-of-art technology. Operational reliability is
ensured only if the instrument is properly used
according to the specifications in the operating
manual. Work instructions must be handled having
regard to following endangerments.
While establishing and operating the TONE NITRO.
We refer to the observance and compliance of the
following relevant laws, regulations and policies:
.
,
.
.
TONE NITRO.
:
1. Equipment and Product Safety Act – GPSG
2. Occupational Safety and Health Act – ArbSchG
3. Ordinance on Industrial Safety and Health –
BetrSichV
4. Food Hygiene Regulation – LMHV
5. Beverage Dispensing System Regulation –
SchankV (until 30.06.2005)
6. Technical Rules for Beverage Dispenser Units
(TRSK and DIN standards)
7. Ordinance on Hazardous Substances (GHS 05
Corrosion)
8. General Acknowledged Rules of Technology
1.
-GPSG
2. -ArbSchG
3.
-BetrSichV
4. -LMHV
5. -SchankV
( 30.06.2005)
6.
( TRSK DIN)
7. ( 05
)
8.
Relevant corresponding country-specific policies
and regulations must be applied.
No changes or modifications may be carried out on
parts relevant to safety as it automatically leads to
the expiration of any guarantee rights.
Check the device for externally visible damage or
defects at least daily. Contact a qualified service
technician if changes or repair work arise. The mains
plug may only be replaced by an authorized
technical staff. Use only original replacement parts
and accessories.
Make sure that only authorized persons work on the
device and that the operating personnel is equipped
with this operating instruction.
Make sure that no unauthorized person makes
modifications of the settings or interferes the
operating of the device.
Schultes Maschinenbau GmbH assumes no liability
for errors or damages caused by non-original parts
or accessories, improper handling or use outside the
rules.
.
,
,
.
.
.
.
.
,
.
,
.
Schultes Maschinenbau GmbH
,
,
.

5 32
2.2 Danger of electric current /
The power plug must be removed before
opening the unit!
Opening the device, modifications to the electronics
and exchanging electric components including the
mains plug may only be made by authorized
technical staff. Before carrying out repair work,
always pull out the mains plug. This also applies for
the cleaning process. The device may only be
connected to a grounded protected contact socket.
A device with damaged mains plug must not be
operated.
Never touch any electric components with damp
or wet hands, as it may result into as electric
shock!
!
,
,
,
.
.
.
.
,
!
2.3 Danger of excessive system pressure /
During operation, certain parts of the device
represent a potential source of danger as they
are subject to excess pressure. Do not remove
or dismantle any pressurized parts.
,
.
,
.
2.4 Danger of operating refrigeration /
The evaporating temperature in the coolant circuit
may amount up to -10°C. Therefore, a potential
source of danger exists while maintaining and
cleaning relevant tempered components without
suitable preventive measures.
-10°C. ,
.
2.5 Danger of operating heating-up /
Do not touch the compressor, the condenser,
engines and pipelines as they may heat up during
operation as it may cause injuries.
, ,
, ..
:
.
2.6 Danger of rotating parts /
Do not touch the fan blades while the device is
switched on.
,
2.7 Danger of sheet-metal edges /
Despite constructional prevention, sheet-metal
edges represent a remaining risk of injury.
,
.

6 32
3 Requirements for the setup location/
3.1 General requirements /
Observe the relevant national requirements
regarding the installation location. Please note the
Technical Rules for Beverage Dispenser Units
(TRSK 400 “Installation of Beverage Dispensing
systems”) since TONE NITRO is a modified
dispensing system.
, .
(TRSK 400 “
”), TONE
NITRO
.
Attention: Low voltage can damage the
compressor. The same applies if several devices
are powered by one power connection.
The power plug must be accessible at all times.
:
.
,
.
3.2 Electrical connections /
see Technical data / .
Fuse protection
max. 16 A
Voltage
230 V∼ +/- 10% 50 Hz
Electric power
300 W
. . 16
230 +/- 10% 50 Hz
300
3.3 Setup location /
An adequate ventilation must be ensured. The
distance to the wall should be at least 30 cm.
Attention:
Do not block the ventilation slits. Other than that, a
lack of cooling may occur and result in a system
failure.
Attention:
Never lay the device close to heat sources or into
direct sunlight.
Attention:
Under no circumstances should liquids be poured
into the upper opening of the device, otherwise
there is a risk of short circuit!
.
30 .
:
.
, .
:
.
:
,
!

7 32
4 Installation /
4.1 Illustration /
frontal view /
rear view /
side view /

8 32
4.2 Items delivered /
The following items are packaged with the device.
:
Pos.
Picture /
Amount /
-
Article- No. /
Article name /
Product Information /
1
1
103010
“”
Perlator-unit
„green“
, /
Perlator unit consisting of:
1 X - 103011-- A
“”/ „green“
3 X - 103012- - B
”” / „green“
1 X - 103013- C
“”/ „green“
2
1
108011
O-Ring Set
(hose)
O-ring set silicone for suction
hoses
3
1
102010
"TONE Nitro"
Tap "TONE Nitro"
TONE Nitro
Nitro DP
Tap for TONE Nitro with "Nitro
DP” laser engraving
4
1
104010
V
"TONE Nitro"
Handle V „TONE Nitro“
- “” TONE Nitro
V-
“Nitro DP-25”,
Handle for TONE Nitro in
V-form with "Nitro DP-25”
Laser engraving, handmade
from German oak
5
1
105010
CMB-
Suctionhose with CMB
– connection
TONE NITRO CMB-
Suction hose for TONE Nitro
with CMB connection

9 32
6
1
109010
EU
Power cable EU (L)
EU
Power cable EU (L)
Power cable EU (L)
Power cable EU (L)
7
1
106018
Drip tray
TONE Nitro
Drip tray for TONE Nitro
systems
8
1
107016
Cleaning plan
Cleaning plan for protocolling
the performed cleaning
operations
9
1
107017
Cleaning set
:
5
3X
consisting of
Cleaning canister 5l
Cleaning powder 3X
cleaning ball
cleaning brush

Page 10 of 32
Seite 10 von 32
4.3 Bag-in-Box & Nitro Canister / Bag-in-Box & Nitro Kanister
The TONE NITRO is designed only for drawing COLD
BREW COFFEE sucked in from unpressurized vessels
(=Bag-in-Box or Nitro Canister). Operating the device
with other liquids is strictly prohibited as it may lead to
soiling or blockage inside the system. This results in a
loss of warranty!
The Bag-in-Box vessels dispose of a high oxygen barrier
so that no ambient air can access the coffee to prevent
mold formation.
TONE NITRO
,
(=Bag-in-Box Nitro
Canister).
,
.
!
“--”
,
.
Pos.
Picture /
Article- No. /
Article name /
Product Information /
1
106010
5
Canister 5l
5 TONE Nitro
Flexible canister with 5l capacity for TONE
Nitro
2
106011
10
Canister 10l
10 TONE Nitro
Flexible canister with 10l capacity for TONE
Nitro
3
106012
6,4
Canister 6,4l
6,4 UV -,
Tone Nitro
NC-Keg,
4
106013
15
Canister 15l
15 UV -,
Tone Nitro
NC-Keg,
5
106014
26
Canister 26l
26 UV -,
Tone Nitro
NC-
,
6
106015
55
Canister 55l
55 UV -,
Tone Nitro
NC-,

11 32
5 Commissioning and Decommissioning /
5.1 Commissioning
5.1 .1 Commissioning (Step-by-step) / ()
Pos.
.
Picture /
Article- No. /
Article name /
Product Information /
Amount
-
1
103010
"n"
Perlator-unit
„green“
, /
Perlator unit consisting of:
1 X - 103011-- A
“”/ „green“
3 X - 103012- - B
”” / „green“
1 X - 103013- C
“”/ „green“
-
2
103011
- A ""
Perlator – A „green“
TONE Nitro
Perlator for TONE Nitro
1
3
103012
- B ""
Perlator – B „green“
TONE Nitro
Perlator for TONE Nitro
3
4
103013
- C ""
Perlator – C „green“
TONE Nitro
Perlator for TONE Nitro
1
Attention: The parts can be screwed together and
it is not necessary that the rings sit flush.
There is a remaining risk of injury on the screw
threads despite constructional prevention.
:
, ,
.
,
.

12 32
5.1.2 First time Installation /
No.
1.
Place the device at the setup
location.
(cf. 3.3 Setup location)
.
(. 3.3 )
2.
Remove the plug from the
machine.
.
3.
Place the Perlator unit (3) in the
front opening.
(Note: Pay attention to the O-rings.)
”” (3)
.
(:
)
4.
Screw the tap handle unit (4) on
the device und tighten it slightly.
(Note: Do not use pliers to tighten
the screws.)
(4)
.
(:
,
.)
5.
Remove the yellow plug on the
backside of your machine.
.
6.
Connect the suction hose (7) to the
machine.
(7) .
3
4
7

13 32
7.
Set the unit switch (a) on the back
of the device to “0 OFF“ and
connect the IEC (power) connector
(5) to the socket (c).
(a)
“0
.”
IEC (power) (5) (c).
8.
Set the thermostat (b) on the back
of the device up to the wanted
temperature.
(Note: Do not set the thermostat to
MAX. Otherwise may cause the
device to freeze.)
(b)
.
(:
.
.)
Attention:
During the initial installation at a new setup location
the device must be left to stand for approx. 30 min
prior to operation.
:
. 30
.
5.1.3 Connection of Bag-in-Box / “- ”
No.
1.
Remove the red plug from the bag-
in-box (alternatively from nitro
canister).
-- (
).
2.
Open the valve by pulling up the
snap lock.
,
3.
The Connector must be mounted
flush with the bag-in-box
connector.
Note: If not, air may also be drawn
in, which negatively affects the
performance of the system.
“--
”.
: ,
,
a
5
b

14 32
5.1.4 Start-up the device / Operational conditions
/
No.
1.
Set the unit switch (a) on the back
of the device to “1 ON“. The device
initiates automatically and powers
down after reaching the factory-
made configured temperature and
pressure: The device is ready to
use after approx. 5 min.
(Note: This process may take up to
2 mins longer during initial
commissioning.)
(a)
“1
.“.
:
. 5 .
(:
2
.)
2.
Turn the central rotary knob (h)
90 degrees to the right to set the
device on “PUR”.
(h) 90
,
“PUR”.
3.
Place a glass under the tap and pull
the tap handle 90 degrees
forward: The device starts to suck
in the liquid and after shortly
thereafter it runs out of the spigot
chilled. To stop this process, fold
the tap handle back to the starting
position.
90
:
,
.
,
.
4.
As soon as the liquid runs, turn the
rotary knob (h) 90 degrees to the
left and set to “NITRO”.
,
(h) 90
“NITRO”.

15 32
5.1.5 Adjusting the air supply for foaming
No.
1.
Adjust this setting by turning the
knob
(Note: The delivery pump looses
efficiency if the ventil is opened to
much and therefore too much air is
sucked in.)
,
(:
,
,
.)
2.
Turn the left rotary “NITRO”
clockwise (to the right) to add
more air (+).
“ NITRO”
(),
(+).
Turn the left rotary “NITRO”
counterclockwise (to the left) to
reduce air (-).
“ NITRO”
(),
( -)
(Note: The fine adjustment is very
sensitive and should therefore only
be carried out in 5-10° steps.)
(:
,
5-10°).
3.
If the system only emits air,
proceed as follows:
1. Close the tap (fold the tap handle upwards
again).
2. Turn the "NITRO" rotary switch at least
half a turn (180°) to the left.
3. Place a glass underneath and pull the tap
handle forward by 90°.
4. If the result still does not meet your
expectations, repeat this procedure.
5. As soon as liquid flows out of the tap, the
fine adjustment can be made during the
tapping (see pos.2).
,
:
1. (
).
2. “NITRO”
(180°) .
3.
90°.
4.
,
.
5.
,
(.
.2).
4.
After locating the perfect setting,
push the rotary knob back in
,
5.
Place a glass under the tap and pull
the tap handle 90 degrees
forward: The device starts to suck
in the liquid and after shortly
thereafter it runs out of the spigot
chilled and foamed.
To stop this process, fold the tap
handle back to the starting position.
90 :
,
.
,

16 32
5.1.6 Adjusting the cooling
No.
1.
Turn the right rotary knob on the
back of the device to the right for
less cooling and to the left for
more cooling.
(Note: Do not set the thermostat to
MAX. Otherwise may cause the
device to freeze.)
.
(:
.
.)
(Hinweis:
2.
If you want to turn off the cooling completely, turn
the rotary switch all the way to the left until you
hear a “click”.
,
,
“”.
5.1.7 NITRO or PUR(e)-Mode
NITRO- PUR-
The TONE NITRO can be used as a pure
continuous cooler without foaming function (PUR
mode) or as a nitro dispenser (NITRO mode).
TONE NITRO
, ,
( PUR) - ( NITRO).
No.
PUR
1.
Turn the central rotary knob (h)
90 degrees to the right to set the
device on “PUR”.
(h) 90
,
“PUR”.
2.
If you want to turn off the cooling
completely, turn the rotary switch all the
way to the left until you hear a “click”.
,
,
“”.
5.2 Daily Operation ending /
Pay attention to the cleaning protocol (6.3.1) in
chapter 6. Hygiene, cleaning and maintaining.
(6.3.1) 6. ,
.
5.3 Daily check /
Check the tightness of the pipes. This is only
possible by visual inspection.
.
.

17 32
6 Hygiene, cleaning and maintaining /
, .
6.1 Hygienic handling / Hygienische Handhabung
Pay attention to the legal provisions for beverage
dispensing systems valid in the setup location. Since
the TONE NITRO.is a modified beverage dispensing
system, we recommend the cleaning of the device
by the valid cleaning regulation according to TRSK
501 “Cleaning of Beverage Dispensing Systems”. In
addition to that we point out DIN 6650-6 (“Dispense
systems for draught beverages: Requirements for
cleaning and disinfection”).
Prior to each connection and each change of liquid,
all pipes, connecting parts and tap fittings must be
cleaned. Parts that encounter air and liquid must be
cleaned everyday (e.g. the tapping outlet).
Pay attention to the instruction of the producer of the
cleaning fluid. Only use cleaning fluids that meet the
requirements of ASI 6.84 and DIN 6650-6.
,
, .
TONE NITRO
,
501 “
”. ,
DIN 6650-6 (”
:
”).
,
. ,
,
(,
).
.
, ASI 6.84
DIN 6650-6.
There is a risk of severe burning while handling
cleaning fluids! Always pay attention to the
safety data sheet during the cleaning process
and wear goggles and appropriate clothing!
!
,
!
6.2 Idle time without operation /
The device can run to empty for a longer idle
time without operation. To do so connect the
cleaning adapter to the suction hose, pull the
tap handle 90 degrees forward and let the
system pump dry.
Perform this process only after implementing
the chemical purification.
.
,
90
.
.
Idle time less than 10 days
If the idle time is less than 10 days, the device must
be flushed out with water. The dawned Bag-in-Box
vessel must be refrigerated.
10
10 ,
.
“--”
.
Idle time more than 10 days
If the idle time is more than 10 days, the device must
be purified chemically and run to empty. Flush the
device with water before starting up again. Make
sure to refrigerate the open Bag-in-Box vessel.
10
10 ,
.
.
“ ”.

18 32
6.3 Cleaning /
The device must undergo chemical purification
every 14 days.
For this process, customary cleaning fluids suitable
for coffee can be used. We recommend a cleaning
fluid with a color indicator to verify the cleaning
effect.
Since the TONE NITRO is a modified beverage
dispensing system, we recommend listing the
cleaning procedures in a logbook (c.f. Appendix).
14 .
, .
.
TONE NITRO
,
(. ).
Electrical components may be affected or
irreparably damaged during or after the
cleaning process due to liquids (e.g. water or
cleaning fluid).
Therefore, take relevant arrangements before
cleaning the device to prevent the intrusion of
water or cleaning fluid in electrical
components.
The cleaning of the device must be performed
by trained qualified personnel in accordance
with following recommendation:
-
(,
).
,
.
:
6.3.1 Cleaning protocol /
What?
How?
When?
?
?
?
Spigot, Spout
outlet (inside and
outside)
Warm water,
cleaning brush
At least daily,
before and after
operating period
,
(
)
,
,
Spigot (outside)
Warm water,
cleaning brush
At least daily
()
,
Tap head (inside
and outside)
Wash with warm
water
For every new
connection and
reconnection of a
Bag-in-Box
vessel, especially
after cleaning the
pipes.
(
)
“-
-”,
.
Tap perlator rings
Wash with warm
water
At least daily
Spigot (inside),
Tap head (inside
and outside)
Warm water,
cleaning brush
and suitable
cleaning fluid
Weekly
(),
( )
,
.
Complete device
Clean with
suitable chemical
cleaning fluid (cf.
6.3.1)
At least every 14
days
(. 6.3.1)
2

19 32
6.3.2 Daily Operating ending /
No.
1.
Set the unit switch (a) on the back
of the device to “0 OFF“.
(a)
“0
.“.
2.
Place a glass under the tap and pull
the tap handle 90 degrees forward
so that the remaining pressure or
liquid can escape out of the
machine.
90
,
.
6.3.3 Cleaning of Tap unit /
No.
1.
Remove the spigot.
2.
Clean the tap with water. Pull the
tap handle 90 degrees forward and
flush it with warm water using the
added cleaning bottle.
.
90
,
6.3.4 Daily cleaning of perlator unit /
No.
1.
Take out the Perlator unit of the
front opening.
Note: We recommend using a
cleaning cloth to absorb remaining
liquid.
.
:
.
Other manuals for NITRO
2
Table of contents
Other Tone Coffee Maker manuals
