Jura ENA 4 User manual

ENA (NAA)
Instructions for Use
For your safety: read and understand manual before use.
en
fr
es
pt

Table of contents
Your ENA
IMPORTANT SAFEGUARDS .......................................................................................
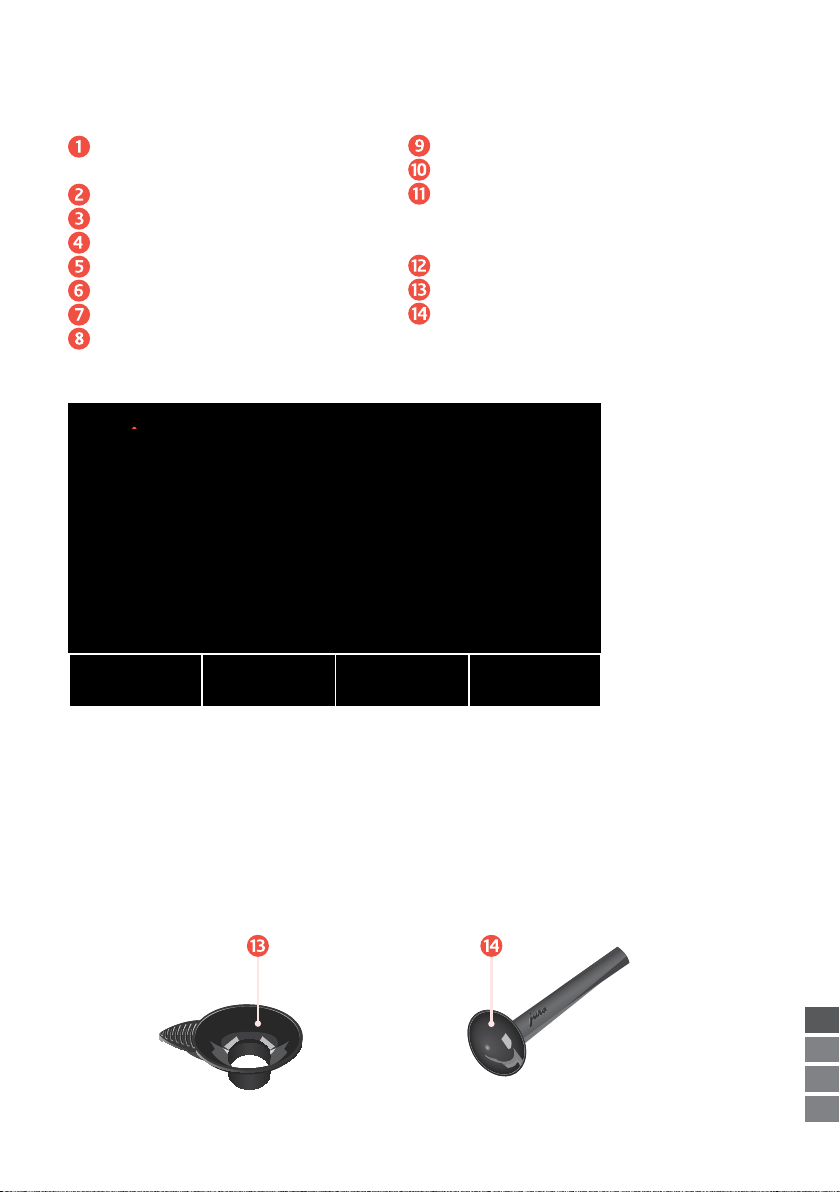
Control elements ...................................................................................................
Preparing and using for the first time ......................................................................
Setting up the machine ...........................................................................................
Filling the bean container .........................................................................................
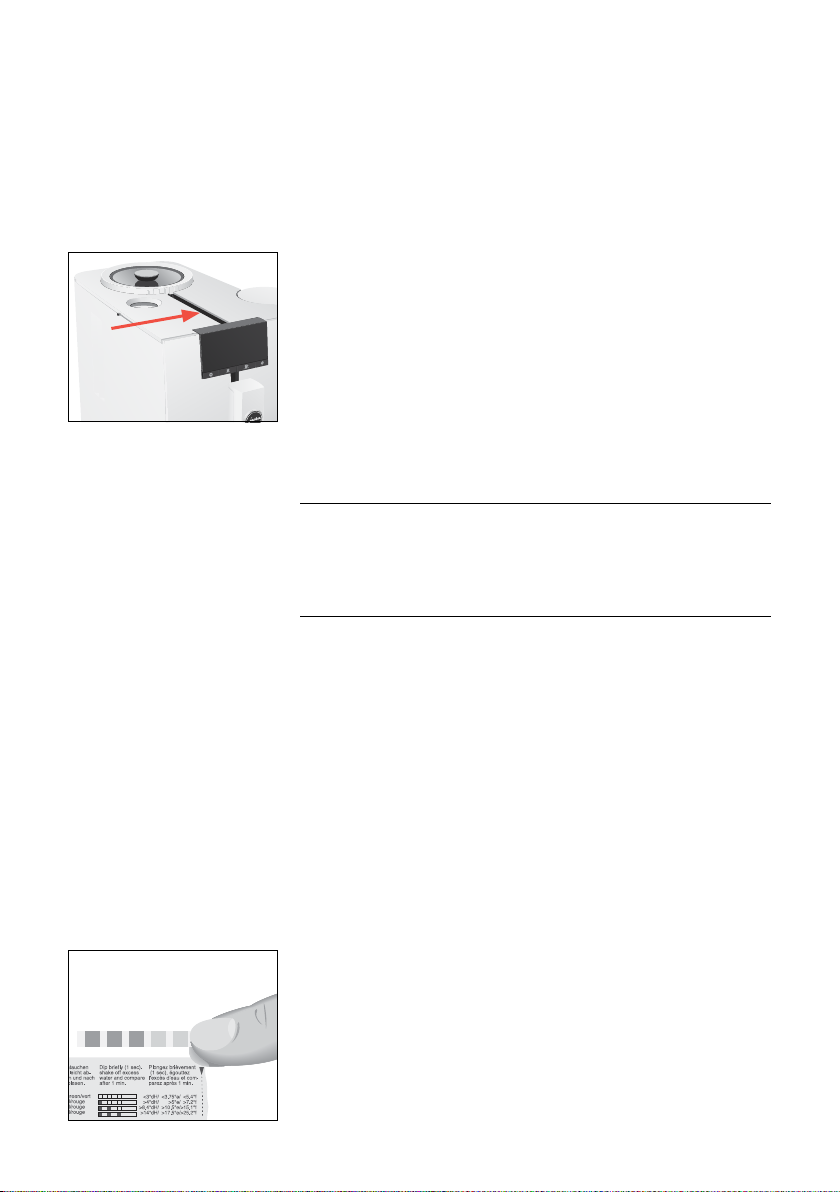
Determining the water hardness ................................................................................
First-time use .........................................................................................................
Preparation .........................................................................................................
Espresso and coffee ................................................................................................
Two espressi and two coffees ....................................................................................
Permanently setting the amount of water for the cup size ...............................................
Adjusting the grinder ..............................................................................................
Ground coffee ........................................................................................................
Daily operation ....................................................................................................
Switching the machine on and off ..............................................................................
Filling the water tank ...............................................................................................
Maintenance actions ...............................................................................................
Permanent settings in programming mode ..............................................................
Automatic switch-off ...............................................................................................
Setting the water hardness .......................................................................................
Maintenance .......................................................................................................
Inserting/changing the filter ......................................................................................
Cleaning the machine ............................................................................................
Descaling the machine ...........................................................................................
Cleaning the bean container ....................................................................................
Descaling the water tank .........................................................................................
Display messages .................................................................................................
Troubleshooting ...................................................................................................

en
fr
es
pt
Table of contents
Transport and environmentally friendly disposal .......................................................
Transport/ Emptying the system ..............................................................................
Disposal ..............................................................................................................
Technical data .....................................................................................................
Index .................................................................................................................
JURA contact details/ Legal information ..................................................................

IMPORTANT SAFEGUARDS
Failure to observe the instructions for use may result in serious
injuries or damage to property. Safety information is therefore
indicated as follows:
JThis is the safety alert symbol. lt is used to
alert you to potential personal injury hazards.
Obey all safety messages that follow this
symbol to avoid possible injury or death.
DANGER indicates a hazardous situation which,
if not avoided, will result in death or serious
injury.
WARNING indicates a hazardous situation
which, if not avoided, could result in death or
serious injury.
JCAUTION CAUTION, used with the safety alert symbol,
indicates a hazardous situation which, if not
avoided, could result in minor or moderate
injury.
NOTICE NOTICE is used to address practices not related
to personal injury.
When using electrical appliances, basic safety precautions shall
always be followed, to reduce the risk of fire, electric shock, and/or
injury to persons, including the following:
ZRead all instructions.
ZDo not touch hot surfaces. Use handles or knobs.
ZTo protect against fire, electric shock and injury to persons, do
not immerse power cord, plugs, or body of machine in water
or other liquid.
ZClose supervision is necessary when any appliance is used by
or near children.
ZUnplug from outlet when not in use and before cleaning.
Allow to cool before putting on or taking off parts, and before
cleaning the appliance.
ZDo not operate any appliance with a damaged cord or plug or
after the appliance malfunctions, or has been damaged in any
manner. Return appliance to the nearest authorized service
facility for examination, repair or adjustment.
Comply with the
instructions for use
J DANGER
J WARNING
Follow the basic safety
precautions

IMPORTANT SAFEGUARDS
en
fr
es
pt
SAVE THESE INSTRUCTIONS. Pass them on to any subsequent user.
The appliance is designed and intended for household use only. It
shall only be used for coffee preparation, according to these
instructions. Use for any other purpose will be deemed improper.
JURA Elektroapparate AG cannot accept any responsibility for the
consequences of improper use.
People, including children, who
Zdo not have the physical, sensory or mental capabilities to use
the appliance safely or
Zare inexperienced or lack knowledge in how to use the
appliance safely
must be supervised by a responsible person when using it, or must
be instructed in how to use it correctly.
ZA short power-supply cord is to be provided to reduce risks
resulting from becoming entangled in or tripping over a
longer cord.
ZThe cord shall be arranged so that it will not drape over the
counter top or table top where it can be pulled on by children
or tripped over.
ZThis appliance has a 3-pin grounded plug.
ZDo not modify the plug in any way.
Intended use
Special power cord set
instructions
ZThe use of an accessory attachment not recommended by the
appliance manufacturer may result in fire, electric shock, or
injury to persons.
ZDo not use outdoors.
ZDo not let the cord hang over the edge of a table or counter,
or touch hot surfaces.
ZDo not place on or near a hot gas or electric burner, or in a
heated oven.
ZTo disconnect, turn any control to ‘OFF’ then remove plug
from wall outlet.
ZDo not use appliance for other than intended use.
ZUse extreme caution when dispensing hot steam, hot water
or hot coffee.

IMPORTANT SAFEGUARDS
Extension cords are available an may be used if care is exercised in
their use.
If the user chooses to use an extension cord,
Zthe marked electrical rating of the extension cord should be
at least as great as the electrical rating of the appliance, and
Zif the appliance is of the grounded type, the extension cord
should be a grounding type 3-wire cord, and
Zthe longer cord should be arranged so that it will not drape
over the counter top or tabletop where it can be pulled on by
children or tripped over.
To reduce the risk of fire or electric shock, DO NOT remove any
service covers. DO NOT modify the appliance in any way that is not
described in these instructions. NO user serviceable parts included.
Repair MUST be done by authorized personnel only.
In the event of signs of damage, for example if there is a smell of
burning, unplug the machine immediately from outlet and contact
JURA customer service.
This appliance is for household use. Any servicing other than
cleaning and user maintenance shall be performed by an authorized
service representative:
ZDo not immerse base in water or try to disassemble.
ZDo not put the appliance or any individual parts in the
dishwasher.
ZCheck voltage to be sure that the voltage indicated on the
name plate complies with your voltage. The name plate is
located on the underside of the appliance.
ZNever use warm or hot water to fill the water container. Use
cold water only.
ZKeep your hands and the cord away from hot parts of the
appliance during operation.
There is a risk of scalds or burns on the spouts.
ZKeep children away.
ZDo not touch any hot parts. Use the handles or knobs
provided.
J WARNING
JCAUTION

IMPORTANT SAFEGUARDS
en
fr
es
pt
ZNever clean with scouring powders or hard implements.
ZEnsure that the ventilation slots are not covered.
ZNever pull out the drip tray during the brewing process. Only
pull the drip tray when the display instructs you or when the
appliance is ready for use.
ZNever fill instant coffee, chocolate mix etc. into the bean
container or ground coffee funnel (filler funnel for ground
coffee). It will damage the functioning of the brewing
chamber.
ZNever fill sugar coated coffee beans into the bean container.
In case of doubt, call your dealer.
ZNever fill anything other than coffee beans into the bean
container (no chocolate, no rice, no nuts, no spices, nothing
other than roasted coffee beans).
ZNever fill frozen beans into the bean container. If you store
beans in the freezer, let them thaw 3 to 4 hours before filling
them into the bean container.
ZNever fill anything but fresh, cold and clean water into the
water tank, except when decalcifying.
ZNever use mineral or carbonated water. You can use tap water,
bottled water, spring water and reverse osmosis water.
ZNever do anything with the machine which is not described in
these instructions. In case of doubt, call your dealer.
NOTICE
NEVER DO
(or you will void your
warranty protection):

Control elements
Control elements
J HOT

en
fr
es
pt
Control elements
Symbol display
fProgramming Mode symbol
iEspresso symbol
oCoffee symbol
s Coffee Strength symbol
L Cleaning symbol
& Descaling symbol
! Filter symbol
üCoffee Grounds Container symbol
u Water Tank symbol
4 WiFi symbol
£ Ground Coffee symbol
s s s £
4
s
i
fo
!ü
L
u
&
Bean container with aroma
preservation cover
Grinding wheel
On/Off button Q
Water tank (with cover)
Height-adjustable coffee spout
Coffee grounds container
Cup platform
Drip tray
Insert for drip tray
Mains cable (back of the machine)
Service socket for optionally available
JURA WiFi Connect and JURA Smart
Connect
Powder chute for ground coffee
Filler funnel for ground coffee
Measuring spoon for ground coffee

Preparing and using for the first time
When setting up your ENA, please note the following:
UPlace the ENA on a horizontal surface that is not sensitive to
water.
UChoose a spot for your ENA which protects the machine
against overheating. Ensure that the ventilation slots are not
covered.
The bean container has an aroma preservation cover. This will ensure
that your coffee beans retain their aroma for longer.
Coffee beans which have been treated with additives (e.g. sugar),
ground coffee or freeze-dried coffee will damage the grinder.
T Only use roasted, untreated coffee beans to fill the bean
container.
T Remove the aroma preservation cover.
T Remove any dirt or foreign objects from inside the bean
container.
T Fill the bean container with coffee beans and close the aroma
preservation cover.
When you use the machine for the first time, you must set the water
hardness. If you do not know the hardness of your water, you can
find this out first. Use the Aquadur® test strips supplied with the
machine.
T Hold the test strip under flowing water for one second. Shake
off the water.
T Wait for about minute.
T You will then be able to read the degree of water hardness from
the discoloration of the Aquadur® test strip and the description
on the packaging.
Setting up the machine
Filling the bean container
NOTICE
Determining the water
hardness

Preparing and using for the first time
en
fr
es
pt
Level Display German
Degree (°dH)
Degrees of general
hardness (°dGH)
Parts per
million (ppm)
Indicator Strip number
of ‘reddish’fields
Not active – – – –
Very soft water < < < . None
Soft water > > >
Hard water > . > . >
Very hard water > > >
If the machine is operated with a defective power cord, there is a
danger of potentially fatal electric shock.
T Never use a machine which is damaged.
T Never use a machine which has a defective power cord.
Milk, sparkling mineral water or other liquids can damage the
water tank or the machine.
T Only fill the water tank with fresh, cold water.
Precondition:The bean container has been filled.
T Insert the power plug into a power socket.
T Press the On/Off button Q.
EThe number of symbols that are brightly lit up indicates the
water hardness level: -°dH(s), -°dH(ss),
-°dH(sss) and -°dH (sss£).
EIf you do not know the hardness of your water, you can find
this out first (see chapter ‘Preparing and using for the first
time – Determining the water hardness’).
T Press the i/obutton to set the water hardness.
T Press the sbutton to confirm the setting.
The !and usymbols appear.
T Remove the water tank.
T Fit the filter cartridge extension supplied on top of the CLEARYL
Smart mini filter cartridge.
First-time useFirst-time use
J WARNING
NOTICE

Preparing and using for the first time
T Insert the filter cartridge with its extension into the water tank.
T Fill the water tank with fresh, cold water and reinsert the tank.
T Place a receptacle under the coffee spout.
EThe machine automatically detects that you have just
inserted the filter cartridge.
Water flows out of the coffee spout, the filter is rinsed.
The üsymbol appears.
T Empty the drip tray and coffee grounds container and put them
back into the machine.
Your ENA is ready for use.
click! click!
Preparation
Hot coffee, hot steam and hot water can cause scalding. Scalding
is a serious burn.
T Use extreme care when handling hot liquid or steam.
T Allow liquid to cool down before drinking.
T In the event of scalding, rinse affected area with cold water and
seek medical attention.
T Keep children AWAY.
Basic information about preparing drinks:
Aim What to do
Select coffee
strength
Press the sbutton x for ‘mild’ , x for
‘normal’ and x for ‘strong’ before or
during grinding (the ENA will remember
the most recently selected option for the
next preparation)
Cancel preparation Press any button
EAll specialty coffees made with coffee beans can be ordered
using the JURA app (J.O.E.®).
EIf no action is performed on the ENA for minutes, the
symbol display goes dark. However, the ENA remains ready
for use.
J WARNING

Preparation
en
fr
es
pt
Coffee tastes best served hot. A cold porcelain cup cools the
beverage – and impairs the taste. We therefore recommend
prewarming the cups. You can purchase a JURA Cup Warmer
from your specialized dealer.
Example:Coffee
T Place a cup under the coffee spout.
T Press the obutton.
The preset amount of water for coffee flows into the cup.
Example:Two espressi
T Place a cup under the coffee spout.
T Press the ibutton x.
ETwo brewing operations take place one after the other.
Change the cup before the second brewing operation.
ETo prepare two coffees, press the obutton x.
The preset amount of water for espresso flows into the cup.
It is easy to make permanent settings for the amount of water for all
specialty coffees according to the cup size. Adjust the amount once
as shown in the following example. Every time you prepare a drink
in the future, this amount of water will be dispensed.
The process for permanently adapting the amount of water to the
cup size is the same for all specialty coffees.
Example: Proceed as follows to permanently set the amount of
water for one coffee.
T Place a cup under the coffee spout.
T Press the obutton for about seconds.
The coffee flows into the cup.
T Press any button as soon as there is sufficient coffee in the cup.
Preparation stops. The set amount of water for one coffee is
permanently stored.
EYou can alter this setting at any time by repeating the above
procedure.
Espresso and coffee
Two espressi and two
coffees
Permanently setting the
amount of water for the cup
size

Preparation
You can adjust the grinder to suit the degree of roast of your coffee.
If you adjust the consistency of grind when the grinder is not
operating, the grinding wheel could be damaged.
T Only adjust the consistency of grind when the grinder is in
motion.
EThe consistency of grind is correct if the coffee flows
regularly from the coffee spout. In addition a fine, thick
crema forms.
Grinding wheel
U: Coarse consistency of grind setting
U: Fine consistency of grind setting
Example: Proceed as follows to change the consistency of grind
during the preparation of an espresso.
T Place a cup under the coffee spout.
T Press the ibutton.
T Turn the grinder adjustment wheel to the desired position while
the grinder is in motion.
The preset amount of water flows into the cup.
You can choose to use a second coffee variety, for example
decaffeinated coffee, with the filter funnel for ground coffee.
Basic information about ground coffee:
UNever add more than one level measuring spoon of ground
coffee.
UUse ground coffee which is not ground too finely. Very fine
coffee can block up the system so that the coffee only comes
out in drips.
UIf you did not fill the machine with enough ground coffee,
the £symbol flashes and the ENA stops the operation.
UThe desired specialty coffee must be prepared within
approximately one minute after filling with the ground coffee.
Otherwise the ENA stops the operation and is once more ready
for use.
UAll specialty coffees with ground coffee are always prepared
following the same model.
Example:Proceed as follows to prepare one espresso using ground
coffee.
T Place an espresso cup under the coffee spout.
Adjusting the grinder
NOTICE
12
Ground coffee

Preparation
en
fr
es
pt
T Keep pressing the sbutton until the £symbol lights up
brightly on the symbol display.
T Open the powder chute for ground coffee.
T Fit the filler funnel for ground coffee.
T Place one level measuring spoon of ground coffee into the filler
funnel.
T Remove the filler funnel and close the cover of the powder
chute.
T Press the ibutton.
The preset amount of water for espresso flows into the cup.

Daily operation
Daily operation
T Place a receptacle under the coffee spout.
T Press the On/Off button Q.
EWhen the machine is switched off, the system is only rinsed
if a specialty coffee has been prepared.
The system rinses itself. Your ENA is switched on or off.
Daily maintenance of the machine and hygiene when handling cof-
fee and water are key to a perfect coffee result in the cup every time.
You should therefore change the water daily.
Milk, sparkling mineral water or other liquids can damage the
water tank or the machine.
T Only fill the water tank with fresh, cold water.
T Remove the water tank and rinse it with cold water.
T Fill the water tank with fresh, cold water and reinsert the tank.
Optimal coffee quality depends on many factors. One important
prerequisite is regular maintenance of your ENA. Perform the
following steps:
Maintenance action Daily If necessary Note
Empty the drip tray and coffee grounds
container and rinse with warm water
(The drip tray and coffee grounds
container are dishwasher-safe, but the
insert for the drip tray is not)
x Always empty the coffee
grounds container when the
machine is switched on. This
is the only way of resetting
the coffee grounds counter.
Rinse the water tank x –
Wipe the surface of the machine with a
clean, soft, damp cloth (e.g. microfiber
cloth)
x –
Clean the inside of the water tank with a
brush
x –
Clean the top and bottom of the cup
platform
x –
Switching the machine on
and off
Filling the water tank
NOTICE
Maintenance actions

Permanent settings in programming mode
en
fr
es
pt
Permanent settings in programming mode
In programming mode you can set the switch-off time and water
hardness. Press the fbutton to enter programming mode. Press
the fbutton again to exit this mode.
EYou can use the JURA app (J.O.E.®) to select in what fill range
the Pulse Extraction Process P.E.P.®and intelligent preheating
are enabled (Intelligent Assistant).
By instructing your ENA to automatically switch itself off, you can
cut down your energy consumption. If this function is activated,
your ENA switches off automatically after the preset time following
the last action on the machine.
EIf no action is performed on the ENA for minutes, the
symbol display goes dark. However, the ENA remains ready
for use.
The number of symbols that are brightly lit up indicates the
activated switch-off time:
Switch-off time Symbol(s) shown in display
minutes s
hour ss
hours sss
hours sss£
Example: Proceed as follows to change the switch-off time from
minutes to hour.
T Press the fbutton.
The &symbol lights up brightly.
T Press the obutton several times until the üsymbol lights up
brightly.
T Press the sbutton to enter the program item.
T Press the i/obutton to change the setting for the switch-off
time.
Press the sbutton to confirm the setting.
EThe setting must be confirmed within seconds.
The sss£ symbols flash times in quick succession.
EThe automatic switch-off can also be set using the JURA app
(J.O.E.®).
Automatic switch-off

Permanent settings in programming mode
The harder the water is, the more frequently the ENA needs to
be descaled. It is therefore important to set the water hardness
accurately.
The water hardness was set when the machine was first used. You
can change this setting at any time.
The number of symbols that are brightly lit up indicates the set
water hardness level:
Water hardness Symbol(s) shown in display
–°dH s
–°dH ss
–°dH sss
–°dH sss£
T Press the fbutton.
The &symbol lights up brightly.
T Press the obutton several times until the usymbol lights up
brightly.
T Press the sbutton to enter the program item.
T Press the i/obutton to change the setting for the water
hardness.
Press the sbutton to confirm the setting.
EThe setting must be confirmed within seconds.
The sss£ symbols flash times in quick succession.
Setting the water hardness

Maintenance
en
fr
es
pt
Maintenance
Use of maintenance products that are harmful to health and
discharge of liquids during maintenance program. Harmful if
swallowed. Irritating to eyes and skin.
T Keep children AWAY.
T Keep children away from the machine while it is performing a
maintenance program.
T Avoid contact with skin and eyes.
T Avoid generation of dust. Do not inhale dust.
T When using do not eat or drink.
T Keep maintenance products away from food, drink and
animal food.
T Keep container tightly closed and dry. Keep in a cool place.
Your ENA has the following integrated maintenance programs:
UCleaning the machine (L)
UDescaling the machine (&)
EProceed with the maintenance programs when prompted to
do so.
Once the filter cartridge stops working (depending on the water
hardness setting), the ENA will prompt you to change the filter.
EYour ENA no longer has to be descaled if you are using the
CLEARYL Smart / Smart mini filter cartridge.
ECLEARYL Smart / Smart mini filter cartridges are available
from specialized dealers.
Precondition:Your ENA is ready for use. The Filter symbol !lights
up (if the filter capacity is used).
T Remove and empty the water tank.
T Remove the used filter cartridge from the water tank.
J WARNING
Inserting/changing the filter
1
2

Maintenance
T Fit the filter cartridge extension on top of a new CLEARYL
Smart / Smart mini filter cartridge.
T Insert the filter cartridge with its extension into the water tank.
T Fill the water tank with fresh, cold water and reinsert the tank.
The machine automatically detects that you have inserted/
changed the filter cartridge.
The filter is rinsed.
The üsymbol lights up.
T Empty the drip tray and coffee grounds container and put them
back into the machine.
After preparations or switch-on rinses, the ENA will prompt
you to clean it.
Non-recommended (e.g. liquid) cleaning agents may contain
substances that could damage the machine or leave residues.
T Use only original JURA cleaning tablets. These are formulated
especially for your machine.
Harmful and irritating cleaning agent. Harmful if swallowed.
Irritating to eyes and skin.
T Keep children AWAY.
T Avoid contact with skin and eyes.
T Avoid generation of dust. Do not inhale dust.
T After contact with skin, wash immediately with plenty of water.
In case of skin irritation, seek medical advice.
T After eye contact, immediately flush eyes with plenty of water
and seek medical advice.
T If swallowed, rinse mouth immediately and drink large
quantities of water. Do not induce vomiting. Seek medical
advice immediately and show label.
EThe cleaning program lasts approximately minutes.
EDo not interrupt the cleaning program. The quality of
cleaning will be impaired if you do so.
EJURA cleaning tablets are available from specialized dealers.
click! click!
Cleaning the machine
J WARNING
J WARNING
Other manuals for ENA 4
2
This manual suits for next models
1
Table of contents
Other Jura Coffee Maker manuals

Jura
Jura E6 User manual

Jura
Jura IMPRESSA C5 Installation guide

Jura
Jura GIGA X3C User manual

Jura
Jura S8 User manual

Jura
Jura GIGA 5 User manual

Jura
Jura cool control User manual

Jura
Jura J90 User manual

Jura
Jura GIGA X8 Professional User manual

Jura
Jura IMPRESSA F7 User manual

Jura
Jura IMPRESSA S9 User manual