TOOL WAREHOUSE WT02F1074 User manual

SAVE THESE INSTRUCTIONS AND PRECAUTIONS.
READ ALL PRECAUTONS AND INSTRUCTIONS BEFORE USE.
18V LI-ION CORDLESS
GREASE GUN
WT02F1074

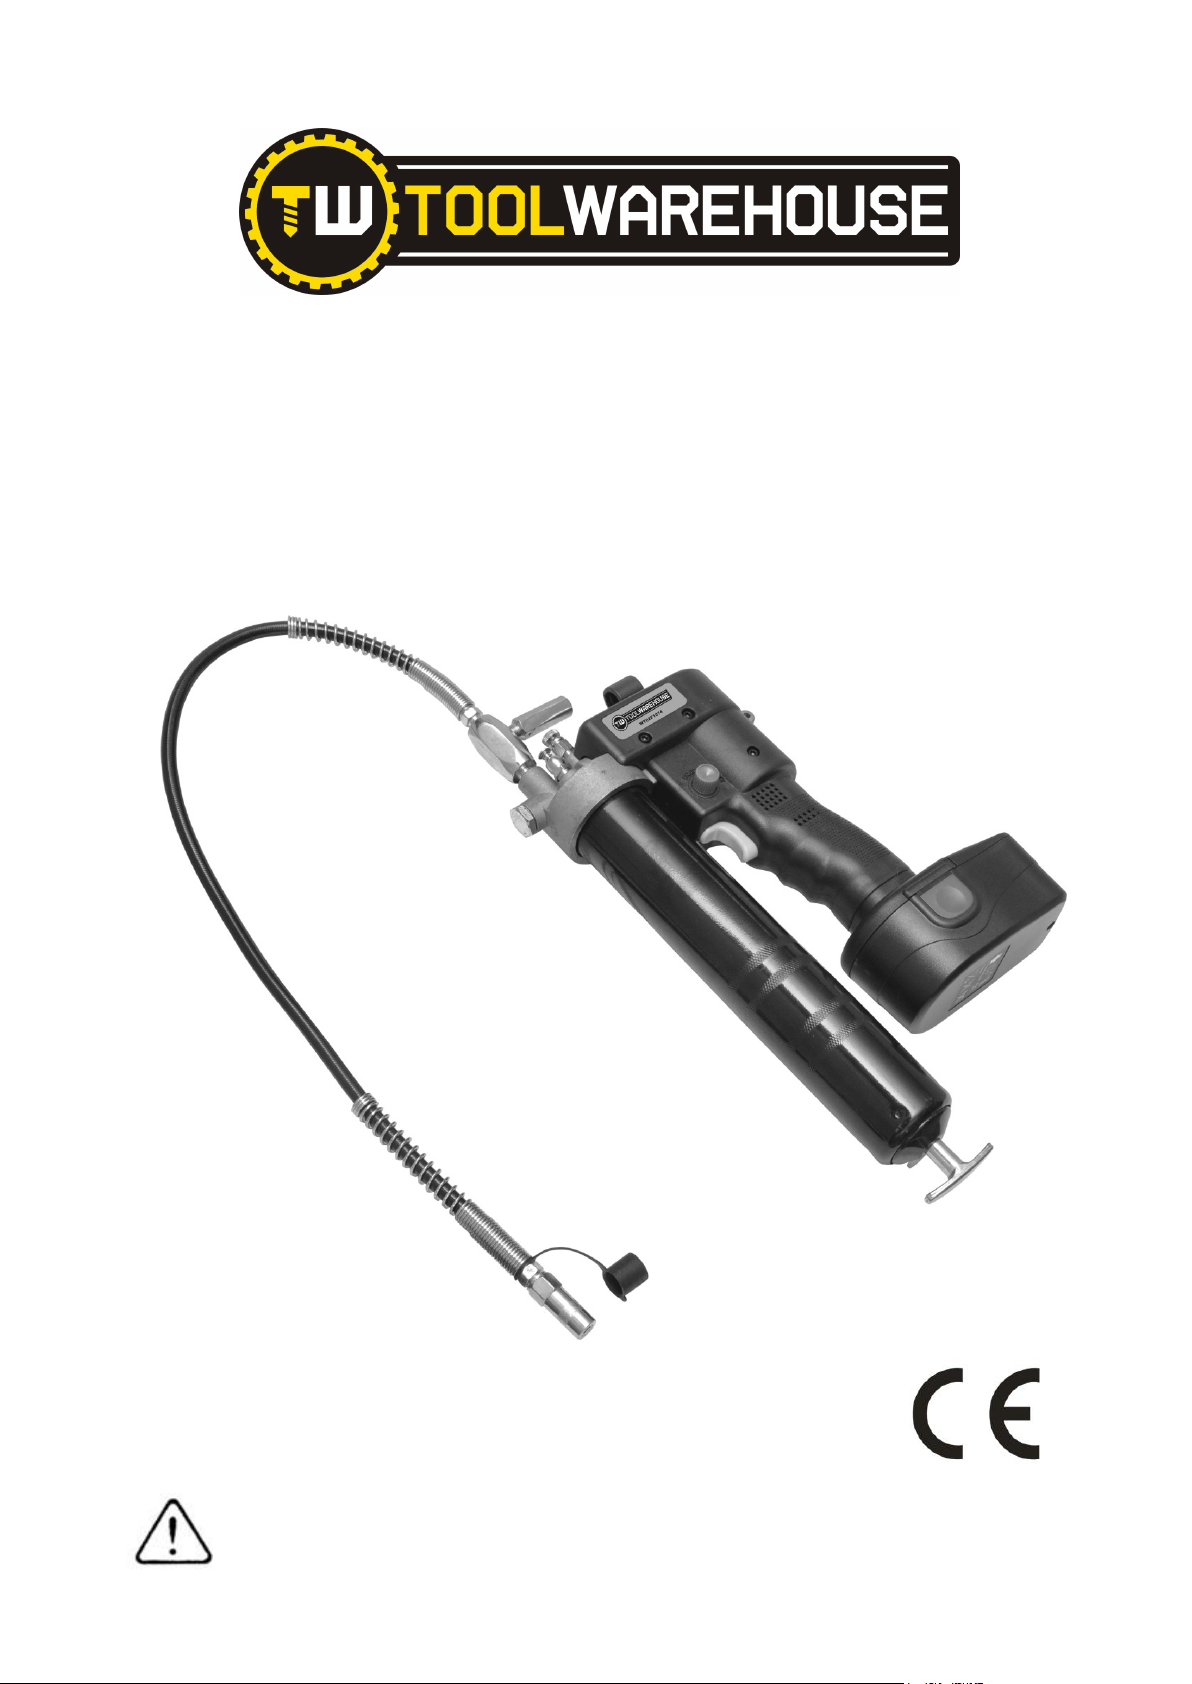
GENERAL SAFETY INSTRUCTIONS
Carefully read these operating instructions thoroughly before unpacking and operating this Rechargeable
Grease Gun.
•A battery operated Rechargeable Grease Gun with a separate battery pack must be recharged only with
the specified battery charger. A charger that may be suitable for one type of battery may create a risk of
fire when used with another battery. Use this battery operated tool only with the specifically designed
battery pack. Use of any other batteries may create a risk of fire. Batteries are shipped in an uncharged
state. Charge batteries for 1 hourbefore first use.
•Do not operate power tools in explosive atmospheres, such as in the presence of flammable liquids, gases
or dust. The Rechargeable Grease Gun can create sparks which may ignite the dust or fumes. Keep
bystanders, children and visitors away during operation. Distractions can cause you to make mistakes.
•Do not use the battery charger in damp or wet locations.
•Always use safety glasses and gloves for protection during operation. The Rechargeable Grease Gun can
generate up to 8000 psi. Grease injection injuries are a very serious injury. Avoid accidental starting. Be
sure the switch is not depressed when inserting battery pack. Do not bend the hose so that it becomes
kinked.
•Do not continue to hold down trigger if the grease gun is stalled. This could damage the motor or cause
fire. When battery pack is not in use, keep it away from other metal objects like: paper, clips, coins, keys,
nails, screws or other small metal objects that can make a connection from one terminal to another.
Shorting battery terminals together may cause sparks, burns, or a fire. Use only accessories that are
recommended for use with the Rechargeable Grease Gun. This tool is a fully rated portable power
lubrication product. Only accessories that are capable or handling 8000 psi should be used.
•Service must be performed only by qualified service personnel. Service or maintenance performed by
unqualified personnel may result in a risk of injury. When servicing this Rechargeable Grease Gun, use
only same replacement parts. Use of unauthorized parts may create risk of injury and will void the
warranty.
•Visually inspect for damaged, loosen or missing parts. If equipment is worn or damaged, remove from
service. Contact sales for damage assessment or repair.
SAFETY INSTRUCTIONS FOR CHARGER & BATTERY
This section of the manual contains important safety and operating instructions for the charger.
Before using a battery charger, read all instructions and cautionary markings on the battery pack, battery
charger, battery and rechargeable grease gun.
•Do not expose charger to rain, snow or frost.
•Do not pull on or otherwise abuse cord. Never pull charger by the cord when disconnecting charger. Have
damaged or worn power cord replaced immediately.
•Do not attempt to repair the power cord. Make sure cord is located so that it will not be stepped on, tripped
over, or otherwise subjected to damage or stress.
•Do not operate charger with a damaged cord or plug. Have the cord replaced immediately to avoid a
hazard. Do not attempt to repair the power cord.
•Do not operate the charger if it has received a sharp blow, been dropped, or otherwise damaged in any
way. Take it to a qualified serviceman for repair.
•Do not disassemble the charger or the battery pack. Take it to a qualified serviceman when service or
repair is required.Incorrect reassembly may result in risk of electrical shock or fire.
•Unplug charger from outlet before attempting any maintenance or cleaning to reduce risk of electrical
shock.
•Charge the battery pack in a well ventilated place. Do not cover the charger and battery while charging.
•Do not store the charger or battery packs in locations where the temperature may reach or exceed 50C°
(122°F). This can lead to deterioration of the batteries.
•Do not charge the battery pack when temperature is below 0°C (32°F) or above 40°C (104°F). This is very
important for proper operation.
•Do not incinerate battery pack as it can explode in a fire.
•Extremely high temperatures could cause personal injury or fire.
•Do not charge battery in damp or went locations.
•Do not short across the terminals of the battery pack.
2

OPERATION
Prime the rechargeable greasegun after each refill or grease cartridge change. Primethe gun before
using it to lubricate grease points.
CAUTION
Air pockets in the lubricant cartridge will cause the gun to lose its prime.
To prime, operate the gun until grease flows from the hose.
Otherwise, you can use the vent valve and the release grease valve to expel air pockets.
CHARGER OPERATION CHARGING THE BATTERY PACK
Before using your rechargeable grease gun for the first time, the battery pack should be charged for a
minimum of 1 hour. If the battery pack is already installed in the rechargeable grease gun, removeit by
following the instructions under installing or removing battery pack. As the battery packapproaches the
dischargedstate, you will notice a sharp drop in tool performance. When the tool is unable to perform the
task at hand, it is time to recharge the battery pack. Recharging the battery pack before this condition is
reached will reduce the total worklife of the pack. Dischargingthe pack beyond this point can damage the
pack.
NOTE:Batterytemperature will increaseduring and shortly after use. Batteries may not accept a full
charge if they are charged immediately after use. Allow the battery pack to cool to room temperature
before charging for best results.
CAUTION
Vent slots in top and bottom of the charger must not be obstructed.
Do not charge the battery pack when temperature is below 0°C (32°F) or above 40°C (104°F).
Normal charging
Make sure the power circuit voltage is the sameas that shown
on the charger specification plate, than connect to power source.
Removing the batterypack
Depress the twobattery release buttons (one button on each
side of battery pack)and pull the battery pack from the grease
gun.
Installing the battery pack
Align battery pack with opening in handle, and pushbattery pack
into handle until it locks into place.
REMOVING EMPTYGREASE CARTRIDGE
1. Pull back on the follower handle until follower rod is fully extended and latched onto the locking lever.
2. Unscrew the grease tube assemblyfrom the rechargeable grease gun.
3. Press the locking lever and carefully release the follower handle to eject the empty cartridge from
container tube.
INSTALLING GREASECARTRIDGE
1. Pull back on the follower handle until the follower rod is fully extended and latched onto the locking
lever.
2. Removethe plastic cap from the grease cartridge and insert cartridgeinto the container tube.
3. Removethe pull tab from the grease cartridge and screw greasetube assemblyinto pump assembly.
4. Press the locking lever to release the follower rod. Purge air from pump. See AIR PURGING
instructions.
3

HOW TO READ THE BATTERY CAPACITY DISPLAY
The LCD display shows the battery capacity whenever the button is pressed. It has
5 segments, each one representing 20% of the full capacity, i.e. three segments lit in the LCD display
indicates the battery is at 60% of its charge (See Figure 1).
BATTERY CAPACITY DISPLAY (Figure 1) LOCKING TRIGGER (Figure 2)
HOW TO USE THE SELF-LOCKING TRIGGER
There is a chance of getting the trigger pressed by children or something else when the grease gun is
being transported or just not being used. The grease gun could then be accidentally activated, spilling
grease all over. To avoid this, turn the button position from “Unlock” to “Lock” (See Figure 2).
NOTE: Do not press the trigger when the button is in the "Lock" position, this could destroy the self-
locking device.
HOW TO FILL THEGUN FROM A BULK CONTAINER
1. Remove pump assembly from grease tube assembly.
2. Pack lubricant into cavity of the pump assembly.
3. Insert the open end of the grease tube assembly into lubricant. Slowly pull the follower handle
back while pushing the grease tube assembly deeper into the lubricant to prevent air pockets
from being pulled into the grease tube assembly. (See Figure 3)
4. When the follower rod is fully extended, it will latch onto the locking lever.
5. Loosely assemble the pump assembly to the grease tube assembly. Press the locking lever while
pushing the follower rod into the grease tube assembly. Slowly unscrew the grease tube
assembly from the pump assembly until lubricant oozes from the interface. Tighten grease tube
assembly into the pump assembly.
Trigger
Locking Button
Battery Capacity LCD Display
Vent Valve
4

Figure 3 Figure 4
HOW TO FILL THE GUN WITH A FILLER PUMP
Insert the gun filler nipple into the filler pump socket. Operate the filler pump tofill the container. Stop the
filler pump when the follower rod extendsto approximately 8 inches (20 cm). (See Figure 4)
Push the follower rod into the grease tube assembly by pressing the locking lever.
HOW TO EXPEL AIR POCKETS
Withdraw the follower rod from the grease tube assembly cap and engage it with the follower by rotating
the follower handle. Exert force on the follower handle while holding down the vent valve.
Pull the trigger in short bursts to operate gun until trapped air is expelled. Disengage the follower rod from
the follower by rotating the follower handle. Push the follower rod into the grease tube assembly.
If step 2 fails, you can adjust the screw inside the grease release valve, then both grease and air will be
expelled.
ASSEMBLY AND MAINTENANCE NOTES (see figures 5 and 6)
It is also normal for lithium ionsbatteries to gradually lose their power retention capacity over hundreds of
charge cycles. When this happens, replacement of the battery pack will be required.
The motor polarity is important, the positive (red wire) must be connected tothe positive terminal on the
motor, which is identified with the small plastic dot next to it.
The green ground wire must be secured underthe motor mounting screw.
ITEM
(1) Battery
(2) Battery Release Button
(3) Handle Assembly
(4) Trigger
(5) Locking Button
(6) Display
(7) Grease Release Valve
(8) Pump Assembly
(9) Flexible Hose
(10) Grease Tube Assembly
(11) Grease Nipple Coupler
(12) Follower Handle
(13)Locking Lever
Figure 5
LCD Display Grease
Release
Valve
Filler
Nipple
5

Figure 6
ITEM
(1) Interference Blanker
(2) Motor Kit
(3) Gear Assembly Kit
(4) Yoke Block
(5) Plunger
(6) Grease Release Valve
(7) Filler Nipple
(8) Vent Valve
(9) Circuit Breaker
(10) Jiggle Switch
(11) Button
(12) Check Valve Kit
(13) Battery Capacity Display
TROUBLESHOOTING
CONDITION POSSIBLE CAUSE CORRECTIVE ACTION
Motor failsto run •Battery needs recharging
•Faulty wiring to motor
•Recharge battery
•Remove battery, disassemble
handle and check wiring for
loose connections
Pressure relief valve opensto
discharge grease
•Blocked line
•Blocked bearing
•Blocked grease fitting
•Check lines, brazing and
grease fitting to remove or
clean obstructions
Grease Gun failsto dispense
grease
•Grease tube assembly is out of
grease
•Loss of prime
•Ball check (item # 12) is not
functioning. (See Figure 6)
•Check that the container has
grease
•Repeat priming operation.
•Remove item #12, clean and
inspect ball seat area
Grease Gun continuesto lose
prime
•Air may be trapped in several
locations in container after bulk
filling
•Follower may be binding in
grease tube assembly
•Empty grease tube assembly,
refill and repeat priming
operation
•Replace container (item # 10)
(See Figure 5)
Battery failstotake a charge •Charger may not have power
•Battery may be bad
•Check that the AC outlet or the
DC car socket has power.
•Replace battery
ENVIRONMENTAL PROTECTION
Recycle unwanted materials instead of disposing of them as waste. All tools, accessories
and packaging should be sorted, taken to a recycling centre and disposed of in a manner
which is compatible with the environment.
DISPOSAL
Do not dispose battery in household waste.
Batteries should be disposed of in a responsible manner, they must be disposed at
appropriate collection point.
6
Table of contents
Other TOOL WAREHOUSE Tools manuals
Popular Tools manuals by other brands

Powerfix Profi
Powerfix Profi PFRS 1.5 A1 operating instructions

Cessna
Cessna T182 1982 Pilot operating handbook

CLEAN ROOM DEVICES
CLEAN ROOM DEVICES CRD 410 Operation manual

ITATOOLS
ITATOOLS ITA40 Operation manual and spare parts list

Rockler
Rockler JIG IT 50713 Guide Instructions

Toro
Toro 22520 Operator's manual