manuals.online logo
Brands
  1. Home
  2. •
  3. Brands
  4. •
  5. QuikDrive
  6. •
  7. Tools
  8. •
  9. QuikDrive QD PRO175G2 User manual

QuikDrive QD PRO175G2 User manual

IMPORTANT SAFETY INSTRUCTIONS
READ AND FOLLOW ALL INSTRUCTIONS
WARNING - When using electric tools, basic safety precautions should always
be followed to reduce the risk of fire, electric shock and personal injury,
including the following:
WHEN SERVICING USE ONLY IDENTICAL QUIK DRIVE®REPLACEMENT PARTS.
1. POLARIZED PLUG. If your screwgun has a polarized plug (one blade is wider
than the other) it will fit into a polarized outlet only one way. If the plug does not
fit fully in the outlet, reverse the plug, if it still does not fit, contact a qualified
electrician to install the proper outlet. Do not change the plug in any way.
2. KEEP WORK AREA CLEAN. Cluttered areas and benches invite injuries.
3. AVOID DANGEROUS ENVIRONMENT. Don’t expose power tools to rain. Don’t use
power tools in damp or wet locations. Keep area well lit. Avoid chemical or cor-
rosive environment. Do not use tool in presence of flammable liquids or gases.
4. GUARD AGAINST ELECTRIC SHOCK. Prevent body contact with grounded surfaces.
For example; pipes, radiators, ranges, refrigerator enclosures.
5. KEEP CHILDREN AWAY. Do not let visitors contact tool or extension cord. All
visitors should be kept away from work area.
6. STORE IDLE TOOLS. When not in use, tools should be stored in dry, and high or
locked-up place - out of reach of children.
7. DON’T FORCE TOOL. It will do the job better and safer at the rate for which it was
intended.
8. USE RIGHT TOOL. Don’t force a small tool or attachment to do the job of a heavy
duty tool. Use the tool for it’s intended purpose only. For example; don’t use a cir-
cular saw for cutting tree limbs or logs.
9. DO NOT ALTER THE TOOL Don’t remove any parts from the tool.
10. DRESS PROPERLY. Do not wear loose clothing or jewelry. Loose clothing, draw
strings and jewelry can be caught in moving parts. Rubber gloves and non-skid
footwear are recommended when working outdoors. Wear protective hair cover-
ing to contain long hair.
11. USE SAFETY GLASSES. Wear safety glasses or goggles while operating power
tools. Also face or dust mask if operation creates dust.
12. DON’T ABUSE CORD. Never carry tool by cord or yank it to disconnect from
receptacle. Keep cord from heat, oil, and sharp edges. Have damaged or worn
power cord and strain reliever replaced immediately. Do not attempt to repair
power cord.
13. SECURE WORK. Use clamps or a vise to hold work. It’s safer than using your
hand and it frees both hands to operate tool.
14. DON’T OVERREACH. Keep proper footing and balance at all times.
15. DISCONNECT TOOLS when not in use, before servicing, and when changing
accessories.
16. MAINTAIN TOOLS WITH CARE. Keep tools sharp and clean for better and safer
performance. Follow instructions for lubricating and changing accessories.
Inspect tool cords periodically and if damaged, have repaired by authorized serv-
ice facility. Inspect extension cords periodically and replace if damaged.
17. REMOVE ADJUSTING KEYS AND WRENCHES. Form habit of checking to see that
keys and adjusting wrenches are removed from tool before turning it on.
18. AVOID UNINTENTIONAL STARTING. Do not carry a tool with finger on switch. Be
sure switch is off when plugging in.
19. EXTENSION CORDS. Make sure your extension cord is in good condition. When
using an extension cord, be sure to use one heavy enough to carry the current your
product will draw. An undersized cord will cause a drop in line voltage resulting
in loss of power and overheating.IF IN DOUBT USE NEXT HEAVIER GAUGE.
A smaller number indicates a heavier gauge.
20. OUTDOOR USE EXTENSION CORDS. When tool is used outdoors, use only exten-
sion cords marked “Suitable for use with outdoor appliances - store indoors when
not in use.
21. STAY ALERT. Watch what you are doing. Use common sense. Do not operate
tool when you are tired.
22. CHECK DAMAGED PARTS. Before further use of the tool, a guard or other part
that is damaged should be carefully checked to determine that it will operate
properly and perform its intended function. Check for alignment of moving parts,
binding of moving parts, breakage of parts, mounting, and any other conditions
that may affect its operation. A guard or other part that is damaged should be
properly repaired or replaced by an authorized service center unless otherwise
indicated elsewhere in this instruction manual.
23. REPAIRING TOOL. Any repairs to electric tools should only be performed by
qualified personnel. To keep your Quik Drive operating most efficiently only use
original Quik Drive parts for repair.
SAVE THESE INSTRUCTIONS
OPERATING INSTRUCTIONS
QD PRO175G2, QD PRO200G2, QD PRO250G2
The Leading AutoFeed Screw Driving System - Worldwide
AUTOFEED SCREW SYSTEMS OPERATING INSTRUCTIONS
ATTACH DRIVING UNIT TO SCREWGUN
OR EXTENSION
Insert drive shaft in extension or screwgun,
slide driving unit on and push tight - until
the locking lever snaps in place. You can
turn it any way that is comfortable for the
way you work. New tools may be tight and
hard to get locked on at first. If so, just put
the nose against a solid surface and push
down sharply. NOT locked in locked in
depress at top of
tool to release
place nose on
solid surface and
push down to seat
new tool
check locking lever position to be sure
driving unit is locked on
seat the drive shaft
first, then add
driving unit
flush with
side of tool
flush with
top of tool
use with or without
the “stand-up”
extension
ATTACH ADAPTOR TO YOUR SCREWGUN
Remove nosecone from your DeWalt,
Milwaukee, or Makita screwgun according
to manufacturers directions (most will pull
straight off). Replace with the Quik Drive
adaptor made for your screwgun and
thread it on. Tighten allen set screws if
available. replace with the appropriate adaptor
(tighten set screw on DeWalt and Milwaukee)
remove the nosecone from
your screwgun
If you purchased a complete system, with screwgun, skip this step
ATTACH EXTENSION TO SCREWGUN
Turn the clamping handle in the “off” direction until the internal
clamp is out of the way.
Insert the screwgun with adaptor in place, into the end of the
extension. Push tight and tighten clamping handle. If it won’t
fully insert, rev the screwgun for a second until the drives mesh.
internal
clamp
hex end of
extension
drive shaft
clamping handle
turn to open clamp
screw release lever (silver) -
push down to unload
LOAD SCREWS
Insert a clip of screws pointed end first, until they click in
place.
To unload a clip, push down on the release lever.
pointed end first
INSTALL CORRECT BIT Be sure you have the correct bit for the screws
you are driving. It’s a good practice to install one of the free bits
included with our screws when you open a new box.
Remove the driving unit, pull the drive shaft from the unit. Extend the
bit wrench and pry the bit out.
Put a new bit in place and push against a solid surface until it snaps in
place.
Insert end of
bitwrench into
slot and pry bit out
WSNTL SERIES #9 wood screw, twin thread, sharp point,
countersink nibs, yellow zinc for interior use only, #3 sq. drive
13⁄4”
LENGTHS AVAILABLE
• ICBO 5053 - 2”, 21⁄2” lengths
• Drive 42% faster than single thread screws
• Ideal for high density OSB
• 2” length is The Approved Fastener for
2” 21⁄2”3”
11⁄4” 15⁄8”LENGTHS AVAILABLE
PPSD11516S #8 wood to steel screw, fine thread, #2 drill point, flat
head, yellow zinc coating for interior use only, #2 sq. drive
115⁄16”
LENGTH AVAILABLE
• Engineered to prevent floor material
(up to 3/4”) from “riding-up” the threads
DWC SERIES #6 drywall screw, coarse, sharp point, bugle head,
grey phosphate finish, phillips drive
11⁄4” 15⁄8”2” LENGTHS AVAILABLE
• Drywall to wood
DWF SERIES #6 drywall screw, fine thread, sharp point,
bugle head, grey phosphate finish, phillips drive
• Drywall to light (18-24 ga.) steel
11⁄4”15⁄8”LENGTHS AVAILABLE
DWFSD SERIES #6 drywall screw, fine thread, #2 drill point,
bugle head, clear zinc coating, phillips drive
• Drywall to heavy (12-16 ga.) steel
11⁄2”11⁄4”LENGTHS AVAILABLE
WSC SERIES #8 wood screw, 2/3 rolled, coarse thread,
sharp point, flat head, yellow zinc coating, #2 square drive
11⁄4”LENGTH AVAILABLE
MTH SERIES #7 underlayment screw, hi-lo thread, sharp point,
modified trim head w/ nibs, grey phosphate, #2 square drive
LENGTHS AVAILABLE 21⁄2”
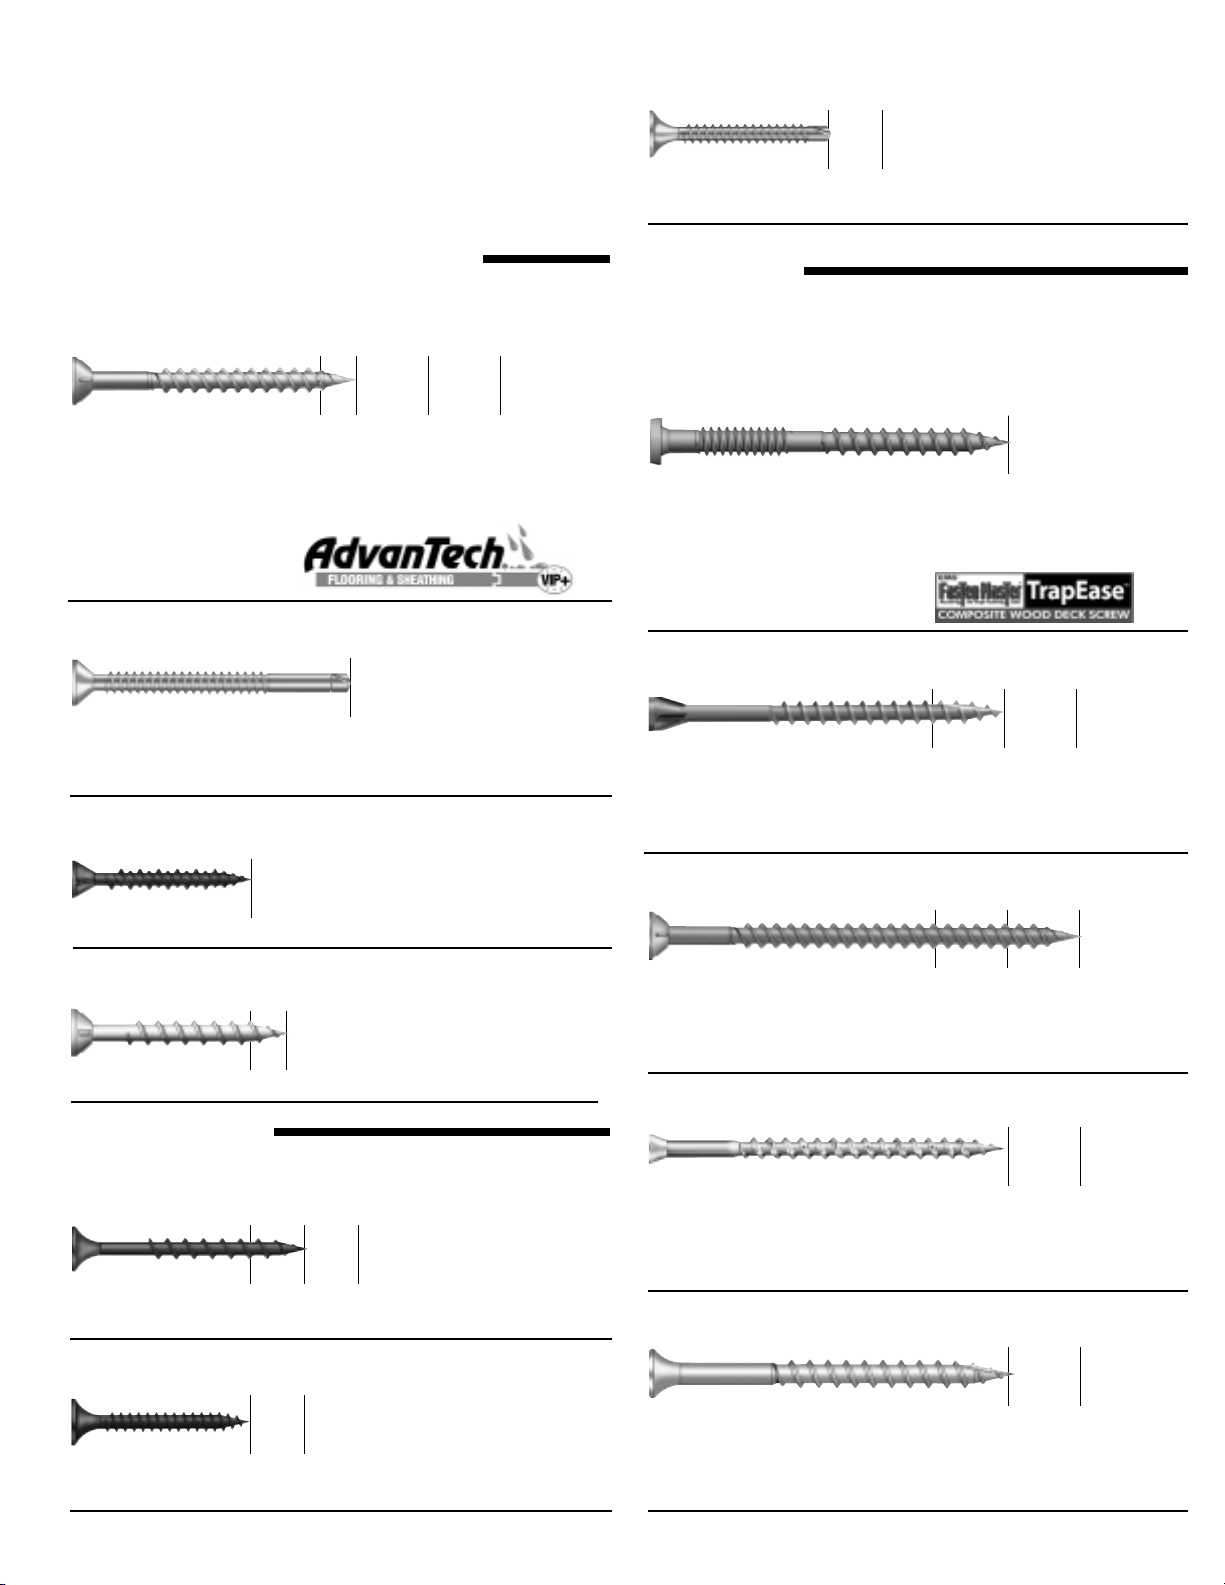
DCTE212S SERIES multi-diameter composite lumber screw,
multi-layer engineered plating, #2 square drive
• Eliminates “mushrooming” in composite deck lumber
• Multi-layer coating prevents bleeding and staining
• Available in 3 colors - tan, grey, red
• The only source for collated
TrapEase®screws
LENGTHS AVAILABLE 2” 21⁄2”3”
DTHG SERIES #8 trim head deck screw, coarse thread,
type 17 point, countersink nibs, QuikGard® coating, #2 sq. drive
• Type 17 point for easy, straight drive
• Trim head for neat appearance
• Surpasses 1000 hours salt spray cabinet testing
3”
LENGTH AVAILABLE 21⁄2”
SSDTH SERIES #7 stainless deck/dock screw, sawtooth thread,
sharp point, 18-8 stainless steel, #2 square drive
• Ultimate corrosion resistance
• Trim head for neat appearance
• Sawtooth threads reduce friction for easier driving
LENGTHS AVAILABLE 21⁄2”3”
SS3DSCB SERIES #10 stainless deck/dock screw*, coarse thread,
type 17 point, 18-8 stainless steel, #3 square drive
• Ultimate corrosion resistance
• Type 17 notched point for easier driving
LENGTHS AVAILABLE 2” 21⁄2”3”
WSNTLG SERIES #9 deck/dock screw, twin thread, sharp point,
countersink nibs, N2000®mechanical galvanized, #3 square drive
• Drive 42% faster than single thread screws
• Surpasses 1800 hours salt spray cabinet testing
• ICBO 5053 - 2”, 21⁄2” lengths
DECK SCREWS
Quik Drive deck/dock screws showed favorable results in
preliminary tests for use in ACQ treated lumber.
FLOOR/UNDERLAYMENT/WOOD SCREWS
DRYWALL SCREWS
MOST POPULAR SCREWS AVAILABLE FOR
QUIK DRIVE®FASTENING SYSTEMS
Your tool will not drive all lengths shown - check screw
length capacity before purchase

This manual suits for next models

2

Popular Tools manuals by other brands

HUBER+SUHNER 74 Z-0-23-16 operating instructions

HUBER+SUHNER

HUBER+SUHNER 74 Z-0-23-16 operating instructions

Bessey BV-HW45 user manual

Bessey

Bessey BV-HW45 user manual

LEGRAND 363292-01 Using

LEGRAND

LEGRAND 363292-01 Using

Sumake CB-32A manual

Sumake

Sumake CB-32A manual

Yost Vises RIA-4 manual

Yost Vises

Yost Vises RIA-4 manual

Sears CRAFTSMAN WOODWORKERS VISE 391.5195 owner's manual

Sears

Sears CRAFTSMAN WOODWORKERS VISE 391.5195 owner's manual

Sealey SM94/C instructions

Sealey

Sealey SM94/C instructions

Beta 1930PA user manual

Beta

Beta 1930PA user manual

Toyama TEA43X-PH-GII owner's manual

Toyama

Toyama TEA43X-PH-GII owner's manual

Black & Decker ATM100 instruction manual

Black & Decker

Black & Decker ATM100 instruction manual

Chicago Pneumatic P Operator's manual

Chicago Pneumatic

Chicago Pneumatic P Operator's manual

Kato TANGLESS COILTHREAD 2KRT Series instructions

Kato

Kato TANGLESS COILTHREAD 2KRT Series instructions

Lincoln 84432 instructions

Lincoln

Lincoln 84432 instructions

jbc NP105-A quick start guide

jbc

jbc NP105-A quick start guide

Festool Basis WRA 500 operating instructions

Festool

Festool Basis WRA 500 operating instructions

Würth VIKING ARM manual

Würth

Würth VIKING ARM manual

Au Tour du Béton Scoot How to use

Au Tour du Béton

Au Tour du Béton Scoot How to use

FRIATEC FWSG 710 L operating instructions

FRIATEC

FRIATEC FWSG 710 L operating instructions

manuals.online logo
manuals.online logoBrands
  • About & Mission
  • Contact us
  • Privacy Policy
  • Terms and Conditions

Copyright 2025 Manuals.Online. All Rights Reserved.