Toolshop 241-9*780 User manual

ACCESSORY SET
Operator’s Manual
ROTARY TOOL WITH 250 PIECE
SAVE THIS MANUAL
You will need this manual for safety instructions, operating procedures and warranty.
Put it and the original sales receipt in a safe dry place for future reference.
For questions about this product, Please call 1-866-915-8626
241-9780

2
GENERAL SAFETY RULES
WARNING: When using electric tools, machines or equipment, basic safety
precautions should always be followed to reduce the risk of fire, electric
shock, and personal injury.
!
1. WARNING
Read and understand all instructions. Failure to follow all instructions listed
below may result in electric shock , fire and/or serious personal injury.
SAVE THESE INSTRUCTIONS
2. Work Area
a. Keep your work area clean and well lit. Cluttered benches and dark
areas invite accidents.
b. Do not operate power tools in explosive atmospheres, such as in the
presence of flammable liquids, gases or dust. Power tools create sparks
which may ignite the dust or fumes.
c. Keep bystanders, children and visitors away while operating a power
tool. Distractions can cause you to lose control.
3. Electrical safety
a. Double insulated tools are equipped with a polarized plug (one blade
is wider than the other). This plug will fit in a polarized outlet only one
way. If the plug does not fit fully in the outlet, reverse the plug. If it still
does not fit, contact a qualified electrician to install a polarized outlet.
Do not change the plug in any way. Double insulation eliminates the
need for the three wire grounded power cord and grounded power supply system.
b. Avoid body contact with grounded surfaces, such as pipes, radiators,
ranges and refrigerators. There is an increased risk of electric shock if
your body is grounded.
c. Do not expose power tools to rain or wet conditions. Water entering a
power tool will increase the risk of electric shock.
d. Do not abuse the cord. Never use the cord to carry the tools or pull the
plug from an outlet. Keep cord away from heat, oil, sharp edges or
moving parts. Replace damaged cords immediately. Damaged cords
increase the risk of electric shock.
e. When operating a power tool outside, use an outdoor extension cord
marked “W-A”or “W”. These cords are rated for outdoor use and reduce
the risk of electric shock.
4. Personal safety
a. Stay alert, watch what you are doing and use common sense when
operating a power tool. Do not use tools while tired or under the
influence of drugs, alcohol or medication. A moment of inattention while
operating power tools may result in serious personal injury.
b. Dress properly. Do not wear loose clothing or jewelry. Contain long
hair. Keep your hair, clothing and gloves away from moving parts.
Loose clothes, jewelry or long hair can be caught in moving parts.
c. Avoid accidental starting. Be sure switch is off before plugging in.
Carrying tools with your finger on the switch or plugging in tools that have
the switch on invites accidents.
d. Remove adjusting keys or switches before turning the tools on. A
wrench or a key that is left attached to a rotating part of the tools may result
in personal injury.
e. Do not overreach. Keep proper footing and balance at all times. Proper
footing and balance enables better control of the tools in unexpected situation.
f. Use safety equipment. Always wear eye protection. Dust mask, non-skid
safety shoes, hard hat ,or hearing protection must be used for appropriate conditions.

3
IMPORTANT SAFETY INSTRUCTIONS
Recommended Minimum Wire Gauge for Extension Cords
Amps from Tool Nameplate 25’ length 50’ length 75’ length 100’ length 150’ length 200’ length
0-5 amps 16 ga. 16 ga. 16 ga. 14 ga. 12 ga. 12 ga.
5.1-8 amps 16 ga. 16 ga. 14 ga. 12 ga. 10 ga. Do Not Use
8.1-12 amps 14 ga. 14 ga. 12 ga. 10 ga. Do Not Use Do Not Use
12.1-15 amps 12 ga. 12 ga. 10 ga. 10 ga. Do Not Use Do Not Use
15.1-20 amps 10 ga. 10 ga. 10 ga. Do Not Use Do Not Use Do Not Use
5. Tool Use and Care
a. Use clamps or other practical way to secure and support the workpiece
to a stable platform. Holding the work by hand or against your body is
unstable and may lead to loss of control.
b. Do not force tool. Use the correct tools for your application. The correct
tools will do the job better and safer at the rate for which it is designed.
c. Do not use tools if switch does not turn it on or off. Any tool that can not
be controlled with the switch is dangerous and must be repaired.
d. Disconnect the plug from the power source before making any
adjustments, changing accessories or storing the tool. Such preventive
safety measures reduce the risk of starting the tools accidentally.
e. Store idle tools out of reach of children and other untrained persons.
Tools are dangerous in the hands of untrained users.
f. Maintain tools with care. Keep cutting tools sharp and clean. Properly
maintained tools with sharp cutting edges are less likely to bind and are easier
to control.
g. Check for misalignment or binding of moving parts, breakage of parts
and any other condition that may affect the tools operation. If damaged,
have the tools serviced before using. Many accidents are caused by poorly
maintained tools.
h. Use only accessories that are recommended by the manufacturer for your
model. Accessories that may be suitable for one tool, may become hazardous
when used on another tool.
6. SERVICE
a. Tool service must be performed only by qualified repair personnel.
Service or maintenance performed by unqualified personnel could result in a
risk of injury.
b. When servicing a tool, use only identical replacement parts. Follow
instructions in the maintenance section of the manual. Use of unauthorized
parts or failure to follow. Maintenance instructions may create a risk of electric
shock or injury.
7. Hold tool by insulated gripping surfaces when performing an operation
where the cutting tool may contact hidden wiring or its own cord.
Contact with a “live” wire will make exposed metal parts of the tool “live” and
shock the operator.
8.ENSURE THE EXTENSION CORD YOU USE IS OF SUFFICIENT GAUGE
FOR ITS LENGTH.
9. STAY ALERT.
Watch what you are doing & use common sense. Don’t operate any tool when
you are tired.
SPECIFIC SAFETY RULES AND/OR SYMBOLS
Accessories must be rated for at least the speed recommended on the tool
warning labels. Wheels and other accessories running over rated speed can fly
apart and cause injury.
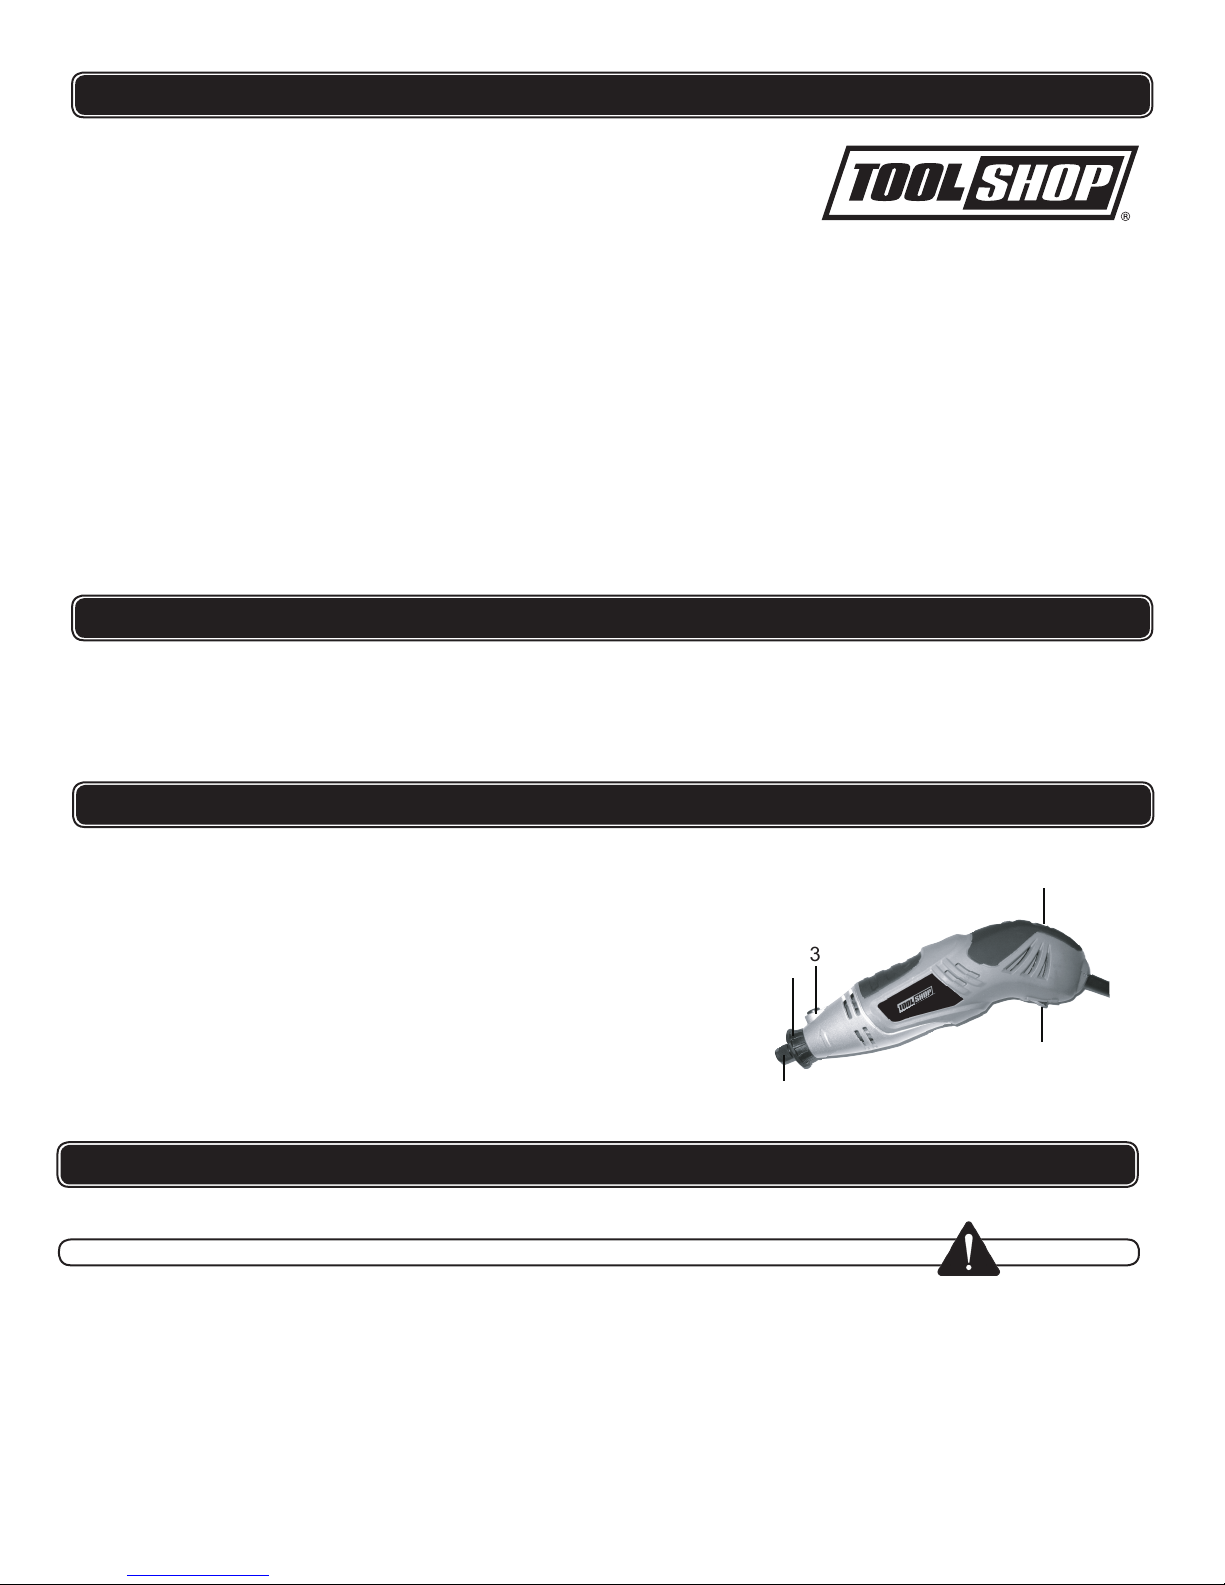
FUNCTIONAL DESCRIPTION
The rotary tool is a multi-purpose tool capable of cutting, drilling, polishing,
grinding, sanding, engraving and other functions depending on the accessory
used. Its high speed of up to 35,000 /min and low torque allows it to be quite
effective with the right
accessory.
The major components of the Rotary Tool:
1. On / Off switch
2. Speed adjustment thumb wheel
3. Shaft lock button
4.
5.
Collet nut
Nose Guard
KEEP THE CORD FROM CONTACTING THE TOOL’S MOVING PARTS
DO NOT ATTACH WRENCHES TO THE TOOL. If they are attached by a
cord or something similar, they could catch in the rotating mechanism and
cause injury.
GUARD AGAINST ELECTRIC SHOCK. When cutting wherever “live” elec-
trical wires may be encountered, hold the tool only by the plastic gripping
surface to prevent electric shock. DO NOT TOUCH ANY METAL PARTS OF
THE TOOL. If you contact a live wire, the exposed metal of the saw be-
comes live as well, and can shock the operator.
ENSURE THAT THE COLLET DIAMETER MATCHES THE SHANK DIAM-
ETER of any accessories you may be using.
SAFETY PRECAUTIONS FOR ROTARY TOOL
ALWAYS CHECK THE SPEED RATING OF ACCESSORIES. This tool will
spin accessories at up to 30,000/min. Accessories not rated for speeds this
high will very likely fly apart and could cause serious injury.
LET THE ROTARY TOOL COME TO A STOP before putting it down. The
motor must be switched off and the moving parts must have stopped.
DO NOT ENGAGE THE SHAFT LOCK BUTTON if the tool shaft is still turn-
ing.
SWITCH OFF THE TOOL IMMEDIATELY and unplug it, if the tool locks up
for any reason.
SPECIFICATIONS
Rotary tool
■Variable speed 8,000 –35,000 /min
■120 volts, 60Hz, 1.5 amp
■Collet capacity: 1/16", 3/32" , 1/8"
4
ACCESSORY INSTALLATION
ASSEMBLY OF ACCESSORIES
WARNING! Always unplug the tool before attaching accessories.
1. Press down the shaft lock button and hold it down
2. Apply the collet wrench to the flats of the collet nut and turn it counterclock-
wise to loosen it.
3. Place the accessories shank into the collet as deep as it will go.
4. Press and hold the shaft lock button
5. Tighten the collet nut by turning it finger tight in a clockwise direction until the
accessory is firmly clamped.
6. Install the 1/8” shank accessories as above.
2
3
4
5
1
5
OPERATING PROCEDURES
BITS
Your Rotary Tool is designed to accept standard 1/8” bits
and accessories. Check to ensure that any attachments you use on this
machine are designed for the speeds they will rotate at and the task.
WARNING! Never use grinding wheels over 1” (25.4mm) in diameter. The tool’s
high speed could cause them to fly apart causing injury.
RUNNING THE TOOL
1. Ensure the accessory is securely clamped in the collet.
2. Plug in the tool.
3. Hold the tool firmly. Press the on / off switch. Rotating the speed adjustment
thumbwheel will increase or decrease the speed.
4. To select the optimal speed for the job, use a piece of scrap material for a trial
run. Vary the speed and check the performance of that particular accessory
on that particular piece of material.
WARNING: Do not put the tool down while it is running.
Do not place the tool on a dusty surface. Dust entering the motor could inter-
fere with its performance.
WARNING! Accessories must be rated
accessories running over rated speed can
Keep the vents and the insides of the tool clear of dust and debris. Ideally,
this can be done with an air blowgun. This will help prevent possible electrical
shorts and ensure proper cooling. Always use approved eye protection when
using air blowguns to clean tools.
Inspect the cord regularly and have it replaced by an authorized repair facility
if it is damaged.
Lubrication for this tool is done at the factory and should not be necessary
again under normal use.
An authorized repair center should do any repairs, modification, or mainte-
nance that involve opening or disassembling the tool housing.
Any damage to the tool should be corrected at an authorized repair center.
Unplug your Rotary Tool before performing any maintenance on it.
Keep the tool housing and accessories clean and free of oil and grease using
mild soap and a damp (not wet) cloth. Do not let solvents like brake fluid,
gasoline, petroleum-based products, etc., contact plastic parts of the hous-
ing. Cleaning with these substances can harm the plastic and compromise
the integrity of the double insulating system.
Inspect the mounting screws regularly. They should be properly tightened. If
any are found to be loose, tighten immediately or serious injury could result.
Use care to see that the motor winding does not become damaged or wet
with oil or water.
The carbon brushes should be checked every 2 to 6 months of home use,
depending on frequency of use, and replaced if worn. Worn brushes could
cause motor damage and should be replaced with identical parts if worn to
or near their limit. Brushes should be kept clean and free moving within
their holder.
MAINTENANCE
Wheels and other
at least the speed recommended on the
tool warning label.
fly apart and cause injury.

ACCESSORIES
6
■Accessories: 250 pc. Kit
■Rotary Tool
For most jobs, the rotary tool works best at the top speed.
1. In general, higher speeds are better for carving, cutting, routing, and shaping
wood. Hardwoods, metals, and glass all require high speed as does drilling.
2. Lower speeds usually work better for some plastics and other materials that
may melt in the heat generated by high speeds. They are also better for
polishing with the felt wheel accessories. You may also find lower speeds
preferable in extremely delicate carving.
3. Be careful not to place too high a load on the tool at low speed.
This could burn out the motor prematurely.
PARTS LIST
Please refer to the schematic drawing on page 7.
power cord
wire cover
cable clamp
screw
Circuit board
Right housing
Stator
Screw
Carbon brush sets
Rotor
1
2
3
4
5
6
7
8
9
10
11
12
13
14
15
16
Stop pin
Plastic nut
Tight nut
Bearing
Bearing
Switch
DescriptionNo.DescriptionNo.
A. 41pcs Sanding bands: (20)1/2"x 1/2", (21)1/4"x 1/2";
B. 2pcs Sanding shank: (1)1/2"x 1/2", (1)1/4"x 1/2";
C. 5pcs Felt wheels: (4)1/2"x 1/4", (1)1"x 1/4";
D. 1pc 3/8"x 3/4" pointed felt wheel.
E. 1pc 1"x 1-1/8" cloth wheel,
F. 1pc rubber emery wheel,
G. 1pc flap wheel
H. 60pcs Sandpaper wheels: (20)160grit,(20)220grit,(20)240grit.
I. 30pcs Heavy-duty cut-off wheels.
J. 37pcs regular cut-off wheels.
K. 5pcs fiberglass cut-off wheels.
L. 4pcs Mandrels.
M. 2pcs Tubs of polishing compound.
N. 3pcs milling cutters,
O. 7pcs diamond cutters,
P. 2pcs rubber grinding wheels.
Q. 6pcs HSS twist drills: (2)1/16"x2",(2)3/32"x2", (2)1/8"x2"
R. 12pcs silicon carbide grinding stones.
S. 18pcs Aluminum oxide grinding stones.
T. 1pc whetstone.
U. 4pcs Collets: (2)1/8",(1)3/32",(1)1/16".
V. 6pcs Brushes,
W.1pc 3/8" wrench

7
SCHEMATIC DRAWING
!WARNING Repairs should be made by an authorized repair center. Do not
this power tool .
open or disassemble

8
1.5AMP ROTARY TOOL
Table of contents
Other Toolshop Power Tools manuals

Toolshop
Toolshop 207-4825 User manual

Toolshop
Toolshop 241-9895 User manual

Toolshop
Toolshop 241-9023 User manual

Toolshop
Toolshop 241-8502 User manual

Toolshop
Toolshop 241-9894 User manual

Toolshop
Toolshop 240-2003 User manual

Toolshop
Toolshop 241-9778 User manual

Toolshop
Toolshop 241-9834 User manual

Toolshop
Toolshop 241-9970 User manual


