Toolshop 241-9894 User manual

SAVE THIS MANUAL
You will need this manual for safety instructions, operating procedures and warranty.
Put it and the original sales receipt in a safe dry place for future reference.
Operator’s Manual
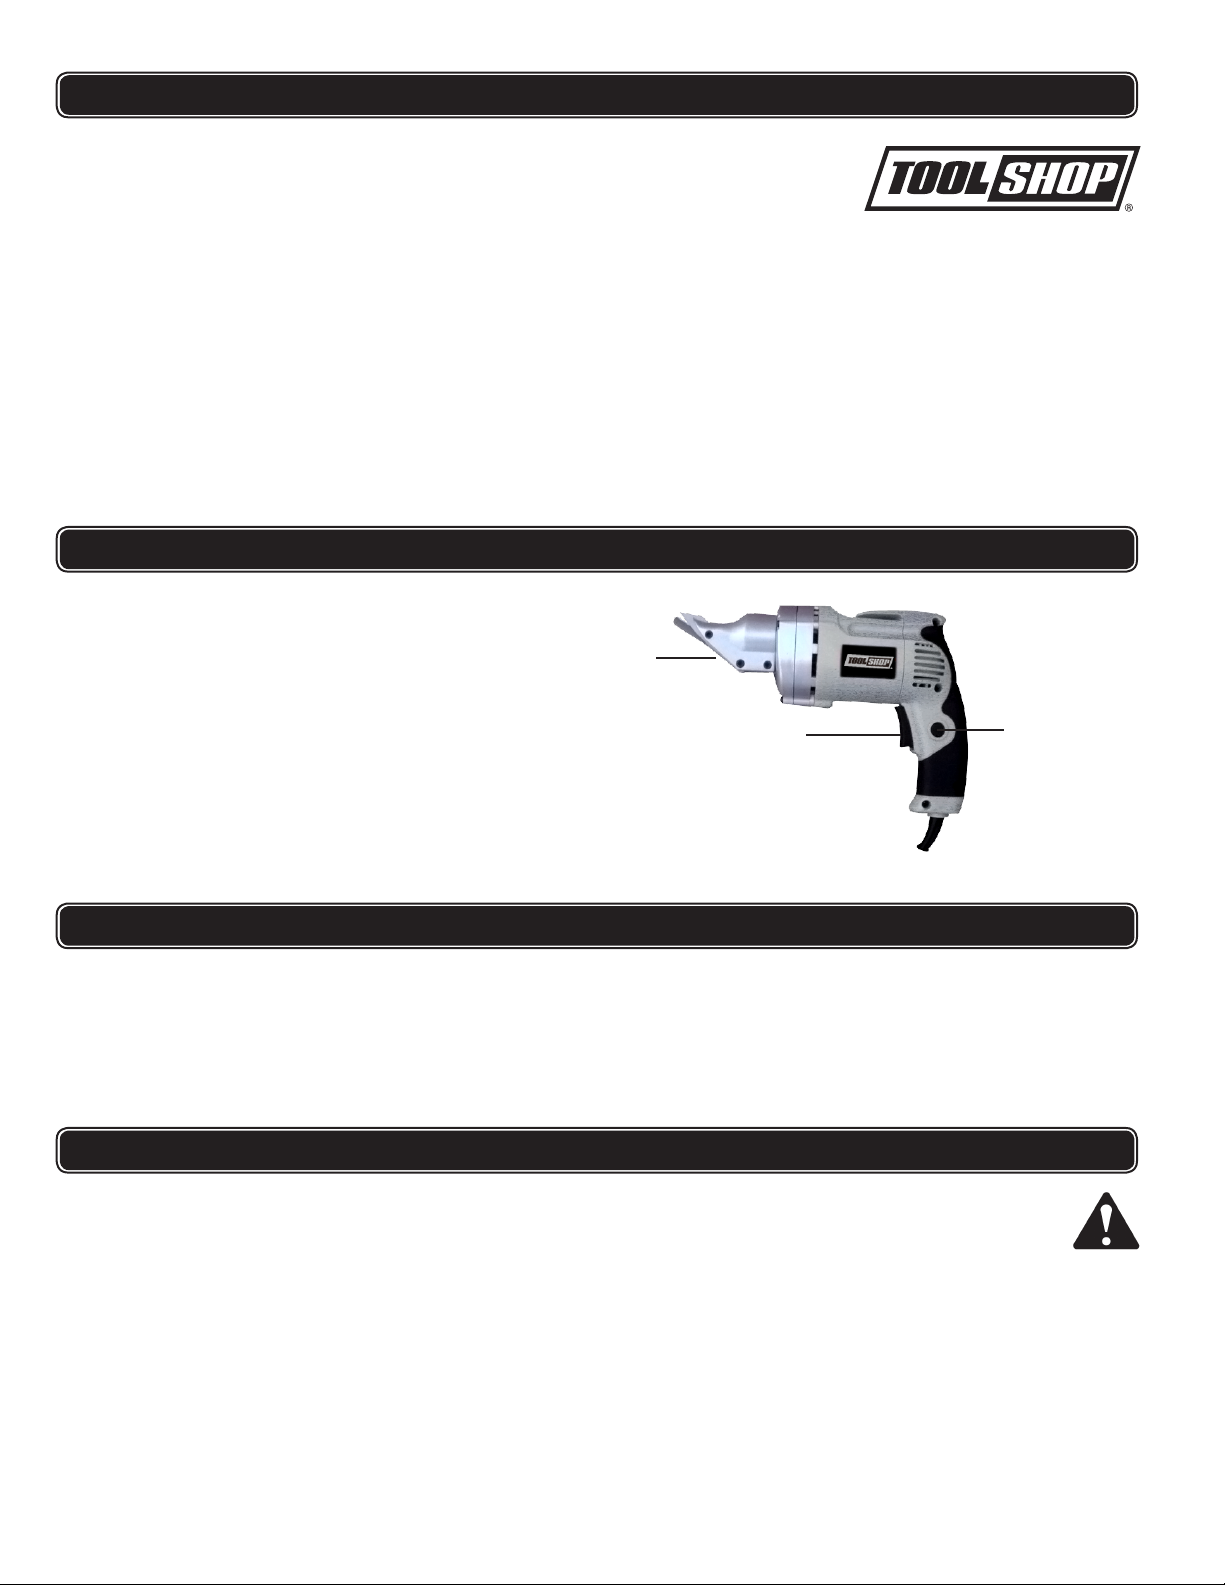
4.0 AMP 18 GAUGE METAL SHEARS
241-9894

2
IMPORTANT SAFETY INSTRUCTIONS
WARNING:When using electric tools, machines or equipment, basic safety
precautions should always be followed to reduce the risk of fire, electric
shock, and personal injury.
READ ALL INSTRUCTIONS BEFORE USING THIS TOOL
1. KEEP WORK AREA CLEAN. Cluttered areas invite injuries.
2. CONSIDER WORK AREA ENVIRONMENT. Don’t use power tools in damp,
wet, or poorly lit locations. Don’t expose your tool to rain. Keep the work area
well lit. Don’t use tools in the presence of flammable gases or liquids.
3. KEEP CHILDREN AND BYSTANDERS AWAY. All children should be kept
away from the work area. Don’t let them handle machines, tools or extension
cords.
Visitors can be a distraction and are difficult to protect from injury.
4. GROUNDED TOOLS must be plugged into an outlet that itself is properly
installed and grounded. Grounding provides a low-resistance path to carry
electricity away from the operator, should the tool malfunction elec -
trically. Do not remove the grounding prong from the plug or alter the plug in
any way. If in doubt as to whether the outlet is properly grounded according
to code, check with a qualified electrician.
5. OBSERVE PROPER PRECAUTIONS REGARDING DOUBLE INSULA-
TION. This tool is double insulated. It is equipped with a polarized plug.
One blade is wider than the other, so it will fit into a polarized outlet only one
way. If you have difficulty inserting the plug, try reversing it. If it still doesn’t
fit , do not alter the plug; have a qualified electrician install a polarized outlet.
6. GUARD AGAINST ELECTRIC SHOCK. Prevent body contact with grounded
surfaces: pipes, radiators, ranges, and refrigerator enclosures. When your
body is grounded the risk of electric shock increases. When working wher-
ever “live” electrical wires may be encountered, try to ascertain whether
there is a danger of shock. Even so, DO NOT TOUCH ANY METAL PARTS
OF THE TOOL while using it. Hold the tool only by the plastic grip to prevent
electric shock if you contact a live wire.
7. DO NOT ABUSE THE CORD. Never carry your tool by the cord or pull on
the cord to unplug it. Protect the cord from potential sources of damage:
heat, oil & solvents, sharp edges, or moving parts. Replace damaged cords
immediately.
8. WHEN WORKING OUTDOORS, USE AN OUTDOOR-RATED EXTENSION
CORD. An extension cord rated for outdoor use must be marked “W-A” or
“W”.
9. DO NOT EXPOSE ELECTRICAL POWER TOOLS TO MOISTURE. Rain or
wet conditions can cause water to enter the tool and lead to electric shock.
10. ENSURE THE EXTENSION CORD YOU USE IS OF SUFFICIENT GAUGE
FOR ITS LENGTH.
11. STORE IDLE EQUIPMENT. Store equipment in a dry area to inhibit rust.
Equipment also should be in a high location or locked up to keep out of
reach of children.
12. DON’T FORCE THE TOOL. It will do the job better and more safely at the
rate for which it was intended.
13. USE THE RIGHT TOOL. Don’t force a small tool or attachment to do the
work of a larger industrial tool. Don’t use a tool for a purpose for which it was
not intended.
14. DRESS PROPERLY. Don’t wear loose clothing or jewelry; they can be
caught in moving parts. Protective, non-electrically conductive gloves and
non-skid footwear are recommended when working. Wear protective hair
covering to contain long hair and keep it from harm.
!
Recommended Minimum Wire Gauge for Extension Cords
Amps
from
Tool Nameplate
25’ length 50’ length 75’ length 100’ length 150’ length 200’ length
0-5 amps 16 ga. 16 ga. 16 ga. 14 ga. 12 ga. 12 ga.
5.1-8 amps 16 ga. 16 ga. 14 ga. 12 ga. 10 ga. Do Not Use
8.1-12 amps 14 ga. 14 ga. 12 ga. 10 ga. Do Not Use Do Not Use
12.1-15 amps 12 ga. 12 ga. 10 ga. 10 ga. Do Not Use Do Not Use
15.1-20 amps 10 ga. 10 ga. 10 ga. Do Not Use Do Not Use Do Not Use

15. USE EYE PROTECTION. Use a full-face mask if the work you’re doing
produces metal filings, dust or wood chips. Goggles are acceptable in other
situations. Wear a clean dust mask if the work involves creating a lot of fine
or coarse dust.
16. SECURE WORK. Use clamps or a vise to hold the work. It’s safer than using
your hands and it frees both hands to operate the tool.
17. DON’T OVERREACH. Keep proper footing and balance at all times. Do not
reach over or across machines that are running.
18. MAINTAIN TOOLS WITH CARE. Keep tools sharp and clean for better and
safer performance. Follow instructions for lubricating and changing accessories.
For safe performance, keep handles dry, clean and free from oil and grease.
19. AVOID UNINTENTIONAL STARTING. Be sure the switch is in the OFF posi-
tion before plugging in.
20. ALWAYS CHECK AND MAKE SURE TO REMOVE ANY ADJUSTING KEYS
OR WRENCHES before turning the tool on. Left attached, these parts can fly
off a moving part and result in personal injury.
21. DO NOT USE THE TOOL IF IT CANNOT BE SWITCHED ON OR OFF.
Have your tool repaired before using it.
22. DISCONNECT THE PLUG FROM POWER BEFORE MAKING ANY AD
JUSTMENTS. Changing attachments or accessories can be dangerous if
the tool accidentally starts.
23. STAY ALERT. Watch what you are doing & use common sense. Don’t operate
any tool when you are tired.
24. CHECK FOR DAMAGED PARTS. Before using this tool, any part that is
damaged should be carefully checked to determine that it will operate prop-
erly and perform its intended function. Check for alignment of moving parts,
binding of moving parts, breakage of parts, mountings, and other conditions
that may affect its operation. Inspect screws and tighten any ones that are
loose. Any part that is damaged should be properly repaired or replaced by
an authorized service center unless otherwise indicated elsewhere in the in-
struction manual. Have defective switches replaced by an authorized service
center. Don’t use the tool if switch does not turn it on and off properly.
25. REPLACEMENT PARTS. When servicing, use only identical replacement
parts.
26. SERVICE AND REPAIRS should be made by qualified repair technicians at
an authorized repair centre. Improperly repaired tools could cause serious
shock or injury
IMPORTANT SAFETY INSTRUCTIONS
SAFETY PRECAUTIONS FOR METAL SHEARS
3
Handle sheet metal with care. Sheet metal will have sharp edges. Wear
ANSI-approved safety goggles, heavyduty work gloves, long sleeve shirt,
and jeans when working with sheet metal.
Maintain labels and nameplates on the tool. These carry important safety
information.
Avoid unintentional starting. Prepare to begin work before turning on the tool.
Do not lay the tool down until it has come to a complete stop. Moving parts can
grab the surface and pull the tool out of your control.
When using a handheld power tool, maintain a firm grip on the tool with both
hands to resist starting torque.
Do not leave the tool unattended when it is plugged into an electrical outlet.
Turn off the tool, and unplug it from its electrical outlet before leaving.
This product is not a toy. Keep it out of reach of children.
People with pacemakers should consult their physician(s) before use.
Electromagnetic fields in close proximity to heart pacemaker could cause
pacemaker interference or pacemaker failure. In addition, people with
1.
2.
3.
4.
5.
6.
7.
8.
-
SAFETY PRECAUTIONS FOR METAL SHEARS
FUNCTIONAL DESCRIPTION
SPECIFICATION
OPERATING PROCEDURES
pacemakers should:
• Avoid operating alone.
• Do not use with trigger locked on.
• Properly maintain and inspect to avoid electrical shock.
• Any power cord must be properly grounded. Ground Fault Circuit
Interrupter (GFCI) should also be implemented – it prevents sustained
electrical shock.
WARNING: Handling the cord on this product will expose you to lead, a
chemical known to the State of California to cause cancer, and birth defects or
other reproductive harm. Wash hands after handling.
The warnings, precautions, and instructions discussed in this instruction
manual cannot cover all possible conditions and situations that may occur.
It must be understood by the operator that common sense and caution are
factors which cannot be built into this product, but must be supplied by the
operator.
120V/60Hz
Rated Power: 4 Amp
Variable Speed: 0-2500 /min
Max Cutting Capacity: 18 gauge
Head swivels 360°
9.
10.
Read the ENTIRE IMPORTANT SAFETY INFORMATION
section at the beginning of this manual including all text under
subheadings therein before set up or use of this product.
A. ON - OFF Switch
B. Lock off button
C. Cutting head
AB
C
4

Figure 1
5
SWIVELING THE CUTTER HEAD
WORK PIECE AND WORK AREA SET UP
Put on heavy-duty work gloves and ANSI-approved safety goggles to avoid
injury.
Loosen the three hex head bolts using
the hex wrench provided with this tool -
see Figure 1.
Firmly grip the cutter head and twist it to
the desired position. Tighten the three
hex bolts to keep the Cutter Head in that
position.
1.
2.
3.
WARNING: TO PREVENT SERIOUS INJURY FROM ACCIDENTAL
OPERATION: Release the Trigger and unplug the tool from its electrical outlet
before adjusting tool or installing accessories.
MAINTENANCE
Procedures not specifically explained in this manual must be performed only
by a qualified technician.
WARNING: TO PREVENT SERIOUS INJURY FROM ACCIDENTAL
OPERATION: Release the Trigger and unplug the tool from its electrical
outlet before performing any inspection, maintenance, or cleaning
procedures.
TO PREVENT SERIOUS INJURY FROM TOOL FAILURE: Do not use
damaged equipment. If abnormal noise or vibration occurs, have the
problem corrected before further use.
Designate a work area that is clean and well-lit. The work area must not allow
access to children or pets to prevent distraction and injury.
Route the power cord along a safe route to reach the work area without
creating a tripping hazard or exposing the power cord to possible damage. The
power cord must reach the work area with enough extra length to allow free
movement.
Secure loose work pieces using a vise or clamps (not included) to prevent
movement while working.
There must not be objects, such as utility lines, nearby that will present a hazard
while working.
Make a practice cut on a piece of scrap material before cutting the work material.
This will allow you to be sure you are familiar with the way the tool operates,
and that the cut can be made properly.
1.
2.
3.
4.
5.
GENERAL OPERATING INSTRUCTIONS
Wear ANSI-approved safety goggles, heavy-duty work gloves, long sleeve
shirt, and jeans.
Plug the tool into an appropriate, safety protected power outlet.
Position the jaws of the Shear over the edge of the sheet metal you will cut.
Squeeze the Power Switch to begin cutting the metal. The Power Switch is
variable speed, allowing you to vary the cutting speed by the amount you
squeeze the trigger. As you squeeze more, the tool will increase speed, and it
will cut more slowly as you release the trigger.
Move the Cutting Blades along the desired cutting line in the work material.
On large pieces of sheet metal, you may wish to swivel the head to one side or
the other to prevent interference of the tool handle with the work material. See
previous page for full instructions on how to swivel the Cutting Head.
To prevent accidents, turn off the tool and disconnect its power supply after
use. Clean, then store the tool indoors out of children’s reach.
1.
2.
3.
4.
5.
6.
7.

6
BEFORE EACH USE, inspect the general condition of the tool. Check for
loose hardware, misalignment or binding of moving parts, cracked or broken parts,
damaged electrical wiring, and any other condition that may affect its safe operation.
AFTER USE, wipe external surfaces of the tool with a clean cloth.
WARNING! If the supply cord of this power tool is damaged, it must be
replaced only by a qualified service technician.
1.
2.
3.
Cutting
Head
(22)
Head
Bolts (28)Left Blade (27)
Right
Blade (24)
Center
Blade
(25)
Bushing
(26)
Unplug the tool.
Using the Hex Tool, remove the three Head Bolts (28).
The three Blades (24, 25, and 27) and the two Bushings (26)
will be loose.
Clean, replace or sharpen the blades as required.
Replace blades as a set only.Reassemble by repositioning
the Blades, and Bushings as illustrated. Replace the
Head Bolts and tighten them securely.
Test the product to be sure that it is working properly.
The Left and Right Blades (24, 27) are slotted. They can
be adjusted to change the direction of the curl of waste
material. To adjust:
a. Unplug the tool.
b. Loosen all three Head Bolts (28).
c. Make a slight adjustment to the Left or Right Blade (24, 27) as needed.
d. Tighten the Head Bolts (28).
e. Test the direction of the waste curl and repeat the steps above as needed.
1.
2.
3.
4.
5.
6.
7.
Note: If the Head Bolts (28) are overtightened, then the Center Blade (25) will not
move freely enough, causing premature wear, or possibly preventing
the tool from operating.
If the Head Bolts are not tight enough, the tool will not make a smooth cut in the
material.
BLADE MAINTENANCE
7
TROUBLESHOOTING
Problem Possible Causes Likely Solutions
Tool will not start. Cord not connected.1.
No power at outlet.2.
Tool’s thermal reset breaker3.
tripped (if equipped).
Internal damage or wear.4.
(Carbon brushes or switch, for
example.)
Head Bolts too tight.5.
Check that cord is plugged in.1.
Check power at outlet. If outlet is unpowered,2.
turn off tool and check circuit breaker. If breaker
is tripped, make sure circuit is right capacity for
tool and circuit has no other loads.
Turn off tool and allow to cool. Press reset button3.
on tool.
Have technician service tool.4.
Make sure that Head Bolts are not5.
excessively tight.
Tool operates slowly. Dirty, worn or damaged blades.1.
Extension cord too long or wire2.
size too small.
Head Bolts too tight.3.
Clean or replace blades.1.
Eliminate use of extension cord. If an extension2.
cord is needed, use shorter/heavier gauge cord.
See Extension Cords in GROUNDING section.
Make sure that Head Bolts are not3.
excessively tight.
Performance
decreases over time.
Blades dull or damaged.1.
Carbon brushes worn or2.
damaged.
Keep blades sharp. Replace as needed.1.
Have qualified technician replace brushes.2.
Cut not smooth. Head Bolts loose. Tighten Head Bolts enough to properly hold the
Left and Right Blades in place.
Excessive noise or
rattling.
Internal damage or wear. (Carbon
brushes or bearings, for example.)
Have technician service tool.
Overheating. Forcing tool to work too fast.1.
Blades misaligned.2.
Blades dull or damaged.3.
Blocked motor housing vents.4.
Motor being strained by long or5.
small diameter extension cord.
Allow tool to work at its own rate.1.
Check and correct blades to fence and/or table2.
alignment.
Keep blades sharp. Replace as needed.3.
Wear ANSI-approved safety goggles and NIOSH-4.
approved dust mask/respirator while blowing dust
out of motor using compressed air.
Eliminate use of extension cord. If an extension5.
cord is needed, use one with the proper diameter
for its length and load. See Extension Cords in
GROUNDING section.
Follow all safety precautions whenever diagnosing or servicing the tool.
Disconnect power supply before service.

8
PARTS LIST AND SCHEMATIC DRAWING
ITEN# DESCRIPTION QTY ITEN# DESCRIPTION QTY

9
PARTS LIST AND SCHEMATIC DRAWING
!
WARNING: Repairs should be made by an authorized repair center. Do not open or
disassemble this power tool. Contact at 1-866-915-8626 for questions regarding
this power tool.

TOOL SHOP®
1-YEAR LIMITED WARRANTY:
This TOOL SHOP® brand power tool carries a 1-YearLimited Warrantyto the
originalpurchaser. If the tool fails within one (1) year from the date of
purchase, simply bring this tool with youroriginal sales receipt back to your
nearest MENARDS® retail store. At its discretion, TOOL SHOP® agrees to
have thetool replaced with the same or similar TOOL SHOP® product free of
charge, within the stated warrantyperiod, when returnedbythe original
purchaser with original sales receipt. Notwithstanding the foregoing, this
limited warrantydoes not cover anydamage that has resulted from abuse or
misuse of the Merchandise. This warranty: (1) excludesexpendable parts
including butnot limited to blades, belts, bits, light bulbs, and/or batteries; (2)
shall be void if this tool is used for commercial and/or rental purposes; and (3)
does not cover any losses, injuries to persons/property or costs. This
warrantydoes give you specific legal rights and you may have other rights,
which vary from state to state. Be careful, tools are dangerous if improperly
used or maintained. Seller’s employees are not qualified to advise you on the
use of this Merchandise. Any oral representation(s) made will not be binding
on seller or its employees. The rightsunderthis limited warrantyare to the
originalpurchaser of the Merchandise and may not be transferred to any
subsequent owner. This limited warranty is in lieu ofall warranties,
expressed or implied including warranties or merchantability and fitness fora
particular purpose. Seller shall not be liable forany special, incidental, or
consequential damages. The sole exclusive remedy against the seller will be
forthe replacement of anydefects as provided herein, as longas the seller is
willing orable to replace this product or is willing to refund thepurchase price
as provided above. For insurance purposes, seller is notallowed to
demonstrate any of these power tools for you.
For questions / comments, technical assistance or repair parts –
Please call toll free at: 1-866-915-8626
(M-F 8am - 5pm EST)
SAVE YOUR RECEIPTS. THIS WARRANTY IS VOID WITHOUT THEM.
4.0 AMP 18 GAUGE METAL SHEARS WARRANTY
10
Table of contents
Other Toolshop Power Tools manuals

Toolshop
Toolshop 241-8502 User manual

Toolshop
Toolshop 241-9023 User manual

Toolshop
Toolshop 207-4825 User manual

Toolshop
Toolshop 241-9970 User manual

Toolshop
Toolshop 241-9*780 User manual

Toolshop
Toolshop 241-9778 User manual

Toolshop
Toolshop 241-9895 User manual

Toolshop
Toolshop 240-2003 User manual

Toolshop
Toolshop 241-9834 User manual


