TOOLSTATION 84582 User manual

TOOLSTATION
1-STAGE POINT OF USE FILTER
84582
Guarantee
This product for the period of one year from the date of purchase against any manufacturing fault. The guarantee is only valid if the product has been installed and
used in accordance with the manufacturers instructions and has not been interfered with in any way. Damaged caused to the product or by the product as a result of
failure to use the product in accordance with the manufacturers instructions is not covered by this guarantee. Under this guarantee we undertake at our discretion to
repair or replace free of charge the product of any part which is found to be faulty. Costs associated with the fitting of a replacement product or part or the removal of
the product is not covered by this guarantee. Loss or damage caused by the product (including consequential loss) is not covered by the guarantee. This guarantee
does not affect your statutory rights.
DIY-TS-84582 Revision 02 Date: 08/16
KEY
PART NO
DESCRIPTION
QTY.
COLOUR
1
ZA-CART-002013
10” Slim Cartridge
1
White
--
ZA-DIY-004002
Toolstation Inhouse Instructions
1
2
ZA-DWFK-003003
Self Cutting Tap
1
Chrome
3
ZA-DWFK-003004
CalTap lever drinking tap
1
Chrome
4
ZA-DIY-004001
1/4” male - 3/8” reducer (brass)
2
Brass
5
ZA-DWFK-003006
3/8” pipe
1
Various
6
ZA-DWFK-003007
Drinking tap fitting 3/8 x 7/16
1
Grey or White
7
ZA-DWFK-003008
3/4”F - 3/8” pushfit fitting
1
Grey
8
ZA-DWFK-003021
2 1/2” single clip/slim filter clamp
1
White
9
ZA-GEN-PLUG
6mm wall plug
1
Grey
10
ZA-GEN-SCREW
1 1/4” screw
1
Zinc Plated
11
ZA-DWFK-003005
3/8” Pipe Insert
2
Grey
21
Select a suitable position for the filter kit to
be installed noting that the length of flexible
pipe supplied is used to connect both the
touch tap and the self piercing tap to the
filter. This kit is intended for cold water
supply only.
BEFORE CARRYING OUT ANY
INSTALLATION CHECK CONTENTS OF
PRODUCT ARE CORRECT
TURN OFF THE WATER SUPPLY AT THE
MAINS STOP COCK
All contents are checked
and sealed in a security
bag. Please check the
contents carefully prior to
installation.
Exchanges or refunds can
only be made on receipt of
the product in full working
order with no parts
missing or broken.
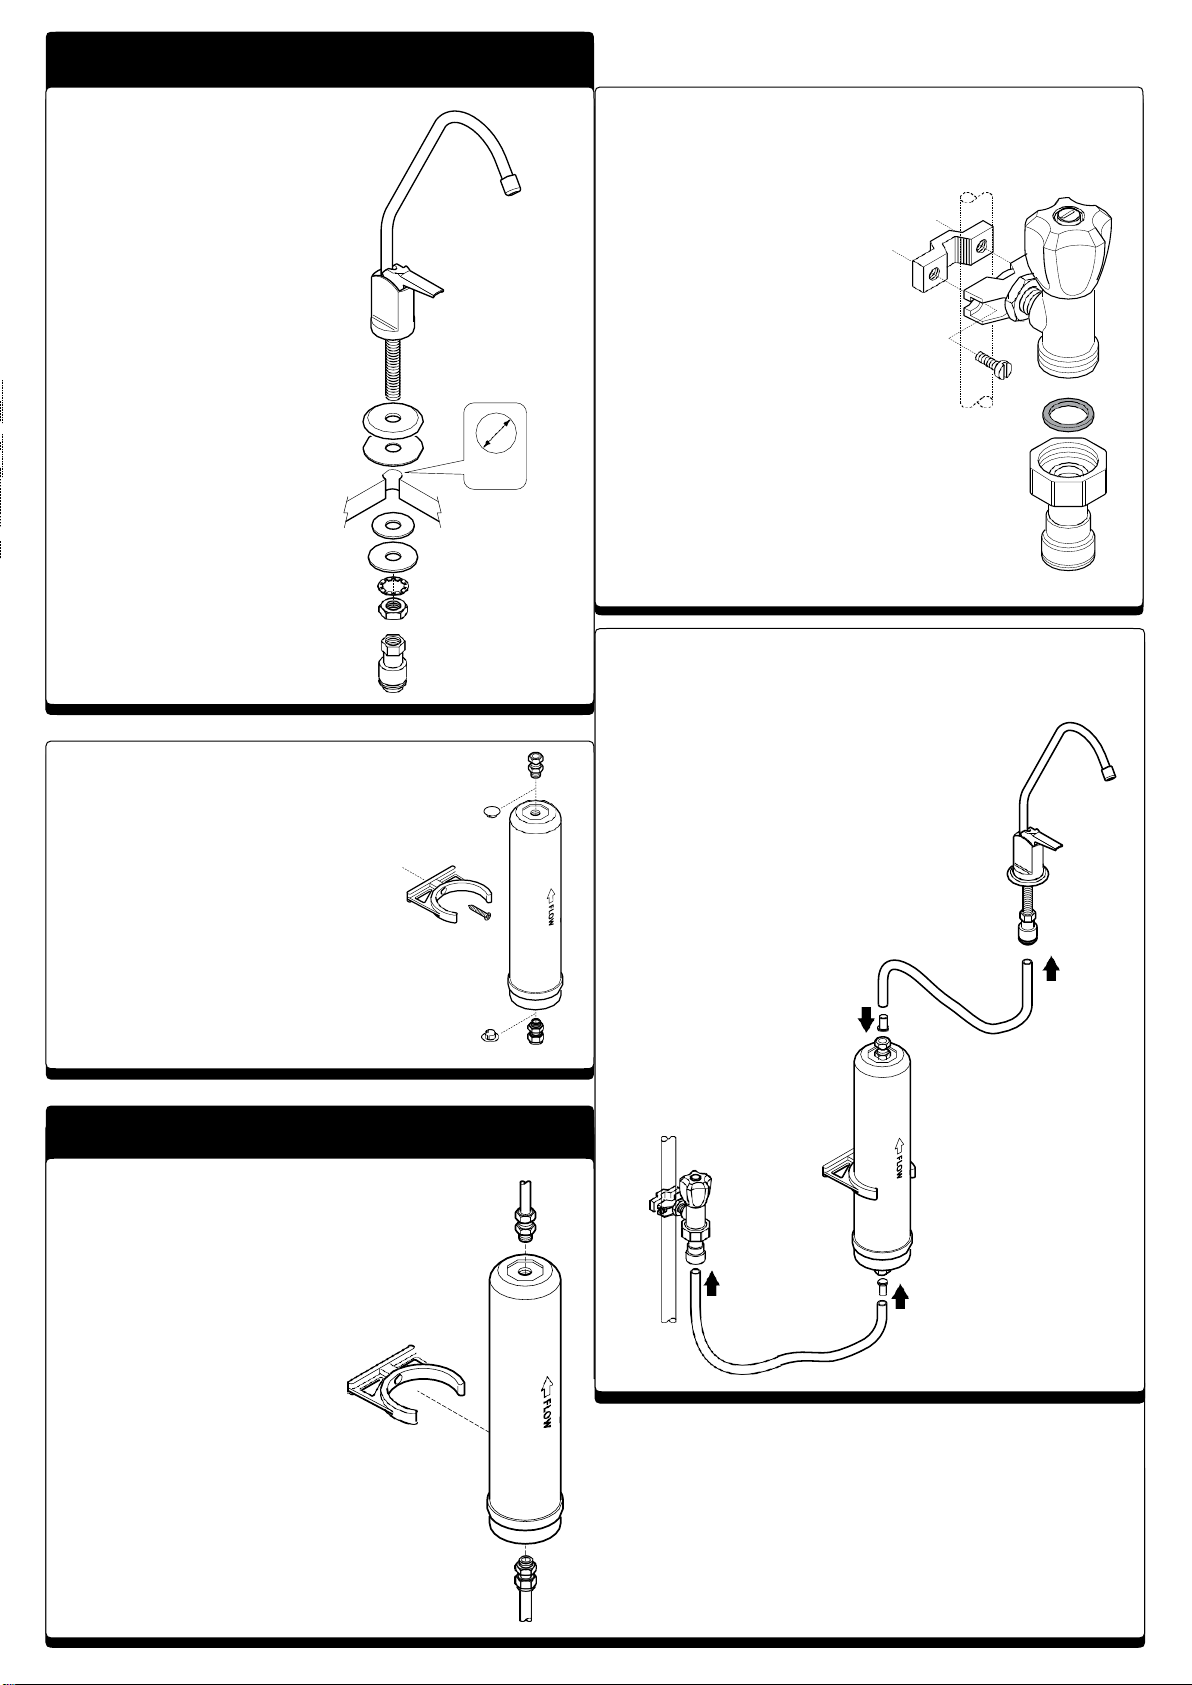
INSTALLATION
1
-Touch Tap Installation
•
Select a suitable position for the
touch tap assembly. This can be
fitted either through a worktop or
a sink unit.
•
Drill a 1/2” diameter clearance
hole at the desired position.
•
Slide the large chrome washer
followed by the large rubber
washer over the threaded part of
the touch tap.
•
Pass the threaded part of the
touch tap through the hole.
•
Pass the remaining rubber washer
over the threaded part of the
protruding thread, followed by the
remaining washers and nuts.
•
Tighten the nut with a suitable
spanner.
•
Position the touch tap so that the
water will flow into the sink.
•
Fit the 7/16” female - 3/8” pushfit
fitting using a suitable spanner to
ensureawatertightjoint.
•
PTFE tape may be usedif
necessary.
3 - 10” Slim Cartridge
•
Select a suitable position for the filter kit to be
installed noting that the length of flexible pipe
supplied is used to connect both the touch
tap and the self peircing tap to the filter.
•
Attach the holding clip (8) to the wall or
cupboardsideusingthefixingssupplied(9,
10) and push the cartridge (1) into the clip
making note of the directional flow arrow on
the cartridge is pointing upwards.
•
Remove the protective caps if required.
Fit the inlet and outlet connectors (4) to
the cartridge. PTFE tape may be used if
necessary.
1/2”
2 - Self Cutting Tap Installation
•
Position the backplate behind the
15mm cold water pipe.
•
Clamp the saddle to the backplate
using the screws supplied. Tighten
after cutting the copper pipe.
•
Screw the male thread of the tap
body into the copper pipe so that
the cutter cuts into the copper pipe.
•
Position the tap body so that the
flexible pipe can be connected to
the filter cartridge inlet connector
without kinking.
•
Do not unscrew the tap body more
than half a turn.
•
Tighten the chrome locknut against
the saddle using a spanner. Do not
overtighten.
•
Attach the 3/4” female - 3/8” pushfit
fitting (7) to the outlet of the self
cutting tap. Ensure the washer isin
place.
4 - Final Assembly
•
Cut the flexible pipe into two lengths suitable to
reach the self piercing tap and touch tap.
•
Firmly push the tube into the fitting on the self
piercing valve (7). Push the other end into the
cartridge inlet connector (4) using the pipe insert.
•
Firmly push the tube into the fitting on the touch
tap. Push the other end into the cartridge outlet
using the pipe insert (11).
•
Check that all connections are tight but do not
overtighten.
•
Slowly turn on the mains water supply.
•
Check for leaks
•
Depress the lever on the touch
tap to remove any air locks and
run water to remove any
discolouration from the
cartridge. The system is
now ready for use.
SERVICE
Changing the Cartridge
•
Shut off the water supply.
•
Depress the touch tap to release
water pressure in the flexible pipe.
•
Remove used cartridge, remove
fittings and dispose of the
cartridge only. Re-use fittings.
•
Noting the direction of flow arrow
on the new cartridge connect
the inlet and outlet connectors
as previous and push firmly back
onto the clip.
•
Slowly turn on the mains water
supply.
•
Check for leaks.
•
Depress the lever on the touch
tap to remove any air locks
and run water to remove any
discolouration from the cartridge.
•
The system is now ready for use.
Important
information:To ensure
sufficient contact time
between the cartridge
and water, the water flow
should not exceed 5 litres
per minute. If the flow of
water exceeds this then
reduce the flow using the
tap on the self piercing
tap.
Note: It is recommended that the filter cartridge is replaced every
six months or when you notice a change is the quality of your
drinking water. Please order replacement filter cartridges quoting
the reference number given below to ensure the correct filter
cartridge is purchased.
R
eplacement
Car
tr
idge
Order
No.
1
0004
Call
F
r
ee:
0808
1
00
7211
or Visit the website www.toolstation.com
Popular Water Filtration System manuals by other brands


Pureit
Pureit Marvella instruction manual

Pure-Pro
Pure-Pro RS3000A user manual

Fillmaster Systems
Fillmaster Systems Fillmaster Filtration Installation instructions and service guide

Astral Pool
Astral Pool SEL BLUE EVO Installation and user manual

Bluebird
Bluebird Pure Diamond user manual

Bio-Tek
Bio-Tek Bio3Sure WDS Mini Installation & operation manual

Alfalaval
Alfalaval AFPX 617XGV-14/74CG instruction manual

Aquapure
Aquapure APRO13212 Installation and operating instructions

Spring Well
Spring Well FS1 installation instructions

Aqua Guard
Aqua Guard AquaSure Aquaflo DX user manual

Puretec
Puretec WTV7550 installation guide

Universal Blue
Universal Blue UACC4002-20 instruction manual