Topaz 14 Quick start guide

topaz
topaz 14
»Rigging Instructions
www.toppersailboats.com

1
»Introduction
»Manufacturers Details
»Maintenance
»Glossary
»Setting Up the Hull
»Rigging the Mast
»Capsize Line
»Attaching the Main Sheet
»Rigging the Jib
»Raising the Mainsail
»Attaching the Rudders
»Rigging the Spinnaker Kit
»Packing the Spinnaker
1
1
2
3 - 4
5 - 8
8 - 12
12 - 13
13 - 14
14 - 17
17 - 18
19
19 - 23
24 - 26
contents
introduction
For further information, spares and
accessories, please contact the
manufacturer:
TOPPER INTERNATIONAL LTD,
Kingsnorth Technology Park,
Wotton Road, Ashford, Kent TN23 6LN
Telephone +44 (0) 1233 629186
email info@toppersailboats.com
These RIGGING INSTRUCTIONS have been compiled to
help you to rig your Topaz 14C/CX Catamaran. Please also
ensure that you refer to your TOPAZ OWNERS MANUAL.
The OWNERS MANUAL has been compiled to help you to
operate your craft with safety and enjoyment. It contains
systems and information on its operation and maintenance.
Please read it carefully and familiarise yourself with the craft
before using it.
you are not familiar with, for your own comfort and safety,
please ensure that you obtain handling and operating
experience before assuming command of the craft. Your
dealer or national sailing federation or yacht club will be
pleased to advise you of local sea schools, or competent
instructors.
PLEASE KEEP THE RIGGING INSTRUCTIONS AND THE OWNERS
MANUAL IN A SECURE PLACE AND HAND THEM OVER TO THE
NEW OWNER WHEN YOU SELL THE CRAFT.

2
maintenance
The Topaz 14 is designed to require very little maintenance, but there are some simple ways to keep your
boat in the best condition.
Rudder
Never launch your boat without checking that the retaining clip has clicked into place beneath the
Sails
Although the battens protect the mainsail to a certain extent, do not leave the mainsail hoisted for
extended periods of time.
Raise and drop the spinnaker as smoothly as possible, as this will extend the life of the sail. Avoid
trawling the spinnaker through the water, this can damage the sail and get the spinnaker stuck
around the bow of the boat.
Remove the spinnaker from the chute after sailing; if the sail is left it can attract mice that damage
the sail.
Always dry the sail before folding and packing it away.
Always rinse the sails and the boat after sailing in salt water.
ALWAYS RELEASE JIB TENSION WHEN NOT SAILING
Foils
between the stock when down. Any movement between the blade and the stock, or the stock and
the hull may cause steering problems.
Hull and ttings
Small dents can be repaired by gently warming the hull with a hot air blower (take care not to melt
the hull). For any more substantial repairs refer to Topper Sailboats.
after salt water exposure.
Always remove the bung to empty any water after sailing, and when not sailing leave the bung out to
Ropes
Always replace any ropes that are showing any signs of wear immediately.

3
glossary / useful terminology
hull
spars
foils
Nose:
Painter:
Transom:
Fore:
Aft:
Mast Step:
Rail:
Port:
Starboard:
Leeward:
Windward:
Gudgeon:
Mast:
Mast Heel:
Boom:
Outhaul:
Vang:
Cunningham:
Sheet:
Daggerboard
Rudder:
Pintle:
Front of the hull
Rope from the nose of the hull used for towing or tying the board to a jetty, buoy or trolley
Back of the hull
Forward
Rearward
Integral tube where the mast heel/foot of the mast locates
Upper/outermost edge of a hull
Left side of the hull when looking forward
Right side of the hull when looking forward
Direction away from the wind
Direction from which the wind is coming
Fitting on the transom used to hang the rudder
Main vertical spar supporting the rig/sail
Lower edge/foot of the mast
Spar at the bottom of the mainsail
Purchase system on the boom for tightening the lower edge/foot of the sail
Purchase system for tightening the rear/aft edge (leech) of the sail
Rope for controlling the inward/outward position of the mainsail
Blade found in the middle of the hull used to counteract leeward slippage
Blade found at the transom used for steering
The male part (pin) of the rudder hanging system

4
sails
Mainsail:
Jib:
Tack:
Clew:
Head:
Leach:
Lu:
Foot:
Batten:
Sail aft/rearward of the mast (Larger of the two)
Sail forward of the mast (Smaller of the two)
Forward lower corner of a sail
Rear lower corner of a sail
Upper corner of sail
Rear edge of the sail
Forward edge of the sail
Bottom edge of the sail
glossary / useful terminology (...)

5
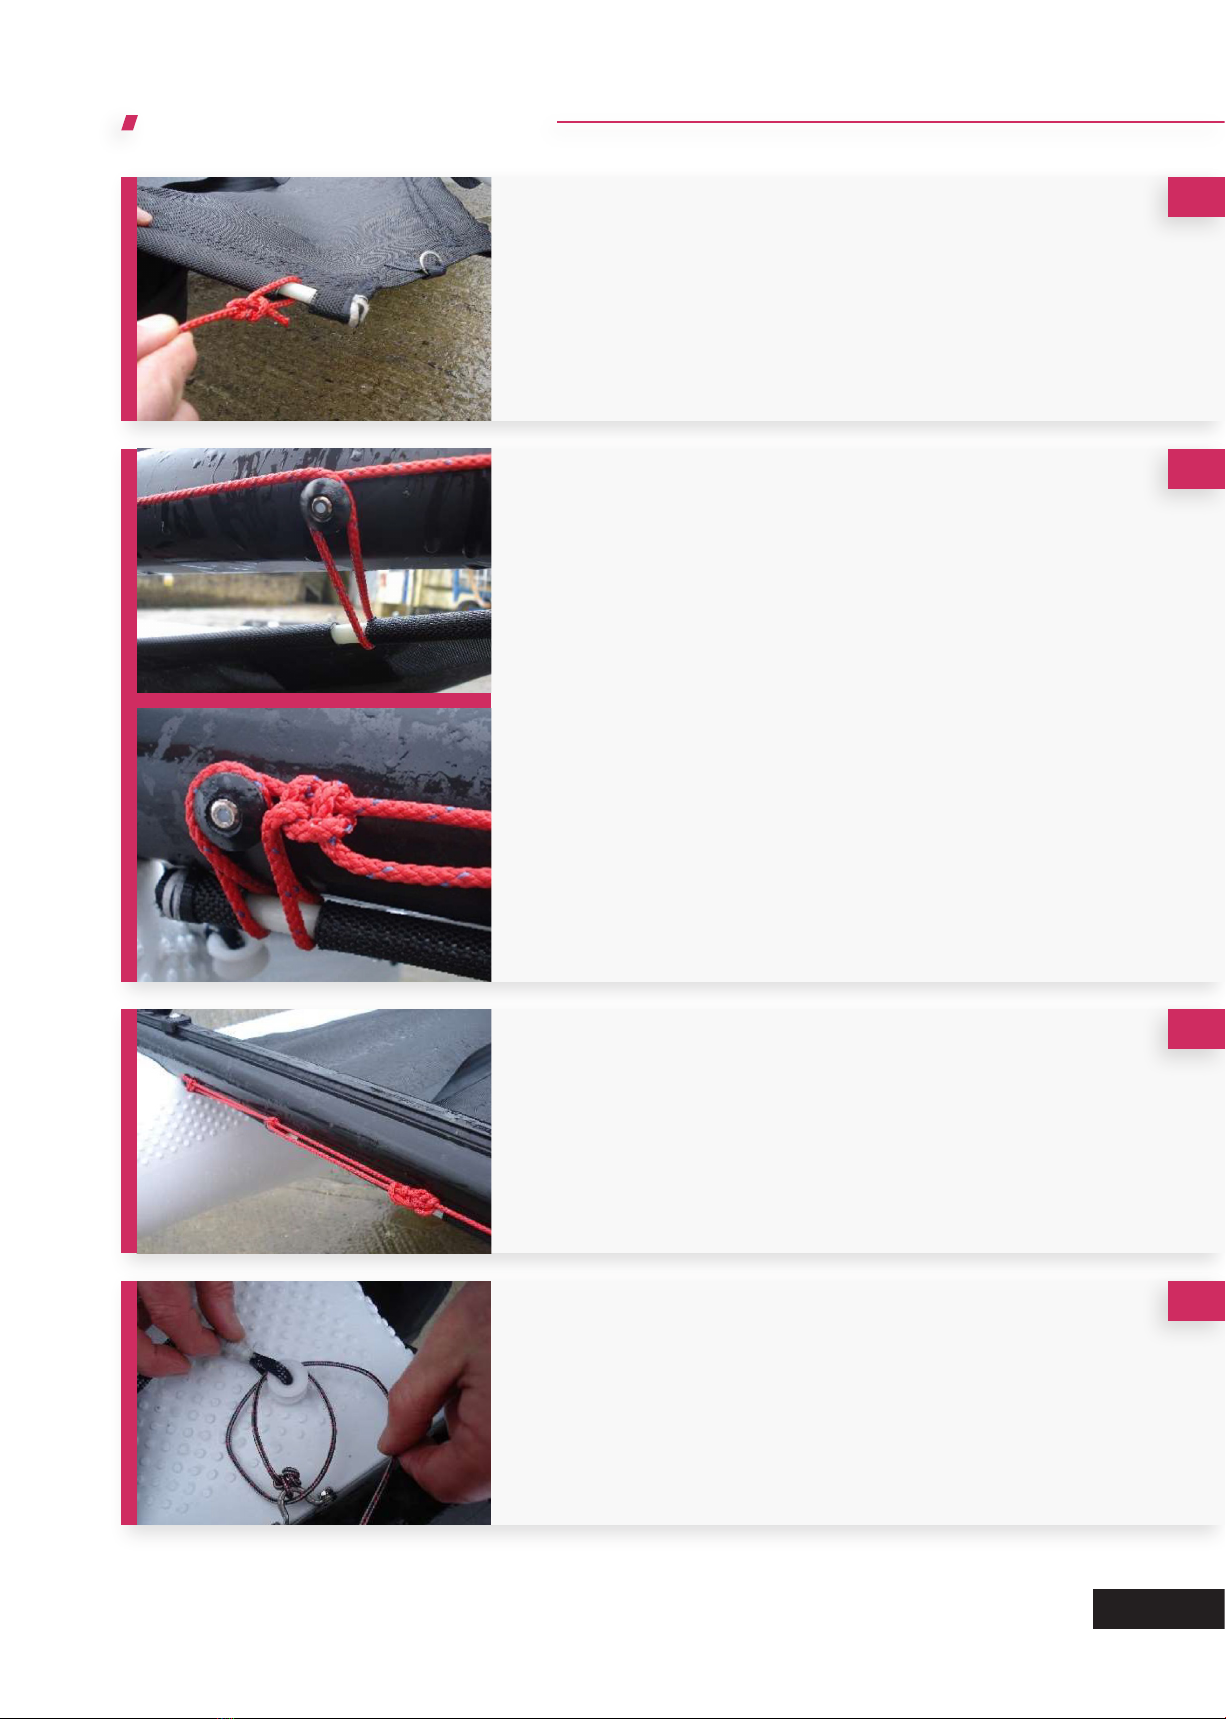
rigging instructions
setting up the hull
Fit the cross bar in the beam socket of each hull and align
them with the predrilled holes. Clean and grease the bolts,
the inner bolt for the rear beam are used with the big plastic
washers and the outer bolt with the smaller one.
Hand tighten the bolts while insuring that the tubes are
inserted in the bolts inside the beam.
Then tighten with 2 x 17mm spanners but not too much.
Retightening on a regular basis is necessary.
covers.
and slide the trampoline into the rail of the front beam until
it is central, this best done by 2 people to avoid snagging the
trampoline on the beam.
1
2
6
setting up the hull (...)
When the trampoline is central it can be laced to the rear
beam.
Attach the tensioning line to one end of the rod in the
trampoline with a bowline.
The excess line can the taken across the back and secured
to the line.
the loop to the metal eye on the rear cross beam and take a
couple of turns through the plastic ring on the trampoline
3
5
6
The rope is lead around the buttons on the rear beam, up
and down to the cut outs on the trampoline passing around
the bar, carry on across the whole trampoline you will need
to go back and tighten the line to pull the trampoline tight.
At the last button take an extra loop around the button and
4

7
setting up the hull (...)
front beam, using a round turn and 2 half hitches.
Pull the line up so the plastic ring at the back is just pulled in
to the side of the trampoline.
The side lines can now be pulled tight at the rear beam to
tension then. When tight secure the line to the metal loop
(using 2 round turns and a half hitch).
Leave a long tail as this is used to tension the trampoline at
the back by feeding through the metal ring on the
trampoline.
7
8
the hull midway between the beams.
9

8
setting up the hull (...)
rigging the mast
The line is fed through the eyes on the trampoline several
the hull.
TIP: extra side line can be tided away by feeding it down the side
of the trampoline.
trampoline should be kept as tight as possible as this makes
it easier to move on.
10
Lay the mast along the centre line of the boat, so you can
wire, shroud and forestay from the large Bow shackle.
The furler swivel is attached to the large Bow shackle with a
smaller bow shackle.
the furler.
block.
1
2

9
rigging the mast (...)
The rigging can then be attached to the mast.
NB: please ensure all shackles are securely tightened.
Remember to separate the rigging to the correct sides
of the boat.
Attach the shroud adjusters to the plates on the hulls and
the shrouds approximately the 4th hole down.
3
5
head halyard pulley.
a round turn and 2 half hitches. The pulley sits just below the
line around the mast.
4
Table of contents
Other Topaz Boat manuals


Popular Boat manuals by other brands


PURSUIT
PURSUIT OS 335 owner's manual

Boston Whaler
Boston Whaler CONQUEST 345 owner's manual

Jeanneau
Jeanneau SUN ODYSSEY 41 DS owner's manual

Meridian
Meridian 490 Pilothouse owner's manual

Advanced Elements
Advanced Elements AdvancedFrame Expedition AE1009 owner's manual

Robo Marine Indonesia
Robo Marine Indonesia GEOMAR user manual


