Topaz taz Quick start guide
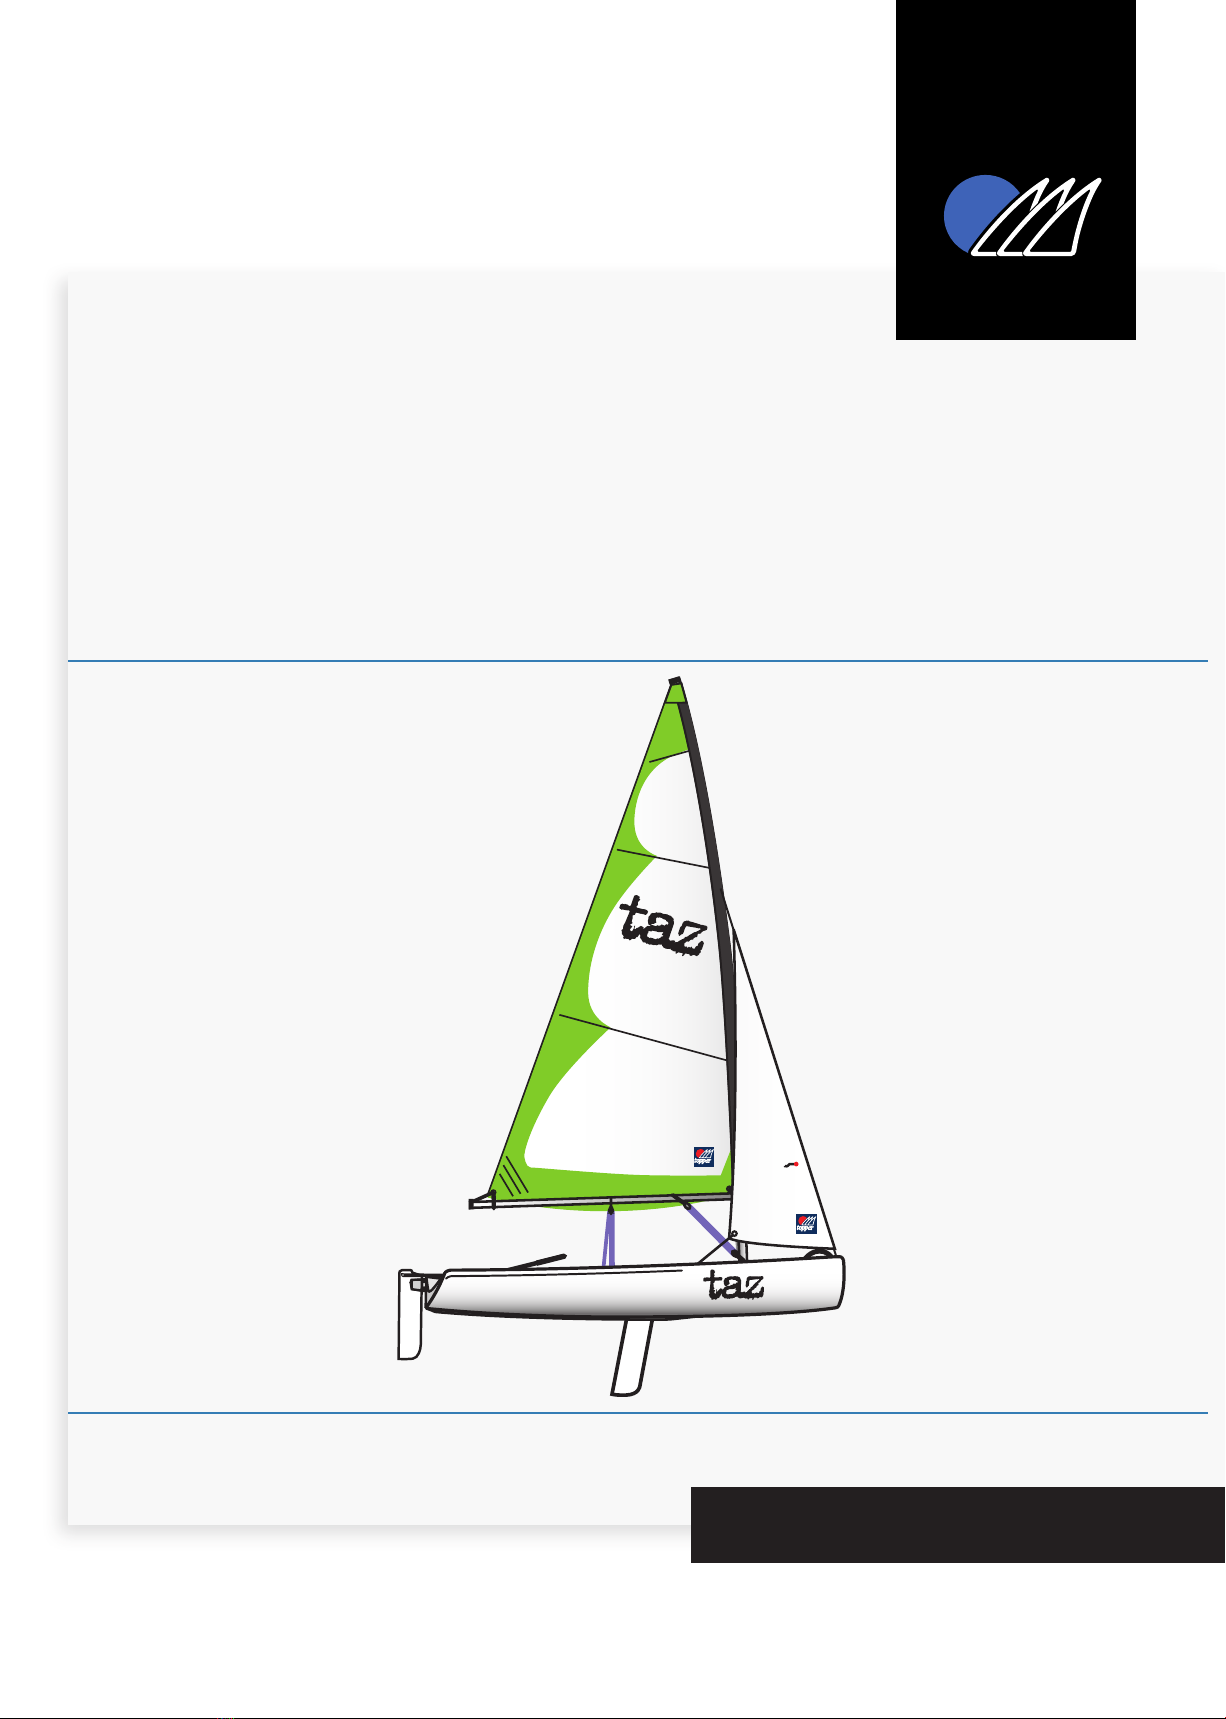
topaz
topaz taz
»Rigging Instructions
www.toppersailboats.com

1
»Introduction
»Manufacturers Details
»Maintenance
»Glossary
»Mast and Mainsail
»Boom
»Jib
»Foils
1
1
2
3 - 4
5 - 6
7 - 9
9 - 10
11
These RIGGING INSTRUCTIONS have been compiled to help you
to rig your Topaz TAZ sailing dinghy. Please also ensure that you
refer to your TOPAZ OWNERS MANUAL.
The OWNERS MANUAL has been compiled to help you to operate
your craft with safety and enjoyment. It contains details of the craft,
the equipment supplied or tted, it’s systems and information on its
operation and maintenance. Please read it carefully and familiarise
yourself with the craft before using it.
If this is your rst craft, or you are changing to a type of craft you
are not familiar with, for your own comfort and safety, please
ensure that you obtain handling and operating experience before
assuming command of the craft. Your dealer or national sailing
federation or yacht club will be pleased to advise you of local sea
schools, or competent instructors.
PLEASE KEEP THE RIGGING INSTRUCTIONS AND THE OWNERS
MANUAL IN A SECURE PLACE AND HAND THEM OVER TO THE
NEW OWNER WHEN YOU SELL THE CRAFT.
For further information, spares and
accessories, please contact the
manufacturer:
TOPPER INTERNATIONAL LTD,
Kingsnorth Technology Park,
Wotton Road, Ashford, Kent TN23 6LN
Telephone +44 (0) 1233 629186
email info@toppersailboats.com
contents
introduction

2
The Topaz TAZ is designed to require very little maintenance, but there are some simple ways to keep your
boat in the best condition.
Rudder
Never launch your boat without checking that the retaining clip has clicked into place beneath the upper
transom tting, as this will prevent the rudder from falling o.
Sails
After you have nished sailing, roll the mainsail loosely, this will extend its life better than folding.
Always rinse the sails and the boat after sailing in salt water.
Foils
Make sure that the rudder blade remains tight between the stock when down. Any movement between the
blade and the stock, or the stock and the hull may cause steering problems.
Hull and ttings
Small dents can be repaired by gently warming the hull with a hot air blower (take care not to melt the hull). For
any more substantial repairs refer to Topper Sailboats.
Check the attachment of all ttings regularly. This is particularly important for the ttings that are screwed onto
xings that are set in the hull. Keep all blocks, cleats and ropes clean and rinse them after salt water exposure.
Always remove the bung to empty any water after sailing, and when not sailing leave the bung out to prevent
the buildup of pressure within the hull as the temperature uctuates.
Ropes
Always replace any ropes that are showing any signs of wear immediately.
maintenance

3
glossary / useful terminology
hull
spars
foils
Nose:
Painter:
Transom:
Fore:
Aft:
Mast Step:
Rail:
Port:
Starboard:
Leeward:
Windward:
Gudgeon:
Mast:
Mast Heel:
Boom:
Outhaul:
Vang:
Cunningham:
Sheet:
Daggerboard
Rudder:
Pintle:
Front of the hull
Rope from the nose of the hull used for towing or tying the board to a jetty, buoy or trolley
Back of the hull
Forward
Rearward
Integral tube where the mast heel/foot of the mast locates
Upper/outermost edge of a hull
Left side of the hull when looking forward
Right side of the hull when looking forward
Direction away from the wind
Direction from which the wind is coming
Fitting on the transom used to hang the rudder
Main vertical spar supporting the rig/sail
Lower edge/foot of the mast
Spar at the bottom of the mainsail
Purchase system on the boom for tightening the lower edge/foot of the sail
Purchase system for tightening the rear/aft edge (leech) of the sail
Purchase system for tightening the forward edge/lu of the sail
Rope for controlling the inward/outward position of the mainsail
Blade found in the middle of the hull used to counteract leeward slippage
Blade found at the transom used for steering
The male part (pin) of the rudder hanging system

4
sails
Mainsail:
Jib:
Tack:
Clew:
Head:
Leach:
Lu:
Foot:
Batten:
Sail aft/rearward of the mast (Larger of the two)
Sail forward of the mast (Smaller of the two)
Forward lower corner of a sail
Rear lower corner of a sail
Upper corner of sail
Rear edge of the sail
Forward edge of the sail
Bottom edge of the sail
A thin stiening strip in the sail to support the leach
glossary / useful terminology (...)
5
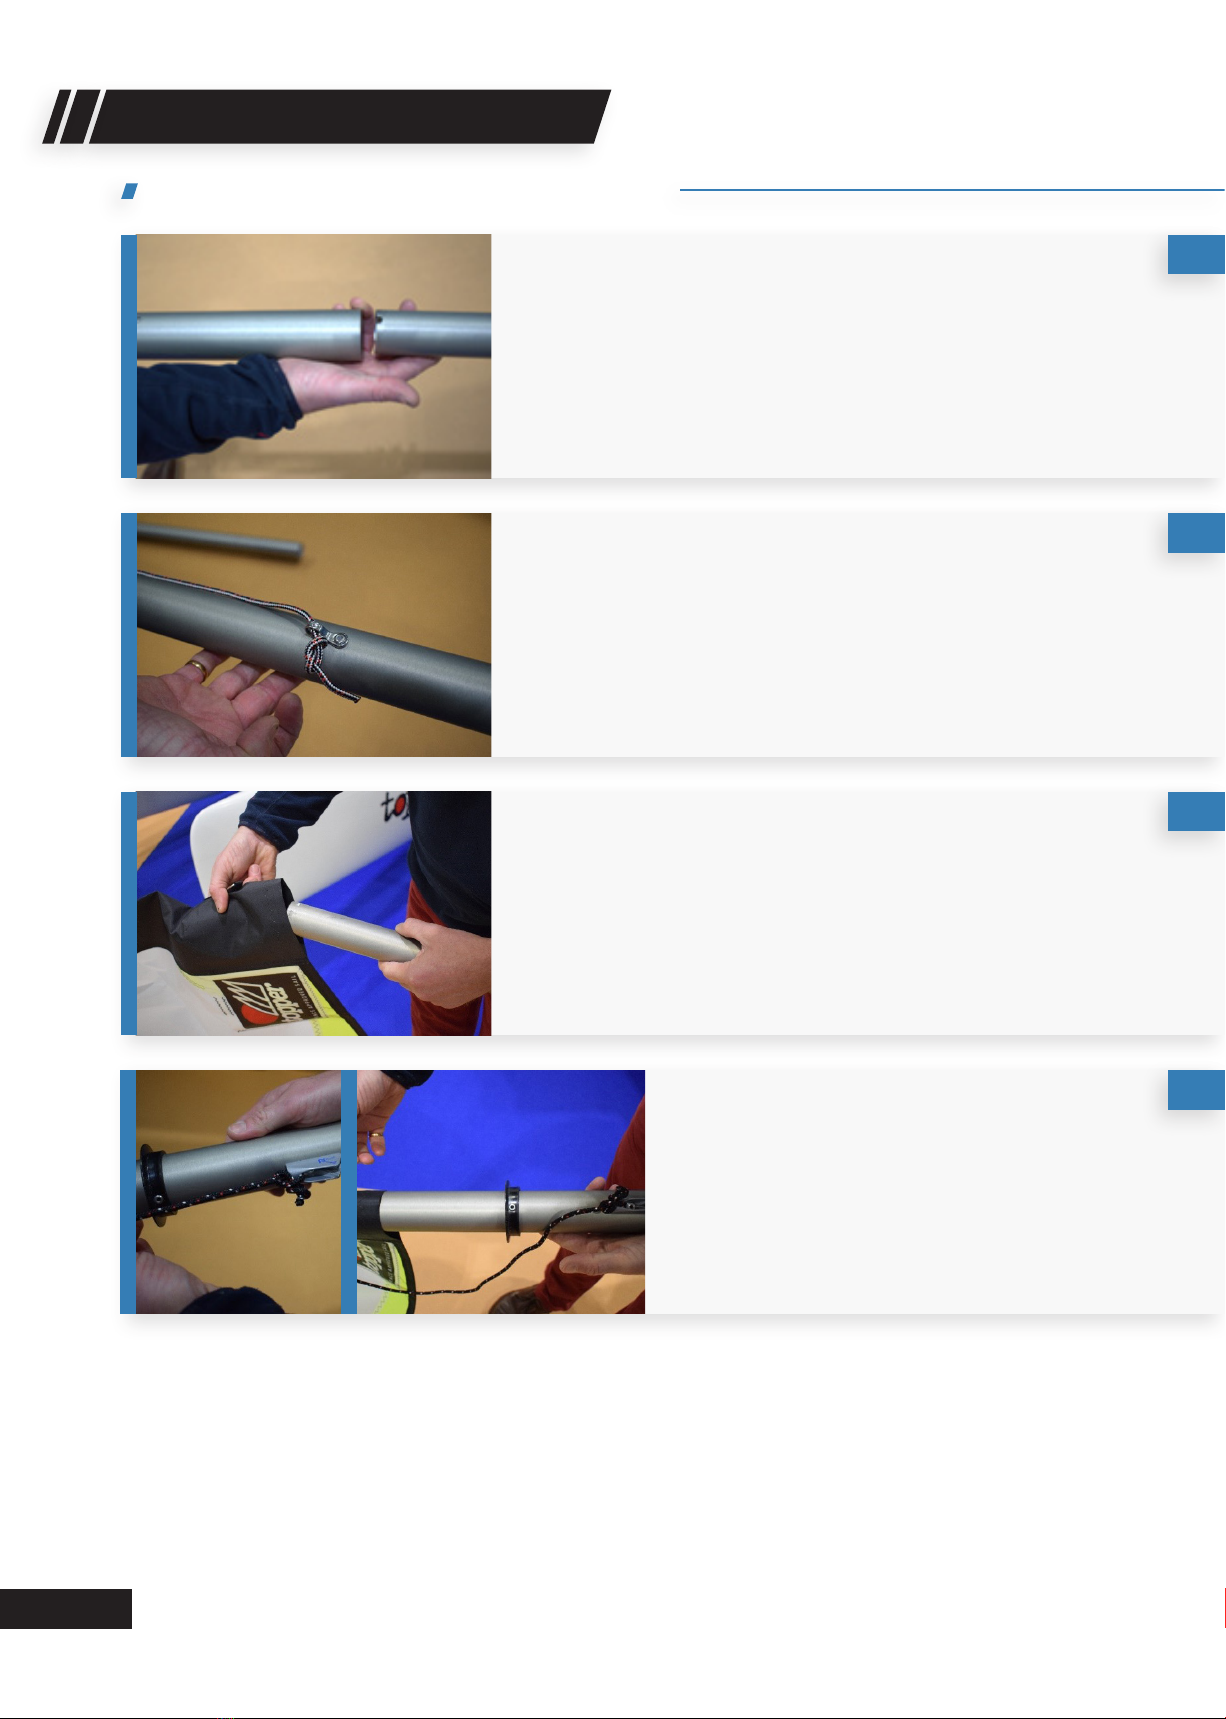
Lay the upper and lower mast sections on the ground.
Slide the upper section into the lower, ensuring that the rivet
(shown on the left of the image) lines up with the slot in the
lower mast section (shown on the right of the image).
ONLY IF RIGGING THE JIB LATER. If not, then please skip
this step.
Pass one end of the jib halyard through the P-clip on the
upper mast section and tie a gure eight knot in the end.
Slide the sleeve on the lu of the sail over the mast.
1
2
3
Tie one end of the downhaul onto the block near
the bottom of the mast, then pass the other end
of the downhaul through the ring on the sail.
Secure the downhaul by passing it through the
cleat.
4
rigging instructions
rigging the mast & mainsail
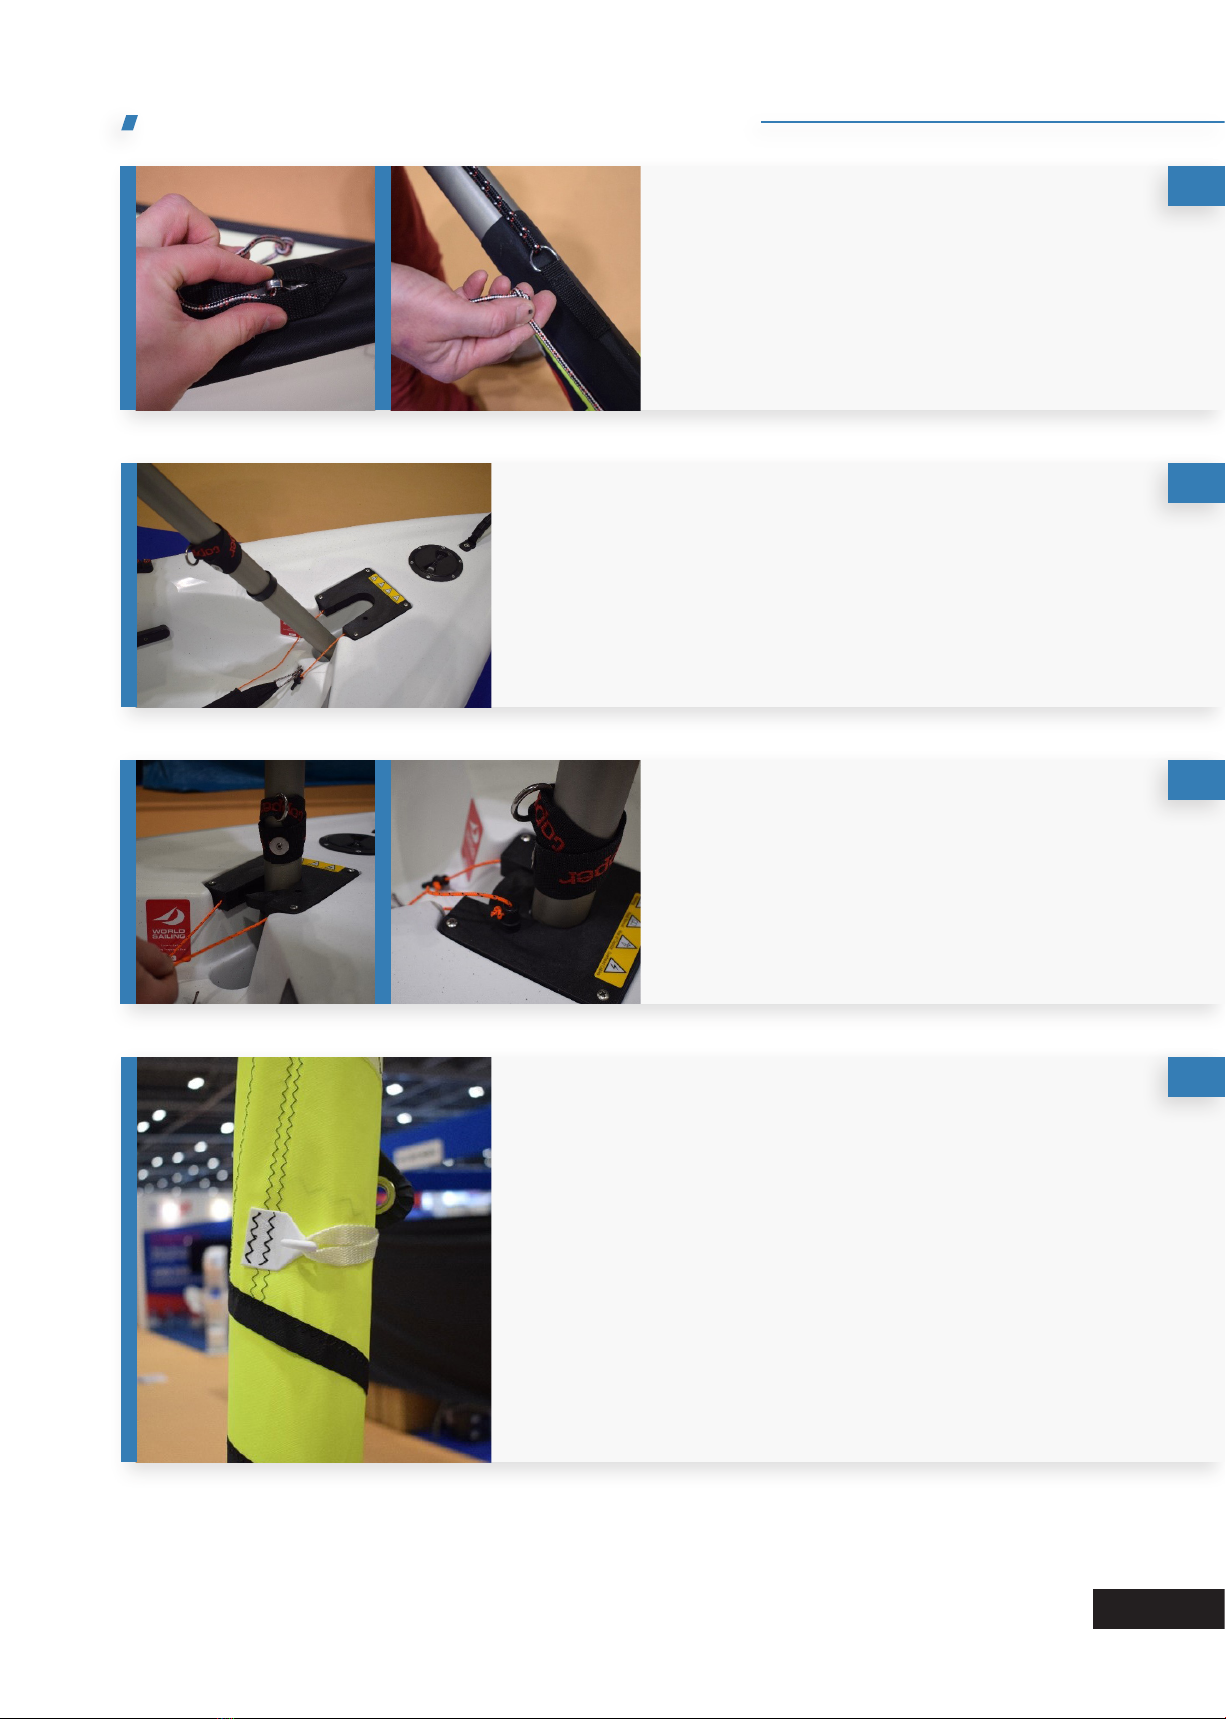
6
Place the mast foot in the hull and lift until the mast is
vertical.
6
Secure the mast by pulling the orange lines to
close the mast gate.
Lock the mast gate by placing the peg in the hole
in the mast gate.
7
Wrap the sail up by passing it clockwise around the mast
and secure the sail by hooking the white strap on the hook
as shown. This keeps the sail secured while the rest of the
boat is rigged.
8
Take the end of the jib halyard with the gure eight
and pull it to the bottom of the mast, and then
secure this end on the mast.
5
rigging the mast & mainsail (...)
7
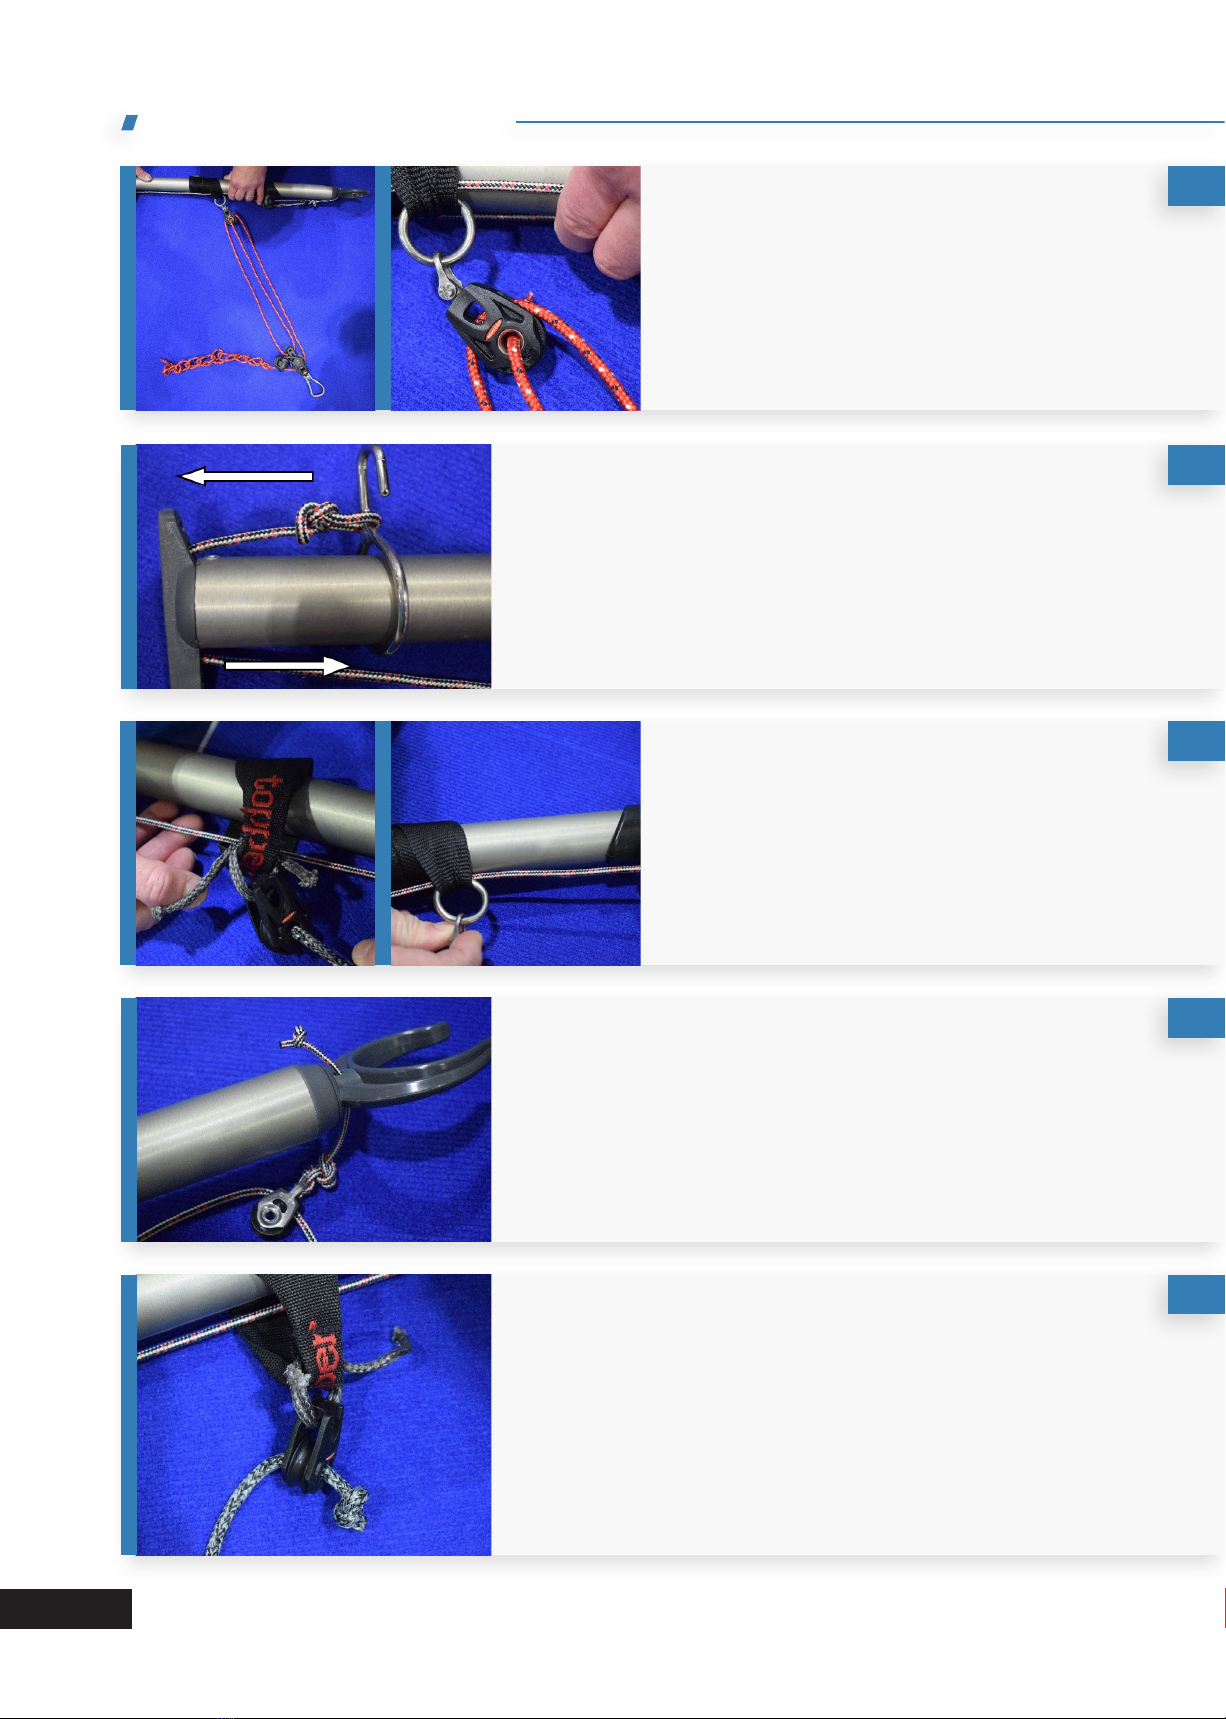
Rigging the outhaul.
Tie one end of the outhaul onto the metal hook on the
boom. Then pass the other end of the outhaul through the
end of the boom, bringing it out underneath as shown.
Tie the pulley onto the front end of the boom as shown, then
pass the free end of the outhaul through the pulley.
Tie the boom mainsheet block onto the topper strap in the
middle using the short grey piece of dyneema.
2
4
5
Attach the kicker to the boom as shown.
Pass the free end of the outhaul through the
topper strap in the middle of the boom (left), then
through the kicker strap and the block near the
front end of the boom (right).
1
3
rigging the boom

8
Clip the kicker onto the ring on the bottom of the mast.
Tie the mainsheet block onto the hull of the boat as shown,
with the cleat on the block pointing towards the stern of the
boat.
Place the gooseneck of the boom on the mast above the
gooseneck, and push the boom until the gooseneck is fully
around the mast.
7
8
6
Rig the mainsheet.
First, pass one end of the mainsheet through the middle of
the pulley on the boom (as shown in the top image), then tie
an overhand knot the in end of the line.
Take the other end of the main sheet and pass it through the
top pulley of the block on the hull (shown in the bottom
image), moving from the front of the boat to the back of the
boat.
Then pass the free end of the main sheet through the pulley
on the boom, from the back of the boat to the front (shown
in the top image).
9
rigging the boom (...)

9
Unwrap the sail and hook the metal eyelet in the clew to
the boom.
Tighten the outhaul so that the clew of the sail is pulled to
the end of the boom, and secure the line in the cleat
(seen in step 2.3).
Pass the free end of the main sheet through the block on the
hull, from the front of the boat to the back.
Then tie a gure of eight knot in the free end of the main
sheet to prevent the line from passing back through the
pulleys.
11
10
Clip the tack of the jib onto the P clip on the bow.
2
Tie the jib halyard from step 1.5 to the head of the
jib.
1
2
rigging the boom (...)
rigging the jib
Other Topaz Boat manuals


Popular Boat manuals by other brands


PURSUIT
PURSUIT OS 335 owner's manual

Boston Whaler
Boston Whaler CONQUEST 345 owner's manual

Jeanneau
Jeanneau SUN ODYSSEY 41 DS owner's manual

Meridian
Meridian 490 Pilothouse owner's manual

Advanced Elements
Advanced Elements AdvancedFrame Expedition AE1009 owner's manual

Robo Marine Indonesia
Robo Marine Indonesia GEOMAR user manual


