TOPIC-LIGHT DP1RGB User manual

TOPIC LIGHT CO., LTD
魅影灯光设备有限公司
USER MANUAL
Professional Stage Lighting Laser show product

2
Thank you for purchasing DP1RGB. To optimize the performance
of this product, prior to use, please read these operating instructions
carefully to familiarize you with the basic operation of this unit.
Please keep the manual in safe price for future reference.
This unit has been tested at our factory before sending out to you,
there is no assembly required.
Once after received this product, please take and put carefully. And
check cautiously that whether the product was damaged or not
during the transportation.
Checking Parts
Please check if the following parts are included:
1 x Laser
1 x Power cable
1 x User manual
Danger Laser Radiation!
Avoid direct eye exposure!
Laser radiation can cause eye damage or skin damage
All protective measures for a safe operation of this laser must
be applied.
Installation

3
1. Please check the voltage whether is the same with the one
showed on the equipment or not.
2. It must ask for the technical person and set the light safety when
installation. And let the light beam at the suitable angle.
3. When install this equipment please make sure there's no
flammable surfaces (decorated things, etc) within at least 2.5M and
maintain minimum distance of 0.5M from the equipment to the walls.
4. Please make sure that there's no other equipment or decorating
materials obstructed the exhaust fan and the vent-pipe.
5. Products should be install immobility.
6. In case of safety, it's very important that to connect the earth with
line.
Attention
1. Please do not open the bottom cover yourself without permission.
Operate it accord the user manual. Call the technician when the
machine breaks down.
2. Please do not see the laser beam directly to avoid any damage.
3. Before connect or disconnect the power, please adjust the
luminance of the laser diode to the least to avoid any damage to the
laser diode.
4. This unit should be keep dry, do not use in the rain and dusty
environment. It can be use in the outdoor with the water-proof cover
protector.
5. Set the light immobility and try to avoid strong shake or hit.
6. Prevent dust into the equipment to avoid problems.

4
7. Please keep that there's no other equipment or decorating
materials obstructed the exhaust fan and the vent-pipe when the
equipment was working.
8. Before connect power, check the plug is immobility or not, power
line should be connected well.
9. Please do not open or close the equipment frequently that's to
avoid any affect to the life span of the laser diode, and try the best to
avoid the long time working.
10. Due to the characteristic of the laser diode, after four hours
working, it should be close at least 25 minutes until the laser diode
cooling then work again.
11. Don't touch the light or draw the power line when your hand was
wet. And do not pull the electronic power line.
12. Maintain the distance at least 3M above from the equipment to
the object.
13. This equipment does not have any parts can repair for the users,
please do not open the equipment.
14. When the laser diode became dim or damaged please contact
the dealer timely.
15. When you want to retransfer the products, you'd better use the
original package to shockproof.

5
LED setting:
Mode
LED DIPLAY
1
MUSIC
2
AUTOMATIC
3
DMX512 control
4
scanner or color
5
SET function
6
Restore Default
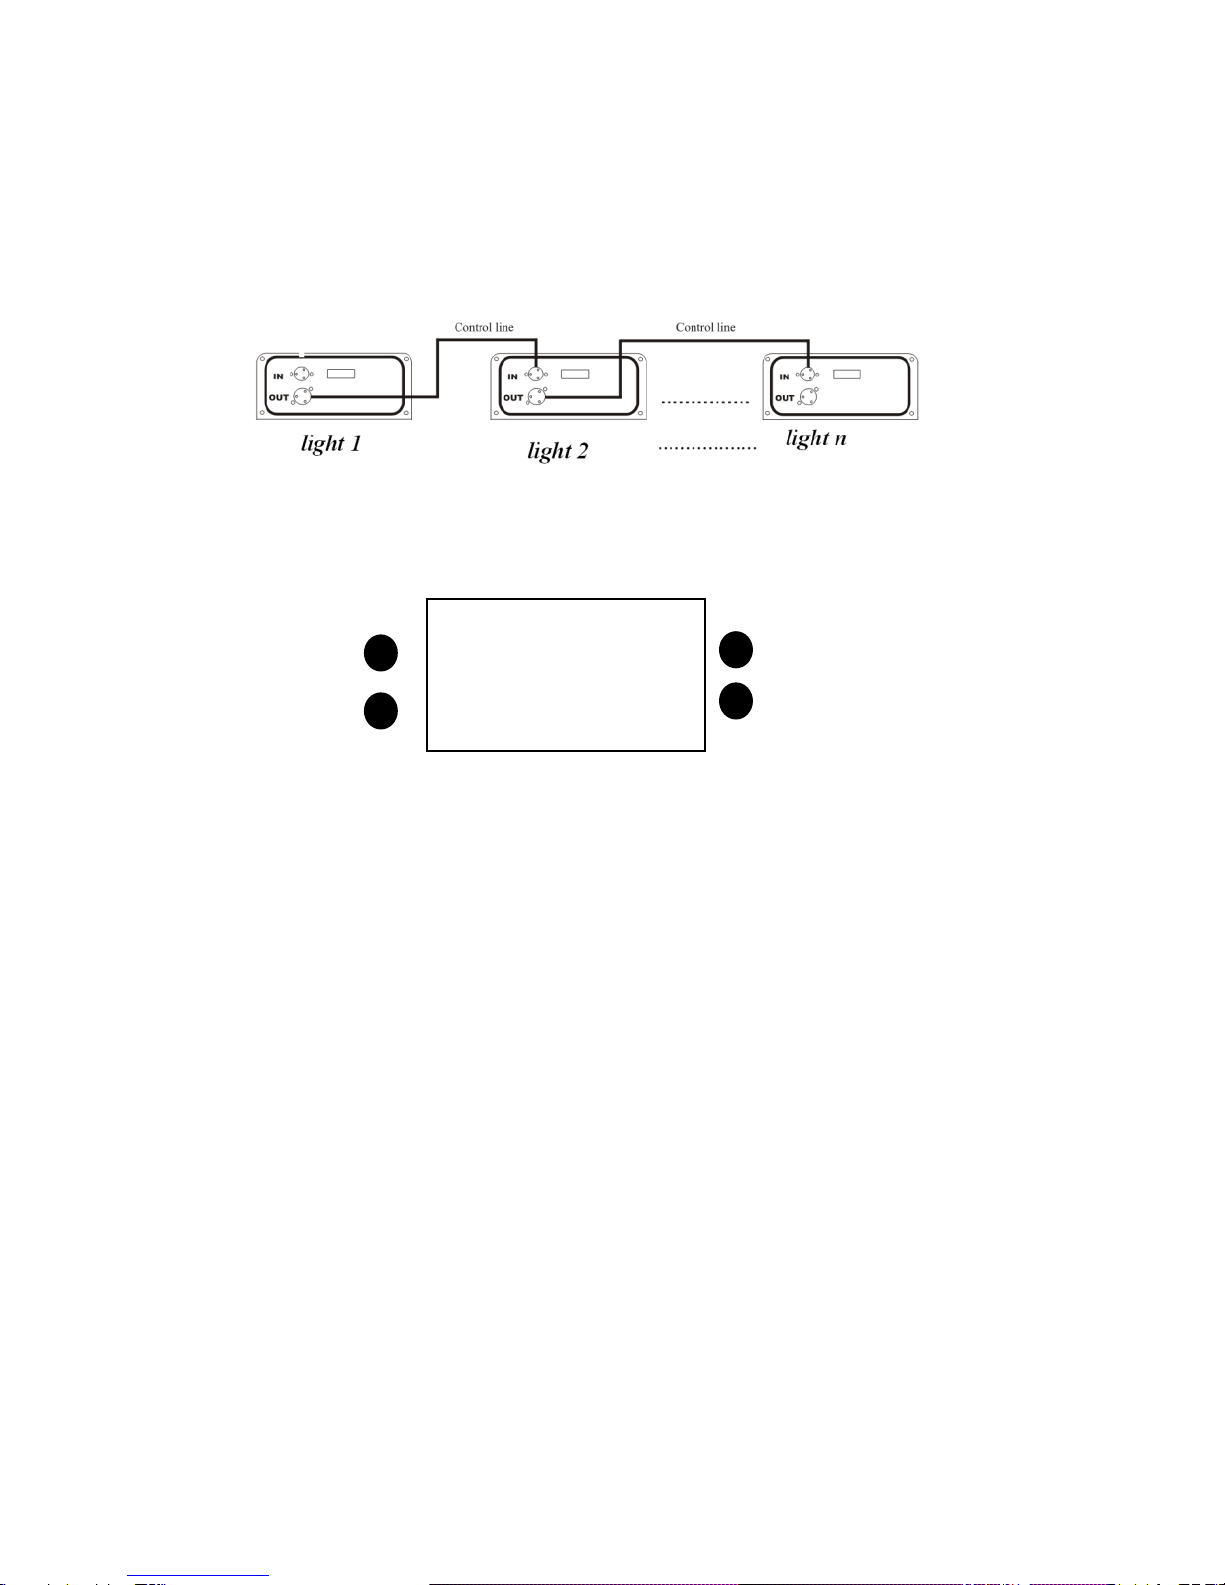
1. DMX Setting:
Input dmx singal, and link the dmx controller and the lights by
the control line as the following picture, you can control the
lights by the controller.
6
1. Master-slave setting:
Link the lights as the following picture (the light which does not
receive signal, only output signal, will be the master light)
LED display panel, as following:
ENTER UP
Exit DOWN
1. Touch keys and LED menu display, menu operation is simple and easy to
use.
2. After loading the software to display the software version(So10)。
3. Through the UP and DOWN buttons to select the need of function。
4. Determined by the selected function ENTER and Exit button, return to the
higher level menu。
Before using pleas check power supply link with earth wire
correctly or not.
The specification of the front and rear panel:
1. Power input to the socket
2. Power switch button
3. Laser safety switch lock
8888

7
4. LED display
5. DMX IN/ DMX OUT:DMX signal output and input
6. When the ILDAinterface connected to the exterior console,
light will automatic change to exterior control mode, and
needn't to convert switch.
7. Min-Max:Volume and sensitivity adjustment
8. MIC:microphone
LE Technical Specifications
1. Power Supply: AC100~240V 50/60Hz
2. Rated Power: <500W
3. Laser color: Red/Green/Blue
4. Working Mode: Sound/Auto/DMX512/Master-Slave/ILDA
8
5. DMX Control Channels: 12CH
6. Modulation: TTL
7. N.W/G.W: 2.9/3.3kg
8. Pack Size:35x26x20CM
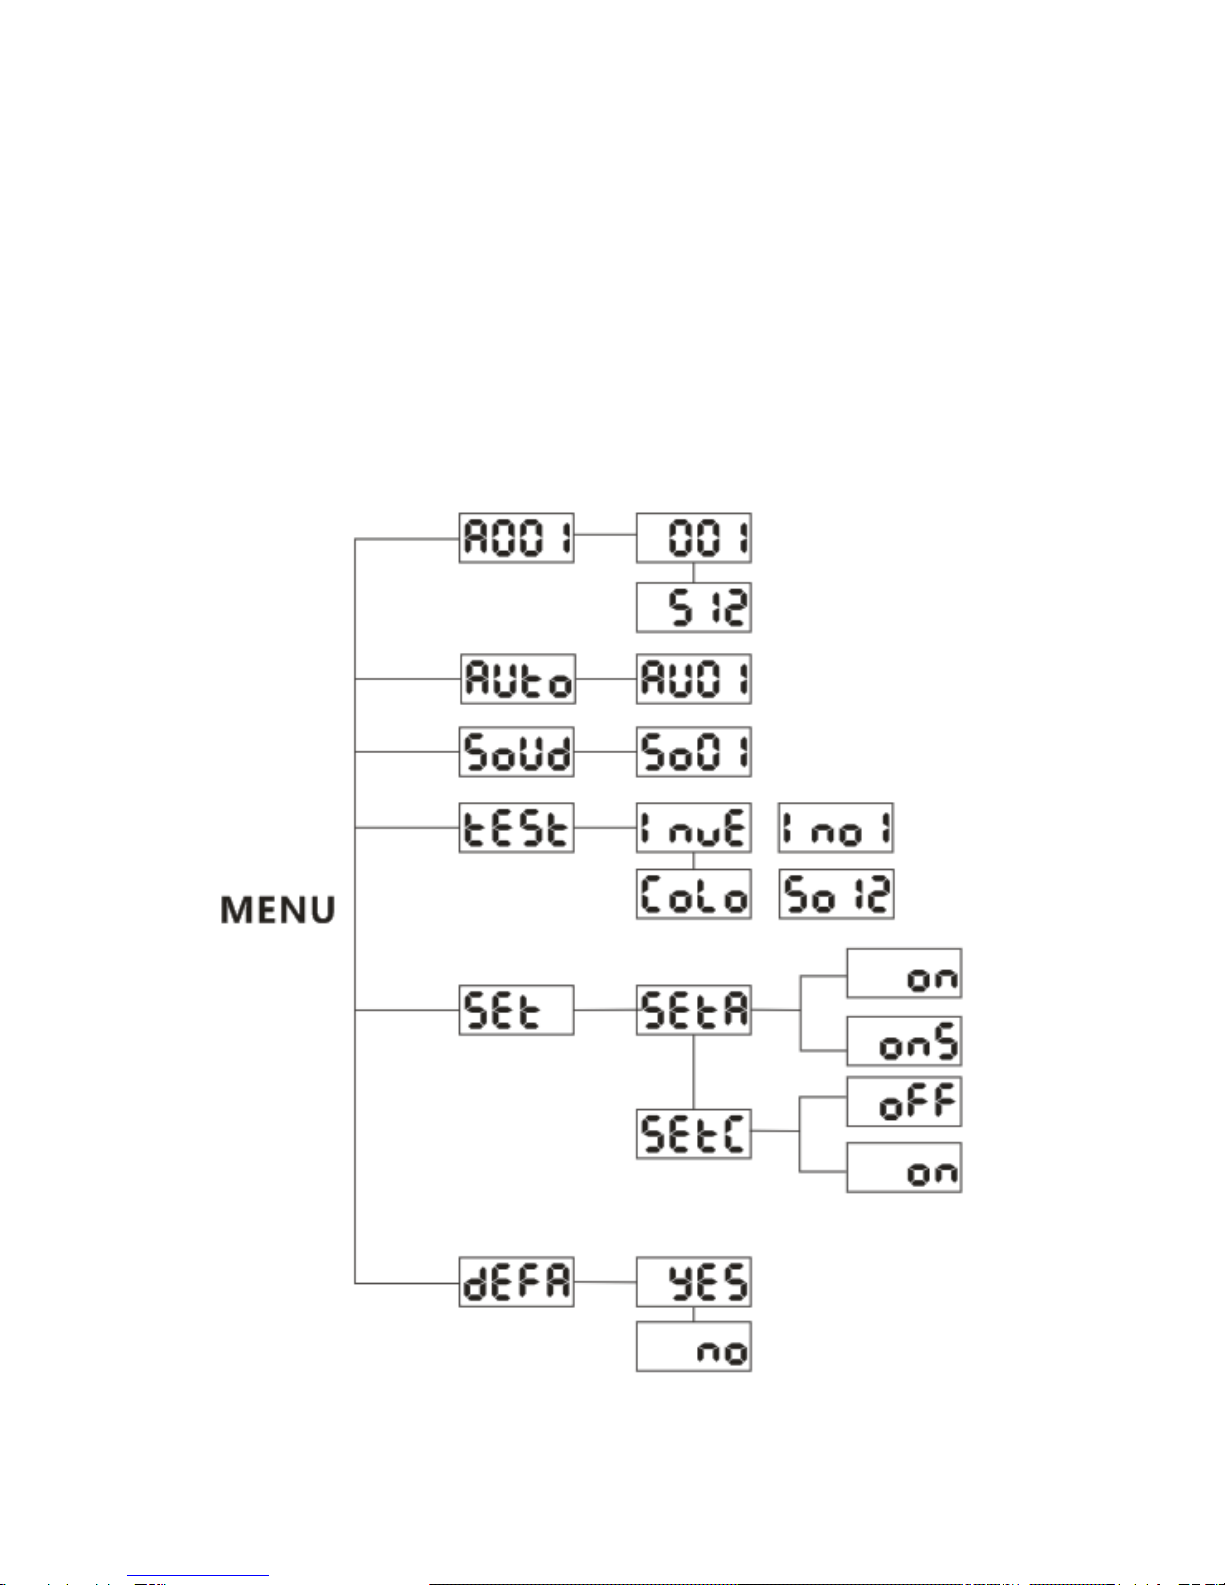
LED function menu setting:

9
1、Choose DMX512 function:
By UP\DOWN keys to select A001, press ENTER button to enter
the DMX-512 function, at meantime through UP\DOWN Keys to set
the address code 001, 013, 512, press EXIT to return.
2、Choose AUTOMATIC function:
By UP, DOWN button to select AUTO, Press ENTER button to
enter theAUTO function, at meantime through UP, DOWN keys to
select self-propelled effect AU01, AU02, AU03, etc., press EXIT to
return.
3、Choose music function:
By UP, DOWN keys to select SODU, Press ENTER button to
enter the voice function, through UP, DOWN keys to select Sound
effects SO01, SO02, SO03, etc., press EXIT to return.
4、Choose test function:
By UP, DOWN button to select TEST, press ENTER button to
enter TEST. By UP, DOWN to select INVE, COLO function, press
EXIT to return.
INVE to set scanner X、Y axis invert:
By UP, DOWN to select INVE, press ENTER button to INO1, by
UP, DOWN to select INO1(X,Y axis no invert), INO2(X axis invert),

10
INO3(Y axis invert), INO4(X,Y axis invert), press EXIT to return.
COLO setting the light of color models:
By UP, DOWN keys to select COLO, press ENTER button to
enter the SO011, at meantime by UP, DOWN keys to select
SO01-SO12, press EXIT to return, SO01 to SO07 is seven kinds of
monochrome mode, SO08 is RGY, SO09 is RBP, SO10 is GBA,
SO11 is RGB, SO12 is WYAP.
5、Choose SET function:
By UP, DOWN keys to select SET, press ENTER to enter the
setting function, through UP, DOWN keys SETA, SETB, SETC,
SETD following functions, press EXIT to return.
SETA set LED bright function:
By UP, DOWN keys to select SETA, press ENTER button to enter,
through UP, DO WN keys to select ON (display lit), 5S (display lights
off after 5 seconds ), press EXIT to return.
SETC set whether to open the host function:
By UP, DOWN keys to select SETC, press ENTER button to enter,
through UP, DO WN keys to select OFF (off the host), ON (open
host), press EXIT to return
6、select Restore Default function
By UP, DOWN keys to select DEFA, press ENTER button to enter
the default function, by UP, DOWN keys YES (the default is restored),
NO (do not restore the default) the functions of following, press EXIT
11
to return.
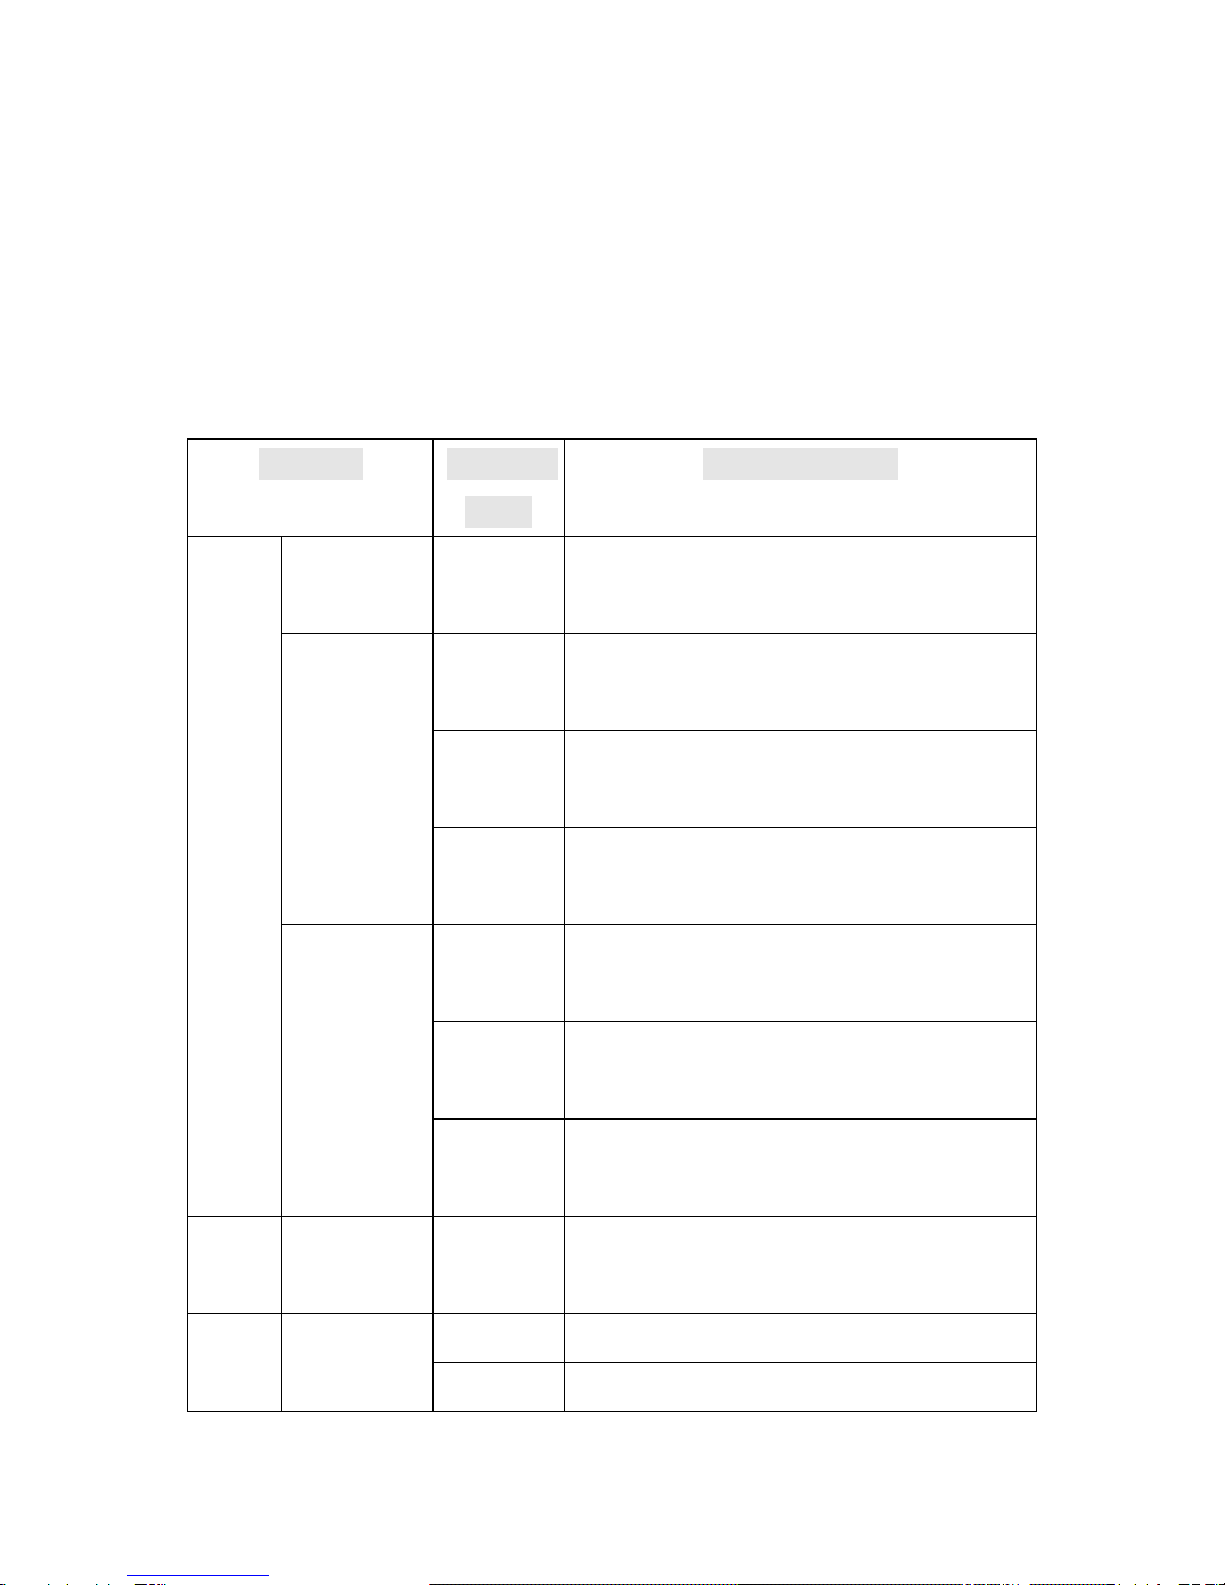
DMX-512 Channel:
1. 12CH mode as following:
Channel
Channel
value
Control Content
CH1
Laser light
off
0~41
Laser light off
auto trigger
42~83
Manual Control CH2-CH10 valid
84~125
Running built-in beam effect
CH2-CH10 invalid
126~167
Running built-in animation effect
CH2-CH10 invalid
Music
trigger
168~209
Running built-in beam effect
CH2-CH10 invalid
210~251
Running built-in animation effect
CH2-CH10 invalid
252~255
Manual Control CH2-CH10 valid
CH2
Choose
pattern
252~255
Choose pattern
CH3
Pattern
1~127
Rotation angle selection
128~191
reverse direction rotation speed
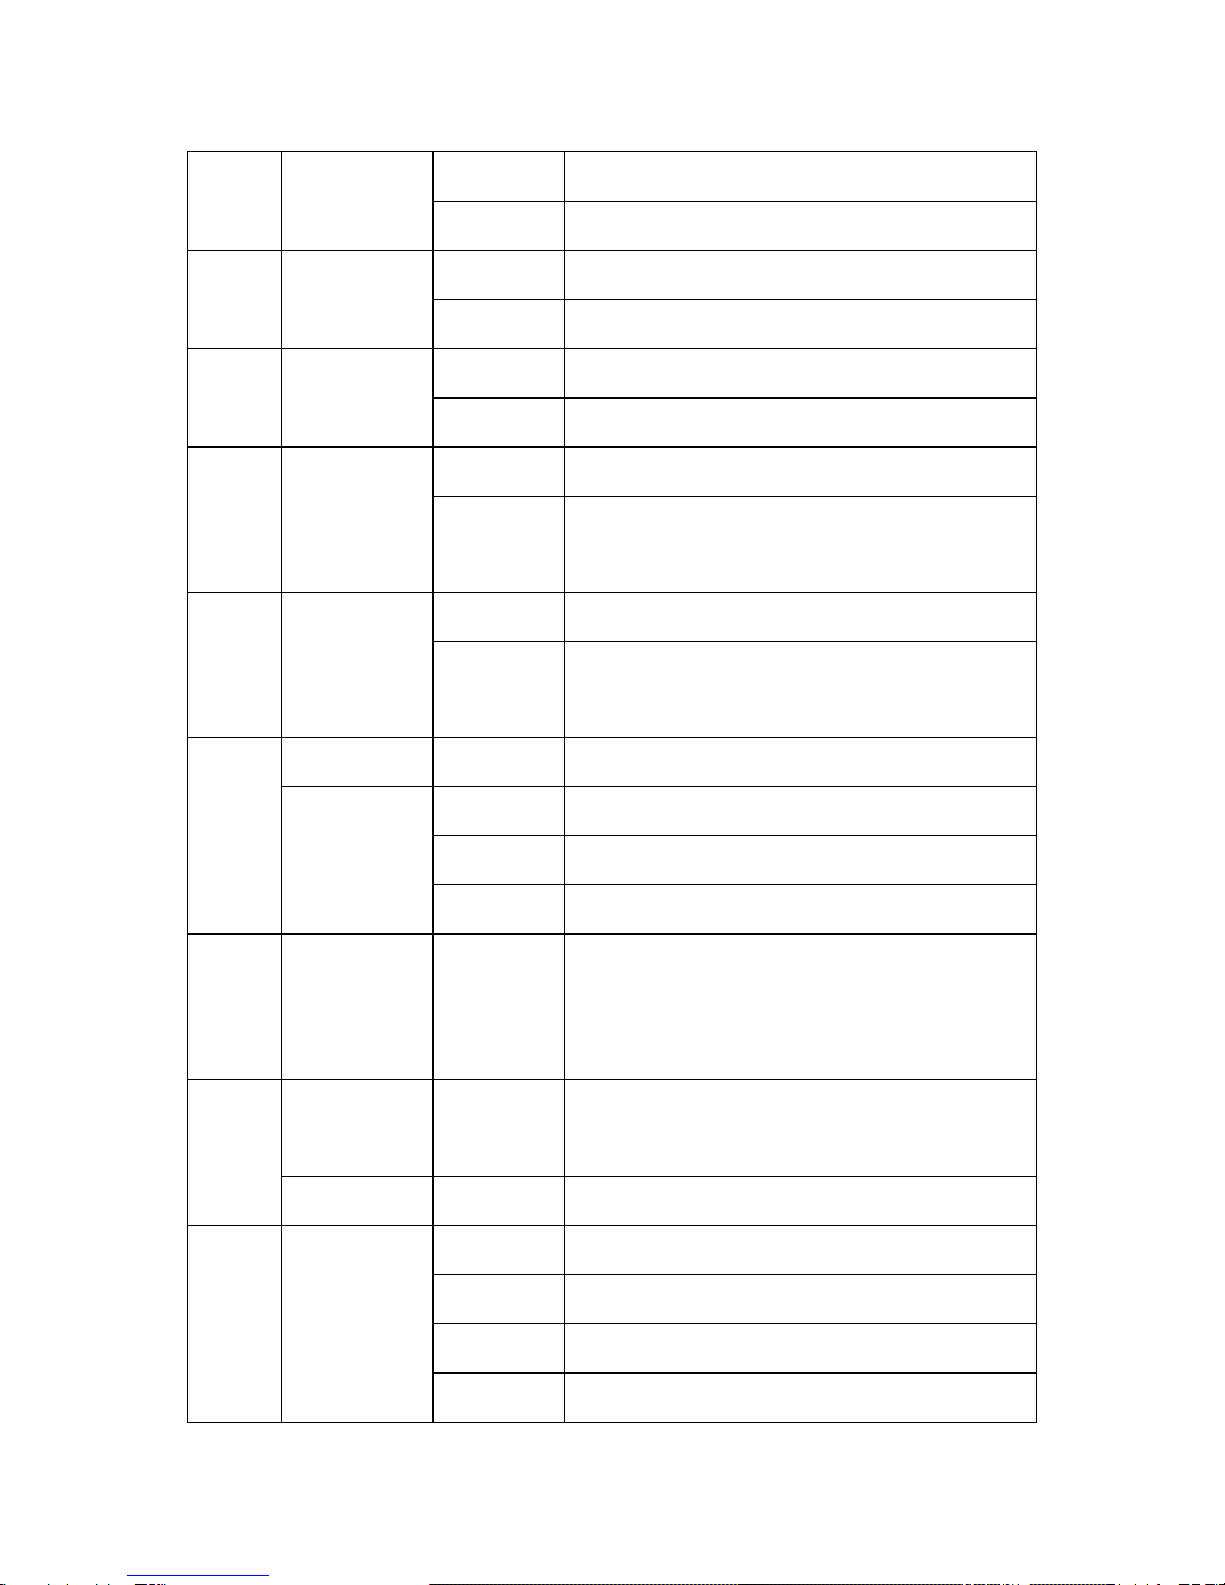
12
rotation
selection
192~255
positive rotation speed selection
CH4
Pattern flip
horizontal
0~127
Flip horizontal angle selection
128~255
Flip horizontal speed selection
CH5
Pattern flip
vertical
1~127
Flip vertical angle selection
128~255
Flip vertical speed selection
CH6
Pattern
horizontal
moving
0~127
Horizontal moving position selection
128~255
Horizontal moving speed selection
CH7
Pattern
vertical
moving
1~127
Vertical moving position selection
224~255
Vertical moving speed selection
CH8
Pattern size
0~63
Pattern size selection
Pattern
zoom
64~127
Speed from fast to slow
128~191
Speed from slow to fast
192~255
Zoom speed selection
CH9
Pattern
gradually
drawing
0~255
Gradually drawing speed selection
CH10
Scanner
speed
1~127
Pattern scanner speed selection
Point effect
128~255
Pattern point length selection
CH11
Color mode
0~24
Fixed color selection
25~199
Color selection
200~224
Color change effect
225~255
Color flow change effect

13
CH12
Color
speed
0~255
Color change speed from slow to
fast
Maintenance
Maintenance should be performed every 15-day period, by using a
sponge which is dipped with alcohol, rather than wet cloth or other
chemical liquid, to clean the mirror.
Always disconnect from the mains when the device is not in use or
before cleaning it.
Warning
Power must be disconnected before maintenance or repair. Do not
look at the light source directly
Note
Don't separate laser machine from laser power and repair them by
yourself, otherwise no good repair service will be supplied.
Declaration
This device has left our premises in absolutely perfect condition. In
order to maintain this condition and to ensure a safe operation, it is
absolutely necessary for the user to follow the safety instructions and
warning notes written in this user manual.
14
We cannot be made liable for damages caused by incorrect
installations and unskilled operation!
Table of contents
Other TOPIC-LIGHT Lighting Equipment manuals


