TORAIZ SP-16 Instruction sheet


Introduction
Thank you for purchasing the TORAIZ SP-16.
This document explains how to use the sound pack (demonstration project file) we’ve provided.
Confirm the firmware version
To use the project file on the TORAIZ SP-16, the firmware version 1.40 or greater must be installed. To check
the machine’s firmware version number:
1. Turn on the TORAIZ SP-16.
2. Press UTILITY in the HOME window to open the UTILITY window.
3. Scrolling the screen with the rotary selector, look for the second version number from the bottom.
※Confirm that the value is equal to or greater than version 1.40. If you’re using an older version, download
the latest firmware via this link and update it according to the firmware update procedure manual.
4. Press UTILITY to exit the UTILITY window.
Decompress project files
Decompress the downloaded zip file. The following files are stored within:
*************** Project.tpkg

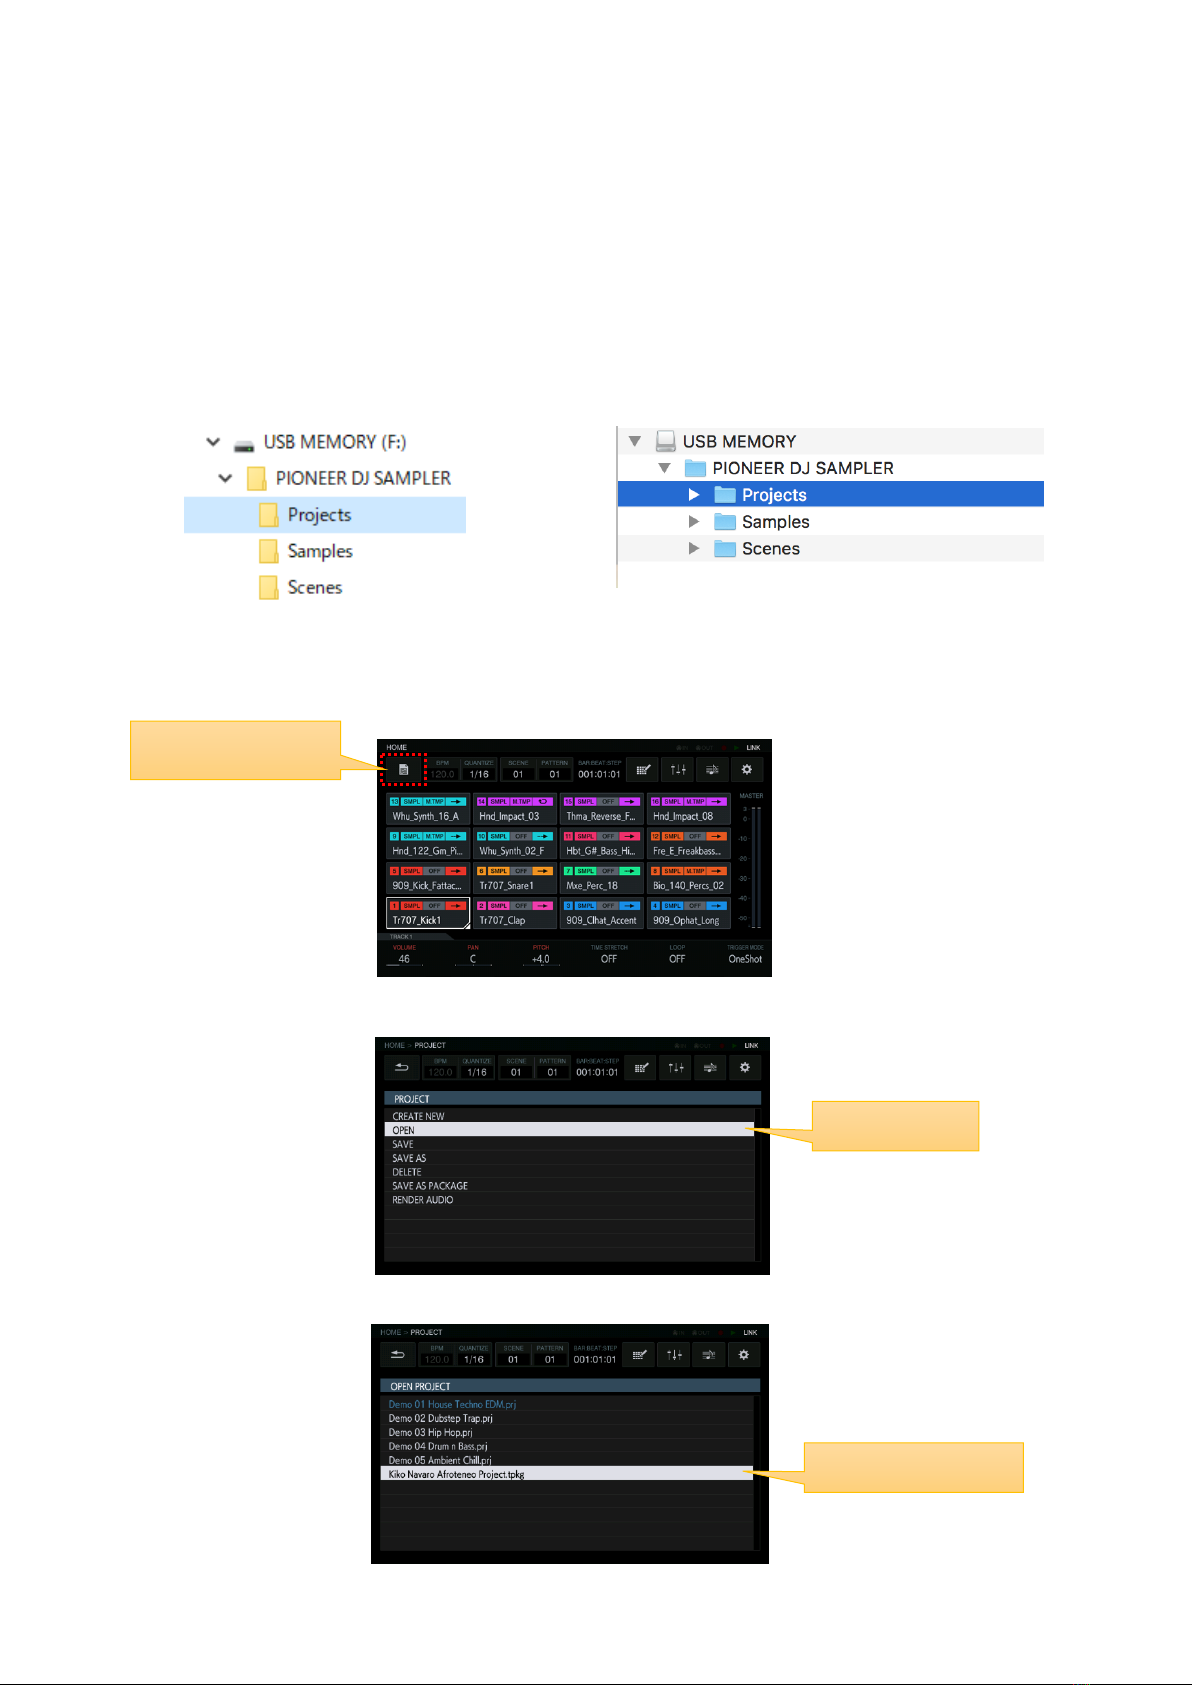
Load the project file from a USB memory device
Copy the decompressed project files to a USB memory device for use on the TORAIZ SP-16.
①Create a PIONEER DJ SAMPLER folder and Projects sub folder in the USB memory device. Paste or drag
the decompressed project file into the folder.
[Windows] [Mac]
②Insert the USB memory device into the TORAIZ SP-16.
③Press the PROJECT icon to open the PROJECT window.
④In the PROJECT window, select OPEN.
⑤Select the decompressed project file to load it into the TORAIZ SP-16.
Press PROJECT
Select OPEN.
Select the projects

Load the project file to the TORAIZ SP-16’s built-in memory
You can add the project file to the TORAIZ SP-16's built-in flash memory.
①Connect the TORAIZ SP-16 to a computer using a USB cable.
②Press the UTILITY icon to open the UTILITY window.
③In the UTILITY window, select USB MASS STORAGE MODE and press OK.
The built-in flash memory can be managed from the computer.
If you want to disconnect, disconnect from the computer and follow the pop-up menu.
USB
Press UTILITY
Select USB MASS
STORAGE MODE
Press OK

Do not disconnect the cable or turn off the power during communication with the computer. Doing so
may cause the machine’s management data to be deleted.
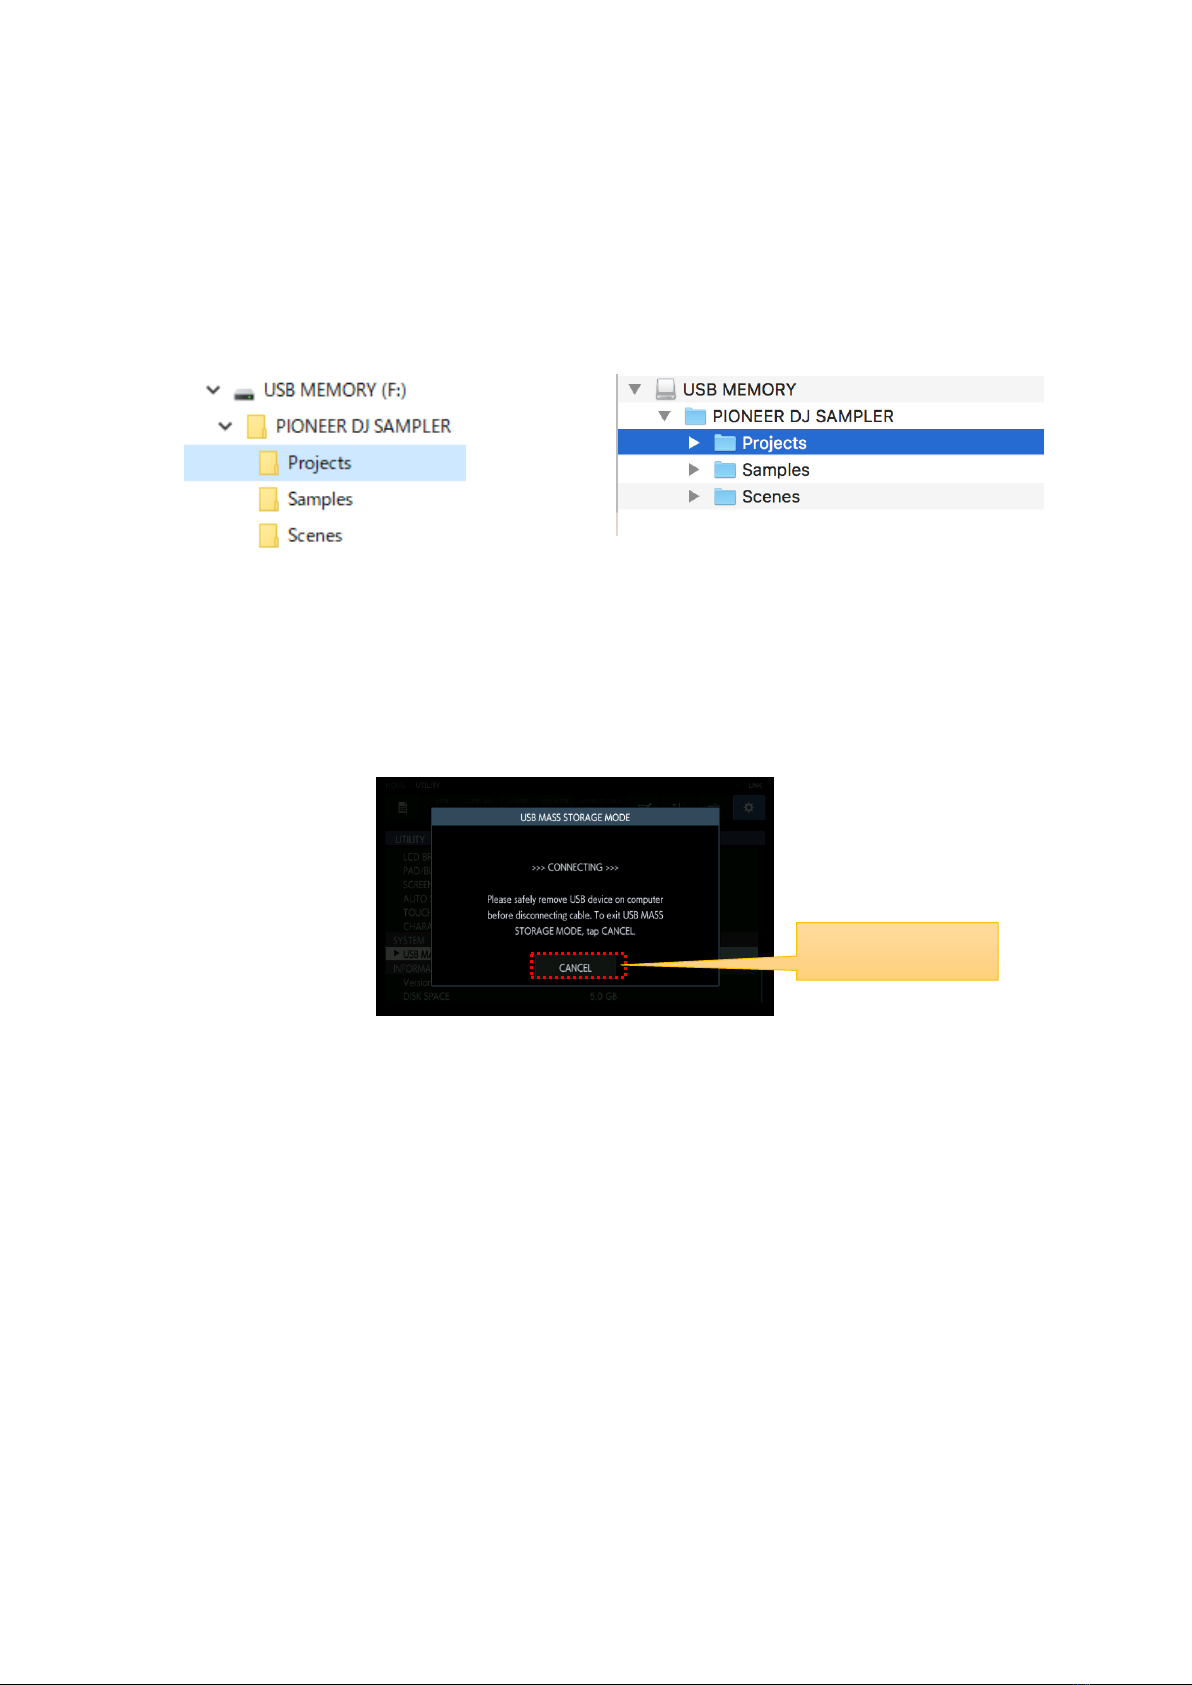
④Copy the decompressed project file to the folder called USB MEMORY/PIONEER DJ SAMPLER/Projects
located in the TORAIZ SP-16’s built-in flash memory.
[Windows] [Mac]
※The project file cannot be copied if the built-in flash memory does not have enough free space. Increase
the free space by moving the sample instrument from the built-in flash memory to the computer.
⑤When you have finished copying, safely disconnect the machine from your computer.
⑥After disconnecting the machine from the computer, press CANCEL.
The project file should now be available in the TORAIZ SP-16’s built-in flash memory.
To use a copied project, select it in the PROJECT window and then again in the OPEN window (refer to step ③
of the section titled ‘Load the project file from a USB memory device’ for instructions on using the project
file).
For trademarks and registered trademarks
The TORAIZ Logos are trademarks of AlphaTheta Corporation.
Other listed company names and product names are registered trademarks or trademarks of each
company.
© 2020 AlphaTheta Corporation, reprinted without permission.
Press CANCEL

Introducción
Gracias por comprar el TORAIZ SP-16.
Este documento explica cómo usar el paquete de sonido (archivo de proyecto de demostración) que te hemos
proporcionado.
Confirmar la versión de firmware
Para usar el archivo de proyecto en el TORAIZ SP-16, debe estar instalada la versión de firmware 1.40 o
superior. Para verificar el número de versión del firmware del hardware:
1. Pon en marcha el TORAIZ SP-16.
2. Presiona UTILITY en la ventana HOME para abrir la ventana UTILITY.
3. Desplazándote por la pantalla con el selector giratorio, busqca el segundo número de versión en la parte
inferior.
※Confirma que el valor es igual o mayor que la versión 1.40. Si estás utilizando una versión anterior,
descarga el firmware más reciente a través de este enlace y actualízalo de acuerdo con el manual de
procedimientos de actualización del firmware.
4. Presiona UTILITY para salir de la ventana UTILITY.
Descomprimir archivos de proyecto
Descomprime el archivo zip descargado. Los siguientes archivos archivos se encuentras dentro:
*************** Project.tpkg
Cargar el archivo de proyecto desde un dispositivo de memoria USB
Copia los archivos de proyecto descomprimidos en un dispositivo de memoria USB para utilizarlos en el
TORAIZ SP-16.
①Crea una carpeta PIONEER DJ SAMPLER y una subcarpeta de Proyectos en el dispositivo de memoria USB.
Pega o arrastra el archivo de proyecto descomprimido a la carpeta.
[Windows] [Mac]
②Inserta el dispositivo de memoria USB en el TORAIZ SP-16.
③Presiona el icono PROJECT para abrir la ventana de PROJECT.
④En la ventana PROJECT, selecciona OPEN.
⑤Selecciona el archivo de proyecto descomprimido para cargarlo en el TORAIZ SP-16.
Prensiona PROJECT
Selecciona OPEN.
Selecciona los proyectos
Carga el archivo de proyecto en la memoria integrada del TORAIZ SP-16
Puedes añadir el archivo de proyecto a la memoria flash incorporada del TORAIZ SP-16.
①Conecta el TORAIZ SP-16 a un ordenador con un cable USB.
②Presiona UTILITY en la ventana HOME para abrir la ventana UTILITY.
③En la ventana UTILITY, selecciona USB MASS STORAGE MODE y presiona OK.
La memoria flash incorporada se puede gestionar desde el ordenador.
Si deseas desconectarte, hazlo desde el ordenador y sigue las indicaciones del menú emergente.
USB
Presiona UTILITY
Selecciona el modo USB
MASS STORAGE
Presiona OK
No desconectes el cable ni desconectes la alimentación durante la comunicación con el ordenador. De
lo contrario, se pueden perder los datos gestionados en el hardware.
④Copia el archivo del proyecto descomprimido en la carpeta llamada USB MEMORY/PIONEER DJ
SAMPLER/ Projects que se encuentra en la memoria flash incorporada en el TORAIZ SP-16.
[Windows] [Mac]
※El archivo de proyecto no se puede copiar si la memoria flash incorporada no tiene suficiente espacio
libre. Aumenta el espacio libre moviendo el instrumento Sample de la memoria flash incorporada al
ordenador.
⑤Cuando hayas terminado de copiar, desconecta con seguridad el TORAIZ del ordenador.
⑥Después de desconectar el TORAIZ del ordenador, presiona CANCEL.
El archivo de proyecto ahora debería estar disponible en la memoria flash incorporada del TORAIZ SP-16.
Para usar un proyecto copiado, selecciónalo en la ventana PROJECT y luego nuevamente en la ventana OPEN
(consulta el paso ③de la sección titulada "Cargar el archivo de proyecto desde un dispositivo de memoria
USB" para obtener instrucciones sobre cómo usar el archivo de proyecto).
Para marcas comerciales y marcas registradas
Los logotipos TORAIZ son marcas comerciales de AlphaTheta Corporation.
Otros nombres de empresas y nombres de productos listados son marcas registradas o marcas
comerciales sus respectivos propietarios.
© 2020 Alpha Theta Corporation, reimpreso sin permiso.
Presiona CANCEL

Introduction
Merci d’avoir acheté le TORAIZ SP-16.
Ce document explique comment utiliser le Sound Pack (fichier projet de démonstration) que nous avons
fourni.
Confirmer la version du firmware
Pour utiliser le fichier projet sur le TORAIZ SP-16, la version 1.40 ou ultérieure du firmware doit être installée.
Pour vérifier le numéro de version du firmware de votre machine :
1. Allumez le TORAIZ SP-16.
2. Appuyez sur UTILITY dans la fenêtre HOME pour ouvrir la fenêtre UTILITY.
3. Faites défiler l’écran avec la molette de sélection et cherchez le deuxième numéro de version en bas.
※Vérifiez que ce numéro est supérieur ou égal à 1.40. Si vous utilisez une version antérieure, téléchargez le
dernier firmware via ce lien et faites la mise à jour en suivant le manuel de procédure des mises à jour.
4. Appuyez sur UTILITY pour sortir de la fenêtre UTILITY.
Décompresser les fichiers projets
Décompressez le fichier zip téléchargé. Les fichiers suivants sont rangés dans :
*************** Project.tpkg

Charger le fichier projet à partir d’un périphérique USB
Copier les fichiers projets décompressés sur un périphérique de stockage USB pour pouvoir les utiliser sur le
TORAIZ SP-16.
①Créez un dossier SAMPLER PIONEER DJ et un sous-dossier Projets sur le périphérique USB. Copiez ou
faites glisser le fichier projet décompressé dans le dossier.
[Windows] [Mac]
②Insérez le périphérique de stockage USB dans le TORAIZ SP-16.
③Appuyez sur l’icône PROJECT pour ouvrir la fenêtre PROJECT.
④Dans la fenêtre PROJECT, sélectionnez OPEN.
⑤Sélectionnez le fichier projet décompressé pour le charger dans le TORAIZ SP-16.
Appuyez sur PROJECT
Sélectionnez OPEN.
Sélectionnez les projets

Charger le fichier projet dans la mémoire intégrée du TORAIZ SP-16
Vous pouvez ajouter le fichier projet à la mémoire flash intégrée du TORAIZ SP-16.
Branchez le TORAIZ SP-16 à un ordinateur en utilisant un câble USB.
Appuyez sur l’icône UTILITY pour ouvrir la fenêtre UTILITY.
Dans la fenêtre UTILITY, sélectionnez le mode USB MASS STORAGE et appuyez sur OK.
La mémoire flash intégrée peut être gérée depuis l’ordinateur.
Si vous voulez vous déconnectez, déconnectez depuis l’ordinateur et suivez le menu pop-up.
USB
Appuyez sur UTILITY
Sélectionnez le Mode
USB MASS STORAGE
Appuyez sur OK

Ne débranchez pas le câble et n’éteignez pas non plus la machine en cours de communication avec
l’ordinateur. Cela pourrait causer la perte de données de gestion de la machine.
Copiez le fichier projet décompressé dans le dossier appelé USB MEMORY/PIONEER DJ
SAMPLER/Projects qui se trouve dans la mémoire flash intégrée du TORAIZ SP-16.
[Windows] [Mac]
※Le fichier projet ne peut pas être copié si la mémoire flash intégrée n’a pas suffisamment d’espace libre.
Augmentez l’espace libre en déplaçant l’instrument sample de la mémoire flash intégrée de l’ordinateur.
Quand vous avez terminé la copie, débranchez en toute sécurité la machine de votre ordinateur.
Après avoir débranché la machine de l’ordinateur, appuyez sur CANCEL (annuler).
Le fichier projet devrait désormais être disponible dans la mémoire flash intégrée du TORAIZ SP-16.
Pour utiliser un projet copié, sélectionnez-le dans la fenêtre PROJECT puis à nouveau dans la fenêtre OPEN
(référez-vous à l’étape ③de la section intitulée « Charger le fichier projet depuis un périphérique de
stockage USB » pour savoir comment utiliser le fichier projet).
Appellations commerciales et marques déposées
Les Logos TORAIZ sont des marques déposées de AlphaTheta Corporation.
Les autres noms de sociétés et de produits mentionnés ici sont les appellations commerciales ou
marques déposées de chaque société en question.
© 2020 AlphaTheta Corporation, réimprimé sans autorisation.
Appuyez sur CANCEL

Einleitung
Vielen Dank für den Kauf des TORAIZ SP-16.
Diese Anleitung erklärt den Gebrauch des mitgelieferten Sound-Packs (Demoprojektdatei).
Feststellen der Firmwareversion
Um die Projektdatei auf dem TORAIZ SP-16 verwenden zu können, muss die Firmwareversion 1.40 oder höher
installiert sein. So überprüfst du die Firmware-Versionsnummer des Geräts:
1. Schalte den TORAIZ SP-16 ein.
2. Drücke UTILITY auf dem Bildschirm HOME, um das Fenster UTILITY zu öffnen.
3. Scrolle mithilfe des Drehreglers den Bildschirm hinunter bis zur zweiten Versionsnummer von unten.
※Vergewissere dich, dass der Wert mindestens 1.40 entspricht. Falls noch eine ältere Version installiert ist,
lade die aktuelle Firmware über diesen Link herunter und führe entsprechend der Firmwareupdate-
Anleitung das Firmware-Update durch.
4. Drücke UTILITY, um das Fenster UTILITY zu verlassen.
Entpacke die Projektdateien
Entpacke das heruntergeladene ZIP-Archiv. Folgende Dateien sind darin enthalten:
*************** Project.tpkg

Laden der Projektdatei von einem USB-Laufwerk
Kopiere die entpackten Projektdateien zur Verwendung mit dem TORAIZ SP-16 auf ein USB-Laufwerk.
①Lege auf dem USB-Laufwerk einen Ordner mit dem Namen PIONEER DJ SAMPLER an und darin einen
Unterordner “Projekte”. Füge die kopierten Projektdateien in diesen Ordner ein oder ziehe sie mit der
Maus dorthin.
[Windows] [Mac]
②Schließe das USB-Laufwerk an den TORAIZ SP-16 an.
③Drücke das PROJECT-Icon, um das Fenster PROJECT zu öffnen.
④Wähle OPEN im Fenster PROJECT.
⑤Wähle die entpackte Projektdatei, die in den TORAIZ SP-16 geladen werden soll.
Drücke PROJECT
Wähle OPEN.
Wähle das Projekt

Laden der Projektdatei in den integrierten Speicher des TORAIZ SP-16
Du kannst die Projektdatei in den eingebauten Flash-Speicher des TORAIZ SP-16 laden.
Schließe den TORAIZ SP-16 mit einem USB-Kabel an einen Computer anschließen.
Drücke das UTILITY-Icon, um das Fenster UTILITY zu öffnen.
Wähle USB MASS STORAGE MODE im Fenster UTILITY und drücke OK.
Der eingebaute Flash-Speicher kann vom Computer aus verwaltet werden.
Um die Verbindung zu trennen, entferne das Kabel vom Computer und folge den Anweisungen im Pop-
up-Menü.
USB
Drücke UTILITY
Wähle USB MASS
STORAGE MODE
Drücke OK

Entferne das Kabel nicht und schalte den Strom nicht aus, während eine Datenkommunikation
stattfindet. Das kann zu empfindlichen Datenverlusten führen!
Kopiere die entpackte Projektdatei in den Ordner USB MEMORY/PIONEER DJ SAMPLER/Projects im
eingebauten Flash-Speicher des TORAIZ SP-16.
[Windows] [Mac]
※Wenn im eingebauten Flash-Speicher nicht genügend freier Speicher zur Verfügung steht, kann die
Projektdatei nicht dorthin kopiert werden. Du kannst Speicher freigeben, indem du das Sample-
Instrument von eingebauten Flash-Speicher auf den Computer verschiebst.
Wenn das Kopieren vollständig abgeschlossen ist, kannst du den Sampler vom Computer trennen.
Nach dem Trennen vom Computer drückst du CANCEL.
Die Projektdatei sollte jetzt im eingebauten Flash-Speicher des TORAIZ SP-16 verfügbar sein.
Um ein kopiertes Projekt zu verwenden, wählst du es im Fenster PROJECT aus und dann noch einmal im
Fenster OPEN (siehe Anleitung zur Verwendung der Projektdatei in Schritt ③im Abschnitt ‘Laden der
Projektdatei von einem USB-Laufwerk’ ).
Markenzeichen und eingetragene Markenzeichen
Die TORAIZ-Logos sind Markenzeichen der AlphaTheta Corporation.
Weitere erwähnte Namen von Unternehmen und Produkten sind eingetragene Markenzeichen oder
Markenzeichen der jeweiligen Unternehmen.
© 2020 AlphaTheta Corporation, unautorisierter Nachdruck.
Drücke CANCEL

Introduzione
Grazie per aver acquistato il TORAIZ SP-16.
Questo documento spiega come utilizzare il sound pack (file di progetto dimostrativo) fornito.
Confermare la versione del firmware
Per utilizzare il file di progetto nel TORAIZ SP-16, deve essere installato un firmware di versione 1.40 o
superiore. Per controllare il numero di versione del firmware dell'apparecchiatura:
1. accendere il TORAIZ SP-16.
2. Premere UTILITY nella finestra HOME per aprire la finestra UTILITY.
3. Facendo scorrere lo schermo con il selettore a manopola, cercare il secondo numero di versione dal basso.
※Confermare che il valore è superiore o uguale alla versione 1.40. Se si utilizza una versione precedente,
scaricare l'ultimo firmware da questo link e aggiornarlo secondo l'apposita procedura indicata nel
manuale del firmware.
4. Premere UTILITY per uscire dalla finestra UTILITY.
Decomprimere i file di progetto
Decomprimere il file compresso scaricato. I seguenti file sono memorizzati in
*************** Project.tpkg

Caricare il file di progetto da un dispositivo di memoria USB
Copiare i file di progetto decompressi in un dispositivo USB da utilizzare con il TORAIZ SP-16.
①Creare una cartella PIONEER DJ SAMPLER e una sotto-cartella Projects (Progetti) nel dispositivo di
memoria USB. Copiare o trascinare il file di progetto decompresso nella cartella.
[Windows] [Mac]
②Inserire il dispositivo di memoria USB nel TORAIZ SP-16.
③Premere l'icona PROJECT (PROGETTO) per aprire la finestra PROJECT (PROGETTO).
④Nella finestra PROJECT (PROGETTO), selezionare OPEN (APRI).
⑤Selezionare il file di progetto decompresso da caricare nel TORAIZ SP-16.
Premere PROJECT
(PROGETTO).
Selezionare OPEN
(APRI).
Selezionare i progetti.

Caricare il file di progetto nella memoria integrata nel TORAIZ SP-16
Si può aggiungere il file di progetto nella memoria flash integrata nel TORAIZ SP-16.
Collegare il TORAIZ SP-16 a un computer con un cavo USB.
Premere l'icona UTILITY per aprire la finestra UTILITY.
Nella finestra UTILITY, selezionare USB MASS STORAGE MODE (MODALITÀ DI ARCHIVIAZIONE DI
MASSA USB) e premere OK.
La memoria flash integrata può essere gestita dal computer.
Se si vuole disconnettersi, scollegarsi dal computer e seguire il menu a comparsa.
USB
Premere UTILITY.
Selezionare USB MASS STORAGE
MODE (MODALITÀ DI
ARCHIVIAZIONE DI MASSA USB)
Premere OK
Table of contents
Languages:
Other TORAIZ Recording Equipment manuals


