TORAIZ SQUID User manual
Multitrack Sequencer / Séquenceur Multipiste / Multitrack-Sequenzer /
Sequenziatore Multitraccia / Multitrack Sequencer /
Secuenciador Multipista / Sequenciador Multifaixas /
Мультиканальный секвенсор
pioneerdj.com/support/
For FAQs and other support information for this product, visit the above sites. / Concernant les questions les plus
fréquemment posées et les autres informations de support à propos de ce produit, veuillez vous rendre sur le site
ci-dessus. / Besuchen Sie für FAQs und andere Support-Informationen die oben aufgeführte Website. / Per FAQ e altre
informazioni di supporto per questo prodotto, visitare il sito sopra indicato. / Voor FAQ's en andere supportinformatie voor
dit product, bezoek de bovengenoemde website. / Para consultar las preguntas frecuentes y otra información de soporte
de este producto, visite el sitio de arriba. / Relativamente às FAQ e outras informações de apoio relacionadas com este
produto, visite o site em cima. / Ответы на часто задаваемые вопросы и другую информацию о поддержке данного
устройства см. на приведенном выше веб-сайте.
Operating Instructions (Quick Start Guide) /
Mode d’emploi (Guide de démarrage rapide) /
Bedienungsanleitung (Kurzanleitung) /
Istruzioni per l’uso (Guida di avvio veloce) / Handleiding (Snelstartgids) /
Manual de instrucciones (Guía de inicio rápido) /
Manual de instruções (Guia de início rápido) /
Инструкции по эксплуатации (Краткое руководство пользователя)
English Français Deutsch Italiano Nederlands EspañolPortuguês Русский

2En
Thank you for buying this Pioneer DJ product. Please read through these operating instructions so you will know how to operate your model properly.
After you have finished reading the instructions, put them away in a safe place for future reference.
In some countries or regions, the shape of the power plug and power outlet may sometimes differ from that shown in the explanatory drawings.
However the method of connecting and operating the unit is the same.
CAUTION
TO PREVENT THE RISK OF ELECTRIC SHOCK, DO NOT
REMOVE COVER (OR BACK). NO USER-SERVICEABLE
PARTS INSIDE. REFER SERVICING TO QUALIFIED
SERVICE PERSONNEL. D3-4-2-1-1_B1_En
WARNING
This equipment is not waterproof. To prevent a fire or
shock hazard, do not place any container filled with
liquid near this equipment (such as a vase or flower
pot) or expose it to dripping, splashing, rain or
moisture.
D3-4-2-1-3_A1_En
WARNING
To prevent a fire hazard, do not place any naked flame
sources (such as a lighted candle) on the equipment.
D3-4-2-1-7a_A1_En
Operating Environment
Operating environment temperature and humidity:
+5 °C to +35 °C (+41 °F to +95 °F); less than 85 %RH
(cooling vents not blocked)
Do not install this unit in a poorly ventilated area, or in
locations exposed to high humidity or direct sunlight (or
strong artificial light).
D3-4-2-1-7c*_A2_En
POWER-CORD CAUTION
Handle the power cord by the plug. Do not pull out the
plug by tugging the cord and never touch the power
cord when your hands are wet as this could cause a
short circuit or electric shock. Do not place the unit, a
piece of furniture, etc., on the power cord, or pinch the
cord. Never make a knot in the cord or tie it with other
cords. The power cords should be routed such that they
are not likely to be stepped on. A damaged power cord
can cause a fire or give you an electrical shock. Check
the power cord once in a while. When you find it
damaged, ask your nearest service center or your
dealer for a replacement.
S002*_A1_En
CAUTION
The switch on this unit will not completely shut off
all power from the AC outlet. Since the power cord
serves as the main disconnect device for the unit,
you will need to unplug it from the AC outlet to shut
down all power. Therefore, make sure the unit has
been installed so that the power cord can be easily
unplugged from the AC outlet in case of an accident.
To avoid fire hazard, the power cord should also be
unplugged from the AC outlet when left unused for a
long period of time (for example, when on vacation).
D3-4-2-2-2a*_A1_En
If you want to dispose this product, do not mix it with general household waste. There is a separate collection system for used
electronic products in accordance with legislation that requires proper treatment, recovery and recycling.
Private households in the member states of the EU, in Switzerland and Norway may return their used electronic products free of charge to
designated collection facilities or to a retailer (if you purchase a similar new one).
For countries not mentioned above, please contact your local authorities for the correct method of disposal.
By doing so you will ensure that your disposed product undergoes the necessary treatment, recovery and recycling and thus prevent potential
negative effects on the environment and human health.
K058b_A1_En
VENTILATION CAUTION
When installing this unit, make sure to leave space
around the unit for ventilation to improve heat radiation
(at least 5 cm at rear, and 5 cm at each side).
D3-4-2-1-7d*_A1_En
When using this product, confirm the safety
information shown on the bottom of the unit.
D3-4-2-2-4_B1_En
CAUTION
This product is evaluated in moderate and tropical
climate condition.
D3-8-2-1-7a_A1_En
The graphical symbol placed on the product
means alternating current.
The graphical symbol placed on the product
means direct current.
The graphical symbol placed on the product
means Class II equipment.
D3-8-2-4_A1_En

En 3
English
Contents
How to read this manual
Thank you for buying this Pioneer DJ product.
Be sure to read this manual and the Operating Instructions available on
the Pioneer DJ site. Both documents include important information that
you should understand before using this product.
In particular, be sure to read “IMPORTANT SAFETY INSTRUCTIONS.”
!In this manual, the names of buttons, controls and terminals
indicated on the product, and program options appearing on the
unit display, etc., are indicated within square brackets ([ ]). (e.g.
[GLOBAL] button, [CLOCK OUT] terminal, [Save As])
!Please note that the screens and specifications of the software
described in this manual as well as the external appearance and
specifications of the hardware are currently under development and
may differ from the final specifications.
!Please note that depending on the operating system version, web
browser settings, etc., operation may differ from the procedures
described in this manual.
This manual provides brief descriptions regarding the names of the
parts of the unit, the connections between the unit and peripherals, and
basic operations.
For more detailed instructions on using the unit, see the Operating
Instructions for this unit.
!To learn how to obtain the Operating Instructions for this unit, see
“Viewing the Operating Instructions” on page 4.
Before starting
Features .............................................................................................. 4
What’s in the box................................................................................. 4
Viewing the Operating Instructions ..................................................... 4
Auto power off function........................................................................ 4
Part names
Control panel....................................................................................... 5
Rear Panel .......................................................................................... 8
Connections
Connecting inputs and outputs............................................................ 9
Operation
Playing demo patterns ...................................................................... 11
Creating a new project ...................................................................... 11
Recording notes in a pattern ............................................................. 12
Using INTERPOLATION................................................................... 12
Using TIME WARP............................................................................ 13
Saving a project................................................................................. 13
Additional information
Troubleshooting ................................................................................ 14
Changing the settings........................................................................ 14
Precautions regarding our repair services ........................................ 14
About trademarks and registered trademarks................................... 14
Specifications .................................................................................... 14

4En
Before starting
Features
The SQUID is a standalone multitrack sequencer that can connect
various music production equipment and produce phrases
successively.
Phrases can be sequenced quickly using the step parameter controls
which work independently for each parameter and the sequence
functions such as HARMONIZER and INTERPOLATION.
Get new inspirations and phrases constantly by adding different
arrangements to the sequence and experimenting with the user
interface using numerous arrangement functions such as RUNNING
DIRECTION, GROOVE BEND and SPEED MODULATION.
This inspiring and expressive musical tool is compatible with many
types of music production systems. It features terminals for USB and
MIDI as well as CV/GATE OUT and DIN SYNC—which can control
not only modular synthesizers but also vintage electronic musical
instruments.
What’s in the box
!AC adaptor
!Power cord
!Operating Instructions (Quick Start Guide) (this document)
Viewing the Operating Instructions
Instructions may also be provided in PDF files.
Adobe® Reader® must be installed in order to view PDF-format files.
1 Launch a web browser on your PC/Mac and access
the Pioneer DJ site below.
pioneerdj.com
!To select your language, click the flag or global icon in the top right
corner of the screen.
2 Point the cursor to [Support] and click it.
3 Click [Tutorials, manuals & documentation].
4 Click [SQUID] in the [MUSIC PRODUCTION]
category.
5 Click on the desired language from the list.
Download the manual if needed.
Auto power off function
This unit has an auto power off function, which is enabled as the default
setting. The power turns off automatically when there is no signal input,
output or operation for approximately 4 hours.
To turn on the power once the unit has turned off automatically, press
the [u]button on the rear panel to release it to the off position (v), and
then press in the [u]button again (w).
To disable the auto power off function, press the [GLOBAL] button to
display the GLOBAL menu. Then, turn the rotary selector to switch the
[Auto Power Off] setting to [Disable].
Notes
!Unsaved data will be lost if the unit is powered off automatically.
Be sure to save important data such as edited project data.
!The auto power off function may not turn off the unit in certain
modes of operation. Therefore, always be sure to turn off the power
manually after use.

En 5
English
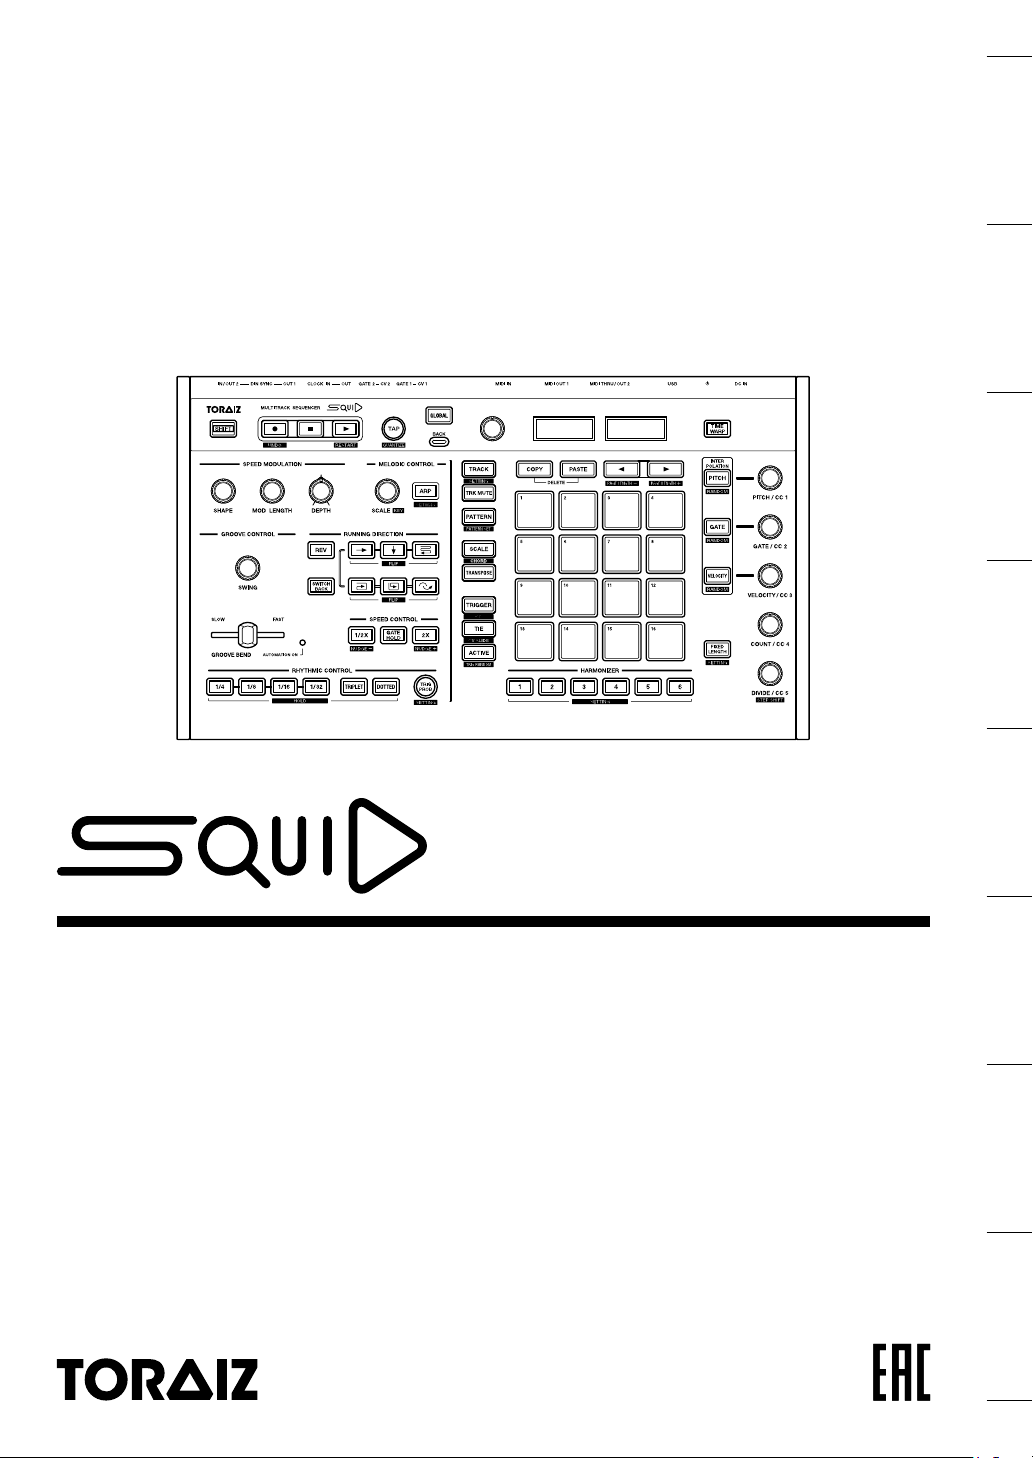
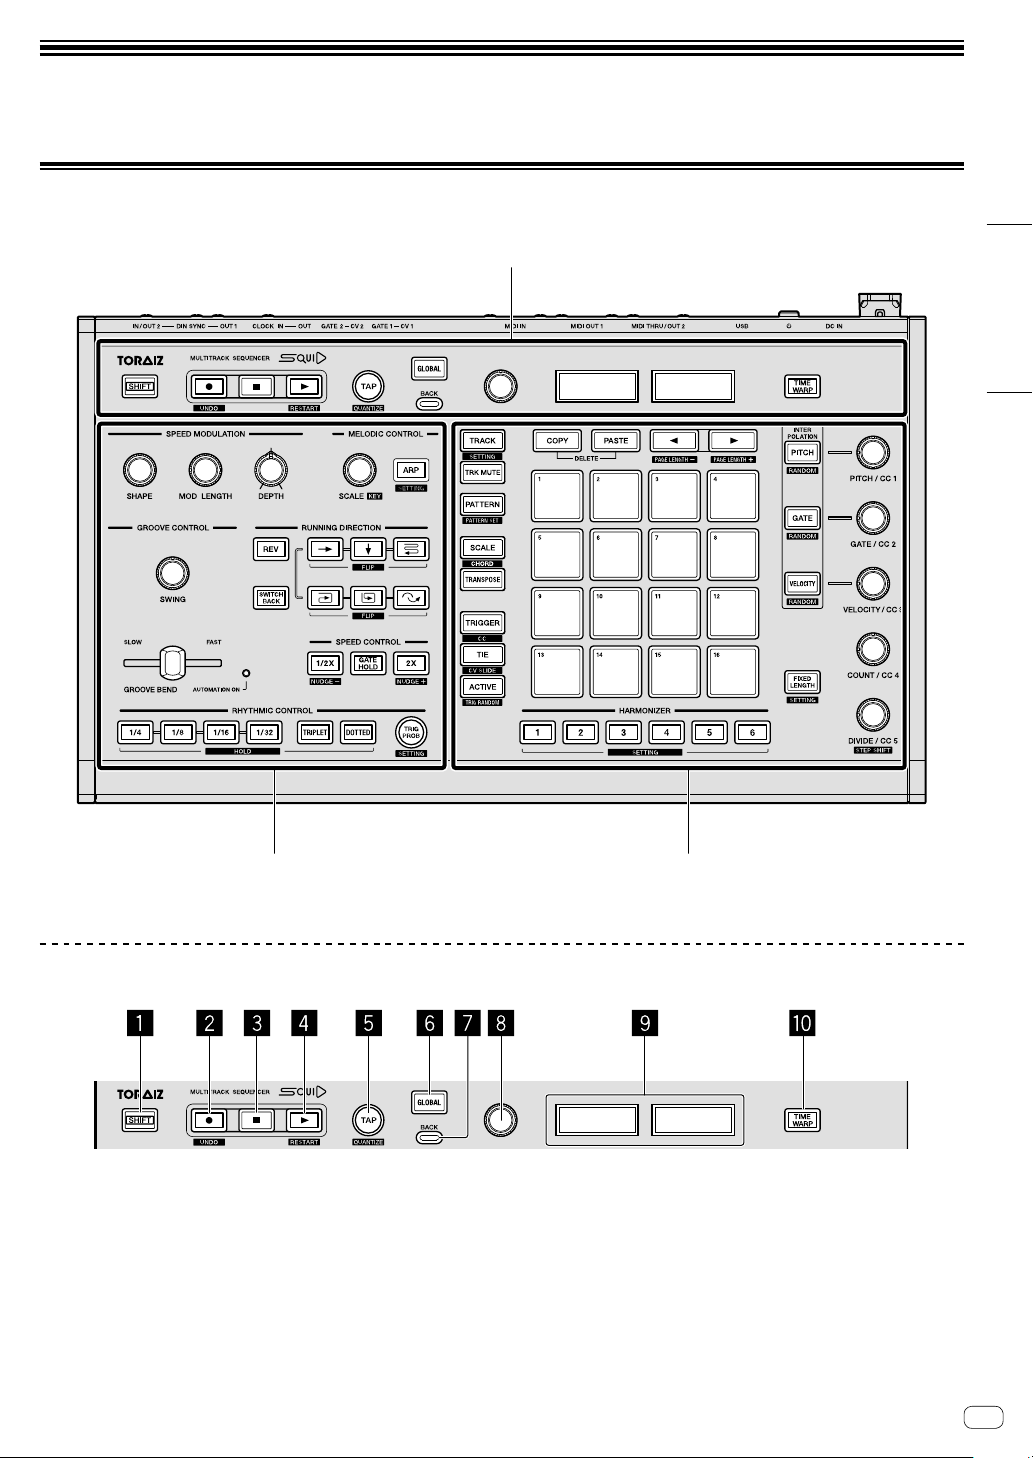
Part names
For further details on each button and control, refer to “Part names and functions” section in the Operating Instructions.
Control panel
Global section
Phrase arrangement section Step edit section
Global section
1SHIFT button
2k(record) button
3g(stop) button
4d(play) button
5TAP button
6GLOBAL button
7BACK button
8Rotary selector
9Display
aTIME WARP button
6En
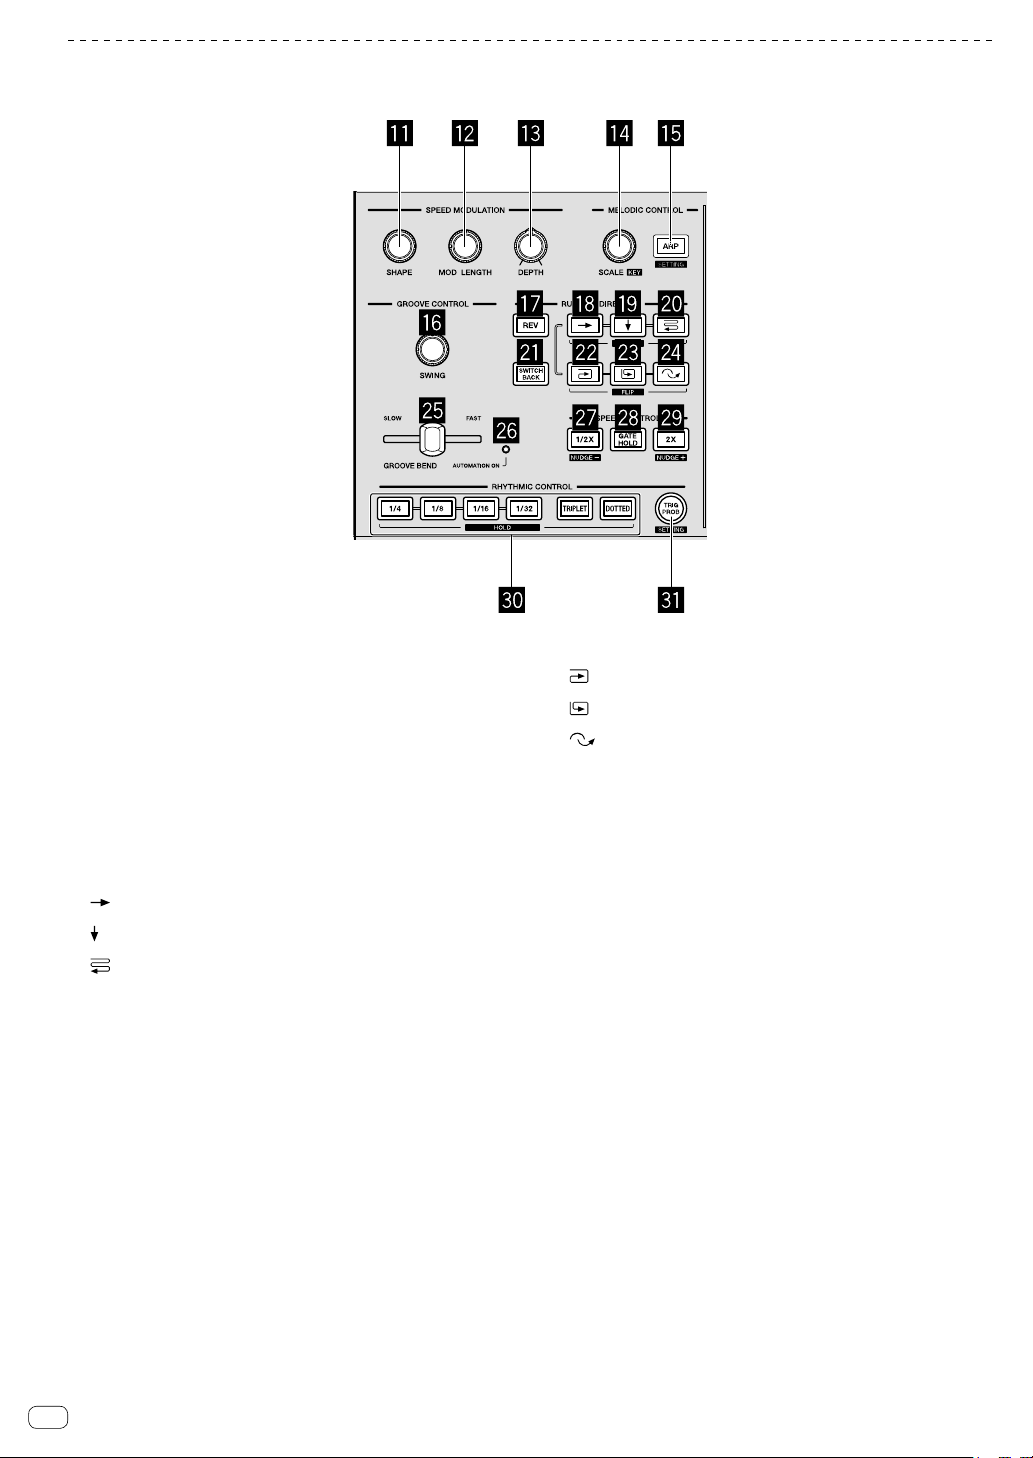
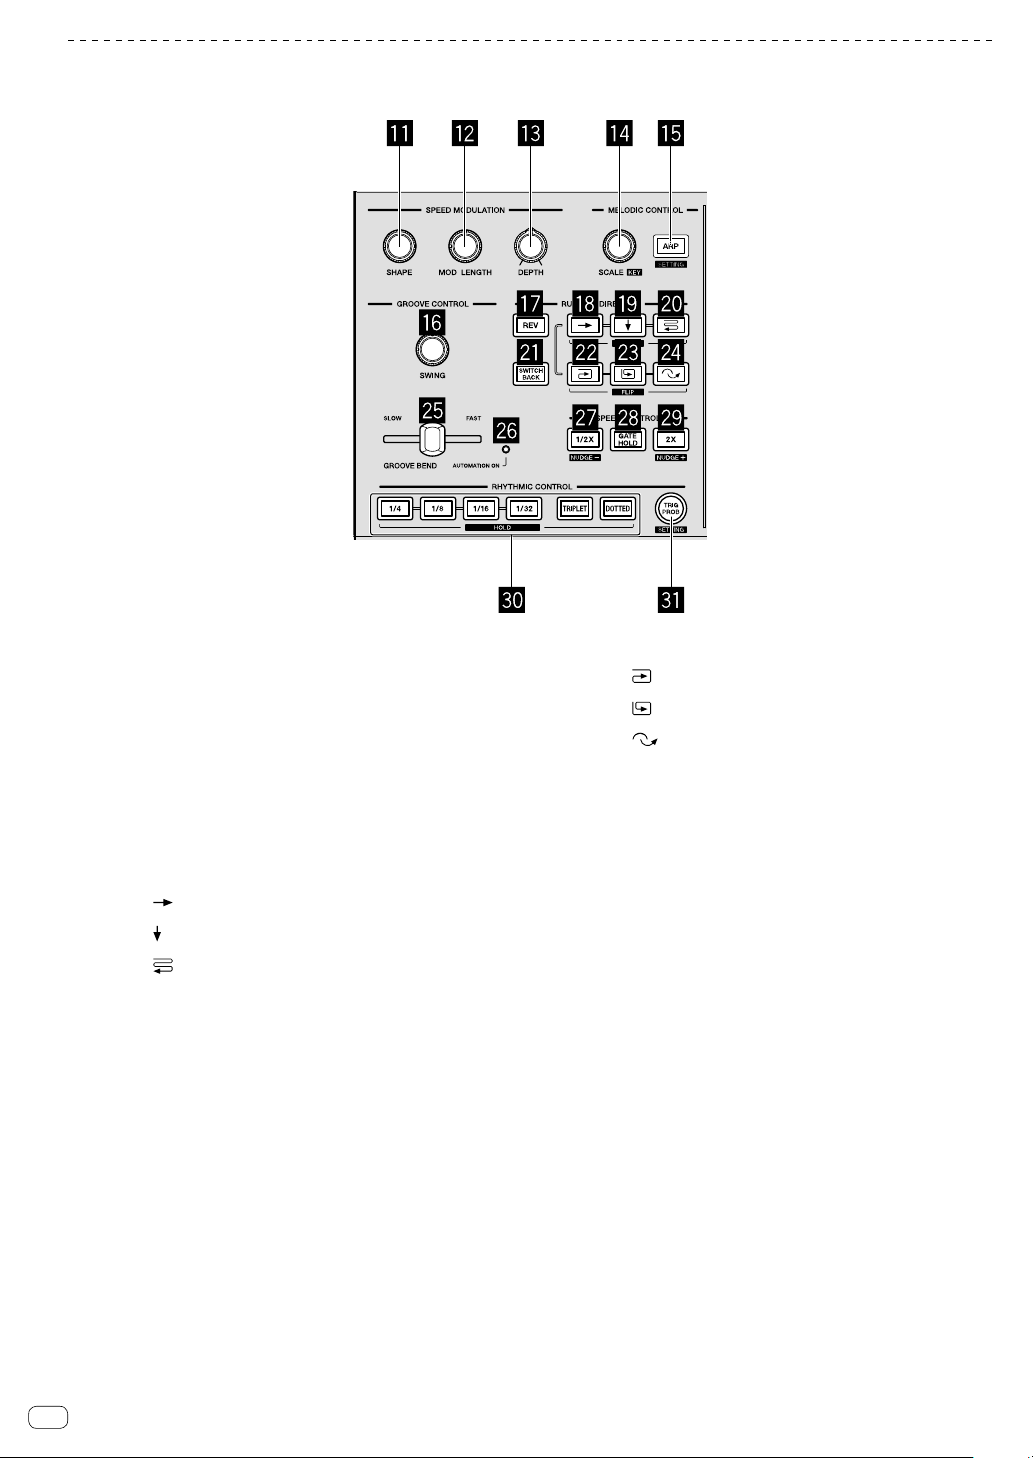
Phrase arrangement section
bSHAPE control
cMOD LENGTH control
dDEPTH control
eSCALE control
fARP button
gSWING control
hREV button
i(right) button
j(down) button
k(zigzag) button
lSWITCH BACK button
m(clockwise) button
n(counterclockwise) button
o(skip back) button
pGROOVE BEND slider
qAUTOMATION ON indicator
r1/2X (half) button
sGATE HOLD button
t2X (double) button
uRHYTHM buttons
1/4, 1/8, 1/16, 1/32, TRIPLET, DOTTED
vTRIG PROB button
En 7
English
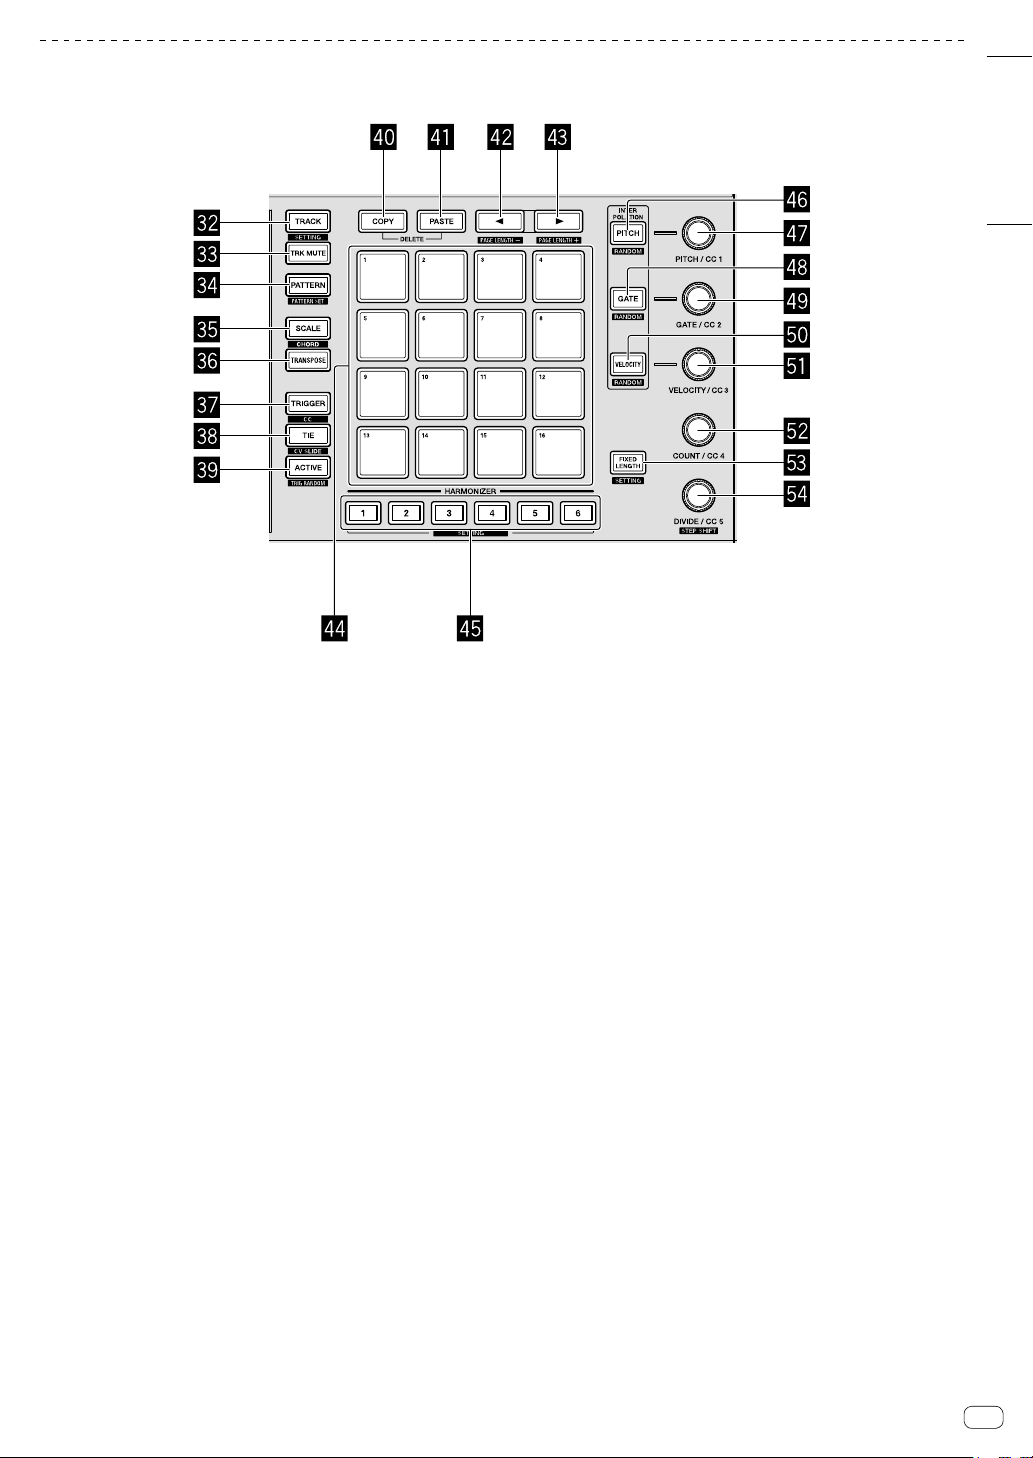
Step edit section
wTRACK button
xTRK MUTE button
yPATTERN button
zSCALE button
ATRANSPOSE button
BTRIGGER button
CTIE button
DACTIVE button
ECOPY button
FPASTE button
Gcbutton
Hdbutton
I16 pads
JHARMONIZER buttons
KPITCH button
LPITCH/CC1 control
MGATE button
NGATE/CC2 control
OVELOCITY button
PVELOCITY/CC3 control
QCOUNT/CC4 control
RFIXED LENGTH button
SDIVIDE/CC5 control

8En
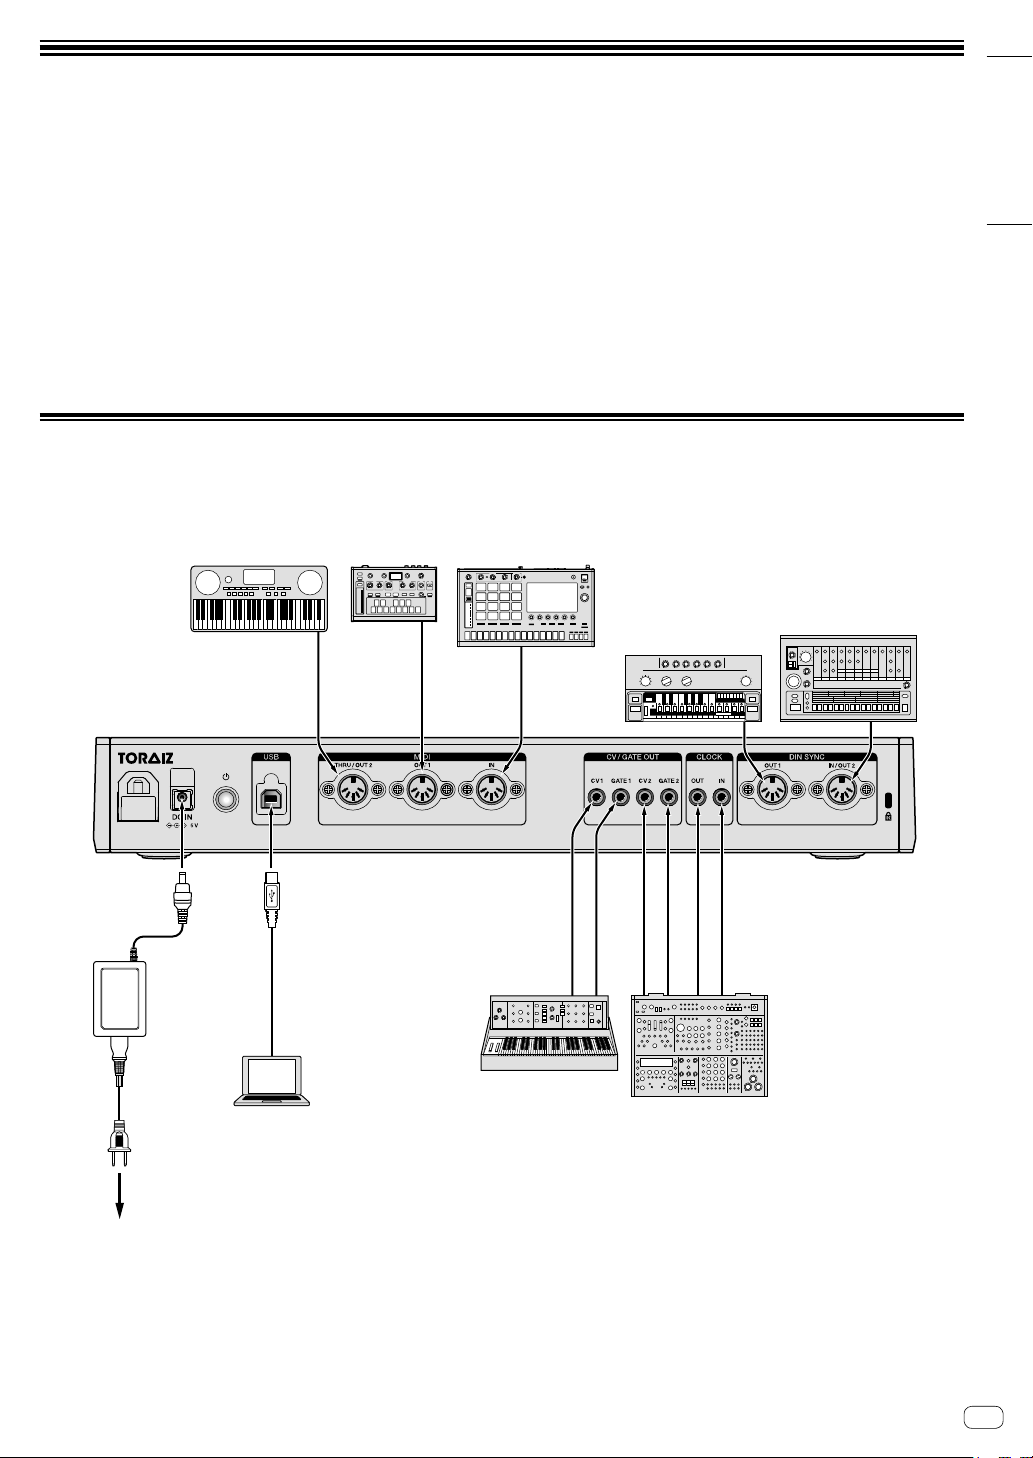
Rear Panel
1Cable hook
2DC IN terminal
3ubutton
Turns the power of this unit On/Off.
wOn/vOff
This switch is between off and on for this unit.
4USB-B terminal
5MIDI THRU/OUT2 terminal
6MIDI OUT1 terminal
7MIDI IN terminal
8CV OUT1 terminal
9GATE OUT1 terminal
aCV OUT2 terminal
bGATE OUT2 terminal
cCLOCK OUT terminal
dCLOCK IN terminal
eDIN SYNC OUT1 terminal
fDIN SYNC IN/OUT2 terminal
gKensington lock slot
En 9
English
Connections
!Be sure to turn off the power, disconnect the USB cable from this unit, and unplug the power cord from the power outlet whenever making or
changing connections.
!Connect the power cord and a USB cable once all the connections between devices have been completed.
!Be sure to use the included power cord and AC adaptor.
!Refer to the operating instructions for components to be connected.
!Use a USB cable which complies with USB 2.0.
!The unit is powered by either the AC adapter or USB-bus power.
The unit can be operated by just connecting the unit and your PC/Mac via a USB cable without connecting the AC adaptor.
If the AC adapter is connected at the same time, the USB-bus power can be used as a backup power source. If the AC adapter is disconnected
while using the unit, the unit automatically switches the power drive to the USB-bus power.
Special notes when using USB-bus power
!There are some restrictions in functions such as dimming on buttons, LEDs for pads, and display.
!Connect the unit directly to a USB 2.0/3.0 port on your PC/Mac using a USB cable.
!We recommend using a USB certified USB cable that is 2 meters (6.56 feet) or shorter.
Connecting inputs and outputs
To power outlet
AC adaptor
(included)
PC/Mac
Power cord
(included)
MIDI-compatible synthesizer,
drum machine, sound module, etc.
MIDI-compatible
synthesizer,
drum machine,
sound module,
MIDI keyboard, etc.
DIN SYNC-compatible synthesizer,
drum machine, sound module, etc.
CV/GATE/CLOCK-compatible synthesizer,
drum machine, sound module, etc.

10 En
How to use the cable hook
Hook the connection cable of the AC power adaptor to avoid
accidentally disconnecting it from the unit.
1 Fit the connection cable of the AC adaptor into the
cable hook.
Secure the cable into place.
2 Connect the plug of the connection cable to the
[DC IN] terminal. If the cable on the left side of the cable
hook is too long, tighten it moderately.
Pull gently
to tighten.
Plug in.
En 11
English
Operation
Playing demo patterns
The SQUID has a pre-installed project including multiple demo patterns
which load automatically when the unit is turned on for the first time
after purchase.
1 Press the [u]button on the rear panel to turn on the
unit.
The buttons and the 16 pads light up and the main screen appears in
the display.
2 Turn on the external devices connected to the unit.
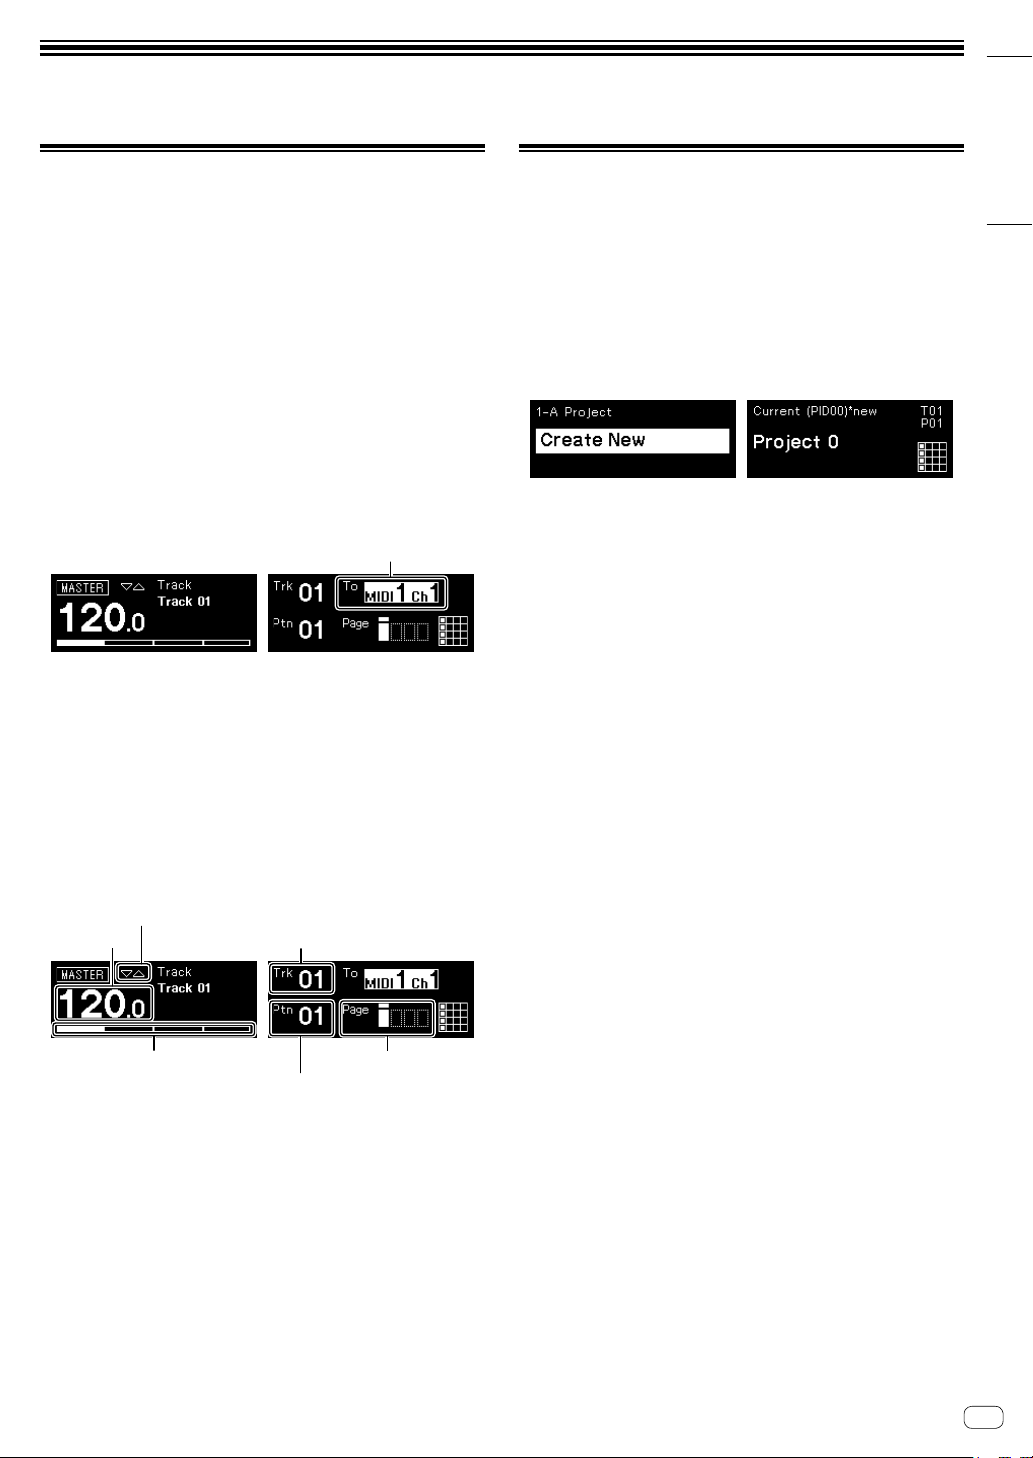
3 Press the [TRACK] button.
The [TRACK] button lights up and the output destination for the current
track is displayed and highlighted.
4 Turn the rotary selector to choose the output terminal
for the connected external device.
!One of the following can be selected: [MIDI1 Ch.1-16], [MIDI2
Ch.1-16], [USB Ch.1-16], [CV/GATE1], [CV/GATE2], [None].
Output terminal
5 Press the [d](play) button.
The [d](play) button lights up green and the unit plays the demo
patterns.
The external device selected for the output destination also plays
depending on the demo pattern being played.
The beat and MIDI indicators appear in the display and show the
current operation.
!To pause the pattern being played
Press the [d](play) button. The [d](play) button flashes.
!To stop the pattern being played
Press the [g](stop) button. The light of the [d](play) button turns
off.
BPM Track number
Beat indicator Pattern page
Pattern number
MIDI indicator
Creating a new project
First, create a new project in order to create a pattern from scratch.
1 Press the [GLOBAL] button.
The [GLOBAL] button lights up and the display shows the GLOBAL
menu.
2 Turn the rotary selector to select [Create New] and
press it.
A new project is created.
!If a current project is modified and a new project is created without
saving the current project, then any changes will be lost.

12 En
Recording notes in a pattern
There are two basic ways to record notes in a pattern.
!Step recording method
You can record note information (muting status and parameters
such as Pitch, Gate, and Velocity) for each step regardless if the
pattern is being played or stopped.
!Real-time recording method
When using the pads to perform while a pattern is being played in
recording mode, this method will record the note information of your
performance.
Step recording
1 Press the [TRIGGER] button.
The [TRIGGER] button lights up and the 16 pads light dim orange.
2 Press the desired pad for the step to unmute the
notes.
The pad for the step lights up bright orange when the notes are
unmuted.
!To mute the notes, press the same pad.
3 Press and hold the desired pad included with the Note
to edit the saved parameters, and turn the rotary selector.
The display shows a note in sequence to select such as [Note1],
[Note2], and [Note3].
Selected note
4 Turn the [PITCH/CC1], [GATE/CC2], and/or
[VELOCITY/CC3] controls while pressing down the pad.
You can change the parameters for the note selected in step 3.
The display shows the value of each parameter.
!Turn the [PITCH/CC1] control to change the Pitch value.
!Turn the [GATE/CC2] control to change the Gate value.
!Turn the [VELOCITY/CC3] control to change the Velocity value.
Parameters of the selected note
Real-time recording
1 Press the [SCALE] button.
The [SCALE] button lights up and the 16 pads light up or dim red.
2 Press the [k](record) button.
The [k](record) button lights up red and the unit enters recording
mode.
3 Press the [d](play) button.
The [d](play) button lights up green and a pattern is played in
recording mode.
4 Play the 16 pads.
The notes will be recorded in the pattern when the pads are tapped.
5 Press the [k](record) button again.
The light of the [k](record) button turns off and the unit exits recording
mode.
!You can change the parameters of the recorded notes in the same
way as in the step recording.
Using INTERPOLATION
By setting each parameter for the beginning step, the middle step(s),
and the end step, the unit automatically interpolates (supplements)
parameters for the steps in-between them.
You can use this function for the Pitch, Gate, Velocity, and CC1 to CC3
parameters.
1 Press [PITCH], [GATE], or [VELOCITY] button.
The pressed button lights up.
2 Press and hold the pad to save the beginning, middle,
or end step, and turn the control to the right of the button
pressed in step 1.
The display shows the value of the parameter. The pads where the
beginning, middle, and end steps were saved light up white.
!In addition to the beginning step and the end step, up to 3 middle
steps can also be inserted.
!To delete the beginning step, the middle step(s), or the end step,
press the pad where the step is saved.
The light of the pad dims.
Parameters of the beginning/middle/end step
3 Press the same button pressed in step 1.
The unit exits Interpolation mode.
En 13
English
Using TIME WARP
The Time Warp function can be used to automatically loop record the
output from the unit so that you can call patterns previously played.
1 Press the [TIME WARP] button.
The [TIME WARP] button changes from a dim white light to a bright
white light.
The display shows the length of the pattern to be previewed.
!If the [TIME WARP] button is pressed during pattern playback,
the unit plays back to the fourth beat indicator (the [TIME WARP]
button flashes), and then enters Time Warp mode (the [TIME
WARP] button lights up).
!The pattern cannot be changed while in Time Warp mode.
2 Turn the rotary selector.
The pattern can be previewed in different lengths: [1 Bar], [2 Bars],
[3 Bars], [4 Bars].
The lengh of the pattern to be previewed
3 Press the desired pad to begin previewing.
The unit plays the loop with the length specified in step 2 from the pad
that was pressed.
The pads that light up brightly are in the preview range. The pads with
a dim light can be selected to start the preview. The preview cannot be
started at pads that do not light up.
!The preview restarts each time a pad is pressed.
!To stop a preview, press the [g](stop) button.
!The length of one pad is 1 Bar.
The beginning of the preview
4 Press the [PATTERN] button.
The unit enters Save mode and the [PATTERN] button lights up green.
The pad of the current pattern lights up brightly. The pads with saved
patterns have a dim light. The pads do not light up when there are no
saved patterns.
5 Press the desired pad to save a pattern being
previewed.
The pattern is saved and the pressed pad lights up.
!A pattern cannot be saved to the pad with the current pattern.
6 Press the [PATTERN] button again to exit Save mode.
The [PATTERN] button dims green.
7 Press the [TIME WARP] button again to exit Time
Warp mode.
The [TIME WARP] button changes from a bright white light to a dim
white light.
Saving a project
1 Press the [GLOBAL] button.
The [GLOBAL] button lights up and the display shows the GLOBAL
menu.
2 Turn the rotary selector to select [Save As], and press
the rotary selector.
!Select [Save] to overwrite the project.
3 Press the [c]/[d]button to move the cursor and
change the character by turning the rotary selector.
Name the project by repeating this step.
!Alphanumeric characters, symbols, or a blank space can be
inserted.
!To delete a character in front of the cursor, press and hold the
[SHIFT] button and press the [BACK] button.
!To insert a blank in front of the cursor, press and hold the [SHIFT]
button and press the rotary selector.
!When an existing project is opened, the name of the project
appears in the display.
4 Press the rotary selector.
The project is saved.

14 En
Additional information
Troubleshooting
!If there seems to be a problem with this unit, check the items in the
“Troubleshooting” section in the Operating Instructions of this unit,
or access the Pioneer DJ site and check [FAQ] for the [SQUID].
pioneerdj.com/support/
Also, check the connected devices. If the problem cannot be
resolved, ask your nearest Pioneer authorized service center or
your dealer to carry out repair work.
!This unit may not operate properly due to static electricity or other
external influences. In such cases, normal operation may be
restored by unplugging the power cord and the USB cable then
plugging the power cord back in.
Changing the settings
!For details on how to change the settings of this unit, see “Changing
the settings” in the Operating Instructions.
Precautions regarding our repair
services
!When we repair your unit, we may need to reset the unit to factory
default depending on the unit conditions. Since we do not back up
your settings prior to repair, we recommend that you back up your
original data using DAW software and MIDI utility software, etc.
About trademarks and registered
trademarks
!Pioneer DJ is a trademark of PIONEER CORPORATION, and is
used under license.
!The names of companies and products mentioned herein are the
trademarks of their respective owners.
Specifications
AC adapter
Power .................................................. AC 100 V to 240 V, 50 Hz/60 Hz
Rated current..................................................................................0.4 A
Rated output ........................................................................ DC 5 V, 2 A
General - Main Unit
Power consumption
DC IN ................................................................... DC 5 V, 1 200 mA
Main unit weight............................................................................ 1.9 kg
Max. dimensions
......................374.8 mm (width) × 72.1 mm (height) × 223.9 mm (depth)
Tolerable operating temperature.................................... +5 °C to +35 °C
Tolerable operating humidity...................5 % to 85 % (no condensation)
Input/output terminals
DIN SYNC IN/OUT2 input/output terminal
5-pin DIN................................................................................... 1 set
DIN SYNC OUT1 output terminal
5-pin DIN................................................................................... 1 set
CLOCK IN input terminal
1/8˝ stereo mini jack .................................................................. 1 set
CLOCK OUT output terminal
1/8˝ stereo mini jack .................................................................. 1 set
GATE OUT output terminal
1/8˝ mono mini jack ................................................................. 2 sets
CV OUT output terminal
1/8˝ mono mini jack ................................................................. 2 sets
MIDI IN input terminal
5-pin DIN................................................................................... 1 set
MIDI OUT1 output terminal
5-pin DIN................................................................................... 1 set
MIDI THRU/OUT2 output terminal
5-pin DIN................................................................................... 1 set
USB terminal
B type........................................................................................ 1 set
!The specifications and design of this product are subject to change
without notice.
!© 2019 Pioneer DJ Corporation. All rights reserved.

En 15
2Fr
Nous vous remercions d’avoir acquis un produit Pioneer DJ. Veuillez lire attentivement ce mode d’emploi afin de connaître la manière d’utiliser
l’appareilcomme il convient. Cela fait, conservez le mode d’emploi de façon à pouvoir vous y référer en cas de nécessité.
Dans certains pays ou certaines régions, la forme de la fiche et de la prise d’alimentation est un peu différente de ce qui est montré dans les
illustrations. Toutefois, l’appareil se raccorde et fonctionne de la même façon.
ATTENTION
POUR ÉVITER TOUT RISQUE D’ÉLECTROCUTION, NE
PAS ENLEVER LE COUVERCLE (NI LE PANNEAU
ARRIÈRE). AUCUNE PIÈCE RÉPARABLE PAR
L’UTILISATEUR NE SE TROUVE À L’INTÉRIEUR.
CONFIER TOUT ENTRETIEN À UN PERSONNEL
QUALIFIÉ UNIQUEMENT. D3-4-2-1-1_B1_Fr
AVERTISSEMENT
Cet appareil n’est pas étanche. Pour éviter les risques
d’incendie et de décharge électrique, ne placez près de
lui un récipient rempli d’eau, tel qu’un vase ou un pot
de fleurs, et ne l’exposez pas à des gouttes d’eau, des
éclaboussures, de la pluie ou de l’humidité. D3-4-2-1-3_A1_Fr
AVERTISSEMENT
Pour éviter les risques d’incendie, ne placez aucune
flamme nue (telle qu’une bougie allumée) sur
l’appareil. D3-4-2-1-7a_A1_Fr
Milieu de fonctionnement
Température et humidité du milieu de fonctionnement :
De +5 °C à +35 °C (de +41 °F à +95 °F) ; Humidité
relative inférieure à 85 % (orifices de ventilation non
obstrués)
N’installez pas l’appareil dans un endroit mal ventilé ou
un lieu soumis à une forte humidité ou en plein soleil
(ou à une forte lumière artificielle).
D3-4-2-1-7c*_A1_Fr
PRÉCAUTION DE VENTILATION
Lors de l’installation de l’appareil, veillez à laisser un
espace suffisant autour de ses parois de manière à
améliorer la dissipation de chaleur (au moins 5 cm à
l’arrière et 5 cm de chaque côté).
D3-4-2-1-7d*_A1_Fr
Si vous souhaitez vous débarrasser de cet appareil, ne le mettez pas à la poubelle avec vos ordures ménagères. Il existe un système de
collecte séparé pour les appareils électroniques usagés, qui doivent être récupérés, traités et recyclés conformément à la législation.
Les habitants des états membres de l’UE, de Suisse et de Norvège peuvent retourner gratuitement leurs appareils électroniques usagés aux
centres de collecte agréés ou à un détaillant (si vous rachetez un appareil similaire neuf).
Dans les pays qui ne sont pas mentionnés ci-dessus, veuillez contacter les autorités locales pour savoir comment vous pouvez vous débarrasser
de vos appareils.
Vous garantirez ainsi que les appareils dont vous vous débarrassez sont correctement récupérés, traités et recyclés et préviendrez de cette façon
les impacts néfastes possibles sur l’environnement et la santé humaine.
K058b_A1_Fr
NOTE IMPORTANTE SUR LE CABLE
D’ALIMENTATION
Tenir le câble d’alimentation par la fiche. Ne pas
débrancher la prise en tirant sur le câble et ne pas
toucher le câble avec les mains mouillées. Cela risque
de provoquer un court-circuit ou un choc électrique. Ne
pas poser l’appareil ou un meuble sur le câble. Ne pas
pincer le câble. Ne pas faire de noeud avec le câble ou
l’attacher à d’autres câbles. Les câbles d’alimentation
doivent être posés de façon à ne pas être écrasés. Un
câble abîmé peut provoquer un risque d’incendie ou un
choc électrique. Vérifier le câble d’alimentation de
temps en temps. Contacter le service après-vente le
plus proche ou le revendeur pour un remplacement.
S002*_A1_Fr
ATTENTION
L’interrupteur de cet appareil ne coupe pas
complètement celui-ci de sa prise secteur. Comme le
cordon d’alimentation fait office de dispositif de
déconnexion du secteur, il devra être débranché au
niveau de la prise secteur pour que l’appareil soit
complètement hors tension. Par conséquent, veillez à
installer l’appareil de telle manière que son cordon
d’alimentation puisse être facilement débranché de
la prise secteur en cas d’accident. Pour éviter tout
risque d’incendie, le cordon d’alimentation sera
débranché au niveau de la prise secteur si vous
prévoyez une période prolongée de non utilisation
(par exemple avant un départ en vacances).
D3-4-2-2-2a*_A1_Fr
Lorsque vous utilisez ce produit, vérifiez les
informations concernant la sécurité sous l’appareil.
D3-4-2-2-4_B1_Fr
ATTENTION
Ce produit a été testé dans des conditions de climats
tempéré et tropical.
D3-8-2-1-7a_A1_Fr
Le symbole graphique indiqué sur le produit
représente le courant alternatif.
Le symbole graphique indiqué sur le produit
représente le courant continu.
Le symbole graphique indiqué sur le produit
représente un équipement de Classe II.
D3-8-2-4_A1_Fr

Fr 3
Français
Sommaire
Comment lire ce manuel
Merci d’avoir acheté ce produit Pioneer DJ.
Veuillez lire ce manuel et le mode d’emploi disponible sur le site
Pioneer DJ. Ces deux documents comprennent des informations
importantes que vous devez connaître avant d’utiliser ce produit.
En particulier, veillez à lire les « CONSIGNES DE SÉCURITÉ
IMPORTANTES ».
!Dans ce manuel, les noms de boutons, commandes et prises
indiqués sur le produit, ainsi que les options de programme
apparaissant sur l’écran de l’appareil, etc. sont indiqués entre
crochets ([ ]). (ex. : bouton [GLOBAL], prise [CLOCK OUT], [Save
As])
!Remarque : les écrans et les spécifications du logiciel décrits
dans ce manuel, ainsi que l’aspect externe et les caractéristiques
techniques du matériel sont en cours de développement ; ils
peuvent donc différer des spécifications finales.
!Veuillez noter que selon la version du système d’exploitation, les
réglages du navigateur web, etc., le fonctionnement peut être
différent des marches à suivre indiquées dans ce mode d’emploi.
Ce manuel décrit brièvement les noms des pièces de cet appareil, les
raccordements entre cet appareil et des périphériques, ainsi que les
opérations de base.
Pour des instructions plus détaillées sur l’utilisation de cet appareil,
reportez-vous au mode d’emploi de cet appareil.
!Pour en savoir plus sur l’obtention du mode d’emploi de cet
appareil, reportez-vous à la section « Affichage du mode d’emploi »
à la page 4.
Avant le démarrage
Caractéristiques .................................................................................. 4
Contenu du carton d’emballage .......................................................... 4
Affichage du mode d’emploi................................................................ 4
Fonction de mise hors tension automatique ....................................... 4
Noms des pièces
Panneau de commande...................................................................... 5
Panneau arrière .................................................................................. 8
Raccordements
Raccordement des entrées et des sorties........................................... 9
Fonctionnement
Lecture de motifs de démonstration...................................................11
Création d’un nouveau projet.............................................................11
Enregistrement de notes dans un motif ............................................ 12
Utilisation d’INTERPOLATION.......................................................... 12
Utilisation de TIME WARP................................................................. 13
Enregistrement d’un projet................................................................ 13
Informations complémentaires
En cas de panne ............................................................................... 14
Modifier les réglages ......................................................................... 14
Précautions à prendre concernant nos services de réparation......... 14
À propos des marques commerciales et des marques déposées .... 14
Spécifications .................................................................................... 14

4Fr
Avant le démarrage
Caractéristiques
Le SQUID est un séquenceur multipiste autonome qui peut
successivement connecter divers équipements de production musicale
et produire des phrases.
Les phrases peuvent être séquencées rapidement à l’aide des
commandes de paramètres de pas qui fonctionnent indépendamment
pour chaque paramètre et des fonctions de séquence telles que
HARMONIZER et INTERPOLATION.
Trouvez constamment de nouvelles idées et phrases en
ajoutant différents arrangements à la séquence et en faisant des
expérimentations avec l’interface utilisateur à l’aide de nombreuses
fonctions d’arrangement comme RUNNING DIRECTION, GROOVE
BEND et SPEED MODULATION.
Cet outil musical inspirant et expressif est compatible avec plusieurs
types de systèmes de production musicale. Il est doté de prises USB
et MIDI, ainsi que des commandes CV/GATE OUT et DIN SYNC — qui
peuvent non seulement commander des synthétiseurs modulaires,
mais aussi des instruments de musique électroniques vintage.
Contenu du carton d’emballage
!Adaptateur secteur
!Cordon d’alimentation
!Mode d’emploi (Guide de démarrage rapide) (ce document)
Affichage du mode d’emploi
Les instructions peuvent également être fournies sous forme de
fichiers PDF.
Adobe® Reader® doit être installé pour pouvoir consulter les fichiers
au format PDF.
1 Lancez un navigateur web sur votre PC/Mac et
accédez au site Pioneer DJ ci-dessous.
pioneerdj.com
!Pour sélectionner votre langue, cliquez sur l’icône du drapeau ou
du globe en haut à droite de l’écran.
2 Orientez le curseur vers [Aide] et cliquez dessus.
3 Cliquez sur [Tutoriels, manuels & documentation].
4 Cliquez sur [SQUID] dans la catégorie
[PRODUCTION MUSICALE].
5 Cliquez sur la langue souhaitée dans la liste.
Téléchargez le manuel si nécessaire.
Fonction de mise hors tension
automatique
Cet appareil a une fonction de mise hors tension automatique, qui est
activée par défaut. L’appareil se met automatiquement hors tension
lorsqu’il n’y a aucune entrée ou sortie de signal ou aucune opération
pendant environ 4 heures.
Pour remettre l’appareil sous tension une fois qu’il s’est mis
automatiquement hors tension, appuyez sur le bouton [u]du panneau
arrière pour le libérer de la position de hors tension (v), puis appuyez à
nouveau sur le bouton [u](w).
Pour désactiver la fonction de mise hors tension automatique, appuyez
sur le bouton [GLOBAL] pour afficher le menu GLOBAL. Ensuite,
tournez le sélecteur rotatif pour commuter le paramètre [Auto Power
Off] sur [Disable].
Remarques
!Les données non sauvegardées seront perdues si l’appareil est mis
hors tension automatiquement.
N’oubliez pas de sauvegarder les données importantes telles que
les données de projet édité.
!La fonction de mise hors tension automatique peut ne pas mettre
l’appareil hors tension dans certains modes de fonctionnement.
Par conséquent, veillez toujours à mettre l’appareil hors tension
manuellement après utilisation.
Fr 5
Français
Noms des pièces
Pour plus de détails sur chaque bouton et chaque commande, reportez-vous à la section « Noms et fonctions des éléments » du mode d’emploi.
Panneau de commande
Section générale
Section d’arrangement de phrases Section d’édition de pas
Section générale
1Bouton SHIFT
2Bouton k(enregistrement)
3Bouton g(arrêt)
4Bouton d(lecture)
5Bouton TAP
6Bouton GLOBAL
7Bouton BACK
8Sélecteur rotatif
9Écran
aBouton TIME WARP
6Fr
Section d’arrangement de phrases
bCommande SHAPE
cCommande MOD LENGTH
dCommande DEPTH
eCommande SCALE
fBouton ARP
gCommande SWING
hBouton REV
iBouton (droite)
jBouton (bas)
kBouton (zigzag)
lBouton SWITCH BACK
mBouton (sens horaire)
nBouton (sens antihoraire)
oBouton (saut arrière)
pCurseur GROOVE BEND
qIndicateur AUTOMATION ON
rBouton 1/2X (moitié)
sBouton GATE HOLD
tBouton 2X (double)
uBoutons RHYTHM
1/4, 1/8, 1/16, 1/32, TRIPLET, DOTTED
vBouton TRIG PROB
This manual suits for next models
1
Table of contents
Languages:
Other TORAIZ Recording Equipment manuals


