manuals.online logo
Brands
  1. Home
  2. •
  3. Brands
  4. •
  5. Nagra
  6. •
  7. Recording Equipment
  8. •
  9. Nagra Nagra-D User manual

Nagra Nagra-D User manual

NAGRA-D
Operating
Manual
Version 2.00
NAGRA-D REGISTRATION FORM
Please carefully fill in this
page
(IN
CAPITAL LETTERS)
and
return it to us upon receipt
of
your
NAGRA-D. We will then
be
able to send
you
upgrade pages for your manual, as well
as
inform you
of
future developments in software.
Please return this page to: Kudelski SA
Route de Geneve, 22
1033 CHESEAUX
SWITZERLAND
ATTN: Support Technique
NAGRA-D Serial Number
Purchase date
Your Name I dept.
Company name
Street Name I N°
Town I City
Zip I Postal code
Country
NAGRA DIGITAL
Chapter
1 Introduction
Chapter
2 Location
of
Keys I Connectors I Functions
Chapter
3 Operationl settings
of
the NAGRA-D
Chapter
4 Synchronization
Chapter
5 External Control
Chapter
6 Specifications
APPENDIX A Application aid sheets
Kudelski
SA,
Route de Geneve 22, 1033 Cheseaux, Switzerland.
TEL: +
41
.21.732.
01
.
01
FAX:
+ 41.21 .732.01.00
GUARANTEE
NAGRAIKUDELSKI certifies that this instrument was thoroughly inspected and tested prior to leaving
our factory and is in accordance with the data given in the accompanying test sheet.
We guarantee the products
of
our
own
manufacture against any defect arising from faulty
manufacture for a period
of
one
year from
the
date
of
delivery.
This guarantee covers the repair
of
confirmed defects
or,
if
necessary, the replacement of the faulty
parts, excluding all other indemnities.
All freight costs,
as
well as customs duty
and
other possible charges, are at the customer's expense.
Our guarantee remains valid in the event
of
emergency repairs or modification being made
by
the
user. However
we
reserve the right
to
invoice the customer for any damage caused
by
an
unqualified person or a false manoeuvre
by
the operator.
We decline any responsibility for any and all damages resulting, directly or indirectly, from the use of
our products.
Other products sold by KUDELSKI S.A. are covered
by
the guarantee clauses of their respective
manufacturers.
We decline any responsibility for damages resulting from the use
of
these products.
We reserve the right to modify the product,
and
lor
the specifications without notice.
Chapter 1
CHAPTER 1
INTRODUCTION
Introduction
Using this manual
General Description
Important notes
Electrostatic discharge
Tape care/handling
Output connection
Head cleaning
The "footprint"
Longitudinal tracks
Time code
Control track
Cue track
Helical tracks
Tape speed
Putting the machine
in
the 7" reel mode
Powering the NAGRA-D
External powering using the ND-AP
External powering using the ND-EPC
Chapter 1
INTRODUCTION
USING THIS
MANUAL
This instruction manual is designed to enable the operator to understand, and use the NAGRA-D.
The basic principles
of
audio recording or digital technology are not covered, except where the
concept within the
NAGRA-D
is different from that normally app'lied. The manual is broken down into
chapters covering different aspects of the machine. At the end
of
the manual there is a
comprehensive index, which should guide the operator to the correct page quickly. The pages are
numbered from 1 to N for each chapter.
If
in
the future there is a page to be added in the middle
of
a
chapter, then the new page to
be
added will have a page number followed by a decimal point and
then
1,
2 or 3 etc. For example
if
a page is to
be
added between pages 5 and 6
of
a particular
chapter then the new page will be numbered 5.1. This manual covering Version 2.X software for the
NAGRA-D replaces all previous editions.
GENERAL
DESCRIPTION
The concept
of
the NAGRA-D was to build a truly professional machine based
on
a
format
that is
reliable and lends itself well to archiving. The arguments regarding the format, choice
of
tape etc. are
not covered here.
The NAGRA-D is a
four
channel digital audio recorder having 24 bits per sample recording
on
6.35mm metal oxide tape. It accommodates the sampling frequencies
of
32 kHz, 44.1 kHz and 48
kHz (with the on-board AID converters) rendering it suitable for all types
of
professional recording
applications. The NAGRA-D is transparent to the AES bus giving connection possibilities to a wide
range
of
external digital equipment, which even give it the possibility
of
recording at sampling
106
frequencies
of
64, 88.2 and 96 kHz. The format of the NAGRA-D records 4.608 x bits per
second, meaning that on a 5" reel
of
tape contains 16.03 x 109 bits (16 giga bits)
of
data. The
combination
of
selected tape speed and number of channels to be recorded gives tape durations to
satisfy all applications.
TAPE
DURATIONS
48
kHz
44.1
kHz
32
kHz
5" reel 4 channel mode 1 hr. 1
hr.
05 mins. 1 hr 30 mins.
2 channel mode 2 hrs. 2 hrs. 10 mins. 3 hrs.
7" reel 4 channel mode 2 hrs. 2 hrs. 10 mins. 3 hrs.
2 channel mode 4 hrs. 4 hrs. 20 mins. 6 hrs.
Apart from the two AES digital inputs, four analog inputs are available for either line
or
microphone
input sources.
When
in microphone operation each of the four inputs is switchable between Dynamic,
"T" powering,
+12V
phantom and +48V phantom. The Signal levels are adjusted using the input
sensitivity potentiometers, and the levels are indicated
on
the four microprocessor controlled meters.
The four head scanner
(2
for recording and 2 for playback) allows read after write (off tape
monitoring) which can be heard through the two, level adjustable, headphone outputs.
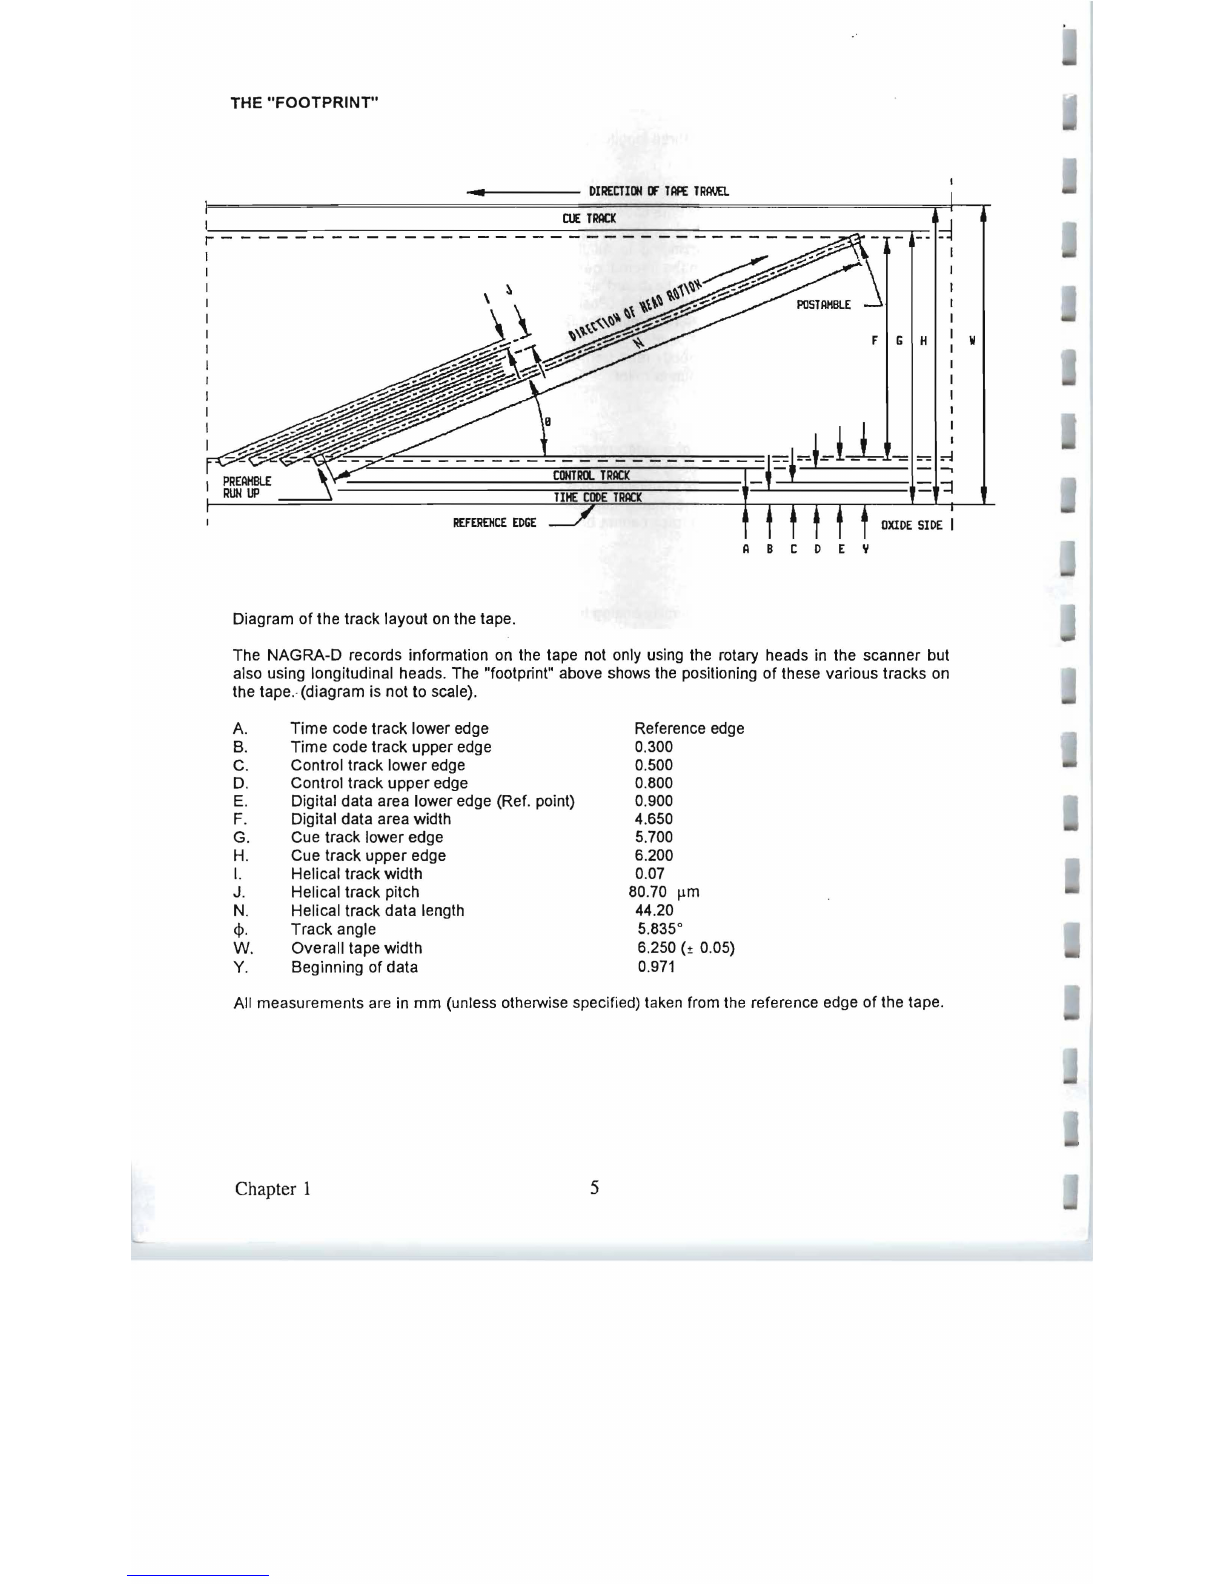
The three longitudinal tracks (Control, CUE
and
Time Code) give flexibility
of
operation and
additional features
never
before seen
in
a professional recorder.
Microprocessor control
of
the entire machine gives almost limitless possibilities, not only as far as the
digital recording is concerned, but also for external control, fault diagnosis, tape directory
management etc., from a PC equipped with the NADCOM software (KSA # 10514)
Chapter 1
This has been a brief outline of the machine, all the
pOints
mentioned here will be covered in more
detail later.
NOTE: The NAGRA-O has few user selections I switches inside (except the type of CUE microphone
to be used -factory selection is for the NO-CM and one bank
of
OIL switches
on
the direct
amplifier, the use
of
which is covered under the relevant chapter). All other mode selections
etc. are made via
an
external
PC
or
by
the MENU mode.
Chapter 1 2
IMPORTANT NOTES
ELECTROSTATIC DISCHARGE
The NAGRA-D's electronic circuits
are
all SMD devices using CMOS and MECL technology, which
renders them very susceptible to electrostatic discharge. These circuits are fully protected while
installed
in
the machine, however
if
any of the circuits are to
be
disconnected and removed from the
machine then the operator must at all times
be
connected to ground via a wrist bracelet and the
circuits must only
be
placed
on
a conductive mat also connected to ground.
If
circuits are to
be
transported for any reason then they must
be
kept
in
anti-static plastic bags at all times. All the
circuits are printed with the international sign indicating the danger. Eproms can also
be
damaged
if
frequently handled therefore
we
suggest this earthing procedure whenever work is to be carried out
on
the NAGRA-D.
TAPE
CAREl
HANDLING
Although scissors editing is technically possible
on
the NAGRA-D, it is not recommended to touch the
tape unless absolutely necessary. Cotton gloves are recommended for this, in order to prevent
moisture (finger prints) from the skin affecting the tape or clogging
of
the heads.
When certain tapes are rewound, the air trapped between the windings during rewinding can cause
the tape to wind unevenly
on
the reel, meaning that the edges
of
the tape stand proud.
If
the plastic
reel
is
then handled, there is a risk of physically damaging the edges of the tape. On the lower edge
of the tape in the format
of
the NAGRA-D are the time code
and
Control track (see FORMAT) which
will cause problems for playing back the tape
if
the edges of the tape are damaged. Normal winding
speed
in
each direction is 4
mls
however slower winding
can
be
selected in the MENU mode
(1,
2,
3,
4 m/s).
ANALOG OUTPUT CONNECTIONS (TO A MIXER)
The NAGRA-D does not have transformers
on
its analog audio outputs. This means that
if
the
outputs are to
be
connected to the inputs
of
a mixing console
(so
that the four channels can
be
mixed
down
to
two) then
be
sure that the inputs to the mixer are set to the LINE position before the
connection to the NAGRA-D
is
made. If they are set to the Phantom +48V position then the output
OP-Amps
of
the NAGRA-D will almost certainly
be
damaged.
Chapter 1 3
HEAD
CLEANING
The NAGRA-D, like any tape recorder requires that the user cleans the heads and other parts
of
the
tape transport periodically. The frequency
of
this depends on
many
factors, such as the operating
environment, the tape type, mechanical alignment of the machine's transport etc. as with any
recorder. It is therefore difficult to give a specific
time
frame. As a guide, we suggest that the heads
are cleaned once per day
if
the machine is being heavily used.
However
if
the cloth does not appear
to be dirty
after
cleaning, and no apparent problems have occurred then more time can be left before
cleaning.
If
however
the scanner etc. has been touched, and there are finger marks
on
it then the
heads need to be cleaned immediately. Increasing error count in the ECC display gives
an
indication
that the heads need to be cleaned.
Procedure
To
clean the heads etc. firstly remove the tape and carefully clean the entry and exit guides
of
the
scanner along with the longitudinal erase head and the longitudinal cue I control I TC head, using a
soft cloth which
has
been dipped in alcohol (preferably
MYTHYL
alcohol but ISOPROPYL can also
be used). Make sure that the ramp
of
the scanner is also perfectly clean as any deposit on this ramp
will cause
the
tape path to be altered which can affect both recording and playback.
Once this has been done the rotary heads in the scanner can be cleaned. There are two
different
methods
for
doing this. The first is to hold the Alcohol soaked cloth against the surface
of
the
scanner
using,your thumb, then gently rotating the scanner with the other hand while
keeping
the
cloth
still.
The other
is
to lace a tape, put the machine in
STOP,
press
RDY
and then gently press
the
alcohol
soaked cloth against the rotating scanner
NEVER MOVE VERTICALLY
UP
AND DOWN ON THE SCANNER AS THIS
CAN BREAK THE HEADS. ALWAYS CLEAN THE SCANNER
IN
A
HORIZONTAL MANNER.
NEVER USE Q-TIPS OR OTHER COTTON BUDS AS THEY WILL LEAVE
HAI
RS
ON
!THE HEADS OF THE SCANNER.
Chapter 1 4
THE
"FOOTPRINT"
-
........
----
DI
REtTI
III
IF
TAPE
TRAVEL
Ill:
TRACK
I------------------------
------
----------~--.---~
F G H W
REFEREHCE
EDGE
OXIDE
SIDE
I
ABC
DEY
Diagram
of
the track layout
on
the tape.
The NAGRA-D records information
on
the tape not only using the rotary heads in the scanner but
also using longitudinal heads. The "footprint" above shows the positioning
of
these various tracks
on
the tape.-(diagram is not to scale).
A.
Time code track lower edge Reference edge
B. Time code track upper edge 0.300
C. Control track lower edge 0.500
D.
Control track upper edge 0.800
E. Digital data area lower edge (Ref. point) 0.900
F.
Digital data area width 4.650
G. Cue track lower edge 5.700
H. Cue track upper edge 6.200
I.
Helical track width 0.07
J. Helical track pitch 80.70
~m
N.
Helical track data length 44.20
cp.
Track angle 5.835°
W. Overall tape width 6.250
(±
0.05)
Y.
Beginning of data 0.971
All measurements are in
mm
(unless otherwise specified) taken from the reference edge
of
the tape.
Chapter 1 5
LONGITUDINI
AL
TRACKS.
As shown in the diagram above there
are
three longitudinal tracks which are:
TIME CODE TRACK
This is a longitudinal SMPTE/EBU
80
bits time code track recorded using Manchester Bi-phase which
allows the reading
of
time code at very
high
speeds. The internal time code system of the NAGRA-D
includes a time code generator corresponding
to
all the presently used formats (including drop
frame). Time code
can
be
recorded from
the
internal generator or
an
external source. Both the time
and
user information
can
be
set from
the
keyboard or a
PC.
Although time code "Pre-striping" is
permitted, recording of time code after
the
event (Post Striping,) is not allowed
as
doing this will
disturb the control track of
the
machine
and
will make the tape unreadable.
When in rapid winding (especially
at
half-speed) the time code passes the head at more than 60
times nominal speed and cannot
be
correctly
read
from the tape.
In
these instances the time code
output and display
is
updated from
the
counter roller.
CONTROL TRACK
This track is similar to the control track of a video recorder. Data
is
recorded along the tape which
serves
as
"markers" indicating the start point of each helical scan. The purpose of these "markers" is
to enable the servo system to synchronize the position ofthe heads
af
the scanner with respect to the
position of the helical scan
on
the
tape, ensuring that
the
heads track the helical scans accurately
and
do
not read between the scans. This track cannot
be
accessed
by
the user and contains
no
user
data.
CUE TRACK
-
The CUE track
of
the NAGRA-D is a low quality analog track which has two principle functions:
1.
In
normal operation it will record a mix of the 4 digi,tal channels, from either the analog or
digital inputs, aillowing rapid audible searching
on
the tape of a particular point
in
the
recording. A cue microphone
can
also
be
recorded at the same time
if
desired. This is the
normal mode and will operate
as
described whenever tlile machine is put into recording mode
and the cue channel "lock out" switch is
in
the
READY position, and also when
no
cue
microphone is connected
to
the external input. The output of the CUE track can only
be
monitored
on
the headphone outputs,
if
searching is being done
at
speeds other than
nominal then the analog
and
digital outputs of the NAGRA-D are muted. The Cue track
output is automatically switched
to
the headphone outputs whenever the tape is not at
nominal speed.
2.
It
can
be
used to record
Cue
information by means of a commentary microphone (ND-CM),
connected to the EXTENSION socket
on
the left-hand side of the machine.
Chapter 1 6
Synoptic diagram of the cue track
CH
1234
JJJJ
CUE
'TRACK
HEAD
HELICAL TRACKS
Each helical track (or scan)
on
the tape contains the information coming from a pair of inputs (either
1
+2
or 3+4). These tracks are made
up
of 192 sectors of digital information sent from the ECC (Error
Correction Code).
This shuffling means that it is perfectly possible
to
record channels 1+2 initially and then at a later
date record channels 3+4 (or vice-versa) using the INSERT feature, providing that the machine is in
the high speed four channel mode. However it is not possible to record channels 1+3 and later 2+4
as
this would require additional heads in the scanner allowing read before write.
The helical tracks
of
the NAGRA-O are recorded by a rotating scanner equipped with VHS heads,
which rotates at 62.5 revolutions per second (3'750 R.P.M.
at
a sampling frequency of
48
kHz.) and
the track width
of
each scan is of
70J.1m.
TAPE SPEED
Two different tape speeds are available, either 49.6 mm/s (approx. 2 ips.) for two channel operation,
giving approximately 2 hrs of continuous recording with a
13
cm (5") reel (at 48 kHz sampling
frequency), or 99.2 mm/s (approx. 4 i.p.s) for 4 channel operation giving approximately 1 hr of
recording using a 13 cm (5") reel (at 48 kHz sampling frequency). Tape speed selection is made in
the MENU mode, and the factory default setting is the high speed four channel mode. The NAGRA-O
will equally well operate with
18
cm
(7") reels respectively doubling these recording times. The reel
motors need to be rotated and a special cover (NO-SET) needs to
be
fitted to the machine in order to
use
7" reels.
Chapter 1 7
PUTTIN,G
THE
MACHINE INTO THE 7" REEL POSITION
The NAGRA-D is delivered
in
the
5"
reel configuration,
but
it
can
easily
be
moved to the 7" position.
The machine must
be
switched
ON
(without tape)
in
order to ensure that the parking brakes are
released. Loosen the two screws
on
the front of the main control panel
so
that the deck plate
of
the
machine can
be
lifted (or the two thumb-screws
if
the ND-PP potentiometer protection bar
is
fitted).
Open the plexi-glass cover
of
the transport
and
remove the tape
and
the empty
ree
k Insert a 1.5mm
Allen Key (for machines with 1000325 or lower)
(a
2mm Allen key for machines with serial number
higher than 1000325) into
each
of the three holes,
in
tum, around the r
eel
motor to
be
moved.
Loosen each screw
in
turn
by
MAXIMUM HALF A REVOLUTION then REMOVE THE ALLEN KEY.
Lift the deck plate
of
the machine,
and
gently rotate the motor to the 7" position
by
turning the grey
plastic cover
of
the reel motor. Once the motor is fully turned,
and
the marks
on
the deck plate are
aligned with the 7" position indications then re-insert the Allen
key
and
re-tighten the three screws.
NOTE:
If
the screws are loosened more than half a turn it
is
possible that they will fall inside the
machine. Secondly
i.f
the
key is not removed
when
rotating the motor the brakes will
be
damaged.
It
should also
be
noted that when
in
the
7"
reel position, the slowing down
of
the reel motors during
fast winding,
as
it reaches the
end
of
the tape does
not
operate. This is because the diameter
of
the
central hub
of
a 7" reel is
not
the same
as
that
of
a 5" reel.
Chapter 1 8
POWERING THE NAGRA-D
The NAGRA-D is fitted with
and
internal battery pack, of the BETACAM ™ style. This internal battery
pack must be fitted to the machine
at
all times,
as
without the internal battery the machine wi
ll
not
operate even
if
connected
to
the external charger unit, or supply. A fully charged battery pack under
normal circumstances will give approximately 2
hrs
of
continuous 4 channel recording. The NAGRA-
D runs permanently
off
this internal battery pack, which acts
as
a :buffer, even when connected
to
the
charging unit.
The NAGRA-D's charger unit supplies a 40 mA trickle charge permanently to avoid reverse-
polarisation
of
the cells in the battery pack. When the battery needs charging the charger is
instructed
to
supply the 400 mA charge current. The internal battery will only be charged when the
machine
is
in LOAD or PARK position. The NAGRA-D communicates with this charger and instructs
it
on
the amount
of
current
to
supply,
at
any particular time. The status of the internal battery,
in
terms of residue etc, can be seen
at
any time
on
the LCD display in the MENU mode (see MENU's
in
chapter 3). The internal battery pack
can
be
removed from the machine and charged
on
a normal
BETACAM ™charger
if
desired: However
if
the internal battery is removed from the machine, then
the memory and settings will
be
lost. A large capacitor
will.
keep
t.he
internal settings
for
a couple
of
minutes. The machine will use default modes when powered
up
again.
If
settings have been saved in
a "Template" (see menus) then these settings will not
be
lost
and
can
be
restored once a new battery
is put into the machine.
NOTE:
When the internal battery
is
replaced' then the battery management system assumes
that the new battery installed
is
already full
and
will indicate 100 % in the battery
reserve menu.
If
however
the
operator knows that the new battery is only charged to
25, 50, or 75 % this
can
be
stored
in
the memory of the machine in the menu mode
and the machine will take this preset value into account from the start.
WARNING: The battery pack
in
the NAGRA-D is of the Betacam ™ type fitted with a 2mm DC
two pole connector (positive pole
on
the external connector)
WITHOUT
any form of
internal electronic protection or control. Battery packs fitted with this type of internal
surveillance
are
fitted with a 3 pole connector that is physically too large to be
connected inside the NAGRA-D. The internal circuits of such batteries also cause a
slight drop in voltage
on
the
output and this causes problems within the NAGRA-D.
It
is
recommended to
run
the internal battery completely flat from time to time to
avoid any memory effect accumulating
in
the NiCd.
NOTE: As the internal battery
is
always inside the machine the life
of
the battery
is
shortened as it
is
charged
at
a temperature
of
about +40 ·C. Meaning that
if
a full 2
hrs of recording time is needed
on
the
internal battery then the battery must
be
replaced with
one
that
has
been externally charged. The effective life of the internal
battery is reduced
to
about 1 h 20 min
if
left·
in
the machine.
Chapter 1 9
EXTERNAL
DC POWERING
USING
THE
ND-AP OPTION
Apart ,from the
use
of the ND-EPC external DC/DC converter, direct powering of the NAGRA-D from
an
external battery
is
possible, assuming that the ND-AP auto power option ,
is
installed
in
the
machine.
As mentioned above, the machine must always have
an
internal battery fitted. However
if
the
machine is
to
be
powered all the time externally, then it is possib'
le
to
install a very small
(1
Ah)
internal battery which makes
the
machine lighter
to
carry. If the ND-AP option is installed
in
the
machine then external batteries having a voltage between
11
and
14V (MAX)
can
be
connected
to
the cable supplied with the option. The ND-AP option will automatically select the external battery
if
H
has
a voltage greater than
11V.
The indication
of
the battery reserve
in
the
menu display will
increase while the external battery
is
being
used
but
in
fact this is meaningless
as
the actual state of
the internal battery
is
not changing.
In
this mode of operation, the external battery will not charge the
internal battery, meaning that
the
internal battery of
the
machine will need
to
be
periodically charged
using
an
external charger.
IMPORTANT: Please note that the external battery must
be
connected to the GROUND and the
CONTROL connections of the external power connector NOT THE POSITIVE
terminal. If
is
not
connected
in
this manner then the internal
fuse
of the NAGRA-D
will blow.
THE ND-EPC OPTION
The NAGRA-D may
be
powered with the external
DC
to DC converter ND-EPC (10505). This
external accessory
is
fitted with a 4 pole
XLR
(male) socket, to which
an
external
DC
supply from
11
to
30
volts
can
be
applied
in
either polarity.
Dimensions 150mm x 120mm x55mm
(L
xW x
H).
Weight
1.1
kg.
Supply voltage
11
-
30
V dc.
NOTE:
The
NAGRA-D must
be
switched ON for this accessory
to
work. The internal battery
of
the
machine will not charge
if
the machine is turned OFF.
CONNECTION:
The three pole LEMO type connector connects to
the
"POWER" connector
on
the right-hand rear
side of the NAGRA-D (where the normal mains charger ND-CCC ,is usually connected). The 4 pole
XLR
connector allows the ND-EPC
to
be
connected
to
the external source which must
be
an
external
battery between 12
and
24
V,
or
an
external
DC
supply with a voltage between 11V
and
30V DC. It
is
recommended that connection of the LEMO connector to the NAGRA-D
be
made before the external
supply / battery
is
connected
to
the
4 pole
XLR
connector.
Chapter 1 10
OPERATION USING THE ND-EPC
The external converter, once connected to the DC supply, supplies the internal battery of the
NAGRA-O with the power necessary
to
run
the NAGRA-O
as
well
as
the charging current required
to
charge the internal battery. The output current
of
the NO-EPC is controlled by the CPU inside the
NAGRA-O, which also manages the charge current
of
the internal battery, according to its state of
charge.
Throughout the time when the internal battery is at less than 100% charge, a charging current of
0.42A is sent to the internal battery of the machine, providing the NAGRA-O is switched ON.
Automatic charging of the internal battery will start
as
soon
as
the external converter is connected to
the machine and the voltage ofthe internal battery is lower than 12V. This is a minimal initial charge
necessary to bring the battery
up
to a level which will allow the NAGRA-O to
be
switched ON.
It
is not
necessary for the NAGRA-O to
be
switched
ON
for this to occur. A security circuit will stop the
converter when the external power source voltage drops to less than 10.SV
LED INDICATIONS
ON
THE ND-EPC
The LED "Input Voltage" indicates that the NO-EPC is
ON
and
is connected to the external source
and
that the NAGRA-O is switched ON. It will flash
if
the NAGRA-O is not connected.
The "Output Current" LED indicates inversely with respect to the output current
of
the NO-EPC.
It
will
be
dimly lit
if
the drain by the NAGRA-O is large (max current supply) (while the internal battery
is
less than 12 V
as
well
as
when the NAGRA-O is switched OFF)
It
will
be
lit brightly when the NAGRA-O is fully charged and hence the current being supplied by the
NO-EPC is less important.
The"
, "
on
the display
of
the machine will indicate whenever the internal battery
of
the machine
is
being charged. (see display indications
in
the time code section of this manual).
Chapter
1
11
CHAPTER
2
LOCATION OF KEYS I CONNECTORS I FUNCTIONS
Description
of
parts located on:
Deck plate
Main control panel
Front face
Left-hand side panel
Right-hand side panel
Chapter 2
12 3 12
1.
~ POWER
.,j!
3.
!
[;:
.!
-!.
.
~,
UiOItaDG
IW
CHANNEL
1 CHANNEL 2 CHAHNEL 3 CHANNEL"
.'·ill]!J
2
1
6
10 4
4 5
8
9
7
11
11
TAPE DECK
(Refer to photograph number
1)
This shows the location of various mechanical parts referred to
elsewhere in the manual.
Description
1 Supply reel holder
2 Take-up reel holder
3 Scanner (for recording helical tracks)
4 Tape tension roller
and
tape counter roller
5 Pinchroller
6 Capstan shaft
7 Tape engagement carriage
8 Longitudinal head (Cue,
TC
and
Control track)
9 Full track erase head
10
Tape g,ulde
11
Deck fastening screws
12 Hermetically sealed plexi-glass cover fixations
MAIN
CONTROL
PANEL
This section describes the operation
of
all the elements of the main control panel
of
the machine.
(please refer to photograph)
Pos Description
1.
HEADPHONE SELECTION SWITCHES
. The 4 headphone selection switches function
in
conjunction with the mode selector
switch 2
and
the direct switch
3.
There are four switches (each corresponding to one
channel) each having three positions. These positions are SOLO I ON I OFF. The
SOLO position is a snap switch and must
be
held in the SOLO position. When held
in the SOLO position the signal from the selected channel is centred on the
headphone outputs, and the other channels are inhibited while the switch is held
there. The four
(1,
2,
3,
4)
headphone switches are also labelled
L,
R,
L,
R
respectively. This means that
if
selector 1 is
ON
then the Signal will
be
fed to the left
channel of the headphone outputs. If selector 2 is ON then it will
be
fed to the right
channel and so
on.
Thus having stereo monitoring between two channels is possible
between the following combinations: 1
+2,
1+4, 2+3 and 3+4. The combination
of
1+3
is not possible
as
they would both be
on
the same channel superimposed. If the 96
kHz option is activated
and
the higher sampling rates are used then only selectors 1
and 3 are activated for left and right channels respectively and naturally the
monitoring in the headphones is only at 48 kHz not 96 kHz due to the internal D/A
converte~.
.
2.
HEADPHONE MODE SELECTOR
This three position switch selects the mode of the headphone outputs. The three
positions correspond to MONO I STEREO I CUE.
In
the MONO or STEREO
positions the audio signals are monitored in the respective format.
In
the CUE
position the headphone outputs monitor the longitudinal CUE track (see CUE
TRACK). Whenever the machine is not
at
nominal speed then the headphone output
is automatically switched
to
the CUE track,
if
the
EE
I AUTO I TAPE switch is not in
the EE position.
in
which
case
it will not
be
switched.
Chapter 2 2
21
23 22 24
2526
27 6 28 1 2 3 4 5
10
19
6
-----u--r-
•
ColI.
Arc
()I{fALO
AD
~
CHANNELl
CHANNEL 2
"-"'
~
..4
CH1
•• •1:.0
=W
1
i'
1::;
...
2 3 4
• • • •
....,
0
CAL
OY£A
ID
AO
~
~
~
~
'>-
•.
:
.
~
L
>-
'!.
CHANNEL 3 CHANNEL 4
CH2
7
I.
~
18
17
II
~
:
15 14 13 12
11
10

Other manuals for Nagra-D

1

Other Nagra Recording Equipment manuals

Nagra LB User manual

Nagra

Nagra LB User manual

Nagra IV-SJ User manual

Nagra

Nagra IV-SJ User manual

Nagra Nagra-D User manual

Nagra

Nagra Nagra-D User manual

Nagra PORTABLE ANALOGUE AUDIO TAPE RECORDER User manual

Nagra

Nagra PORTABLE ANALOGUE AUDIO TAPE RECORDER User manual

Nagra Ares-M Audio Recorder User manual

Nagra

Nagra Ares-M Audio Recorder User manual

Nagra ARES-BB Plus User manual

Nagra

Nagra ARES-BB Plus User manual

Nagra NAGRA-SD User manual

Nagra

Nagra NAGRA-SD User manual

Nagra IV-SJ User manual

Nagra

Nagra IV-SJ User manual

Nagra Nagra-VI User manual

Nagra

Nagra Nagra-VI User manual

Nagra ARES-C User manual

Nagra

Nagra ARES-C User manual

Nagra Ares-M User manual

Nagra

Nagra Ares-M User manual

Nagra IV-S User manual

Nagra

Nagra IV-S User manual

Nagra SNST-R User manual

Nagra

Nagra SNST-R User manual

Nagra Seven User manual

Nagra

Nagra Seven User manual

Nagra NAGRA 4.2 User manual

Nagra

Nagra NAGRA 4.2 User manual

Nagra IV-SJ User manual

Nagra

Nagra IV-SJ User manual

Nagra E User manual

Nagra

Nagra E User manual

Nagra III User manual

Nagra

Nagra III User manual

Nagra NAGRA-V User manual

Nagra

Nagra NAGRA-V User manual

Nagra NAGRA 4.2 User manual

Nagra

Nagra NAGRA 4.2 User manual

Nagra NAGRA-SD User manual

Nagra

Nagra NAGRA-SD User manual

Nagra IV D User manual

Nagra

Nagra IV D User manual

Popular Recording Equipment manuals by other brands

YOKOGAWA UTAdvanced Series user manual

YOKOGAWA

YOKOGAWA UTAdvanced Series user manual

Yamaha QX-3 owner's manual

Yamaha

Yamaha QX-3 owner's manual

ESI MaXiO 032 System manual

ESI

ESI MaXiO 032 System manual

SpeakerCraft MZC-64 installation instructions

SpeakerCraft

SpeakerCraft MZC-64 installation instructions

tams elektronik 70-01045 manual

tams elektronik

tams elektronik 70-01045 manual

Pro-tools MTRX II Guide

Pro-tools

Pro-tools MTRX II Guide

Rice Lake DeviceNet Series Installation and programming manual

Rice Lake

Rice Lake DeviceNet Series Installation and programming manual

turck IMX12-DI 1NAM Series quick start guide

turck

turck IMX12-DI 1NAM Series quick start guide

LSC Nexus 1 user manual

LSC

LSC Nexus 1 user manual

ZipRip UC5 installation manual

ZipRip

ZipRip UC5 installation manual

auray iso-armor owner's manual

auray

auray iso-armor owner's manual

Black Lion Audio PBR TT owner's manual

Black Lion Audio

Black Lion Audio PBR TT owner's manual

Altera Arria 10 Avalon-ST Interface user guide

Altera

Altera Arria 10 Avalon-ST Interface user guide

ALFAtron ALF-DSP88-U manual

ALFAtron

ALFAtron ALF-DSP88-U manual

Broadcast Pix Mica 2000 Operator's manual

Broadcast Pix

Broadcast Pix Mica 2000 Operator's manual

AMX AXC-DTMF Plus Dimensional drawing

AMX

AMX AXC-DTMF Plus Dimensional drawing

Tascam SX-1 Release notes

Tascam

Tascam SX-1 Release notes

Tektronix P7001 /IEEE 488 instruction manual

Tektronix

Tektronix P7001 /IEEE 488 instruction manual

manuals.online logo
manuals.online logoBrands
  • About & Mission
  • Contact us
  • Privacy Policy
  • Terms and Conditions

Copyright 2025 Manuals.Online. All Rights Reserved.