Toro 30071 User manual

FormNo.3391-718RevA
CommercialWalk-BehindMower
16HP ,T-Bar,HydroDrivewith91cmTURBO
FORCE®CuttingUnit
ModelNo.30071—SerialNo.315000001andUp
g020238
Registeratwww.Toro.com.
OriginalInstructions(EN)*3391-718*A

WARNING
CALIFORNIA
Proposition65Warning
Thisproductcontainsachemicalorchemicals
knowntotheStateofCaliforniatocausecancer,
birthdefects,orreproductiveharm.
Theengineexhaustfromthisproduct
containschemicalsknowntotheStateof
Californiatocausecancer,birthdefects,
orotherreproductiveharm.
ThisproductcomplieswithallrelevantEuropeandirectives;
fordetails,pleaseseetheseparateproductspecicDeclaration
ofConformity(DOC)sheet.
Introduction
Thisrotary-blade,lawnmowerisintendedtobeused
byresidentialhomeownersorprofessional,hired
operators.Itisdesignedprimarilyforcuttinggrasson
well-maintainedlawnsonresidentialorcommercial
properties.Itisnotdesignedforcuttingbrushorfor
agriculturaluses.
Readthisinformationcarefullytolearnhowtooperateand
maintainyourproductproperlyandtoavoidinjuryand
productdamage.Youareresponsibleforoperatingthe
productproperlyandsafely.
YoumaycontactTorodirectlyatwww .Toro.comforproduct
andaccessoryinformation,helpndingadealer,ortoregister
yourproduct.
Wheneveryouneedservice,genuineToroparts,oradditional
information,contactanAuthorizedServiceDealerorToro
CustomerServiceandhavethemodelandserialnumbersof
yourproductready.Figure1identiesthelocationofthe
modelandserialnumbersontheproduct.Writethenumbers
inthespaceprovided.
Figure1
1.Locationofthemodelandserialnumbers
ModelNo.
SerialNo.
Thismanualidentiespotentialhazardsandhassafety
messagesidentiedbythesafetyalertsymbol(Figure2),
whichsignalsahazardthatmaycauseseriousinjuryordeath
ifyoudonotfollowtherecommendedprecautions.
Figure2
1.Safetyalertsymbol
Thismanualuses2wordstohighlightinformation.
Importantcallsattentiontospecialmechanicalinformation
andNoteemphasizesgeneralinformationworthyofspecial
attention.
©2014—TheToro®Company
8111LyndaleAvenueSouth
Bloomington,MN554202
Contactusatwww.Toro.com.
PrintedintheUSA
AllRightsReserved

Contents
Safety...........................................................................4
GeneralLawnMowerSafety.....................................4
SoundPressure.......................................................5
SoundPower..........................................................5
VibrationLevel.......................................................5
SlopeIndicator.......................................................6
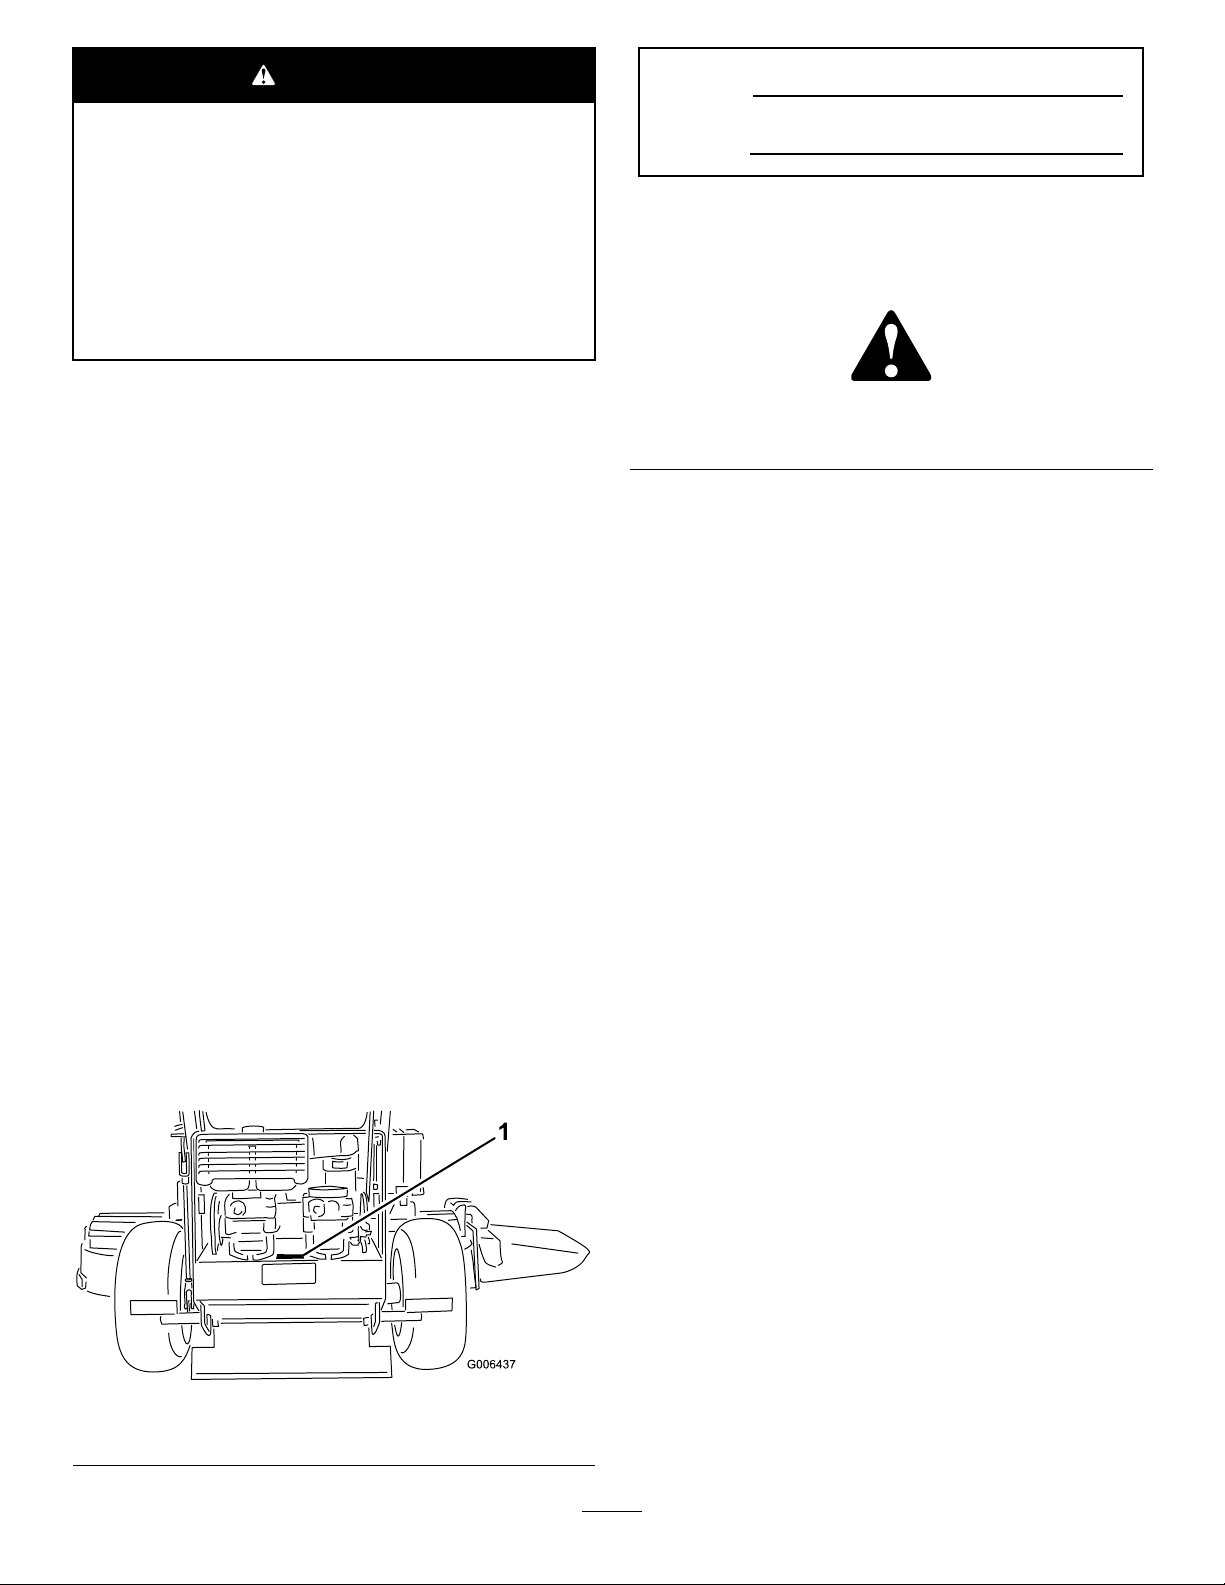
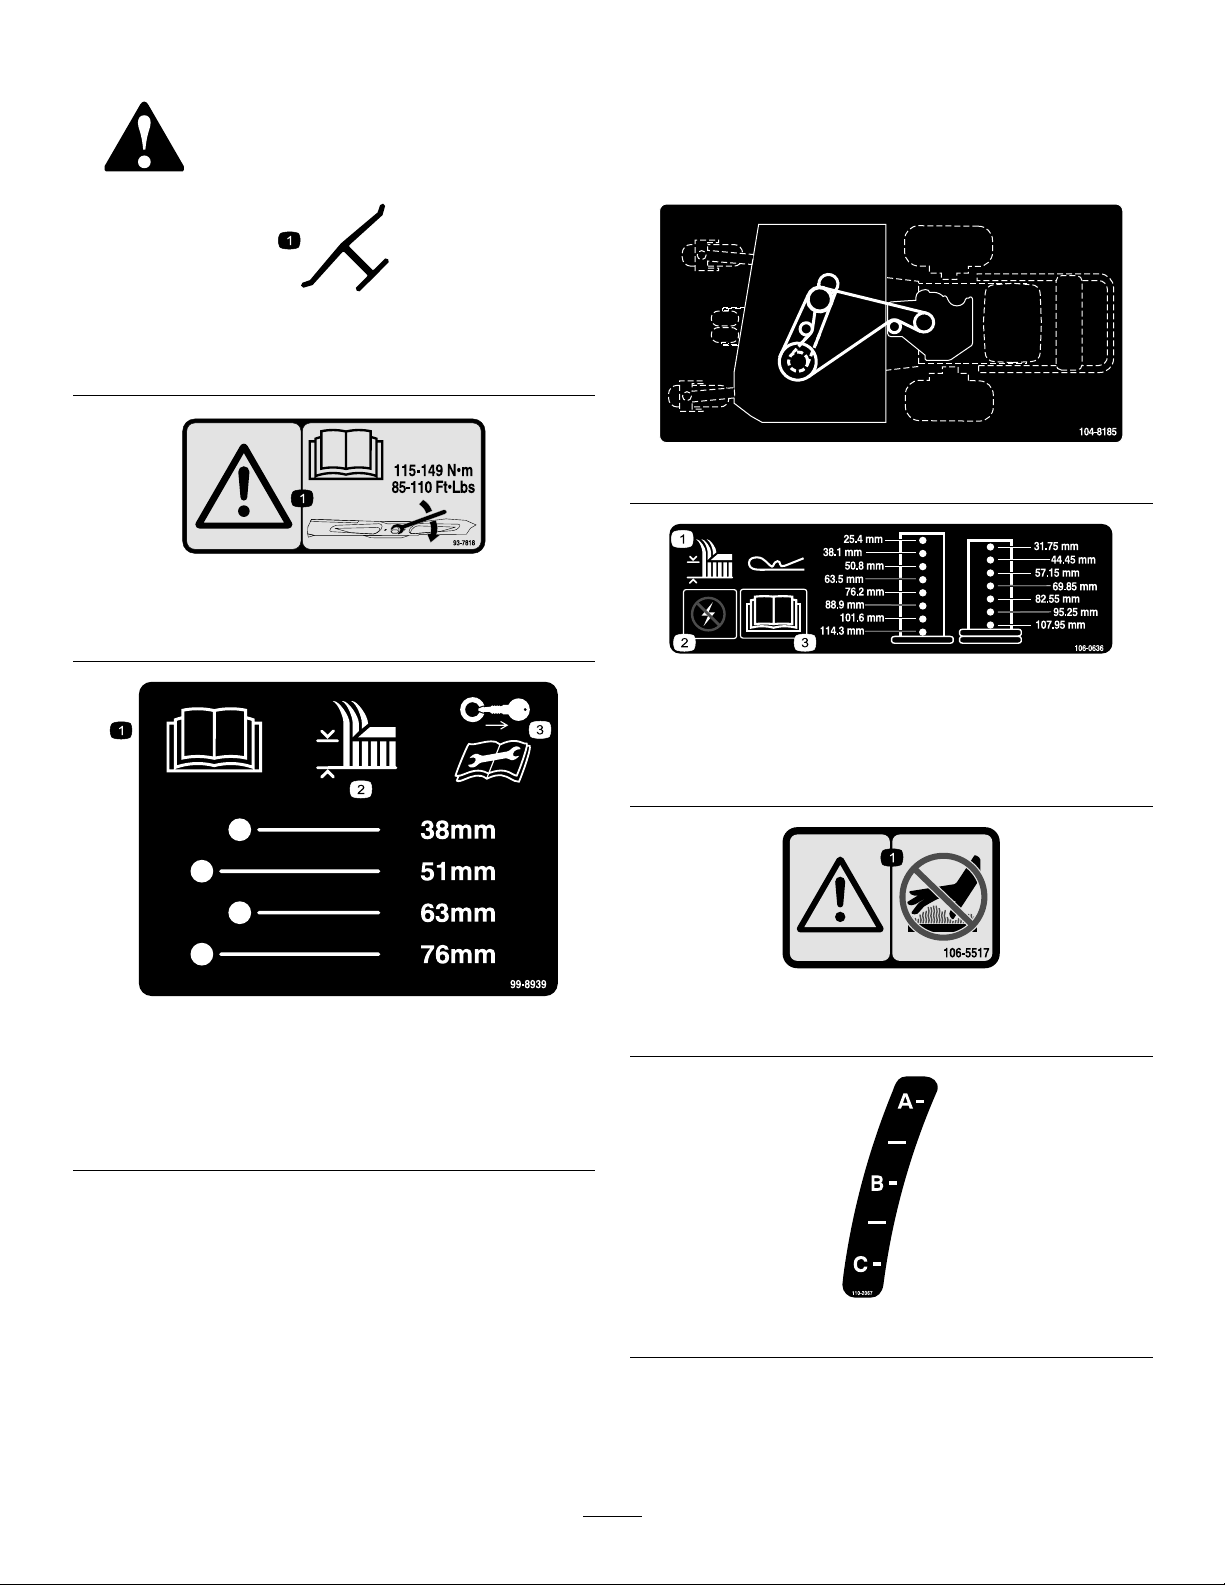
SafetyandInstructionalDecals.................................7
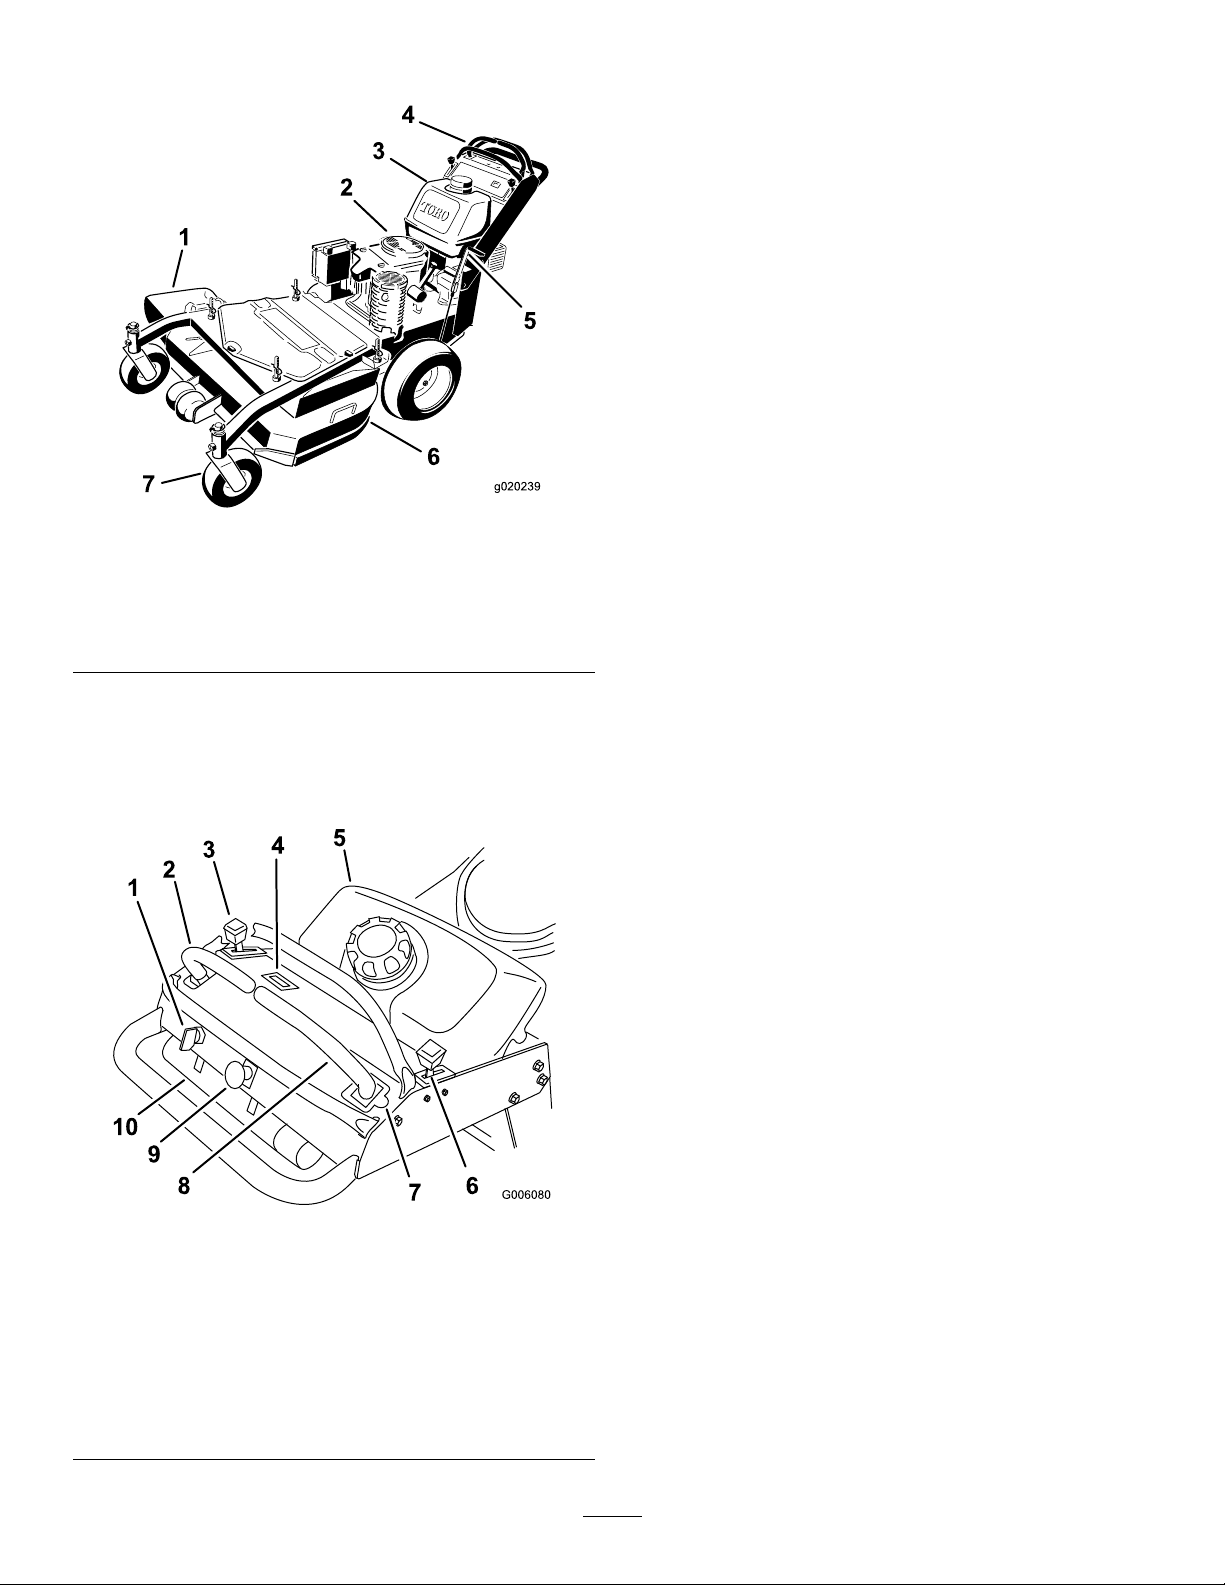
ProductOverview.........................................................10
Controls...............................................................10
Specications........................................................11
Operation....................................................................11
AddingFuel...........................................................11
CheckingtheEngine-OilLevel.................................12
PuttingSafetyFirst.................................................12
OperatingtheParkingBrake....................................12
StartingandStoppingtheEngine..............................13
OperatingtheMowerBladeControl(PTO)................14
TheSafety-InterlockSystem....................................14
DrivingForwardorBackward..................................15
StoppingtheMachine.............................................15
PushingtheMachinebyHand..................................16
TransportingMachines............................................16
SideDischargingorMulchingtheGrass.....................16
AdjustingtheHeight-of-Cut....................................17
AdjustingtheAnti-ScalpRollers...............................17
AdjustingtheFlowBafe........................................17
PositioningtheFlowBafe......................................18
Maintenance.................................................................19
RecommendedMaintenanceSchedule(s)......................19
Lubrication...............................................................20
LubricatingtheMachine..........................................20
LubricatingtheBearings..........................................20
GreasingthePTODriveBeltIdler............................20
EngineMaintenance..................................................21
ServicingtheAirCleaner.........................................21
ServicingtheEngineOil..........................................21
ServicingtheSparkPlugs.........................................23
FuelSystemMaintenance...........................................24
DrainingtheFuelTank...........................................24
ReplacingtheFuelFilter..........................................25
ElectricalSystemMaintenance....................................25
ServicingtheFuses.................................................25
DriveSystemMaintenance.........................................26
AdjustingtheTracking...........................................26
CheckingtheTirePressure......................................26
ReplacingtheCasterWheelForkBushings.................26
ServicingtheCasterWheelandBearings....................27
AdjustingtheElectricClutch....................................28
CoolingSystemMaintenance......................................28
CleaningtheAirIntakeScreen..................................28
BrakeMaintenance....................................................29
ServicingtheBrakes................................................29
BeltMaintenance......................................................30
InspectingtheBelts................................................30
ReplacingtheMowerBelt........................................30
ReplacingthePTO-DriveBelt..................................30
AdjustingthePTO-Drive-Belt-Idler-Spring
Anchor..............................................................31
ReplacingthePump-DriveBelt................................31
ControlsSystemMaintenance.....................................32
AdjustingtheMotion-Control-Handle
Positions............................................................32
HydraulicSystemMaintenance....................................34
ServicingtheHydraulicSystem.................................34
MowerDeckMaintenance...........................................37
ServicingtheCuttingBlades.....................................37
CorrectingtheMowerQualityofCut........................38
SettinguptheFrame...............................................38
CheckingtheMowerDeckFront-to-Rear
Pitch.................................................................40
ChangingtheMowerDeckFront-to-Rear
Pitch.................................................................40
CheckingtheMowerDeckSide-to-Side
Height...............................................................41
ChangingtheMowerDeckSide-to-Side
Height...............................................................41
MatchingtheHeight-of-Cut.....................................41
ReplacingtheGrassDeector..................................42
Cleaning...................................................................42
CleaningundertheMower.......................................42
DisposingofWaste.................................................42
Storage........................................................................43
CleaningandStorage..............................................43
Troubleshooting...........................................................44
3

Safety
ThismachinehasbeendesignedinaccordancewithENISO
5395:2013.
Improperlyusingormaintainingthemachinecanresult
ininjury.Toreducethepotentialforinjury,complywith
thesesafetyinstructionsandalwayspayattentiontothe
safetyalertsymbol,whichmeans
Caution, W ar ning ,
or
Danger
—personalsafetyinstruction.Failuretocomply
withtheinstructionmayresultinpersonalinjuryor
death.
GeneralLawnMowerSafety
Thiscuttingmachineiscapableofamputatinghandsandfeet
andthrowingobjects.Failuretoobservethefollowingsafety
instructionscouldresultinseriousinjuryordeath.
Training
•Readtheinstructionscarefully.Befamiliarwiththe
controlsandtheproperuseoftheequipment.
•Neverallowchildrenorpeopleunfamiliarwiththese
instructionstousethemower.Localregulationscan
restricttheageoftheoperator.
•Keepinmindthattheoperatororuserisresponsiblefor
accidentsorhazardsoccurringtootherpeopleortheir
property.
•Understandexplanationsforallpictogramsusedonthe
mowerorintheinstructions.
Gasoline
WARNING-Gasolineishighlyammable.Takethe
followingprecautions.
•Storefuelincontainersspecicallydesignedforthis
purpose.
•Refueloutdoorsonlyanddonotsmokewhilerefueling.
•Addfuelbeforestartingtheengine.Neverremovethe
capofthefueltankoradgasolinewhiletheengineis
runningorwhentheengineishot.
•Ifgasolineisspilled,donotattempttostarttheengine
butmovethemowerawayfromtheareaofspillageand
avoidcreatinganysourceofignitionuntilgasolinevapors
havedissipated.
•Replaceallfueltankandcontainercapssecurely.
Preparation
•Whilemowing,alwayswearsubstantialfootwearandlong
trousers.Donotoperatetheequipmentwhenbarefoot
orwearingopensandals.
•Thoroughlyinspecttheareawheretheequipmentisto
beusedandremoveallstones,sticks,wires,bonesand
otherforeignobjects.
•Beforeusing,alwaysvisuallyinspecttoseethatguards,
andsafetydevices,suchasdeectorsand/orgrass
catchers,areinplaceandworkingcorrectly.
•Beforeusing,alwaysvisuallyinspecttoseethattheblades,
bladeboltsandcutterassemblyarenotwornordamaged.
Replacewornordamagedbladesandboltsinsetsto
preservebalance.
Starting
•Disengageallbladeanddriveclutchesandshiftinto
neutralbeforestartingtheengine.
•Donottiltmowerwhenstartingtheengineorswitching
onthemotor,unlessthemowerhastobetiltedfor
starting.Inthiscase,donottiltitmorethanabsolutely
necessaryandliftonlythepart,whichisawayfromthe
operator.
•Starttheengineorswitchonthemotorcarefully
accordingtoinstructionsandwithfeetwellawayfrom
theblade(s)andnotinfrontofthedischargechute.
Operation
•Nevermowwhilepeople,especiallychildren,orpetsare
nearby.
•Mowonlyindaylightoringoodarticiallight.
•Avoidoperatingthelawnmowerinwetgrass,where
feasible.
•Stayalertforholesintheterrainandotherhiddenhazards.
•Neverdirectdischargeofmaterialtowardsbystanders.
•Donotputhandsorfeetnearorunderrotatingparts.
Keepclearofthedischargeopeningatalltimes.
•Neverpickuporcarryalawnmowerwhiletheengineis
running.
•Useextremecautionwhenreversingorpullinga
pedestriancontrolledlawnmowertowardsyou.
•Walk,neverrun.
•Slopes:
–Donotmowexcessivelysteepslopes.
–Exerciseextremecautionwhenonslopes.
–Mowacrossthefaceofslopes,neverupanddown
andexerciseextremecautionwhenchangingdirection
onslopes.
–Alwaysbesureofyourfootingonslopes.
•Uselowthrottlesettingswhenengagingthe
traction-clutch,especiallyinhighgears.Reducespeed
onslopesandinsharpturnstopreventoverturningor
lossofcontrol.
•Stopthebladeifthelawnmowerhastobetiltedfor
transportationwhencrossingsurfacesotherthangrass
andwhentransportingthelawnmowertoandfromthe
areatobemowed.
4

•Donotoperatetheengineinaconnedspacewhere
dangerouscarbonmonoxidefumescancollect.
•Stoptheengine
–wheneveryouleavethelawnmower.
–beforerefueling.
–beforeremovingthegrasscatcher.
–beforemakingheightadjustmentunlessadjustment
canbemadefromtheoperator'sposition.
•Stoptheengineanddisconnectthespark-plugwireor
turnoffandremovethekey.
–beforeclearingblockagesoruncloggingchute.
–beforechecking,cleaningorworkingonthelawn
mower.
–afterstrikingaforeignobject,inspectthelawnmower
fordamageandmakerepairsbeforerestartingand
operatingthelawnmower.
–iflawnmowerstartstovibrateabnormally(check
immediately).
•Usecarewhenusingsulkies,and
–useonlyapproveddrawbarhitchpoints.
–limitloadstothoseyoucansafelycontrol.
–donotturnsharply:usecarewhenreversing.
–donotcarrypassengers.
•Watchoutfortrafcwhencrossingornearroadways.
•Beforeleavingtheoperator'sposition
–disengagethepowertake-offandlowerthe
attachments.
–changeintoneutralandsettheparkingbrake.
–stoptheengineandremovethekey.
MaintenanceandStorage
•Keepallnuts,boltsandscrewstighttobesurethe
equipmentisinsafeworkingcondition.
•Donotusepressurecleaningequipmentonmachine.
•Neverstoretheequipmentwithgasolineinthetankand
insideabuildingwherefumescanreachanopename
orspark.
•Allowtheenginetocoolbeforestoringinanyenclosure.
•Toreducetherehazard,keeptheengine,silencer,
batterycompartmentandgasolinestoragearefreeof
grass,leaves,orexcessivegrease.
•Checkgrasscatchercomponentsandthedischargeguard
frequentlyandreplacewithmanufacturer'srecommended
parts,whennecessary.
•Replacewornordamagedpartsforsafety.
•Replacefaultysilencers.
•Ifthefueltankhastobedrained,dothisout-doors.
•Donotchangetheenginegovernorsettingsoroverspeed
theengine.Operatinganengineatexcessivespeedcan
increasethehazardofpersonalinjury.
•Onmultibladedlawnmowers,takecareasrotatingone
blademaycauseotherstorotate.
•Becarefulduringadjustmentofthelawnmowerto
prevententrapmentofthengersbetweenmovingblades
andxedpartsofthelawnmower.
•Toensurethebestperformanceandsafety,
purchaseonlygenuineTororeplacementpartsand
accessories.Donotuse
will t
partsandaccessories;
theymaycauseasafetyhazard.
SoundPressure
Thisunithasasoundpressurelevelattheoperator’searof88
dBA,whichincludesanUncertaintyValue(K)of1dBA.
Thesoundpressurelevelwasdeterminedaccordingtothe
proceduresoutlinedinENISO5395:2013.
SoundPower
Thisunithasaguaranteedsoundpowerlevelof100dBA,
whichincludesanUncertaintyValue(K)of1dBA.
Thesoundpowerlevelwasdeterminedaccordingtothe
proceduresoutlinedinISO11094.
VibrationLevel
Hand-Arm
Measuredvibrationlevelforrighthand=2.8m/s2
Measuredvibrationlevelforlefthand=2.1m/s2
UncertaintyValue(K)=1.4m/s2
Measuredvaluesweredeterminedaccordingtotheprocedures
outlinedinENISO5395:2013.
5

SlopeIndicator
G01 1841
Figure3
Thispagemaybecopiedforpersonaluse.
1.Themaximumslopeyoucansafelyoperatethemachineonis20degrees.Usetheslopecharttodeterminethedegreeofslope
ofhillsbeforeoperating.Donotoperatethismachineonaslopegreaterthan20degrees.Foldalongtheappropriateline
tomatchtherecommendedslope.
2.Alignthisedgewithaverticalsurface,atree,building,fencepole,etc.
3.Exampleofhowtocompareslopewithfoldededge.
6

SafetyandInstructionalDecals
Safetydecalsandinstructionsareeasilyvisibletotheoperatorandarelocatednearanyareaofpotential
danger.Replaceanydecalthatisdamagedorlost.
Manufacturer'sMark
1.Indicatesthebladeisidentiedasapartfromtheoriginal
machinemanufacturer.
93-7818
1.Warning—readtheOperator'sManualforinstructionson
torquingthebladebolt/nutto115-149N-m(85-110ft-lb).
99-8939
1.ReadtheOperator's
Manual.
3.Removetheignitionkey
andreadtheinstructions
beforeservicingor
performingmaintenance.
2.Heightofcut
104-8185
106-0636
1.Height-of-cut3.ReadtheOperator's
Manualformore
information.
2.Warning—power
106-5517
1.Warning–DoNottouchthehotsurface.
110-2067
7

110-2068
1.ReadtheOperator'sManual.
112-8721
1.Parkingbrake—off2.Parkingbrake—on
114-3422
1.Thrownobject
hazard—keepdeector
inplace.
4.Engine—start7.Warning—readthe
Operator'sManual.
10.Warning—stoptheengine
beforeleavingthemachine.
2.Cutting,dismemberment
hazardofhandor
foot—stayawayfrom
movingparts.
5.Movethemotioncontrol
levertotheneutralposition,
thenpulloutonPTO(Power
TakeOff)switchtoengage
theblades.
8.Thrownobject
hazard—keepbystanders
asafedistancefromthe
machine.
11.Warning—donotoperate
thismachineunlessyou
aretrained.
3.Engine—stop6.PushinonthePTO(Power
TakeOff)todisengagethe
blades.
9.Warning—stoptheengine
andremovethesparkplug
wirebeforeperforming
anymaintenanceonthe
machine.
114-3424
1.Tractioncontrol3.Slow5.Reverse
2.Fast4.Neutral6.DisengagethePTO(PowerTake-off)
8

114-3442
1.Fast3.Engine5.Choke
2.Continuousvariablesetting4.Slow
114-3449
1.Thrownobjecthazard—keepbystandersasafedistance
fromthemachine.
2.Thrownobjecthazard,mower—keepthedeectorinplace.
3.Cutting/dismembermentofhandorfoot—stayawayfrom
movingparts.
115-4212
1.Hydraulicoillevel3.Warning—donottouchthe
hotsurface.
2.ReadtheOperator's
Manual.
119-0217
1.Warning—stoptheengine;stayawayfrommovingparts;
keepallguardsandshieldsinplace.
9

ProductOverview
g020239
Figure4
1.Side-dischargechute5.Parkingbrake
2.Engine6.Mowerdeck
3.Gastank7.Frontcasterwheel
4.Controls
Controls
Becomefamiliarwithallthecontrols(Figure5)beforeyou
starttheengineandoperatethemachine.
Figure5
1.Ignitionswitch6.Choke
2.Leftmotion-controllever7.Neutral-Lockpositionfor
therightmotion-control
lever
3.Throttlecontrol8.Rightmotion-controllever
4.Hourmeter9.Blade-controlswitch
(PTO)
5.Fueltank10.Operator-manualtube
ThrottleControl
Thethrottlecontrolhas2positions:FastandSlow.
Choke
Usethechoketostartacoldengine.
Blade-ControlSwitch(PTO)
Theblade-controlswitch(PTO)isusedtoengagetheelectric
clutchtodrivethemowerbladeswiththerightmotion-control
leverinthecenter,unlockedposition.Pulltheswitchupto
engagethebladesandrelease.Todisengagetheblades,push
theblade-controlswitch(PTO)downormoveorreleasethe
rightmotion-controlleverintotheNeutral-Lockposition.
IgnitionSwitch
Thisswitchisusedtostartthemowerengineandhas3
positions:Start,Run,andOff.
Motion-ControlLevers
Themotion-controlleversareusedtodrivethemachine
forward,reverse,andturneitherdirection.
Neutral-LockPosition
TheNeutral-Lockpositionisusedwiththesafetyinterlock
systemtoengageanddisengagethemowerbladesandto
determinetheNeutralposition.
FuelShut-offValve
Closethefuelshut-offvalve(underthefueltank)when
transportingorstoringthemower.
HourMeter
Showsthetotalhoursthemachinehasbeenoperated.This
operatesonlywhenthemowerbladesareoperating.
Thehourmeterwillash3hoursbeforeandafteraservice
interval.Theserviceintervalsaresetfortherst8hours,
every100hoursthereafter,andevery400hours.
Note:Makesuremaintenanceisdoneatallrecommended
intervalsshownintheRecommendedMaintenanceSchedule.
10

Attachments/Accessories
AselectionofToroapprovedattachmentsandaccessoriesis
availableforusewiththemachinetoenhanceandexpand
itscapabilities.ContactyourAuthorizedServiceDealeror
Distributororgotowww .Toro.comforalistofallapproved
attachmentsandaccessories.
Specications
Note:Specicationsanddesignaresubjecttochange
withoutnotice.
Widthwithdeectordown130cm(51-1/8inches)
Length199cm(78-1/2inches)
Height117cm(46inches)
Weight303kg(667lb)
Operation
AddingFuel
•Forbestresults,useonlyclean,fresh,unleadedgasoline
withanoctaneratingof87orhigher((R+M)/2rating
method).
•Oxygenatedfuelwithupto10%ethanolor15%MTBE
byvolumeisacceptable.
•Ethanol:Gasolinewithupto10%ethanol(gasohol)
or15%MTBE(methyltertiarybutylether)byvolume
isacceptable.EthanolandMTBEarenotthesame.
Gasolinewith15%ethanol(E15)byvolumeisnot
approvedforuse.Neverusegasolinethatcontains
morethan10%ethanolbyvolume,suchasE15
(contains15%ethanol),E20(contains20%ethanol),or
E85(containsupto85%ethanol).Usingunapproved
gasolinemaycauseperformanceproblemsand/orengine
damagewhichmaynotbecoveredunderwarranty.
•Donotuseethanolblendsofgasoline(suchasE15
orE85)withmorethan10%ethanolbyvolume.
Performanceproblemsand/orenginedamagemayresult
whichmaynotbecoveredunderwarranty.
•Donotusegasolinecontainingmethanol.
•Donotstorefueleitherinthefueltankorfuelcontainers
overthewinterunlessafuelstabilizerisused.
•Donotaddoiltogasoline.
DANGER
Incertainconditions,gasolineisextremely
ammableandhighlyexplosive.Areorexplosion
fromgasolinecanburnyouandothersandcan
damageproperty.
•Fillthefueltankoutdoors,inanopenarea,
whentheengineiscold.Wipeupanygasoline
thatspills.
•Neverllthefueltankinsideanenclosedtrailer.
•Donotllthefueltankcompletelyfull.Add
gasolinetothefueltankuntilthelevelis6to13
mm(1/4to1/2inch)belowthebottomofthe
llerneck.Thisemptyspaceinthetankallows
gasolinetoexpand.
•Neversmokewhenhandlinggasoline,andstay
awayfromanopenameorwheregasoline
fumesmaybeignitedbyaspark.
•Storegasolineinanapprovedcontainerand
keepitoutofthereachofchildren.Neverbuy
morethana30-daysupplyofgasoline.
•Donotoperatewithoutentireexhaustsystemin
placeandinproperworkingcondition.
11

DANGER
Incertainconditionsduringfueling,static
electricitycanbereleasedcausingasparkwhich
canignitethegasolinevapors.Areorexplosion
fromgasolinecanburnyouandothersandcan
damageproperty.
•Alwaysplacegasolinecontainersontheground
awayfromyourvehiclebeforelling.
•Donotllgasolinecontainersinsideavehicleor
onatruckortrailerbedbecauseinteriorcarpets
orplastictruckbedlinersmayinsulatethe
containerandslowthelossofanystaticcharge.
•Whenpractical,removegas-poweredequipment
fromthetruckortrailerandrefueltheequipment
withitswheelsontheground.
•Ifthisisnotpossible,thenrefuelsuch
equipmentonatruckortrailerfromaportable
container,ratherthanfromagasolinedispenser
nozzle.
•Ifagasolinedispensernozzlemustbeused,
keepthenozzleincontactwiththerimofthe
fueltankorcontaineropeningatalltimesuntil
fuelingiscomplete.
WARNING
Gasolineisharmfulorfatalifswallowed.Long-term
exposuretovaporscancauseseriousinjuryand
illness.
•Avoidprolongedbreathingofvapors.
•Keepfaceawayfromnozzleandgastankor
conditioneropening.
•Keepgasawayfromeyesandskin.
UsingStabilizer/Conditioner
Useafuelstabilizer/conditionerinthemachinetoprovide
thefollowingbenets:
•Keepsgasolinefreshduringstorageof90daysorless.
Forlongerstorageitisrecommendedthatthefueltank
bedrained.
•Cleanstheenginewhileitruns
•Eliminatesgum-likevarnishbuildupinthefuelsystem,
whichcauseshardstarting
Important:Donotusefueladditivescontaining
methanolorethanol.
Addthecorrectamountofgasstabilizer/conditionertothe
gas.
Note:Afuelstabilizer/conditionerismosteffectivewhen
mixedwithfreshgasoline.Tominimizethechanceofvarnish
depositsinthefuelsystem,usefuelstabilizeratalltimes.
FillingtheFuelTank
1.Shuttheengineoffandsettheparkingbrake.
2.Cleanaroundeachfueltankcapandremovethecap.
3.Addunleadedregulargasolinetobothfueltanks,until
thelevelis6to13mm(1/4to1/2inch)belowthe
bottomofthellerneck.
Thisspaceinthetankallowsgasolinetoexpand.Do
notllthefueltankscompletelyfull.
4.Installfueltankcapssecurely.
5.Wipeupanygasolinethatmayhavespilled.
CheckingtheEngine-OilLevel
Beforeyoustarttheengineandusethemachine,checktheoil
levelintheenginecrankcase;refertoCheckingOilLevelin
EngineMaintenance(page21).
Note:Determinetheleftandrightsidesofthemachine
fromthenormaloperatingposition.
PuttingSafetyFirst
Carefullyreadallthesafetyinstructionsanddecalsinthe
safetysection.Knowingthisinformationcouldhelpyouor
anybystandersavoidinjury.
Theuseofprotectiveequipmentforeyes,hearing,feet,and
headisrecommended.
CAUTION
Thismachineproducessoundlevelsinexcessof
85dBAattheoperator'searandcancausehearing
lossthroughextendedperiodsofexposure.
Wearhearingprotectionwhenoperatingthis
machine.
OperatingtheParkingBrake
Alwayssettheparkingbrakewhenyoustopthemachineor
leaveitunattended.Beforeeachuse,checktheparkingbrake
forproperoperation.
Iftheparkingbrakedoesnotholdsecurely,adjustit.Referto
ServicingtheBrakes(page29).
CAUTION
Childrenorbystandersmaybeinjuredifthey
moveorattempttooperatethemachinewhileitis
unattended.
Alwaysremovetheignitionkeyandsettheparking
brakewhenleavingthemachineunattended,even
ifjustforafewminutes.
12

SettingtheParkingBrake
Pulltheparkingbrakeleverrearward(Figure6).
Figure6
1.Parkingbrakelever(inthe
releasedposition)
2.Parkingbrakelever(inthe
engagedposition)
ReleasingtheParkingBrake
Pushtheparkingbrakeleverforward.
StartingandStoppingthe
Engine
StartingtheEngine
1.Connectthewirestothesparkplugs.
2.Openthefuelvalve.
3.Settheparkingbrake.
4.Movethethrottlecontroltofastandmovethechoke
levertotheonpositionbeforestartingacoldengine
(Figure7).
Note:Awarmorhotenginemaynotrequirechoking.
Tostartawarmengine,movethrottlecontrolmidway
betweentheFastandSlowpositions.
Figure7
1.Ignitionswitch3.Choke
2.Throttlelever
5.Turntheignitionkeytothestartpositiontoenergize
thestarter.Whentheenginestarts,releasethekey.
Note:Donotengagethestarterformorethan5
secondsatatime.Iftheenginefailstostart,allow
fora15secondcool-downperiodbetweenattempts.
Failuretofollowtheseinstructionscanburnoutthe
startermotor.
6.Whenenginestarts,movethethrottlecontrolbetween
thefastandslowpositionandmovethechokeleverto
theoffposition.Allowtheenginetowarmupandthen
movethethrottlecontroltothefastposition.
StoppingtheEngine
1.Movethemotion-controlleverstotheNeutralposition
andmovetherightmotion-controlleverintothe
Neutral-Lockposition.
2.Movethethrottlelevertoslow(Figure7).
3.Iftheenginehasbeenworkinghardorishot,letthe
engineidlefor30to60secondsbeforeturningthe
engineoff.
4.Tostoptheengine,turntheignitionkeytooff.
Important:Makesurefuelshutoffvalveisclosed
beforetransportingorstoringthemachine,asfuel
leakagemayoccur.Beforestoringthemachine,
pullwireoffsparkplug(s)topreventpossibilityof
accidentalstarting.
13

OperatingtheMowerBlade
Control(PTO)
Theblade-controlswitch(PTO)isusedinconjunctionwith
therightmotion-controllevertoengageanddisengagethe
mowerblades.
EngagingtheMowerBlades(PTO)
1.Toengagethemowerblades,movetheright
motion-controllevertothecenter,unlockedposition
(Figure8).
2.Pulltheblade-controlswitch(PTO)upandreleaseit
whileholdingdowntherightmotion-controlleverin
thecenter,unlockedposition.
Figure8
1.Blade-controlswitch
(PTO)
3.Rightmotion-controllever
inNeutral-Lockposition
2.Rightmotion-controllever
pusheddownintothe
center,unlockedposition
4.Leftmotion-controllever
DisengagingtheMowerBlades(PTO)
Thefollowingare2optionsfordisengagingthemowerblades.
•Pushtheblade-controlswitch(PTO)downtotheOff
position.
•Movethemotion-controlleverstotheNeutralposition
andmovetherightmotion-controlleverintothe
Neutral-Lockposition.
TheSafety-InterlockSystem
CAUTION
Ifthesafety-interlockswitchesaredisconnectedor
damaged,themachinecouldoperateunexpectedly,
causingpersonalinjury.
•Donottamperwiththeinterlockswitches.
•Checktheoperationoftheinterlockswitches
dailyandreplaceanydamagedswitchesbefore
operatingthemachine.
UnderstandingtheSafety-Interlock
System
Thesafety-interlocksystemisdesignedtopreventthemower
bladesfromrotatingunless:
•Therightmotion-controlleverismovedtothecenter,
unlockedposition.
•Theblade-controlswitch(PTO)ispulledtotheOn
position.
Thesafety-interlocksystemisdesignedtostopthemower
bladesifyoumoveorreleasetherightmotion-control
leverintotheNeutral-Lockposition.
TestingtheSafety-InterlockSystem
ServiceInterval:Beforeeachuseordaily
Note:Ifthesafetysystemdoesnotoperateasdescribed
below,haveanAuthorizedServiceDealerrepairthesafety
systemimmediately.
1.Starttheengine;refertoStartingandStoppingthe
EngineinStartingandStoppingtheEngine(page13).
2.Settheparkingbrake.
3.Movetherightmotion-controllevertothecenter,
unlockedposition.
Note:Thebladesshouldnotrotate.
4.Movethemotion-controlleversforward.
Note:Theengineshouldkill.
5.Starttheengineandreleasetheparkingbrake.
6.Movetherightmotion-controllevertothecenter,
unlockedposition.
7.Continueholdingtherightmotion-controlleverin
thecenter,unlockedpositionandpulluponthe
blade-controlswitch(PTO)andrelease.
Note:Theclutchshouldengageandthemower
bladesbeginrotating.
8.Moveorreleasetherightmotion-controlleverintothe
Neutral-Lockposition.
Note:Thebladesshouldstoprotating.
9.Movetherightmotion-controllevertothecenter,
unlockedposition.
14

10.Continueholdingtherightmotion-controlleverin
thecenter,unlockedpositionandpullupontheblade
controlswitch(PTO)andrelease.
Theclutchshouldengageandthemowerbladesbegin
rotating.
11.Pushtheblade-controlswitch(PTO)downtotheOff
position.
Note:Thebladesshouldstoprotating.
12.Withtheenginerunning,pulluptheblade-control
switch(PTO)andreleasewithoutholdingright
motion-controllevertothecenter,unlockedposition.
Note:Thebladesshouldnotrotate.
DrivingForwardorBackward
Thethrottlecontrolregulatestheenginespeedasmeasured
inrpm(revolutionsperminute).Placethethrottlecontrolin
thefastpositionforbestperformance.Alwaysoperateinthe
fullthrottlepositionwhenmowing.
CAUTION
Machinecanspinveryrapidly.Operatormaylose
controlofmachineandcausepersonalinjuryor
damagetomachine.
•Usecautionwhenmakingturns.
•Slowthemachinedownbeforemakingsharp
turns.
DrivingForward
1.Releasetheparkingbrake;refertoReleasingtheParking
BrakeinStartingandStoppingtheEngine(page13).
2.Movetherightmotion-controllevertothecenter,
un-lockedposition.
3.Togoforward,slowlypushthemotion-controllevers
forward(Figure9).
Note:Theenginewillkillifthetraction-controllevers
aremovedwiththeparkingbrakeengaged.
Togostraight,applyequalpressuretoboth
motion-controllevers(Figure9).
Toturn,movethemotion-controllevertowardthe
Neutralpositioninthedirectionyouwanttoturn
(Figure9).
Thefartheryoumovethetraction-controlleversin
eitherdirection,thefasterthemachinewillmovein
thatdirection.
Tostop,pullthemotion-controlleversbacktothe
Neutralposition.
Figure9
1.Forward2.Backward
DrivingBackward
1.Movetherightmotion-controllevertothecenter,
unlockedposition.
2.Togobackward,slowlypullthemotion-controllevers
rearward(Figure9).
Togostraight,applyequalpressuretoboth
motion-controllevers(Figure9).
Toturn,releasepressureonthemotion-controllever
towardthedirectionyouwanttoturn(Figure9).
Tostop,pushthemotion-controlleverstotheNeutral
position.
StoppingtheMachine
Tostopthemachine,movethemotion-controlleverstothe
Neutralposition,movetherightmotion-controlleverintothe
Neutral-Lockposition,disengagethepowertake-off(PTO),
andturntheignitionkeytotheOffposition.
Settheparkingbrakewhenyouleavethemachine;referto
SettingtheParkingBrakeinStartingandStoppingtheEngine
(page13).
Removethekeyfromtheignitionswitch.
CAUTION
Childrenorbystandersmaybeinjuredifthey
moveorattempttooperatethetractorwhileitis
unattended.
Alwaysremovetheignitionkeyandsettheparking
brakewhenleavingthemachineunattended,even
ifjustforafewminutes.
15

PushingtheMachinebyHand
Theby-passvalvesallowthemachinetobepushedbyhand
withouttheenginerunning.
Important:Alwayspushthemachinebyhand.Never
towthemachinebecausehydraulicdamagemayoccur.
1.DisengagethePTO,movethemotion-controlleversto
theNeutral-Lockedpositionandsettheparkingbrake.
2.Opentheby-passvalveonbothpumpsbyturning
themcounterclockwise1to2turns.Thisallows
hydraulicuidtoby-passthepumpsandthewheels
toturn(Figure10).
Note:Rotatetheby-passvalvesamaximumof2turns
sothevalvedoesnotcomeoutofthebodycausing
uidtorunout.
Figure10
1.Pumpby-passvalve
3.Releasetheparkingbrake.
4.Pushthemachinetothedesiredlocation.
5.Settheparkingbrake.
6.Closetheby-passvalves,butdonotovertightenthem.
Important:Donotstartoroperatethemachine
withtheby-passvalvesopen.Damagetosystem
mayoccur.
TransportingMachines
Useaheavy-dutytrailerortrucktotransportthemachine.
Ensurethatthetrailerortruckhasallnecessarybrakes,
lighting,andmarkingasrequiredbylaw .Pleasecarefullyread
allthesafetyinstructions.Knowingthisinformationcould
helpyou,yourfamily,pets,orbystandersavoidinjury.
Totransportthemachine:
1.Ifusingatrailer,connectittothetowingvehicleand
connectthesafetychains.
2.Ifapplicable,connectthetrailerbrakes.
3.Loadthemachineontothetrailerortruck.
4.Stoptheengine,removethekey,setthebrake,and
closethefuelvalve.
5.Usethemetaltiedownloopsonthemachineto
securelyfastenthemachinetothetrailerortruckwith
straps,chains,cable,orropes(Figure11).
6.Fastenthefrontofthemachinetothetrailerortruck
withstraps,chains,cable,orropes.
Figure11
1.Tiedownloop
SideDischargingorMulching
theGrass
Thismowerhasahingedgrassdeectorthatdisperses
clippingstothesideanddowntowardtheturf.
DANGER
Withoutthegrassdeector,dischargecover,or
completegrasscatcherassemblymountedin
place,youandothersareexposedtobladecontact
andthrowndebris.Contactwithrotatingmower
blade(s)andthrowndebriswillcauseinjuryor
death.
•Neverremovethegrassdeectorfromthemower
becausethegrassdeectorroutesmaterialdown
towardtheturf.Ifthegrassdeectorisever
damaged,replaceitimmediately.
•Neverputyourhandsorfeetunderthemower.
•Nevertrytocleardischargeareaormower
bladesunlessyoureleasethebailandthepower
takeoff(PTO)isoff.Rotatetheignitionkeyto
Off.Alsoremovethekeyandpullthewire(s)off
thesparkplug(s).
16

AdjustingtheHeight-of-Cut
Theheight-of-cutcanbeadjustedfrom25to114mm(1
to4-1/2inch)in6mm(1/4inch)increments.Adjustment
isdonebyrelocating4hairpincotterpinsindifferenthole
locationandbyaddingorremovingspacers.
Note:Allheight-of-cutpinsneedatleast1spacerordamage
canoccurtobushingifnoneareused.
Note:Allheight-of-cutpinscanuse2spacersmaximum.
1.Selectholeinheight-of-cutpostandnumberofspacers
correspondingtotheheight-of-cutdesired(Figure12).
2.Usingthelifthandle,raisesideofdeckandremove
hairpincotter(Figure12).
3.Addorremovespacersifneededandthenalignholes
andinserthairpincotter(Figure12).
Note:Spareheight-of-cutspacersmaybestoredon
postsandretainedbyahairpincotter.
Important:All4hairpincotterpinsmustbeinthe
sameholelocationandwiththecorrectnumberof
spacersforalevelcut.
Figure12
1.Carrierframe4.Spacers
2.Hairpincotter5.Frontheight-of-cutpost
3.Backheight-of-cutpost
AdjustingtheAnti-Scalp
Rollers
Theanti-scalprollersneedtobeadjustedintheproperhole
locationforeachheight-of-cutposition.Thereneedstobe10
mm(3/8inch)minimumclearanceabovetheground.
Note:Iftheanti-scalprollersareadjustedtoolowitcan
causeexcesswearoftherollers.
1.Afteradjustingheight-of-cut,checktheanti-scalp
rollerssothatthereisaminimumof10mm(3/8inch)
clearanceabovetheground(Figure13).
2.Ifadjustmentisneeded,removethebolt,washersand
nut(Figure13).
3.Selectaholepositionsotheanti-scalprollersarea
minimumof10mm(3/8inch)offtheground(Figure
13).
4.Installtheboltandnut(Figure13).
Figure13
1.Mowerdeck4.Anti-scalprollers
2.Bolt5.Nut
3.Spacer
5.Incertainmowingconditionsandterrain,amismatch
ofcuttingheightmaybeseen.Adjustingtheoutside
anti-scalprollerstotheminimumsettingof10mm
(3/8inch)willhelppreventthemowerdeckcutting
toolowontheoutsideandminimizethemismatch.
AdjustingtheFlowBafe
Themowerdischargeowcanbeadjustedfordifferenttypes
ofmowingconditions.Positionthecamlockandbafeto
givethebestqualityofcut.
1.DisengagethePTO,movethemotion-controlleversto
theNeutral-Lockedpositionandsettheparkingbrake.
2.Stoptheengine,removethekey,andwaitforallmoving
partstostopbeforeleavingtheoperatingposition.
3.Toadjustthebafe,loosenthenut(Figure14).
4.Adjustthebafeandnutintheslottothedesired
dischargeowandtightenthenut.
17

g012676
1 2
Figure14
1.Slot2.Nut
PositioningtheFlowBafe
Thefollowingguresareonlyrecommendationsforuse.
Adjustmentswillvarybygrasstype,moisturecontent,and
heightofgrass.
Note:Iftheenginepowerdrawsdownandthemower
groundspeedisthesame,openupthebafe.
PositionA
Thisisthefullrearposition(seeFigure15).Thesuggested
useforthispositionisafollows:
•Useforshort,lightgrassmowingconditions.
•Useindryconditions.
•Forsmallergrassclippings.
•Propelsgrassclippingsfartherawayfromthemower.
G012677
Figure15
PositionB
Usethispositionwhenbagging(Figure16).
G012678
Figure16
PositionC
Thisisthefullopenposition.Thesuggesteduseforthis
positionisasfollows(Figure17):
•Useintall,densegrassmowingconditions.
•Useinwetconditions.
•Lowerstheenginepowerconsumption.
•Allowsincreasedgroundspeedinheavyconditions.
G012679
Figure17
18

Maintenance
Note:Determinetheleftandrightsidesofthemachinefromthenormaloperatingposition.
RecommendedMaintenanceSchedule(s)
MaintenanceService
IntervalMaintenanceProcedure
Aftertherst8hours
•Changetheengineoil.
•Checkthehydraulicuid.
•Changethehydrauliclter.
Beforeeachuseordaily
•Checkthesafety-interlocksystem.
•Greasethefrontcasterpivotbearing.
•Checktheengineoillevel.
•Cleantheairintakescreen.
•Checkthebrakes.
•Inspecttheblades.
•Cleanthemowerdeck.
Every25hours•Cleanfoamaircleanerelement.
•Checkthehydraulicuid.
Every50hours
•GreasethePTObeltidler.
•Checkthepaperaircleanerelement.
•Checkthetirepressure.ormonthly,whicheveroccursrst.
•Inspectthebeltsforcracksandwear.
Every100hours
•Changetheengineoil.
•Checkthesparkplugs.
•Adjusttheelectricclutch.
•Checkthehydrauliclines.
Every200hours
•Replacethepaperaircleanerelement.
•Changetheoillter.
•Replacethefuellter.oryearly,whicheveroccursrst.
•Changethehydraulicuid.
•Changethehydrauliclter.
Every400hours•Greasethefrontwheelbearings(moreoftenindirtyordustyconditions).
Beforestorage•Paintchippedsurfaces.
•Performallmaintenanceprocedureslistedabovebeforestorage.
Important:Refertoyourengineowner'smanualforadditionalmaintenanceprocedures.
CAUTION
Ifyouleavethekeyintheignitionswitch,someonecouldaccidentlystarttheengineandseriouslyinjure
youorotherbystanders.
Removethekeyfromtheignitionanddisconnectthesparkplugwiresfromthesparkplugsbeforeyoudo
anymaintenance.Setthewiresasidesothattheydonotaccidentallycontactthesparkplugs.
19

Lubrication
GreasewithNo.2general-purpose,lithium-basedor
molybdenum-basedgrease.
LubricatingtheMachine
1.DisengagethePTOandsettheparkingbrake.
2.Stoptheengine,removethekey,andwaitforallmoving
partstostopbeforeleavingtheoperatingposition.
3.Cleanthegreasettingswitharag.Makesuretoscrape
anypaintoffthefrontofthetting(s).
4.Connectagreaseguntothetting.Pumpgrease
intothettingsuntilgreasebeginstooozeoutofthe
bearings.
5.Wipeupanyexcessgrease.
LubricatingtheBearings
ServiceInterval:Beforeeachuseordaily—Greasethefront
casterpivotbearing.
Every400hours—Greasethefrontwheelbearings
(moreoftenindirtyordustyconditions).
Lubricatethefrontcasterwheelbearingsandfrontpivots
(Figure18).
Figure18
GreasingthePTODriveBelt
Idler
ServiceInterval:Every50hours—GreasethePTObelt
idler.
Greasetheidlerpulleypivot(Figure19).
Figure19
20
Other manuals for 30071
2
Table of contents
Other Toro Lawn Mower manuals

Toro
Toro 2000 Series User manual

Toro
Toro ProCore 648 User manual

Toro
Toro 20051 User manual

Toro
Toro 21462 User manual

Toro
Toro Z MASTER 74310 User manual

Toro
Toro 2000 Series User manual

Toro
Toro 2770 User manual

Toro
Toro TimeCutter ZS 4200S User manual

Toro
Toro 22178 User manual

Toro
Toro Z Master Professional 7500-DSeries User manual

Toro
Toro 22155TE User manual

Toro
Toro 31051 User manual

Toro
Toro 74933 User manual

Toro
Toro Recycler 20961 User manual

Toro
Toro 3674 User manual

Toro
Toro 74943 User manual

Toro
Toro 3678 User manual

Toro
Toro 30342 User manual

Toro
Toro Wheel Horse XL 380H Instruction Manual

Toro
Toro Greensmaster 120-9600 User manual