Toro 30602 User manual

FormNo.3376-200RevB
Groundsmaster®4100-Dand
4110-DRotaryMower
ModelNo.30602—SerialNo.313000001andUp
ModelNo.30604—SerialNo.313000001andUp
Registeratwww.Toro.com.
OriginalInstructions(EN)*3376-200*B

ThisproductcomplieswithallrelevantEuropeandirectives,
fordetailspleaseseetheseparateproductspecicDeclaration
ofConformity(DOC)sheet.
WARNING
CALIFORNIA
Proposition65Warning
Dieselengineexhaustandsomeofits
constituentsareknowntotheStateof
Californiatocausecancer,birthdefects,
andotherreproductiveharm.
Becauseinsomeareastherearelocal,state,orfederal
regulationsrequiringthatasparkarresterbeusedonthe
engineofthismachine,asparkarresterisincorporatedwith
themuferassembly.
GenuineTorosparkarrestersareapprovedbytheUSDA
ForestryService.
Important:Thisengineisequippedwithaspark
arrestermufer.ItisaviolationofCaliforniaPublic
ResourceCodeSection4442touseoroperatetheengine
onanyforest-covered,brush-covered,orgrass-covered
landwithoutasparkarrestermufermaintainedin
workingorder,ortheengineconstricted,equipped,and
maintainedforthepreventionofre.Otherstatesor
federalareasmayhavesimilarlaws.
Introduction
Thismachineisaride-on,rotary-bladelawnmowerintended
tobeusedbyprofessional,hiredoperatorsincommercial
applications.Itisprimarilydesignedforcuttinggrass
onwell-maintainedlawnsinparks,sportselds,andon
commercialgrounds.Itisnotdesignedforcuttingbrush,
mowinggrassandothergrowthalongsidehighways,orfor
agriculturaluses.
Readthisinformationcarefullytolearnhowtooperateand
maintainyourproductproperlyandtoavoidinjuryand
productdamage.Youareresponsibleforoperatingthe
productproperlyandsafely.
YoumaycontactTorodirectlyatwww.Toro.comforproduct
andaccessoryinformation,helpndingadealer,ortoregister
yourproduct.
Wheneveryouneedservice,genuineToroparts,oradditional
information,contactanAuthorizedServiceDealerorToro
CustomerServiceandhavethemodelandserialnumbersof
yourproductready.Figure1identiesthelocationofthe
modelandserialnumbersontheproduct.Writethenumbers
inthespaceprovided.
Figure1
1.Modelandserialnumberlocation
ModelNo.
SerialNo.
Thismanualidentiespotentialhazardsandhassafety
messagesidentiedbythesafetyalertsymbol(Figure2),
whichsignalsahazardthatmaycauseseriousinjuryordeath
ifyoudonotfollowtherecommendedprecautions.
Figure2
1.Safetyalertsymbol
Thismanualuses2otherwordstohighlightinformation.
Importantcallsattentiontospecialmechanicalinformation
andNoteemphasizesgeneralinformationworthyofspecial
attention.
©2013—TheToro®Company
8111LyndaleAvenueSouth
Bloomington,MN554202
Contactusatwww.Toro.com.
PrintedintheUSA.
AllRightsReserved

Contents
Introduction..................................................................2
Safety...........................................................................4
SafeOperatingPractices...........................................4
ToroMowerSafety..................................................6
SoundPowerLevel..................................................6
SoundPressureLevel-Model30602...........................7
SoundPressureLevel-Model30604...........................7
VibrationLevel......................................................7
EngineEmissionCertication...................................7
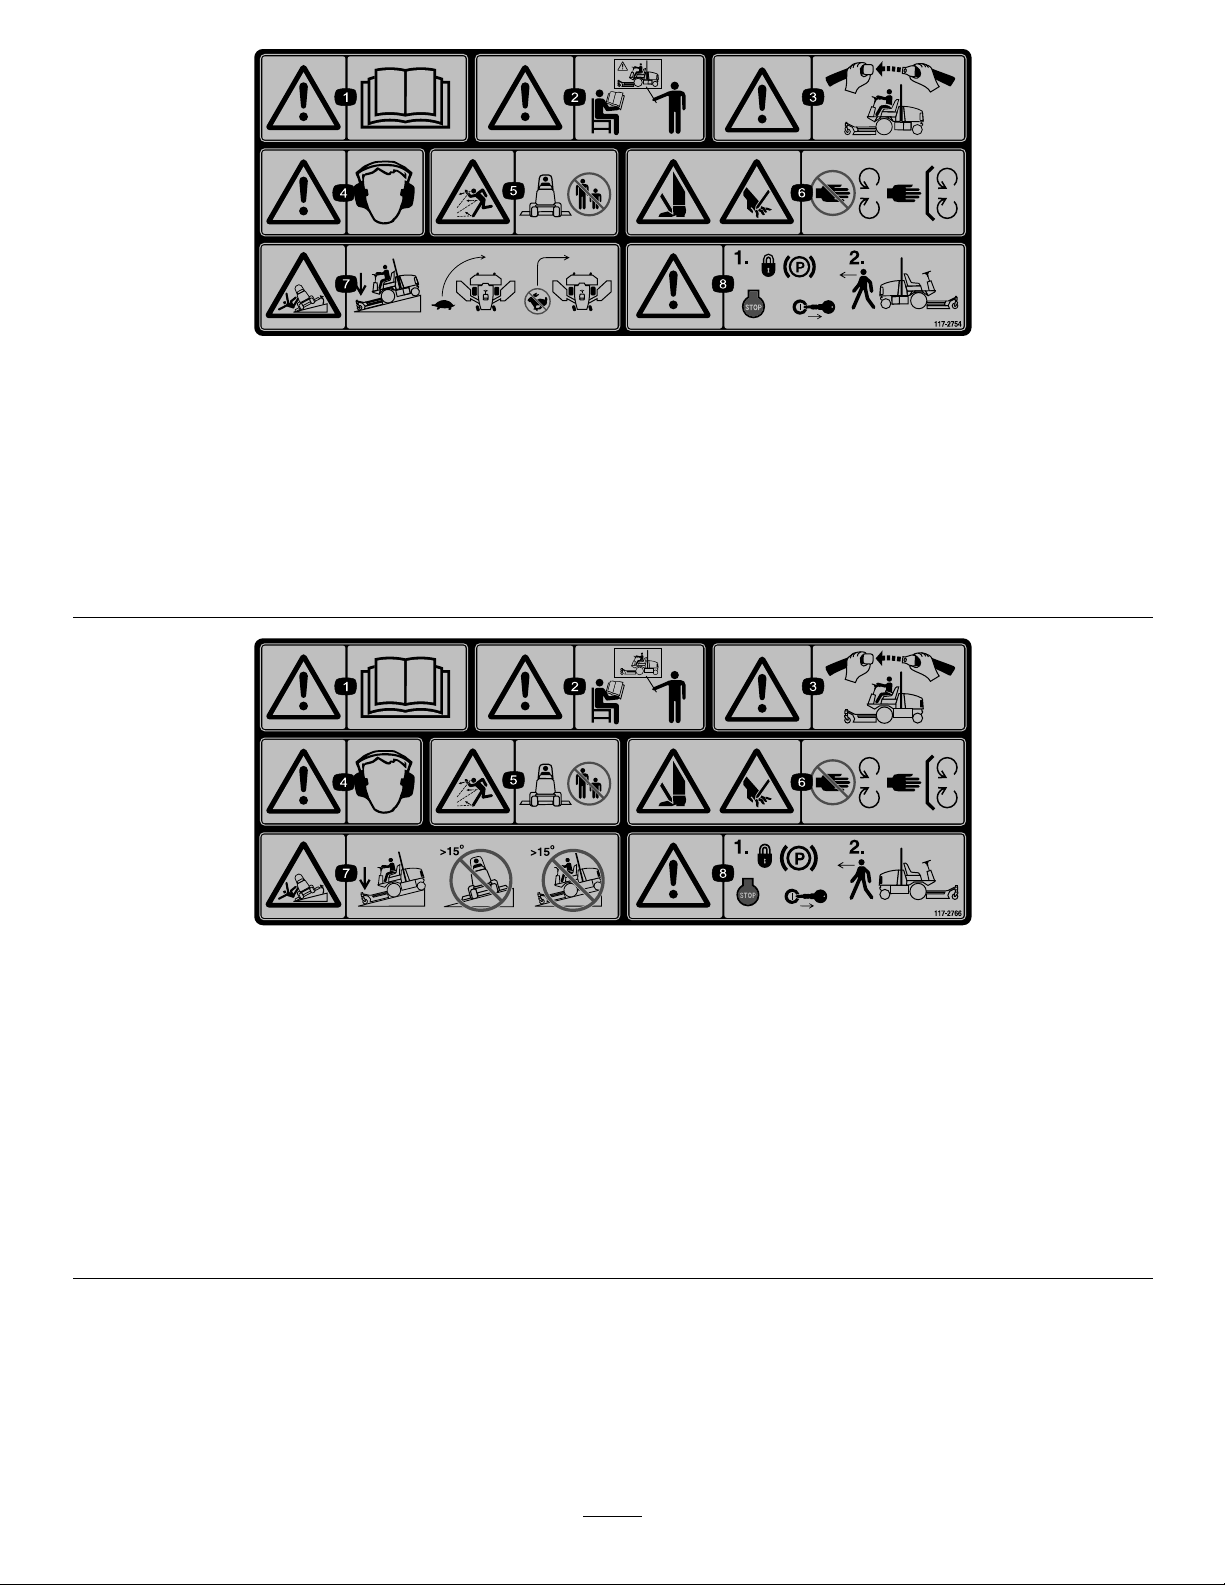
SafetyandInstructionalDecals.................................8
Setup...........................................................................15
1GreasingtheMachine...........................................15
2ReplacingtheWarningDecal.................................15
ProductOverview.........................................................16
Controls...............................................................16
ForeandAftAdjustingLever...................................17
SeatArmRestAdjustingKnob.................................17
SeatBackAdjustingLever.......................................17
Weightgauge.........................................................17
WeightAdjustingLever...........................................17
WindShieldWiperSwitch.......................................17
AirConditioningSwitch..........................................17
FanControl...........................................................17
TemperatureControl..............................................17
WindShieldLatch..................................................18
RearWindowLatch................................................18
AccessingtheProtectedMenuSettings......................21
ToSettheAutoIdle................................................21
ToSettheMaximumAllowedMowSpeed..................21
ToSettheMaximumAllowedTransport
Speed................................................................21
Specications........................................................22
Attachments/Accessories........................................22
Operation....................................................................23
BeforeOperating...................................................23
AdjustingtheMirrors..............................................31
AimingtheHeadlights............................................31
StartingandStoppingtheEngine..............................31
SmartPower..........................................................32
ReversingFanOperation.........................................32
AutoIdle...............................................................32
MowSpeed............................................................32
TransportSpeed.....................................................32
CheckingtheInterlockSwitches...............................32
UsingtheRolloverProtectionSystem(ROPS)............33
PushingorTowingtheMachine................................33
JackingPoints........................................................34
TieDowns............................................................34
OperatingCharacteristics........................................34
OperatingTips......................................................34
Maintenance.................................................................36
RecommendedMaintenanceSchedule(s)......................36
ServiceIntervalChart.............................................37
Lubrication...............................................................38
GreasingtheBearingsandBushings..........................38
EngineMaintenance..................................................40
AirCleanerMaintenance.........................................40
ServicingtheEngineOilandFilter............................41
FuelSystemMaintenance...........................................42
ServicingtheFuelSystem........................................42
ServicingtheWaterSeparator..................................42
ElectricalSystemMaintenance....................................43
BatteryCare...........................................................43
Fuses....................................................................44
DriveSystemMaintenance.........................................45
AdjustingtheTractionPedalAngle...........................45
ChangingthePlanetaryGearDriveOil......................45
ChangingtheRearAxleLubricant.............................46
CheckingtheRearWheelToe-In..............................46
ChangingtheFrontTires.........................................46
CoolingSystemMaintenance......................................47
ServicingtheEngineCoolingSystem........................47
BrakeMaintenance....................................................47
AdjustingtheServiceBrakes....................................47
BeltMaintenance......................................................48
ServicingtheAlternatorBelt....................................48
ServicingtheCompressorBelt.................................48
Re-tensioningtheBladeDriveBelts..........................49
ReplacingtheBladeDriveBelt.................................49
HydraulicSystemMaintenance....................................50
ChangingtheHydraulicFluid...................................50
ReplacingtheHydraulicFilters.................................50
CheckingtheHydraulicLinesandHoses....................51
AdjustingtheCounterbalancePressure......................51
MowerMaintenance...................................................52
Pivoting(Tilting)theFrontCuttingUnit
Upright.............................................................52
PivotingtheFrontCuttingUnitDown.......................52
AdjustingtheCuttingUnitPitch...............................52
ServicingtheCastorArmBushings...........................53
ServicingtheCastorWheelsandBearings..................53
ReplacingtheCuttingUnitHingeCovers...................54
BladeMaintenance.....................................................55
CheckingforaBentBlade........................................55
RemovingandInstallingtheCutterBlade(s)...............55
InspectingandSharpeningtheCutterBlade(s)............55
CorrectingCuttingUnitMismatch............................56
CabMaintenance.......................................................57
CleaningtheCabAirFilters.....................................57
CleaningtheAirConditioningCoil...........................58
CleaningtheA/CCondenserScreen.........................58
Storage........................................................................59
PreparingforSeasonalStorage.................................59
Schematics...................................................................60
3

Safety
ThismachinemeetsorexceedsCENstandardEN
836:1997,ISOstandard5395:1990,andANSIB71.4-2012
specicationsineffectatthetimeofproduction.
Improperuseormaintenancebytheoperatoror
ownercanresultininjury.Toreducethepotential
forinjury,complywiththesesafetyinstructionsand
alwayspayattentiontothesafetyalertsymbol,which
meansCaution,Warning,orDanger—personalsafety
instruction.Failuretocomplywiththeinstructionmay
resultinpersonalinjuryordeath.
SafeOperatingPractices
ThefollowinginstructionsarefromtheCENstandardEN
836:1997,ISOstandard5395:1990,andANSIstandard
B71.4-2012.
Training
•ReadtheOperator'sManualandothertrainingmaterial
carefully.Befamiliarwiththecontrols,safetysigns,and
theproperuseoftheequipment.
•Neverallowchildrenorpeopleunfamiliarwiththese
instructionstousethemower.Localregulationsmay
restricttheageoftheoperator.
•Nevermowwhilepeople,especiallychildren,orpetsare
nearby.
•Keepinmindthattheoperatororuserisresponsiblefor
accidentsorhazardsoccurringtohimselforherself,other
people,orproperty.
•Donotcarrypassengers.
•Alldriversandmechanicsshouldseekandobtain
professionalandpracticalinstruction.Theowneris
responsiblefortrainingtheusers.Suchinstructionshould
emphasize:
–theneedforcareandconcentrationwhenworking
withride-onmachines;
–controlofaride-onmachineslidingonaslopewill
notberegainedbytheapplicationofthebrake.The
mainreasonsforlossofcontrolare:
◊insufcientwheelgrip;
◊beingdriventoofast;
◊inadequatebraking;
◊thetypeofmachineisunsuitableforitstask;
◊lackofawarenessoftheeffectofground
conditions,especiallyslopes;
◊incorrecthitchingandloaddistribution.
Preparation
•Whilemowing,alwayswearsubstantialfootwear,long
trousers,hardhat,safetyglasses,andhearingprotection.
Longhair,looseclothingorjewelrymaygettangled
inmovingparts.Donotoperatetheequipmentwhen
barefootorwearingopensandals.
•Thoroughlyinspecttheareawheretheequipmentisto
beusedandremoveallobjectswhichmaybethrownby
themachine.
•Warning–fuelishighlyammable.Takethefollowing
precautions:
–Storefuelincontainersspecicallydesignedforthis
purpose.
–Refueloutdoorsonlyanddonotsmokewhile
refuelling.
–Addfuelbeforestartingtheengine.Neverremove
thecapofthefueltankoraddfuelwhiletheengineis
runningorwhentheengineishot.
–Iffuelisspilled,donotattempttostarttheengine
butmovethemachineawayfromtheareaofspillage
andavoidcreatinganysourceofignitionuntilfuel
vaporshavedissipated.
–Replaceallfueltankandcontainercapssecurely.
•Replacefaultysilencers/mufers.
•Beforeusing,alwaysvisuallyinspecttoseethatthe
blades,bladebolts,andcuttingassemblyarenotworn
ordamaged.Replacewornordamagedbladesandbolts
insetstopreservebalance.
•Onmulti-bladedmachines,takecareasrotatingoneblade
cancauseotherbladestorotate.
•Evaluatetheterraintodeterminewhataccessoriesand
attachmentsareneededtoproperlyandsafelyperform
thejob.Onlyuseaccessoriesandattachmentsapproved
bythemanufacturer.
•Checkthatoperatorspresencecontrols,safetyswitches,
andshieldsareattachedandfunctioningproperly.Donot
operateunlesstheyarefunctioningproperly.
Operation
•Donotoperatetheengineinaconnedspacewhere
dangerouscarbonmonoxidefumescancollect.
•Mowonlyindaylightoringoodarticiallight.
•Beforeattemptingtostarttheengine,disengageallblade
attachmentclutchesandengagetheparkingbrake.Only
starttheenginefromtheoperator'sposition.Alwaysuse
theseatbeltandROPStogether.
•Rememberthereisnosuchthingasasafeslope.Travel
ongrassslopesrequiresparticularcare.Toguardagainst
overturning:
–Donotstoporstartsuddenlywhengoingupor
downhill.
–Themachinespeedshouldbekeptlowonslopesand
duringtightturns.
–Stayalertforhumpsandhollowsandotherhidden
hazards.
–Nevermowacrossthefaceoftheslope,unlessthe
machineisdesignedforthatpurpose.
4

•Stayalertforholesintheterrainandotherhiddenhazards.
•Usecarewhenusingheavyequipment.
–Donotturnsharply.Usecarewhenreversing.
–Usecounterweight(s)orwheelweightswhen
suggestedintheOperator'sManual.
•Watchoutfortrafcwhencrossingornearroadways.
•Stopthebladesfromrotatingbeforecrossingsurfaces
otherthangrass.
•Whenusinganyattachments,neverdirectdischargeof
materialtowardbystandersnorallowanyonenearthe
machinewhileinoperation.
•Neveroperatethemachinewithdamagedguards,shields,
orwithoutsafetyprotectivedevicesinplace.Besureall
interlocksareattached,adjustedproperly,andfunctioning
properly.
•Beforeleavingtheoperatorsposition:
–Stoponlevelground.
–Disengagethepowertake-off.
–Settheparkingbrake.
–Stoptheengineandremovethekey.
•Disengagedrivetoattachments,stoptheengine,and
removetheignitionkey:
–beforeclearingblockages;
–beforechecking,cleaning,orworkingonthemachine;
–afterstrikingaforeignobject.Inspectthemachine
fordamageandmakerepairsbeforerestartingand
operatingtheequipment.Torqueallthespindlepulley
nutsto176to203N-m(130to150ft.-lbs.);
–ifthemachinestartstovibrateabnormally(check
immediately).
•Disengagedrivetoattachmentswhentransportingornot
inuse.
•Stoptheengineanddisengagedrivetoattachment:
–beforerefuelling;
–beforemakingheightadjustment.
•Reducethethrottletolowidlebeforestoppingengine.
•Keephandsandfeetawayfromthecuttingunits.
•Lookbehindbeforebackinguptobesureofaclearpath.
•Slowdownandusecautionwhenmakingturnsand
crossingroadsandsidewalks.
•Donotoperatethemowerundertheinuenceofalcohol
ordrugs.
•Lightningcancausesevereinjuryordeath.Iflightning
isseenorthunderisheardinthearea,donotoperate
themachine;seekshelter.
•Usecarewhenloadingorunloadingthemachineintoa
trailerortruck.
•Theoperatorshallturnonashingwarninglights,if
provided,whenevertravelingonapublicroad,except
wheresuchuseisprohibitedbylaw .
MaintenanceandStorage
•Keepallnuts,bolts,andscrewstighttobesurethe
equipmentisinsafeworkingcondition.
•Neverstoretheequipmentwithfuelinthetankinsidea
buildingwherefumesmayreachanopenameorspark.
•Allowtheenginetocoolbeforestoringinanyenclosure
anddonotstorenearame.
•Toreducetherehazard,keeptheengine,
silencer/mufer,batterycompartment,cuttingunits,
drives,andfuelstorageareafreeofgrass,leaves,or
excessivegrease.Cleanupoilorfuelspillage.
•Replacewornordamagedpartsforsafety.
•Ifthefueltankhastobedrained,dothisoutdoors.
•Onmulti-bladedmachines,takecareasrotatingoneblade
cancauseotherbladestorotate.
•Whenmachineistobeparked,stored,orleftunattended,
lowerthecuttingunitsunlessapositivemechanicallock
isprovided.
•Disengagedrives,lowerthecuttingunits,movetraction
pedaltoNeutral,setparkingbrake,stopengineand
removekey.Waitforallmovementtostopbefore
adjusting,cleaningorrepairing.
•Parkmachineonlevelground.Neverallowuntrained
personneltoservicemachine.
•Usejackstandstosupportcomponentswhenrequired.
•Carefullyreleasepressurefromcomponentswithstored
energy.
•Disconnectbatterybeforemakinganyrepairs.Disconnect
thenegativeterminalrstandthepositivelast.Reconnect
positiverstandnegativelast.
•Usecarewhencheckingblades.Wrapthebladesor
weargloves,andusecautionwhenservicingthem.Only
replaceblades.Neverstraightenorweldthem.
•Keephandsandfeetawayfrommovingparts.Ifpossible,
donotmakeadjustmentswiththeenginerunning.
•Chargebatteriesinanopenwellventilatedarea,away
fromsparkandames.Unplugchargerbeforeconnecting
ordisconnectingfrombattery.Wearprotectiveclothing
anduseinsulatedtools.
•Makesureallhydrauliclineconnectorsaretightandall
hydraulichosesandlinesareingoodconditionbefore
applyingpressuretothesystem.
•Keepyourbodyandhandsawayfrompinholeleaksor
nozzlesthatejecthydraulicuidunderhighpressure.
Usepaperorcardboard,notyourhands,tosearchfor
leaks.Hydraulicuidescapingunderpressurecanhave
sufcientforcetopenetratetheskinandcauseserious
injury.Ifuidisinjectedintotheskinitmustbesurgically
removedwithinafewhoursbyadoctorfamiliarwiththis
formofinjuryorgangrenemayresult.
5

ToroMowerSafety
ThefollowinglistcontainssafetyinformationspecictoToro
productsorothersafetyinformationthatyoumustknowthat
isnotincludedintheCEN,ISO,orANSIstandards.
Thisproductiscapableofamputatinghandsandfeetand
throwingobjects.Alwaysfollowallsafetyinstructionsto
avoidseriousinjuryordeath.
Useofthisproductforpurposesotherthanitsintendeduse
couldprovedangeroustouserandbystanders.
WARNING
Engineexhaustcontainscarbonmonoxide,which
isanodorless,deadlypoisonthatcankillyou.
Donotrunengineindoorsorinanenclosedarea.
Operation
•BeforeoperatingamachinewithROPS(rollover
protectionsystem),becertainthattheseatbeltsare
attachedandtheseatislatchedtopreventtheseatfrom
pivotingforward.
•Knowhowtostopthemachineandenginequickly.
•Donotoperatethemachinewhilewearingtennisshoes
orsneakers.
•Wearingsafetyshoesandlongpantsisadvisableand
requiredbysomelocalordinancesandinsurance
regulations.
•Keephands,feet,andclothingawayfrommovingparts
andthemowerdischargeareaandundersideofthe
mowerwhiletheengineisrunning.
•Fillfueltankuntillevelis25mm(1inch)belowthe
bottomofthellerneck.Donotoverll.
•Checkthesafetyinterlockswitchesdailyforproper
operation.Ifaswitchshouldfail,replacetheswitch
beforeoperatingthemachine.
•Checkcarefullyforoverheadclearances(i.e.branches,
doorways,electricalwires)beforedrivingunderany
objectsanddonotcontactthem.
•Donotmowinreverseunlessabsolutelynecessary.
•Reducespeedwhenmakingsharpturns.
•Avoidstartingorstoppingonaslope.Iftireslosetraction,
disengagethebladesandproceedslowlystraightdown
theslope.Avoidraisingthesidecuttingunitsonaslope.
•Avoidturningonslopes.Ifyoumustturn,turnslowly
andgraduallydownhill,ifpossible.
•WhenoperatingamachinewithaROPS,alwaysusea
seatbelt.
•Becertainthattheseatbeltcanbereleasedquicklyifthe
machineisdrivenorrollsintoapondorwater.
•Watchfortrafcwhennearorcrossingroads.Always
yieldtheright-of-way.
•Thismachineisnotdesignedorequippedforon-road
useandisa“slow-movingvehicle”.Ifyoumustcross
ortravelonapublicroad,youshouldbeawareofand
complywithlocalregulations,suchasrequiredlights,
slowmovingvehiclesigns,andreectors.
•Donotmowneardrop-offs,ditches,orembankments.
Themachinecouldsuddenlyturnoverifawheelgoes
overtheedgeofaclifforditch,orifanedgecavesin.
•Donotmowonwetgrass.Reducedtractioncouldcause
sliding.
•Useextracarewithotherattachments.Thesecanchange
thestabilityofthemachine.
•Turnoffthebladeswhennotmowing.
MaintenanceandStorage
•Donottouchequipmentorattachmentpartswhichmay
behotfromoperation.Allowtocoolbeforeattempting
tomaintain,adjust,orservice.
•Neverstorethemachineorfuelcontainerinsidewhere
thereisanopename,suchasnearawaterheateror
furnace.
•Keepnutsandboltstight,especiallythebladeattachment
bolts.Keepequipmentingoodcondition.
•Iftheenginemustberunningtoperformamaintenance
adjustment,keephands,feet,clothing,andanypartsof
thebodyawayfromthecuttingunits,attachments,and
anymovingparts.Keepeveryoneaway.
•Checkbrakeoperationfrequently.Adjustandserviceas
required.
•Batteryacidispoisonousandcancauseburns.Avoid
contactwithskin,eyes,andclothing.Protectyourface,
eyes,andclothingwhenworkingwithabattery.
•Batterygasescanexplode.Keepcigarettes,sparks,and
amesawayfromthebattery.
•Theenginemustbeshutoffbeforecheckingtheoilor
addingoiltothecrankcase.
•Ifmajorrepairsareeverneededorifassistanceisdesired,
contactanAuthorizedToroDistributor.
•Tomakesureofoptimumperformanceandcontinued
safetycerticationofthemachine,useonlygenuineToro
replacementpartsandaccessories.Replacementparts
andaccessoriesmadebyothermanufacturerscouldbe
dangerous,andsuchusecouldvoidtheproductwarranty.
SoundPowerLevel
Thisunithasaguaranteedsoundpowerlevelof104dBA,
whichincludesanUncertaintyValue(K)of1dBA.
Soundpowerlevelwasdeterminedaccordingtothe
proceduresoutlinedinISO11094.
6

SoundPressureLevel-Model
30602
Thisunithasasoundpressurelevelattheoperator’searof90
dBA,whichincludesanUncertaintyValue(K)of1dBA.
Soundpressurelevelwasdeterminedaccordingtothe
proceduresoutlinedinEN836.
SoundPressureLevel-Model
30604
Thisunithasasoundpressurelevelattheoperator’searof90
dBA,whichincludesanUncertaintyValue(K)of1dBA.
Soundpressurelevelwasdeterminedaccordingtothe
proceduresoutlinedinEN836.
VibrationLevel
Hand-Arm
Measuredvibrationlevelforrighthand=1.1m/s2
Measuredvibrationlevelforlefthand=1m/s2
UncertaintyValue(K)=0.5m/s2
Measuredvaluesweredeterminedaccordingtotheprocedures
outlinedinEN836.
WholeBody
Measuredvibrationlevel=0.29m/s2
UncertaintyValue(K)=0.5m/s2
Measuredvaluesweredeterminedaccordingtotheprocedures
outlinedinEN836.
EngineEmissionCertication
TheengineinthismachineisEPATier4iandstage3a
compliant.
7

SafetyandInstructionalDecals
Safetydecalsandinstructionsareeasilyvisibletotheoperatorandarelocatednearanyareaofpotential
danger.Replaceanydecalthatisdamagedorlost.
93-7818
1.Warning—readtheOperator'sManualforinstructionson
torquingthebladebolt/nutto115-149N-m(85-110ft-lb).
100-5622
1.Heightofcutadjustment
100-5623
1.Lowheightofcut
adjustment
2.Highheightofcut
adjustment
106-4250
1.Heightofcut
106-4251
1.Heightofcut
104-3579
1.Lowheightofcut
adjustment
2.Highheightofcut
adjustment
8

117–2754
1.Warning—readtheOperator'sManual.
2.Warning—donotoperatethismachineunlessyouaretrained.
3.Warning—weartheseatbeltwhenseatedintheoperator'sposition.
4.Warning—wearhearingprotection.
5.Thrownobjecthazard—keepbystandersasafedistancefromthemachine.
6.Cuttinghazardofhandorfoot—stayawayfrommovingparts;keepallguardsinplace.
7.Tippinghazard—lowerthecuttingunitwhendrivingdownslopes;slowmachinebeforeturning,donotturnathighspeeds
8.Warning—locktheparkingbrake,stoptheengineandremovetheignitionkeybeforeleavingthemachine.
117–2766
(Afxoverpartno.117–2754forCE*)
*ThissafetydecalincludesaslopewarningrequiredonthemachineforcompliancetotheEuropeanLawnMowerSafetyStandardEN836:1997.Theconservativemaximum
slopeanglesindicatedforoperationofthismachineareprescribedbyandrequiredbythisstandard.
1.Warning—readtheOperator'sManual.
2.Warning—donotoperatethismachineunlessyouaretrained.
3.Warning—weartheseatbeltwhenseatedintheoperator'sposition.
4.Warning—wearhearingprotection.
5.Thrownobjecthazard—keepbystandersasafedistancefromthemachine.
6.Cuttinghazardofhandorfoot—stayawayfrommovingparts;keepallguardsinplace.
7.Tippinghazard—lowerthecuttingunitwhendrivingdownslopes;donotoperatemachineonslopesgreaterthan15degrees.
8.Warning—locktheparkingbrake,stoptheengineandremovetheignitionkeybeforeleavingthemachine.
9

93-7275
1.ReadtheOperator'sManual.
2.Donotusestartingaids.
106-6754
1.Warning—donottouchthehotsurface.
2.Cutting/dismembermenthazard,fanandentanglement
hazard,belt—stayawayfrommovingparts.
100-6578
1.Entanglementhazard,belt—donotoperatethemachine
withtheshieldsorguardsremoved;alwayskeeptheshields
andguardsinplace;stayawayfrommovingparts.
121–3884
1.Engine—stop3.Engine—start
2.Engine—preheat
120–4159
1.Off8.High
2.Lights9.Tractiondrive
3.On10.Low
4.Lightswitchlocation11.Powertake-off(PTO)
5.Fast12.Lowerleftdeck
6.Variablespeedadjustment13.Lowercenterdeck
7.Slow14.Lowerrightdeck
121–3887
1.ReadtheOperator’sManual.
58-6520
1.Grease
10

117–2718
93-7272
1.Cutting/dismembermenthazard;fan—stayawayfrom
movingparts.
117–2787
1.Headlights,15Afuse4.Windshieldwipers,15A
fuse
2.Heater,15Afuse5.Domelight,15Afuse
3.Airconditioning,30Afuse
119–0124
(Cabmodels)
1.Warning—whenthecabwindowsareopenwearhearing
protection.
2.Closetherearwindowbeforeattemptingtoopenthehood.
106-6754
1.Warning—donottouchthehotsurface.
2.Cutting/dismembermenthazard,fanandentanglement
hazard,belt—stayawayfrommovingparts.
106-6755
1.Enginecoolantunder
pressure.
3.Warning—donottouchthe
hotsurface.
2.Explosionhazard—read
theOperator'sManual.
4.Warning—readthe
Operator'sManual.
120-6604
1.Thrownobjecthazard—keepbystandersawayfromthe
machine.
2.Cutting/dismembermenthazardofhand,mower
blade—stayawayfrommovingparts,keepallguardsand
shieldsinplace.
3.Cutting/dismembermenthazardoffoot,mowerblade—stay
awayfrommovingparts,keepallguardsandshieldsin
place.
11

120–8947
1.Warning—readthe
Operator’sManual.
4.Iftherollbarisraised,
weartheseatbelt.
2.Thereisnorollover
protectionwhentheroll
barisdown.
5.Iftherollbarislowered,
donotweartheseatbelt.
3.Thereisrolloverprotection
whentherollbarisup.
6.Driveslowlywhenturning.
121–1592
1.Cruisecontrolnotset4.Raisetheleftdeck
2.Cruisecontrolswitch5.Raisethemiddledeck
3.Cruisecontrolset6.Raisetherightdeck
120–4129
1.Beacon3.Leftturnsignal
2.Hazardlight4.Rightturnsignal
120–4130
1.ReadtheOperator’s
Manual.
3.Parkingbrake
2.Toengagetheparking
brake—1)Lockthepedals
together;2)Pushdownon
thebrake;3)Pulloutthe
parkingbrakeknob.
4.Todisengagetheparking
brake,pushdownonthe
brakepedal.
12

121–1599
1.ReadtheOperator’sManualforinformationonfuses.
114–0849
1.Warning—1)Disengage
thePTO;2)Raisethedeck
4.Forwarddirection
2.Donotplaceyourfoot
here.
5.Reversedirection
3.Directionpedal
114–0845
1.Steeringwheeltiltlever2.Horn
114–0846
1.ReadtheOperator’s
Manualforinformationon
startingtheengine—1)Set
toneutral;2)Engagethe
brake;3)Settheengine
speedtoslow;4)Turnthe
ignitionkeytopreheat;
5)Turntheignitionkeyto
enginestart.
4.Pulltheknoboutto
engagethePTO.
2.ReadtheOperator’s
Manualforinformation
onstoppingthe
engine—1)Setthe
enginespeedtoslow;
2)Disengagethedeck;
3)Locktheparkingbrake;
4)Wait5minutes;5)Turn
theignitionkeytoengine
stop;6)Removethekey
fromtheignition.
5.Pushtheknobinto
disengagethePTO.
3.ReadtheOperator’s
Manual.
6.RaisethedeckstogotoH
range.
BatterySymbols
Someorallofthesesymbolsareonyourbattery
1.Explosionhazard6.Keepbystandersasafe
distancefromthebattery.
2.Nore,opename,or
smoking.
7.Weareyeprotection;
explosivegasescan
causeblindnessandother
injuries
3.Causticliquid/chemical
burnhazard
8.Batteryacidcancause
blindnessorsevereburns.
4.Weareyeprotection9.Flusheyesimmediately
withwaterandgetmedical
helpfast.
5.ReadtheOperator's
Manual.
10.Containslead;donot
discard.
13

121–1678
1.ReadtheOperator’sManualformaintenanceinformation.
14

Setup
LooseParts
Usethechartbelowtoverifythatallpartshavebeenshipped.
ProcedureDescriptionQty.Use
1Nopartsrequired–Greasethemachine.
2WarningDecal1Usedonlyonmachinesrequiring
EuropeanCEcompliance.
MediaandAdditionalParts
DescriptionQty.Use
Operator'sManual1Reviewbeforeoperatingmachine
EngineOperator'sManual1Usetoreferenceengineinformation
PartsCatalog1Usetoreferencepartnumbers
OperatorTrainingMaterials1Reviewbeforeoperatingmachine
Declarationofconformity1
Note:Determinetheleftandrightsidesofthemachine
fromthenormaloperatingposition.
1
GreasingtheMachine
NoPartsRequired
Procedure
Beforethemachineisoperated,itmustbegreasedtoensure
properlubricatingcharacteristics;refertoGreasingthe
BearingsandBushingsinLubrication.Failuretoproperly
greasethemachinewillresultinprematurefailureofcritical
parts.
2
ReplacingtheWarningDecal
Partsneededforthisprocedure:
1WarningDecal
Procedure
OnmachinesrequiringEuropeanCEcompliance,replace
thewarningdecal,partno.117–2754withthewarningdecal
partno.117–2766.
15

ProductOverview
Controls
Note:Determinetheleftandrightsidesofthemachine
fromthenormaloperatingposition.
CAUTION
Thismachineproducessoundlevelsinexcessof85
dBAattheoperatorsearandcancausehearingloss
throughextendedperiodsofexposure.
Wearhearingprotectionwhenoperatingthis
machine.
TractionPedal
Tostop,reduceyourfootpressureonthetractionpedaland
allowittoreturntothecenterposition(Figure3).
9
10 g020756
Figure3
1.Brakepedals6.Hazardlightswitch
2.Pedallockinglatch7.Turnsignalswitch
3.Parkingbrakelatch8.Hornbutton(optional)
4.Spaceforoptional
accessory
9.Tractionpedal
5.Beaconswitch(optional)10.Tiltsteeringlever
BrakePedals
Twofootpedals(Figure3)operateindividualwheelbrakes
forturningassistance,parking,andtoaidinobtainingbetter
sidehilltraction.Alatchconnectsthepedalsforparking
brakeoperationandtransport.
PedalLockingLatch
Thepedallockinglatch(Figure3)connectsthepedals
togethertoengagetheparkingbrake.
TiltSteeringLever
Pressthelever(Figure3)downtotiltthesteeringwheel
tothedesiredposition.Thenreleasethelevertolockthe
adjustment.
ParkingBrakeLatch
Aknobontheleftsideoftheconsoleactuatestheparking
brakelock(Figure3).Toengagetheparkingbrake,connect
thepedalswiththelockinglatch,pushdownonbothpedals,
andpulltheparkingbrakelatchout.Toreleasetheparking
brake,pressbothpedalsuntiltheparkingbrakelatchretracts.
HazardLightSwitch
Pressthehazardlightswitch(Figure3)toactivatethehazard
lights.
TurnSignalSwitch
Presstheleftsideoftheturnsignalswitch(Figure3)to
activatetheleftturnsignalandtherightsideoftheswitchto
activatetherightturnsignal.Thecenterpositionisoff.
KeySwitch
Thekeyswitch(Figure4)hasthreepositions:Off,
On/Preheat,andStart.
g020513
1
2
3
4
5
6
7
8
Figure4
1.Liftswitches5.Hi-Lospeedcontrol
2.PTOswitch6.Enginespeedswitch
3.Keyswitch7.Lightswitch(optional)
4.InfoCenter8.Cruisecontrolswitch
PTOSwitch
ThePTOswitch(Figure4)hastwopositions:Out(start)
andIn(stop).PullthePTObuttonouttoengagethecutting
unitblades.Pushinthebuttontodisengagethecuttingunit
blades.
16

Hi-LoSpeedControl
Theswitch(Figure4)allowsthespeedrangetoincreasefor
transportofthemachine.Cuttingdeckswillnotoperate
inhighrange.ToswitchbetweentheHighandLorange,
thedecksmustberaised,PTOdisengaged,cruisecontrol
disengaged,tractionpedalinneutralpositionandthemachine
mustbemovingataslowspeed.
LiftSwitches
Theliftswitches(Figure4)raiseandlowerthecutting
units.Presstheswitchesforwardtolowerthecuttingunits
andbackwardtoraisethecuttingunits.Whenstartingthe
machine,withthecuttingunitsinthedownposition,pressthe
liftswitchdowntoallowthecuttingunitstooatandmow.
Note:ThedeckswillnotlowerwhileintheHIspeedrange
andtheywillnotraiseorloweriftheoperatorisoutofthe
seatwhentheengineisrunning.Also,thedeckswilllower
withthekeyintheOnpositionandtheoperatorintheseat.
PowerPoint
Thepowerpoint(Figure5)isusedtopoweroptional
electricalaccessories.
Figure5
1.Powerpoint
SeatAdjustments
ForeandAftAdjustingLever
Pulloutonthelevertoslidetheseatforeoraft(Figure6).
SeatArmRestAdjustingKnob
Rotatetheknobtoadjusttheseatarmrestangle(Figure6).
SeatBackAdjustingLever
Movethelevertoadjusttheseatbackangle(Figure6).
Weightgauge
Indicateswhentheseatisadjustedtotheweightofthe
operator(Figure6).Heightadjustmentismadebypositioning
thesuspensionwithintherangeofthegreenregion.
Figure6
1.Weightgauge4.Seatbackadjustinglever
2.Weightadjustinglever5.Armrestadjustingknob
(notshown-locatedunder
armrest)
3.ForeandAftadjusting
lever
WeightAdjustingLever
Adjustforoperatorweight(Figure6).Pullupontheleverto
increasetheairpressureandpushdowntodecreasetheair
pressure.Theproperadjustmentisattainedwhentheweight
gaugeisinthegreenregion.
CabControls
Cabmodelonly
WindShieldWiperSwitch
Pressfrontofswitchtoactivatethewindshieldwipers
(Figure7)andrearofswitchtoturnoffthewipers.
AirConditioningSwitch
Pressfrontofswitchtoactivatetheairconditioning(Figure7)
andrearofswitchtoturnofftheairconditioning.
FanControl
Rotatethefancontrolknobtoregulatethespeedofthefan
(Figure7).
TemperatureControl
Rotatethetemperaturecontrolknobtoregulatetheair
temperatureinthecab(Figure7).
17

Figure7
1.Windshieldwiperswitch3.Fancontrol
2.Airconditioningswitch4.Temperaturecontrol
WindShieldLatch
Liftuponlatchestoopenthewindshield(Figure8).Press
inonlatchtolockwindshieldinopenposition.Pulloutand
downonlatchtocloseandsecurewindshield.
Figure8
1.Windshieldlatch
RearWindowLatch
Liftuponlatchestoopentherearwindow.Pressinonlatch
tolockwindowinopenposition.Pulloutanddownonlatch
tocloseandsecurewindow(Figure8).
Important:Therearwindowmustbeclosedbefore
openingthehoodordamagemayoccur.
UsingtheInfoCenterLCDDisplay
TheInfoCenterLCDdisplayshowsinformationaboutyour
machinesuchastheoperatingstatus,variousdiagnostics
andotherinformationaboutthemachine(Figure9)There
isasplashscreenandmaininformationscreenofthe
InfoCenter.Youcanswitchbetweenthesplashscreenand
maininformationscreen,atanytime,bypressinganyof
theInfoCenterbuttonsandthenselectingtheappropriate
directionalarrow.
1
g020650
2
3
4
TORO
Figure9
1.Indicatorlight3.Middlebutton
2.Rightbutton4.Leftbutton
•LeftButton,MenuAccess/BackButton—pressthis
buttontoaccesstheInfoCentermenus.Youcanuseitto
backoutofanymenuyouarecurrentlyusing.
•MiddleButton—usethisbuttontoscrolldownmenus.
•RightButton—usethisbuttontoopenamenuwherea
rightarrowindicatesadditionalcontent.
•Beeper—activatedwhenloweringthedecksorfor
advisoriesandfaults.
Note:Thepurposeofeachbuttonmaychangedepending
onwhatisrequiredatthetime.Eachbuttonwillbelabeled
withanicondisplayingitscurrentfunction.
18

InfoCenterIconDescription
SERVICEDUEIndicateswhenscheduledservice
shouldbeperformed
EngineRPM/status—indicatesthe
engineRPM
Hourmeter
Infoicon
Setsthemaximumtractionspeed
Fast
Slow
FanReversal—indicateswhenthe
fanisreversed
Fuellevel
Stationaryregenerationrequired
Airintakeheaterisactive
Raiseleftdeck
Raisecenterdeck
Raiserightdeck
Operatormustsitinseat
ParkingBrakeIndicator—indicates
whentheparkingbrakeisOn
IdentiestherangeasHigh
Neutral
IdentiestherangeasLow
CoolantT emperature-indicatesthe
enginecoolanttemperatureineither
°Cor°F
Temperature(hot)
TractionorTractionPedal
InfoCenterIconDescription(cont'd.)
Deniedornotallowed
EngineStart
PTO-indicatesthePTOisOn
Stoporshutdown
Engine
Keyswitch
Indicateswhenthecuttingunitsare
beinglowered
Indicateswhenthecuttingunitsare
beingraised
PINpasscode
HydraulicOilT emperature-indicates
thehydraulicoiltemperature
CANbus
InfoCenter
Badorfailed
Center
Right
Left
Bulb
OutputofTECcontrollerorcontrol
wireinharness
High:overallowedrange
Low:underallowedrange
/
Outofrange
Switch
Operatormustreleaseswitch
Operatorshouldchangetoindicated
state
19

InfoCenterIconDescription(cont'd.)
Symbolsareoften
combinedtoform
sentences.Some
examplesareshown
below
Operatorshouldputmachinein
neutral
Enginestartdenied
Engineshutdown
Enginecoolanttoohot
Hydraulicoiltoohot
or
Sitdownorsetparkingbrake
UsingtheMenus
ToaccesstheInfoCentermenusystem,pressthemenuaccess
buttonwhileatthemainscreen.Thiswillbringyoutothe
mainmenu.Refertothefollowingtablesforasynopsisof
theoptionsavailablefromthemenus:
MainMenu
MenuItemDescription
FaultsTheFaultsmenucontains
alistoftherecentmachine
faults.RefertotheService
ManualoryourAuthorizedToro
Distributorformoreinformation
ontheFaultsmenuandthe
informationcontainedthere.
ServiceTheServicemenucontains
informationonthemachine
suchashoursofuseandother
similarnumbers.
DiagnosticsTheDiagnosticsmenudisplays
thestateofeachmachine
switch,sensorandcontrol
output.Youcanusethisto
troubleshootcertainissuesas
itwillquicklytellyouwhich
machinecontrolsareonand
whichareoff.
SettingsTheSettingsmenuallows
youtocustomizeandmodify
congurationvariablesonthe
InfoCenterdisplay.
AboutTheAboutmenuliststhe
modelnumber,serialnumber,
andsoftwareversionofyour
machine.
Service
MenuItemDescription
HoursListsthetotalnumberofhours
thatthemachine,engineand
fanhavebeenon,aswell
asthenumberofhoursthe
machinehasbeentransported
andhasoverheated.
CountsListsthenumberofpreheats
andstartsthemachinehas
experienced.
Diagnostics
MenuItemDescription
EngineRunRefertotheServiceManual
oryourAuthorizedToro
Distributorformoreinformation
ontheEngineRunmenu
andtheinformationcontained
there.
GlowplugsIndicatesifthefollowingitems
areactive:Keystart,timeout
limited,andglowplugs.
FanIndicatesifthefanisactive
inthefollowinginstances:
Enginehightemp,oilhigh
temp,engineorhydraulichigh
temp,andfanon.
Settings
MenuItemDescription
UnitsControlstheunitsusedonthe
InfoCenter.Themenuchoices
areEnglishorMetric
LanguageControlsthelanguageusedon
theInfoCenter*.
LCDBacklightControlsthebrightnessofthe
LCDdisplay.
LCDContrastControlsthecontrastofthe
LCDdisplay.
ProtectedMenusAllowsthedistributor/engineer
toaccessprotectedmenusby
inputtingapasscode.
AutoIdleControlsthetimethatbefore
idlingtheenginewhenthe
machinenotinuse.
MowSpeedControlsthemaximumspeed
whileinmow(lowrange).
TransSpeedControlsthemaximumspeed
whileintransport(highrange).
SmartPowerSmartPowerprevents
boggingdowninheavyturfby
automaticallycontrollingthe
machinespeedandoptimizing
cuttingperformance.
20
This manual suits for next models
3
Table of contents
Other Toro Lawn Mower manuals

Toro
Toro 4380 User manual

Toro
Toro Greensmaster e1021 User manual

Toro
Toro LX466 User manual

Toro
Toro 30635 User manual

Toro
Toro 30403 User manual

Toro
Toro 30857 User manual

Toro
Toro TimeCutter ZS 4200S User manual

Toro
Toro 74226 Z255 Z Master User manual

Toro
Toro Greensmaster 3250-D User manual

Toro
Toro 4042 User manual