Toro 30643 User manual

FormNo.3400-151RevA
Groundsmaster®4110Rotary
Mower
ModelNo.30643—SerialNo.316000001andUp
Registeratwww.Toro.com.
OriginalInstructions(EN)*3400-151*A

ThisproductcomplieswithallrelevantEuropeandirectives;
fordetails,pleaseseetheseparateproductspecicDeclaration
ofConformity(DOC)sheet.
WARNING
CALIFORNIA
Proposition65Warning
Thisproductcontainsachemicalorchemicals
knowntotheStateofCaliforniatocausecancer,
birthdefects,orreproductiveharm.
Dieselengineexhaustandsomeofits
constituentsareknowntotheStateof
Californiatocausecancer,birthdefects,
andotherreproductiveharm.
GenuineTorosparkarrestersareapprovedbytheUSDA
ForestryService.
ItisaviolationofCaliforniaPublicResourceCode
Section4442or4443touseoroperatetheengineonany
forest-covered,brush-covered,orgrass-coveredlandunless
theengineisequippedwithasparkarrester,asdenedin
Section4442,maintainedineffectiveworkingorderorthe
engineisconstructed,equipped,andmaintainedforthe
preventionofre.
Introduction
Thismachineisaride-on,rotary-bladelawnmowerintended
tobeusedbyprofessional,hiredoperatorsincommercial
applications.Itisprimarilydesignedforcuttinggrass
onwell-maintainedlawnsinparks,sportselds,andon
commercialgrounds.Itisnotdesignedforcuttingbrush,
mowinggrassandothergrowthalongsidehighways,orfor
agriculturaluses.
Readthisinformationcarefullytolearnhowtooperateand
maintainyourproductproperlyandtoavoidinjuryand
productdamage.Youareresponsibleforoperatingthe
productproperlyandsafely.
YoumaycontactTorodirectlyatwww.Toro.comforproduct
andaccessoryinformation,helpndingadealer,ortoregister
yourproduct.
Wheneveryouneedservice,genuineToroparts,oradditional
information,contactanAuthorizedServiceDealerorToro
CustomerServiceandhavethemodelandserialnumbersof
yourproductready.Figure1identiesthelocationofthe
modelandserialnumbersontheproduct.Writethenumbers
inthespaceprovided.
g028455
1
Figure1
1.Modelandserialnumberlocation
ModelNo.
SerialNo.
Thismanualidentiespotentialhazardsandhassafety
messagesidentiedbythesafety-alertsymbol(Figure2),
whichsignalsahazardthatmaycauseseriousinjuryordeath
ifyoudonotfollowtherecommendedprecautions.
Figure2
1.Safety-alertsymbol
Thismanualuses2wordstohighlightinformation.
Importantcallsattentiontospecialmechanicalinformation
andNoteemphasizesgeneralinformationworthyofspecial
attention.
©2016—TheToro®Company
8111LyndaleAvenueSouth
Bloomington,MN554202
Contactusatwww.Toro.com.
PrintedintheUSA
AllRightsReserved

Contents
Safety...........................................................................4
GeneralSafety.........................................................4
SoundPowerLevel..................................................5
SoundPressureLevel...............................................5
VibrationLevel......................................................5
EngineEmissionCertication...................................5
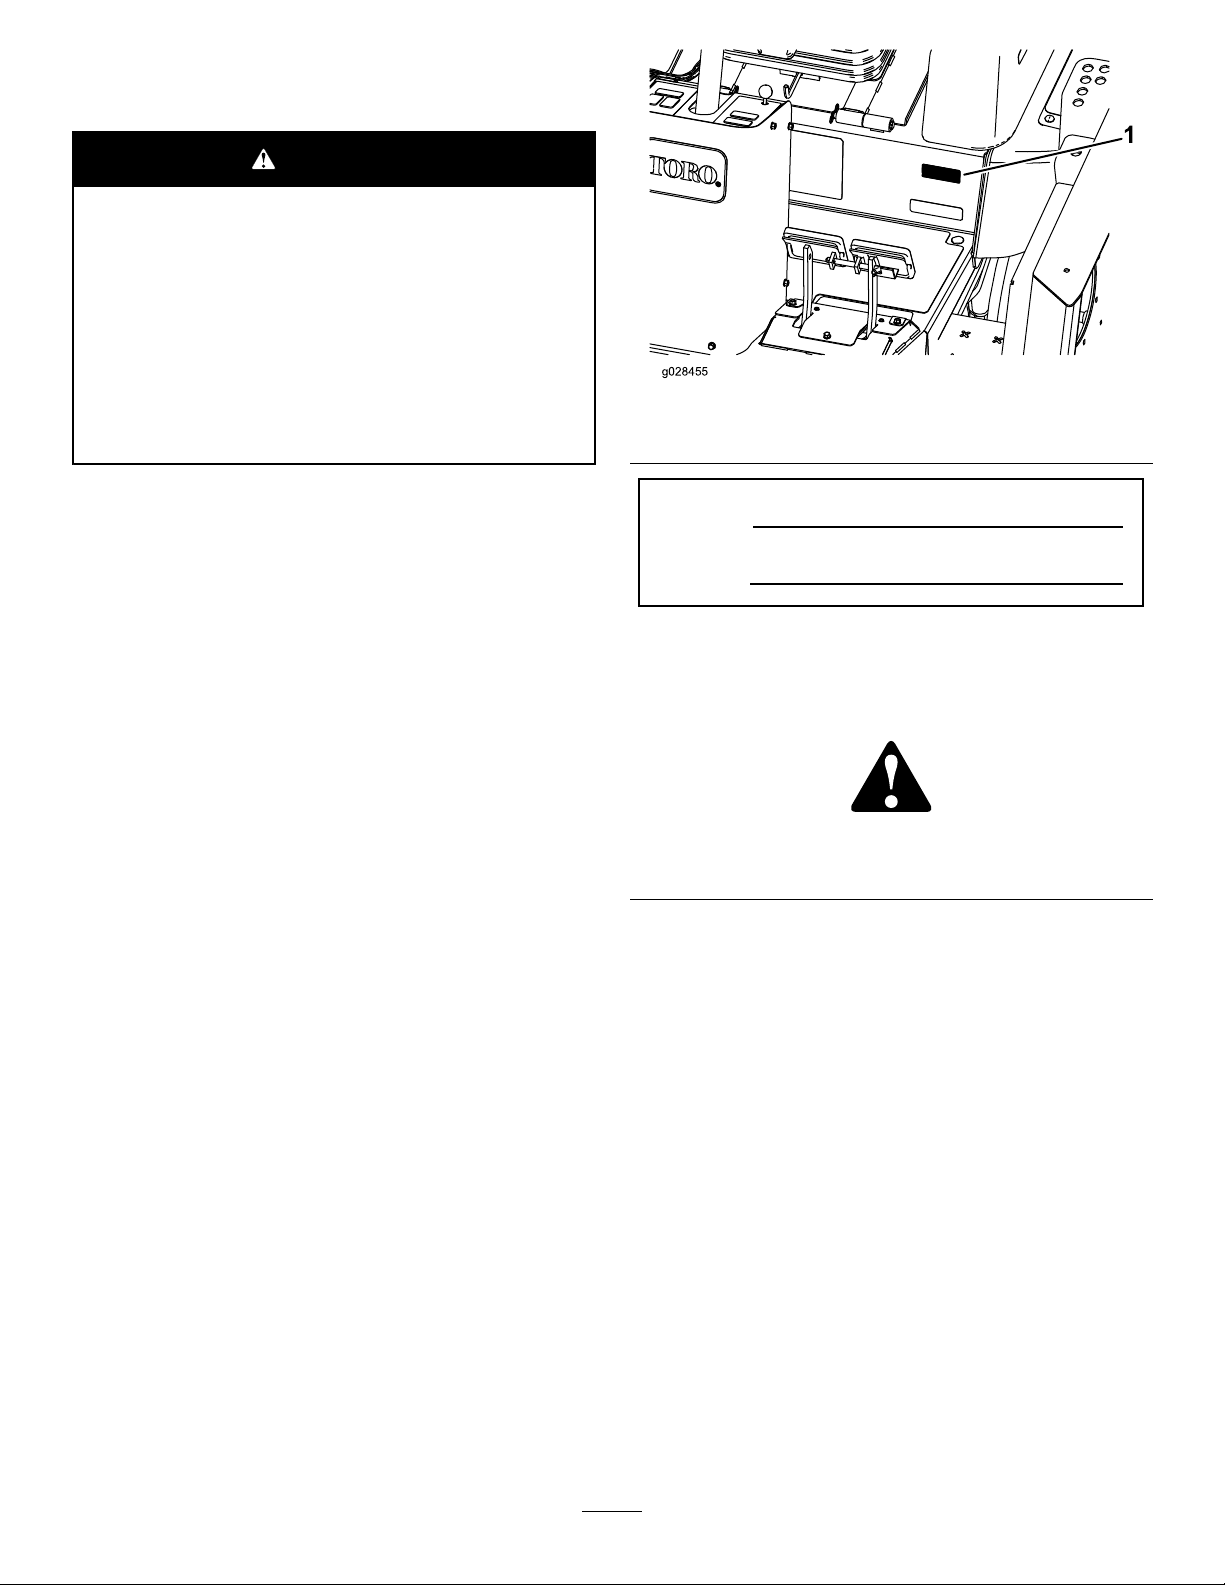
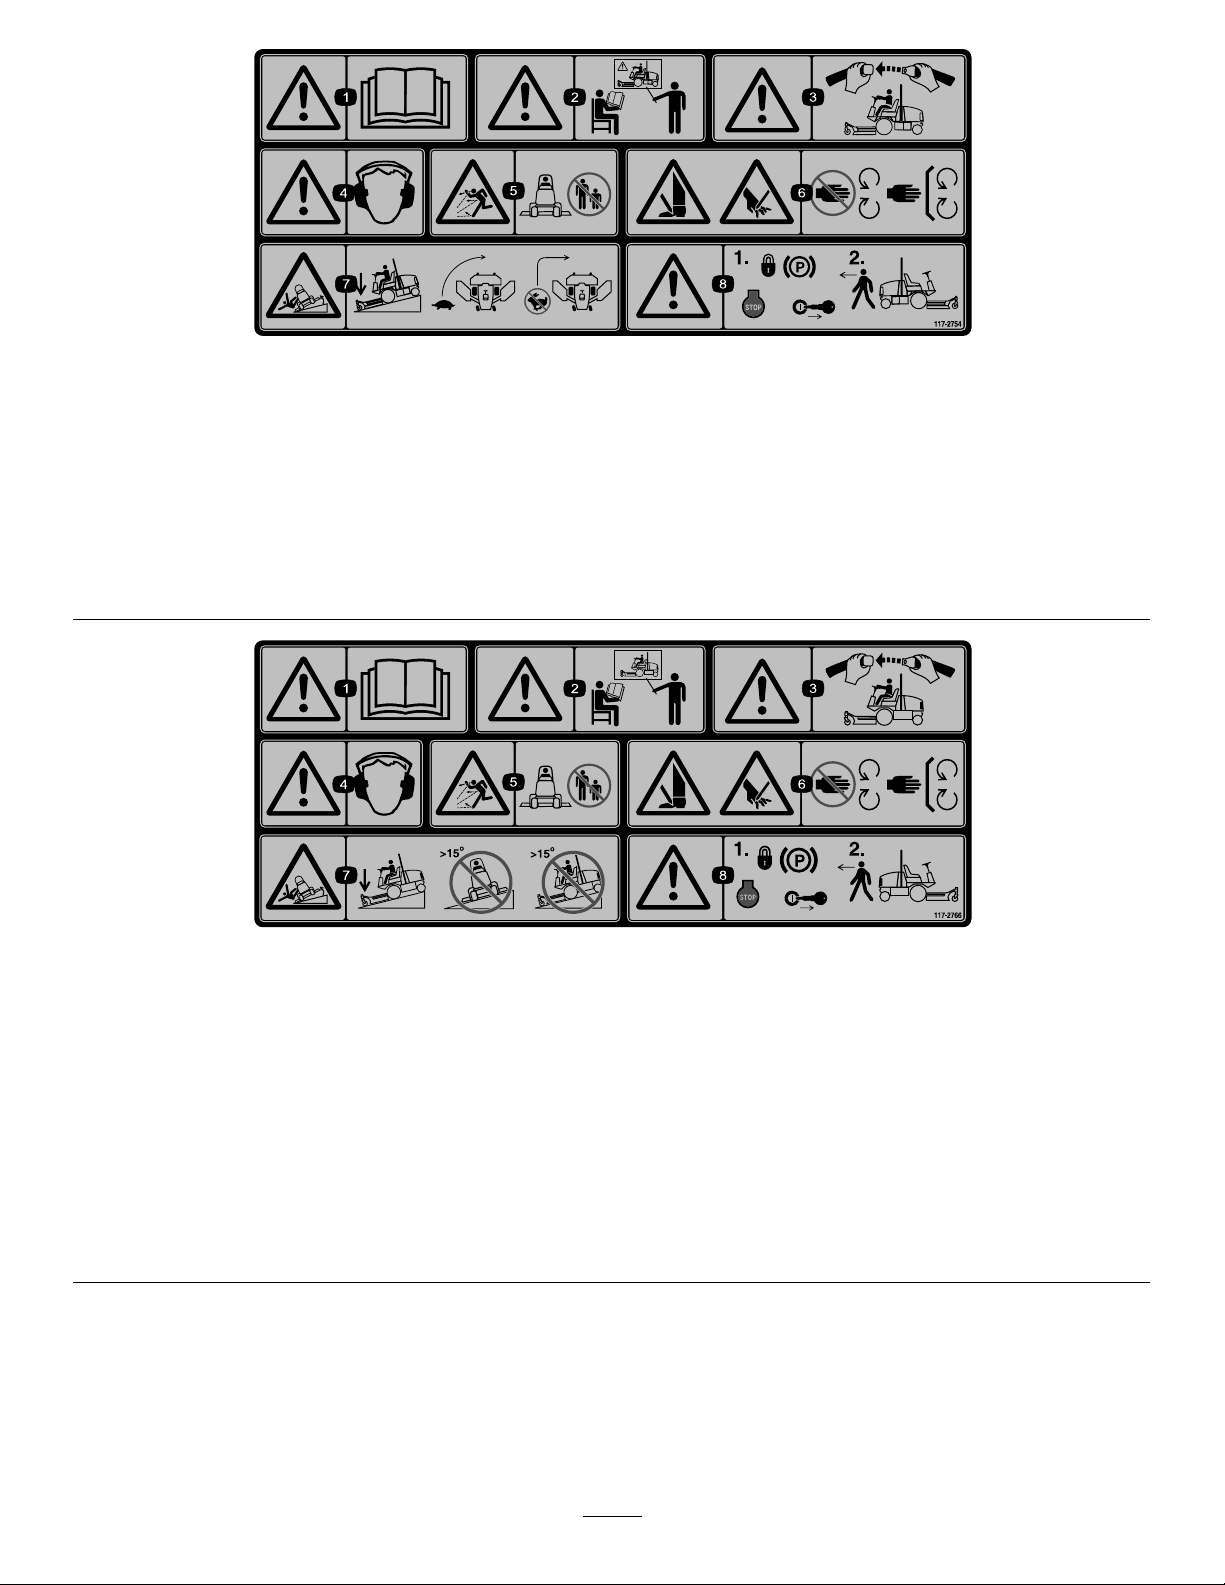
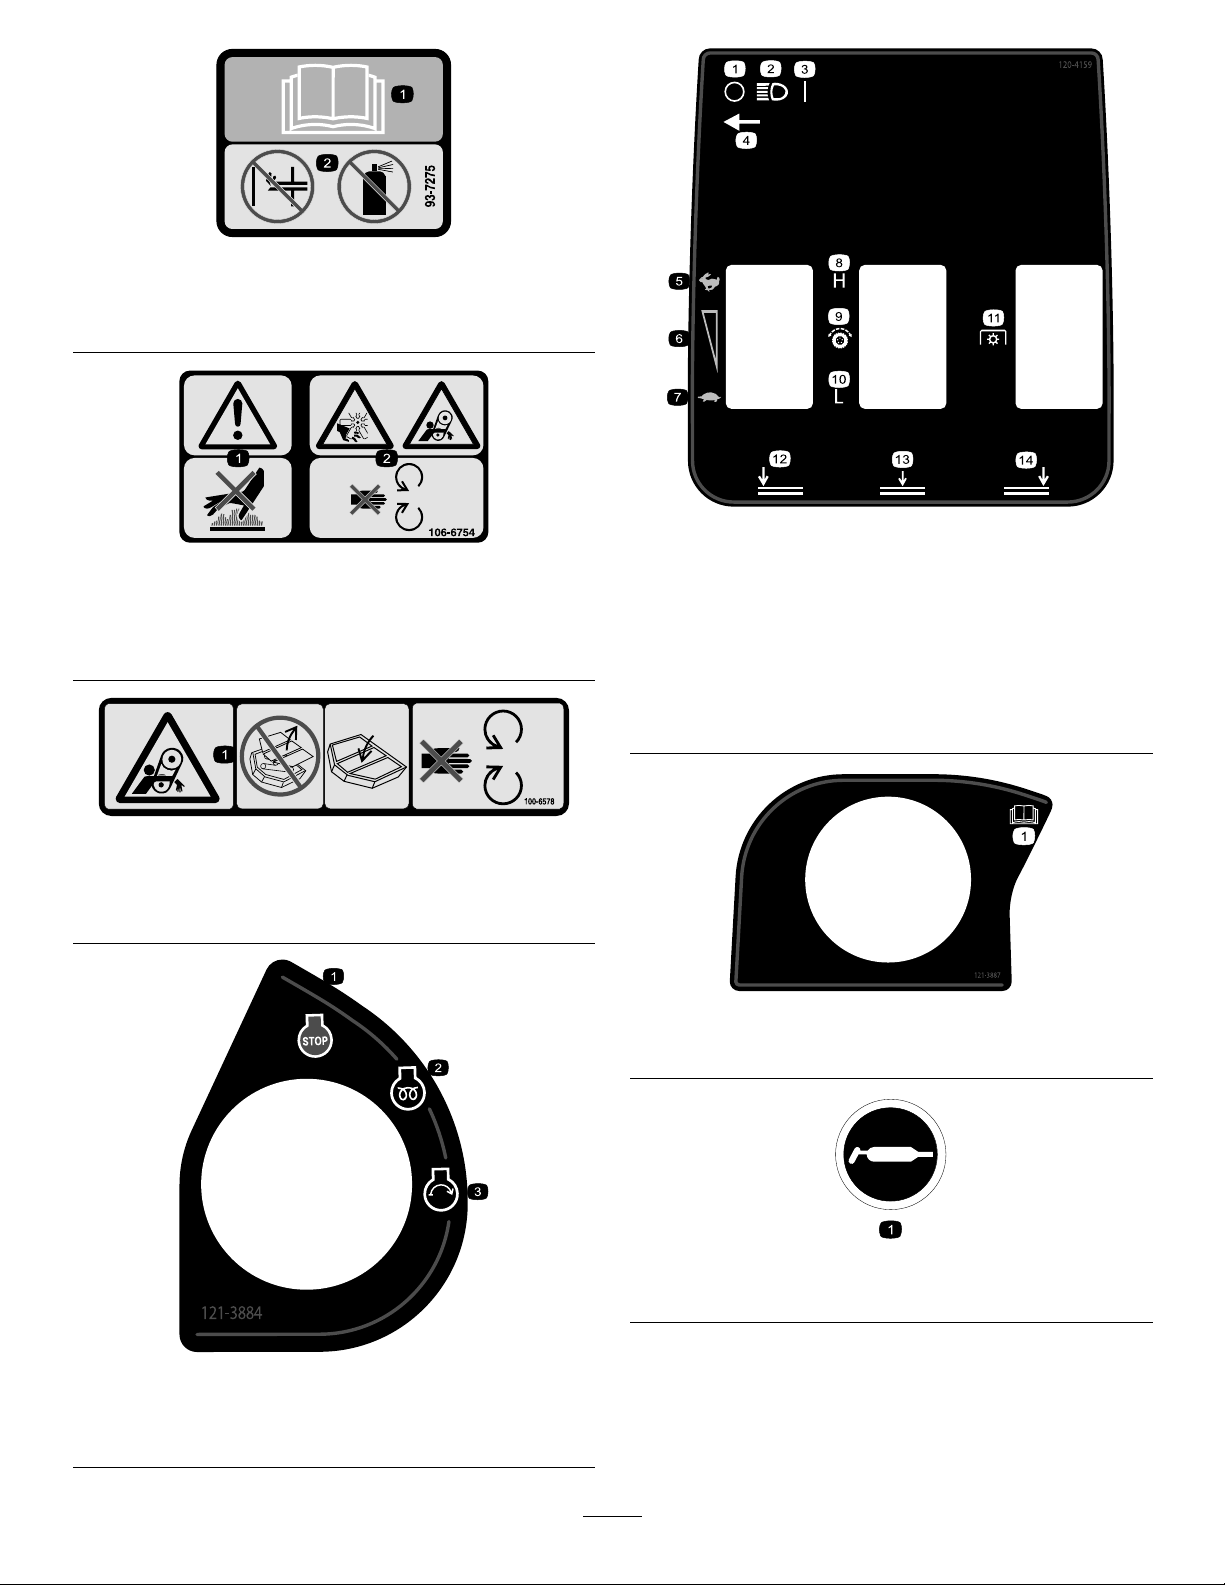
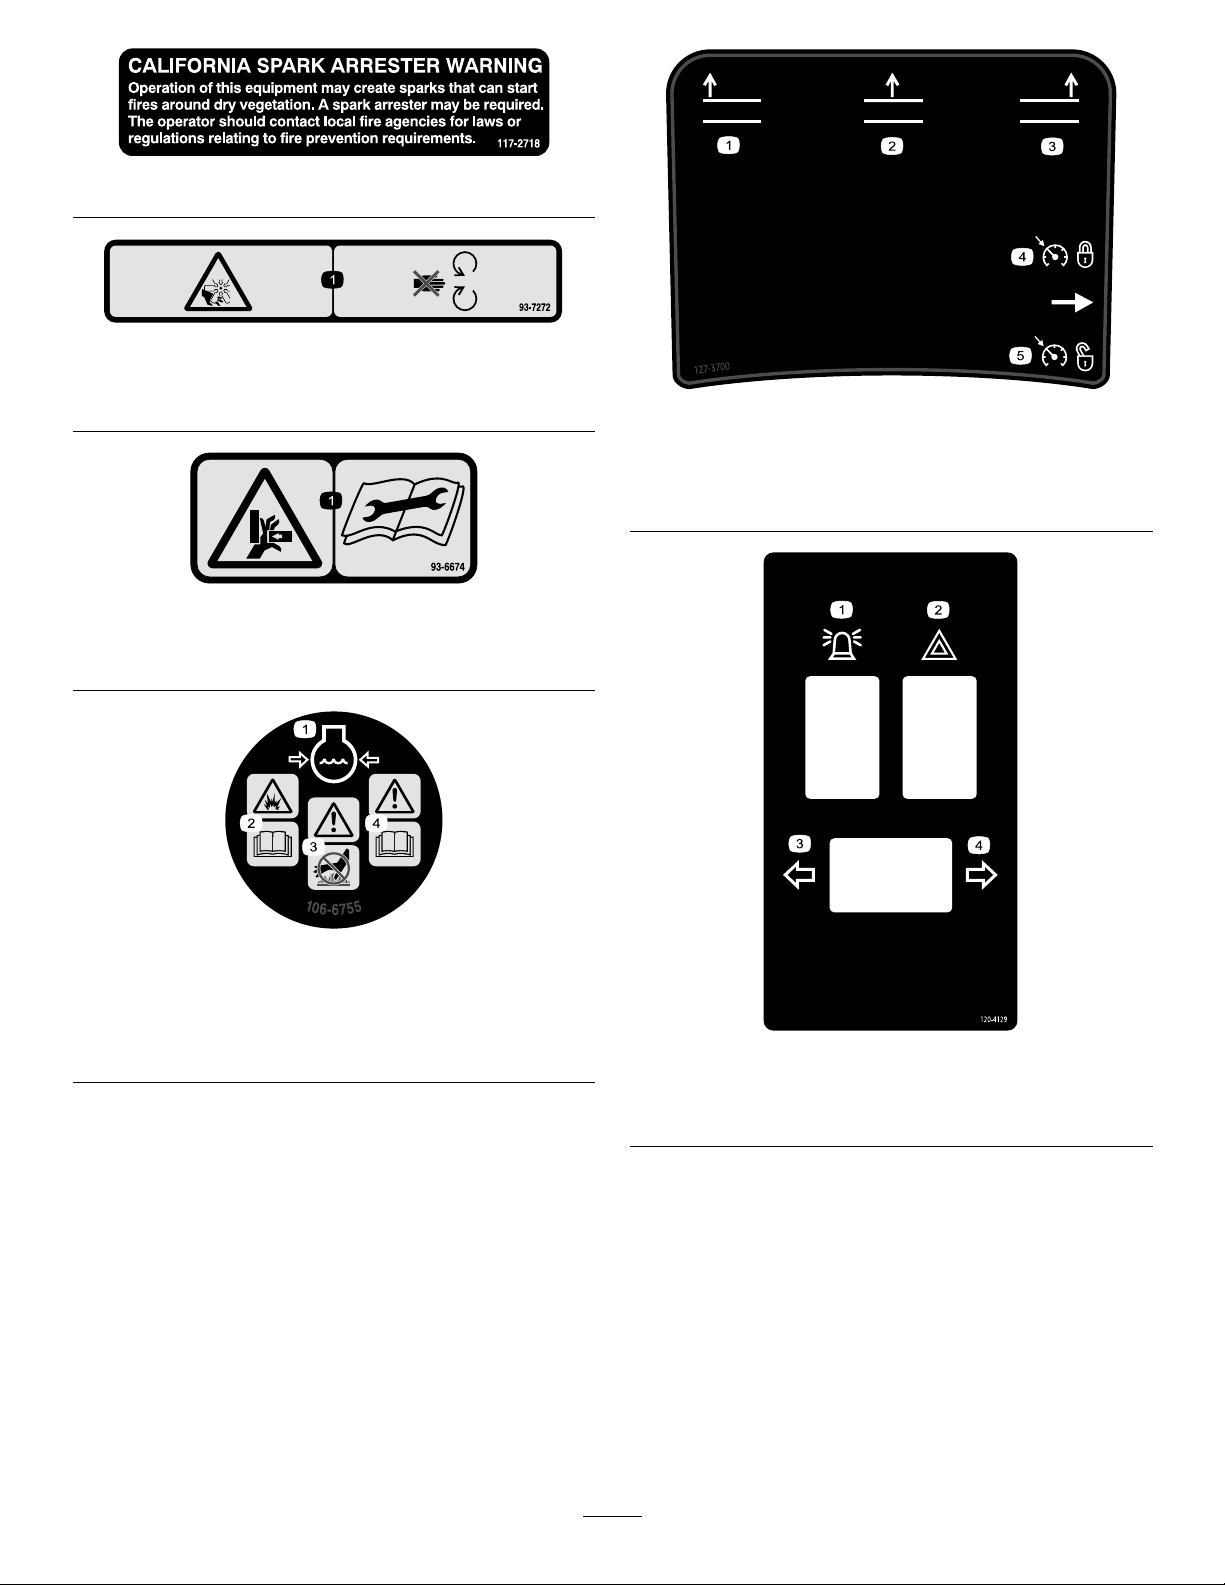
SafetyandInstructionalDecals.................................6
Setup...........................................................................15
1GreasingtheMachine...........................................15
2ReplacingtheWarningDecal.................................15
3CheckingtheTirePressure....................................15
4CheckingtheFluidLevels.....................................16
ProductOverview.........................................................16
Controls...............................................................16
MachineControls...............................................16
CabControls......................................................18
Specications........................................................20
Attachments/Accessories........................................21
BeforeOperation......................................................22
BeforeOperationSafety..........................................22
CheckingtheEngine-OilLevel.................................23
CheckingtheCoolingSystem...................................23
CheckingtheHydraulicSystem................................23
DrainingtheWaterSeparator...................................23
FillingtheFuelTank...............................................23
CheckingtheTirePressure......................................24
CheckingtheTorqueoftheWheel-Lug
Nuts.................................................................24
AdjustingtheMirrors..............................................25
AimingtheHeadlights............................................25
AdjustingtheHeight-of-Cut....................................25
AdjustingtheSkids.................................................27
AdjustingtheMower-DeckRollers...........................27
AdjustingtheBlade.................................................28
CorrectingaMismatchBetweenMower
Decks................................................................28
CheckingtheSafety-InterlockSwitches......................30
UsingtheInfoCenterControl..................................30
DuringOperation.....................................................34
DuringOperationSafety.........................................34
StartingandShuttingOfftheEngine.........................35
UnderstandingSmartPower™Traction....................36
ReversingtheFanOperation....................................36
UnderstandingtheAutoIdle....................................36
UsingtheCruiseControl.........................................36
UsingtheEngine-SpeedSwitch................................36
AdjustingtheMowingSpeed....................................36
AdjustingtheTransportSpeed.................................36
UnderstandingtheOperatingCharacteristicsofthe
Machine............................................................37
OperatingTips......................................................37
AfterOperation........................................................38
AfterOperationSafety............................................38
PushingorTowingtheMachine................................38
LocatingtheJackingPoints......................................39
HaulingtheMachine...............................................39
LocatingtheTie-DownPoints..................................39
Maintenance.................................................................40
RecommendedMaintenanceSchedule(s)......................40
DailyMaintenanceChecklist....................................41
ServiceIntervalChart.............................................42
PremaintenanceProcedures........................................43
Pre-MaintenanceSafety...........................................43
PreparingtheMachineforMaintenance.....................43
RemovingtheHood...............................................43
Lubrication...............................................................44
GreasingtheBearingsandBushings..........................44
EngineMaintenance..................................................46
EngineSafety.........................................................46
ServicingtheAirCleaner.........................................46
CheckingtheEngine-OilLevel.................................47
ChangingtheEngineOilandFilter...........................48
FuelSystemMaintenance...........................................49
ServicingtheFuelSystem........................................49
ServicingtheWaterSeparator...................................49
ElectricalSystemMaintenance....................................50
ElectricalSystemSafety...........................................50
ServicingtheBattery...............................................50
Fuses....................................................................51
DriveSystemMaintenance.........................................52
AdjustingtheTraction-PedalAngle...........................52
CheckingthePlanetary-Gear-DriveOil.....................52
ChangingthePlanetary-Gear-DriveOil.....................52
CheckingtheRear-AxleLubricant.............................53
CheckingtheRear-Axle-GearboxLubricant...............53
ChangingtheRear-AxleLubricant............................53
CheckingtheRearWheelToe-In..............................54
ChangingtheFrontTires.........................................54
CoolingSystemMaintenance......................................55
CoolingSystemSafety.............................................55
CheckingtheCoolingSystem...................................55
ServicingtheEngine-CoolingSystem........................55
BrakeMaintenance....................................................56
AdjustingtheServiceBrakes....................................56
BeltMaintenance......................................................57
ServicingtheAlternatorBelt....................................57
ServicingtheAirConditionerCompressor
Belt...................................................................57
TensioningtheBlade-DriveBelts..............................57
ReplacingtheBlade-DriveBelt.................................57
HydraulicSystemMaintenance....................................58
HydraulicSystemSafety..........................................58
CheckingtheHydraulicFluid...................................58
ChangingtheHydraulicFluid...................................59
ReplacingtheHydraulicFilters.................................60
CheckingtheHydraulicLinesandHoses....................60
AdjustingtheCounterbalancePressure......................61
MowerMaintenance...................................................61
Pivoting(Tilting)theCenterMowerDecktothe
UprightPosition.................................................61
PivotingtheCenterMowerDeckDown.....................62
AdjustingtheMower-DeckPitch..............................62
ServicingtheCaster-ArmBushings...........................63
ServicingtheCasterWheelsandBearings...................63
3

ReplacingtheMower-Deck-HingeCovers.................64
BladeMaintenance.....................................................65
BladeSafety...........................................................65
CheckingforaBentBlade........................................65
RemovingandInstallingtheMowerBlade(s)..............65
InspectingandSharpeningtheMower
Blade(s).............................................................65
CorrectingaMower-DeckMismatch.........................66
CabMaintenance.......................................................67
PressureWashingtheCab........................................67
CleaningtheCab-AirFilters.....................................68
CleaningtheAir-ConditioningCoil..........................68
Storage........................................................................69
PreparingforSeasonalStorage.................................69
Safety
ThismachinehasbeendesignedinaccordancewithEN
ISO5395:2013andANSIB71.4-2012.
Improperuseormaintenancebytheoperatoror
ownercanresultininjury.Toreducethepotential
forinjury,complywiththesesafetyinstructionsand
alwayspayattentiontothesafetyalertsymbol,which
meansCaution,Warning,orDanger—personalsafety
instruction.Failuretocomplywiththeinstructionmay
resultinpersonalinjuryordeath.
GeneralSafety
Thisproductiscapableofamputatinghandsandfeetand
ofthrowingobjects.Alwaysfollowallsafetyinstructionsto
avoidseriouspersonalinjury.
Usingthisproductforpurposesotherthanitsintendeduse
couldprovedangeroustoyouandbystanders.
•ReadandunderstandthecontentsofthisOperator’sManual
beforeyoustarttheengine.Ensurethateveryoneusing
thisproductknowshowtouseitandunderstandsthe
warnings.
•Donotputyourhandsorfeetnearmovingcomponents
ofthemachine.
•Donotoperatethemachinewithoutallguardsandother
safetyprotectivedevicesinplaceandworkingonthe
machine.
•Keepclearofanydischargeopening.Keepbystandersa
safedistancefromthemachine.
•Keepchildrenoutoftheoperatingarea.Neverallow
childrentooperatethemachine.
•Stopthemachineandshutofftheenginebeforeservicing,
fueling,oruncloggingthemachine.
Improperlyusingormaintainingthismachinecanresult
ininjury.Toreducethepotentialforinjury,complywith
thesesafetyinstructionsandalwayspayattentiontothe
safety-alertsymbol,whichmeansCaution,Warning,or
Danger—personalsafetyinstruction.Failuretocomplywith
theseinstructionsmayresultinpersonalinjuryordeath.
Youcanndadditionalitemsofsafetyinformationintheir
respectivesectionsthroughoutthismanual.
4

SoundPowerLevel
Thisunithasaguaranteedsoundpowerlevelof104dBA,
whichincludesanUncertaintyValue(K)of1dBA.
Soundpowerlevelwasdeterminedaccordingtothe
proceduresoutlinedinISO11094.
SoundPressureLevel
Thisunithasasoundpressurelevelattheoperator’searof85
dBA,whichincludesanUncertaintyValue(K)of1dBA.
Soundpressurelevelwasdeterminedaccordingtothe
proceduresoutlinedinENISO5395:2013.
VibrationLevel
Hand-Arm
Measuredvibrationlevelforrighthand=1.1m/s2
Measuredvibrationlevelforlefthand=1m/s2
UncertaintyValue(K)=0.5m/s2
Measuredvaluesweredeterminedaccordingtotheprocedures
outlinedinENISO5395:2013.
WholeBody
Measuredvibrationlevel=0.29m/s2
UncertaintyValue(K)=0.5m/s2
Measuredvaluesweredeterminedaccordingtotheprocedures
outlinedinENISO5395:2013.
EngineEmissionCertication
TheengineinthismachineisEUstage3acompliant.
5

SafetyandInstructionalDecals
Safetydecalsandinstructionsareeasilyvisibletotheoperatorandarelocatednearanyareaofpotential
danger.Replaceanydecalthatisdamagedorlost.
93-7818
1.Warning—readtheOperator'sManualforinstructionson
torquingthebladebolt/nutto115-149N-m(85-110ft-lb).
100-5622
1.Height-of-cutadjustment
100-5623
1.Lowheight-of-cut
adjustment
2.Highheight-of-cut
adjustment
106-4250
1.Height-of-cut
106-4251
1.Height-of-cut
104-3579
1.Lowheight-of-cut
adjustment
2.Highheight-of-cut
adjustment
6

117–2754
1.Warning—readtheOperator'sManual.
2.Warning—donotoperatethismachineunlessyouaretrained.
3.Warning—weartheseatbeltwhenseatedintheoperator'sposition.
4.Warning—wearhearingprotection.
5.Thrownobjecthazard—keepbystandersasafedistancefromthemachine.
6.Cuttinghazardofhandorfoot—stayawayfrommovingparts;keepallguardsinplace.
7.Tippinghazard—lowerthecuttingunitwhendrivingdownslopes;slowmachinebeforeturning,donotturnathighspeeds
8.Warning—locktheparkingbrake,shutofftheengineandremovetheignitionkeybeforeleavingthemachine.
117–2766
(Afxoverpartno.117–2754forCE*)
*ThissafetydecalincludesaslopewarningrequiredonthemachineforcompliancetotheEuropeanLawnMowerSafetyStandardEN836:1997.Theconservativemaximum
slopeanglesindicatedforoperationofthismachineareprescribedbyandrequiredbythisstandard.
1.Warning—readtheOperator'sManual.
2.Warning—donotoperatethismachineunlessyouaretrained.
3.Warning—weartheseatbeltwhenseatedintheoperator'sposition.
4.Warning—wearhearingprotection.
5.Thrownobjecthazard—keepbystandersasafedistancefromthemachine.
6.Cuttinghazardofhandorfoot—stayawayfrommovingparts;keepallguardsinplace.
7.Tippinghazard—lowerthecuttingunitwhendrivingdownslopes;donotoperatemachineonslopesgreaterthan15degrees.
8.Warning—locktheparkingbrake,shutofftheengineandremovetheignitionkeybeforeleavingthemachine.
7

93-7275
1.ReadtheOperator'sManual.
2.Donotusestartingaids.
106-6754
1.Warning—donottouchthehotsurface.
2.Cutting/dismembermenthazard,fanandentanglement
hazard,belt—stayawayfrommovingparts.
100-6578
1.Entanglementhazard,belt—donotoperatethemachine
withtheshieldsorguardsremoved;alwayskeeptheshields
andguardsinplace;stayawayfrommovingparts.
121–3884
1.Engine—shutoff3.Engine—start
2.Engine—preheat
120–4159
1.Off8.High
2.Lights9.Tractiondrive
3.On10.Low
4.Lightswitchlocation11.Powertake-off(PTO)
5.Fast12.Lowerleftdeck
6.Variable-speedadjustment13.Lowercenterdeck
7.Slow14.Lowerrightdeck
121–3887
1.ReadtheOperator’sManual.
58-6520
1.Grease
8

117–2718
93-7272
1.Cutting/dismembermenthazard;fan—stayawayfrom
movingparts.
93-6674
1.Crushinghazard,hand—readtheinstructionsbefore
servicingorperformingmaintenance.
106-6755
1.Enginecoolantunder
pressure.
3.Warning—donottouchthe
hotsurface.
2.Explosionhazard—read
theOperator'sManual.
4.Warning—readthe
Operator'sManual.
127–3700
1.Raiseleftdeck4.Lockenginespeed
2.Raisecenterdeck5.Unlockenginespeed
3.Raiserightdeck
120–4129
1.Beacon3.Leftturnsignal
2.Hazardlight4.Rightturnsignal
9

120–4130
1.ReadtheOperator’s
Manual.
3.Parkingbrake
2.Toengagetheparking
brake—1)Lockthepedals
together;2)Pushdownon
thebrake;3)Pulloutthe
parkingbrakeknob.
4.Todisengagetheparking
brake,pushdownonthe
brakepedal.
121–1599
1.ReadtheOperator’sManualforinformationonfuses.
114–0849
1.Warning—1)Disengage
thePTO;2)Raisethedeck
4.Forwarddirection
2.Donotplaceyourfoot
here.
5.Reversedirection
3.Directionpedal
114–0845
1.Steering-wheel-tiltlever2.Horn
10

114–0846
1.ReadtheOperator’s
Manualforinformationon
startingtheengine—1)Set
toneutral;2)Engagethe
brake;3)Settheengine
speedtoslow;4)Turnthe
ignitionkeytopreheat;5)
Turntheignitionkeyto
enginestart.
4.Pulltheknoboutto
engagethePTO.
2.ReadtheOperator’s
Manualforinformationon
shuttingofftheengine—1)
Settheenginespeedto
slow;2)Disengagethe
deck;3)Locktheparking
brake;4)Wait5minutes;
5)Turntheignitionkeyto
enginestop;6)Remove
thekeyfromtheignition.
5.Pushtheknobinto
disengagethePTO.
3.ReadtheOperator’s
Manual.
6.RaisethedeckstogotoH
range.
BatterySymbols
Someorallofthesesymbolsareonyourbattery
1.Explosionhazard6.Keepbystandersasafe
distancefromthebattery.
2.Nore,opename,or
smoking
7.Weareyeprotection;
explosivegasescan
causeblindnessandother
injuries
3.Causticliquid/chemical
burnhazard
8.Batteryacidcancause
blindnessorsevereburns.
4.Weareyeprotection.9.Flusheyesimmediately
withwaterandgetmedical
helpfast.
5.ReadtheOperator's
Manual.
10.Containslead;donot
discard
120-6604
1.Thrownobjecthazard—keepbystandersawayfromthe
machine.
2.Cutting/dismembermenthazardofhand,mower
blade—stayawayfrommovingparts;keepallguardsand
shieldsinplace.
3.Cutting/dismembermenthazardoffoot,mowerblade—stay
awayfrommovingparts;keepallguardsandshieldsin
place.
11

121-8378
1.Fan—off3.Coldair5.Externalair7.Airconditioner—on(If
equipped)
2.Fan—onfull4.Hotair6.Internalair8.Airconditioner—off(If
equipped)
125-9688
1.Windshieldwipers—off3.Windshieldwipers—on
2.Windshieldwipers4.Spraywindshield-washer
uid
12

130-0594
1.Warning—readtheOperator’sManual;whensittinginthe
cab,alwayswearaseatbelt;wearhearingprotection.
130-0611
1.Warning—1)Removethepin;2)Raisethedoors;3)Exit
thecab.
130-5355
1.Closetherearwindow.2.Raisethehood.
130-5357
1.Pushforwardtomove
forward.
2.Pushbacktoreverse.
130-5733
1.Attention;readtheOperator'sManual—1)Removethe
optionaltrashbag;2)Tilttheseatforward.
130-5980
1.Attention;readtheOperator'sManual—T oleavethe
machine:1)Lowerthecuttingdeck;2)Leavethemachine.
132-3600
1.ReadtheOperator's
Manualformore
informationonfuses.
5.Workinglight—20A
2.Headlight—25A6.Auxiliarypower—15A
3.CondenserfanandA/C
clutch—30A
7.Cablight—15A
4.Fan—25A8.Windshieldwipers—15A
13

GROUNDS MASTER 4110, MODEL 30643 & 30644
QUICK REFERENCE AID
SPE CIFICATIO NS /CHANG E INTER VALS
S EE O P ERATOR ’S
MANUAL FOR
INITIAL CHANGES .
ENGINE OIL
HYDRAULIC FLUID
HYDRAULIC BREATHER
P RIMARY AIR FILTER
S AFETY AIR FILTE R
FUEL
S YS TEM
ENGINE COOLANT
> 32 F
< 32 F
FLUID TYP E
15W-40, CI-430643
30644
30643
30644
15W-40, CJ -4
IS O VG 46/68
50% WATER
50% ETHYL GLYCOL
NO. 2 DIESEL
NO. 1 DIESEL
CAPACITY
6QUARTS
7.75 GALLONS
14.5 QUARTS
21 GALLONS
80 OUNCES
CHANGE INTERVAL
250 HOURS
800 HOURS
800 HRS /YRLY
DRAIN & FLUSH
EVERY 2 YRS.
800 HOURS
DRAIN/FLUSH
800 HOURS
800 HOURS
250 HOURS
800 HOURS
SEE S E RVICE
INDICATOR
S EE O P ER ATOR'S
MANUAL
40 0 HOURS /
YEARLY
FILTER
P ART NO .
125-7025
75-1310
94-2621
115-9793
108-3814
108-3816
110-9049
125-2915
125-8752
FLUID FILTER
A
B
C
F
D
G
G
I
H
E
REAR AXLE
P LANETARY DR IVE
85W-140
85W-140
22 OUNCES
BREATHER
110-4812
1. ENGINE O IL LE VEL
2. HYDR AULIC FLUID LEVEL
3. ENGINE COOLANT LEVEL
4. FUEL - DIES EL ONLY
5. F UEL/WATE R S EP ARATO R
6. FAN BELT TENSION
7. R ADIATOR S C RE EN
8. AIR CLEANER
9. BRAKE FUNCTION
10. INTE RLO CK S YS TE M
11.
TIRE P RES SURE - 25 P S I/1.70 BAR
12. GR EAS E P OINTS (4)
S EE OP ER ATOR 'S MANUAL FOR
50 HR INTER VAL G RE AS E P OINTS .
CHECK/S E RVICE (DAILY)
13 0-6048
A
B C
F
D
G
E
1
2
3
5
4
6
7
8
9
11
11
1111
I
H
130–6048
1.ReadtheOperator’sManual.
130–6042(UnderCab)
1.ReadtheOperator’sManual.
14

Setup
LooseParts
Usethechartbelowtoverifythatallpartshavebeenshipped.
ProcedureDescriptionQty.Use
1Nopartsrequired–Greasethemachine.
2Warningdecal1Replacethewarningdecal.
3Nopartsrequired–Checkthetirepressure.
4Nopartsrequired–Checktheuidlevels.
MediaandAdditionalParts
DescriptionQty.Use
Operator'sManual1Reviewbeforeoperatingmachine
Engineowner'sManual1Usetoreferenceengineinformation
PartsCatalog1Usetoreferencepartnumbers
Operatortrainingmaterials1Reviewbeforeoperatingmachine
DeclarationofConformity1
Note:Determinetheleftandrightsidesofthemachine
fromthenormaloperatingposition.
1
GreasingtheMachine
NoPartsRequired
Procedure
Beforeoperatingthemachine,greaseittoensureproper
lubricatingcharacteristics;refertoGreasingtheBearingsand
Bushings(page44).
Important:Failuretoproperlygreasethemachinewill
resultinprematurefailureofcriticalparts.
2
ReplacingtheWarningDecal
ForCEModelsOnly
Partsneededforthisprocedure:
1Warningdecal
Procedure
OnmachinesrequiringEuropeanCEcompliance,replace
thewarningdecalPartNo.117-2754withthewarningdecal
PartNo.117-2766.
15

3
CheckingtheTirePressure
NoPartsRequired
Procedure
Checkthetirepressure;refertoCheckingtheTirePressure
(page24).
Important:Maintainpressureinalltirestoensurea
goodquality-of-cutandpropermachineperformance.
Donotunderinatethetires.
4
CheckingtheFluidLevels
NoPartsRequired
Procedure
1.Checktheengine-oillevel;refertoCheckingthe
Engine-OilLevel(page47).
2.Checkthehydraulicuidlevel;refertoCheckingthe
HydraulicFluid(page58).
3.Checkthecoolingsystem;refertoCheckingthe
CoolingSystem(page55).
4.Checktheplanetary-gear-driveoil;refertoChecking
thePlanetary-Gear-DriveOil(page52).
5.Checktherear-axlelubricant;refertoCheckingthe
Rear-AxleLubricant(page53).
6.Checktherear-axle-gearboxlubricant;referto
CheckingtheRear-Axle-GearboxLubricant(page53).
ProductOverview
Controls
Note:Determinetheleftandrightsidesofthemachine
fromthenormaloperatingposition.
MachineControls
9
10 g020756
Figure3
1.Brakepedals6.Hazard-lightswitch
(optional)
2.Pedal-lockinglatch7.Turn-signalswitch
(optional)
3.Parking-brakelatch8.Hornbutton(optional)
4.Spaceforoptional
accessory
9.Tractionpedal
5.Beaconswitch(optional)10.Tilt-steeringlever
TractionPedal
Tostopthemachine,reduceyourfootpressureonthe
tractionpedalandallowittoreturntothecenterposition
(Figure3).
BrakePedals
Thereare2footpedalsthatoperateindividualwheelbrakes
forturningassistance,parking,andtoaidinbetterside-hill
traction.Alatchconnectsthepedalsforparking-brake
operationandtransport(Figure3).
Pedal-LockingLatch
Thepedal-lockinglatchconnectsthepedalstogetherto
engagetheparkingbrake(Figure3).
Tilt-SteeringLever
Pressthetilt-steeringleverdowntotiltthesteeringwheel
tothedesiredposition,thenreleasethelevertolockthe
adjustment(Figure3).
16

Parking-BrakeLatch
Aknobontheleftsideoftheconsoleactuatesthe
parking-brakelock(Figure3).
Toengagetheparkingbrake,connectthepedalswiththe
lockinglatch,pushdownonbothpedals,andpullthe
parking-brakelatchout.Toreleasetheparkingbrake,press
bothpedalsuntiltheparking-brakelatchretracts.
Hazard-LightSwitch(Optional)
Pressthehazard-lightswitchtoactivatethehazardlights
(Figure3).
Turn-SignalSwitch(Optional)
Presstheleftsideoftheturn-signalswitchtoactivatethe
left-turnsignalandtherightsideoftheswitchtoactivatethe
right-turnsignal(Figure3).
KeySwitch
Thekeyswitch(Figure4)has3positions:OFF,
ON/PREHEAT,andSTART.
g028453
1
2
3
4
5
6
7
Figure4
1.Liftswitches5.High-Lowspeedcontrol
2.PTOswitch6.Engine-speedswitch
3.Keyswitch7.Lightswitch(optional)
4.InfoCenter
Engine-SpeedSwitch
Theengine-speedswitchhas2modestochangetheengine
speed(Figure4).
Bymomentarilytappingtheswitch,youcanincreaseor
decreasetheenginespeedin100-rpmincrements.Whenyou
holdtheswitchdown,theengineautomaticallymovesto
HIGHorLOWIDLE,dependingonwhichswitchyoupress.
PTOSwitch
ThePTOswitchhas2positions:OUT(START)andIN(STOP).
PullthePTObuttonouttoengagethemower-deckblades.
Pushthebuttonintodisengagethemower-deckblades
(Figure4).
LiftSwitches
Theliftswitchesraiseandlowerthemowerdecks(Figure
4).Presstheswitchesforwardtolowerthemowerdecks
andrearwardtoraisethemowerdecks.Whenstartingthe
machine,withthemowerdecksinthedownposition,press
theliftswitchdowntoallowthemowerdeckstooatand
mow .
Note:ThedecksdonotlowerwhileintheHigh-speedrange
andtheydonotraiseorloweriftheoperatorisoutoftheseat
whentheengineisrunning.Also,thedeckslowerwiththe
keyintheONpositionandtheoperatorintheseat.
Cruise-ControlSwitch
Thecruise-controlswitchlocksinthepedalpositionto
maintainthedesiredgroundspeed(Figure5).Pressingthe
rearoftheswitchturnsoffthecruisecontrol,themiddle
positionoftheswitchenablesthecruise-controlfunction,
andthefrontoftheswitchsetsthedesiredgroundspeed.
Note:Pressingeitherbrakepedalormovingthetraction
pedalintotheREVERSEposition,for1second,also
disengagesthepedalposition.
g028454
12
Figure5
1.Power-pointport2.Cruise-controlswitch
Power-PointPort
Thepower-pointportisusedtopoweroptionalelectrical
accessories(Figure5).
17

SeatControls
Seat-AdjustmentLever
Movetheseat-adjustmentleveronthesideoftheseat
outward,slidetheseattothedesiredposition,andreleasethe
levertolocktheseatintoposition(Figure6).
Figure6
1.Weightgauge4.Seat-backadjustment
lever
2.Weight-adjustmentlever5.Armrest-adjustmentknob
(notshown;locatedunder
armrest)
3.Seat-adjustmentlever
Armrest-AdjustmentKnob
Rotatetheknobtoadjustthearmrestangle(Figure6).
Seat-Back-AdjustmentLever
Movethelevertoadjusttheseat-backangle(Figure6).
WeightGauge
Theweightgaugeindicateswhentheseatisadjustedto
theweightoftheoperator(Figure6).Adjusttheheightby
positioningthesuspensionwithintherangeofthegreen
region.
Weight-AdjustmentLever
Usethislevertoadjusttotheproperweightoftheoperator
(Figure6).Pullupthelevertoincreasetheairpressure
andpushdowntodecreasetheairpressure.Theproper
adjustmentiscorrectwhentheweightgaugeisinthegreen
region.
CabControls
1
2
3
4
5
6
7
8g028431
9
Figure7
1.Air-recirculationcontrol5.Poweroutlet
2.Fancontrol6.Lightsswitch
3.Temperaturecontrol7.Flashersswitch
4.Windshield-wiperswitch8.Air-conditioningswitch
AirRecirculationControl
Setsthecabtoeitherrecirculatetheairinthecabinortodraw
airintothecabinfromoutside(Figure7).
•Setittorecirculatetheairwhenusingtheairconditioning.
•Setittodrawairinwhenusingtheheaterorfan.
FanControl
Rotatethefancontrolknobtoregulatethespeedofthefan
(Figure7).
TemperatureControl
Rotatethetemperaturecontrolknobtoregulatetheair
temperatureinthecab(Figure7).
WindShieldWiperSwitch
Usethisswitchtoturnthewindshieldwipersonoroff
(Figure7).
PowerOutlet
Usethis15A,12VDCpoweroutlettopowercompatible
devices(Figure7).
LightsSwitch
Usethisswitchtoturntheheadlightsandtaillightonoroff
(Figure7).
FlashersSwitch
Usethisswitchtoturntheashers(hazardlights)onoroff
(Figure7).
18

Air-ConditioningSwitch
Usethisswitchtoturntheairconditioningonoroff(Figure
7).
WindShieldLatch
Liftupthelatchestoopenthewindshield(Figure8).Pressin
thelatchtolockwindshieldtotheOPENposition.Pullout
anddownonthelatchtocloseandsecurethewindshield.
Figure8
1.Windshieldlatch
RearWindowLatch
Liftupthelatchestoopentherearwindow .Pressinthelatch
tolockthewindowintheOPENposition.Pulloutanddown
onthelatchtocloseandsecurethewindow(Figure8).
Important:Youmustclosetherearwindowbefore
openingthehoodordamagetothehoodorwindowmay
occur.
19

Specications
Figure9
20
This manual suits for next models
1
Table of contents
Other Toro Lawn Mower manuals

Toro
Toro 30381 User manual

Toro
Toro TurfMaster HDX 22215 User manual

Toro
Toro GroundsmasterR 4300-D User manual

Toro
Toro 30252 User manual

Toro
Toro 74741 User manual

Toro
Toro 30555 User manual

Toro
Toro Super Recycler 20383 User manual

Toro
Toro Groundsmaster 30689 User manual

Toro
Toro 73570 Manual

Toro
Toro Recycler 20655 User manual