Toro VR-2650 User manual

FormNo.3382-922RevA
VR-2650,VR-3100,andVR-3500
RammerCompactor
ModelNo.68034—SerialNo.313000001andUp
ModelNo.68035—SerialNo.313000001andUp
ModelNo.68036—SerialNo.313000001andUp
Registeratwww.Toro.com.
OriginalInstructions(EN)*3382-922*A

WARNING
CALIFORNIA
Proposition65Warning
Thisproductcontainsachemicalorchemicals
knowntotheStateofCaliforniatocausecancer,
birthdefects,orreproductiveharm.
Theengineexhaustfromthisproduct
containschemicalsknowntotheStateof
Californiatocausecancer,birthdefects,
orotherreproductiveharm.
ThissparkignitionsystemcomplieswithCanadianICES-002.
Becauseinsomeareastherearelocal,state,orfederal
regulationsrequiringthatasparkarresterbeusedonthe
engineofthismachine,asparkarresterisavailableas
anoption.Ifyourequireasparkarrester,contactyour
AuthorizedToroServiceDealer.
GenuineTorosparkarrestersareapprovedbytheUSDA
ForestryService.
Important:ItisaviolationofCaliforniaPublic
ResourceCodeSection4442touseoroperatetheengine
onanyforest-covered,brush-covered,orgrass-covered
landwithoutasparkarrestermufermaintainedin
workingorder,ortheengineconstricted,equipped,and
maintainedforthepreventionofre.Otherstatesor
federalareasmayhavesimilarlaws.
Theenclosed
Engine Owner's Man ual
issuppliedfor
informationregardingtheUSEnvironmentalProtection
Agency(EPA)andtheCaliforniaEmissionControl
Regulationofemissionsystems,maintenance,and
warranty.Replacementsmaybeorderedthroughthe
enginemanufacturer.
Introduction
Thismachineisdesignedtocompactawidearrayofsoil
substances,includinglumpsofclay,silt,gravel,sand,loam,
andothergranularobjects.
Readthisinformationcarefullytolearnhowtooperateand
maintainyourproductproperlyandtoavoidinjuryand
productdamage.Youareresponsibleforoperatingthe
productproperlyandsafely.
YoumaycontactTorodirectlyatwww .Toro.comforproduct
andaccessoryinformation,helpndingadealer,ortoregister
yourproduct.
Wheneveryouneedservice,genuineToroparts,oradditional
information,contactanAuthorizedServiceDealerorToro
CustomerServiceandhavethemodelandserialnumbersof
yourproductready.Figure1illustratesthelocationofthe
modelandserialnumbersontheproduct.Writethenumbers
inthespaceprovided.
G022333
1
Figure1
1.Modelandserialnumberplate
ModelNo.
SerialNo.
Thismanualidentiespotentialhazardsandhassafety
messagesidentiedbythesafetyalertsymbol(Figure2),
whichsignalsahazardthatmaycauseseriousinjuryordeath
ifyoudonotfollowtherecommendedprecautions.
©2013—TheToro®Company
8111LyndaleAvenueSouth
Bloomington,MN554202
Contactusatwww.Toro.com.
PrintedintheUSA
AllRightsReserved

Figure2
1.Safetyalertsymbol
Thismanualuses2wordstohighlightinformation.
Importantcallsattentiontospecialmechanicalinformation
andNoteemphasizesgeneralinformationworthyofspecial
attention.
Contents
Introduction..................................................................2
Safety...........................................................................3
SafeOperatingPractices...........................................3
SafetyandInstructionalDecals.................................5
ProductOverview..........................................................6
Controls................................................................6
Specications.........................................................8
Operation.....................................................................8
PreparingtoUsetheMachine....................................8
AddingFuel............................................................8
CheckingtheEngine-oilLevel..................................10
CheckingtheSpring-housingOil..............................11
StartingandStoppingtheEngine..............................11
TransportingtheMachine........................................12
OperatingTips......................................................12
Maintenance.................................................................13
RecommendedMaintenanceSchedule(s)......................13
PremaintenanceProcedures........................................13
DisconnectingtheSpark-plugWire...........................14
EngineMaintenance..................................................14
ServicingtheAirCleaner.........................................14
ServicingtheEngineOil..........................................16
ServicingtheSpring-housingOil..............................17
ServicingtheSparkPlug..........................................18
CompactorShoeMaintenance.....................................19
CheckingtheCompactorShoe.................................19
Cleaning...................................................................19
RemovingDebrisfromtheMachine..........................19
Storage........................................................................20
............................................................................20
RemovingtheMachinefromStorage.........................20
Troubleshooting...........................................................21
Safety
Improperlyusingormaintainingthemachinecanresult
ininjury.Toreducethepotentialforinjury,complywith
thesesafetyinstructionsandalwayspayattentiontothe
safetyalertsymbol,whichmeans:
Caution
,
W ar ning
,
or
Danger
—personalsafetyinstruction.Failureto
complywiththeinstructionmayresultinpersonalinjury
ordeath.
SafeOperatingPractices
Thisproductiscapableofcausingseriousinjury.Always
followallsafetyinstructionstoavoidseriousinjuryordeath.
WARNING
Engineexhaustcontainscarbonmonoxide,an
odorless,deadlypoisonthatcankillyou.
Donotruntheengineindoorsorinanenclosed
area.
Training
•ReadtheOperator'sManualandothertrainingmaterial.If
theoperator(s)ormechanic(s)cannotreadorunderstand
theinformation,itistheowner'sresponsibilitytoexplain
thismaterialtothem.
•Becomefamiliarwiththesafeoperationoftheequipment,
operatorcontrols,andsafetysigns.
•Alloperatorsandmechanicsshouldbetrained.The
ownerisresponsiblefortrainingtheusers.
•Neverletchildrenoruntrainedpeopleoperateorservice
theequipment.Localregulationsmayrestricttheageof
theoperator.
•Theowner/usercanpreventandisresponsiblefor
accidentsorinjuriesoccurringpeopleordamageto
property.
Preparation
•Wearappropriateclothingincludinghardhat,faceshield,
safetyglasses,longpants,steel-toeshoes,andhearing
protection.Longhair,looseclothing,orjewelrymayget
tangledinmovingparts.
•Inspecttheareawheretheequipmentistobeusedand
removeallobjectssuchasrocks,toys,andwirewhichcan
bethrownbythemachine.
•Useextracarewhenhandlinggasolineandotherfuels.
Theyareammableandvaporsareexplosive.
–Useonlyanapprovedcontainer
–Neverremovethegascaporaddfuelwiththeengine
running.Allowtheenginetocoolbeforerefueling.
Donotsmoke.
–Neverfuelordrainthemachineindoors.
3

Operation
•Neverrunanengineinanenclosedarea.
•Onlyoperateingoodlight,keepingawayfromholesand
hiddenhazards.
•Usecarewhenloadingorunloadingthemachineintoa
trailerortruck.
•Neverliftthemachineonyourown.Makesuretohaveat
leasttwopersonstoliftthemachine.
•Besurethatalldrivesareintheslowpositionbefore
startingtheengine.Starttheenginefromtheoperator's
positiononly.
•Donotchangetheenginegovernorsettingoroverspeed
theengine.
•Keephandsandfeetawayfromtheshoeofthe
compactor.
•Lookbehindanddownbeforebackinguptobesureof
aclearpath.
•Donotoperatethemachineundertheinuenceof
alcoholordrugs.
•Usecarewhenapproachingblindcornersorobjectsthat
mayobscurevision.
•Ensurethattheareaisclearofotherpeoplebefore
operatingthemachine.Stopthemachineifanyoneenters
thearea.
•Neverleavearunningmachineunattended.Alwaysstop
theengineandverifythatthecompactingshoehasbeen
completelystopped.
•Neverjerkthecontrols;useasteadymotion.
•Watchfortrafcwhenoperatingnearroadways.
•Donottouchpartswhichmaybehotfromoperation.
Allowthemtocoolbeforeattemptingtomaintain,adjust,
orservicethemachine.
•Lightningcancausesevereinjuryordeath.Iflightning
isseenorthunderisheardinthearea,donotoperate
themachine;seekshelter.
•Tominimizefuelandoilleakage,transportthemachine
eitheruprightortippedforward,nottippedtotheside.
Beforetransportingthemachine,ensurethattheengine
on/offswitchisinthestopposition.
•Useproperlyratedstrapsorchainstosecurethemachine
beforetransportingit.
MaintenanceandStorage
•Stoptheengine.Waitforallmovementtostopbefore
adjusting,cleaning,orrepairingthemachine.
•Ensurethattheengineon/offswitchisinthestop
positionbeforestoringthemachineorperforming
maintenance.
•Cleandebrisfromthedrives,mufer,andenginetohelp
preventres.Cleanupoilorfuelspillage.
•Lettheenginecoolbeforestoringanddonotstoreneara
ame.
•Donotstorefuelnearamesordrainfuelfromthe
machineindoors.
•Parkthemachineonlevelground.Neverallowuntrained
personneltoservicethemachine.
•Carefullyreleasepressurefromcomponentswithstored
energy.
•Removethesparkplugwirebeforemakinganyrepairs.
•Keephandsandfeetawayfrommovingparts.Ifpossible,
donotmakeadjustmentswiththeenginerunning.
•Keepallpartsingoodworkingconditionandallhardware
tightened.Replaceallwornordamageddecals.
•Keepnutsandboltstight.Keepequipmentingood
condition.
•Nevertamperwithsafetydevices.
•Keepthemachinefreeofdebrisbuildup.Cleanupoilor
fuelspillage.Allowthemachinetocoolbeforestoringit.
•Useextracarewhenhandlinggasolineandotherfuels.
Theyareammableandvaporsareexplosive.
–Useonlyanapprovedcontainer.
–Neverremovethefuelcaporaddfuelwhenthe
engineisrunning.Allowtheenginetocoolbefore
fueling.Donotsmoke.
–Neverfuelthemachineindoors.
–Neverstorethemachineorfuelcontainerinside
wherethereisanopename,suchasnearawater
heaterorfurnace.
–Neverllacontainerwhileitisinsideavehicle,trunk,
pick-upbed,oranysurfaceotherthantheground.
–Keepthefuel-containernozzleincontactwiththe
tankduringlling.
•Stopandinspectthemachineifyoustrikeanobject.Make
anynecessaryrepairsbeforestartingtheengineagain.
•UseonlygenuineTororeplacementpartstoensurethat
originalstandardsaremaintained.
•Tominimizefuelandoilleakage,donotlaythemachine
ontotherightorleftside.
•Storethemachineupright.
4
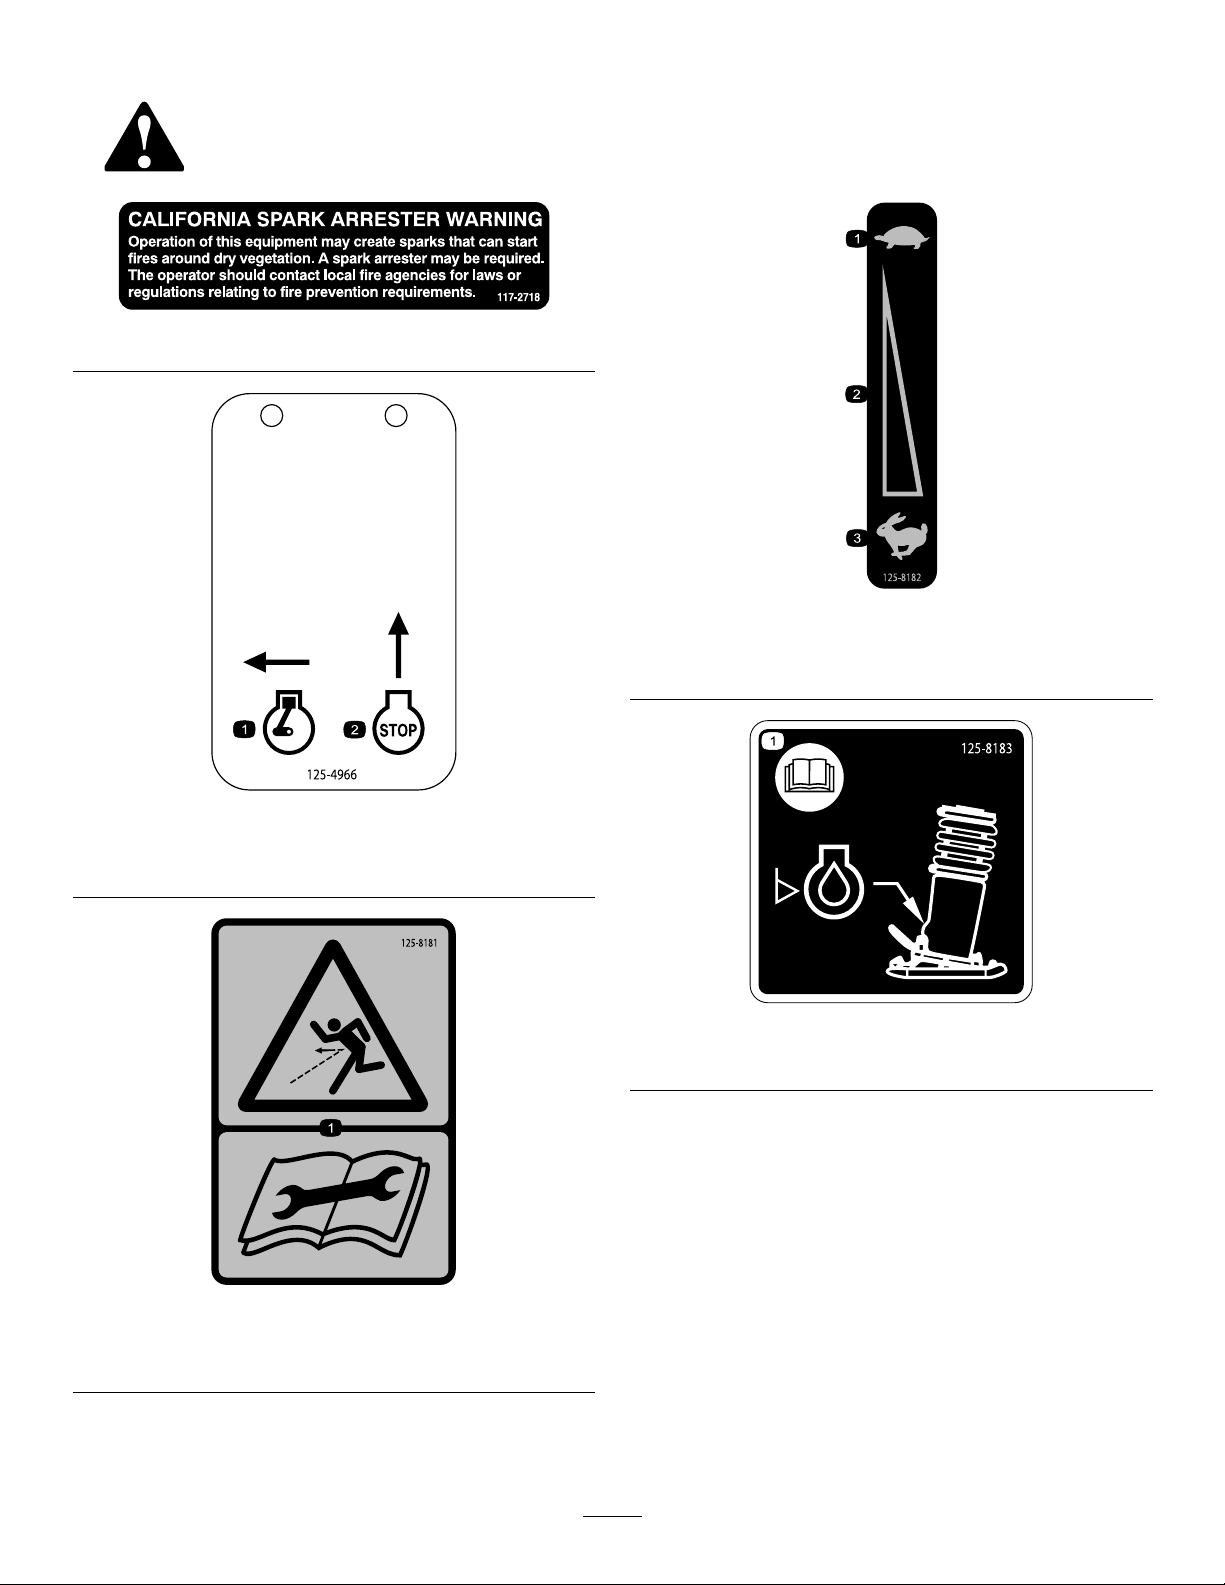
SafetyandInstructionalDecals
Safetydecalsandinstructionsareeasilyvisibletotheoperatorandarelocatednearanyareaofpotential
danger.Replaceanydecalthatisdamagedorlost.
117-2718
125-4966
1.Movelefttostartthe
engine.
2.Moveuptostopthe
engine.
125-8181
1.Kickbackhazard—readtheOperator’sManualbefore
performingmaintenance.
125-8182
1.Slow3.Fast
2.Variablespeedcontrol
125-8183
1.ReadtheOperator’sManual—checktheoillevel.
5

125-8191
1.ReadtheOperator’sManualforinformationonstartingthe
engine—1)Turnlevertotheenginestartposition;2)Closethe
choke;3)Pulltherecoilstarter;4)Openthechoke.
5.Warning—keepbystandersawaywhenoperatingthe
machine.
2.ReadtheOperator’sManualforinformationonstoppingthe
engine—turnlevertoenginestopposition.
6.Chokinghazard—donotruntheengineinanenclosed
location.
3.Warning—readtheOperator’sManual;wearhearing
protection.
7.Explosionhazard—stoptheengineandextinguishallames
beforerefuelingthemachine.
4.Warning—keepawayfrommovingparts;keepallguardsand
shieldsinplace.
ProductOverview
1
2
3
456
7
9
8
10
G023144
Figure3
1.Compactorshoe6.Handle
2.Oilllplugandsightgauge7.Fueltank
3.Throttlelever8.Recoil-starterhandle
4.Lifteye9.Springhousing
5.Fuel-tankcap10.Lifthandle
Controls
Becomefamiliarwithallthecontrolsbeforeyoustartthe
engineandoperatethemachine.
EngineOn/OffSwitch
Theengineon/offswitchallowstheenginetorunwhenit
isintherunposition.Inthestopposition,itstopsthefuel
fromowingtotheengineandpreventstheenginefrom
running(Figure4orFigure5).
12
34
G023108
Figure4
Models68034and68035
1.Switchintherunposition3.Stop
2.Switchinthestopposition4.Run
6

12
34
G0231 13
Figure5
Model68036
1.Switchinrunposition3.Stop
2.Switchinstopposition4.Run
ChokeLever
Usethechokelever(Figure6orFigure7)tostartacold
engine.Beforepullingtherecoil-starterhandle,movethe
chokelevertotheclosedposition.Oncetheengineis
running,movethechokelevertotheopenposition.Donot
usethechokeiftheengineisalreadywarmeduporifthe
airtemperatureishigh.
1 2 3
G023107
Figure6
Models68034and68035
1.Openposition3.Chokelever
2.Closedposition
G023112
2
1
Figure7
Model68036
1.ChokeleverintheOpen
position
2.ChokeleverintheClosed
position
ThrottleLever
Thethrottlelevercontrolstheenginespeed.Whenthelever
isintheslowposition,theenginerunsatidlespeed.Thisis
alsothestartingposition.Whenyoumovethelevertothe
fastposition,thecentrifugalclutchengages,andtheshoeof
themachinevibratesandcompacts.
40 00 +/-50 R PM
1
3
G020101
2
Figure8
1.Fastposition3.Slowposition
2.Variablecontrolspeed
7

Specications
Note:Specicationsanddesignaresubjecttochange
withoutnotice.
Model680346803568036
Weight60kg(132lb)65kg(144lb)70kg(154lb)
Length77cm(30.6
inches)
75cm(29.7
inches)
85cm(33.8
inches)
Width34cm(13.5
inches)
37cm(14.9
inches)
41cm(16.4
inches)
Height106cm(42
inches)
106cm(42
inches)
111cm(44
inches)
EngineHonda®
GX100
Honda®
GX100
Honda®
GX120
ImpactForce1205kg(2650
lb)
1409kg(3100
lb)
1591kg(3500
lb)
Maximum
Blows/Minute
727690655
Operation
Note:Determinetheleftandrightsidesofthemachine
fromthenormaloperatingposition.
Important:Beforeoperating,checkthefuelandoil
levelsandremovedebrisfromthemachine.Also,ensure
thattheareaisclearofpeopleanddebris.Youshould
alsoknowandhavemarkedthelocationsofallutility
lines.
PreparingtoUsetheMachine
•Checkthatthegroundisfreeofforeignobjects,suchas
electricalcables,barbedwire,etc.
•Reviewallthesafetydecalsonthemachine.
•Usesteel-toeshoes,ahard-hat,hearingprotection,and
eyeprotection.Ameshvisoralonedoesnotprovide
sufcienteyeprotection;supplementwithprotective
glasses.
•Ensurethatyouarefamiliarwithsafetyregulationsand
shutdownproceduresdescribedintheOperator’sManual.
•Ensurethatallguardsareinplaceandingoodcondition.
•Ensurethatthecompactorshoeisinplaceandingood
condition.
•Ensurethateveryone,includingchildrenandanimals,
maintainadistanceofatleast15m(50feet)fromthe
machine.
AddingFuel
•Forbestresults,useonlyclean,fresh(lessthan30days
old),unleadedgasolinewithanoctaneratingof87or
higher((R+M)/2ratingmethod).
•Ethanol:Gasolinewithupto10%ethanol(gasohol)
or15%MTBE(methyltertiarybutylether)byvolume
isacceptable.EthanolandMTBEarenotthesame.
Gasolinewith15%ethanol(E15)byvolumeisnot
approvedforuse.Neverusegasolinethatcontains
morethan10%ethanolbyvolume,suchasE15
(contains15%ethanol),E20(contains20%ethanol),or
E85(containsupto85%ethanol).Usingunapproved
gasolinemaycauseperformanceproblemsand/orengine
damagewhichmaynotbecoveredunderwarranty.
•Donotusegasolinecontainingmethanol.
•Donotstorefueleitherinthefueltankorfuelcontainers
overthewinterunlessafuelstabilizerisused.
•Donotaddoiltogasoline.
8

DANGER
Incertainconditions,gasolineisextremely
ammableandhighlyexplosive.Areorexplosion
fromgasolinecanburnyouandothersandcan
damageproperty.
•Fillthefueltankoutdoors,inanopenarea,
whentheengineiscold.Wipeupanygasoline
thatspills.
•Neverllthefueltankinsideanenclosedtrailer.
•Donotllthefueltankcompletelyfull.Add
gasolinetothefueltankuntilthelevelis6to13
mm(1/4to1/2inch)belowthebottomofthe
llerneck.Thisemptyspaceinthetankallows
gasolinetoexpand.
•Neversmokewhenhandlinggasoline,andstay
awayfromanopenameorwheregasoline
fumesmaybeignitedbyaspark.
•Storegasolineinanapprovedcontainerand
keepitoutofthereachofchildren.Neverbuy
morethana30-daysupplyofgasoline.
•Donotoperatewithoutentireexhaustsystemin
placeandinproperworkingcondition.
DANGER
Incertainconditionsduringfueling,static
electricitycanbereleasedcausingasparkwhich
canignitethegasolinevapors.Areorexplosion
fromgasolinecanburnyouandothersandcan
damageproperty.
•Alwaysplacegasolinecontainersontheground
awayfromyourvehiclebeforelling.
•Donotllgasolinecontainersinsideavehicleor
onatruckortrailerbedbecauseinteriorcarpets
orplastictruckbedlinersmayinsulatethe
containerandslowthelossofanystaticcharge.
•Whenpractical,removegas-poweredequipment
fromthetruckortrailerandrefueltheequipment
withitswheelsontheground.
•Ifthisisnotpossible,thenrefuelsuch
equipmentonatruckortrailerfromaportable
container,ratherthanfromagasolinedispenser
nozzle.
•Ifagasolinedispensernozzlemustbeused,
keepthenozzleincontactwiththerimofthe
fueltankorcontaineropeningatalltimesuntil
fuelingiscomplete.
WARNING
Gasolineisharmfulorfatalifswallowed.Long-term
exposuretovaporscancauseseriousinjuryand
illness.
•Avoidprolongedbreathingofvapors.
•Keepfaceawayfromnozzleandgastankor
conditionerbottleopening.
•Avoidcontactwithskin;washoffspillagewith
soapandwater.
UsingStabilizer/Conditioner
Useafuelstabilizer/conditionerinthemachinetoprovide
thefollowingbenets:
•Keepsgasolinefreshduringstorageof90daysorless.
Forlongerstorageitisrecommendedthatthefueltank
bedrained.
•Cleanstheenginewhileitruns
•Eliminatesgum-likevarnishbuildupinthefuelsystem,
whichcauseshardstarting
Important:Donotusefueladditivescontaining
methanolorethanol.
Addthecorrectamountofgasstabilizer/conditionerto
thegas.
Note:Afuelstabilizer/conditionerismosteffective
whenmixedwithfreshgasoline.Tominimizethechance
ofvarnishdepositsinthefuelsystem,usefuelstabilizer
atalltimes.
9

FillingtheFuelTank
1.Parkthemachineonalevelsurfaceandstoptheengine.
2.Allowtheenginetocool.
3.Cleanaroundthefueltankcapandremoveit(Figure9).
G020337
1
2
3
Figure9
1.Fillwithgasolinehere3.Gasolinecan
2.Gasolinecap
4.Addunleadedgasolinetothefueltank,untilthelevel
is6to13mm(1/4to1/2inch)belowthebottomof
thellerneck.
Important:Thisspaceinthetankallowsgasoline
toexpand.Donotllthefueltankcompletelyfull.
5.Installthefueltankcapsecurely.
6.Wipeupanygasolinethatmayhavespilled.
CheckingtheEngine-oilLevel
OilType:4-cycleengineoilthatmeetsorexceedsthe
requirementsforAPIservicecategorySJ,SL,SM,orhigher.
CrankcaseCapacity:
•0.28L(0.30USqt)formodels68034and68035
•0.40L(0.37USqt)formodel68036
Viscosity:SAE10W-30isrecommendedforgeneraluse.
1.Stoptheengineandallowittocool.
2.Tiltthemachinesothattheengineislevel.
Important:Proporleanthemachineagainst
somethingtoensurethatitdoesnotfallover.
3.Cleanaroundtheoildipstick.
4.Removethedipstickandwipetheendclean.
5.Slidethedipstickfullyintothedipsticktubewithout
threadingitintothellerneck.
6.Pullthedipstickoutandlookattheend.
Theoilshouldbelevelwiththeupper-limitmark
(Figure10).
12
3
4
g019686
5
Figure10
1.Fillertube4.Lowerlimit
2.Dipstick5.Oil-drainbolt
3.Upperlimit
Important:Runningtheenginewithalowoil
levelcancauseenginedamage.Thistypeof
damageisnotcoveredbywarranty.
7.Iftheoillevelislow,slowlypouronlyenoughoilinto
thecrankcasetoraisetheleveltotheupperlimit.
Important:Donotoverllthecrankcasewithoil
becausetheenginemaybedamaged.
8.Installandsecurethedipstick.
10

CheckingtheSpring-housing
Oil
ServiceInterval:Beforeeachuseordaily
OilType:4-cycleengineoilthatmeetsorexceedsthe
requirementsforAPIservicecategorySJ,SL,SM,orhigher.
Capacity:0.47L(0.5USqt)
Viscosity:SAE10W-30isrecommendedforgeneraluse.
Checkthespring-housingoilasfollows:
1.Carefullytipthemachineslightlybackward,sothatit
standscompletelyuprightandvertical.
Important:Proporleanthemachineagainst
somethingtoensurethatitdoesnotfallover.
2.Checktheoilsightplug(Figure11),andensurethat
theoillevelishalfwaybetweenthetopandbottom
oftheoilsightplug.
1
G023141
Figure11
1.Oilsightplug
3.Iftheoillevelislow ,addoil;refertoAddingOiltothe
SpringHousing(page17).
StartingandStoppingthe
Engine
StartingtheEngine
1.Movetheengineon/offswitchtotherunposition
(counterclockwise);refertoEngineOn/OffSwitch
(page6).
2.Movethechokelevertotheclosedpositionifyouare
startingacoldengine;refertoChokeLever(page7).
Note:Awarmorhotenginemaynotrequirechoking.
3.Movethethrottlelevertotheslowposition;referto
ThrottleLever(page7).
4.Pulltherecoil-starterhandlelightlyuntilyoufeel
resistance,thenpullthehandlebriskly.Gentlyreturn
thehandletotheoriginalposition.
5.Aftertheenginestarts,graduallymovethechoke
leverbacktotheopenposition.Iftheenginestalls
orhesitates,movethechokeleverbacktotheclosed
positionagainuntiltheenginewarmsup.Thenmove
ittotheopenposition.
StoppingtheEngine
1.Movethethrottlelevertotheslowposition.Ifthe
enginehasbeenworkinghardorishot,letitrunfora
minute.Thishelpstocooltheenginebeforestopping.
Important:Tostoptheengineimmediately,you
canmovetheengineon/offswitchtothe
stop
positionbeforemovingthethrottlelevertothe
slo w
position.
2.Movetheengineon/offswitchtothestopposition
(clockwise).
11
TransportingtheMachine
CAUTION
Ifyoutipthemachinewhentheengineon/off
switchisinthe
r un
position,fuelcanleakoutofthe
fueltank.Afuelleakcouldleadtoareandcause
seriouspersonalinjury.
Drainthefueltankorensurethattheengineon/off
switchisinthe
stop
positionbeforetippingthe
machine.
Important:Beforetransportingthemachine,secureit
withstrapsorchainstopreventitfromfallingortipping
over.
Ensurethattheliftingdeviceandstrapsorchainsare
properlyrated;refertoSpecications(page8).
Ifpossible,keepthemachinestandinguprightwhen
transportingit.Secureitwithstrapsorchains;donotletit
fallover.
Ifyoumusttransportthemachinehorizontally,dosoas
follows:
1.Stoptheengineandallowittocoolfor15minutes.
Ensurethattheengineon/offswitchisinthestop
position.
Theengineon/offswitchisalsoafuelvalve.Ensuring
thatitisinthestoppositionpreventsfuelfromleaking
outofthefueltank.
2.Usealiftingdevicewithadequateliftingcapacity(at
least75kg,or165.3lb)toliftthemachineintothe
transportvehicle.
Important:Attachchainsorotherlifting-device
componentstoonlythelifteyeofthemachine;
refertoFigure3.
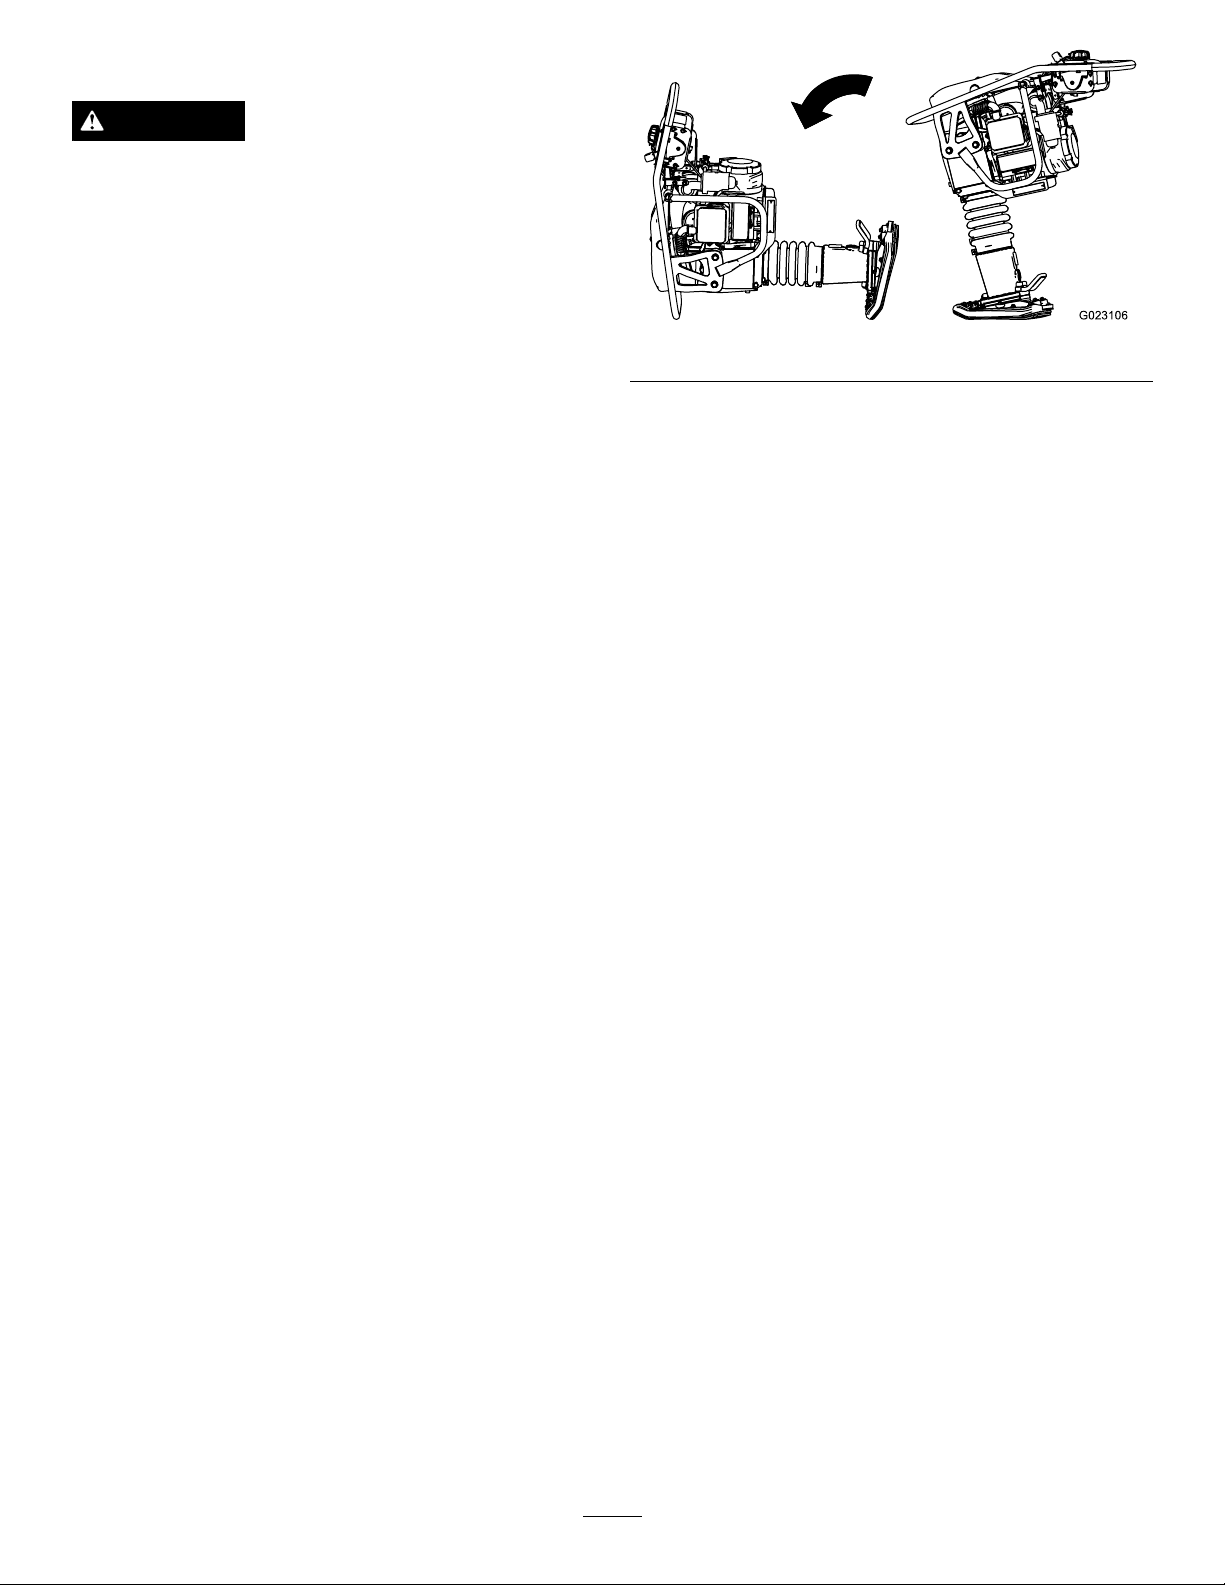
3.CarefullypositionthemachineasshowninFigure12,
andsecureitwithstrapsorchainstopreventitfrom
movingortipping.
Important:Donotlaythemachineontotheright
orleftside,ortheengineoilcanleakintotheair
intakeortheexhaustsystem.Laythemachine
tippedforwardonly,sothatitrestsonthefrontbar.
G023106
Figure12
4.Aftertransportingthemachine,standituprightto
allowtheoiltodrainthroughtheengineandsettle
backintothecrankcase.
Important:Allowtheoiltosettleforatleast2
minutesafterstandingthemachineuprightbefore
startingtheengine.
OperatingTips
•Keepthemachineuprightsothatitcontactstheground
withtheentireshoe,ratherthanwithjustthefrontor
backedgeoftheshoe.
•Allowthemachinetodothework;pushingdownwardon
thehandlelimitstheeffectivenessofthemachine.
•Onlevelsurfaces,themachinemovesforwardinrapid
jumps.Onunevensurfaces,tiltthemachineasnecessary
toassisttheforwardmovement.
•Thejumpheightofthemachineincreasesastheground
becomesmorecompacted.
12

Maintenance
Note:Determinetheleftandrightsidesofthemachinefromthenormaloperatingposition.
Important:Youmaytipthemachineforward,ifyoudrainthefueltankormovetheengineon/offswitchtothe
stop
position,tomakecleaningorservicingthemachineeasier.Ifyoulaythemachineontotheside,oilcandrainout
ofthecrankcase,intotheaircleanerorthemufer.
Allowtheoiltosettleforatleast2minutesafterstandingthemachineuprightbeforestartingtheengine.
RecommendedMaintenanceSchedule(s)
MaintenanceService
IntervalMaintenanceProcedure
Aftertherst25hours•Changetheengineoil.
•Changethespring-housingoil.
Beforeeachuseordaily
•Checkthespring-housingoil.
•Checktheairlter.
•Checkthecompactorshoe.
•Removedebrisfromthemachine.
Every50hours•Cleantheair-lterelements(morefrequentlyifconditionsaredustyorsandy).
•Cleantheprelter(models68034and68035).
Every100hours
•Changetheengineoil(morefrequentlyiftheoperatingconditionsareextremely
dustyorsandy).
•Changethespring-housingoil.
•Checkthesparkplug.
Every200hours•Replacethepaperair-lterelement(morefrequentlyifconditionsaredustyorsandy).
Yearlyorbeforestorage•Changetheengineoil.
•Changethespring-housingoil.
Important:Refertoyour
Engine Operator's Man ual
foradditionalmaintenanceprocedures.
Premaintenance
Procedures
Beforeperformingmaintenanceonthemachine,dothe
following:
1.Ensurethattheengineandmuferarecool.
2.Disabletheenginebydisconnectingthespark-plug
wire;refertoDisconnectingtheSpark-plugWire(page
14).
13

DisconnectingtheSpark-plug
Wire
Pullthespark-plugwireofftheterminalofthesparkplug
(Figure13orFigure14).
1
G0231 19
Figure13
Models68034and68035
1.Spark-plugwire
1
G023120
Figure14
Model68036
1.Spark-plugwire
EngineMaintenance
ServicingtheAirCleaner
ServiceInterval:Beforeeachuseordaily—Checktheair
lter.
Every50hours—Cleantheair-lterelements(more
frequentlyifconditionsaredustyorsandy).
Every200hours—Replacethepaperair-lterelement
(morefrequentlyifconditionsaredustyorsandy).
Important:Donotoperatetheenginewithoutthe
air-lterassembly;extremeenginedamagewilloccur.
Note:Iftheengineislowonpower,producesblacksmoke,
orrunsunevenly,theairltermaybeclogged.
CleaningthePrelter—Models68034
and68035
ServiceInterval:Every50hours
1.Openthecoverofthemachine(Figure15).
1
2
G020404
Figure15
2.Removethescrewsthatsecurethecovertotheprelter
housing(Figure16),andremovethecover.
A B
2
1
G023121
Figure16
1.Prelterhousing2.Prelter
3.Removetheprelter.
4.Cleantheprelterasfollows:
A.Washtheprelterusingamilddetergentand
water.
B.Squeezeitdrywithacleancloth.
C.Soakitwithnewengineoil.
14
D.Gentlywindtheprelterinanabsorbentcloth,
andsqueezeouttheexcessoil.
5.Installtheprelterasfollows:
A.Aligntheprelterinsideofthecover.
B.Alignthepreltercovertothehousing.
C.Securethecovertothehousingwiththescrews.
ServicingtheAirFilter—Models68034
and68035
1.Removethescrewsthatsecurethecovertotheair-lter
housing(Figure17)
A B
2
1
G023122
Figure17
1.Air-lterhousing2.Airlter
2.Removetheairlterfromthehousingasshownin
Figure17.
3.Inspecttheairlterandreplaceitifitisdamaged,
excessivelydirty,orsaturatedwithoilorfuel.
4.Aligntheairlterinsideofthecover.
5.Aligntheairltercovertothehousing.
6.Securethecoverhousingwiththescrews.
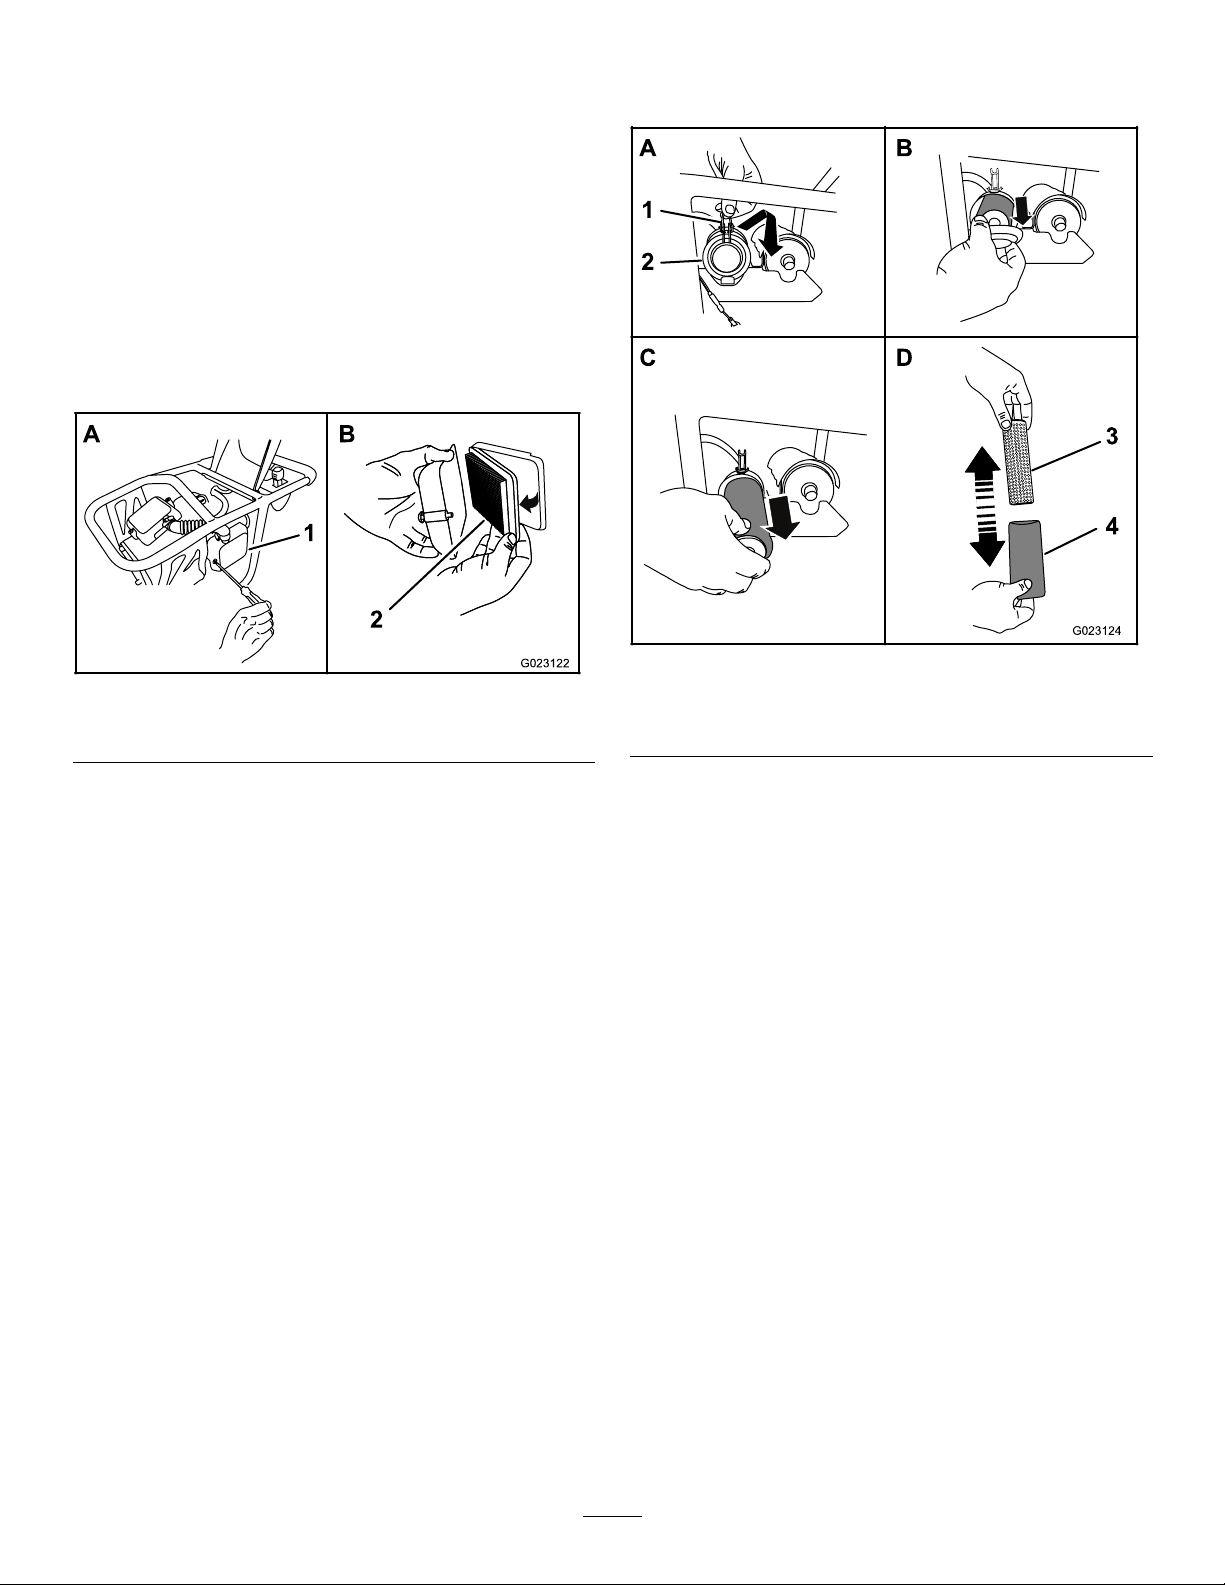
ServicingtheAirFilter—Model68036
1.Openthelatchoftheair-ltercover(Figure18).
G023124
AB
C D
3
4
1
2
Figure18
1.Latch3.Paperelement
2.Cover4.Foamelement
2.Removetheairlterfromthehousingasshownin
Figure18.
3.Removethefoamelementfromthepaperelement.
4.Inspecttheelementsandreplacethemiftheyare
damagedorexcessivelydirty.
Note:Ifthepaperelementissaturatedwithoilor
fuel,replaceit.
5.Tapthepaperelementseveraltimesonahardsurface
toremovethedirt.
6.Cleanthefoamelementinwarm,soapywaterorin
anonammablesolvent.
Note:Donotusefueltocleanthefoamelement
becauseitcouldcreateariskofreorexplosion.
7.Rinseanddrythefoamelementthoroughly.
8.Dipthefoamelementincleanengineoil,thensqueeze
outtheexcessoil.
Note:Excessoilinthefoamelementrestrictstheair
owthroughtheelementandmayreachthepaper
lterandclogit.
9.Wipedirtfromthehousingandthecoverwithamoist
rag.
Note:Becarefultopreventdirtanddebrisfrom
enteringtheairductleadingtothecarburetor.
15

10.Installtheair-cleanerelementsandensurethattheyare
properlypositioned(Figure19).
Important:Ensurethattheopenendofthe
air-cleanerelementsarefacinginwardtoward
themachine,asthemachinewillnotrunif
theelementsarenotplacedintheproperair
orientationduetoairrestriction(Figure19).
Figure19
1.Openendofthepaper
element
2.Openendofthefoam
element
11.Securethecovertothehousingwiththelatch.
ServicingtheEngineOil
OilType:4-cycleengineoilthatmeetsorexceedsthe
requirementsforAPIservicecategorySJ,SL,SM,orhigher.
CrankcaseCapacity:
•0.28L(0.30USqt)formodels68034and68035
•0.40L(0.37USqt)formodel68036
Viscosity:SAE10W-30isrecommendedforgeneraluse.
ChangingtheEngineOil
ServiceInterval:Aftertherst25hours
Every100hours
Yearlyorbeforestorage
ToroPremiumEngineOilisavailablefromyourAuthorized
ToroDealer.
1.Starttheengineandletitrunfor5minutes;referto
StartingtheEngine(page11).
2.Stoptheengine;refertoStoppingtheEngine(page11).
3.Tiltthemachinesothatthedrainsideisslightlylower
thantheoppositesidetoensurethattheoildrains
completely.
4.Placeadrainpanundertheoil-drainhole.
5.Removethedrainplug,anddraintheoilfromthe
engine(Figure20).
3
2
1
G020104
Figure20
1.Oilpan3.Oil-llhole
2.Oil-drainhole
6.Whentheoilhasdrainedcompletely,installtheplug
andwipeupanyspilledoil.
Note:Disposeoftheusedoilatacertiedrecycling
center.
7.Removethedipstickandslowlypourapproximately80
percentofthespeciedamountofoilintotheengine
(Figure20).
8.Slowlyaddadditionaloiltobringtheoilleveltothe
upper-limitmarkonthedipstick;refertoCheckingthe
Engine-oilLevel(page10).
9.Installandsecurethedipstick.
16

ServicingtheSpring-housing
Oil
OilType:4-cycleengineoilthatmeetsorexceedsthe
requirementsforAPIservicecategorySJ,SL,SM,orhigher.
Capacity:0.47L(0.5USqt)
Viscosity:SAE10W-30isrecommendedforgeneraluse.
ChangingtheSpring-housingOil
ServiceInterval:Aftertherst25hours
Every100hours
Yearlyorbeforestorage
Changethespring-housingoilasfollows:
1.Starttheengineandletitrunfor5minutes;referto
StartingtheEngine(page11).
2.Stoptheengine;refertoStoppingtheEngine(page11).
3.Ensurethattheengineon/offswitchisinthestop
positionsothatthefueldoesnotleakoutofthefuel
tank.
4.Tiltthemachinesothattheoilsightplugfaces
downwardtoensurethattheoildrainscompletely
(Figure21).
G023142
1
2
Figure21
1.Oilsightplug2.Drainpan
5.Placeadrainpanundertheoilsightplug(Figure21).
6.Removetheoilsightplug(Figure21).
7.Draintheoiloutoftheholeinthehousing(Figure21).
8.Cleanthethreadsontheoilsightplug,andapply3
layersofPTFEthread-sealingtape.
9.Addoiltothespringhousing;refertoAddingOilto
theSpringHousing(page17).
10.Installandtorquetheoilsightplugto54N-m(39.8
ft-lb).
Important:Allowtheoiltosettleforatleast2minutes
afterstandingthemachineuprightbeforestartingthe
engine.
AddingOiltotheSpringHousing
Addoiltothespringhousingasfollows:
1.Tiltthemachinesothattheoilsightplugisfacing
upward(Figure22).
1
G023143
Figure22
1.Openingfortheoil
2.Removetheoilsightplug.
3.Cleanthethreadsontheoilsightplug,andapply3
layersofPTFEthread-sealingtape.
4.Addtheoiltothespringhousinginincrementsto
ensurethatyoudonotoverllthemachine;referto
CheckingtheSpring-housingOil(page11)toensure
thattheoilisatthecorrectlevel.
Note:Theoilcapacityofthespringhousingis0.47
L(0.5USqt);addthefullamountonlyifthespring
housingisempty.
5.Installandtorquetheoilsightplugto54N-m(39.8
ft-lb).
Important:Allowtheoiltosettleforatleast2minutes
afterstandingthemachineuprightbeforestartingthe
engine.
17

ServicingtheSparkPlug
ServiceInterval:Every100hours—Checkthesparkplug.
Ensurethattheairgapbetweenthecenterelectrodeandthe
sideelectrodeiscorrectbeforeinstallingthesparkplug.Usea
spark-plugwrenchforremovingandinstallingthesparkplug
andagappingtool/feelergaugetocheckandadjusttheair
gap.Installanewsparkplugifnecessary.
Models68034and68035:UseaDENSOU16FSR-UBor
anNGKCR5HSBsparkplug.
Model68036:UseaDENSOW14EPR-UoranNGK
BP4ESsparkplug.
RemovingtheSparkPlug
1.Ensurethatthemachineisstoppedandthattheengine
isoff,andletthemachinecool.
2.Disconnectthewirefromthesparkplug(Figure23).
Figure23
1.Sparkplug2.Wire
3.Cleanaroundthesparkplug.
4.Useaspark-plugwrenchtoremovethesparkplugand
themetalwasher.
CheckingtheSparkPlug
1.Lookatthecenterofthesparkplug(Figure24).Ifyou
seelightbrownorgrayontheinsulator,theengineis
operatingproperly.Ablackcoatingontheinsulator
usuallymeansthattheaircleanerisdirty.
Important:Donotcleanthesparkplug.Always
replacethesparkplugwhenithasablackcoating,
wornelectrodes,anoilylm,orcracks.
G023105
1 2 43 5
Figure24
1.Sideelectrode4.0.60to0.70mm(0.024to
0.028inch)gap(Models
68034and68035)
2.Centerelectrode5.0.70to0.80mm(0.028
to0.031inch)gap(Model
68036)
3.Insulator
2.Checkthegapbetweenthecenterandsideelectrodes
(Figure24).
3.Ifthegapisnotwithinthespeciedrange,dothe
following:
A.Ifthegapistoosmall,carefullybendtheside
electrodeawayfromthecenterelectrodeuntilthe
gapbetweentheelectrodesiscorrect.
B.Ifthegapistoolarge,carefullybendtheside
electrodetowardthecenterelectrodeuntilthegap
betweentheelectrodesiscorrect.
InstallingtheSparkPlug
1.Threadthesparkplugintothespark-plughole.
2.Tightenthesparkplugto20ft-lb(27N-m).
3.Connectthewiretothesparkplug.
18

CompactorShoe
Maintenance
CheckingtheCompactorShoe
ServiceInterval:Beforeeachuseordaily
Amongthemostcriticalelementsofthemachineisthe
compactorshoe.Itisalsothemostsubjecttodamageand
wear.Inthecourseofcompactingawidearrayofgranular
objects,themachineencountersnumerousabrasivesand
objects,suchasdirt,stones,andoccasionallyalargerockor
buriedscrap.
Thewearofthecompactorshoecansignicantlyimpairthe
efciencyandperformanceofthemachine.Therefore,itis
importanttomakefrequentchecksoftheconditionofthe
compactorshoeforleaksandcracks.(Figure25).
G020338
1
Figure25
1.Compactorshoe
Cleaning
RemovingDebrisfromthe
Machine
Regularcleaningandwashingwillincreasethelifespanofthe
machine.Cleanthemachineimmediatelyafteruse,before
thedirthardens.
Checkbeforecleaningthatthefueltankcapisproperlyin
placetoavoidgettingwaterinthetank.
Usecarewhenusingahigh-pressuresprayerbecauseitcan
damagewarningdecals,instructionsigns,andtheengine.
19

Storage
Forstorageover30days,preparethemachineasfollows:
1.Removedirtandgrimefromtheexternalpartsofthe
entiremachine,especiallytheengine.Cleanallgranular
objectsfromtheoutsideoftheenginecylinder-head
nsandtheblowerhousing.
Important:Youcanwashthemachinewithmild
detergentandwater.
2.Addapetroleum-basedstabilizer/conditionerto
thefuelinthetank.Followthemixinginstructions
fromthestabilizermanufacturer.Donotusean
alcohol-basedstabilizer(ethanolormethanol).
Note:Fuelstabilizer/conditionerismosteffective
whenmixedwithfreshgasolineandusedatalltimes.
Important:Donotstorestabilizer/conditioned
gasolineover90days.
3.Runtheenginetodistributeconditionedfuelthrough
thefuelsystem(5minutes).
4.Stoptheengine,allowittocool,anddrainthefueltank
usingapump-typesiphon.Disposeoffuelproperly;
recycleitaccordingtolocalcodes.
5.Starttheengineandrunituntilitstops.
6.Choketheengine.
7.Startandruntheengineuntilitwillnotstartagain.
8.Servicetheaircleaner;refertoFigure15.
9.Changetheenginecrankcaseoil;refertoFigure20.
10.Removethesparkplugandcheckthecondition;refer
toFigure23andFigure24.
11.Withthesparkplugremovedfromtheengine,pour30
ml(2tablespoons)ofengineoilintothespark-plug
hole.
12.Pulltherecoil-starterhandleslowlytocranktheengine
anddistributetheoilinsidethecylinder.
13.Installthesparkplug,butdonotinstallthewireon
thesparkplug.
14.Checkandtightenallbolts,nuts,andscrews.Repairor
replaceanypartthatisdamaged.
15.Paintallscratchedorbaremetalsurfaces.Paintis
availablefromyourAuthorizedServiceDealer.
16.Storethemachineinaclean,drygarageorstoragearea.
Important:Storethemachineintheupright
position.Donottipthemachineonitsside,or
leavethemachinetippedforwardwiththefront
bardownforalongperiodoftime.
17.Coverthemachinetoprotectitandkeepitclean.
RemovingtheMachinefrom
Storage
1.Checkandtightenallfasteners.
2.Inspectthesparkplugandreplaceitifitisdirty,worn,
orcracked;refertotheengineOperator’sManual.
3.Installthesparkpluguntilitishand-tight,thenan
additional1/2turnifitisnew,otherwise,tightenitan
additional1/8to1/4turn.
4.Performanyneededmaintenanceprocedures.
5.Checktheengine-oillevel;refertoCheckingthe
Engine-oilLevel(page10).
Important:Storethemachineintheupright
position.Donottipthemachineonitsside,or
leavethemachinetippedforwardwiththefront
bardownforalongperiodoftime.
6.Checkthespring-housingoillevel;refertoChecking
theSpring-housingOil(page11).
7.Fillthefueltankwithfreshgasoline;refertoAdding
Fuel(page8).
8.Connectthewiretothesparkplug.
20
Other manuals for VR-2650
1
This manual suits for next models
5
Table of contents
Other Toro Other manuals

Popular Other manuals by other brands

Feig Electronic
Feig Electronic OBID ID RW02 Series Mounting instructions

Black Horse
Black Horse 17FJ26MA installation instructions

Richard Paul Russell
Richard Paul Russell SpaceLogger D10 user manual

Beats
Beats Studio Wireless quick start guide

Skyrc
Skyrc iMax B8+ instruction manual

Panasonic
Panasonic GP-KH232 manual


