Toro 36001 User manual

FormNo.3406-735RevA
SnowMaster®724ZXRSnowthrower
ModelNo.36001—SerialNo.400010798andUp
Operator'sManual
Introduction
WARNING
CALIFORNIA
Proposition65Warning
Thisproductcontainsachemicalorchemicals
knowntotheStateofCaliforniatocausecancer,
birthdefects,orreproductiveharm.
Theengineexhaustfromthisproduct
containschemicalsknowntotheStateof
Californiatocausecancer,birthdefects,
orotherreproductiveharm.
Thismachineisintendedtobeusedbyresidential
homeowners.Itisdesignedforremovingsnowfrom
pavedsurfaces,suchasdrivewaysandsidewalks,and
othersurfacesfortrafconresidentialorcommercial
properties.Itisnotdesignedforremovingmaterials
otherthansnow,norisitdesignedforclearingoffgravel
surfaces.
Readthisinformationcarefullytolearnhowtooperateand
maintainyourmachineproperlyandtoavoidinjuryand
machinedamage.Youareresponsibleforoperatingthe
machineproperlyandsafely.
YoumaycontactTorodirectlyatwww .Toro.comformachine
andaccessoryinformation,helpndingadealer,ortoregister
yourmachine.
Wheneveryouneedservice,genuineToroparts,oradditional
information,contactanAuthorizedServiceDealerorToro
CustomerServiceandhavethemodelandserialnumbersof
yourmachineready.Figure1identiesthelocationofthe
modelandserialnumbersonthemachine.Writethenumbers
inthespaceprovided.
Figure1
1.Modelandserialnumberlocation
ModelNo.
SerialNo.
Thismanualidentiespotentialhazardsandhassafety
messagesidentiedbythesafety-alertsymbol(Figure2),
whichsignalsahazardthatmaycauseseriousinjuryordeath
ifyoudonotfollowtherecommendedprecautions.
Figure2
1.Safety-alertsymbol
Thismanualuses2wordstohighlightinformation.
Importantcallsattentiontospecialmechanicalinformation
andNoteemphasizesgeneralinformationworthyofspecial
attention.
Formodelswithstatedpower,thenetpoweroftheenginewas
laboratoryratedbytheenginemanufacturerinaccordance
withSAEJ1940.Asconguredtomeetsafety,emission,and
operatingrequirements,theactualenginehorsepoweronthis
classofsnowthrowerwillbesignicantlylower.
©2016—TheToro®Company
8111LyndaleAvenueSouth
Bloomington,MN55420
Registeratwww.Toro.com.OriginalInstructions(EN)
PrintedintheUSA
AllRightsReserved*3406-735*A

Important:Ifyouareusingthismachineabove1500m
(5,000ft)foracontinuousperiod,ensurethattheHigh
AltitudeKithasbeeninstalledsothattheenginemeets
CARB/EPAemissionregulations.TheHighAltitude
Kitincreasesengineperformancewhilepreventing
spark-plugfouling,hardstarting,andincreased
emissions.Onceyouhaveinstalledthekit,attach
thehigh-altitudelabelnexttotheserialdecalonthe
machine.ContactanyAuthorizedToroServiceDealer
toobtaintheproperHighAltitudeKitandhigh-altitude
labelforyourmachine.Tolocateadealerconvenientto
you,accessourwebsiteatwww.Toro.comorcontactour
ToroCustomerCareDepartmentatthenumber(s)listed
inyourEmissionControlWarrantyStatement.
Removethekitfromtheengineandrestoretheengine
toitsoriginalfactorycongurationwhenrunningthe
engineunder1500m(5,000ft).Donotoperateanengine
thathasbeenconvertedforhigh-altitudeuseatlower
altitudes;otherwise,youcouldoverheatanddamage
theengine.
Ifyouareunsurewhetherornotyourmachinehasbeen
convertedforhigh-altitudeuse,lookforthefollowing
label(Figure3).
Figure3
ThissparkignitionsystemcomplieswithCanadianICES-002.
Contents
Introduction..................................................................1
Safety...........................................................................3
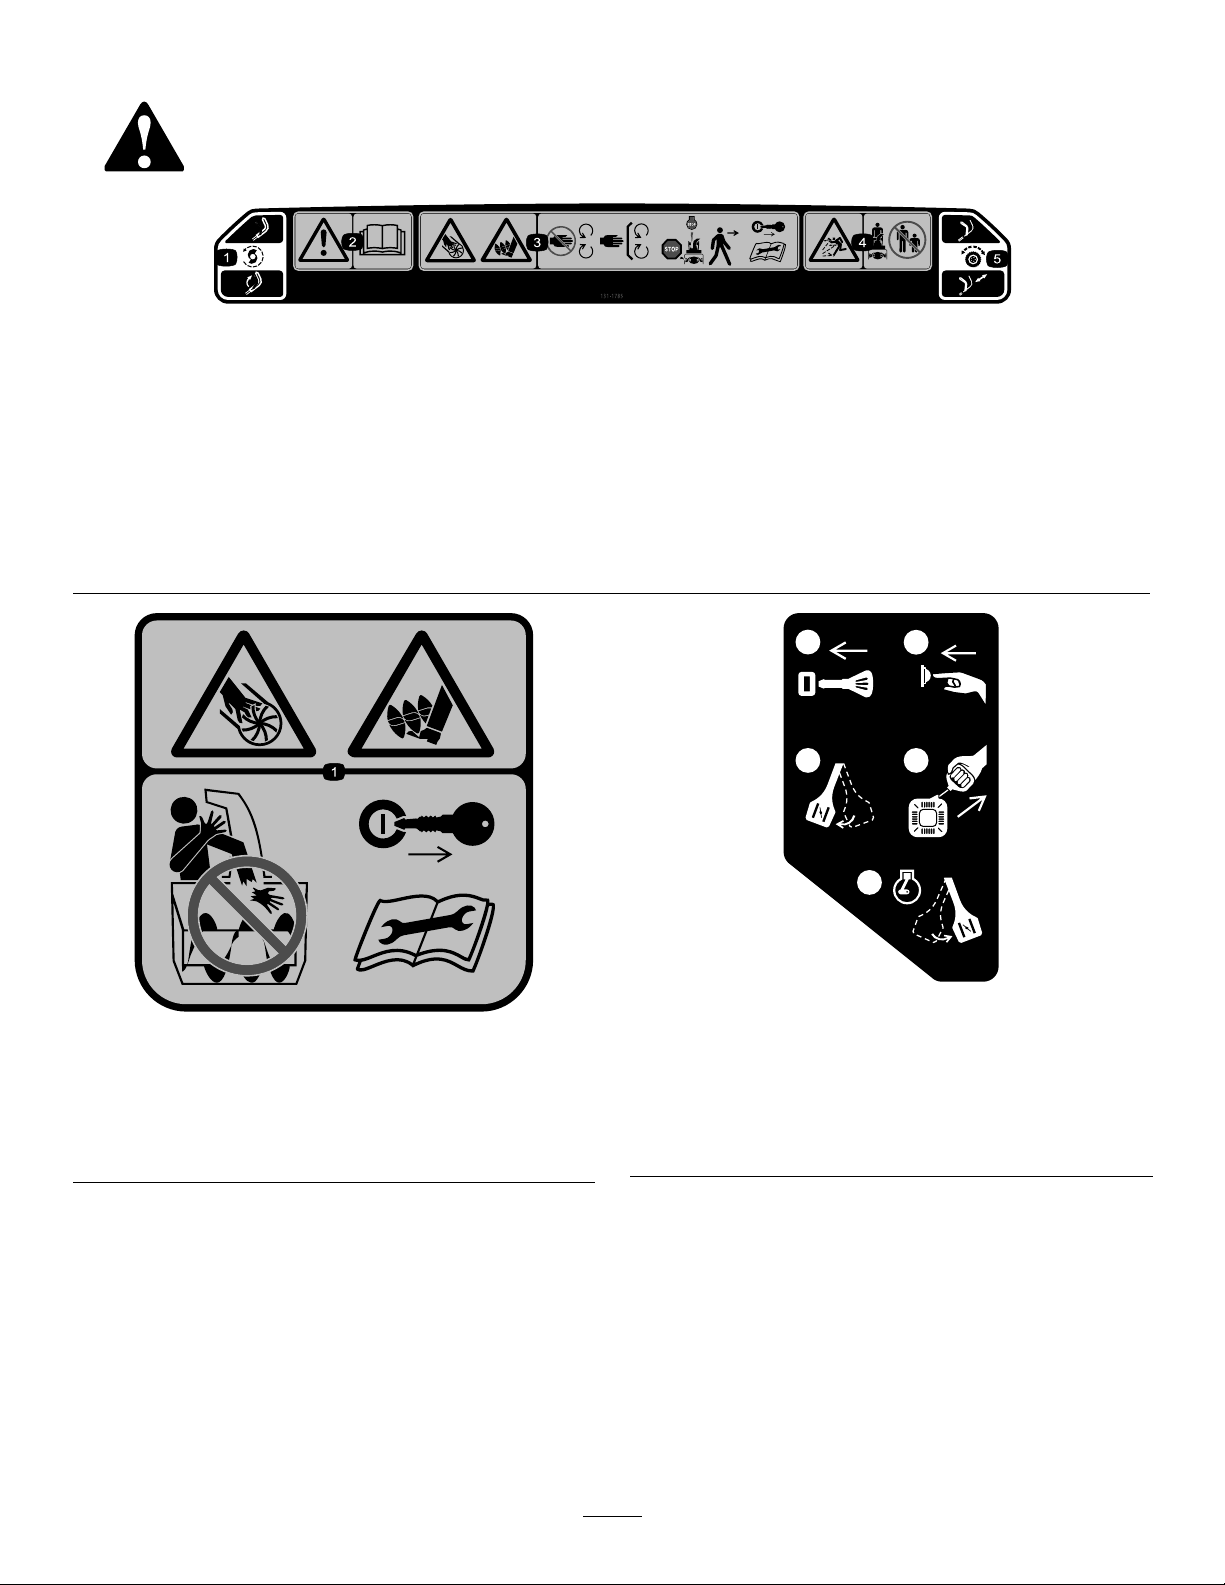
SafetyandInstructionalDecals.................................4
Setup............................................................................5
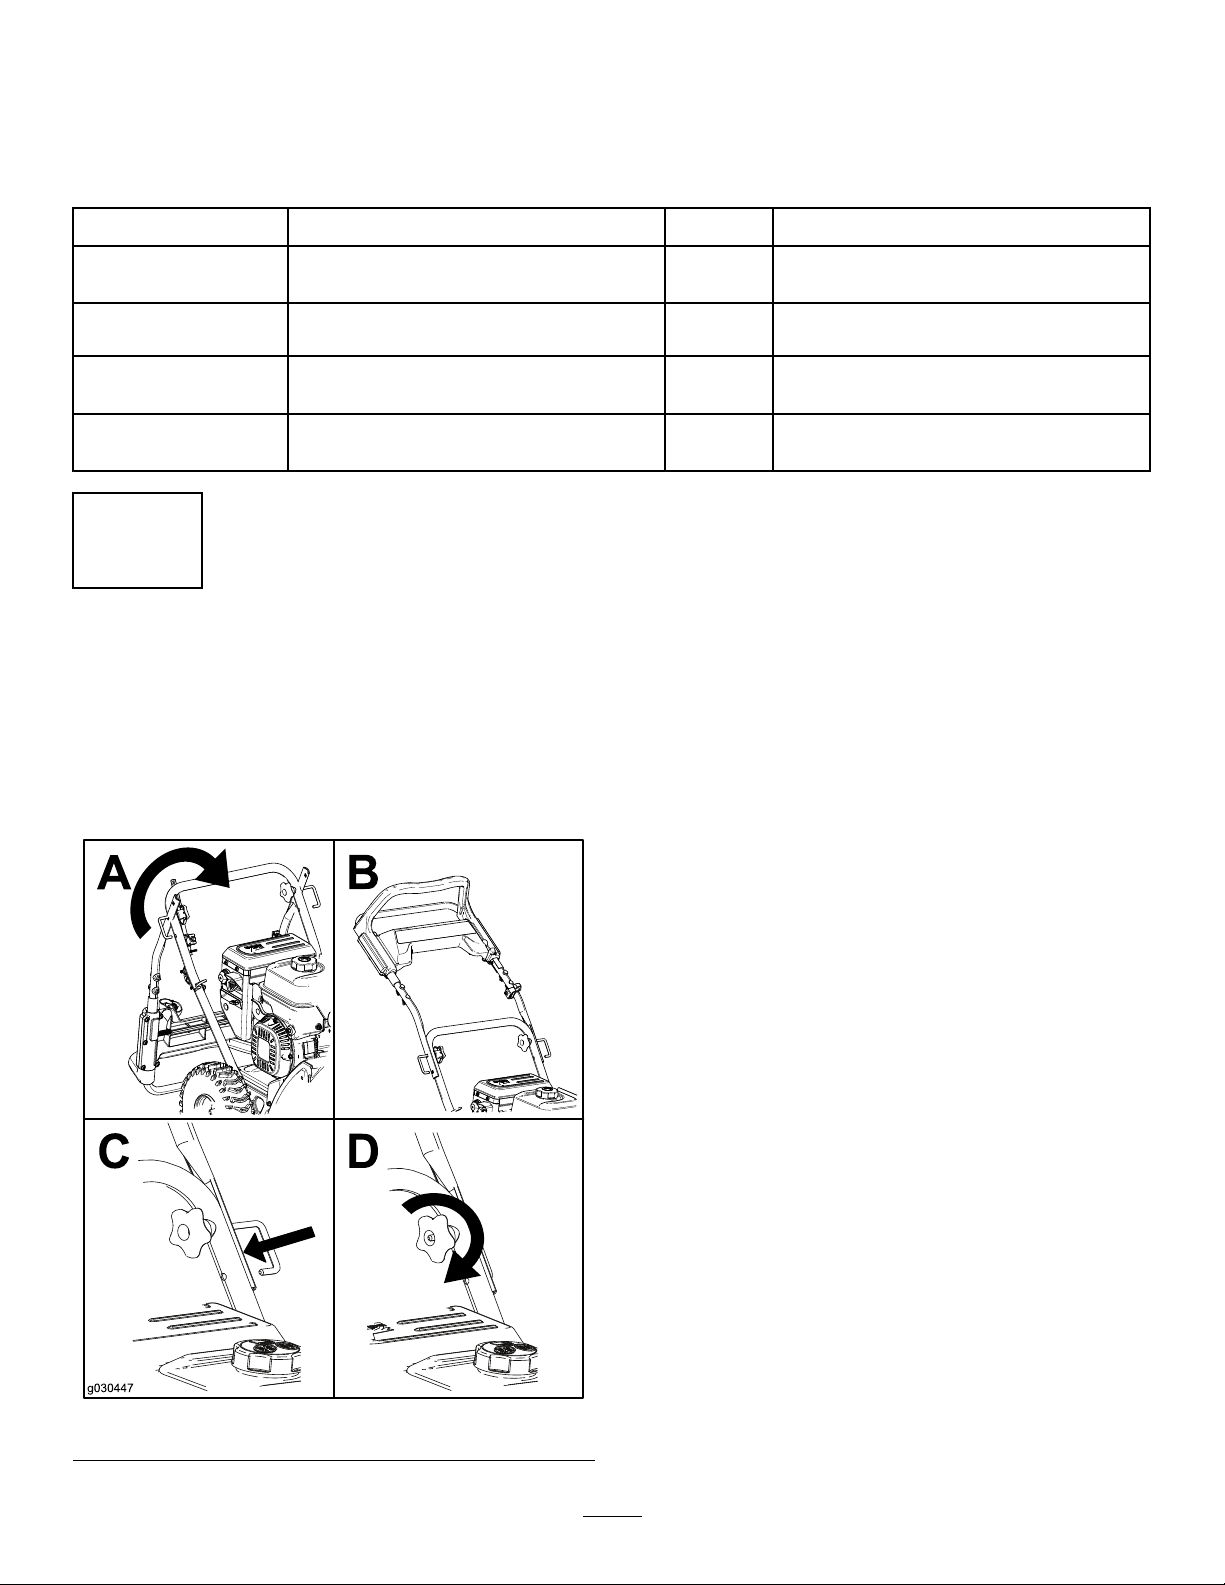
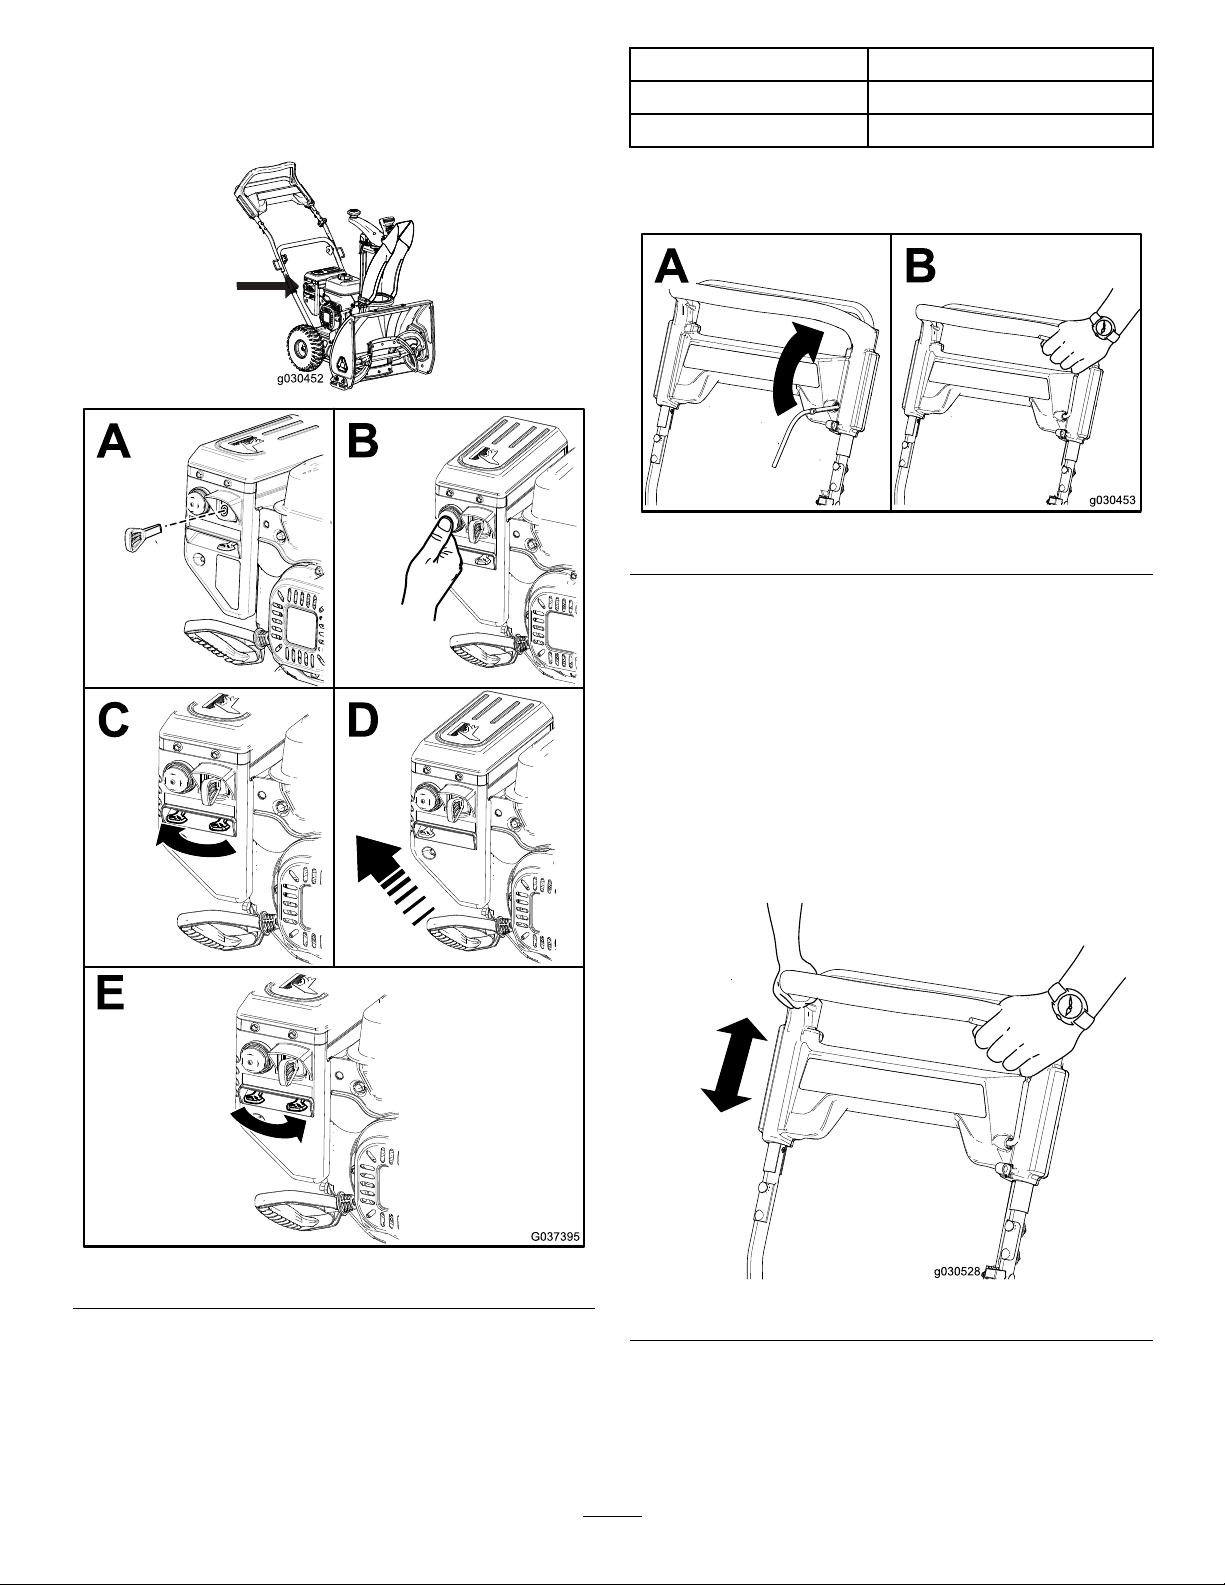
1UnfoldingtheHandle............................................5
2InstallingtheDischargeChute................................6
3CheckingtheEngine-OilLevel...............................6
4CheckingtheTirePressure.....................................6
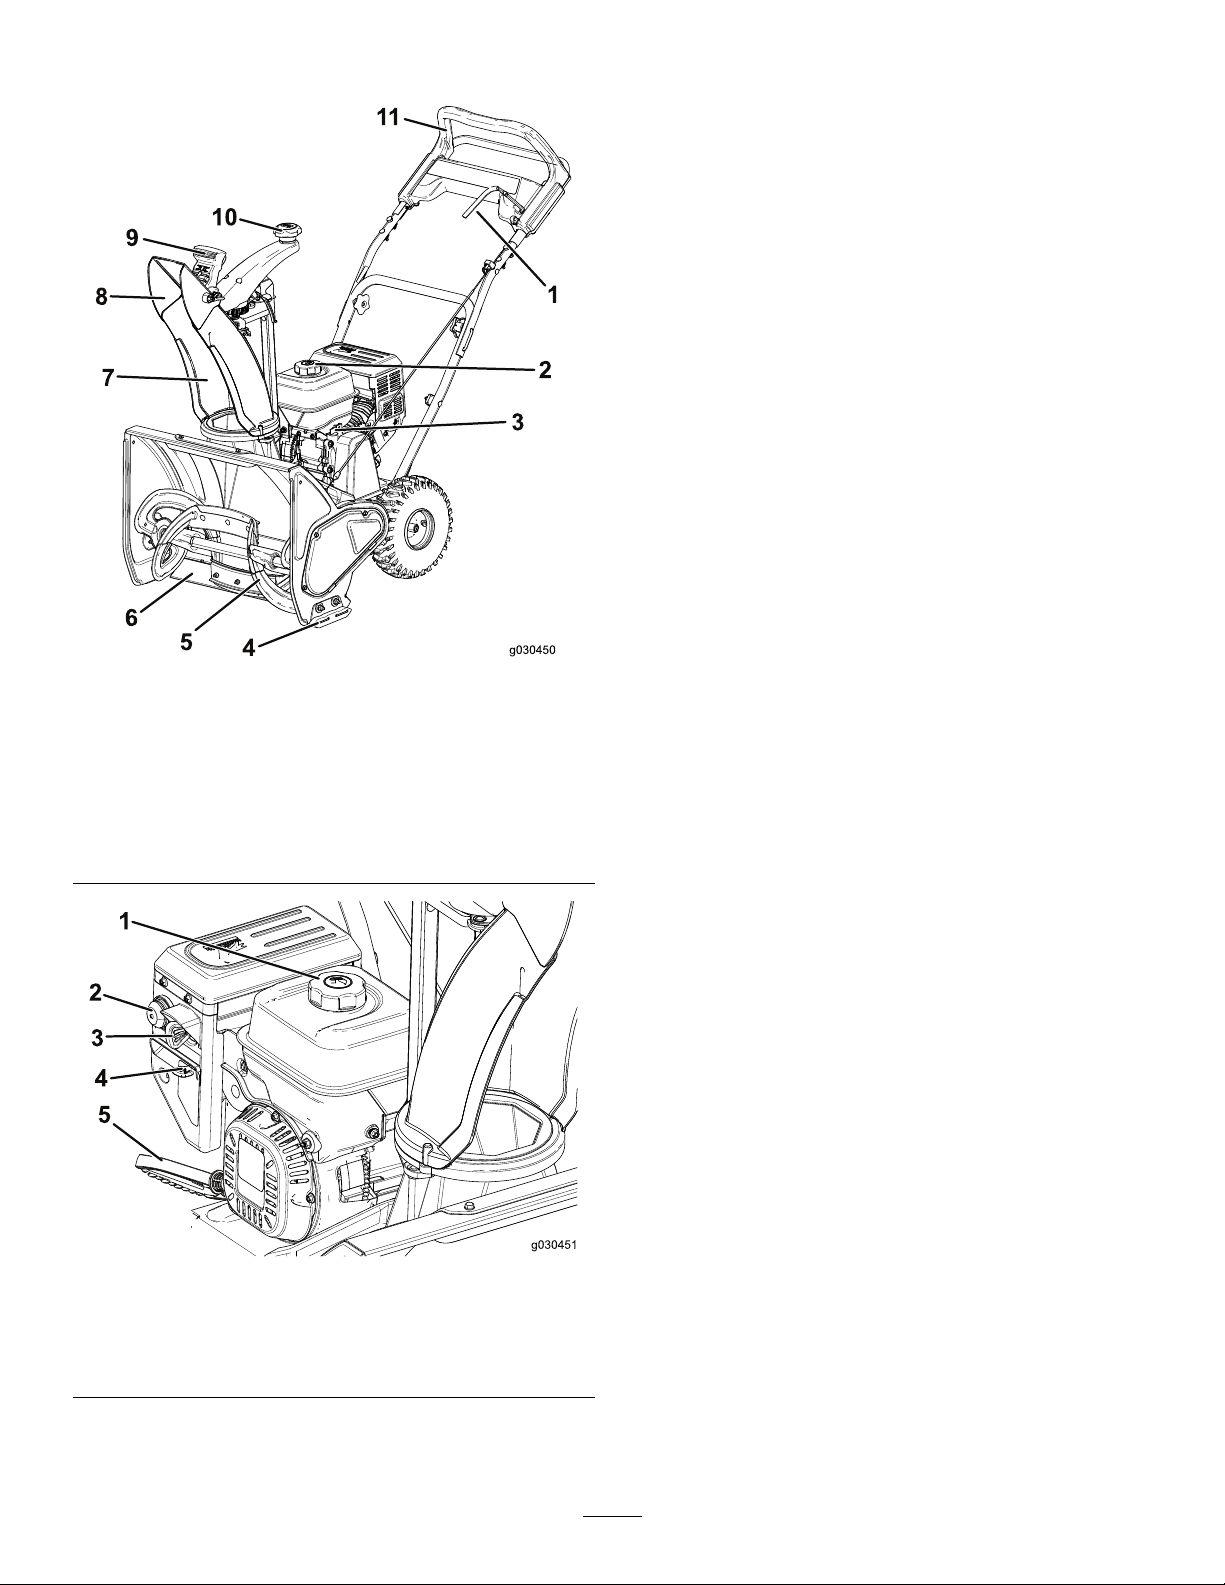
ProductOverview..........................................................7
Operation.....................................................................7
BeforeOperation.......................................................7
Safety.....................................................................7
FillingtheFuelTank................................................7
CheckingtheEngine-OilLevel..................................8
DuringOperation......................................................8
Safety.....................................................................8
StartingtheEngine..................................................9
EngagingtheAuger.................................................9
DisengagingtheAuger.............................................9
Self-PropellingtheMachine......................................9
ShuttingOfftheEngine...........................................9
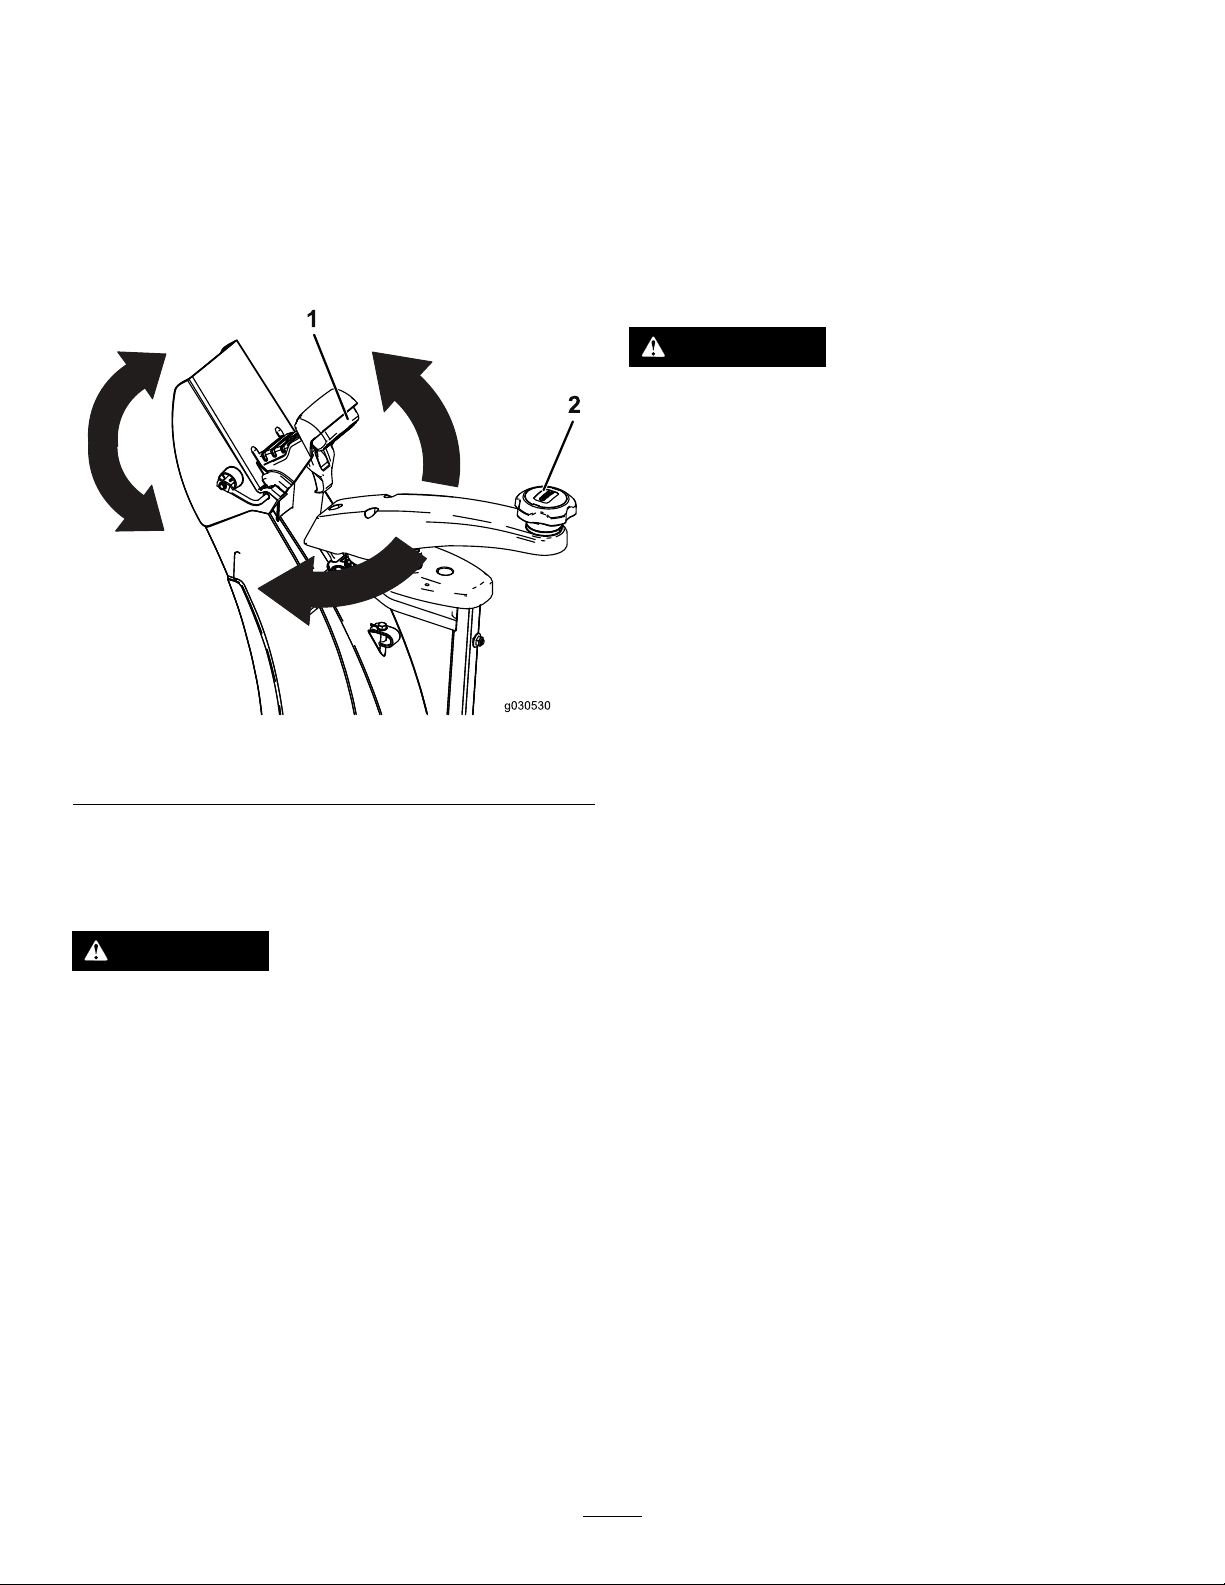
AdjustingtheDischargeChuteandChute
Deector...........................................................10
UncloggingtheDischargeChute..............................10
OperatingTips......................................................10
AfterOperation........................................................11
Safety....................................................................11
PreventingFreeze-upafterUse.................................11
Maintenance.................................................................11
RecommendedMaintenanceSchedule(s)......................11
MaintenanceSafety.................................................11
CheckingtheEngine-OilLevel.................................12
CheckingandAdjustingtheSkids.............................12
InspectingtheThrowingEdges................................13
ChangingtheEngineOil.........................................13
ReplacingtheSparkPlug.........................................14
AdjustingtheAugerCable.......................................14
AdjustingtheTransmissionCable.............................15
CheckingtheTirePressure......................................15
Storage........................................................................16
StoringtheSnowthrower.........................................16
2

Safety
ThismachinecomplieswithANSIB71.3specications
ineffectatthetimeofproduction.
•Readandunderstandthecontentsofthemanualbefore
youstarttheengine.Makesurethateveryoneusingthis
productknowshowtousetheproductandunderstands
thewarnings.
•Donotputyourhandsorfeetnearmovingcomponents
onthemachine.
•Donotoperatethemachinewithoutallguardsandother
safetyprotectivedevicesinplaceandworkingonthe
machine.
•Keepclearofanydischargeopening.Keepbystandersa
safedistanceawayfromthemachine.
•Keepchildrenoutoftheoperatingareaandunderthe
watchfulcareofaresponsibleadultotherthanthe
operator.Neverallowchildrentooperatethemachine.
•Shutthemachineoffbeforeservicing,fueling,or
unclogging.
Youcanndadditionalitemsofsafetyinformationintheir
respectivesectionsthroughoutthismanual.
3

SafetyandInstructionalDecals
Safetyandinstructiondecalsarelocatednearareasofpotentialdanger.Replacedamagedor
missingdecals.
131-1785
OrderPartNo.131-5921
1.Augerdrive—squeezethelevertoengage;releasethelever
todisengage.
4.Thrownobjecthazard—keepbystandersasafedistance
awayfromthesnowthrower.
2.Warning—readtheOperator'sManual.5.Self-propeldrive—pushdownonthehandletoengagethe
self-propeldrive.
3.Cutting/dismembermenthazardofhandorfoot,auger—keep
awayfrommovingparts;keepallguardsandshieldsinplace;
shutofftheengineandwaitfortheaugertostopbefore
leavingthemachine;removetheignitionkeyandreadthe
instructionsbeforeservicingorperformingmaintenance.
131-5914
OrderPartNo.131-5916
1.Cutting/dismembermenthazardofhandorfoot,auger—do
notplaceyourhandinthechute;removetheignitionkey
andreadtheinstructionsbeforeservicingorperforming
maintenance.
x 3
12
34
5
120-9805
120-9805
1.Insertthekey.
2.Primetheengine3times.
3.Engagethechoke.
4.Pullthestartercord.
5.Oncetheengineisrunning,disengagethechoke.
4

Setup
LooseParts
Usethechartbelowtoverifythatallpartshavebeenshipped.
ProcedureDescriptionQty.Use
1Nopartsrequired–Unfoldthehandle.
Bolt(1/4-20X1–1/2inches)1
2Washer-facedlocknut(1/4-20inch)1Installthedischargechute.
3Nopartsrequired–Checktheengine-oillevel.
4Nopartsrequired–Checkthetirepressure.
1
UnfoldingtheHandle
NoPartsRequired
Procedure
Important:Ensurethecablesarenotpinchedwhen
unfoldingthehandle.
Figure4
5

2
InstallingtheDischargeChute
Partsneededforthisprocedure:
1Bolt(1/4-20X1–1/2inches)
1Washer-facedlocknut(1/4-20inch)
Procedure
Insertthechutepostthroughthebracketintothebaseofthe
machineandsecureitusingaboltandalocknut(Figure5).
Figure5
1.Chutepost3.Washer-facedlocknut
(1/4-20inch)
2.Bolt(1/4-20X1–1/2
inches)
4.Bracket
3
CheckingtheEngine-OilLevel
NoPartsRequired
Procedure
Note:Yourmachinecomeswithoilintheenginecrankcase.
Beforestartingtheengine,checktheoillevelandaddoilif
necessary.
RefertoCheckingtheEngine-OilLevel(page12).
4
CheckingtheTirePressure
NoPartsRequired
Procedure
Thetiresareoverinatedatthefactoryforshipping.Reduce
thetirepressureequallyinbothtirestobetween103and137
kPa(15and20psi).
6

ProductOverview
Figure6
1.Augerlever7.Dischargechute
2.Fuel-tankcap8.Chutedeector
3.Dipstick9.Chute-deectorcontrol
4.Skid10.Discharge-chutecontrol
5.Auger11.Upperhandle
6.Scraper
Figure7
1.Fuel-tankcap4.Choke
2.Primer5.Recoil-starthandle
3.Ignitionkey
Operation
BeforeOperation
Safety
•Donotoperatethemachinewithoutwearingadequate
wintergarments.Avoidloosettingclothingthatcanget
caughtinmovingparts.Wearsubstantial,slip-resistant
footwearthatwillimprovefootingonslipperysurfaces.
•Alwayswearsafetyglassesoreyeprotectionduring
operationorwhileperforminganadjustmentorrepair
toprotecteyesfromforeignobjectsthatmaybethrown
fromthemachine.
•Thoroughlyinspecttheareawherethemachineistobe
usedandremovealldoormats,sleds,boards,wires,and
otherforeignobjects.
•Ifashield,safetydevice,ordecalisdamaged,illegible,or
lost,repairorreplaceitbeforebeginningoperation.Also,
tightenanyloosefasteners.
FillingtheFuelTank
•Forbestresults,useonlyclean,fresh(lessthan30days
old),unleadedgasolinewithanoctaneratingof87or
higher((R+M)/2ratingmethod).
•Ethanol:Gasolinewithupto10%ethanol(gasohol)
or15%MTBE(methyltertiarybutylether)byvolume
isacceptable.EthanolandMTBEarenotthesame.
Gasolinewith15%ethanol(E15)byvolumeisnot
approvedforuse.Neverusegasolinethatcontainsmore
than10%ethanolbyvolume,suchasE15(contains15%
ethanol),E20(contains20%ethanol),orE85(contains
85%ethanol).Usingunapprovedgasolinemaycause
performanceproblemsand/orenginedamagewhichmay
notbecoveredunderwarranty.
•Donotusegasolinecontainingmethanol.
•Donotstorefueleitherinthefueltankorfuelcontainers
overthewinterunlessyouuseafuelstabilizer.
•Donotaddoiltogasoline.
Important:Toreducestartingproblems,addfuel
stabilizertothefuelallseason,mixingitwithgasoline
lessthan30daysold.
7

Figure8
1.Donotllabovethebottomofthefuel-tankneck.
CheckingtheEngine-OilLevel
RefertoCheckingtheEngine-OilLevel(page12).
DuringOperation
Safety
•Rotatingaugerbladescaninjurengersorhands.
Staybehindthehandlesandawayfromthedischarge
openingwhileoperatingthemachine.Keepyourface,
hands,feet,andanyotherpartofyourbodyor
clothingawayfrommovingorrotatingparts.
•Neverdirectthedischargetowardpeopleorareaswhere
propertydamagecanoccur.
•Exercisecautiontoavoidslippingorfalling.Alwaysbe
sureofyourfooting,andkeeparmholdonthehandles.
Walk;neverrun.
•Exerciseextremecautionwhenoperatingonslopes.
•Neveroperatethemachinewithoutgoodvisibilityor
light.
•Donotoperatethemachinewhileill,tired,orunderthe
inuenceofalcoholordrugs.
•Lookbehindandusecarewhenbackingupwiththe
machine.
•Whennotactivelyclearingsnow ,disengagepowertothe
rotorblades.
•Donotattempttoclearsnowfromagravelorcrushed
rocksurface.Thisproductisintendedforuseonlyon
pavedsurfaces.
•Donotusethemachineonaroof.
•Neverattempttomakeanyadjustmentswhiletheengine
isrunning(exceptwhenspecicallyrecommendedby
manufacturer).
•Stayalertforhiddenhazardsortrafc.
•Afterstrikingaforeignobject,stoptheengine,remove
theignitionkey,thoroughlyinspectthemachinefor
anydamage,andrepairthedamagebeforestartingand
operatingthemachine.
•Ifthemachineshouldstarttovibrateabnormally,stop
theengineandcheckimmediatelyforthecause.
•Donotruntheengineindoors,exceptwhenstarting
theengineandfortransportingthemachineinorout
ofthebuilding.Opentheoutsidedoors;exhaustfumes
aredangerous.
•Donotoverloadthemachinecapacitybyattemptingto
clearsnowattoofastarate.
•Nevertouchahotengineormufer.
8

StartingtheEngine
Note:Fullyinsertthekeytostarttheengine.Turningthe
keytothemiddlepositiondoesnotstarttheengine.
Figure9
Note:PrimetheengineinBofFigure9accordingtothe
followingtable:
TemperatureSuggestedNumberofPrimes
-23°C(-10°F)andabove3
Below-23°C(-10°F)6
EngagingtheAuger
Figure10
DisengagingtheAuger
Todisengagetheauger,releasetheaugerlever.
Self-PropellingtheMachine
Tooperatetheself-propeldrive,simplywalkwithyourhands
ontheupperhandleandyourelbowsatyoursides,andthe
machineautomaticallykeepspacewithyou(Figure11).
Note:Youcanself-propelthemachinewiththeauger
engagedordisengaged.
Figure11
ShuttingOfftheEngine
Toshutofftheengine,removethekeyfromtheignitionor
movethekeytothemiddleposition.
9

AdjustingtheDischargeChute
andChuteDeector
Toraiseorlowertheangleofthechutedeector,pressthe
triggeronthechutedeectorandmovethechutedeector
upordown.
Toadjustthedischargechute,movethechutehandle.
Note:Disengagetheaugerbeforeadjustingthechuteor
chutedeector.
Figure12
1.Trigger2.Chutehandle
UncloggingtheDischarge
Chute
WARNING
Iftheauger/impellerisrunningbutthereisno
snowcomingoutofthedischargechute,the
dischargechutemaybeclogged.
Neveruseyourhandstoclearacloggeddischarge
chute.Thiscouldresultinpersonalinjury.
1.Whileremainingintheoperatingposition,releasethe
self-propelhandle.
2.Engagetheauger.
3.Pushdownonthehandletoraisethefrontofthe
machineafewcentimeters(inches)offthepavement,
thenliftthehandlesquicklytobumpthefrontofthe
machineontothepavement.
4.Disengagetheauger.
5.Repeatsteps1through4,ifnecessary,untilastreamof
snowcomesoutofthedischargechute.
Note:Ifyoucannotunclogthedischargechutebybumping
thefrontofthemachine,shutofftheengine,waitforall
movingpartstostop,anduseasnow-cleanouttool(not
included);neveruseyourhand.
Important:Uncloggingthedischargechuteby
bumpingthefrontofthemachineonthepavementmay
causetheskidstomove.Adjusttheskidsandtighten
theskidboltssecurely;refertoCheckingandAdjusting
theSkids(page12).
OperatingTips
WARNING
Theaugercanthrowstones,toys,andotherforeign
objectsandcauseseriouspersonalinjurytothe
operatorortobystanders.
•Keeptheareatobeclearedfreeofallobjects
thattherotorbladescouldpickupandthrow.
•Keepallchildrenandpetsawayfromthearea
ofoperation.
•Removethesnowassoonaspossibleafteritfalls.
•Ifthemachinedoesnotpropelitselfforwardonslippery
surfacesorinheavysnow ,pushforwardonthehandle,
butallowthemachinetoworkatitsownpace.
•Overlapeachswathtoensurecompletesnowremoval.
•Dischargethesnowdownwindwheneverpossible.
10

AfterOperation
Safety
•Neverstorethemachinewithfuelinthefueltankinsidea
buildingwhereignitionsourcesarepresent,suchashot
waterheaters,spaceheaters,orclothesdryers.Allowthe
enginetocoolbeforestoringinanyenclosure.
•Whenstoringthemachineformorethan30days,referto
Storage(page16)forimportantdetails.
PreventingFreeze-upafterUse
•Lettheenginerunforafewminutestopreventmoving
partsfromfreezing.Shutofftheengine,waitforall
movingpartstostop,andremoveiceandsnowfromthe
machine.
•Cleanoffanysnowandicefromthebaseofthechute.
•Rotatethedischargechuteleftandrighttofreeitfrom
anyicebuildup.
•WiththeignitionkeyintheOFFposition,pullthe
recoil-starthandleseveraltimestopreventtherecoil
starterfromfreezingup.
•Insnowyandcoldconditions,somecontrolsandmoving
partsmayfreeze.Donotuseexcessiveforcewhen
tryingtooperatefrozencontrols.Ifyouhavedifculty
operatinganycontrolorpart,starttheengineandletit
runforafewminutes.
•Donotusethechutecontroltoattempttomoveafrozen
dischargechute.Holddowntheblueknobanduseyour
handstorotatethechute.
•Transportingthemachineinanopentrailerorvehiclecan
causethecontrolsordischargechutetofreeze.
Maintenance
Note:Determinetheleftandrightsidesofthemachinefromthenormaloperatingposition.
RecommendedMaintenanceSchedule(s)
MaintenanceService
IntervalMaintenanceProcedure
Afterthersthour•Checkforloosefastenersandtightenthemifnecessary.
Aftertherst2hours
•Changetheengineoil.
•Inspecttheaugercableandadjustitifnecessary.
•Inspectthetransmissioncableandadjustitifnecessary.
Beforeeachuseordaily•Checktheengine-oillevelandaddoilifnecessary.
Every100hours•Replacethesparkplug.
Yearly
•Checktheskidsandadjustthemifnecessary.
•InspectthethrowingedgesandhaveanAuthorizedServiceDealerreplacethe
throwingedgesandscraperifnecessary.
•Changetheengineoil.
•Inspecttheaugercableandadjustitifnecessary.
•Inspectthetransmissioncableandadjustitifnecessary.
•Checkthetirepressure.
•Checkforloosefastenersandtightenthemifnecessary.
•HaveanAuthorizedServiceDealerinspectthedrivebeltandreplaceitifnecessary.
Yearlyorbeforestorage•Preparethemachineforstorage.
MaintenanceSafety
Readthefollowingsafetyprecautionsbeforeperformingany
maintenanceonthemachine:
•Beforeperforminganymaintenance,service,or
adjustment,shutofftheengineandremovethekey.If
majorrepairsareeverneeded,contactanAuthorized
ServiceDealer.
•Checkallfastenersatfrequentintervalsforproper
tightnesstobesurethemachineisinsafeworking
condition.
•Maintainorreplacesafetyandinstructionlabels,as
necessary.
•Donotchangethegovernorsettingsontheengine.
•PurchaseonlygenuineTororeplacementpartsand
accessories.
11

CheckingtheEngine-OilLevel
ServiceInterval:Beforeeachuseordaily
Figure13
CheckingandAdjustingthe
Skids
ServiceInterval:Yearly
Checktheskidstoensurethattheaugerdoesnotcontactthe
pavedsurface.Adjusttheskidsasneededtocompensatefor
wear(Figure14).
1.Loosentheskidbolts.
2.Slidea5mm(3/16inch)boardunderneaththescraper.
Note:Usingathinnerboardwillresultinamore
aggressivescraper.Athickerboardwillresultinaless
aggressivescraper.
3.Lowertheskidstotheground.
Note:Ensurethattheskidsareatontheground.
4.Tightentheskidbolts.
Figure14
12

InspectingtheThrowing
Edges
ServiceInterval:Yearly—Inspectthethrowingedgesand
haveanAuthorizedServiceDealer
replacethethrowingedgesandscraper
ifnecessary.
Beforeeachsession,inspectthethrowingedgesforwear.
Whenathrowingedgehasworndowntothewear-indicator
hole,haveanAuthorizedServiceDealerreplacethethrowing
edges(Figure15).
Figure15
1.Thewear-indicatorhole
isintact;youdonotneed
toreplacethethrowing
edges.
2.Thewear-indicatorhole
isexposed;replaceboth
throwingedges.
ChangingtheEngineOil
ServiceInterval:Aftertherst2hours
Yearly
Ifpossible,runtheengineforafewsecondsbeforechanging
theoilbecausewarmoilowsbetterandcarriesmore
contaminants.
Oiltype:automotivedetergentoilwithanAPIservice
classicationofSJ,SL,orhigher.
UseFigure16toselectthebestoilviscosityfortheoutdoor
temperaturerangeexpected:
Figure16
EngineOilCapacities
ModelMaxll
360010.5L(17oz)
1.Movethemachinetoalevelsurface.
2.Placeanoil-drainpanundertheoil-drainplug,remove
theoil-drainplug,andtipthemachinebackwardand
draintheusedoilintheoil-drainpan(Figure17).
Figure17
1.Oil-drainplug
3.Afterdrainingtheusedoil,returnthemachinetothe
operatingposition.
4.Installtheoil-drainplugandtightenitsecurely.
5.Cleanaroundtheoil-llcap.
6.Fillthecrankcasewithoil.
A.Removethedipstickandslowlypouroilintothe
oil-lltubetoraisetheoilleveltotheFullmark
onthedipstick(Figure19).Donotoverll.
13

Figure18
1.Lowoillevel—addoil2.Correctoillevel
B.Installthedipsticksecurely.
ReplacingtheSparkPlug
ServiceInterval:Every100hours—Replacethesparkplug.
WARNING
Replacingthesparkplugwhiletheengineishot
canresultinburns.
Waituntiltheengineiscooltoreplacethespark
plug.
UseaTorosparkplugorequivalent(Champion®RN9YCor
NGKBPR6ES).
1.Removetheboot(Figure19).
Figure19
1.Spark-plugboot
2.Cleanaroundthebaseofthesparkplug.
3.Removeanddiscardtheoldsparkplug.
Note:Youwillneedaratchetwrenchextensionto
removethesparkplug.
4.Setthegapbetweentheelectrodesonanewsparkplug
at0.76mm(0.030inch)asshowninFigure20.
Figure20
1.0.76mm(0.030inch)
AdjustingtheAugerCable
ServiceInterval:Aftertherst2hours
Yearly
Ifthedrivebeltslipsorsquealsunderheavyload,adjustthe
augercable.
1.Loosenthenutonthelowercableclamp,butdonot
removeit(Figure21).
Figure21
1.Nut3.Connector
2.Cable4.Spring
2.Pullthecableuptoremovesomeslack(Figure21).
Important:Donotremovealltheslackfrom
thecable.Removingalltheslackfromthecable
preventstheaugerfromstoppingproperly.
3.Holdthecableinplaceandtightenthenut(Figure21).
14

AdjustingtheTransmission
Cable
ServiceInterval:Aftertherst2hours
Yearly
Ifthewheelseasilystallout,orifthewheelsdrivewithout
engagingtheself-propelhandle,adjustthetransmissioncable.
1.Loosenthenutontheuppercableclamp,butdonot
removeit(Figure22).
Figure22
1.Nut2.Cable
2.Pullthecabledowntoremovemostoftheslackinthe
cable(Figure22).
Important:Donotremovealltheslackfromthe
cable.Removingalltheslackfromthecablemay
causethewheelstoengagewithoutengagingthe
self-propelhandle.
3.Tightenthenut(Figure22).
CheckingtheTirePressure
ServiceInterval:Yearly
Checktheairpressureinthetiresandinatethemto103to
137kPa(15to20psi).
15

Storage
StoringtheSnowthrower
WARNING
•Gasolinefumesarehighlyammable,explosive,
anddangerousifinhaled.Ifyoustorethe
machineinanareawithanopename,the
gasolinefumesmayigniteandcausean
explosion.
•Donotstorethemachineinahouse(living
area),basement,oranyotherareawhereignition
sourcesmaybepresent,suchashotwaterand
spaceheaters,clothesdryers,furnaces,and
otherlikeappliances.
•Donottipthemachinebackwardwithfuelin
thefueltank;otherwise,fuelmayleakoutof
themachine.
1.Onthelastrefuelingoftheseason,addfuelstabilizer
tofreshfuelasdirectedbytheenginemanufacturer.
2.Runtheenginefor10minutestodistributethe
conditionedfuelthroughthefuelsystem.
3.Shutofftheengine,allowittocool,andsiphonthe
fueltankorruntheengineuntilitshutsoff.
4.Starttheengineandrunituntilitstops.
5.Chokeorprimetheengine,startitathirdtime,and
runtheengineuntilitdoesnotstart.
6.Drainthefuelinthecarburetorthroughthe
carburetor-drainboltintoanapprovedgasoline
container.
7.Disposeofunusedfuelproperly.Recycleitaccording
tolocalcodes,oruseitinyourautomobile.
8.Whiletheengineisstillwarm,changetheengineoil.
RefertoChangingtheEngineOil(page13).
9.Removethesparkplug.
10.Squirt2teaspoonsofoilintothespark-plughole.
11.Installthesparkplugbyhandandthentorqueitto27
to30N∙m(20to22ft-lb).
12.WiththeignitionkeyintheOFFposition,pullthe
recoil-starthandleslowlytodistributetheoilonthe
insideofthecylinder.
13.Cleanthemachine.
14.Touchupchippedsurfaceswithpaintavailablefroman
AuthorizedServiceDealer.Sandaffectedareasbefore
painting,andusearustpreventativetopreventthe
metalpartsfromrusting.
15.Tightenanyloosefasteners.Repairorreplaceany
damagedparts.
16.Coverthemachineandstoreitinaclean,dryplace
outofthereachofchildren.Allowtheenginetocool
beforestoringitinanyenclosure.
16

Notes:

*374-0320*
EmissionControlWarrantyStatement
FortheUnitedStates,California,andCanada
YourWarrantyRightsandObligations
TheCaliforniaAirResourcesBoard(CARB),theU.S.EnvironmentalProtectionAgency(EPA),andTheT oroCompany,arepleasedtoexplainthe
emissioncontrolsystemwarrantyonyour2017–2018smalloff-roadengine/equipment.InCaliforniaandtheUnitedStates,newsmalloff-road
engines/equipmentmustbedesigned,built,andcertiedtomeetstringentanti-smogstandards.TheToroCompanywarrantstheemissioncontrol
systemonyoursmalloff-roadengine/equipmentfortheperiodoftimelistedbelow,providedtherehasbeennoabuse,neglect,orimpropermaintenance
ofyoursmalloff-roadengine/equipment.
Youremissioncontrolsystemmayincludepartssuchasthecarburetor,fuel-injectionsystem,theignitionsystem,catalyticconverter,fueltanks,fuellines,
fuelcaps,valves,canisters,lters,vaporhoses,clamps,connectors,andotherassociatedemission-relatedcomponents.
Whereawarrantableconditionexists,TheToroCompanywillrepairyoursmalloff-roadengine/equipmentatnocosttoyouincludingdiagnosis,
partsandlabor.
Manufacturer’sWarrantyCoverage
ThisemissioncontrolsystemiswarrantedfortwoyearsorthedurationofTheToroWarranty,whicheverislonger.Ifanyemission-relatedpartonyour
engine/equipmentisdefective,thepartwillberepairedorreplacedbyTheToroCompany.
OwnerResponsibilities
Asthesmalloff-roadengineowner,youareresponsiblefortheperformanceoftherequiredmaintenancelistedinyourOperator'sManual.Werecommend
thatyouretainallreceiptscoveringmaintenanceonyoursmalloff-roadengine/equipment,butwecannotdenywarrantysolelyforthelackofreceipts.
Asthesmalloff-roadengine/equipmentowner,youshouldhoweverbeawarethatwemaydenyyouwarrantycoverageifyoursmalloff-road
engine/equipmentoraparthasfailedduetoabuse,neglect,impropermaintenanceorunapprovedmodications.
Youareresponsibleforpresentingyoursmalloff-roadengine/equipmenttoaT oroDistributionCenterorServiceCenterassoonasaproblemexists.The
warrantyrepairsshouldbecompletedinareasonableamountoftime,nottoexceedthirty(30)days.
Ifyouhaveanyquestionsregardingyourwarrantycoverage,contactusat:
CustomerCareDepartment,ConsumerDivision
ToroWarrantyCompany
8111LyndaleAvenueSouth
Bloomington,MN55420-1196
1-888-384-9939(U.S.andCanadiancustomers)
emailCustomerSupportat:www.toro.com
GeneralEmissionsWarrantyCoverage
TheToroCompanywarrantstotheultimatepurchaserandeachsubsequentpurchaserthatthesmalloff-roadengine/equipmentis:
•Designed,built,andcertiedtoconformwithallapplicableemissionsregulations;and
•Freefromdefectsinmaterialsandworkmanshipthatcouldcausethefailureofawarrantedpart;and
•Identicalinallmaterialrespectstothepartsasdescribedintheapplicationforcertication.
Thewarrantyperiodbeginsonthedatethesmalloff-roadengine/equipmentisdeliveredtoanultimatepurchaser.Thewarrantedperiodistwoyearsor
thedurationofTheT oroWarranty,whicheverislonger.
Subjecttocertainconditionsandexclusionsasstatedbelow,thewarrantyonevaporativeemissions-relatedpartsisasfollows:
1.Anywarrantedpartthatisnotscheduledforreplacementasrequiredmaintenanceinthewritteninstructionssupplied,iswarranted
forthewarrantyperiodstatedabove.Ifthepartfailsduringtheperiodofwarrantycoverage,thepartwillberepairedorreplacedby
TheToroCompany.Anysuchpartrepairedorreplacedunderwarrantywillbewarrantedfortheremainderofthewarrantyperiod.
2.Anywarrantedpartthatisscheduledonlyforregularinspectioninthewritteninstructionssuppliediswarrantedforthewarranty
periodstatedabove.Anysuchpartrepairedorreplacedunderthewarrantywillbewarrantedfortheremainderofthewarrantyperiod.
3.Anywarrantedpartthatisscheduledforreplacementasrequiredmaintenanceinthewritteninstructionssuppliedis
warrantedfortheperiodoftimebeforetherstscheduledreplacementdateforthatpart.Ifthepartfailsbeforetherst
scheduledreplacement,thepartwillberepairedorreplacedbyTheT oroCompany.Anysuchpartrepairedorreplaced
underwarrantywillbewarrantedfortheremainderoftheperiodpriortotherstscheduledreplacementpointforthepart.
4.Repairorreplacementofanywarrantedpartunderthewarrantyprovisionshereinmustbeperformedatan
AuthorizedServiceDealeratnochargetotheowner.
5.WarrantyservicesorrepairswillbeprovidedatallServiceDealersauthorizedtoservicethesubjectenginesorequipment.
6.Thesmalloff-roadengine/equipmentownerwillnotbechargedfordiagnosticlaborthatisdirectlyassociatedwithdiagnosis
ofadefective,emission-relatedwarrantedpart,providedthatsuchdiagnosticworkisperformedatanAuthorizedServiceDealer.
7.TheT oroCompanyisliablefordamagestootherengine/equipmentcomponentscausedbyafailureunderwarrantyofanywarrantedpart.
8.Throughoutthesmalloff-roadengine/equipmentwarrantyperiodstatedabove,TheT oroCompanywillmaintainasupply
ofwarrantedpartssufcienttomeettheexpecteddemandforsuchparts.
9.Manufacturerapprovedreplacementpartsmaybeusedintheperformanceofanywarrantymaintenanceorrepairsand
mustbeprovidedwithoutchargetotheowner.SuchusewillnotreducethewarrantyobligationsofTheToroCompany.
10.Add-onormodiedpartsthatarenotapprovedbyTheToroCompanymaynotbeused.Theuseofanon-approvedadd-onormodiedpartsby
thepurchaserwillbegroundsfordisallowingawarrantyclaim.TheT oroCompanywillnotbeliabletowarrantfailuresofwarrantedpartscausedby
theuseofannon-approvedadd-onormodiedparts.374-0320RevA

WarrantedParts
Thefollowingemissionwarrantypartsarecovered,totheextentthesepartswerepresentontheT oroengine/equipmentand/orTorosuppliedfuelsystem:
1.FuelSystemParts
•Carburetorandinternalparts
•Coldstartingenrichment(primerorchoke)
•Fuelpump
•Fuelline,ttings,andclamps
•Fueltank,cap,andtether
•Carboncanister
2.AirInductionSystem
•Aircleaner
•Intakemanifold
•Crankcaseventandline(s)
•Purgelineandttings
3.IgnitionSystem
•Sparkplug(s)andwire(s)
•Magnetoignitionsystem
4.CatalyticExhaustSystem
•Catalyticconverter
•Exhaustmanifold
•Airinjectorsystemandvalve(s)
5.MiscellaneousItemsUsedinEmissionControlSystem
•Valves,switches,andlinkages
•Connectors,ttings,andbrackets
374-0320RevA

SnowMaster
PowerMax
TheToroWarranty
AThree-YearLimitedWarranty(45DayLimitedWarrantyforCommercialUse)
ConditionsandProductsCovered
TheT oroCompanyanditsafliate,T oroWarrantyCompany,pursuantto
anagreementbetweenthem,jointlypromisetorepairtheT oroProduct
listedbelowifusedforresidentialpurposes*,ifdefectiveinmaterialsor
workmanshiporifitstopsfunctioningduetothefailureofacomponent
fortheperiodlistedbelow.
Thiswarrantycoversthecostofpartsandlabor,butyoumustpay
transportationcosts.
Thefollowingtimeperiodsapplyfromtheoriginaldateofpurchase:
ProductsWarrantyPeriod
SnowMasterandPowerMaxSnowthrowers
andAttachments
3years
—ChuteLifetime(originalowner
only)
—DeectorLifetime(originalowner
only)
—SnowMasterLowerChuteLifetime(originalowner
only)
—PowerMaxAnti-CloggingSystem(Plastic
impellerhousingcover)
Lifetime(originalowner
only)
LimitedWarrantyforCommercialUse
Gas-poweredToroProductsusedforcommercial,institutional,orrental
use,arewarrantedfor45daysagainstdefectsinmaterialsorworkmanship.
Componentsfailingduetonormalweararenotcoveredbythiswarranty.
InstructionsforObtainingWarrantyService
IfyouthinkthatyourToroProductcontainsadefectinmaterialsor
workmanship,followthisprocedure:
1.ContactanyAuthorizedToroServiceDealertoarrangeserviceattheir
dealership.T olocateadealerconvenienttoyou,refertotheYellow
Pagesofyourtelephonedirectory(lookunder“LawnMowers”)or
accessourwebsiteatwww.Toro.com.Youmayalsocallthenumbers
listedinitem#3tousethe24-hourToroDealerlocatorsystem.
2.Bringtheproductandyourproofofpurchase(salesreceipt)tothe
ServiceDealer.Thedealerwilldiagnosetheproblemanddetermineif
itiscoveredunderwarranty.
3.IfforanyreasonyouaredissatisedwiththeServiceDealer’s
analysisorwiththeassistanceprovided,contactusat:
ToroWarrantyCompany
CustomerCareDepartment,RLCDivision
8111LyndaleAvenueSouth
Bloomington,MN55420-1196
Tollfreeat866-336-5205(U.S.customers)
Tollfreeat866-854-9033(Canadiancustomers)
OwnerResponsibilities
YoumustmaintainyourT oroProductbyfollowingthemaintenance
proceduresdescribedintheOperator'sManual.Suchroutinemaintenance,
whetherperformedbyadealerorbyyou,isatyourexpense.
ItemsandConditionsNotCovered
Thereisnootherexpresswarrantyexceptforspecialemissionsystem
coverageandenginewarrantycoverageonsomeproducts.Thisexpress
warrantydoesnotcoverthefollowing:
•Costofregularmaintenanceserviceorreplacementofwearparts,
suchasblades,rotorblades(paddles),scraperblades,belts,fuel,
lubricants,oilchanges,sparkplugs,lightbulbs,cable/linkageorbrake
adjustments
•Anyproductorpartwhichhasbeenalteredormisusedorneglected
orrequiresreplacementorrepairduetoaccidentsorlackofproper
maintenance
•Pickupanddeliverycharges
•Operationalmisuse,neglect,oraccidents
•RepairsorattemptedrepairsbyanyoneotherthananAuthorizedT oro
ServiceDealer
•Repairsnecessaryduetofailuretofollowrecommendedfuel
procedure(consultOperator'sManualformoredetails)
–Removingcontaminantsfromthefuelsystemisnotcovered
–Useofoldfuel(morethanonemonthold)orfuelwhichcontains
morethan10%ethanolormorethat15%MTBE
–Failuretodrainthefuelsystempriortoanyperiodofnon-use
overonemonth
GeneralConditions
AllrepairscoveredbythesewarrantiesmustbeperformedbyanAuthorized
ToroServiceDealerusingT oroapprovedreplacementparts.Repairbyan
AuthorizedT oroServiceDealerisyoursoleremedyunderthiswarranty.
NeitherTheToroCompanynorToroWarrantyCompanyisliablefor
indirect,incidental,orconsequentialdamagesinconnectionwiththe
useoftheToroProductscoveredbythesewarranties,includingany
costorexpenseofprovidingsubstituteequipmentorserviceduring
reasonableperiodsofmalfunctionornon-usependingcompletionof
repairsunderthesewarranties.
Allimpliedwarrantiesofmerchantability(thattheproductistforordinary
use)andtnessforuse(thattheproductistforaparticularpurpose)are
limitedtothedurationoftheexpresswarranty.
Somestatesdonotallowexclusionsofincidentalorconsequential
damages,orlimitationsonhowlonganimpliedwarrantylasts,sotheabove
exclusionsmaynotapplytoyou.
Thiswarrantygivesyouspeciclegalrights,andyoumayalsohaveother
rightswhichvaryfromstatetostate.
CountriesOtherthantheUnitedStatesorCanada
CustomerswhohavepurchasedT oroproductsexportedfromtheUnitedStatesorCanadashouldcontacttheirToroDistributor(Dealer)toobtain
guaranteepoliciesforyourcountry,province,orstate.IfforanyreasonyouaredissatisedwithyourDistributor'sserviceorhavedifcultyobtaining
guaranteeinformation,contacttheT oroimporter.Ifallotherremediesfail,youmaycontactusatToroWarrantyCompany.
AustralianConsumerLaw
AustraliancustomerswillnddetailsrelatingtotheAustralianConsumerLaweitherinsidetheboxoratyourlocalT oroDealer.
*Residentialpurposesmeansuseoftheproductonthesamelotasyourhome.Useatmorethanonelocation,orinstitutionalorrentaluse,isconsidered
commercialuse,andthecommercialusewarrantywouldapply.
374-0314RevB
This manual suits for next models
1
Table of contents
Other Toro Snow Blower manuals

Toro
Toro 37779 User manual

Toro
Toro 38073 Series User manual

Toro
Toro 38567 User manual

Toro
Toro Power TRX 1428 OHXE User manual

Toro
Toro 722 Power Throw User manual

Toro
Toro 37781 User manual

Toro
Toro Power Max 828LXE User manual

Toro
Toro Power Clear 38578 User manual

Toro
Toro 38051 User manual

Toro
Toro CCR Powerlite 38173 User manual

Toro
Toro Power Clear 821 R-C User manual

Toro
Toro 38751 User manual

Toro
Toro 39914 User manual

Toro
Toro 38026 User manual

Toro
Toro Power Max Heavy Duty 926 OXE User manual

Toro
Toro Power Max Heavy Duty 928 OHXE User manual

Toro
Toro 38637C User manual

Toro
Toro TXL 2000 User manual

Toro
Toro power max 826 OXE User manual

Toro
Toro 38547 User manual