Toro 41253 Series User manual

FormNo.3362-317RevA
SpreaderBaseUnit
forWorkman®3000/4000andHDSeriesUtilityVehicle
ModelNo.41253—SerialNo.290000001andUp
InstallationInstructions
Safety
SafetyandInstructionalDecals
Safetydecalsandinstructionsareeasilyvisibletotheoperatorandarelocatednearanyareaof
potentialdanger.Replaceanydecalthatisdamagedorlost.
93-6687
1.Donotstephere.
93-6689
1.Warning—donotcarrypassengers.
93-9084
1.Liftpoint2.Tie-downpoint
93–9528
93–9863
1.Tippinghazard—readtheOperator’sManual.
2.Warning—maximumloadis318kg.
117–4977
1.Warning—readtheOperator’sManual.
2.Crushinghazard—stayclearofthependulum.
3.Thrownobjecthazard—keepbystandersasafedistance
fromthemachine.
117–4979
1.Entanglementhazard,belt—stayawayfrommovingparts,
keepallguardsandshieldsinplace.
©2009—TheToro®Company
8111LyndaleAvenueSouth
Bloomington,MN55420
Registeratwww.Toro.com.OriginalInstructions(EN)
PrintedintheUSA.
AllRightsReserved
Installation
Note:InstalltheHighFlowHydraulicControlKitto
thevehiclebeforeinstallingthespreaderbase.Referto
theInstallationInstructionsincludedwiththekit.
1.Removeallcomponentsfromthepackaging.
Removeandretaintheattachmentmounting
bracketsandfastenersusedtosecurethespreader
frametothepackagingskid.
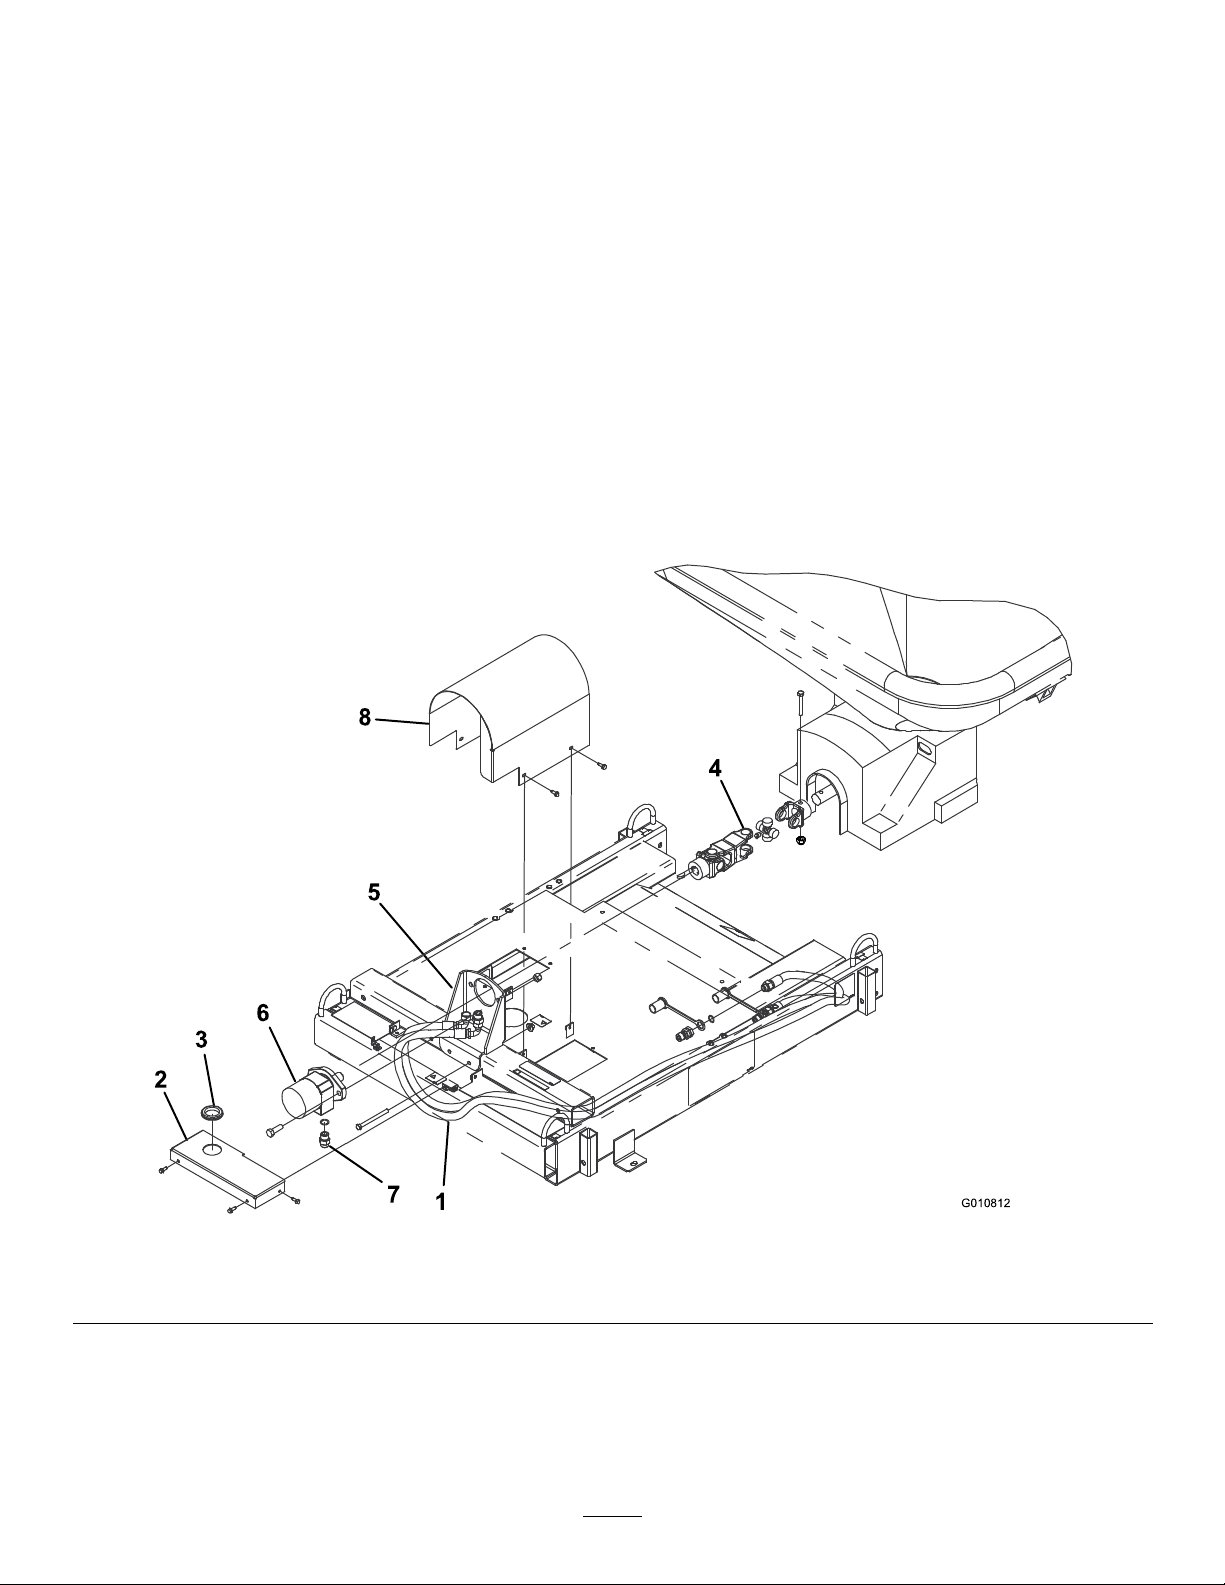
2.Routethehydraulichosesthroughtheguidesalong
therightsideoftheframe(Figure1).Ensurethat
thestraightttingendsofthehosesgototherearof
thespreaderframe.
3.Insertarubbergrommetintotheholeintheaccess
cover(Figure1).
4.Insertthefrontendofthehosesthroughtheaccess
holeinthecover.
5.Mounttheaccesscovertothespreaderframewith
4washerheadscrews(Figure1).
6.Installthe2straightttingsandO-ringstothe
motor(Figure1).
7.ConnectthefronthosettingsandO-ringstothe
straightttingsonthemotor(Figure1).
8.Securethedriveshafttothespreaderdriveshaft
withabolt(3/8x2-1/2inches)andnut(3/8inch)
(Figure1).
9.Securethemotormounttothespreaderframewith
2bolts(3/8x4-1/4inches)andnuts(3/8inch)
(Figure1).
10.Securethehydraulicmotortothemotormountwith
2bolts(1/2x1-1/2inches)andnuts(1/2inch)
(Figure1).
G010812
1
2
3
4
5
6
7
8
Figure1
1.Hydraulichose3.Rubbergrommet5.Motormount7.Straighttting
2.Accesscover4.Driveshaft6.Hydraulicmotor8.Driveshaftcover
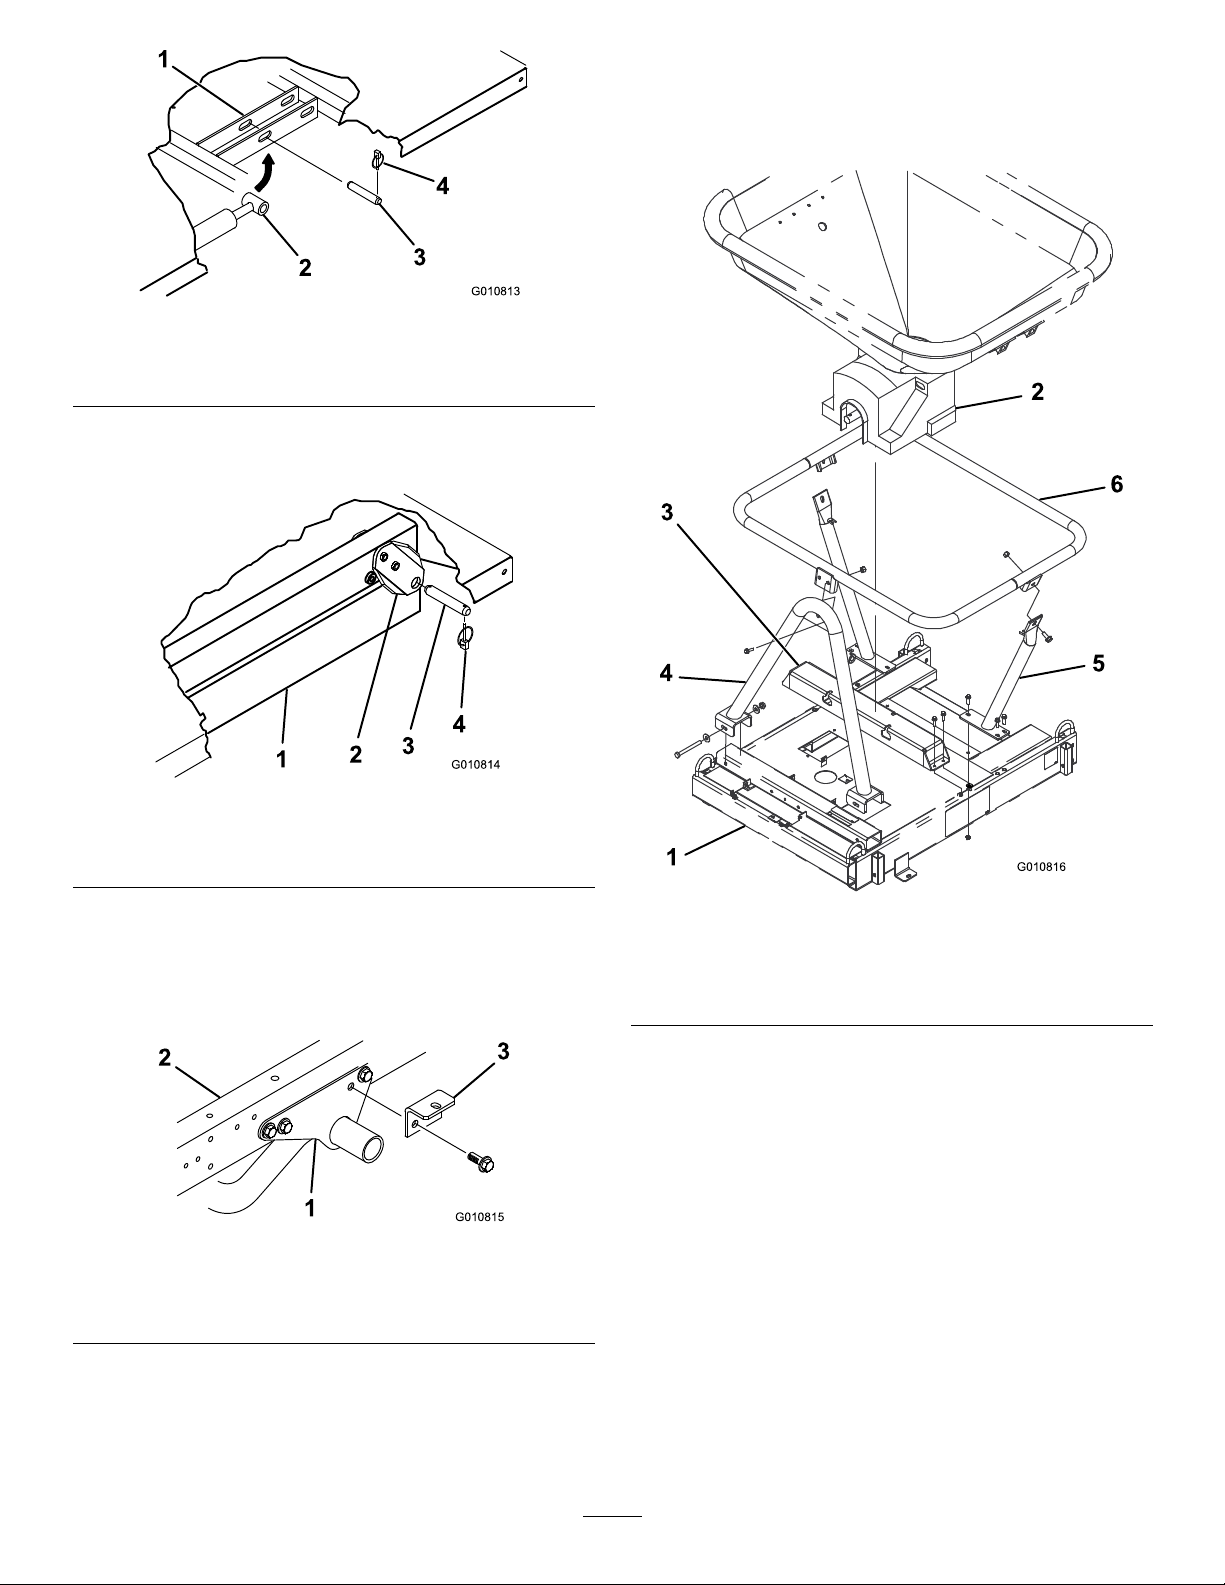
11.Withthebedlowered,removetheclevispinsand
lynchpinssecuringeachcylinderrodendtothebed
mountingplates(Figure2).
2
G010813
1
23
4
Figure2
1.Bedmountingplate3.Clevispin
2.Cylinderrodend4.Lynchpin
12.Removetheclevispinand2lynchpinssecuringeach
setofpivotplatestotheframechannels(Figure3).
G010814
123
4
Figure3
1.Vehicleframechannel3.Clevispin
2.Pivotplate4.Lynchpin
13.Carefullyremovethebedfromthevehicleframe.
14.Removethe2angeheadboltsandangelocknuts
securingtherearofeachengineframemounting
brackettoeachsideofthevehicleframe(Figure4).
G010815
1
23
Figure4
1.Engineframemounting
bracket
3.Attachmentmounting
bracket
2.Vehicleframe
15.Looselysecureanattachmentbrackettoeachengine
framemountingbracketandthevehicleframe
withthe2angeheadboltsandangelocknuts
previouslyremoved(Figure4).
16.Mountthespreaderdrivetothesupportchannel
with2bolts(M12x65mm),2bolts(M12x40mm),
and4nuts(M12)(Figure5),providedwiththe
spreader.
G010816
1
2
3
45
6
Figure5
1.Spreaderframe4.Frontsupporttube
2.Spreaderdrive5.Rearsupporttube(2)
3.Supportchannel6.Upperframe
17.Looselymountthefrontsupporttubetothe
spreaderframewith2bolts,4washers,and2nuts
(Figure5).
18.Looselymounteachrearsupporttubetothe
spreaderframewith3angeboltsand1angenut
(Figure5).
19.Looselymounttheupperframetothesupporttubes
with4angeboltsandangenuts(Figure5).
20.Positionthespreaderframeontothevehicleframe
aligningthemountingtabswiththeattachment
brackets(Figure6).
21.Looselymountthesupporttubetorearofthe
spreaderbasewith4bolts,8washers,and4nuts
(Figure6).
3

22.Securethesupporttubetothevehicleframewith2
pinsand4lynchpins(Figure6).
23.Securethespreaderframemountingtabstothe
attachmentmountingbracketswith2bolts,washers,
andnuts(Figure6).Torqueallfastenersto75ft-lb
(102N-m).
24.Mounttheradiatorcovertothevehicleframewith4
boltsandwashers(Figure6).
25.Mountthesupportchannelandspreadertothe
spreaderframewith4boltsandwashers(Figure5).
Placethewashersbetweenthechannelandframe.
Note:Wheninstallingthespreader,slidethepump
sideofthePTOshaftontothepump.
26.Tightenallfasteners.
27.Lubricatethedriveshaftgreasettingwithgeneral
purposelithiumbasegrease.Greaseitafterevery50
hoursofoperation.
28.Mountthedriveshaftcovertothespreaderframe
tabswith4washerheadscrews(Figure1).
29.Tostorethejackstands,insertthemintothetop
ofthemountingtubes(padsideup)andsecureit
withthehitchpins(Figure6).Insertthejackstands
intothebottomofthemountingtubestostorethe
spreaderonthem.Makesurethegroundisrm.
Note:Youmaymountcastorwheelstojackstands.
G010817
1
2
3
4
5
6
7
Figure6
(Upperspreaderpartsnotshown.)
1.Supporttube3.Lynchpin5.Jackstand7.Hitchpin
2.Pin4.Radiatorcover6.Attachmentmounting
bracket
4

Notes:
5

Notes:
6

Notes:
7

Toro General Commercial Products Warranty
ATwo-Year Limited Warranty
Conditions and Products Covered
The Toro Company and its affiliate, Toro Warranty Company,
pursuant to an agreement between them, jointly warrant your Toro
Commercial Product (“Product”) to be free from defects in materi-
als or workmanship for two years or 1500 operational hours*,
whichever occurs first. This warranty is applicable to all products
with the exception of Aerators (refer to separate warranty state-
ments for these products). Where a warrantable condition exists,
we will repair the Product at no cost to you including diagnosis,
labor, parts, and transportation. This warranty begins on the date
the Product is delivered to the original retail purchaser.
* Product equipped with hour meter
Instructions for Obtaining Warranty Service
You are responsible for notifying the Commercial Products Dis-
tributor or Authorized Commercial Products Dealer from whom
you purchased the Product as soon as you believe a warrantable
condition exists. If you need help locating a Commercial Products
Distributor or Authorized Dealer, or if you have questions regard-
ing your warranty rights or responsibilities, you may contact us at:
Toro Commercial Products Service Department
Toro Warranty Company
8111 Lyndale Avenue South
Bloomington, MN 55420-1196
952-888-8801
Owner Responsibilities
As the Product owner, you are responsible for required main-
tenance and adjustments stated in your Operator’s Manual.
Failure to perform required maintenance and adjustments can be
grounds for disallowing a warranty claim.
Items and Conditions Not Covered
Not all product failures or malfunctions that occur during the
warranty period are defects in materials or workmanship. This
warranty does not cover the following:
Product failures which result from the use of non-Toro
replacement parts, or from installation and use of add-on,
or modified non-Toro branded accessories and products. A
separate warranty may be provided by the manufacturer of
these items.
Product failures which result from failure to perform recom-
mended maintenance and/or adjustments. Failure to properly
maintain your Toro product per the Recommended Mainte-
nance listed in the Operator’s Manual can result in claims for
warranty being denied.
Product failures which result from operating the Product in an
abusive, negligent or reckless manner.
Parts subject to consumption through use unless found to be
defective. Examples of parts which are consumed, or used
up, during normal Product operation include, but are not lim-
ited to, brakes pads and linings, clutch linings, blades, reels,
bed knives, tines, spark plugs, castor wheels, tires, filters,
belts, and certain sprayer components such as diaphragms,
nozzles, and check valves, etc.
Failures caused by outside influence. Items considered to be
outside influence include, but are not limited to, weather, stor-
age practices, contamination, use of unapproved coolants,
•
•
•
•
•
lubricants, additives, fertilizers, water, or chemicals, etc.
Normal noise, vibration, wear and tear, and deterioration.
Normal “wear and tear” includes, but is not limited to, dam-
age to seats due to wear or abrasion, worn painted surfaces,
scratched decals or windows, etc.
Parts
Parts scheduled for replacement as required maintenance are war-
ranted for the period of time up to the scheduled replacement time
for that part. Parts replaced under this warranty are covered for the
duration of the original product warranty and become the property
of Toro. Toro will make the final decision whether to repair any ex-
isting part or assembly or replace it. Toro may use remanufactured
parts for warranty repairs.
Note Regarding Deep Cycle Battery Warranty:
Deep cycle batteries have a specified total number of kilowatt-
hours they can deliver during their lifetime. Operating, recharging,
and maintenance techniques can extend or reduce total battery
life. As the batteries in this product are consumed, the amount
of useful work between charging intervals will slowly decrease
until the battery is completely worn out. Replacement of worn out
batteries, due to normal consumption, is the responsibility of the
product owner. Battery replacement may be required during the
normal product warranty period at owner’s expense.
Maintenance is at Owner’s Expense
Engine tune-up, lubrication cleaning and polishing, replacement of
filters, coolant, and completing Recommended Maintenance are
some of the normal services Toro products require that are at the
owner’s expense. General Conditions
Repair by an Authorized Toro Distributor or Dealer is your sole
remedy under this warranty.
Neither The Toro Company nor Toro Warranty Company is
liable for indirect, incidental or consequential damages in
connection with the use of the Toro Products covered by this
warranty, including any cost or expense of providing sub-
stitute equipment or service during reasonable periods of
malfunction or non-use pending completion of repairs under
this warranty. Except for the Emissions warranty referenced
below, if applicable, there is no other express warranty. All
implied warranties of merchantability and fitness for use are
limited to the duration of this express warranty.
Some states do not allow exclusions of incidental or consequential
damages, or limitations on how long an implied warranty lasts, so
the above exclusions and limitations may not apply to you. This
warranty gives you specific legal rights, and you may also have
other rights which vary from state to state.
Note regarding engine warranty:
The Emissions Control System on your Product may be covered
by a separate warranty meeting requirements established by the
U.S. Environmental Protection Agency (EPA) and/or the California
Air Resources Board (CARB). The hour limitations set forth above
do not apply to the Emissions Control System Warranty. Refer to
the Engine Emission Control Warranty Statement printed in your
Operator’s Manual or contained in the engine manufacturer’s
documentation for details.
•
•
Countries Other than the United States or Canada
Customers who have purchased Toro products exported from the United States or Canada should contact their Toro Distributor (Dealer)
to obtain guarantee policies for your country, province, or state. If for any reason you are dissatisfied with your Distributor’s service or
have difficulty obtaining guarantee information, contact the Toro importer. Part No. 374-0031 Rev. D
Table of contents
Other Toro Spreader manuals


Popular Spreader manuals by other brands

XtremepowerUS
XtremepowerUS 65057 Owner's manual and safety instructions

Earth Way
Earth Way FLEX-SELECT F80 Series Assembly and operating instructions

Earth Way
Earth Way Prizelawn BF l owner's manual

In-Ex
In-Ex 165 owner's manual

Salt Dogg
Salt Dogg SHPE0750 Series installation instructions

Earth Way
Earth Way Hand Crank Spreader Setting instructions

AIRFLO
AIRFLO PSV Operator and parts manual

Earth Way
Earth Way FLEX-SELECT F80PSD Assembly and operating instructions

Earth Way
Earth Way EV-N-Spred C22HD Assembly and operating instructions

Western
Western PRO-FLO 2 owner's manual

Gearmore
Gearmore PDC400 Operation, service & parts manual

Agri-Fab
Agri-Fab 45-02152 owner's manual


