Torro RF Series User manual
Silniki rurowe RF Torro
Tubular motors RF | Buismotoren RF
Instrukcja obsługi | Operating instructions | Handleiding
ver. 2.0
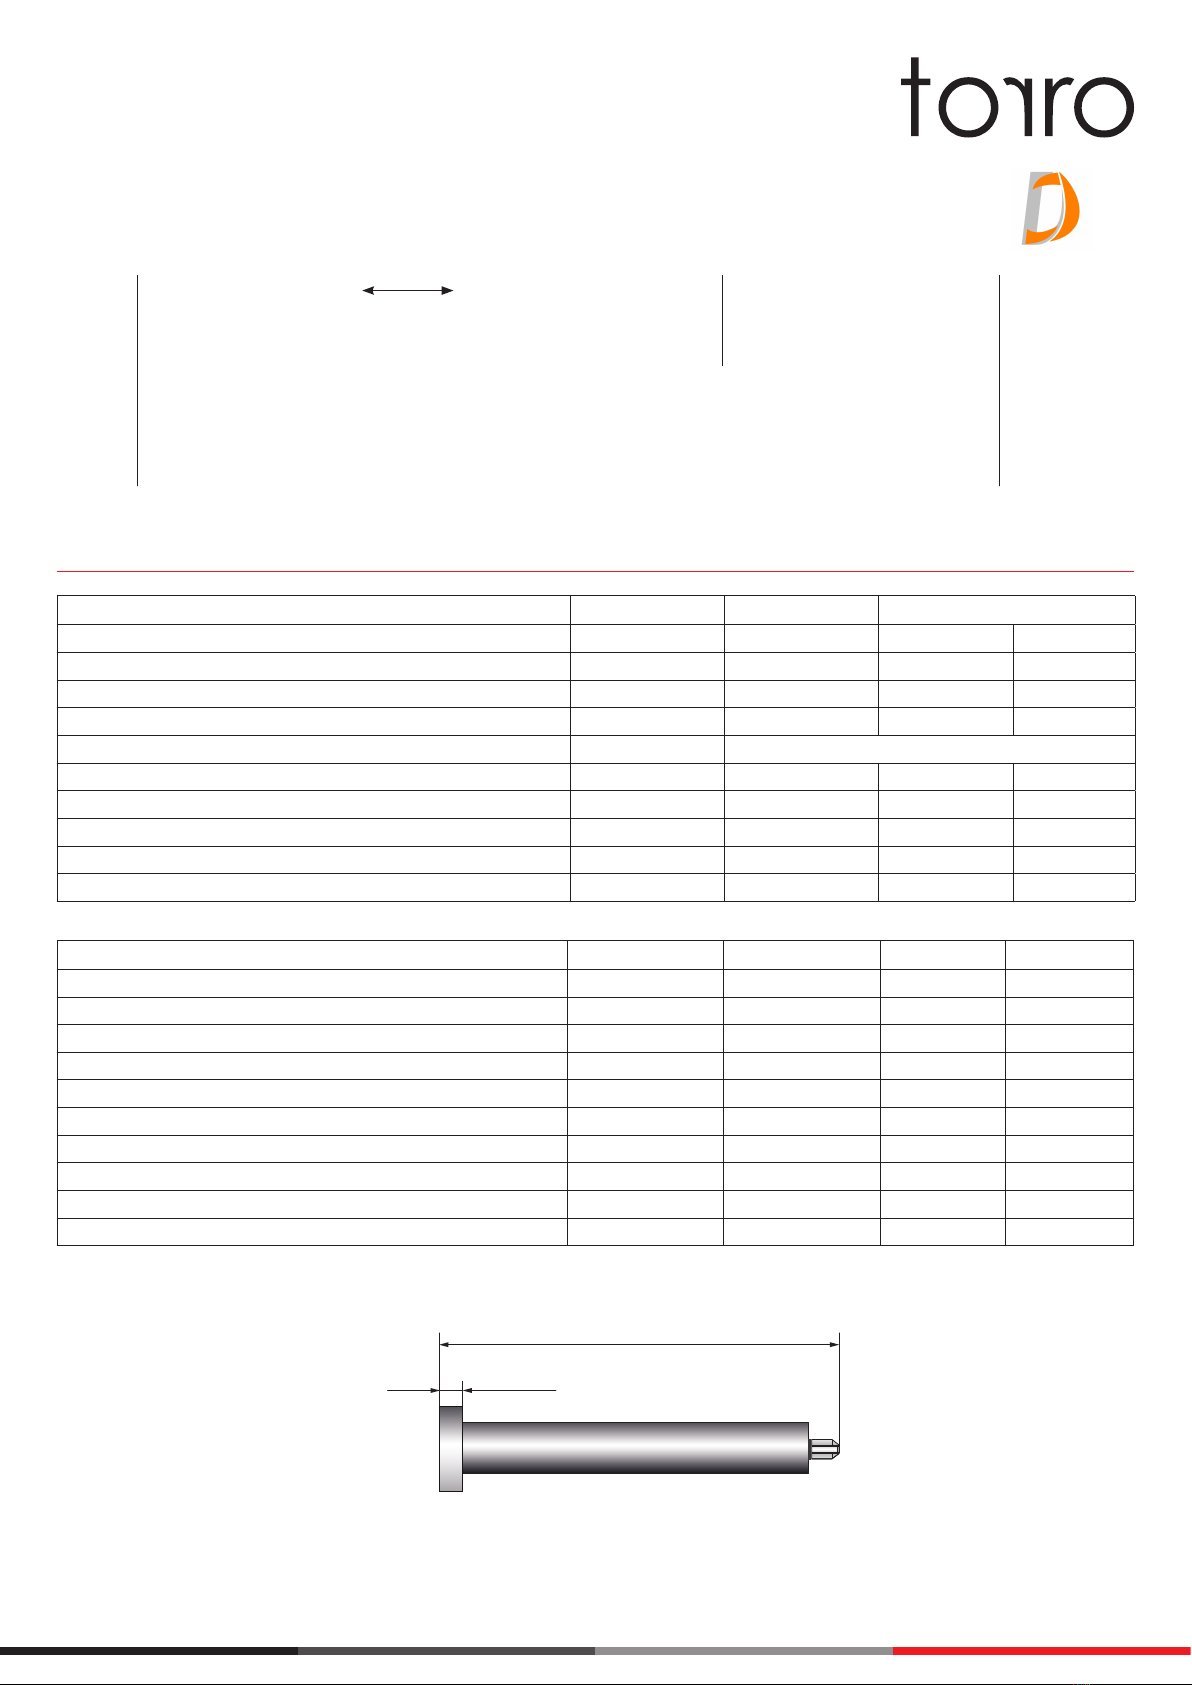
typ | type | тype AM45QMEL RF AM35MEL RF AM35QMEL RF
moment obrotowy koppel 6 Nm 6 Nm 3 Nm 6 Nm
omwentelingen per minuut 28 rpm 28 rpm 28 rpm 18 rpm
lengte motor 704 mm 492 mm 504 mm 504 mm
LHmotor kop breedte 14 mm 12 mm 12 mm 12 mm
nominale spanning AC 230 V 50 Hz
stroom 0,49 A 0,49 A 0,38 A 0,49 A
moc znamionowa nominaal vermogen 115 W 115 W 85 W 115 W
temperatura pracy werk temperatuur 0 ÷ 60 °C 0 ÷ 60 °C 0 ÷ 60 °C 0 ÷ 60 °C
klasse IP 44 IP 44 IP 44 IP 44
DTC kabel + + +
typ | type | тype AM15 EB RF AM24 RF AM25 RF AM25 EB RF
moment obrotowy koppel 0,3 Nm 0,8 Nm 1 Nm 1,2 Nm
omwentelingen per minuut 35 rpm 34 rpm 30 rpm 30 rpm
lengte motor 356 mm 202 mm 289 mm 451 mm
LHmotor kop breedte 9 mm - 12 mm 16 mm
nomonale spanning
stroom 0,80A 0,65 A 0,90 A 1,0 A
moc znamionowa nominaal vermogen 4 W - 11 W 6,7 W
temperatura pracy werk temperatuur 0 ÷ 60 °C 0 ÷ 60 °C 0 ÷ 60 °C 0 ÷ 60 °C
klasse IP 44 IP 20 IP 44 IP 44
DTC kabel - - - -
Dane techniczne | Technical data | Technische data
Silniki
Motors
Motoren
AM35MEL RF Piloty
Remote controls
Afstandsbedieningen
AC127 RF Przełączniki
Switches
Schakelaars
AC125-01 RF
AM35QMEL RF AC129 RF AC126-01 RF
AM45QMEL RF AC141 RF AC128-01 RF
AM24 RF
AM25 EB RF
AM25 RF AC133 RF
AM15 EB RF AC134 RF
L
L
H
Blijf uit de buurt van water
Stoot de motor niet!
Boor niet in de motor!
Losse kabel beschermt tegen
binnendringend water.
Verwijderd houden van bijtende stoffen!
Niet in vloeistoffen dompelen!
Ostrzeżenia | Warnings | Waarschuwingen
Ogólne wytyczne | Before start | Voor het starten
• Przed rozpoczęciem użytkowania urządzenia należy dokładnie przeczytać całą instrukcję, jak również zachować ją przez cały okres używania urządzenia.
Before using the product please read all operating instructions carefully. Please keep these operating instructions for future reference.
Lees voor gebruik van het product alle gebruiksaanwijzingen aandachtig door. Bewaar deze gebruiksaanwijzing voor toekomstig gebruik.
• W zależności od wersji silnika/odbiornika, potwierdzenie operacji następuje poprzez krótki ruch silnika lub sygnał dźwiękowy.
Depending on a motor/receiver version, confirmation is indicated by move or sound.
Afhankelijk van een motor/ontvanger uitvoering wordt de bevestiging aangegeven door beweging of geluid.
•Po rozpoczęciu danego punktu programowania, po 10 - 30 s bezczynności, zmiany nie zostaną zapisane i silnik automatycznie zasygnalizuje wyjście z trybu
ustawiania poprzez ruch lub dźwięk.
After beginning of each stage of programming: if there is no action within 10 -30 s, changes will not be saved and motor will quit the stage confirming it with move/sound signal.
Na het begin van elke programmeerfase: als er binnen 10 - 30 sec. geen actie is, worden de wijzigingen niet opgeslagen en zal de motor de fase verlaten en
dit bevestigen met een bewegings-/geluidssignaal.
• Każda pozycja (poza pierwszą) może być niezależnie ustawiana i kasowana.
Each middle and end positions (except the first one) can be set and canceled independently.
Elke midden- en eindpositie (behalve de eerste) kan afzonderlijk worden ingesteld en geannuleerd.
• Pierwsza pozycja krańcowa może zostać usunięta tylko po całkowitym zresetowaniu pamięci silnika (pkt. 10).
First position may be deleted only after complete reset of motor’s memory (section 10).
De eerste positie mag alleen worden gewist na een volledige reset van het motorgeheugen (paragraaf 10).
• Pozycje pośrednie (możliwość ustawienia do 4 pozycji) mogą być ustawione wyłącznie pomiędzy górną i dolną pozycją krańcową.
Middle positions (up to 4) can be set between top and bottom positions only.
Middelste posities (maximaal 4) kunnen alleen worden ingesteld tussen de bovenste en onderste posities.
• Pojedyncze wciśnięcie lub spowoduje ruch do najbliższej pozycji środkowej lub krańcowej.
Single press of or button will cause move to the nearest middle/end position.
Door één keer op of te drukken, gaat u naar de dichtstbijzijnde middelste/eindpositie.
• Podwójne wciśnięcie lub spowoduje ruch do pozycji krańcowej (górnej lub dolnej), bez zatrzymywania się.
Double press of or button will cause move to the desired end position (top or bottom).
Door twee keer op de of knop te drukken gaat u naar de gewenste eindpositie (boven of onder).
górna pozycja krańcowa
top limit position
boven grens
pośrednie pozycje krańcowe (max. 4)
middle limit positions (max. 4)
middelste eindposities (max. 4)
dolna pozycja krańcowa
bottom limit position
ondergrens
Podłączenie zasilania i okablowanie | Power wire and connection | Stroomdraad en aansluiting
AM24 RF / AM25 RF
AM35MEL RF / AM35QMEL RF
AM45QMEL RF
AC 230 V 50 Hz
N - neutralny (niebieski)
neutral (blue)
neutraal (blauw)
L - fazowy (brązowy)
live (brown)
fase (bruin)
PE - uziemienie (zielony/żółty)
earth (green/yellow)
aarde (groen/geel
port A
serial line A
seriële poort A
(RS485/RS232) port B
serial line B
seriële poort B
(RS485/RS232)
COM
góra | up | op
stop | stop | stop
dół | down | neer
Wtyczka RJ-12
Plug RJ-12
plug RJ-12
sterowanie bezpotencjałowe dry
contact switch control
controle schakelaar
123456
3- czerwony | red | rood
4- zielony | green | groen
5 - żółty | yellow | geel
6- niebieski | blue | blauw
1 - biały | white | wit
2- czarny | black | zwart
AM35MEL RF / AM35QMEL RF - DCT
Installatie en aansluiting moeten worden uitgevoerd door een gekwalificeerde technicus.
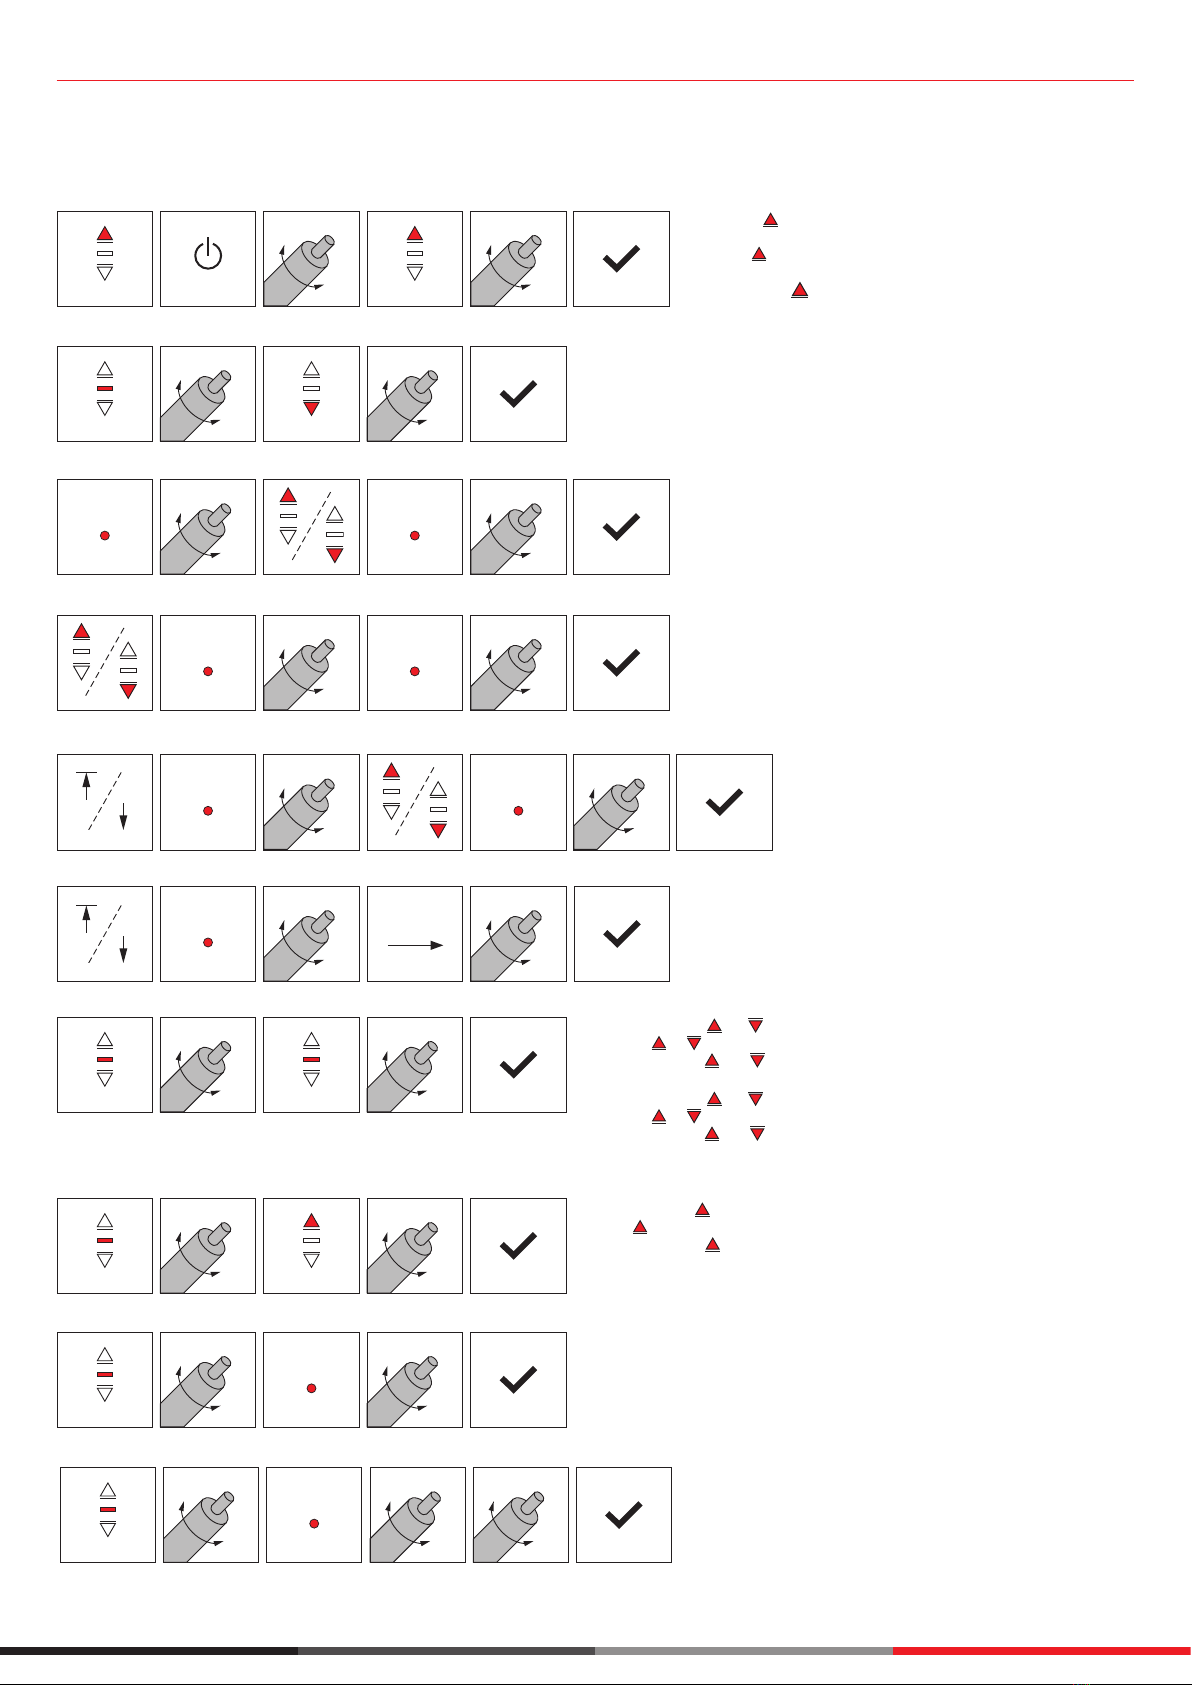
Programowanie | Programming | Programmeren
2. Zmiana kierunku obrotu|Changingdirection|Richting veranderen
3. Ustawianiegórnejpozycjikrańcowej|Toplimitpositionsetting|Bovenste positie instellen
4. Ustawianiepozostałychpozycjikrańcowych|Otherlimitpositionsetting|Andere instelling van de eindpositie
5. Dopasowaniepozycjikrańcowej|Limitposition ine-tuning|Fijnafstelling van de eindpositie
6. Usuwaniepozycjikrańcowej|Deletingthelimitposition|Eindpositie wissen
7. Tryb pracy roletowy 1)/żaluzjowy2) | Dot move 1) and continuous move 2)convertion|Puntverplaatsing 1) en continue verplaatsing2) conversie
8. Dodawanienowegonadajnikalubkanału|Addingnewtransmitterorchannel|Nieuwe zender of kanaal toevoegen
a
≥ 3 s
dC eb
POWER ON
a
5 s
bdc
a
5 s
b c d
a
5 s
b c d
10. RESET-kasowaniewszystkichustawieńsilnika|RESET-Deletingallsettings|RESET-Alle instellingen verwijderen
b
PROG
7 s
c ea
b ea
PROG
1 s
d
PROG
1 s
c
b
PROG
1 s
cd
PROG
1 s
ea
b
PROG
1 s
c fe
PROG
1 s
ad
a) Trzymając po 3 s włącz napięcie.
Kroki a) i b) można zastąpić wciśnięciem przycisku PROG na silniku.
Holding button, after 3 s turn power on.
Steps a) and b) can be replaced by pressing the PROG button on the motor.
Houd de knop ingedrukt, schakel de stroom na 3 sec in.
Stappen a) en b) kunnen worden vervangen door op de PROG-knop op
de motor te drukken..
a) Pierwsze wciśnięcie przycisku PROG należy wykonać, gdy belka dolna
znajduje się kilka cm poniżej docelowego poziomu.
First press of the PROG button should be done a little bit lower than
desired bottom bar position.
De eerste druk op de PROG-knop moet iets lager worden gedaan
dan de gewenste positie van de onderste balk.
1) Krótkie wciśnięcie lub powoduje ruch do najbliższej pozycji środkowej/krańcowej.
Pressing or will cause move to the nearest middle/end position.
Druk op of om naar de dichtstbijzijnde midden-/eindpositie te gaan
2) Krótkie wciśnięcie lub powoduje krótki ruch - mały obrót lameli żaluzji.
Pressing or will cause short move - rotation of slats.
Als u op of drukt, wordt een korte beweging - rotatie van de lamellen
veroorzaakt.
9. Usuwanienadajnikalubkanału|Deletingtransmitterorchannel|Zender of kanaal wissen
a
5 s
bdc
PROG
1 s
d
~7 s
a
5 s
bc
PROG
7 s
de
x 2
1 s
1 s
1 s
1 s
Lees voor het programmeren aandachtig de algemene richtlijnen en alle opmerkingen met betrekking tot elke programmeerfase.
1. Programowanienadajnikalubkanału|Transmitterorchannelprogramming|Zender- of kanaalprogrammering.
a) Ustaw silnik w danej pozycji krańcowej.
Set the motor in given limit position.
Zet de motor in de gegeven eindpositie.
a) Ustaw silnik w danej pozycji krańcowej.
Set the motor in given limit position.
Zet de motor in de gegeven eindpositie.
c) Przytrzymaj wciśnięty przycisk PROG aż do dojścia do kroku e).
Press and hold the PROG button until it reaches the step e).
Houd de PROG-knop ingedrukt totdat u stap e) bereikt.
c) Wciśnij przycisk na nowym nadajniku.
Press button on the new transmitter.
Druk op van de afstandsbediening
NEW

Problem|Problem|Probleem Przyczyna|Cause|Oorzaak Rozwiązanie|Solution|Oplossing
Wanneer ingeschakeld, werkt de motor niet of
langzaam.
a. Er was geen zender toegevoegd.
b. De spanning is verkeerd.
c. Overbelasting.
d. Verkeerde installatie waardoor het
vastloopt.
a. Voeg afstandsbediening toe volgens de
instructies.
b. Spanning wijzigen of meten (230 V AC).
c. Ontlaad het mechanisme tot het juiste
gewicht.
d. Controleer de installatie van de motor om er
zeker van te zijn dat niets de rotatie kan
stoppen.
Wanneer ingeschakeld, werkt de motor slechts
in één richting.
Motor stopte op een van de eindposities.
-
Draai de kroon 1 of 2 omdraaiingen met de
hand in de tegenovergestelde richting van de
stroomrichting van de motor (paragraaf 10).
-
De motor stopte plotseling. a. Uitschakelen/storing.
b. Motor was oververhit (continue werktijd
gelijk aan ca. 4 min - afhankelijk van
omgevingscondities).
a. Na het aansluiten op de stroom kan de motor
werken.
b. Wacht tot de temperatuur van het apparaat is
afgekoeld.
lub
Motor draait in de tegenovergestelde
richting van de zender en knoppen.
Vanwege de zijkant van de motorinstallatie kan
het nodig zijn om de draairichting te wijzigen.
Verander de draairichting - zie: paragraaf 2.
lub
or buttons, motor reacts only
Na het indrukken van of knoppen
reageert de motor alleen door een beetje te
"joggen".
Door het motortype van de jaloezie dat is
geïnstalleerd, kan het nodig zijn de modus te
wijzigen.
Controleer de motormodus - zie: sectie 7.
W przypadku silników rurowych AM15 EB RF oraz AM25 EB RF proces programowania jest identyczny jak w przypadku innych silników radiowych, jedyna różnica to możliwość
wyłączenia zasilania poprzez długie przytrzymanie klawisza PROG do usłyszenia długiego sygnału akustycznego. Włączenie to przytrzymanie klawisza do krótkiego sygnału
dźwiękowego. Reset silnika następuje poprzez przyciśnięcie klawisza PROG 5 razy przy czym ostatni raz należy przytrzymać kilka sekund aż do wywołania podwójnego poruszenia
GÓRA-DÓŁ.
In the case of tubular motors AM15 EB RF and AM25 EB RF, the programming process is identical to that of other radio motors, the only dierence is the possibility of turning o the
power by holding down the PROG key for a long acoustic signal. Turning on is holding the key to a short beep. To reset motor press the PROG key 5 times, the last time it is necessary
to hold a few seconds until a double movement is caused UP TO DOWN.
In het geval van buismotoren AM15 EB RF en AM25 EB RF is het programmeerproces identiek aan dat van andere radiomotoren, het enige verschil is de
mogelijkheid om de stroom uit te schakelen door de PROG-toets ingedrukt te houden voor een lang akoestisch signaal. Inschakelen is de toets ingedrukt
houden tot een korte pieptoon. Om de motor te resetten drukt u 5 keer op de PROG-toets, de laatste keer moet u enkele seconden ingedrukt houden totdat er
een dubbele beweging OMHOOG NAAR OMLAAG wordt veroorzaakt.
Rozwiązywanie problemów | Troubleshooting | Probleemoplossing
This manual suits for next models
7
Other Torro Engine manuals

Popular Engine manuals by other brands

Siemens
Siemens SIMOTICS S-1FK7 G2 Service instructions

Ametek
Ametek Dunkermotoren BG Original assembly instructions

Danfoss
Danfoss EM-PME375 Series user guide

Ingersoll-Rand
Ingersoll-Rand 3IRL2N Workshop manual

Clarke
Clarke LC2A Operation and maintenance instruction manual

Mercury
Mercury 135 Verado FourStroke Operation and maintenance manual


