ToSee Defender User manual

1
User manual
Defender Smart Wireless Garage Door Opener
2
Introduction
Defender Smart Wireless Garage Door Opener is a companion device of your existing door opener.
It makes your door smarter and securer. By using it, your door opener can be controlled and monitored
at your own will.
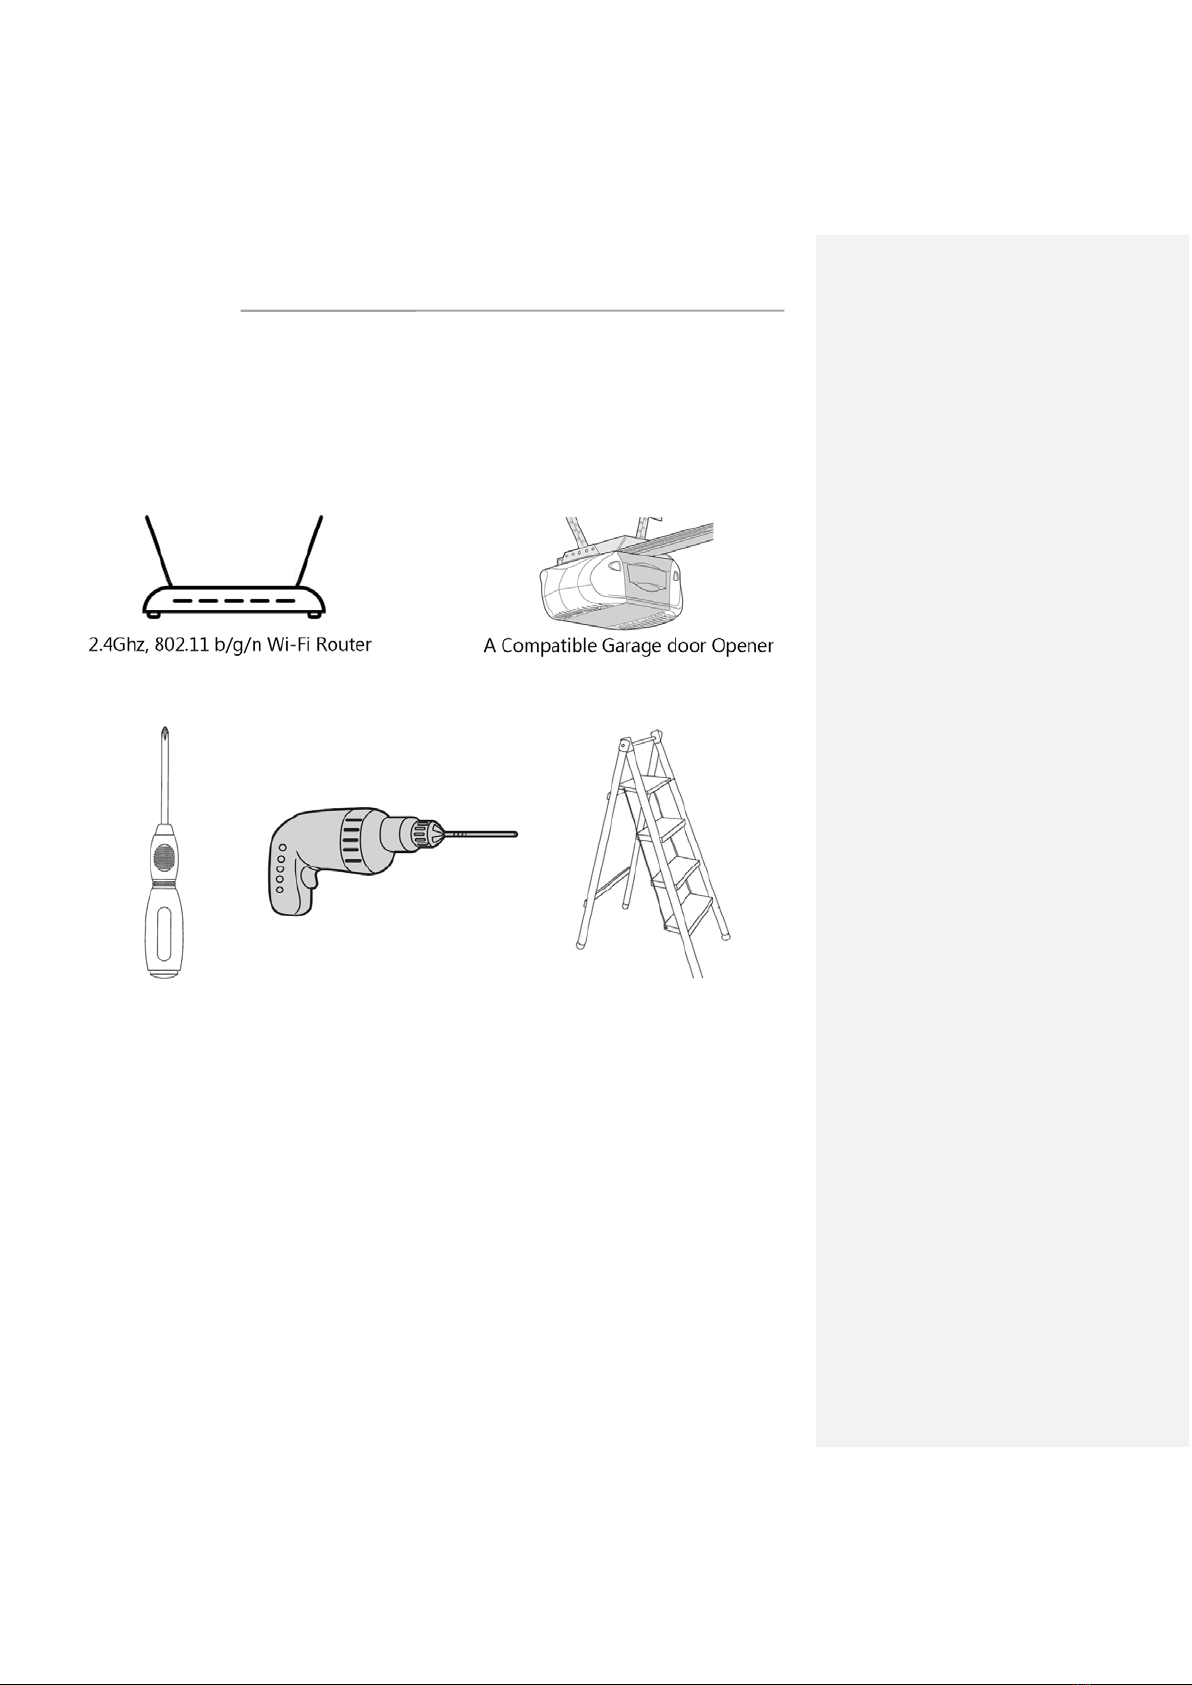
Confirm the Following before installation:
Tools required:
Reminder: please check the compatibility of your door opener before installation.

3
How to check compatibility?
1. Compatibility of some brands
A) Chamberlain® or LiftMaster®
All models with security+ are not compatible.
B) Craftsman®
All models with assurance+ 2.0 are not compatible.
C) Genie®
Compatible models:
Genie Series II openers – best identified by the wall console button(s), which is/are a non-black color.
This covers the vast majority of Genie openers, including all the currently sold models.
Incompatible models:
Genie Series III openers – best identified by the wall console button(s), which is/are black.
D) Linear®
All models are compatible.
E) Marantec®
All models are compatible.
F) Overhead Door®
Compatible models:
Series II openers– best identified by the wall console button(s), which is/are a non-black color.
Incompatible models:
Series III – best identified by the wall console button(s), which is/are black.
G) Stanley®
All models are compatible.
H) Wayne Dalton®
All models are compatible.

4
2. Check by yourself
Take a wire with both ends stripped or a straightened-out paper clip and put each end to the same
terminals as the wall button wires are terminated to (Terminal #A and Terminal #B, See the figure above).
By doing so, if your door activates, then your door opener is compatible with our device. If the door does
not activate, then the opener is not compatible by default.
3. Email us with any questions to:
info@toseesecurity.com.au
Overview

5
Wi-Fi indicator Status
Name Performance Status
Wi-Fi
indicator
Flashing rapidly in red
Wi
-Fi is not configured, Smart Mode.
Flashing slowly in red
Wi
-Fi is not configured, AP Mode.
Flashing in green
Wi-Fi configured, Not connect to network; Please check the
router
’s firewall or the Wi-Fi ssid and Wi-Fi password.
Flashing in blue
Door Sensor is not paired with Controller, please open or
close the door or flip the door sensor for 90 degrees to pair.
Solid in green
Wi
-Fi configured, Working Mode.
Button operations
1) Reset the device
If the Wi-Fi indicator doesn’t flash in red, press and hold the reset button for 3 seconds, it will flash in
red, it means it was reset successfully.
Reset operation will clear the Wi-Fi configuration and door sensor pairing.
2) Switch Wi-Fi configuration mode
If the Wi-Fi indicator flashes in red, press and hold the reset button for 3 seconds, it switches the Wi-
Fi configuration mode and the Wi-Fi indicator flashes rapidly or slowly according to different mode.

6
3) Clear door sensor pairing
If the Wi-Fi indicator flashes in green or stays in solid green, press and hold the button for 10 seconds,
the Wi-Fi indicator will flash in blue, it means that the door sensor was cleared from controller.
Installation
1. Install the application
1) Install the application
Download the "Smart life" app from the Play Store (Android) or App Store (iOS).
Register
If you do not have a “Smart life” application’s account, register or sign in with a verification code sent
by SMS.
To register:
1) Tap to enter registration page.
2) The system automatically recognizes your country/area.You can also select your country code
manually. Enter your mobile phone number/email address and tap "Next".
3) If you choose the mobile phone number option, then enter the verification code in the message
sent to you by SMS. Set a password as prompted and press "Confirm" to finish your registration.
2.
Commented [3]: 请自行修改
Commented [4]: 根据自己的
app
配图

7
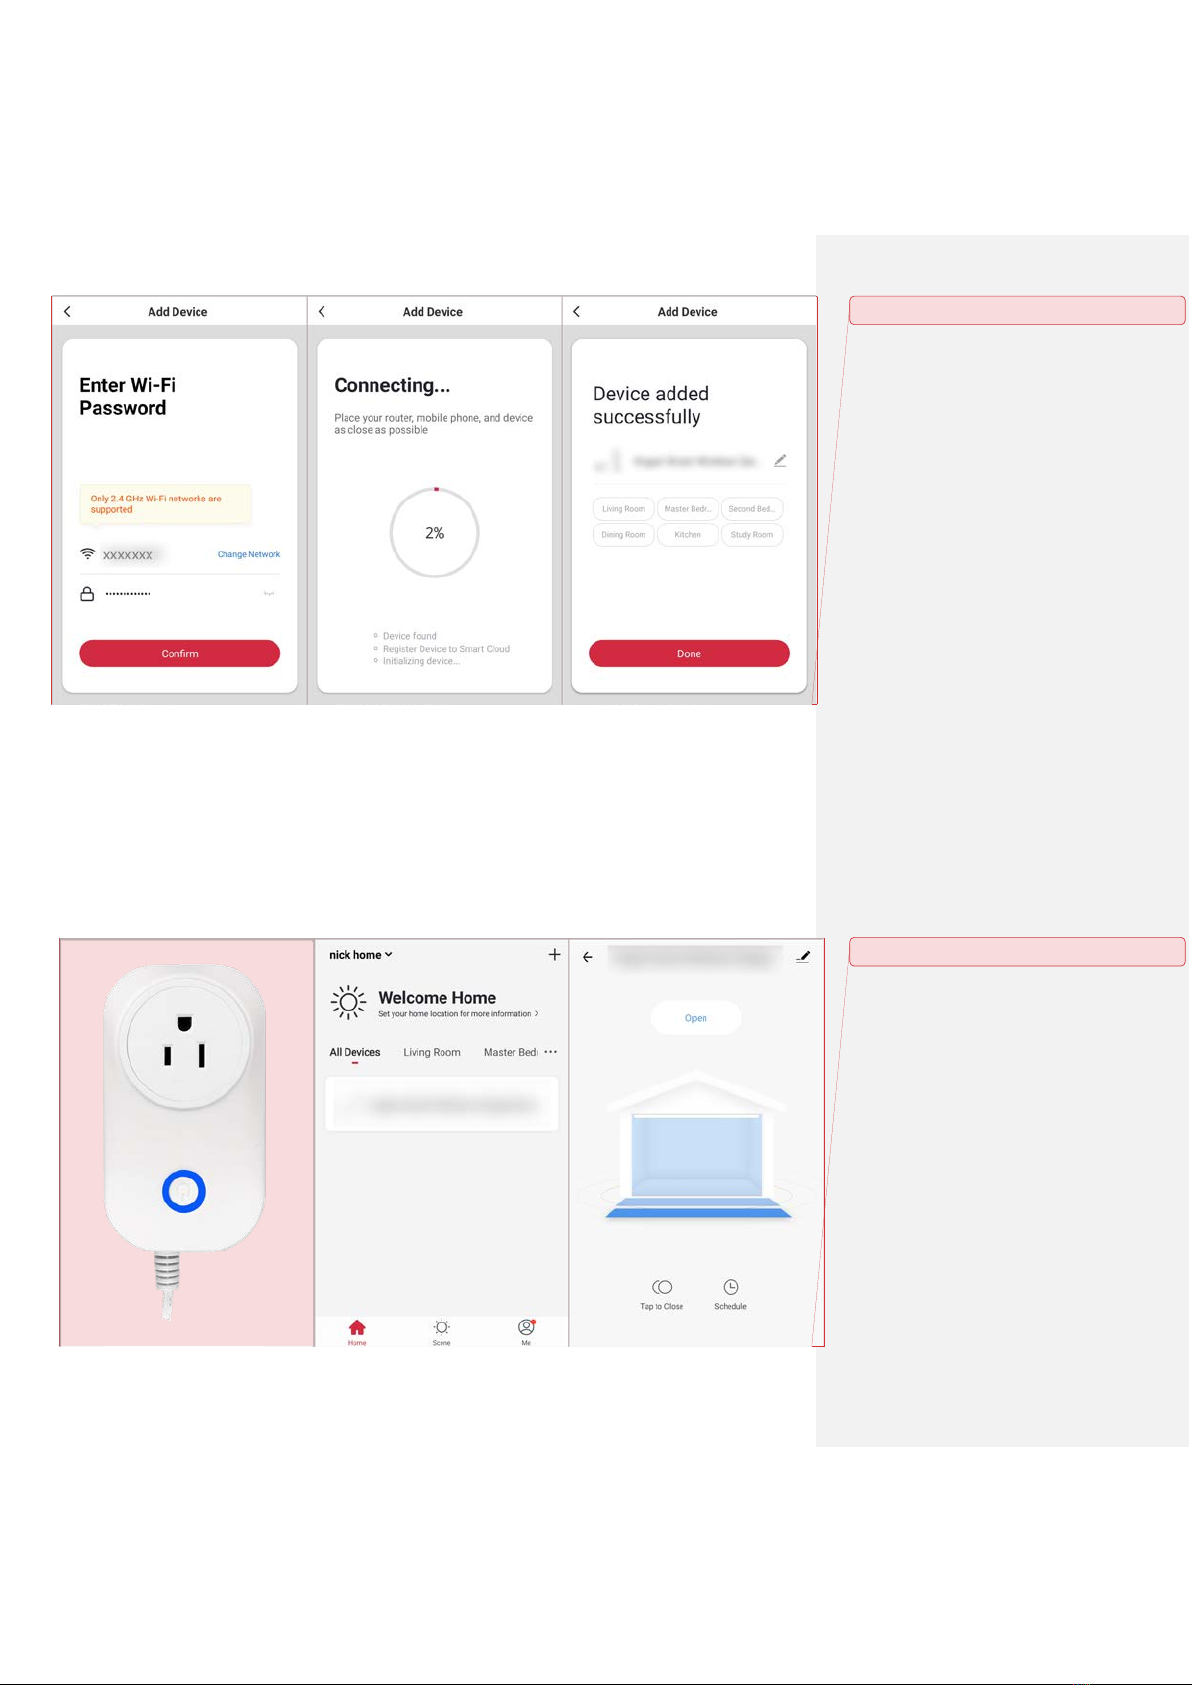
3. Add device through network
1) Plug in the device to your socket; Power Defender Garage Door Opener device on and check that the
Wi-Fi indicator is rapidly blinking in red. If not, long-press the Wi-Fi button for 3 seconds to reset the device.
2) Open Smart life app and tap "+" in the upper right to add a new device through the network.
3) Ensure the device’s Wi-Fi indicator rapidly flashes and tap "Confirm indicator rapidly blinking".
4) Select Defender Garage Door Opener;
5) Connect to Wi-Fi network (note: network must be 2.4GHz band) and return to the “Smart life” app.
The device will commence the pairing process and connect to the app.
Commented [5]: 根据自己产品命名修改
Commented [6]: 自行配图
8
6) After successfully configuring the devices, the device will be shown on the home page.Tap to enter
its control page. The device’s Wi-Fi indicator light will flash in blue.
Commented [7]: 自行配图
Commented [8]: 自行配图

9
Note:
When device is online, it can be controlled.
When device is offline, it displays "Offline" and cannot be remotely powered on.
The garage door opener does not support 5GHz networks, ensure your Wi-fi is 2.4GHz.
If you can’t add device to the app successfully, please contact us for help and don’t go to next step.
4. Install device
Note:
Please power off your garage door opener before install the device.
1) Connect the cables of the controller to your garage door opener terminals which should be connected
to the wall button; If you have installed a wall button, please twist them together.
Commented [9]: 可自行配图
10
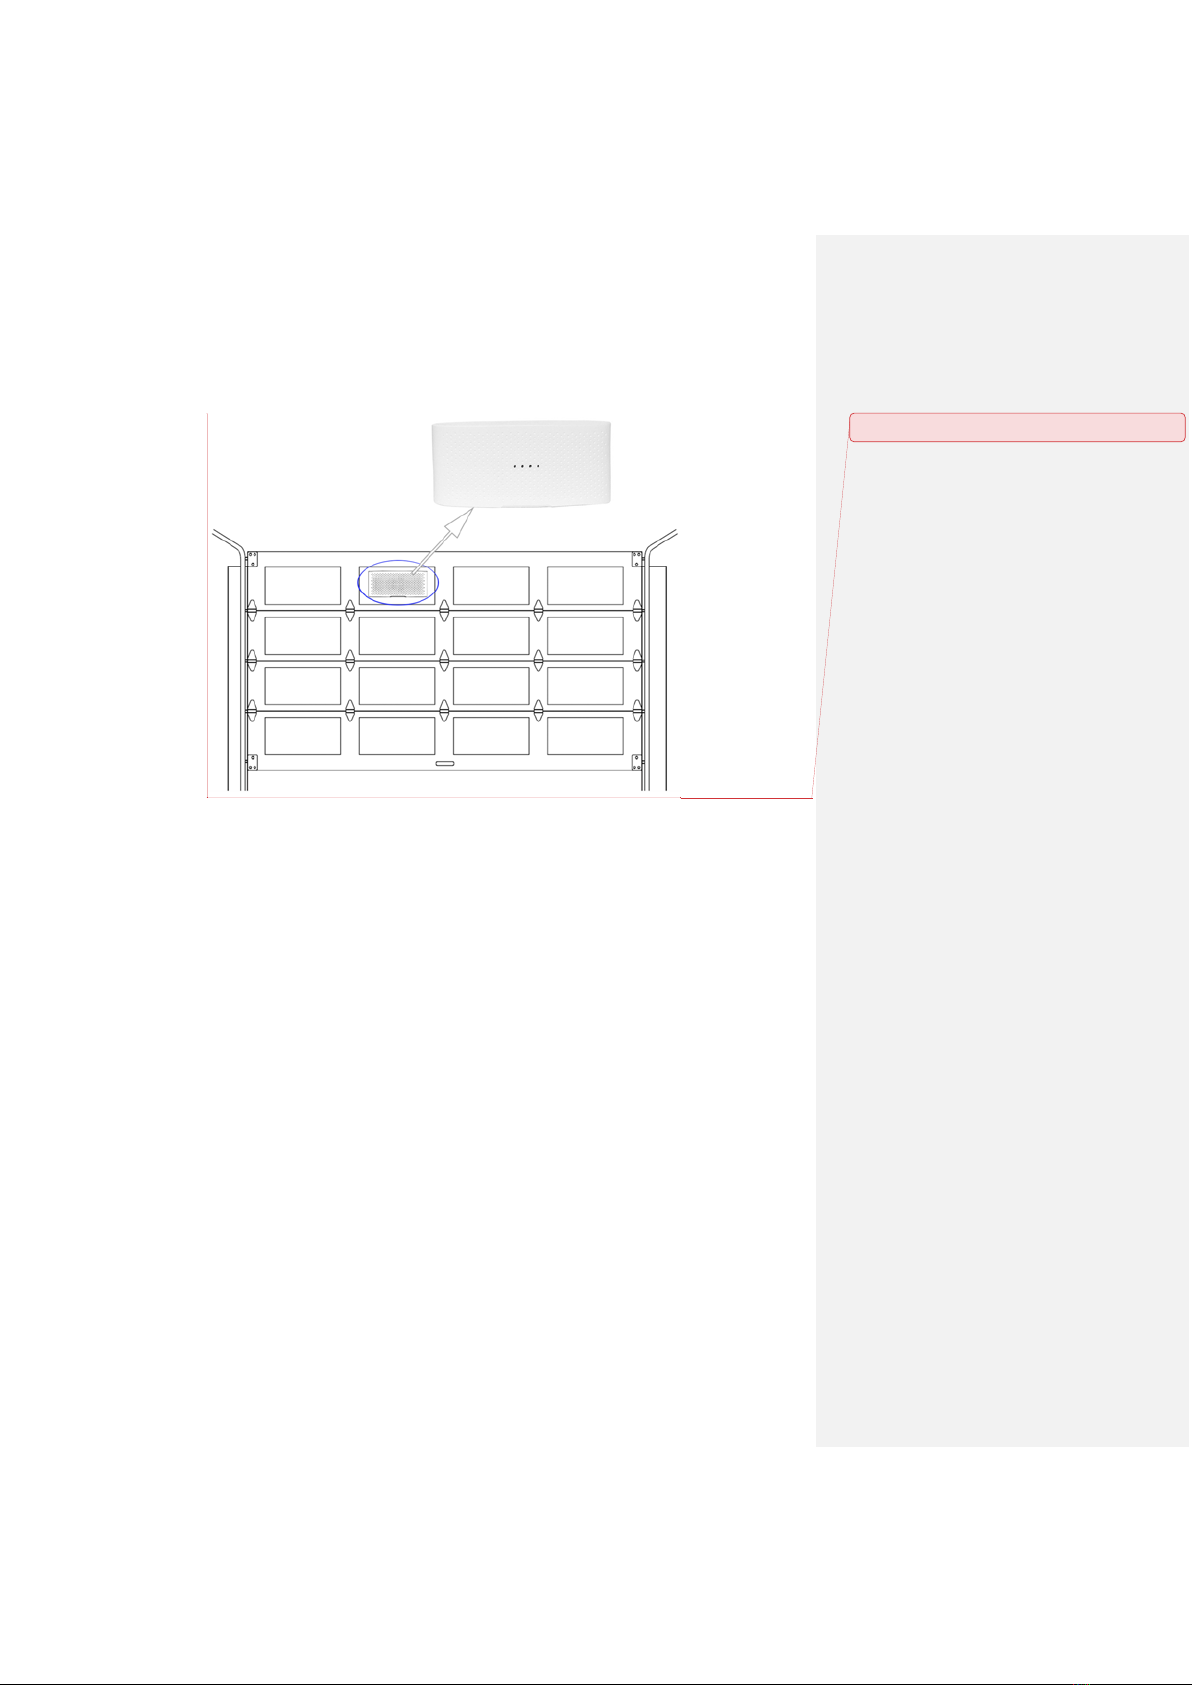
5. Install Door sensor
Stick the sensor on the top flap of your garage door; Please make sure the direction of the sensor is
correct;
Note:
Power on the device and check the controller’s Wi-Fi indicator light state after you installed the
door sensor. It should be solid green.
If it flashes in blue, please try to control the door, the controller will link the sensor automatically.
How to link the door sensor to the controller if the door state is not correct?
Please set according to the controller’s light state
1) If it is red, please configure Wi-Fi first, then go to next step;
2) If it flashes in green, please check the Wi-Fi configuration, then go to next step;
3) If it is solid green, press and hold the reset button of the controller for 10 seconds until it flashes in
blue; then go to next step;
4) If it flashes in blue, make sure you have installed the sensor on the door correctly, open the door or
close the door, the sensor will be paired with controller automatically.
Note: The sensor only support sectional doors, not support roller doors.
Commented [10]: 可自行配图

11
6. Testing
Power on the device and the garage door opener, open or close the door, check the state on your app,
If the door state is not correct after you operate the door up to four or more times, it means something
wrong. Please try to fix as following steps:
1) Press and hold the reset button for 3 seconds until it flashes in red to reset the device.
2) Add the device through Smart life app again; the Wi-Fi indicator light will flash in blue after you add
it successfully.
3) Close or open the door, the Wi-Fi indicator light will be solid green which means it is working now.
4) Operate the door through Smart life app for three times again, check the door state on your app.
If the steps above failed, please contact us for help.
More functions of the Application
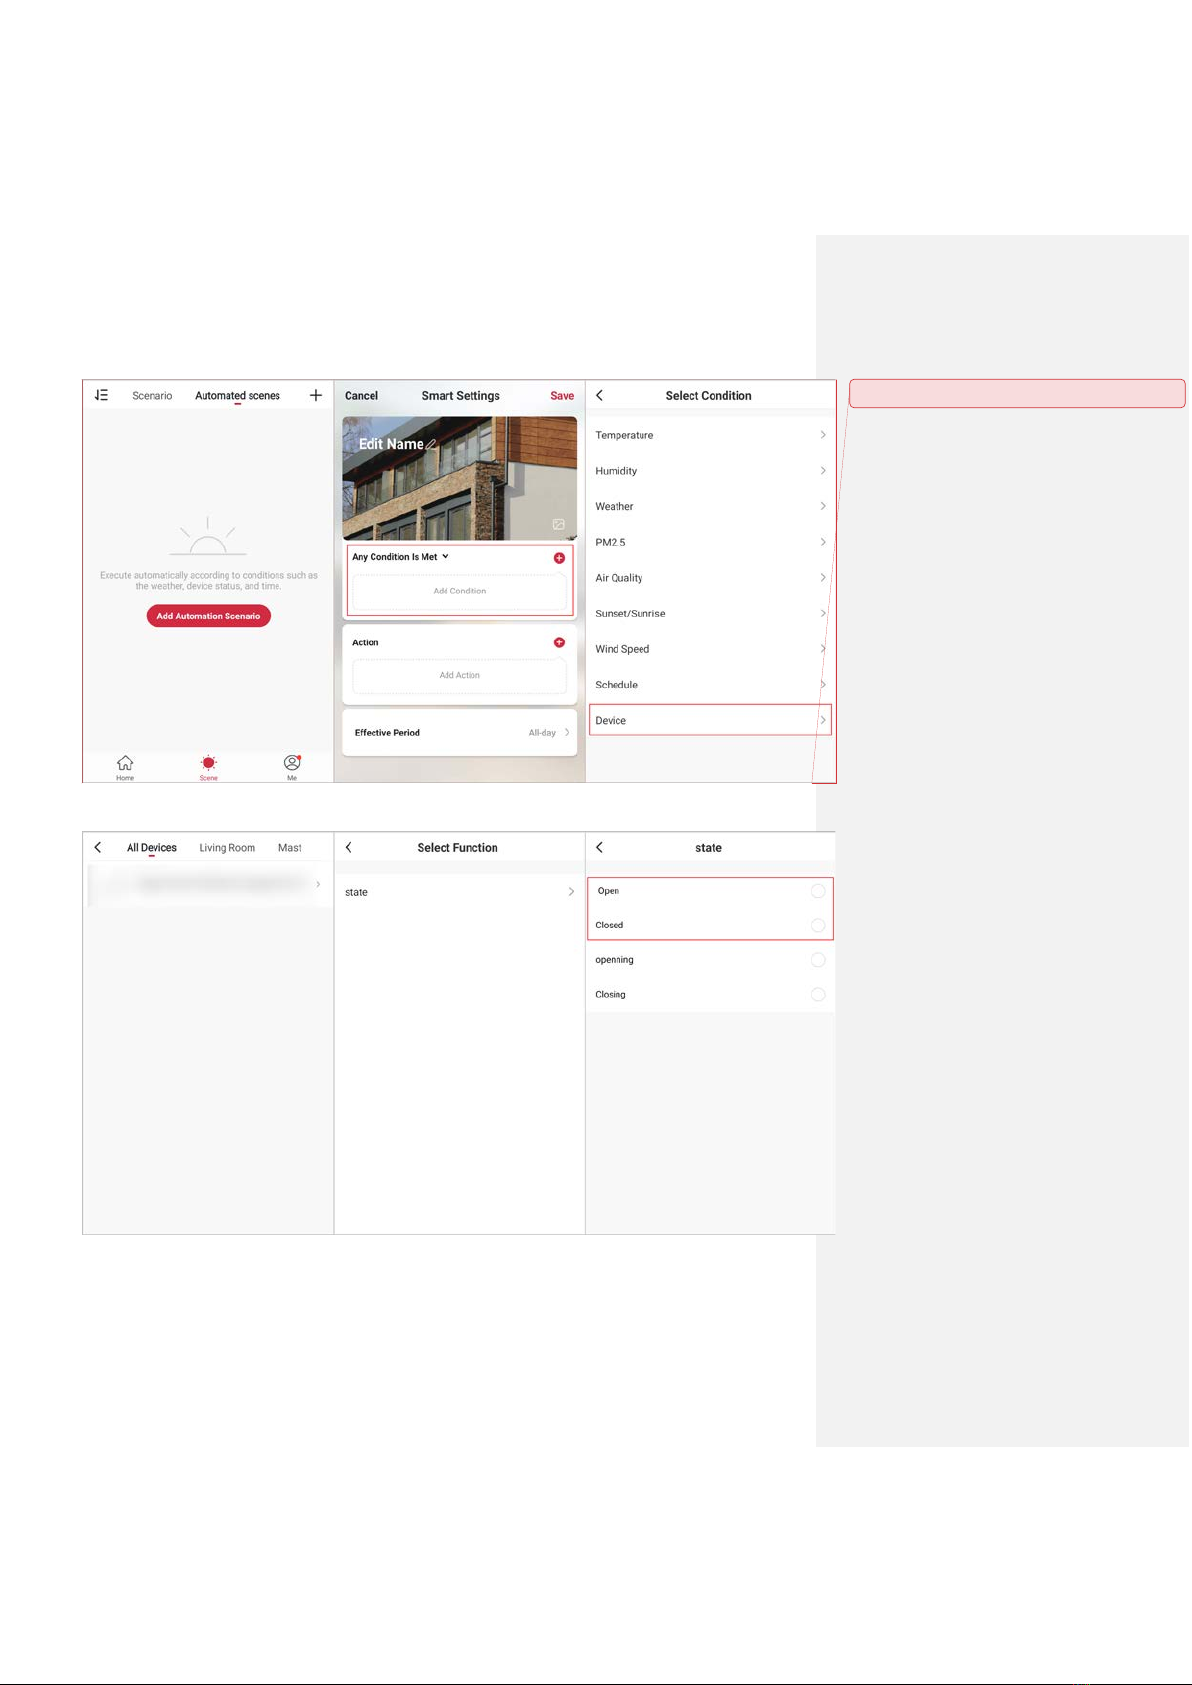
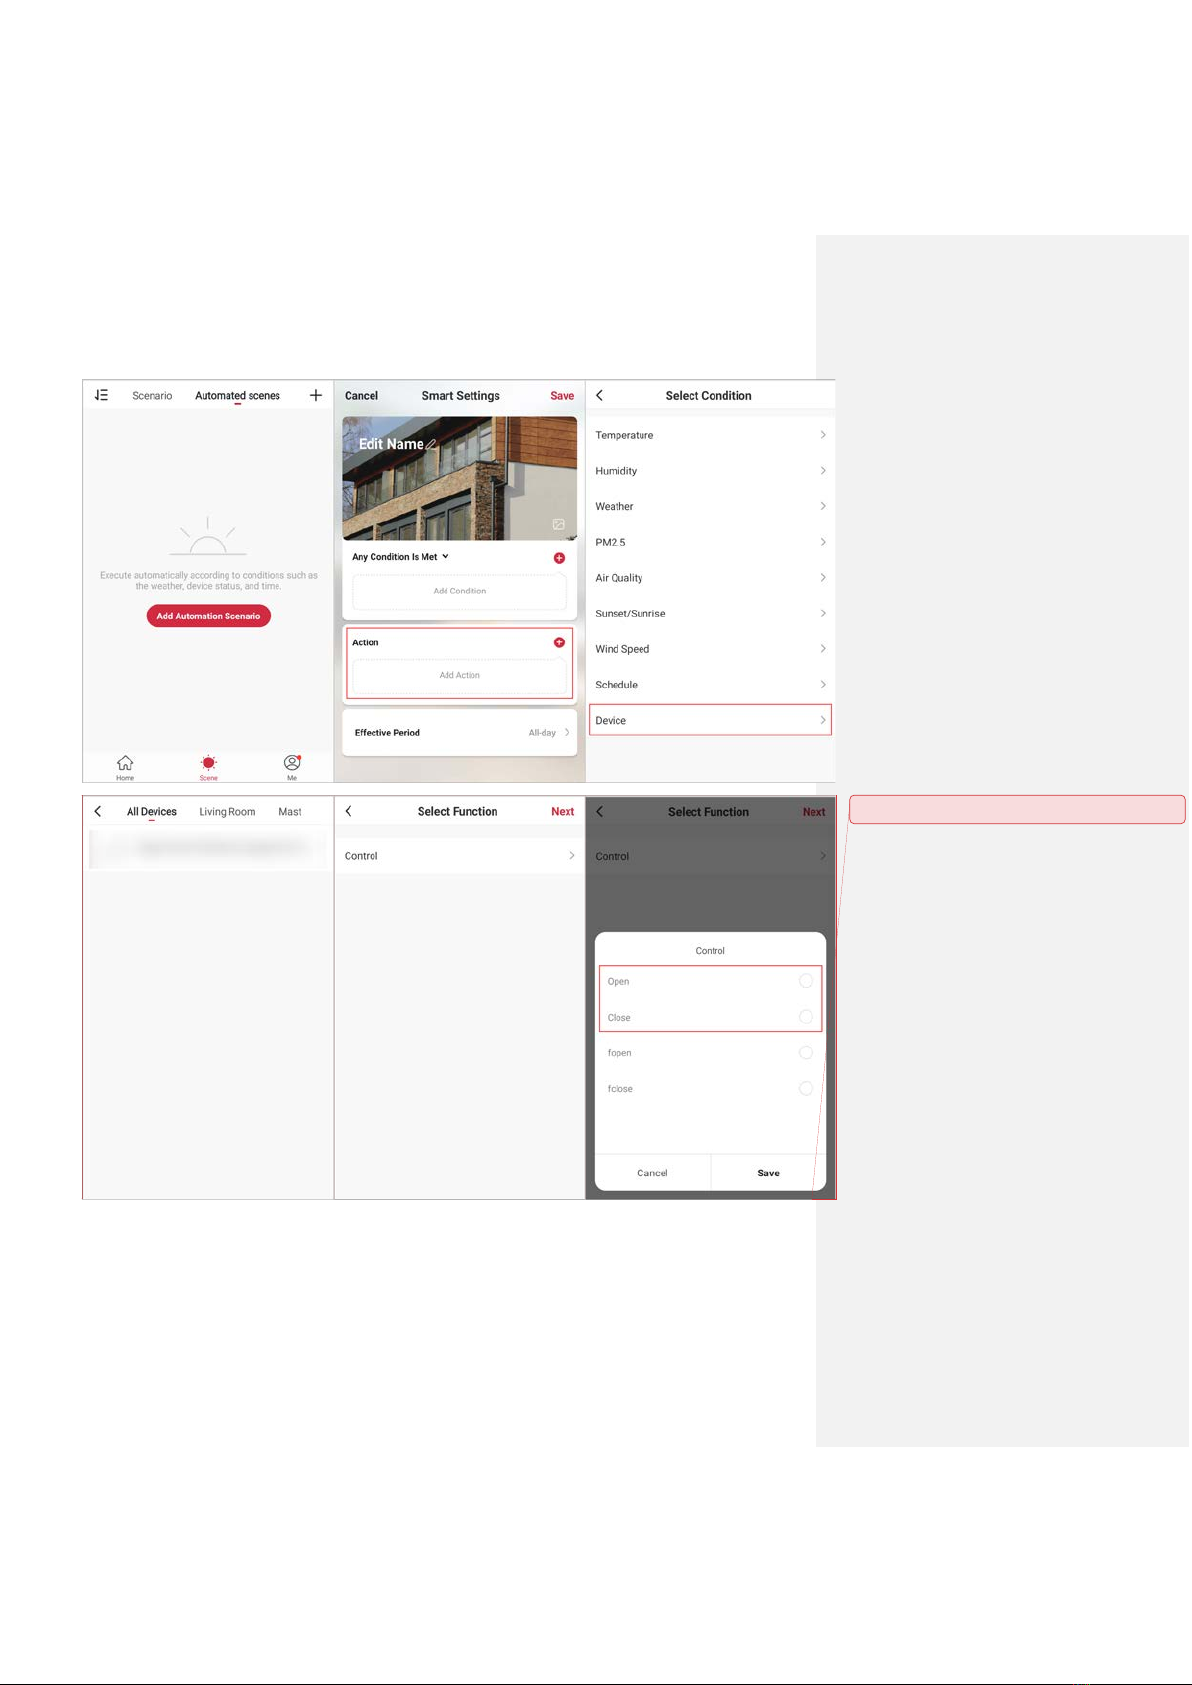
1. How to use automated scenes?
There are two setting options for you to set automated scenes.
1) One option is that add the device to “condition” list to trigger your other smart device.
2) Another option is that add the device to “action” list to be triggered by other condition.
12
How to add the device to “Condition” list?
Note:
Only “Open” or “Closed” state is valid.
Commented [11]: 根据自己的
app
配图
13
How to add the device to “Action” list?
Note:
Only “Open” or “Close” action is valid.
Commented [12]: 根据自己的
app
配图

14
Amazon Echo
How to set Amazon Echo to control your Defender Smart Wireless Garage Door Opener?
Before using Echo to control your device, make sure you meet the following conditions.
•1) An Echo device, including Echo, Echo Tap, or Echo Dot.
•2) An Amazon account.
•3) “Smart life”app and a related account.
Make sure you have added Defender Smart Wireless Garage Door Opener to “Smart life” application
successfully and you have added an Alexa device to the Amazon Alexa application.
1. Launch Amazon Alexa app and login with your account;
2. Search “Smart life” skill, enable this skill, and link your “Smart life” account with Amazon Alexa app.
3. Voice commands
“Alexa, Turn on (xxx)” OR “Alexa, Turn off (xxx)”
Note: “xxx” is the device name. We suggest you rename the device to a simple but uncommon name.
Commented [13]: 请自行配图。我这里的
pad
比例不
对。
15
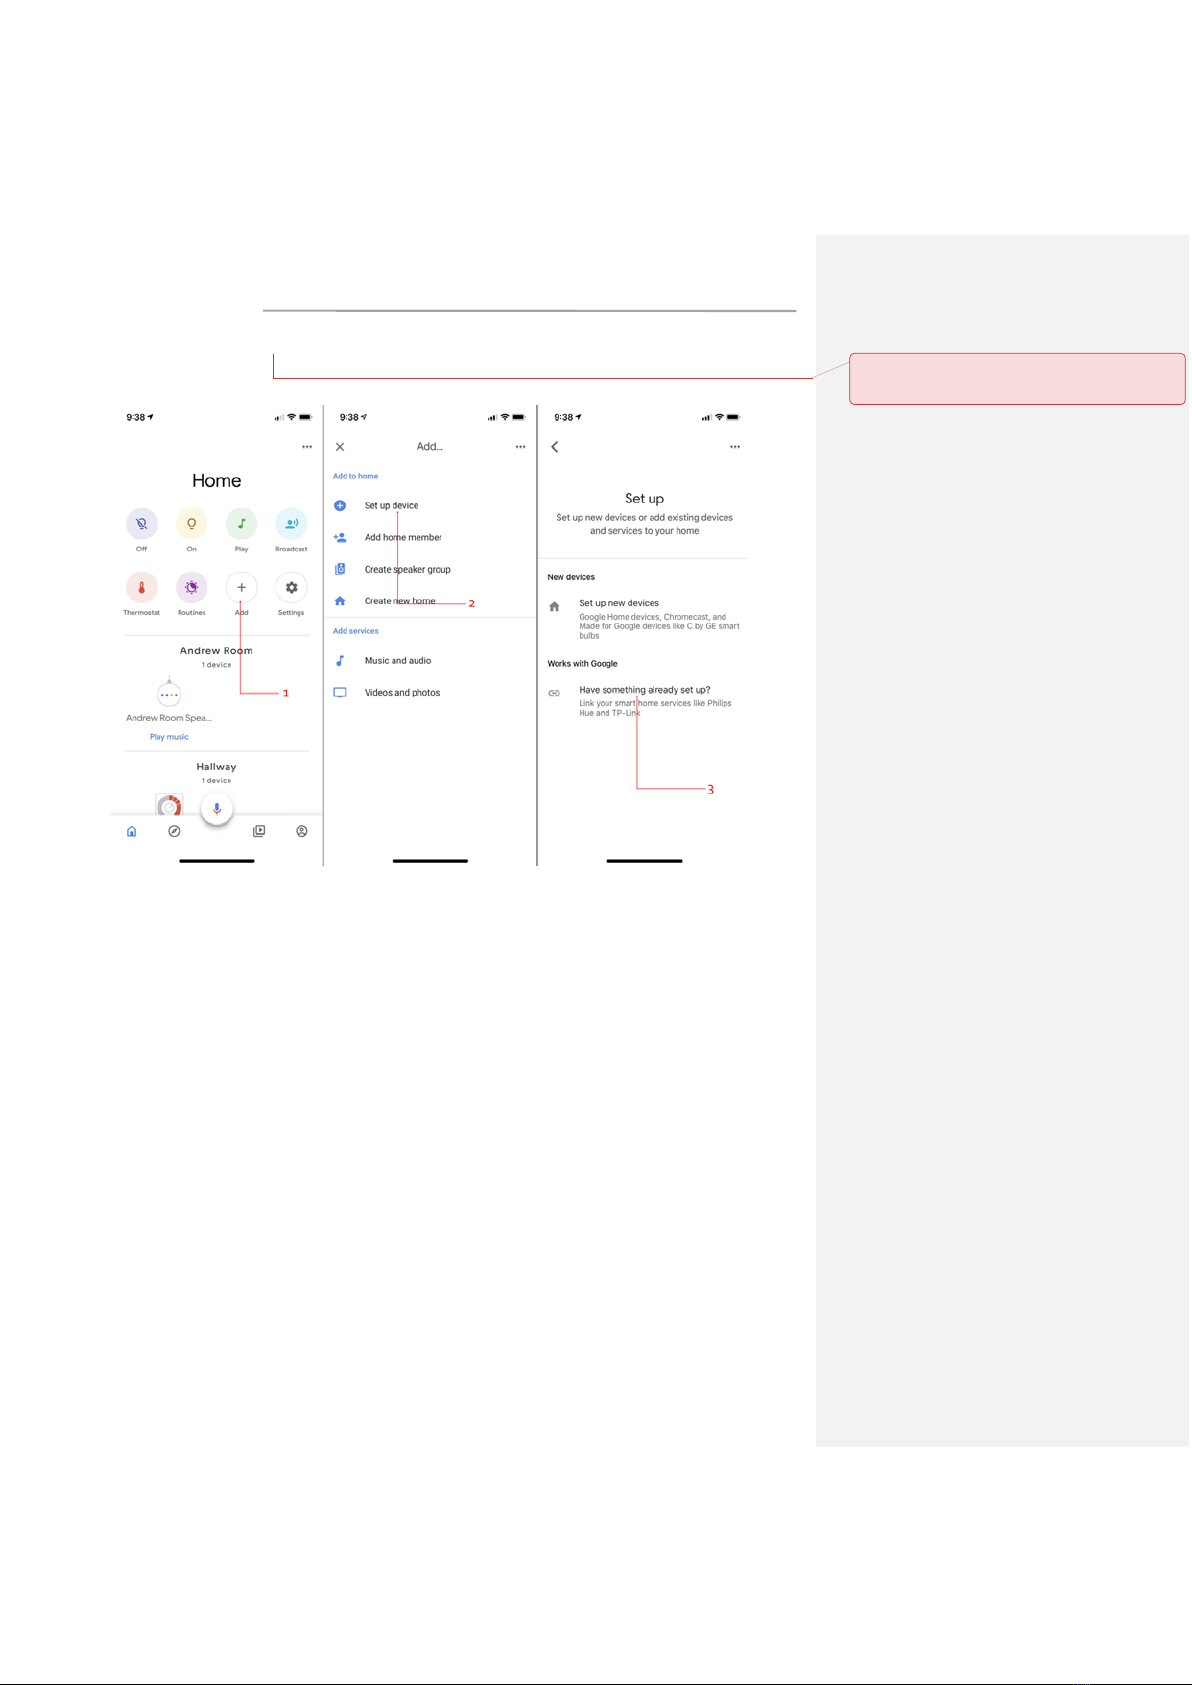
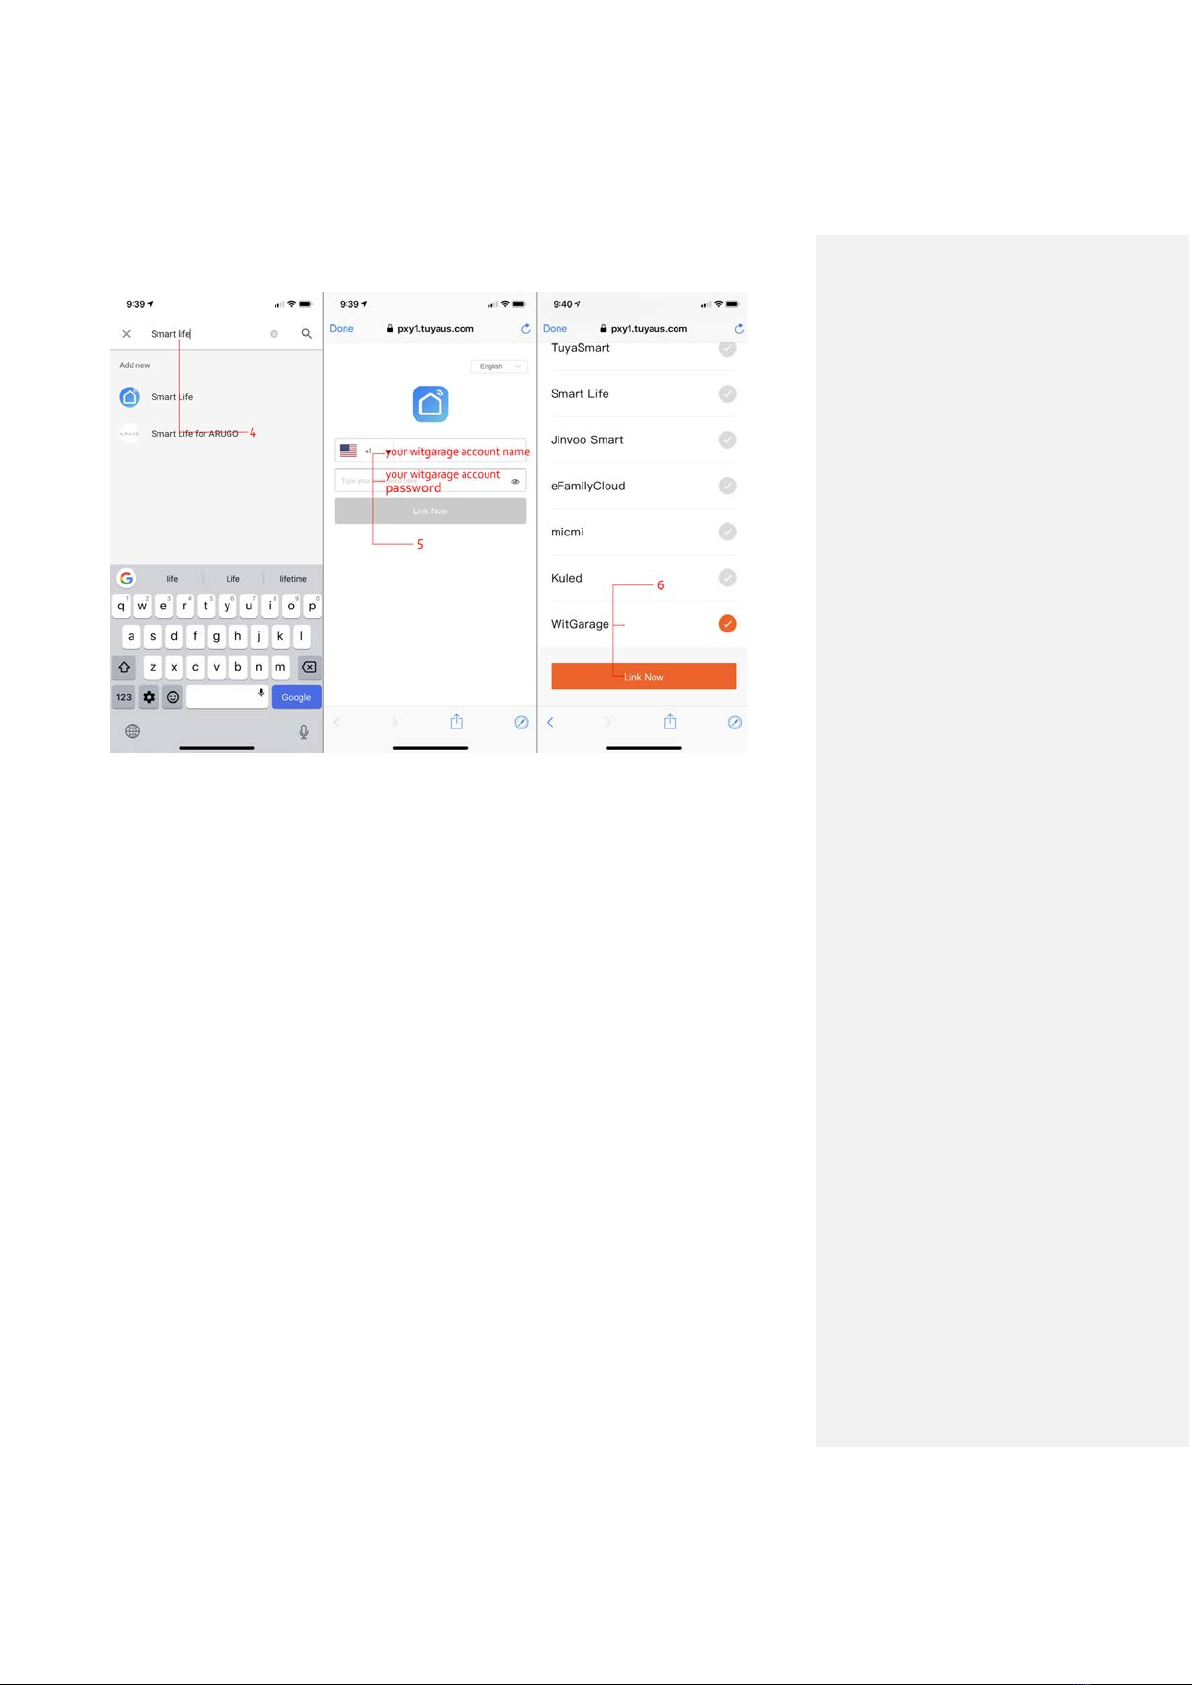
Google home
How to set google home?
Commented [14]: 请参照添加此部分,
google home
我
这里使用不了。
16
Voice command:
“Ok Google, open (WitGarage)” OR “Ok Google, close (WitGarage)”
If the voice command above doesn’t work, please try
“Ok Google, turn on (WitGarage)” OR “Ok Google, turn off (WitGarage)”
Note: “witgarage” is the device name.
Table of contents
Popular Garage Door Opener manuals by other brands


Chamberlain
Chamberlain Power Drive PD458D owner's manual

Sears
Sears Craftsman 139.53910 owner's manual

Automatic Technology
Automatic Technology SecuraLift GDO-7V1 Owner's installation instructions

Tucker
Tucker ZAP THE BUTLER installation guide

Bauer
Bauer CROSS18 Application. Installation and Maintenance Manual

SAMT
SAMT START-S2XL Manuals and warnings

Chamberlain
Chamberlain 4000 instructions

Craftsman
Craftsman 139.536481DM owner's manual

Schellenberg
Schellenberg STA Slide 400 instructions

Chamberlain
Chamberlain Security+ 9500-3K owner's manual

Wayne-Dalton
Wayne-Dalton 9800 Installation instructions and owner's manual

King gates
King gates STARG8 24 Installation and use instructions and warnings