Toshiba SD-22VB User manual

DVD PLAYER
Hi-Fi VIDEO
CASSETTE
RECORDER
USER’S GUIDE
SD-22VB
DIGITAL VIDEO
2A78701AE Cover 8/5/2002, 0:071

2
SAFETY FIRST
The rating plate and the safety caution are on the rear of the unit.
WARNING: DANGEROUS VOLTAGE INSIDE
WARNING: TO PREVENT FIRE OR SHOCK HAZARD, DO NOT EXPOSE THIS UNIT
TO RAIN OR MOISTURE.
Safety Precautions
CAUTION
When you are not using the recorder for a long period of time, it is recommended that you disconnect the
power cord from the mains outlet.
Dangerous voltage inside. Refer internal servicing to qualified service personnel.To prevent electric shock
or fire hazard, remove the power cord from the mains outlet prior to connecting or disconnecting any signal
lead or aerial.
IMPORTANT
Connection to the mains supply in the United Kingdom. DO NOT cut off the mains plug from this
equipment. If the plug fitted is not suitable for the power points in your home or the cable is too short to
reach a power point, then obtain a proper safety approved extension lead/adapter or consult your dealer.
In the unlikely event of the plug fuse failing be sure to replace the fuse only with an identical ap-
proved type, as originally fitted, and to replace the fuse cover. If the fuse fails again consult your
nearest JVC dealer.
If nonetheless the mains plug is cut off remove the fuse and dispose of the plug immediately, to avoid a
possible shock hazard by inadvertent connection to the mains supply.
If this product is not supplied fitted with a mains plug then follow the instructions given below:
DO NOT make any connection to the LargerTerminal coded E or Green.
The wires in the mains lead are coloured in accordance with the following code:
Blue to N (Neutral) or Black
Brown to L (Live) or Red
If these colours do not correspond with the terminal identifications of your plug, connect as follows:
Blue wire to terminal coded N (Neutral) or coloured Black.
Brown wire to terminal coded L (Live) or coloured Red.
If in doubt – consult a competent electrician.
IMPORTANT
Please read the various precautions on page 2 and 3 before installing or operating the recorder.
It should be noted that it may be unlawful to re-record pre-recorded tapes, records, or discs without the
consent of the owner of copyright in the sound or video recording, broadcast or cable programme and in
any literary, dramatic, musical, or artistic work embodied therein.
Video tapes recorded with this video recorder in the LP (Long Play) mode cannot be played back on a single-
speed video recorder.
The STANDBY/ON button does not completely shut off mains power from the unit, but switches operating
current on and off. “ ” shows electrical power standby and “ I ” shows ON.
MOISTURE CONDENSATION
Moisture in the air will condense on the recorder when you move it from a cold place to a warm place, or under
extremely humid conditions-just as water droplets form in the surface of a glass filled with cold liquid. Moisture
condensation on the head drum will cause damage to the tape.In conditions where condensation may occur,
keep the recorder turned on for a few hours to let the moisture dry.
2A78701AE(02-05) 7/5/2002, 5:002

3
Safety Precautions
When the equipment is installed in a cabinet or a shelf, make sure that it has sufficient space on all sides to allow
for ventilation (10 cm or more on both sides, on top and at the rear.)
When discarding batteries, environmental problems must be considered and the local rules or laws governing
the disposal of these batteries must be followed strictly.
Failure to heed the following precautions may result in damage to the recorder, remote control or video
cassette.
1. DO NOT place the recorder ...
... in an environment prone to extreme temperatures or humidity.
... in direct sunlight.
... in a dusty environment.
... in an environment where strong magnetic fields are generated.
... on a surface that is unstable or subject to vibration.
2. DO NOT block the recorder’s ventilation openings or holes.
(If the ventilation openings or holes are blocked by a newspaper or cloth, etc., the heat may not be able to get
out.)
3. DO NOT place heavy objects on the recorder or remote control.
4. DO NOT place anything which might spill on top of the recorder or remote control.
(If water or liquid is allowed to enter this equipment, fire or electric shock may be caused.)
5. DO NOT expose the apparatus to dripping or splashing.
6.DO NOT use this equipment in a bathroom or places with water. Also DO NOT place any containers filled
with water or liquids (such as cosmetics or medicines, flower vases, potted plants, cups, etc.) on top of this
unit.
7. DO NOT place any naked flame sources, such as lighted candles, on the apparatus.
8.AVOIDviolentshocks totherecorderduringtransport.
Some Do's And Don'ts OnThe Safe Use Of Equipment
This equipment has been designed and manufactured to meet international safety standards but, like
any electrical equipment, care must be taken if you are to obtain the best results and safety is to be
assured.
DO read the operating instructions before you attempt to use the equipment.
DO ensure that all electrical connections (including the mains plug, extension leads and interconnec-
tions between pieces of equipment) are properly made and in accordance with the manufacturer's
instructions. Switch off and withdraw the mains plug when making or changing connections.
DO consult your dealer if you are ever in doubt about the installation, operation or safety of your
equipment.
DO be careful with glass panels or doors on equipment.
DON'T continue to operate the equipment if you are in any doubt about it working normally, or if it is
damaged in any way – switch off, withdraw the mains plug and consult your dealer.
DON'T remove any fixed cover as this may expose dangerous voltages.
DON'T leave equipment switched on when it is unattended unless it is specifically stated that it is
designed for unattended operation or has a standby mode. Switch off using the switch on the
equipment and make sure that your family knows how to do this. Special arrangements may
need to be made for infirm or handicapped people.
DON'T use equipment such as personal stereos or radios so that you are distracted from the require-
ments of road safety. It is illegal to watch television whilst driving.
DON'T listen to headphones at high volume, as such use can permanently damage your hearing.
DON'T obstruct the ventilation of the equipment, for example with curtains or soft furnishings.
Overheating will cause damage and shorten the life of the equipment.
DON'T use makeshift stands and NEVER fix legs with wood screws – to ensure complete safety
always fit the manufacturer's approved stand or legs with the fixings provided according to the
instructions.
DON'T allow electrical equipment to be exposed to rain or moisture.
ABOVE ALL...
– NEVER let anyone especially children push anything into holes, slots or any other opening in
the case – this could result in a fatal electrical shock;
– NEVER guess or take chances with electrical equipment of any kind – it is better to be safe than sorry!
2A78701AE(02-05) 7/5/2002, 5:003

4
Features
Video Cassette Recorder
•High Quality (HQ) Images
• On-Screen Displays (OSD)
• Nicam Hi-Fi Stereo Audio
Recording and Playback
• Auto TV Station Tuning and Auto
Clock Set
• 80 Memory for presets
• Auto Time Setting
• 30 Minute Back-Up in case of
Power failure
• 6 rotary Head (4 Video Head and
2 Hi-Fi Audio Head)
• Long play
• Programme Delivery Control
System
• Timer Recording of up to 8
Programme per Month
• VIDEO Plus+®rapid timer
programming
• One-touch Timer Recording
(OTR)
• Video index Search System
• Slow Motion
• NTSC Video Cassette Tape
Playback on PAL TV
• Real-TimeTape Counter with
ZERO RETURN-Function
• Digital AUTO Tracking (ATR
Function)
• Repeat/Playback
• On-Screen Display in 3
Language
• AV-Front input jack
• Audio Mixing
DVD Player
•Digital Audio Jack (Coaxial)
• Multi-Language
• Multi-Angle
• Surround audio
• Repeat Playback
• Memory/Random Playback
• Zoom
• Video Aspect Ratio
• Parental Control
• 3 Scene memory
• Digital (Optical or Coaxial) output
for Dolby Digital (AC-3) and DTS
• Playback of DVD, Video-CD and
Audio-CD
• PAL & NTSC DVDs playback
• A-B Repeat playback
• MP3 CD playback
• Cassettesmarked“VHS”(or“S-VHS”)canbeusedwiththisvideocassetterecorder.However,S-VHSrecording
is not possible with this model.
• This model is equipped with SQPB (S-VHS QUASI PLAYBACK) that makes it possible to play back S-VHS
recordings with regular VHS resolution.
• HQ VHS is compatible with existing VHS equipment.
• VIDEO Plus+ and PlusCode are registered trademarks of Gemstar Development Corporation. The VIDEO
Plus+ system is manufactured under license from Gemstar Development Corporation.
PAL
2A78701AE(02-05) 7/5/2002, 5:014

5
*This product incorporates copyright protection technology that is protected by method claims of certain U.S. patents
and other intellectual property rights owned by Macrovision Corporation and other rights owners. Use of this copy-
right protection technology must be authorized by Macrovision Corporation or other rights owners and is intended for
home and other limited viewing uses only unless otherwise authorized by Macrovision Corporation or other rights
owners. Reverse engineering or disassembly is prohibited.
*Manufactured under license from Dolby Laboratories. “Dolby” and the double-D symbol are trademarks of Dolby
Laboratories.Confidential unpublished works. © 1992-1997 Dolby Laboratories, Inc.All rights reserved.
*“DTS” and “DTS Digital Out” are trademarks of Digital Theater Systems, Inc.
*Certain audio features of this product manufactured under license from Desper Products,Inc. Spatializer and the
circle - in - square device are trademarks owned by Desper Products,Inc.
*Unauthorized recording of copyrighted television programs, films, video cassettes and other materials may infringe
the rights of copyright owners and be contrary to copyright laws.
Contents
Safety Precautions ...........................................2
Features ...........................................................4
Contents...........................................................5
Parts and functions ..........................................6
Display .............................................................7
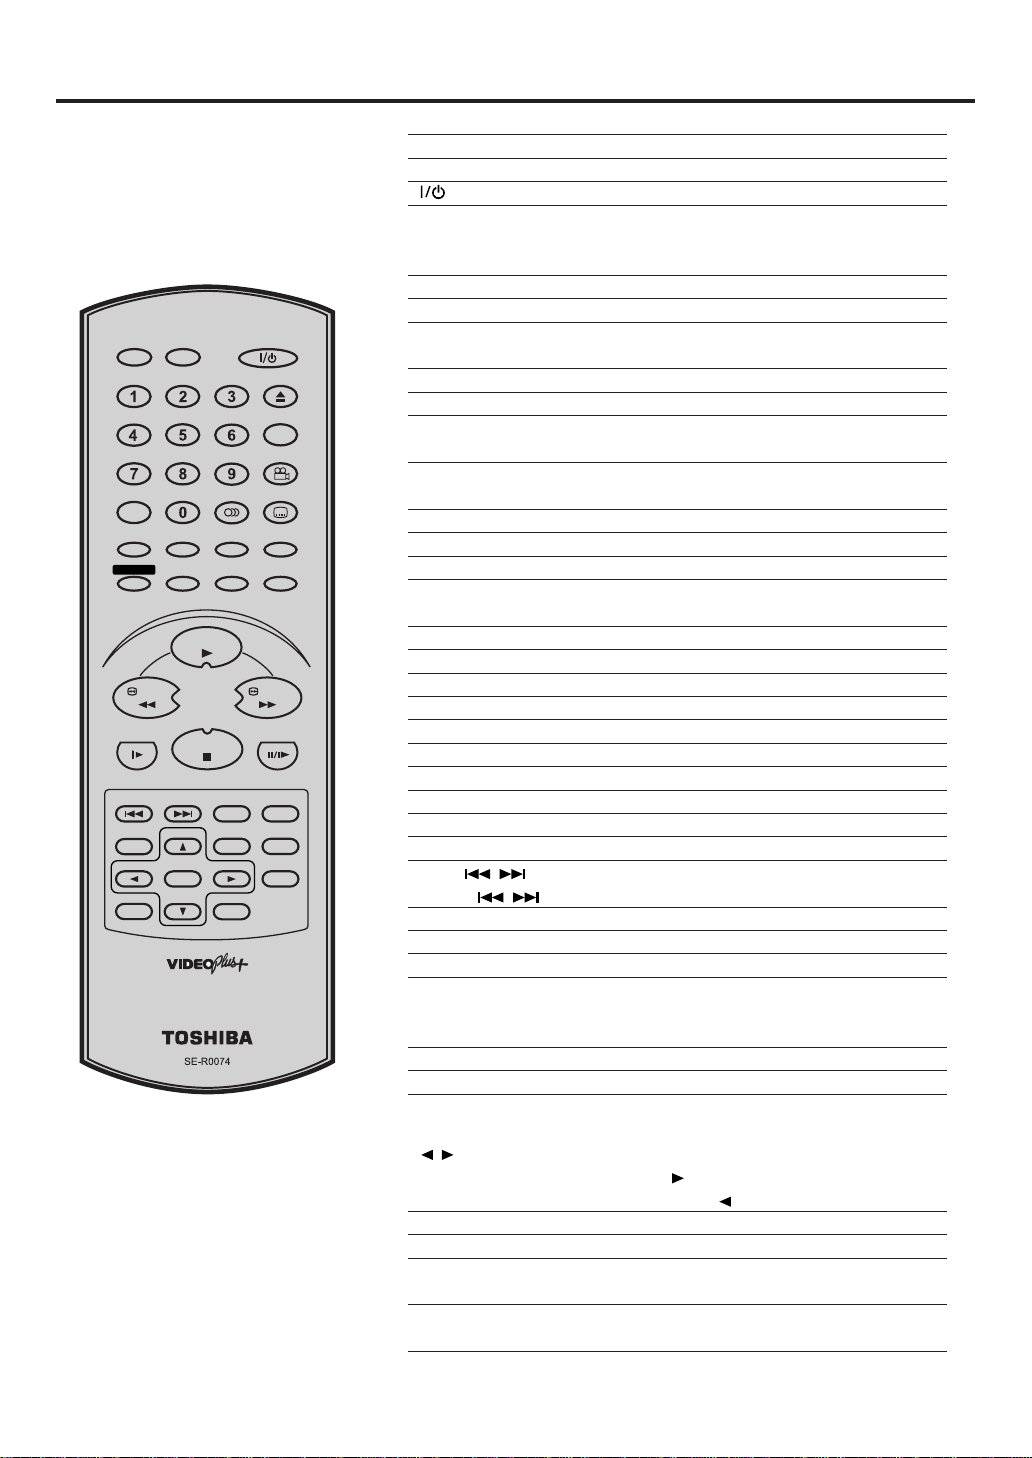
Remote control.................................................8
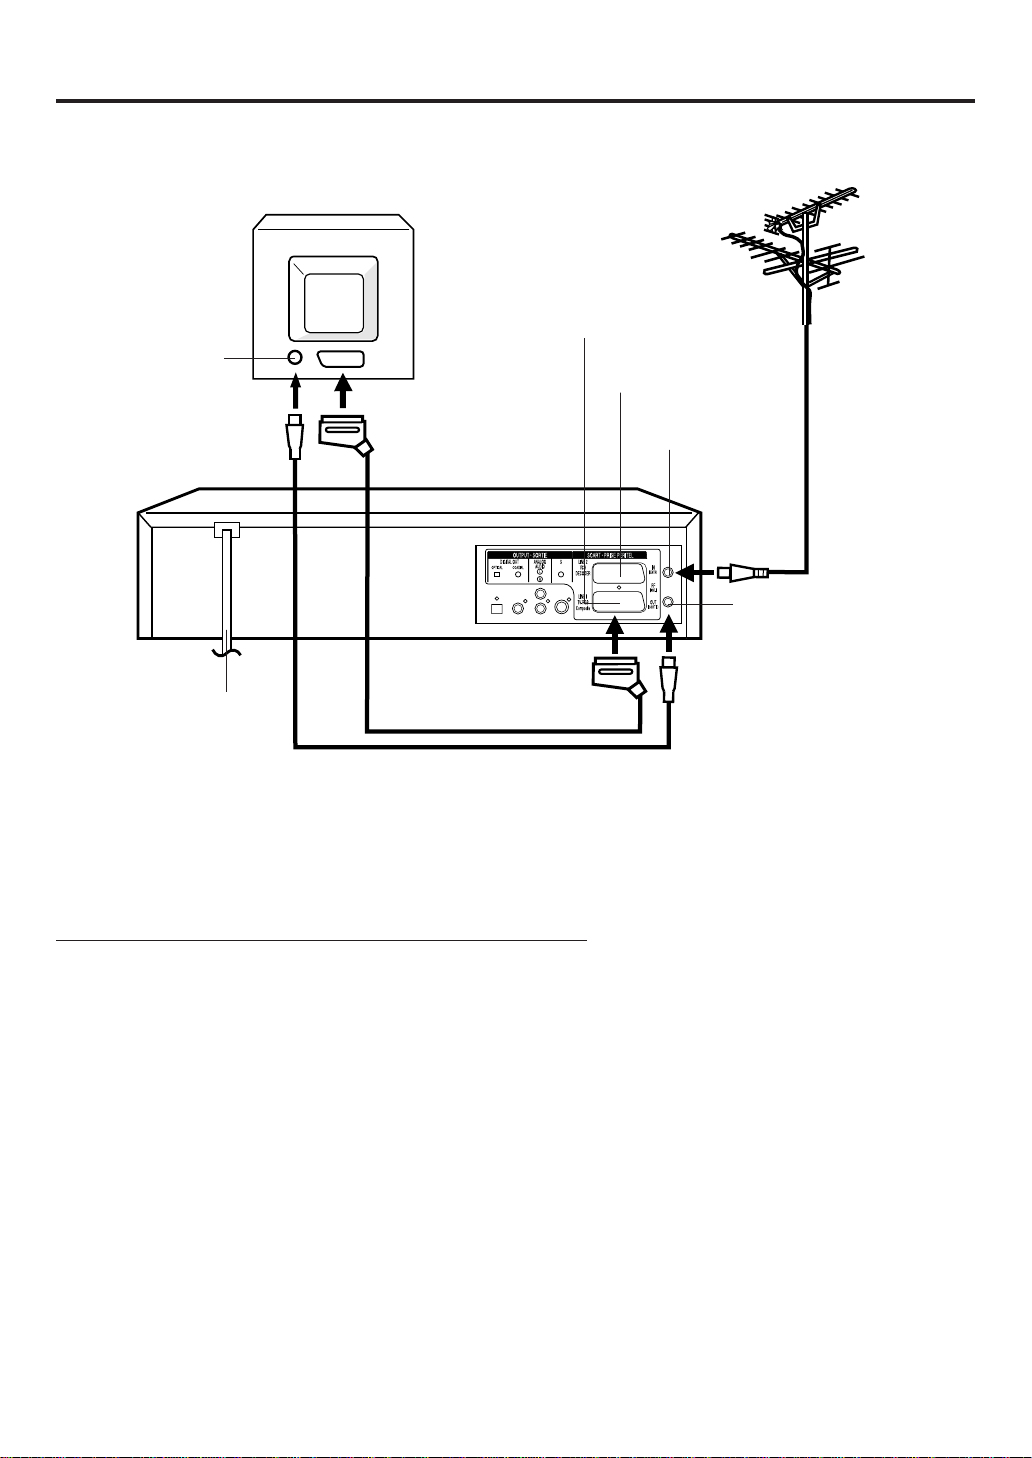
Connections and Installation ..........................10
Playback connection ......................................11
Before using your unit
Recording a TV Programme...........................24
One-touch Timer Recording (OTR) ................26
VIDEO Plus+®Recording ...............................27
Timer Recording Manually .............................29
Recording
Advanced function of VCR section
Loading and Unloading a Cassette Tape .......18
Cassette tape playback..................................19
Special playback/Playback sharpness/Skip Search ........
20
Repeat Playback ............................................21
Counter Display..............................................22
Video Index Search System...........................23
Tape playback operation
Tuning the TV Stations and Setting the Time
and Date Automatically ..................................13
On-screen Language Selection......................14
Setting the Time and Date Manually ..............15
Tuning the TV Stations Manually ...................16
Setting the VIDEO Plus+ Channel Number
(Guide CH) .....................................................17
Setting up the VCR section
DISC...............................................................36
Setting setup language ..................................37
Playback procedure .......................................38
Special playback ............................................39
DVD Picture Signal Selection/Zooming..........40
Repeat playback ............................................41
Memory playback/Random playback .............42
MP3 Playback ................................................43
Changing soundtrack language /
Changing Subtitles language .........................44
Changing angles / Title selection /
DVD menu......................................................45
Disc playback operation
Parental control ..............................................46
Setting menu language ..................................48
Setting audio soundtrack language................49
Setting subtitle language................................50
Setting the aspect ratio of TV screen /
Setting on Screen display ..............................51
Setting Audio ..................................................52
Setting Operation ...........................................53
Selecting the sound enhancement (E.A.M.)/
Setting Background/Setting Screen Saver.....54
Setting initial setup/output sound
conversion table .............................................55
Status display of Disc.....................................56
Table of languages.........................................57
Advanced function of DVD section
Problems and troubleshooting ....................... 58
Video head cleaning....................................... 59
Specifications ................................................. 60
Additional information
NICAM Stereo Recording and Playback ........32
Audio Mixing...................................................34
Duplicating a Video Tape ...............................35
2A78701AE(02-05) 7/5/2002, 5:015

6
SCART-socket
(for VCR/DECODER)
Parts and functions
Front
VCR/DVD mode selector button
Rear
AC power cord
VCR indicator
OPEN/CLOSE button
Disc tray
Standby/On
button
DVD COAXIAL DIGITAL
AUDIO OUT jack
RF IN jack
CHANNEL buttons
AUDIO (L/R)/
VIDEO IN jacks
FWD (Fast Forward) button
Remote sensor
EJECT button
INPUT SELECT button
Cassette Loading Slot
REW (Rewind) button
REC button
DVD indicator
DVD AUDIO (L/R) OUT jacks
RF OUT jack
Display window
SCART-socket
(for TV-RGB/Composite)
DVD S-VIDEO OUT jack
DVD OPTICAL
DIGITAL AUDIO
OUT jack
PLAY button
STOP button
2A78701AE(06-11) 7/5/2002, 5:016

7
VCR
SLP
SM
CH
No. Display Description
1
2
3
4
5
6
124
76
Display
8
VCR
01H 00M 00S
tr 2
L1/L2/L3
SP
2 CH
Note:
Some discs may be displayed wrong or e.g.chapter number, playback time, etc.may not be displayed.
8
Display window
3
Play indicator (VCR)
Video tape is in the unit
VCR mode of TV/VCR switch
Play indicator (DVD)
Clock display (colon[ : ] flashes)
Counter display by hour/minute/second
Track number display for CD
TV channel position display
External input display
Tape speed indicator (VCR)
Timer recording display
Normal recording display (flashes during Recording PAUSE mode)
10 : 00
7
5
2A7A101AE(06-11) 14/5/2002, 20:387

8
Remote control
Page
VCR
Switch to operate VCR 14
DVD
Switch to operate DVD 37
Standby/On 14
0-9 Direct channel selection of TV 24,26
Input setting 16~17,24,26,42,43
Enter a password 46
OPEN/CLOSE Open or Close the tray 38
CLOCK COUNTER
Change the clock and tape counter 22
ANGLE Change playback angle of a DVD disc 45
COUNTER RESET
Reset the counter to 00:00 22
TV/VCR Switches between TV and VCR 25
AUX Scart input or AV-Front input 35
AUDIO Change sound track language of DVD 44
AUDIO SELECT Switches sound 33
SUBTITLE Set Subtitle of a DVD disc 44
ATR Digital AUTO TRACKING 20
MEMORY Index for DVD 42
ZOOM Zoom (for DVD playback) 40
E.A.M Switch a preferred audio enhancement 54
PLAY MODE Select playback mode 41,42
SP/LP Sets the tape speed for recording 24,26,35
TIMER REC
Set the unit to start recording at a preset time.
28,30
REC/OTR Recording 24,26,35
RETURN Remove DVD set up menu 46
DISPLAY CALL Display VCR or DVD operation status 24~25,56
PLAY Playback 19,38,43
REW Rewind/Review playback 19,20,39
FWD Fast Forward/Forward search playback 19,20,39
STOP Stop 19,38,43
SLOW Slowmotion playback 20,39
PAUSE/STILL Still picture/Recording pause on/off 20,24,35,39
SKIP /Skip chapter to forward or reverse direction 39
INDEX / Search for the INDEX mark of a tape 23
TITLE Select title of a DVD disc 45
A-B RPT Repeat playback between A and B (DVD/CD) 41
SET UPVCR MENU
Display menu of setup 14~21,37,46~55
CH +/– Select channel of the connected TV or VCR
8,24,26,35
▲/▼Cursor buttons
MENU Display menu of DVD software 45
ZERO RETURN
Stop the tape when the counter reaches 00:00:00
22
SET –/+ Setting buttons 28~30
Manual tracking buttons in playback mode 20
/ Cursor buttons - To move Up in the VCR menu
you press the .To move Down in the VCR
menu you press the .
ENTER
Enter information in the menu/Select option in the menu
INSTANT SKIP Skip the unwanted short material of a tape 20
CANCEL Delete Timer program 31
Cancel input data in the setting mode
27,31,42~46
VIDEO Plus+ VIDEO Plus Recording 27
Confirmation of Timer Recording 31
SLOW
PAUSE/STILL
SET –
INDEX – SKIP INDEX +
SET UP
VCR MENU
ENTER
CANCEL
VIDEO Plus+
A-B RPT
INSTANT SKIP
ZERO RETURN
TITLE
SET +
CH +
CH –
OPEN/CLOSE
ANGLE
COUNTER RESET
AUDIO
AUDIO SELECT
SUBTITLE
ATR
PLAY MODE
SP/LP
DISPLAY
CALL
TIMER REC
CLOCK
COUNTER
DVDVCR
ZOOM
AUXTV/VCR
MEMORY
REC/OTR RETURN
E.A.M
MENU
PLAY
REW FWD
STOP
2A7A101AE(06-11) 14/5/2002, 16:198

9
Remote control
1Slide the battery compartment
cover in the direction of the
arrow.
How to install the batteries
Use micro batteries type AAA.
Distance of Remote
Control Operation
Battery precautions
The precautions below should be followed when using batteries in this device:
1.Use only the size and type of batteries specified.
2.Be sure to follow the correct polarity when installing the batteries as indicated in the battery compartment.
Reversed batteries may cause damage to the device. To avoid a potential short circuit, insert the “–” end first.
3.Do not mix different types of batteries together (e.g.Alkaline and Carbon-zinc) or old batteries with fresh ones.
4.If the device is not to be used for a long period of time, remove the batteries to prevent damage or injury from
possible battery leakage.
5.Do not try to recharge batteries not intended to be recharged; they can overheat and rupture.
Effective angle:
approx. 60°
approx.
5m
Point the remote
control directly at the
remote sensor.
3Replace the compartment
cover.
2
Install two "AAA" batteries (supplied),
paying attention to the polarity
diagram in the battery
compartment.
2A78701AE(06-11) 8/5/2002, 0:119

10
Connections and Installation
Connect your DVD/VCR to your home's aerial and to your TV-set as shown in the illustration.
When you have finished these connections you connect your DVD/VCR to the 230-240 V / 50 Hz mains.
TV
AC power cord 230V/50 Hz
DVD/VCR
Aerial-Input
To Scart socket RF-Input (from
house antenna)
TV Scart Socket (A1)
RF-Output (to TV)
Aerial
Supplied Coaxial cable
Connect a TV with the Scart socket
Inaddition to the coaxialcable connection, connect alsowith scart cable. Thepicture and sound willbe transmitted
best through the scart cable. In this case, the TV need not be tuned to the video recorder. The Video channel also
neednotbetuned.Thevideorecorderswitchthetelevisiontovideooperationthroughthescartcableautomatically.
The stereo-playback is possible in only case through a scart cable!
If your TV-set does not switch to video-playback operation automatically, please
turn your TV's video switch to VIDEO position manually.
Scart cable (not supplied)
VCR/DECODER
Scart Socket (A2)
2A78701AE(06-11) 7/5/2002, 5:0110

11
Playback connection
The exact arrangement you use to interconnect various video and audio components to the DVD/VCR is
dependent on the model and features of each component.Check the Owner's Manual provided with each
component for the location of SCART socket.
Connection to a Satellite Receiver
If a Satellite Receiver is used, we recommend the following configuration:
To record from Satellite Receiver press "AUX" on the remote control of DVD/VCR twice. "A2" will appear on the
front display. Select the desired TV-program at Satellite Receiver.
Connect to a TV with S-Video Output
SCART-cable (not supplied)
Satellite
Aerial
Satellite
Receiver
DVD/VCR TV
SCART-cable (not supplied)
DVD/VCR
TV
S-Video Cord (not supplied)
To Audio (R) Input
To S-Video Input
To Audio (L) Input
S-Video Output
AUDIO Cord (not supplied)
Audio (L) Output
Audio (R) Output
Note:
• The S-VIDEO jack is useful only for DVD section.
• If you use the connection with S-Video Cord, set the “Video Out Select” (P.40) to “Video”.
2A78701AE(06-11) 7/5/2002, 5:0211

12
Connect to an AV Amplifier with built-in digital surround
If you are using an Amplifier with a built-in digital surround as follows, you can enjoy the various audio systems
such as Dolby Digital and DTS by using the Coaxial Digital Output.
Use this connection to connect an:
• AV amplifier with built-in *Dolby Digital decoder
• AV amplifier with built-in *DTS decoder
Playback connection
Connect to a Stereo Amplifier with Audio Output
Connecting the optical digital cable
You may connect to an AV Amplifier with an Optical digital cable (not supplied) instead of a Coaxial digital
cable.
When you connect the optical digital cable (not supplied), remove the dust protection cap from the rear panel.
When not using the optical digital cable, attach the dust protection cap to protect against dust.
NOTES:
• The OPTICAL, COAXIAL jacks are useful only for DVD section.
VHS signal is output only from the SCART-sockets, AUDIO L/R jacks and RF OUT jack.
• When you make the connections above, do not set DOLBY DIGITAL to DOLBY DIGITAL or DTS to ON on the AV
Amplifier. If you do, a loud noise will suddenly come out from the speakers, affecting your ears or causing the
speakers to be damaged.
• DTS audio will be output only from the COAXIAL output.To hear DTS audio, DTS-Decoder is necessary.
When playing DTS-encoded CDs, only noise will be heard from the speakers or analogue stereo outputs.
• Some DTS decoders which do not support DVD-DTS interface may not work properly with the unit.
Coaxial digital cable
(not supplied)
AV Amplifier with
built-in various
decoder as above
DVD/VCR
TV
If your DVD/VCR is connected to a stereo amplifier, the video soundtrack can output through the loudspeakers of
the stereo system.
To Audio (L) Input
To Audio (R) Input
TV
AUDIO Cord (not supplied)
Stereo Amplifier
DVD/VCR
Audio (R) Output
SCART-cable (not supplied)
Audio (L) Output
Coaxial digital
Audio Output
SCART-Socket
(for TV-RGB/Composite)
To SCART
input
SCART-cable (not supplied) To SCART
input
SCART-Socket
(for TV-RGB/Composite)
2A78701AE(12-17) 7/5/2002, 5:0212

13
Plug your DVD/VCR's plug into the mains supply. "Auto"
will start to flash in the display.Your DVD/VCR will auto-
matically tune itself in and set the correct
time and date (This may take
approx. 4 minutes).
Plugyour DVD/VCR into themains sup-
plyandit willstarttoautomaticallytune
itself in and set the correct date and
time. After setting itself up, you must
set the TV to the video channel.
Preparation
•
•
•
MakesurethatyourDVD/VCRisconnectedproperlytotheTV.
Ifasatellite receiver is connectedwiththecoaxiallead,make
sure it’s switched ON and set to SKY ONE.
TurnontheTVandselectthechannelyouwishtoallocatefor
video use.
Tuning the TV Stations and Setting the Time and
Date Automatically
2
1
• The DVD/VCR automatically corrects
the clock setting every hour and
automatically adjusts the clock setting
for Daylight Saving Time.
• Your DVD/VCR will tune the TV
stations as follows.
CH 1 BBC 1
CH 2 BBC 2
CH 3 ITV
CH 4 Channel 4
CH 5 Channel 5
CH 6 Satellite
CH 7 etc.
For VIDEO Plus+ recording to work
correctly, this order should not be
changed.
• If you want to change the RF output
channel or switch to "OFF", press and
hold the DVD/VCR on the front of
your DVD/VCR in the Standby mode
until the current RF output channel
appears. Press CHANNEL on your
DVD/VCR to select the RF channel you
desire.
•Skipped channels still may be selected
directly through the 1 to 0 keys.
• To cancel skipping select the skipped
channel using the 1 to 0 keys, then
press CANCEL. The channel No. does
not blink any longer, and the channel
No. now may be selected again using
CHANNEL.
Notes:
Press and hold the button on the front of your DVD/
VCR in the Standby mode until "rF"
and RF output channel "36" will
appear in the display.
4
Now the output from the DVD/VCR is
tuned to this channel. Whenever you
want to play back a tape, select this
channel.
If there is interference in the picture (wavy lines, picture
roll, etc.), press CHANNEL on your DVD/VCR to select
anyRFchannelbetween23and69,retuningyourTV until
the word "TEST" flashes on the TV screen.
5Press the button to turn OFF the DVD/VCR.
Now the TV is tuned to your DVD/VCR.
To skip a channel position
Unwanted channels can be
skipped so that they cannot
be called up by pressing
CHANNEL. Select the
channel to be skipped,
CH 29
3If you have used a 21PIN scart lead you now, simply se-
lect the AV channel on yourTV and go to step 5.Tune the
TV in the same way as tuning in a TV broadcast station
until the word "TEST" flashes on the TV screen. Refer to
the TV operating instructions for tuning.
If you connected a satellite receiver as explained on page
11, you must switch off the DVD/VCR’s transmitter. Press
theVCR’sCHANNEL repeatedly until OFFappearsinthe
display window (OFF will appear
after 69 or before 23).
...e.g. channel 29. Select channel 29, then press
CANCEL.
This channel’s number will be flashing. That way you can
cancel further channels one after the other.
VCR
SP
VCR
SP
TEST
VCR
SP
VCR
SP
CH
2A7A101AE(12-17) 14/5/2002, 16:2013

14
On-screen Language Selection
LANGUAGE/SPRACHE/LANGUE
ENGLISH
DEUTSCH
FRANCAIS
SELECT : OK : ENTER
Notes:
•If the unit does not operate properly,
or No key operation (by the unit and /
or the remote control): Static electric-
ity, etc., may affect the player’s opera-
tion.DisconnecttheACpowercordonce,
then connect it again.
• If you use the unit for the first time and
press VCR MENU, instead of the MENU
screenin steps 1 and 2,theoneinstep 3
mayappear.ThisisnormalforthisDVD/
VCR and is no indication of a malfunc-
tion.
Please first select the language to oper-
ate this unit.
Turn on your TV and select the VCR
channel which you have already tuned
on your TV. The TV will switch to AV
(VCR mode) automatically by the Scart
lead connection. The on-screen menu
can display any of three languages;
English, German and French.
SLOW
PAUSE/STILL
SET –
INDEX – SKIP INDEX +
SET UP
VCR MENU
ENTER
CANCEL
VIDEO Plus+
A-B RPT
INSTANT SKIP
ZERO RETURN
TITLE
SET +
CH +
CH –
OPEN/CLOSE
ANGLE
COUNTER RESET
AUDIO
AUDIO SELECT
SUBTITLE
ATR
PLAY MODE
SP/LP
DISPLAY
CALL
TIMER REC
CLOCK
COUNTER
DVDVCR
ZOOM
AUXTV/VCR
MEMORY
REC/OTR RETURN
E.A.M
MENU
PLAY
REW FWD
STOP
Preparation
•Press the button to turn on the DVD/VCR.
•Press VCR to select the VCR mode.(The VCR indicator will
light)
1Press VCR MENU.Press ▲or ▼to select the SYSTEM
SETUP.
Then press ENTER.
2Press ▲or ▼to select
the LANGUAGE.Then
pressENTER.
3Press ▲or ▼to select
the desired language.
Then press ENTER.
4Press VCR MENU repeatedly until the TV picture
appears on the screen.
SELECT :
CHANNEL SETUP
ENTER
EXIT : ENTER
: MENU
VCR SETUP
AUTO REPEAT OFF
SYSTEM SETUP
TIMER REC SET
SELECT :
SYSTEM SETUP
LANGUAGE/SPRACHE/LANGUE
ENTER
EXIT : ENTER
: MENU
CLOCK SET
2A78701AE(12-17) 7/5/2002, 5:0214

15
Setting the Time and Date Manually
Notes:
• The AUTO TIME function adjusts the
clock only if the error is within 5
minutes.
• The VCR automatically adjusts the
clock setting for Daylight Saving Time
once you set AUTO TIME to ON.
You must set the date and time manually
for timer recordings if Automatic tuning
process did not set them correctly.
SELECT :
:
YEAR
SET
OK : ENTER EXIT : MENU
MONTH
DAY
TIME 2002
10
26 SAT
11: 30
AUTO TIME ON
CLOCK SET
SELECT :
:
YEAR
SET
OK : ENTER EXIT : MENU
MONTH
DAY
TIME 2000
1
26 WED
0: 00
AUTO TIME ON
CLOCK SET
SLOW
PAUSE/STILL
SET –
INDEX – SKIP INDEX +
SET UP
VCR MENU
ENTER
CANCEL
VIDEO Plus+
A-B RPT
INSTANT SKIP
ZERO RETURN
TITLE
SET +
CH +
CH –
OPEN/CLOSE
ANGLE
COUNTER RESET
AUDIO
AUDIO SELECT
SUBTITLE
ATR
PLAY MODE
SP/LP
DISPLAY
CALL
TIMER REC
CLOCK
COUNTER
DVDVCR
ZOOM
AUXTV/VCR
MEMORY
REC/OTR RETURN
E.A.M
MENU
PLAY
REW FWD
STOP
Preparation
•Turn on the TV, and select the VCR channel on TV.
•
PressVCR toselecttheVCR mode.(TheVCRindicatorwilllight)
Example: Setting the clock to 11:30, 26 Oct.2002.
1Press VCR MENU.Press ▲or ▼to select
the
SYSTEM
SETUP.Then press
ENTER.
The step-2 will appear
when clock is not set.
2Press ▲or ▼to select
the CLOCK SET.Then
press ENTER.
3Press or repeatedly
until 26 appears.Then
press ▼to continue.
4Set the month, year, hour and minute in the same way
as in step 3.Then press ENTER.
• In case of an error,
press ▲ to go back to
one step and enter
again.
5Press or to select AUTOTIME ON or OFF.
The VCR automatically corrects the clock setting every
hour once you set AUTO TIME to ON.
6Press VCR MENU repeatedly until the TV picture
appears on the screen.
7The clock will begin operation.
15
SELECT :
CHANNEL SETUP
ENTER
EXIT : ENTER
: MENU
VCR SETUP
AUTO REPEAT OFF
SYSTEM SETUP
TIMER REC SET
SELECT :
SYSTEM SETUP
LANGUAGE/SPRACHE/LANGUE
ENTER
EXIT : ENTER
: MENU
CLOCK SET
VCR
SP
CH
2A7A101AE(12-17) 14/5/2002, 16:2015

16
This VCR has one built-in tuner to
receive broadcasts. Before you
recordaTVbroadcast,youmustsetand
presetallchannels.ThisVCRcanpreset
up to 80 channels.
Tuning the TV Stations Manually
•Turn on the TV, and select the VCR channel on TV.
•Press VCR to select the VCR mode.(The VCR indicator will
light)
Preparation
CH 01
CH 02
CH 03
CH 04
CH 05
CH 06
BBC 1
BBC 2
ITV
CH4
CH5
SATELLITE
3Press (falling frequency) or (rising frequency)
once to start the search. It stops at each broadcast
Press ▲or ▼repeatedly
until 2 is displayed. (Or
enter 0 2 with the 1 to 0
numbered keys). Then
press ENTER.
4
5
6Press VCR MENU repeatedlyuntil theTVpicture appears
on the screen.
Repeat the steps 3and 4 to preset other TV stations.
automatically (" "
changes to " "). Press
or repeatedly until
BBC 2 appears. Only in
case of receiving a weak
broadcast (drifting
picture), does search fail
to stop. If you want to
stop, press or .
Press ENTER to preset.
The search menu screen
will disappear if the next
mode is not activated in
less than 50 seconds.
CH 1
: MENU
SEARCH :
EXIT
CH 1
EXIT : MENU
CH : / 0Ð9
OK :
ENTER
1PressVCR MENU.
Press ▲or ▼to select
the CHANNEL SETUP.
Then press ENTER.
Example: Preset the BBC 2 on programme position 2.
Note:
Occasionally,theautosearchmightcatch
a weak signal and stop. If the TV station
signal is weak, you shouldn't store this
station.
In that case restart the auto search
using or .
CH 2
EXIT : MENU
SEARCH :
OK : ENTER
SELECT :
CHANNEL SETUP
ENTER
EXIT : ENTER
: MENU
VCR SETUP
AUTO REPEAT OFF
SYSTEM SETUP
TIMER REC SET
2Press ▲or ▼to select
the CH TUNING.
Press ENTER to select
CH TUNING screen.
SELECT :
CH TUNING
ENTER
EXIT : ENTER
: MENU
GUIDE CH SET
CHANNEL SETUP
SLOW
PAUSE/STILL
SET Ð
INDEX Ð SKIP INDEX +
SET UP
VCR MENU
ENTER
CANCEL
VIDEO Plus+
A-B RPT
INSTANT SKIP
ZERO RETURN
TITLE
SET +
CH +
CH Ð
OPEN/CLOSE
ANGLE
COUNTER RESET
AUDIO
AUDIO SELECT
SUBTITLE
ATR
PLAY MODE
SP/LP
DISPLAY
CALL
TIMER REC
CLOCK
COUNTER
DVDVCR
ZOOM
AUXTV/VCR
MEMORY
REC/OTR RETURN
E.A.M
MENU
PLAY
REW FWD
STOP
2A78701AE(12-17) 8/5/2002, 1:0516

17
Preparation
•Turn on the TV, and select the VCR channel on TV.
•Press VCR to select the VCR mode. (The VCR indicator will
light)
Example: Satellite channel has been incorrectly stored on
channel 8 of your VCR.
1
The TV stations must be stored according
to the tuning guide given on page 13,
otherwise the VIDEO Plus+ feature will not
work. If for any reason you did not select
channels BBC1, BBC2, ITV, CH4, CH5 and
Satellite in channel positions 1 through to 6
respectively,youmustseteachVIDEOPlus+
channel number (GUIDE CH) manually.
2Press ▲or ▼ to select
the GUIDE CH SET.
Then press ENTER.
3Enter "SAT" with ▲or ▼or
number keys.
Then press ENTER.
SET : / 0-9
GUIDE CH SET
GUIDE
6
VCR
CH CH
8
OK
EXIT : ENTER
: MENU
SET : / 0-9
GUIDE CH SET
GUIDE
6
VCR
CH CH
6
CLEAR
OK : CANCEL
: ENTER
EXIT : MENU
For other Codes, repeat steps 3and 4.
5
6Press VCR MENU repeatedly until the TV picture
appears.
Enter "6" with ▲or ▼or
number keys.
Then press ENTER.
4
If you have connected
your satellite using the
scart socket, you must
select "AV" for the VCR
CH number.
TV
STATION
BBC1
BBC2
ITV
CH4
CH5
Satellite
1
2
3
4
5
6
GUIDE CH
GUIDE CHANNEL TABLE
Press VCR MENU.Press
▲or ▼ to select the
CHANNEL SETUP.Then
press ENTER.
Setting the VIDEO Plus
+
®
Channel Number (Guide CH)
SELECT :
CHANNEL SETUP
ENTER
EXIT : ENTER
: MENU
VCR SETUP
AUTO REPEAT OFF
SYSTEM SETUP
TIMER REC SET
SELECT :
CH TUNING
ENTER
EXIT : ENTER
: MENU
GUIDE CH SET
CHANNEL SETUP
SLOW
PAUSE/STILL
SET –
INDEX – SKIP INDEX +
SET UP
VCR MENU
ENTER
CANCEL
VIDEO Plus+
A-B RPT
INSTANT SKIP
ZERO RETURN
TITLE
SET +
CH +
CH –
OPEN/CLOSE
ANGLE
COUNTER RESET
AUDIO
AUDIO SELECT
SUBTITLE
ATR
PLAY MODE
SP/LP
DISPLAY
CALL
TIMER REC
CLOCK
COUNTER
DVDVCR
ZOOM
AUXTV/VCR
MEMORY
REC/OTR RETURN
E.A.M
MENU
PLAY
REW FWD
STOP
2A78701AE(12-17) 7/5/2002, 5:0217

18
Automatic tape eject
This VCR will automatically rewind the tape when the tape has ended. And when the tape is rewinded to its
beginning, the cassette tape will be ejected automatically.
Loading and Unloading a Cassette Tape
To prevent accidental erasure
Removetheerasepreventiontabwithascrewdriver. Cover the hole with a piece of adhesive tape.
To record again
Screwdriver
PressEJECTontheunit.Evenifatapeisbeing
played, press this button only once. Remove the cassette tape.
Loading
Push the centre of the tape until it is automatically
inserted.
Insertthecassettetapewithitslabeledsidefacingup
and the erase prevention tab positioned at your left.
An inverted cassette tape cannot be inserted.
Automatic playback
When loading a cassette tape without an erase prevention tab, playback will start automatically.
Automatic power ON
When you insert a cassette tape the DVD/VCR power will turn ON automatically.
Unloading
12
Use only video cassette tapes marked and .
• Cassettes marked “VHS”(or“S-VHS”) can be used with this video cassette recorder.However, S-VHS recording
is not possible with this model.
• This model is equipped with SQPB (S-VHS QUASI PLAYBACK) that makes it possible to play back S-VHS
recordings with regular VHS resolution.
• HQ VHS is compatible with existing VHS equipment.
• SQPB playback can be seen only at PAL SP mode.
Erase prevention tab
Adhesive tape
Erase prevention tab
S P
SM
H
VCR
VCR
S P
SM
H
VCR
SP
CH
2A7A101AE(18-23) 14/5/2002, 16:2118

19
Load a prerecorded tape
(When loading a cassette tape
without the erase prevention
tab, playback will start auto-
matically).
1
2Press PLAY.
Playback will start.
If the cassette has not loaded
yet, will blink for 4 seconds.
To start playback
Press STOP.
To stop playback
To rewind the tape or forward it rapidly
Stop the playback or recording with STOP.
To rewind the tape:
Press REW.
To forward the tape:
Press FWD.
To stop the tape-winding, press STOP. To switch to playback
directly (without 3), press PLAY.
Forward/Reverse picture search mode
Whenthe tape is being winded, you canswitch to picture search
mode (see next page). To do this, press REW or FWD and hold
it down. The unit will resume the tape winding as soon as the
button is released.
• This VCR selects the playback tape
speed SP or LP automatically.
• The Cassette tape and DVD disc can
be played back simultaneously.If you
pressVCR orDVD,thetape playback
andDVDplaybackalternatewith each
other on the screen.
Preparation:
•Turn on the TV, and select the VCR channel on TV.
•Press VCR to select the VCR mode. (The VCR indicator will light)
NTSC video cassette playback
When using a pre-recorded NTSC video cassette tape, the
connected TV set must operate with a 60 Hz vertical frequency.
Otherwise the on-screen picture will be affected by vertical
rolling.EvenifyourVCRsetiscapableofprocessingNTSCvideo
signals, the picture may be shortened vertically (appearance of
black bars at the top and at the bottom of the TV screen). The
dubbing of a NTSC video cassette tape to a standard PAL VCR
is not possible.
Cassette tape playback
SLOW
PAUSE/STILL
SET –
INDEX – SKIP INDEX +
SET UP
VCR MENU
ENTER
CANCEL
VIDEO Plus+
A-B RPT
INSTANT SKIP
ZERO RETURN
TITLE
SET +
CH +
CH –
OPEN/CLOSE
ANGLE
COUNTER RESET
AUDIO
AUDIO SELECT
SUBTITLE
ATR
PLAY MODE
SP/LP
DISPLAY
CALL
TIMER REC
CLOCK
COUNTER
DVDVCR
ZOOM
AUXTV/VCR
MEMORY
REC/OTR RETURN
E.A.M
MENU
PLAY
REW FWD
STOP
VCR
SP
SM
H
VCR
S P
SM
H
2A7A101AE(18-23) 14/5/2002, 16:2119

20
Toreturntotheinitialsharpnesssetting,pressCANCEL
while the sharpness setting screen is appearing.
Note:
Playback sharpness
Adjust the sharpness of playback picture during
playback. During slow motion, still picture and picture
search, sharpness-adjusting is impossible.
TIMER REC SET
AUTO REPEAT
CHANNEL SETUP
SYSTEM SETUP
SELECT :
ENTER : ENTER
MENU
EXIT
:
VCR SETUP [OFF]
5Press VCR MENU repeatedly until the TV picture
appears on the screen.
Press VCR MENU.
Press or to select
VCR SETUP.Then press
ENTER.
Press or to select
PLAYBACK SHARP-
NESS.Then press
ENTER.
4Press or to adjust
the playback sharpness
to the level you reguire.
2
3
AUDIO MIX
NICAM
VCR SETUP
SELECT :
ENTER : ENTER
MENU
EXIT :
PLAYBACK SHARPNESS [OFF]
[AUTO]
PLAYBACK SHARPNESS
+ÐÐ+ÐÐ+ÐÐ+ÐÐ
SET : CANCEL
CENTRE : MENU
EXIT :
2
softer sharper
Special playback/Playback sharpness/Skip Search
Adjusting tracking condition
Whenever you insert a tape and start playback,
automatic tracking starts working and continuously
analyzes the signal to enable optimum picture quality
during playback.
Notes:
•
The audio output is muted during SPEED SEARCH,
STILL, FRAME ADVANCE and SLOW MOTION.
• During picture search mode there will be noise bars
which are caused by the system.
• The Special Playback will automatically change to
playback after approx.5 minutes to protect the video
tape against excessive wear.
Automatic tracking adjustment
Ifautomatictrackingcannot eliminate noises wellduring
playback, press SET + or SET – to eliminate the noises.
“MANUAL TR.” will appear. Press it briefly for a fine
adjustment, or press and hold for a coarse adjustment.
Manual tracking adjustment
To return to automatic tracking, press A.TRK.
Special playback
Slow Motion
During playback press SLOW.
You can change the slow speed by the additional
pressing of SLOW.
To return to playback: Press PLAY.
Reverse picture search function
Press REW x 1 or x 2 during the playback.
Picture Search
Forward picture search function
Press FWD x 1 or x 2 during the playback.
To return to playback: Press PLAY.
Still Picture
PressPAUSE/STILLduringplayback.Toresume
normal playback: Press PLAY.
During playback, press PAUSE/STILL one by one:
The picture advances frame by frame.
To return to playback: Press PLAY.
Frame by Frame picture
Slow tracking and vertical lock adjustment
If noise bars appear in the picture during slow motion,
press the SET + or –to reduce the noise bars.
If the still picture jitters excessively, press SET + or –
to stabilize the still picture.
Skip Search
Eachtimeyoupress INSTANT SKIP whilea tape is playing,
theunit will fast-forward ahead 30seconds on the tape.You
may press the button up to six times in a row to move 180
seconds (three minutes) ahead.
For example: 1 press: Approx. 30 seconds of tape
2 presses: Approx. 60 seconds of tape
3 presses: Approx. 90 seconds of tape
1Start the playback of video tape.
2A7A101AE(18-23) 14/5/2002, 16:2120
Other manuals for SD-22VB
1
Table of contents
Other Toshiba VCR System manuals

Toshiba
Toshiba M-784 User manual

Toshiba
Toshiba M759 User manual

Toshiba
Toshiba VE28 User manual

Toshiba
Toshiba M-784 User manual

Toshiba
Toshiba M-653 User manual

Toshiba
Toshiba M222 User manual

Toshiba
Toshiba M770 User manual

Toshiba
Toshiba KV-7024A User manual

Toshiba
Toshiba M-5010 User manual

Toshiba
Toshiba W-704 User manual

Toshiba
Toshiba RDXV49DTKF User manual

Toshiba
Toshiba RD-XV47KE User manual

Toshiba
Toshiba W-607 User manual

Toshiba
Toshiba M-473 User manual

Toshiba
Toshiba VIDEOplus+ V-855 User manual

Toshiba
Toshiba M46 User manual

Toshiba
Toshiba M-663 User manual

Toshiba
Toshiba V-621EW User manual

Toshiba
Toshiba M249 User manual

Toshiba
Toshiba M-672 User manual