Tosibox Oy Tosibox User manual

Copyright © Tosibox Oy 2012
User Manual - Beta Version 2

2Table of Contents
1. Tosibox in brief 4
2. Tosibox glossary 5
3. Contents of the Tosibox sales package 6
4. Tosibox connections 7
5. Tosibox Key and Lock serialization 8
6. Serializing several Keys 10
7. Serializing several Locks 12
8. Serializing the Lock-Sub Lock 14
9. Bringing the Key into use 16
10. Lock settings 20
11. Devices with fixed IP address 22
12. Problem situations 24
13. Maintenance instructions 25
14. Tosibox – technical data 28
15. Tosibox licences 30
16. Declaration of Conformity 32
Sisällysluettelo
1. Tosibox lyhyesti 4
2. Tosibox sanastoa 5
3. Tosibox myyntipakkauksen sisältö 6
4. Tosibox liitännät 7
5. Tosibox Keyn ja Lockin sarjoitus 8
6. Usean Keyn sarjoitus 10
7. Usean Lockin sarjoitus 12
8. Lock-Sub Lock -sarjoitus 14
9. Keyn käyttöönotto 16
10. Lockin asetukset 20
11. Laitteet joilla kiinteä IP-osoite 22
12. Ongelmatilanteet 24
13. Huolto-ohjeita 25
14. Tosibox – tekniset tiedot 28
15. Tosibox-lisenssit 30
16. Vaatimustenmukaisuusilmoitus 32

3
Innehåll
1. Kort om Tosibox 4
2. Tosibox ordlista 5
3. Innehåll i Tosibox försäljningsförpackning 6
4. Tosibox anslutningar 7
5. Tosibox-Key och -Lock serieläggning 8
6. Serieläggning av flera Keys 10
7. Serieläggning av flera Locks 12
8. Serieläggning av Lock-Sub Lock 14
9. Ibruktagande av en Key 16
10. Lock-inställningar 20
11. Maskiner med en fast IP adress 22
12. Problemsituationer 24
13. Serviceinstruktioner 25
14. Tosibox tekniska uppgifter 28
15. Tosibox-licenser 30
16. Försäkran om överensstämmels 32
Inhaltsverzeichnis
1. Tosibox in Kürze 4
2. Tosibox-Glossar 5
3. Inhalt der Tosibox-Verkaufsverpackung 6
4. Tosibox-Anschlüsse 7
5. Tosibox-Key und -Lock-Serialisierung 8
6. Serialisierung mehrerer Keys 10
7. Serialisierung mehrerer Locks 12
8. Serialisierung des Lock-Sub Lock 14
9. Inbetriebnahme des Key 16
10. Lock-Einstellungen 20
11. Geräte mit festgelegtem IP Adresse 22
12. Problemlösung 24
13. Wartungshinweise 25
14. Technische Daten Tosibox 28
15. Tosibox-Lizenzen 30
16. Konformitätserklärung 32
4Dear User!
Tosibox offers a new, automatic way to establish
a remote connection easily, cost-efficiently and safely.
Tosibox is a plug-and-play data automation product. All you
need to bring it into use is mains current and an Internet
connection. The operating principle of Tosibox resembles that
of a lock and key.
The product consists of a key device (Key) and a locking
device (Lock). The system is brought into use by serializing the
equipment physically through a USB port. The settings of the
Tosibox locking device do not usually need to be changed.
Hyvä Käyttäjä!
Tosibox tarjoaa täysin uudenlaisen, automaattisen tavan
muodostaa etäyhteys helposti, edullisesti ja turvallisesti.
Tosibox on kytke-ja-käytä menetelmään perustuva
tietoautomaatiotuote, jonka käyttöönotossa tarvitaan vain
verkkovirtaa ja internetliittymä. Tosiboxin toimintaperiaate
muistuttaa mekaanisen lukon ja avaimen toimintaa.
Tuote koostuu avainlaitteesta (Key) ja lukkolaitteesta (Lock).
Käyttöönotto tapahtuu sarjoittamalla laitteet fyysisesti
toisiinsa USB-portin kautta.
Käyttöönotossa ei yleensä tarvitse muuttaa Tosibox-
lukkolaitteen asetuksia.
Bästa Användare!
Tosibox erbjuder ett helt nytt, automatiskt sätt att
bilda en fjärranslutning enkelt, förmånligt och säkert.
Tosibox är en dataautomationsprodukt som baserar sig
på plug-and-play-tekniken. För att ta den i bruk krävs
endast nätström och en internetanslutning. Tosibox
verksamhetsprincip påminner om ett mekaniskt lås med
nyckel.
Produkten består av en nyckelmaskin (Key) och en låsmaskin
(Lock). Ibruktagandet sker genom att fysiskt serielägga
maskinerna med varandra via USB-porten.
Oftast behövs Tosibox-låsmaskinens inställningar inte ändras
i ibruktagandet.
Geehrter Benutzer!
Tosibox bietet einen völlig neuartigen, automatischen Weg
zur Herstellung einer Kommunikationsverbindung: leicht,
kostengünstig und sicher.
Tosibox ist ein Produkt der Datenautomation und basiert auf
dem Plug-and-use-Verfahren, für die Inbetriebnahme sind
nur Netzstrom und ein Internetanschluss erforderlich. Das
Arbeitsprinzip von Tosibox ist ähnlich wie die Funktion einer
mechanischen Sperre und eines Schlüssels.
Das Produkt besteht aus einem Schlüsselgerät (Key) und
einem Sperrgerät (Lock). Die Inbetriebnahme erfolgt durch
physische Serialisierung der Geräte untereinander über einen
USB-Port.
Bei der Inbetriebnahme müssen die Einstellungen des
Tosibox-Sperrgerätes normalerweise nicht geändert werden.
5
Tosibox glossary
Key = an intelligent, microprocessor using USB connected key
device that establishes a connection with the locking device.
Sub Key = an accessory key device.
Lock = a locking device that acts as a host to the Keys, Sub
Keys and Sub Locks. The Lock automatically distributes IP
addresses to remotely controlled devices that are connected.
The controlled devices with fixed IP address can also be
controlled with the Lock.
Sub Lock = a Lock that has been converted to Sub Lock mode
of operation. When connecting two Locks with each other one
of them has to be in sub Lock mode of operation.
Industry setting = data transfer through the Tosibox to the
Internet is prevented.
Tosibox-sanastoa
Key = Älykäs, prosessorin sisältävä USB-liitäntäinen
avainlaite, jonka avulla muodostuu yhteys lukkolaitteeseen.
Sub Key = Lisäavainlaite.
Lock = Lukkolaite, joka toimii isäntänä Key, Sub Key ja Sub
Lock -laitteille. Lock jakaa siihen liitetyille etäohjattaville
laitteille automaattisesti IP-osoitteet. Lockilla voidaan ohjata
myös kiinteä IP-osoitteisia laitteita.
Sub Lock = Lock-laite, joka on muutettu ohjelmallisesti Sub
Lock -tilaan. Yhdistettäessä kaksi Lock-laitetta keskenään,
toisen niistä on oltava Sub Lock -tilassa
Industry-asetus = Tosiboxin kautta kulkeva tietoliikenne
julkiseen internetiin on estetty.
Tosibox ordlista
Key = En intelligent, microprocessor innehållande
nyckelmaskin med USB-anslutning. som bildar en anslutning
till låsmaskinen.
Sub Key = Extra nyckelmaskin
Lock = Låsmaskin som fungerar som värd för Key, Sub Key
och Sub Lock -maskiner. Lock-maskinen delar automatiskt IP-
adresser ttill de fjärrstyrda maskiner som är kopplade till dessa.
Maskiner med statisk IP-adress kan också styras med Locket.
Sub Lock = Ett Lock som har modifierats programmvis
att fungera i Sub Lock verksamhetsläge. När två Locks
blir kopplats med varandra, den andra ska vara i Sub Lock
verksamhetsläge.
Industry-inställning = Datatrafiken via Tosibox är förhindrad
att nå öppet internet.
Tosibox-Glossar
Key = ein intelligentes, Mikroprozessor unter Verwendung der
USB verbundenen Schlüsselgerät, mit dem eine Verbindung
zum Sperrgerät hergestellt wird.
Sub Key = Zusätzliches Schlüsselgerät.
Lock = Sperrgerät, das als Master für die Key, Sub Key
und Sub Lock -Geräte fungiert. Ein Lock weist daran
angeschlossenen fernzusteuernden Geräten automatisch
IP-Adressen zu. Geräte mit festen IP-Adressen kann auch mit
der Lock-Gerät steuern.
Sub-Lock = ein Key, der in Vorverschlußbetriebsart
umgewandelt worden ist. Wenn es zwei Locks mit einander
einer von ihnen müssen in der Sub Lock betriebsart sein.
Industry-Einstellung = die über Tosibox laufende
Datenübertragung an das öffentliche Internet ist gesperrt.

6
Basic sales package contents:
Optional contents:
Tosibox Lock Ethernet Cable AC Adapter USB Cable
Tosibox Key
7
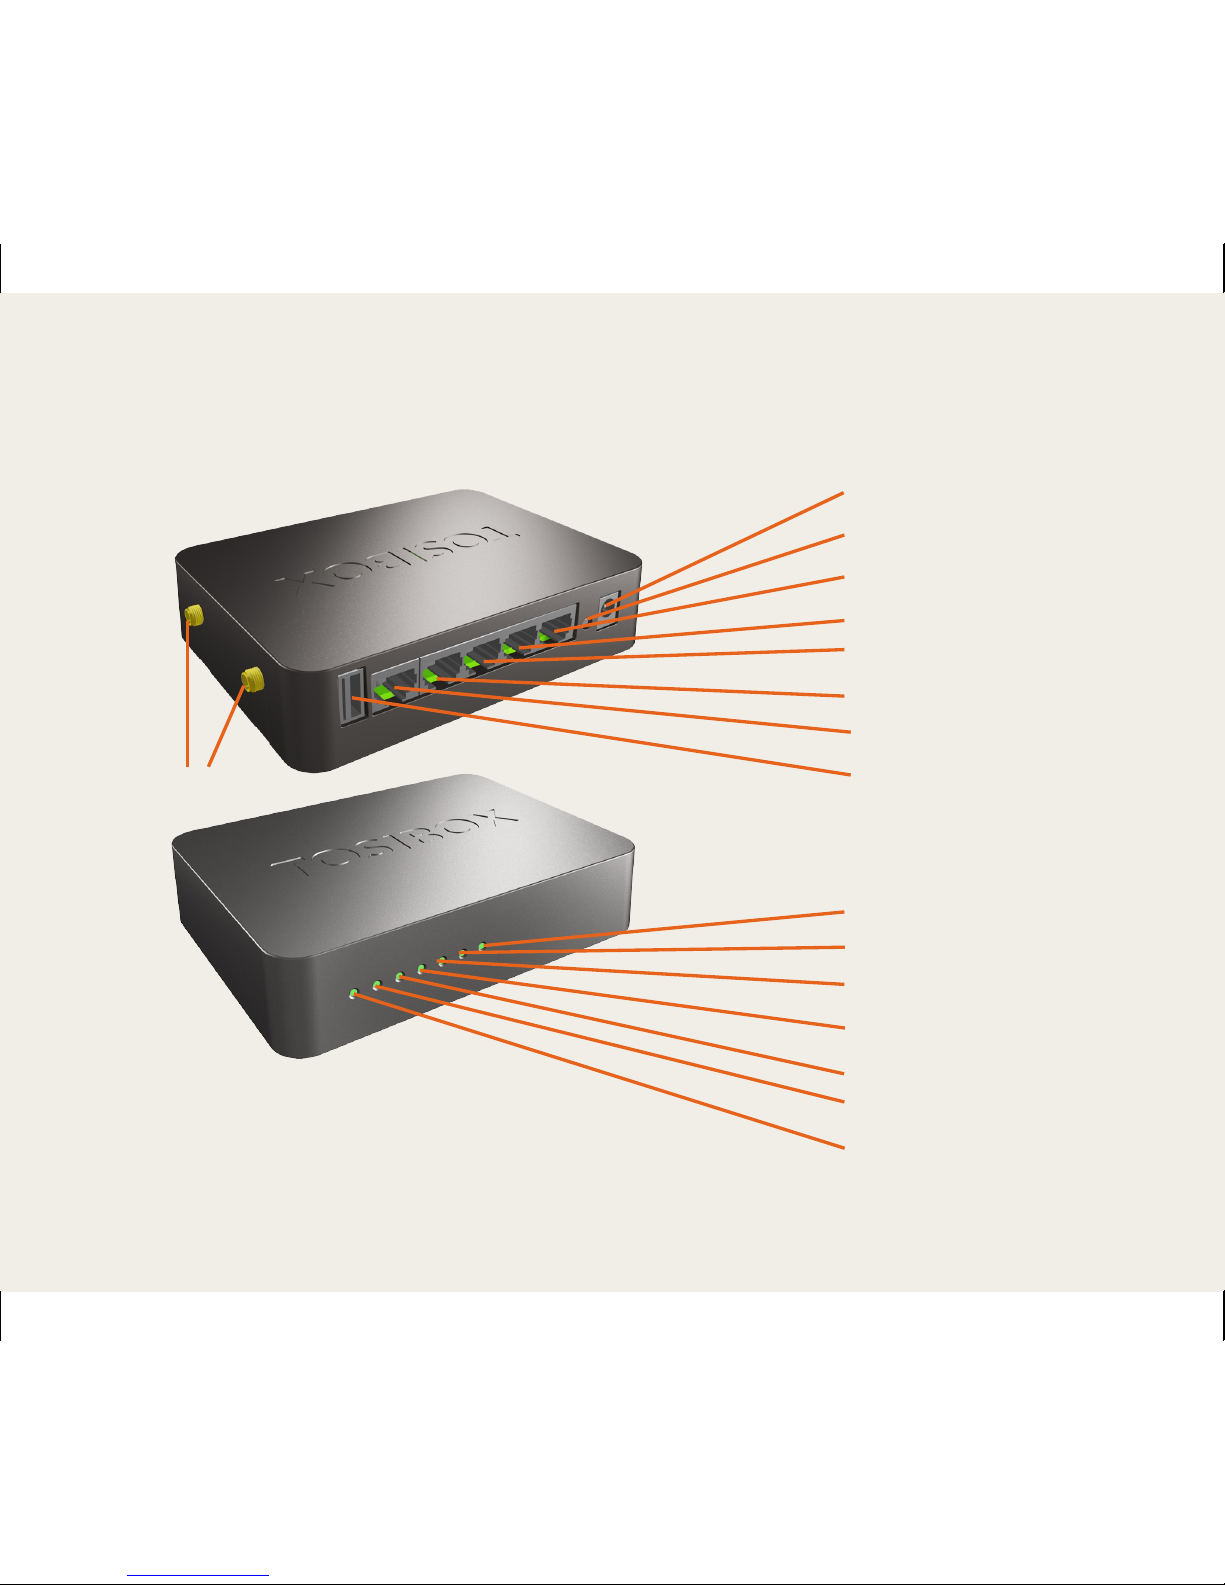
DC Power Input
Reset Button (Not used)
Service Port
LAN3 Port
LAN2 Port
LAN1 Port
WAN Port
USB Port
WAN
LAN1
LAN2
LAN3
Service
WLAN
Power
WLAN Antenna Ports
8
1. 2.
3.
5.
4.

9
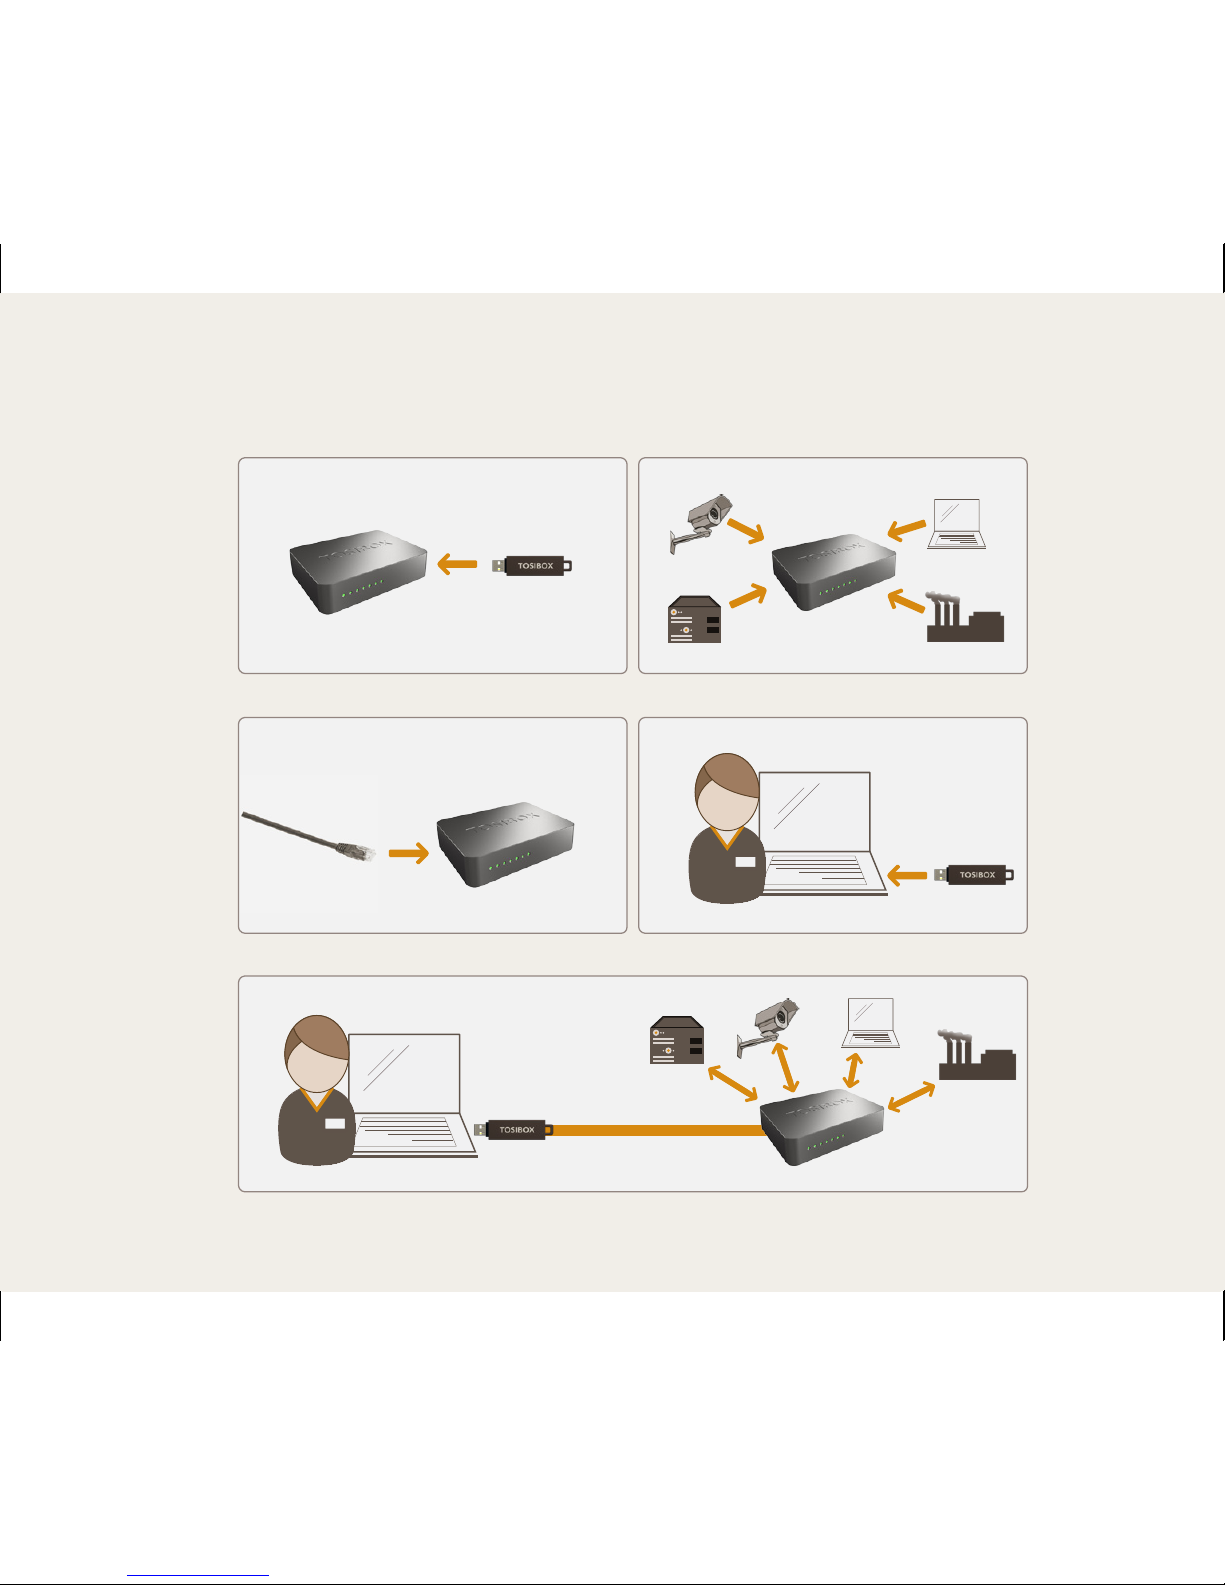
Tosibox Key and Lock serialization
1. Connect the Tosibox AC adapter to the Lock and
wait for 2 minutes. Serialize the Key to the Lock by
inserting the Key into the USB port of the Lock. When
the LED on the Key stops blinking, the serialization is
complete. Remove the Key from the Lock.
2. Connect the device to be remotely controlled to
some of the LAN ports (LAN1, LAN2, LAN3) of the
Lock.
3. Connect the Key to your computer and install the
Key. Follow the section ”Bringing the key into use”.
4. Tosibox is now ready. You can use, control and
monitor remote objects.
Tosibox-Key och -Lock serieläggning
1. Koppla Tosibox-strömkällan till Locket och vänta
2 minuter. Serielägg en Key med ett Lock genom att
placera Keyn i Lockets USB-port. Serieläggningen
är klar när LED-lampan på Keyn slutar blinka. Lösgör
Keyn från låsmaskinen.
2. Anslut maskinen som ska fjärrstyras till en av Lock-
maskinens LAN-port (LAN1, LAN2, LAN3).
3. Anslut Keyn med din egen dator och installera
Keyn. Se ”ibruktagande av en Key”.
4. Tosibox är klar. Du kan använda, styra och övervaka
fjärrobjekt.
Tosibox Keyn ja Lockin sarjoitus
1. Kytke Tosibox-virtalähde Lockiin ja odota
2 minuuttia. Sarjoita Key Lockiin laittamalla Key
Lockin USB-porttiin. Kun Keyn LED-valo lakkaa
vilkkumasta, sarjoitus on valmis. Irroita Key
lukkolaitteesta.
2. Kytke etäohjattava laite johonkin Lockin LAN-
porteista (LAN1, LAN2, LAN3).
3. Liitä Key omaan tietokoneeseesi ja asenna Key
ohjeen kohta ”Keyn käyttöönotto” mukaisesti.
4. Tosibox on valmis. Voit käyttää, ohjata ja valvoa
etäkohteita.
Tosibox-Key und -Lock -Serialisierung
1. Verbinden Sie das Tosibox-Stromversorgungsgerät
mit dem Lock und warten Sie für 2 minuten.
Serialisieren Sie den Key für den Lock durch Ein-
stecken des Key in den USB-Port des Lock. Wenn die
LED-Anzeige nicht mehr blinkt, ist die Serialisierung
abgeschlossen. Key vom Sperrgerät abnehmen.
2. Fernzusteuernde Geräte an den LAN-Port (LAN1,
LAN2 oder LAN3) in dem Lock anschließen.
3. Key mit dem eigenen Computer verbinden und
Key installieren. Siehe ”Inbetriebnahme des Key”.
4. Tosibox Ist fertig installiert. Sie können Remote-
Objekte benutzen, steuern und überwachen.

10
Key
Key
Key
11
Serializing several Keys
You are free to serialize the number of Keys
you require to the Lock.
1. Serialize the first Key to the Lock by inserting the
Key into the USB port of the Lock. When the LED on
the Key stops blinking, the serialization is complete.
Remove the Key from the Lock.
2. Take a new Key and insert it into the Lock’s USB
port.
3. Repeat step 2 for the required number of Keys.
4. Tosibox is now ready.
Usean Keyn sarjoitus
Voit sarjoittaa Lockiin tarvitsemasi määrän Keytä.
1. Sarjoita ensimmäinen Key Lockiin laittamalla
Key Lockin USB-porttiin. Kun Keyn LED-valo lakkaa
vilkkumasta sarjoitus on valmis. Irroita Key Lockista.
2. Ota uusi Key ja käytä sitä Lockin USB-portissa.
3. Toista kohta 2. tarvitsemallesi määrälle Keytä.
4. Tosibox on valmis.
Serieläggning av flera Keys
Du kan serielägga det antal Keys du behöver
för ditt Lock.
1. Serielägg den första Keyn med Locket genom att
placera Keyn i Lockets USB-port. Serieläggningen
är klar när LED-lampan på Keyn slutar blinka. Lösgör
Keyen från Locket.
2. Ta en ny Key och placera den i Lockets USB-port.
3. Upprepa punkt 2 för det antal Keys du behöver.
4. Tosibox är klar.
Serialisierung mehrerer Keys
Sie können die für den Lock erforderliche
Anzahl Keys serialisieren.
1. Serialisieren Sie den ersten Key für den Lock
durch Einstecken des Key in den USB-Port des
Lock. Wenn die LED-Anzeige nicht mehr blinkt, ist
die Serialisierung abgeschlossen. Key vom Lock
abnehmen.
2. Nehmen Sie einen neuen Key und stecken Sie ihn
in den USB-Port des Lock.
3. Punkt 2 für die erforderliche Anzahl Keys
wiederholen.
4. Tosibox Ist fertig installiert.
12
Key

13
Serializing several Locks
You can serialize to the Key the number of
Locks you need.
1. Serialize the Key to the Lock by inserting the Key
into the USB port of the Lock. When the LED on
the Key stops blinking, the serialization is complete.
Remove the Key from the Lock.
2. Take a new Lock and insert the Key into the Lock’s
USB port.
3. Repeat step 2 for the required number of Locks.
4. Tosibox is now ready.
Usean Lockin sarjoitus
Voit sarjoittaa Keyhin tarvitsemasi määrän Lockeja.
1. Sarjoita Key Lockiin laittamalla Key Lockin USB-
porttiin. Kun Keyn LED-valo lakkaa vilkkumasta
sarjoitus on valmis. Irroita Key Lockista.
2. Ota uusi Lock ja käytä Keytä sen USB-portissa.
3. Toista kohta 2. tarvitsemallesi määrälle Lockeja.
4. Tosibox on valmis.
Serieläggning av flera Locks
Du kan serielägga det antal Locks du behöver
för Keys.
1. Serielägg en Key med ett Lock genom att placera
Keyn i Lockets USB-port. Serieläggningen är klar när
LED-lampan på Keyn slutar blinka. Lösgör Keyen från
Locket.
2. Ta ett nytt Lock och placera Keyn i dess USB-port.
3. Uppreka punkt 2 för det antal Locks du behöver.
4. Tosibox är klar.
Serialisierung mehrerer Locks
Sie können die für den Key erforderliche Menge
Locks serialisieren.
1. Serialisieren Sie den Key für den Lock durch
Einstecken des Key in den USB-Port des Lock.
Wenn die LED-Anzeige nicht mehr blinkt, ist
die Serialisierung abgeschlossen. Key vom Lock
abnehmen.
2. Nehmen Sie einen neuen Lock und stecken Sie
den Key in dessen USB-Port.
3. Punkt 2 für die erforderliche Anzahl Locks
wiederholen.
4. Tosibox Ist fertig installiert.

14
Serializing the Lock-Sub Lock
1. Convert one of the two Locks into
a Sub Lock mode:
- Log in to the Lock via the ”Service”-port.
Address is ”http//laite.tosibox” or
”172.17.17.17”.
- Go to Settings --> Mode. Select ”Device mode”
-setting as ”Sub Lock” and select ”Save”.
- Go to ”Network” --> ”LAN”. Select
”Unmanaged” from ”Protocol” -menu. Select
”Switch protocol” and select ”Save”.
- Software conversion of Lock into a Sub Lock
mode is ready after reboot (select ”Settings” -->
”Reboot”). Wait for 2 min. before proceeding to
next phase.
2. Make the Lock–Sub Lock serialization as follows:
A) Insert the Key into the USB-port of the Lock.
When the LED on the Key stops blinking,
remove the Key from the Lock.
B) Insert the Key into the USB-port of the Sub
Lock. When the LED on the Key stops blinking,
remove the Key from the Sub Lock.
C) Insert the Key again into the USB-port of the
Lock. When the LED on the Key stops blinking,
remove the Key from the Lock.
3. Tosibox is now ready. A readiness for a VPN
connection between the two locking devices has
been established.
3. 4.
1. 2.
Lock
Lock
Lock
Sub Lock Sub Lock Sub Lock
Lock
x2
Lock
Lock
Lock
Lock
Sub Lock
15
Lock-Sub Lock -sarjoitus
1. Muuta toinen Lockeista Sub Lockiksi seuraavasti:
- Kirjaudu Lockiin sen ”Service”-portista osoitteella
”http://laite.tosibox” tai ”172.17.17.17”.
- Mene kohtaan ”Settings” --> ”Mode”. Valitse
”Device mode” -asetukseksi ”Sub Lock” ja
valitse ”Save”.
- Mene kohtaan ”Network” --> ”LAN”. Valitse ”Protocol”
-kohdasta ”Unmanaged”. Valitse ”Switch protocol” ja
valitse ”Save”
- Lockin ohjelmallinen muutos SubLockiksi on valmis
uudelleen käynnistyksen jälkeen (valitse ”Settings”
-->”Reboot”). Odota 2 min. ennen seuraavaan
vaiheeseen siirtymistä.
2. Tee Lock-Sub Lock -sarjoitus seuraavasti:
A) Laita Key Lockin USB-porttiin. Irroita Key Lockista
kun Keyn LED-valo lakkaa vilkkumasta.
B) Laita Key Sub Lockin USB-porttiin. Irroita Key Sub
Lockista kun Keyn LED-valo lakkaa vilkkumasta.
C) Laita Key uudestaan Lockin USB-porttiin. Kun Keyn
LED-valo lakkaa vilkkumasta sarjoitus on valmis.
Irroita Key Lockista.
3. Tosibox on valmis. Valmius kahden lukkolaitteen väliseen
VPN-yhteyteen on luotu.
Serieläggning av Lock-Sub Lock
1. Ställa en av de två Locks till Sub Lock verksamhetsläge:
- Logga in i Locket från ”Service”-anslutningen i adress
”http://laite.tosibox” eller ”172.17.17.17”.
- Gå till ”Settings”--> ”Mode”. Välj ”Device mode”
-inställningen ”Sub Lock” och välj ”Save”.
- Gå till ”Network” --> ”LAN”. Välj ”Protocol” -->
”Unmanaged”. Välj ”Switch protocol” och välj ”Save”
- Software förändringen från Lock till Sub Lock är klar efter
omstart (välj ”Settings” -->”Reboot”). Vänta for 2 min.
före nästa steg.
2. Gör serieläggning av Lock-Sub Lock så här:
A) Placera Keyn i Lockets USB-port. Lösgör Keyn från
Locket då Keyns LED-lampa slutar blinka.
B) Placera Keyn i Sub Lockets USB-port. Lösgör Keyn från
Locket då Keyns LED-lampa slutar blinka.
C) Placera Keyn en gång till i Lockets USB-port. Lösgör
Keyn från Locket då Keyns LED-lampa slutar blinka.
3. Tosibox är klar. Beredskapen för en VPN-anslutning
mellan två låsmaskiner är nu klar.

16
Bringing the Key into use
1. Insert the serialized Key into the USB -port of your
computer.
2. Wait until an autoplay -window opens on the screen. Open
the Tosibox -folder > start Tosibox.exe. If your computer asks
whether you allow Tosibox.exe to make changes, click allow.
Tosibox setup starts.
3. The Key will ask for a password which you can enter,
if you wish. By entering a password, you can prevent the
unauthorized use of the Key. Store the password safely.
4. When the installation is ready, the Key opens a connection
window with all Locks that are connected to the Internet.
Blue = the key has found a Lock, but VPN has not yet been
established. Green = the connection is ready and VPN has
been established.
5. The Internet browsers showing the device connections will
be opened next. You can open the browser user interface of
a remotely controlled device by clicking on the name of the
device in question.
Keyn käyttöönotto
1. Laita sarjoitettu Key tietokoneesi USB-porttiin.
2. Odota että näyttöön avautuu autoplay-ikkuna > avaa
Tosibox-kansio > käynnistä Tosibox.exe. Jos tietokoneesi kysyy
sallitko Tosibox.exen tehdä muutoksia > klikkaa salli. Tosibox
setup käynnistyy.
3. Key kysyy salasanan, jonka voit halutessasi syöttää.
Asettamalla salasanan voit estää Keyn luvattoman käytön.
Talleta salasana huolella.
Serialisierung des Lock-Sub Lock
1. Wandeln Sie einen der zwei Locks in einen
Sub Lock modus um:
- Einloggen zum der Lock über den “Service“ - Port.
Adresse ist “http//laite.tosibox“ oder “172.17.17.17“.
- Gehen Sie zum Settings --> Mode. Wählen Sie“ Device
mode“ - Einstellung als“ Sub Lock“ vor und wählen Sie
“Save“ vor.
- Gehen Sie “Network“ zum -->“LAN“. Wählen Sie
“Unmanaged“ vom ”Protocol“ - Menü vor. Wählen Sie
“Switch Protocol“ vor und wählen Sie“ Save“ vor.
- Software Umwandlung des Lock in einen Sub Lock ist nach
Neustart bereit (auserwählter “Settings“ -->“Reboot”).
Vor dem Verfahren warten Sie 2 Min., zunächst in Phasen
einzuteilen.
2. Machen Sie das Lock-Sub Lock Serializierung wie
folgt ab:
A) Einstecken Sie den Key in den USB-Port des Lock.
Wenn die LED-Anzeige des Key nicht mehr blinkt,
Key vom Lock entfernen.
B) Einstecken Sie den Key in den USB-Port des Sub Lock.
Wenn die LED-Anzeige des Key nicht mehr blinkt,
Key vom Sub Lock entfernen.
C) Einstecken Sie den Key noch einmal in den USB-Port
des Lock. Wenn die LED-Anzeige des Key nicht mehr
blinkt, Key vom Lock entfernen.
3. Tosibox Ist fertig installiert. Die Voraussetzungen für
eine VPN-Verbindung zwischen zwei Sperrgeräten sind
geschaffen.

17
Ibruktagande av en Key
1. Anslut den serielagda Keyn med din dators USB-port.
2. Vänta att autoplay-fönstret öppnas på skärmen > öppna
foldern Tosibox > starta Tosibox.exe. Ifall din dator fråga ifall
du tillåter Tosibox.exe att göra förändringar > klicka tillåt.
Tosibox setup startar.
3. Keyn frågar efter ett lösenord som du kan ange ifall du vill.
Genom att ange ett lösenord kan du förhindra olovligt bruk av
Keyn. Spara lösenordet noggrant.
4. När installationen är klar öppnar Keyn ett förbindelsefönster
där du ser vilka Lock som har en internetanslutning.
Blå = Keyn hittade ett Lock men VPN har ännu inte bildats.
Grön = anslutningen klar, VPN bildad.
5. Sedan öppnas webbläsarna där maskinförbindelserna syns.
Genom att klicka på namnet på den maskin som fjärrstyrs
öppnar du den maskinens webbgränssnitt.
Inbetriebnahme des Key
1. Stecken Sie den serialisierten Key in den USB-Port Ihres
Computers.
2. Warten Sie bis das Autoplay-Fenster in der Anzeige
erscheint > Tosibox-Ordner öffnen > Tosibox.exe starten.
Wenn Ihr Computer fragt, ob Sie Änderungen durch Tosibox.
exe erlauben wollen, Klicken sie auf ‘Erlauben’. Tosibox-Setup
startet.
3. Der Key fordert das Passwort an, das Sie gegebenenfalls
eingeben können. Durch Festlegen eines Passwortes können
Sie die unerlaubte Benutzung des Key verhindern. Passwort
sorgfältig aufbewahren.
4. Wenn die Installation beendet ist, öffnet der Key ein
Anschlussfenster mit allen Keys, die an das Internet
angeschlossen werden. Blau = Key hat Lock gefunden, aber
VPN ist noch nicht hergestellt. Grün = Verbindung fertig, VPN
hergestellt.
5. Als nächstes öffnen die Internet-Browser, in denen die
Geräteverbindungen zu sehen sind. Durch Klicken auf den
Namen des fernzusteuernden Gerätes öffnen Sie die Browser-
Oberfläche des Gerätes.
4. Kun asennus on valmis, Key aukaisee yhteysikkunan, jossa
näkyvät ne Keylle sarjoitetut Lockit, jotka ovat internet-
yhteydessä. Sininen = Key on löytänyt Lockin, mutta VPN on
vielä muodostumatta. Vihreä = yhteys on valmis ja VPN on
muodostunut.
5. Seuraavaksi avautuvat internetselaimet, joissa laiteyhteydet
näkyvät. Klikkaamalla etäohjattavan laitteen nimeä, avaat
kyseisen laitteen selainkäyttöliittymän.
18
Locks and Keys
Green:
Connection is
ready
Red: Lock not
found
Lock ja Key
laitteet,
Vihreä valo =
yhteys on
Punainen valo =
yhteys off
Additional
information of
the Keys and
Locks
Klikkaamalla
näet Key ja
Lock - laitteiden
lisätiedot
Remotely
controlled devices
Green: Connection
is ready
Red: No
connection
Ohjattavat
laitteet,
Vihreä valo =
yhteys on
Punainen valo =
yhteys off
Additional
information of
the remotely
controlled
devices
IP-addresses and
MAC addresses
Lisätiedot
ohjattavista
laitteista:
laitteiden
IP- osoitteet
ja laitteiden
MAC-nro
Details of
the remotely
controlled
devices
Klikkaamalla
näet ohjattavien
- laitteiden
lisätiedot
Login using
User or Admin
passwords
found in the
bottom of the
Lock
Klikkaamalla
pääset
kirjautumaan
User- tai Admin-
tunnuksilla.
Tunnukset ovat
Lockin pohjassa

19
Lock- och Key-
maskiner,
Grönt ljus =
anslutning on
Rött ljus =
anslutning off
Lock und Key
Geräte,
Grünes Licht =
Verbindung steht
Rotes Licht =
Verbindung off
Genom att
klicka ser du
information om
Key- och Lock-
maskinerna
Durch Klicken
sehen Sie weitere
Informationen
zu den Key- und
Lock-Geräten
Maskiner som
styrs,
Grönt ljus =
anslutning on
Rött ljus =
anslutning off
Zu steuernde
Geräte
Grünes Licht =
Verbindung steht
Rotes Licht =
Verbindung off
Mera information
om styrda
maskiner:
maskinernas
IP-adresser och
MAC-nr.
Weitere
Informationen über
die zu steuernden
Geräte:
IP-Adressen der
Geräte und MAC-
Nr. der Geräte
Genom att klicka
ser du tilläggs-
informationen
om de apparater
som stryrs.
Durch Klicken
sehen Sie weitere
Informationen
über die zu
steuernden
Geräte
Genom att klicka
kan du logga in med
User- eller Admin-
användarnamnet
som finns på
undersidan av
Locket.
Durch Klicken
können Sie sich
mit der User- oder
Admin-Kennung
einloggen. Die
Kennungen stehen
auf dem Boden des
Lock.

20Lock settings
The Lock has two access levels, User and Admin. User level
users have more restricted rights to make changes. The
User and Admin identifiers are marked on the bottom of
the device. The Lock settings can be changed remotely with
the Key or locally by connecting the PC directly to Lock with
ethernet cable.
Log into the Lock using “admin” or ”user” ID. When logging
in directly from the ”Service” port of the Lock the address is
”http://laite.tosibox” or ”172.17.17.17”. When logging
in from the ”LAN” ports (1,2 or 3) the adress is
”http://laite.tosibox”. The username and the password
are printed in the bottom of the Lock.
With User ID:
- Naming the controlled devices
- Changing the User password
With Admin ID:
- Naming the controlled devices
- Changing the User and Admin passwords
- Changing 3G settings
- Setting a fixed IP-address
- Changing DHCP settings
- Wireless Local Area Network (WLAN) connection settings
- Industry settings for a closed network
- Preventing the automatic software upgrading
- Changing Lock/Sub Lock settings
- Removal of serialization
Lockin asetukset
Lockissa on kaksi käyttäjäoikeustasoa, User ja Admin.
User-tason käyttäjällä on rajoitetumpi oikeus tehdä muutoksia.
User- ja Admin-tunnukset ovat merkittyinä laitteen pohjassa.
Lockin asetuksia pääsee muuttamaan sekä etäältä Keyn avulla
että yhdistämällä PC suoraan Lockiin ethernet-kaapelilla.
Kirjaudu sisään Lockiin käyttäen “admin”- tai ”user” -tunnusta.
Kirjauduttaessa suoraan Lockin ”Service” -portista osoite
on ”http://laite.tosibox” tai ”172.17.17.17”. Kirjauduttaessa
”LAN” -porteista (1,2 tai 3) osoite on ”http://laite.tosibox”.
Käyttäjätunnus ja salasana on nähtävissä Lockin pohjassa.
User-tunnuksilla:
- Ohjattavien laitteiden nimeäminen
- User-käyttäjän salasanan vaihtaminen
Admin-tunnuksilla:
- Ohjattavien laitteiden nimeäminen
- User- ja admin -käyttäjien salasanojen vaihtaminen
- 3G-asetusten muuttaminen
- Kiinteän IP-osoitteen asettaminen
- DHCP-asetusten muuttaminen
- Langattoman lähiverkon yhteysasetukset (wlan)
- Industry-asetuksen kytkeminen suljettua verkkoa varten
- Automaattisten ohjelmistopäivitysten salliminen /estäminen
- Lock/Sub Lock -asetuksen vaihtaminen
- Sarjoituksen poistaminen
- Tietoliikenteen prioriteettiasetukset (QoS)
- Internet-liitännän lisäasetukset (WAN)
Table of contents
Popular Network Hardware manuals by other brands


Direct IP
Direct IP Idis DR-3104P installation manual

Ihse
Ihse Kvm-Tec INDUSTRYFLEX line KT-6016iL Quick Instruction

Garland
Garland P1GCSSP user guide

Riverbed
Riverbed SteelFusion Edge 2100 Installation and configuration guide

ADC
ADC HiGain H2TU-R-402 List 7A Quick installation

NI
NI PCIe-6593 SAFETY, ENVIRONMENTAL, AND REGULATORY INFORMATION


