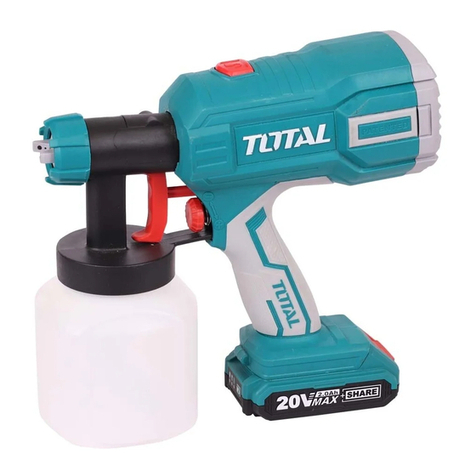
Total TSGLI2001 User manual

Li-Ion pistola rociadora
ES
EN
Lithium-Ion Spray Gun
LITHIUM-ION SPRAY GUN
TSGLI2001
20V
totaltoolsworld
TOTAL TOOLS WORLD
SCAN FOR VIDEO

The symbols in instruction manual and the label on the tool
Double insulated for additional protection.
Read the instruction manual before using.
CE conformity.
Wear safety glasses, hearing protection and dust mask.
Charging the battery only bellow 50ºc
Always recycle batteries
Do not destroy battery by fire
Do not expose battery to water
Waste electrical products should not be disposed of with household waste.
Please recycle where facilities exist. Check with your Local Authority or
retailer for recycling advice.
Safety alert.
Please only use the accessories supported by the manufacture.
PD[Û&
2

GENERAL POWER TOOL SAFETY WARNINGS
WARNING Read all safety warnings and all instructions.Failure to
follow the warnings and instructions may result in electric shock, fire and/or
serious injury.
Save all warnings and instructions for future reference.
The term "power tool" in the warnings refers to your mains-operated (corded)
power tool or battery-operated (cordless) power tool.
1) Work area safety
a) Keep work area clean and well lit. Cluttered and dark areas invite
accidents.
b) Do not operate power tools in explosive atmospheres, such as
in the presence of flammable liquids, gases or dust. Power tools
create sparks which may ignite the dust or fumes.
c) Keep children and bystanders away while operating a power
tool. Distractions can cause you to lose control.
2) Electrical safety
a) Power tool plugs must match the outlet. Never modify the plug
in any way. Do not use any adapter plugs with earthed
(grounded) power tools. Unmodified plugs and matching outlets will
reduce risk of electric shock.
b) Avoid body contact with earthed or grounded surfaces such as
pipes, radiators, ranges and refrigerators. There is an increased
risk of electric shock if your body is earthed or grounded.
c) Do not expose power tools to rain or wet conditions. Water
entering a power tool will increase the risk of electric shock.
d) Do not abuse the cord. Never use the cord for carrying, pulling
or unplugging the power tool. Keep cord away from heat, oil,
sharp edges or moving parts. Damaged or entangled cords
increase the risk of electric shock.
e) When operating a power tool outdoors, use an extension cord
suitable for outdoor use. Use of a cord suitable for outdoor use
reduces the risk of electric shock.
f) If operating a power tools in a damp location is unavoidable, use
3

a residual current device (RCD) protected supply. Use of an RCD
reduces the risk of electric shock.
3) Personal safety
a) Stay alert, watch what you are doing and use common sense
when operating a power tool. Do not use a power tool while you
are tired or under the influence of drugs, alcohol or medication.
A moment of inattention while operating power tools may result in
serious personal injury.
b) Use personal protective equipment. Always wear eye protection.
Protective equipment such as dust mask, non-skid safety shoes,
hard hat, or hearing protection used for appropriate conditions will
reduce personal injuries.
c) Prevent unintentional starting. Ensure the switch is in the off-
position before connecting to power source and/or battery pack,
picking up or carrying the tool. Carrying power tools with your
finger on the switch or energizing power tools that have the switch on
invites accidents.
d) Remove any adjusting key or wrench before turning the power
tool on. A wrench or a key left attached to a rotating part of the
power tool may result in personal injury.
e) Do not overreach. Keep proper footing and balance at all times.
This enables better control of the power tool in unexpected
situations.
f) Dress properly. Do not wear loose clothing or jewellery. Keep
your hair, clothing and gloves away from moving parts. Loose
clothes, jewellery or long hair can be caught in moving parts.
g) If devices are provided for the connection of dust extraction and
collection facilities, ensure these are connected and properly
used. Use of dust collection can reduce dust-related hazards.
4) Power tool use and care
a) Do not force the power tool. Use the correct power tool for your
application. The correct power tool will do the job better and safer at
the rate for which it was designed.
b) Do not use the power tool if the switch does not turn it on and off.
Any power tool that cannot be controlled with the switch is dangerous
4

and must be repaired.
c) Disconnect the plug from the power source and/or the battery
pack from the power tool before making any adjustments,
changing accessories, or storing power tools. Such preventive
safety measures reduce the risk of starting the power tool accidentally.
d) Store idle power tools out of the reach of children and do not allow
persons unfamiliar with the power tool or these instructions to
operate the power tool. Power tools are dangerous in the hands of
untrained users.
e) Maintain power tools. Check for misalignment or binding of
moving parts, breakage of parts and any other condition that may
affect the power tools operation. If damaged, have the power tool
repaired before use. Many accidents are caused by poorly maintained
power tools.
f) Keep cutting tools sharp and clean. Properly maintained cutting tools
with sharp cutting edges are less likely to bind and are easier to control.
g) Use the power tool, accessories and tool bits etc. in accordance
with these instructions, taking into accountthe working
conditions and the work to be performed. Use of the power tool for
operations different from those intended could result in a hazardous
situation.
5) Battery tool use and care
a) Recharge only with the charger specified by the manufacturer.A
charger that is suitable for one type of battery pack may create a risk of
fire when used with another battery pack.
b) Use power tools only with specifically designated battery packs.
Use of any other battery packs may create a risk of injury and fire.
c) When battery pack is not in use, keep it away from other metal
objects, like paper clips, coins, keys, nails, screws or other small
metal objects, that can make a connection from one terminal to
another.Shorting the battery terminals together may cause burns or a
fire.
d) Under abusive conditions, liquid may be ejected from the
battery; avoid contact. If contact accidentally occurs, flush with
water. If liquid contacts eyes, additionally seek medical help.Liquid
5

ejected from the battery may cause irritation or burns.
e) Do not use a battery pack or tool that is damaged or modified.
Damaged or modified batteries may exhibit unpredictable behaviour
resulting in fire, explosion or risk of injury.
f) Do not expose a battery pack or tool to fire or excessive
temperature.Exposure to fire or temperature above 130 °C may cause
explosion.
g) Follow all charging instructions and do not charge the battery
pack or tool outside the temperature range specified in the
instructions. Charging improperly or at temperatures outside the
specified range may damage the battery and increase the risk of fire.
6) Service
a)
a) Instruction not to use guns for spraying flammable materials.
b) Warning to be aware of any hazards presented by the material being sprayed and
instruction to consult the markings on the container or the information supplied by
the manufacturer of the material to be sprayed.
c) Instruction not to spray any material where the hazard is not known.
d) Instruction to use appropriate personal protective equipment, such as dust mask.
e) Instruction not to clean guns with flammable solvents.
Have your power tool serviced by a qualified repair person using
only identical replacement parts. This will ensure that the safety of the
power tool is maintained.
b) Never service damaged battery packs. Service of battery packs
should only be performed by the manufacturer or authorized service providers.
Residual risks
Even when the power tool is used as prescribed it is not possible to
eliminate all residual risk factors. The following hazards may arise in
connection with the power tool’s construction and design:
a) Health defects resulting from vibration emission if the power tool is being
used over longer period of time or not adequately managed and properly
maintained.
b) Injuries and damage to property to due to broken accessories that are
suddenly dashed.
Warning! This power tool produces an electromagnetic field during
operation. This field may under some circumstances interfere with active or
passive medical implants. To reduce the risk of serious or fatal injury, we
recommend persons with medical implants to consult their physician and the
medical implant manufacturer before operating this power tool.
Additional Safety Warnings
6

TECHNICAL DATA
Intended Use
The spray gun is for spraying non-flammable and non-hazardous paints and
varnishes suitable.
Not Intended Use
The tool could not be used for spraying of flammable liquids.
Do not use the tool for the food, pharmacy or other purposes that are not mentioned
in the manual.
Residual risk
This machine is built according to the valid and applicable standards and guidelines.
However, the following residual
risks may arise during the use.
The fog may harm your breathing system.
ATTENTION! We accept no liability for any damage caused by improper site
preparation or incompetent, misapplication and incorrect adjustment of the
spray gun.
Max.Viskosität: 40din-s
Voltage: 20V
Air Max back pressure: 0.1-0.2bar
Maxairflow: 600ml/min
Sound pressure level: LpA:77 dB(A) KpA:3,0dB(A)
LwA:90 dB(A) KwA:3,0dB(A)
Vibration level: ˘2.5m/s2
Reservoir capacity: 800 ml
Nozzlesize ¶2.5mm
Weight: 0.95kg
7

Product Description
De
sc
ription
FIG. 1
),*
1--------- Tank release button
2---------Blower
3-------Trigger (On/Off power switch)
4------- Dosage adjustment screw
5 --------Tank
6 -------- Air cap
7--------- Nozzle
8---------Cap nut
8

Measuring the viscosity
FIG. 3
Viscosity table
Coating material viscosity DIN-s
Solvent-based paintsűűűűűűűűűűű15-50
Primersűűűűűűűűűűűűűűű
Picklingűűűűűűűűűűűűűűű
25-50
undiluted
2 Kompnenten paintsűűűűűűűűűűű20-50
Varnishesűűűűűűűűűűűűűű15-40
Waterborne paintsűűűűűűűűűűűű20-40
Automotive topcoatsűűűűűűűűűűű20-40
Wood protection center lűűűűűűűűűű undiluted
Functional Description
The air flow generated by the motor fan flows to the spray gun. The air flow serves to
atomize the coating material to the nozzle, and to pressurize the container. This
pressure promotes the coating material through the riser pipe to the nozzle. Air flow and
pressure settings are adjustable.
Coating Materials
Solvent-based and water-based paints, finishes, primers, two-component paints,
varnishes, automotive topcoats, stains and
wood preservatives.
Preparedness the Coating material
Note: Before spraying, the material being used may need to be thinned with the proper
solvent as specified by the material manufacturer. Never exceed the thinning advice
given by the coating manufacturer.
(viscosity = thickness of the liquid coating material)
1 Stir the spray material thoroughly before measuring viscosity
2 Dip the viscosity cup completely into the spray material. Then hold the viscosity cup
up and measure the time in seconds until the liquid empties out . This time is referred
to as runout time. Required runout time as follow
9

Spray job with overhead objects
3. container filled with coating material.-Tighten the screw gun.
4. power supply connecting, make sure that the voltage is consistent with the name-
plate.
5. switch on the unit. spray pattern and Amounts of material setting, Air flow and
pressure setting set
6. trigger on the spray gun.
Note:
With the unit on flows the air cap standing in air.
Setting the desired spray pattern
1) The spray pattern shape is adjusted by turning the ears of the air cap to either the
vertical, horizontal, or diagonal positions.
To adjusting spray pattern, unscrew the union nut counterclockwise to remove from
the spray gun, pull and turn the ears on air cap to the requested position.
2) Screw the union nut back to the spray gun.
3) Test each pattern and use whichever pattern is suitable for your application.
Warning:
Never during the setting of the Air cap pull the trigger
Adjustment of the spray gun
Adjustment of the rate of spread
The material volume by turning the set screw.
+ Right-turn more Rate of Spread
-Left-turn-less Rate of Spread
Selection spray patterns
A = vertical flat jet
for horizontal surfaces.
B = vertical flat beam
for vertical surfaces
C = circular jet
for corners, edges and others
FIG. 4
FIG. 5
10

Important: the open space of the spray area start and disruptions Avoid within the spray area.
Directional strength (Fig. 6) Hold the spray gun necessarily at equal distance of
about 5 -15 cm for the object being sprayed.
False (Fig. 7)
Tarke overspray, unevenly even surface quality.
Move the spray gun evenly across or up and down, depending on the pattern adjustment.
A uniform spray gun guide gives a uniform surface quality.
Clean as coating material buildup on the nozzle A and air cap B (Fig. 8) both parts
with solvents or water.
Work Stoppages
Ɣ6ZLWFKRIIWKHGHYLFH
Ɣ3URYLGHVSUD\JXQWRWKHVSUD\JXQKROGHU
Decommissioning and cleaning
6ZLWFKRIIWKHGHYLFH3UHVVWKHWULJJHUVRWKDWWKHFRDWLQJPDWHULDOLQWKHVSUD\JXQ
passes back into the container.
2 Unscrew the container. Remaining coating material in material tin back empty.
3 Containers and tubing with pre-cleaning brush.
3RXULQZDWHUVROYHQWVRUWKHFRQWDLQHU
6FUHZWKHFRQWDLQHU
Only use solvents with a flash point above 37.8ºC.
6ZLWFKRQWKHGHYLFHDQGLQMHFWVROYHQWRUZDWHULQWRDFRQWDLQHU
When a tube is not used, deposited solvent or water in addition to the container.
Therefore, the air is hoche ed current volume.
5 Repeat the above procedure is leaking at the nozzle clear solvent or water.
6ZLWFKRIIWKHGHYLFH
7 Then, empty the tank completely. Always keep container seal free of paint residue
and check for damage.
8
Clean spray gun and container exterior with a cloth soaked in solvent and water cloth.
9 Unscrew the nut, remove the air cap. Clean the air cap and nozzle with brush and
solvent or water.
Note:
Never clean the nozzle or air holes in the spray gun with sharp metal objects.
Spray Technology
The spraying result depends crucially on how smooth and clean the surface before
spraying. Therefore, the surface must be pretreated and dust-free.
Not to be sprayed must be covered with tape and newspaper.
Cover screw or similar at the object being sprayed.
It is important to perform on cardboard or a similar surface spray sample to find the
right spray gun setting
FIG.6 FIG.7
FIG.8
11

Warranty Statement
Without prejudice to the statutory warranty claims, the manufacturer grants a warranty
in accordance with the laws of your
country, but at least 1 year (in Germany 2 years). Warranty start date is the sale of the
unit to the end user.
The warranty covers only those defects which are caused by material or manufactur-
ing defects.
Warranty repairs must be performed by an authorized service center. To make your
claim under warranty must be
accompanied (with date of sale) of the original sales receipt.
Excluded from the warranty are:
- Normal wear and tear
- Improper applications, such as overloading of the device, not approved accessories
- Damage caused by external influences, use of force or by foreign bodies
- Damage caused by not following the instructions, eg connection to the wrong mains
voltage or non-observance of the
installation instructions
- Fully or partially disassembled equipment
Troubleshooting
Problem
Cause
Remedy
No coating material at the
nozzle exit
D PTS clogged
Clogged riser
Small holes on the riser pipe clogged.
Amounts of material adjustment screw is turned
too far to the left (-).
Air flow and pressure adjustment knob is turned
too far to the left (counterclockwise)
Riser loose
No pressure build-up in the container.
Clean
Clean
Clean
To the right (+)
To the left (counterclockwise)
To the right (clockwise)
Nstecken egg
Tighten container
Coating material to the
nozzle by dropwiseNozzle loose
Worn nozzle
Coating material buildup on air cap and nozzle.
Attract
Replace
Clean
To coarse atomization
Coatings has gsstoff to high viscosity.
Large amount of material to
Amounts of material adjustment screw is turned
too far to the right (+).
Air flow and pressure adjustment knob is turned
too far to the left (counterclockwise).
Contaminated nozzle
Extremely dirty air filter
Too little pressure buildup in the tank
Dilute
Amounts of material adjustment
screw to the left (-).
Turn to the left (-)
Knob to the right (clockwise)
Clean
Replace
Tighten container
Pulsating spray jetCoating material in the tank is low.
Small holes on the riser pipe clogged.
Air filter is very dirty.
Top up
Clean
Replace
Coating material-runnerToo much coating material applied
Check material quantity
Too much fog coating
material
Distance to the object being sprayed too big.
Too much coating material order.
Reduce spray distance
12

TSGLI2001 Exploded view
13

NO. Part Description Qty
1 air inlet plate 1
2 filter spong 1
3 left shell 1
4 motor seal ring 1
5 motor 1
6 motor mount 1
7 motor cover 1
8 sealing block 1
9 button spring 1
10 release button 1
11 trigger 1
12 spring retainer nut 1
13 big O ring 1
14 connecting tube 1
15 thimble spring 1
16 spring retainer 1
17 E-type circlip( 3) 1
18 thimble guide sleeve 1
19 screw 3×8 2
20 trigger plate 1
21 screw 3×8 2
22 rifle rack 1
23 copper nozzle nut 1
24 O ring 1
NO. Part Description Qty
25 thimble 1
26 nozzle sets 1
27 nozzle 1
28 tune fog board 1
29 spray plate 1
30 large nut 1
31 right shell 1
32 circuit board 1
33 battery connector 1
34 transmission rod 1
35 transmission rod spring 1
36 power switch 1
37 pressure plate 1
38 knob spring 1
39 knob 1
40 on a straw 1
41 straw seals 1
42 under a straw 1
43 plastic pot ring 1
44 plastic pots 1
45 screw 4×14 11
46 viscosity cup 1
47 cleaning needle 1
TSGLI2001 Spare part list
14

Los símbolos del manual de instrucciones y la etiqueta de la herramienta
Doble aislamiento para protección adicional
Lea el manual de instrucciones antes de usar
CE de Conformidad Europea
Utilice gafas de seguridad, protección auditiva y máscara contra
el polvo.
Los productos eléctricos de desecho no deben eliminarse con la
basura doméstica. Por favor, recicle en las instalaciones
correspondientes. Revise con su Autoridad Local o distribuidor
para reciclar estos productos.
Alerta de seguridad
Por favor utilice únicamente los accesorios compatibles con el fabricante.
15

ADVERTENCIAS DE SEGURIDAD PARA HERRAMIENTAS ELECTRICAS EN
GENERAL
ADVERTENCIA Lea todas las advertencias de seguridad y todas las instrucciones. No
seguir todas las advertencias e instrucciones puede provocar una descarga eléctrica,
incendio y / o lesiones graves.
Guarde todas las advertencias e instrucciones para referencia futura.
El término "herramienta eléctrica " en las advertencias se refiere a una herramienta
operada con cable eléctrico y a las herramientas inalámbricas.
1) Seguridad del área de trabajo
A) Mantenga el área de trabajo limpia y bien iluminada. Las áreas desordenadas u
oscuras podrían causar accidentes.
B) No utilice herramientas eléctricas en atmósferas explosivas, o con la presencia
de líquidos inflamables, gases o polvo. Las herramientas eléctricas crean chispas que
pueden encender el polvo o los vapores.
C) Mantenga alejados a los niños y transeúntes mientras maneja una
herramienta eléctrica, las distracciones pueden hacer que pierda el control.
2) Seguridad eléctrica
A) Los enchufes de la herramienta eléctrica deben coincidir con el tomacorriente. Nunca
modifique el enchufe de ninguna manera. No utilice enchufes adaptadores en
herramientas eléctricas puesta a tierra. Enchufes no modificados y las tomas de
corriente coincidente reducirán el riesgo de descarga eléctrica.
B) Evite el contacto con instalaciones o superficies a tierra tales como tuberías,
radiadores y refrigeradores. Hay un incremento de riesgo de descarga eléctrica si su
cuerpo está puesto a tierra.
C) No exponga la herramienta eléctrica a lluvia o condiciones húmedas. El
ingreso de agua a la herramienta eléctrica incrementará el riesgo de descarga eléctrica.
D) No abuse del cable. Nunca utilice el cable para arrastar, halar o desconectar la
herramienta eléctrica. Mantenga el cable lejos del calor, aceite, superficies
afiladas o partes en movimiento. Cables dañados o enredados incrementan el
riesgo de descarga eléctrica.
E) Cuando opera una herramienta eléctrica en exteriores, utilice un cable
extensión adecuado para uso en exteriores. El uso de un cable adecuado para
exteriores reduce el riesgo de descarga eléctrica.
F) Si opera una herramienta eléctrica en un sitio húmedo es inevitable, usar un
dispositivo de corriente residual (DDR). El uso de un DDR reduce el riesgo de
descarga eléctrica.
16

3) Seguridad personal
A) Manténgase alerta, observe lo que está haciendo y utilice el sentido común
cuando opera una herramienta eléctrica. No utilice una herramienta eléctrica
mientras este cansado o bajo la influencia de drogas, alcohol o medicación. Un
momento de distracción mientras opera una herramienta eléctrica puede resulta en
serias lesiones personales.
B) Use equipo de protección personal. Siempre use protección para los ojos. El
uso apropiado de mascarillas contra polvo, zapatos de seguridad antideslizantes,
casco o protección auditiva, reducirán lesiones personales.
C) Evite el arranque involuntario. Asegúrese de que el interruptor esté en la
posición de apagado antes de conectar a la fuente de alimentación y / o la
batería. Transportar la herramienta por el cable o con el dedo en el interruptor
aumenta el riesgo de accidentes.
D) Retire cualquier llave de ajuste o inglesa antes de encender la herramienta
eléctrica. Una llave de ajuste dejada junto a una parte en rotación de una herramienta
eléctrica puede resultar en lesión personal.
E) No utilice la herramienta por periodos de tiempo prolongados. Mantenga la
postura y el equilibrio en todo momento. Esto permite un mejor control de la
herramienta en situaciones inesperadas.
F) Vístase adecuadamente. No use ropa suelta o joyas. Mantenga el cabello y la
ropa alejados de las partes móviles. La ropa suelta, la joyería o el pelo largo pueden
quedar atrapados en las partes móviles.
G) Si dispone de recolectores de polvo, asegúrese de que éstas estén bien
conectadas las tuberías y conectores. El uso de acumuladores de polvo puede
reducir los peligros relacionados con ese material y con su sistema respiratorio.
4) Uso y cuidado de la herramienta eléctrica
A) No fuerce la herramienta eléctrica. Utilice la herramienta eléctrica adecuada
para cada operación específica. La herramienta eléctrica correcta hará el trabajo
mejor y más seguro y a la velocidad para la que fue diseñada.
B) No utilice la herramienta eléctrica si el interruptor no la enciende y apaga.
Cualquier herramienta eléctrica que no pueda ser controlada con el interruptor es
peligrosa y debe ser revisada por personal calificado y autorizado.
C) Desconecte el enchufe de la fuente de alimentación y/o la batería de la
herramienta eléctrica antes de realizar cualquier ajuste, cambio de accesorios o
almacenamiento. Estas medidas preventivas de seguridad reducen el riesgo de
encender la herramienta accidentalmente.
D) Guarde las herramientas eléctricas fuera del alcance de los niños y no
permita que personas que no estén familiarizadas con su operación las utilice.
Las herramientas eléctricas son peligrosas en manos de usuarios inexpertos.
17

E) Cuide y revise las herramientas eléctricas.Revise y compruebe una
herramienta antes de su uso por: atascamiento de las piezas móviles, la rotura
de partes, elementos desajustados y cualquier otra condición que pueda afectar
su funcionamiento óptimo. Si está dañada, haga reparar la herramienta antes de
su uso. Muchos accidentes son causados por mantenimientos pobres en las
herramientas eléctricas.
F) Mantenga las herramientas de corte afiladas y limpias. Mantenimiento
apropiado en las herramientas de corte con un afilado correcto son menos propensas
de doblarse y se pueden controlar mas fácilmente.
G) Utilice la herramienta eléctrica, accesorios, brocas, etc. de acuerdo con estas
instrucciones, teniendo en consideración las condiciones de trabajo y el trabajo a
realizar. El uso de la herramienta eléctrica para operaciones diferentes para las que
fue creada podría resultar en una situación peligrosa.
5) Mantenimiento
A) Permita que un técnico de reparación calificado preste servicio a la
herramienta eléctrica, y solo con piezas de repuesto idénticas. Esto
asegurará que se mantenga la seguridad de la herramienta eléctrica.
Advertenciasadicionalesdeseguridad.
8.12.2 a) Además:
101) No utilizar la pistola de pulverizado para materiales inflamables.
102) Advertencia: Esté seguro de los peligros que conlleva utilizar el producto
que va a rociar, lea el instructivo detallado en el contenedor o la
información otorgada por el fabricante del material a ser rociado.
103) NO rociar ningún material cuando no se conoce el peligro que conlleva.
8.12.2 b) Además:
101) Utilice equipos de protección personal apropiado, como son máscaras
contra polvo y si es necesario máscaras con filtro.
8.12.2 c) Además:
101) NO limpiar las pistolas con líquidos inflamables.
Riesgos residuales
Inclusive cuando la herramienta eléctrica sea usada como se indica no es
posible eliminar todo los factores de restos residuales. Los siguientes riesgos
pueden presentarse en conexión con la construcción de la herramienta eléctrica
y diseño:
A) Defectos de salud resultado de la emisión de vibración si la herramienta eléctrica es
usada por largos periodos de tiempos o no es manejada adecuadamente y
mantenimiento apropiado.
18

B) Lesiones y daños al operario debido a accesorios rotos que de repente e
involuntariamente se eyectan de la herramienta.
Advertencia! Esta herramienta eléctrica produce un campo electromagnético durante
su funcionamiento. Este campo bajo algunas circunstancias interfiere con implantes
activos o pasivos. Para reducir el riesgo de serios o fatales heridas, recomendamos
que personas con implantes médicos consulten a su médico y fabricante del implante
antes de utilizar esta herramienta eléctrica.
19

Uso previsto
La máquina de pintar es para rociar pinturas y barnices no inflamables y no peligrosos.
Uso no previsto
La herramienta no puede ser usada para rociar líquidos inflamables.
No use la herramienta para comida, farmacia u otros propósitos que no están
mencionados en el manual.
Riesgo residual
Esta máquina está fabricada de acuerdo a los estándares y pautas válidas y aplicables.
Sin embargo, los siguientes riesgos residuales pueden surgir durante el uso.
La bruma puede lastimar su sistema de respiración.
¡ATENCIÓN! No aceptamos ningún tipo de responsabilidad causado por una
incorrecta e incompetente preparación, mala aplicación y ajuste incorrecto de
la máquina para pintar.
DATOS TÉCNICOS
Max.Viscosidad:
40
din-s
Voltaje: 20V
Máxima presión del aire: 0.1-0.2bar
Flujo máximo de aire: 600ml / min
Nivel de presión del sonido: LpA:77 dB(A) KpA:3,0dB(A)
LwA:90 dB(A) KwA:3,0dB(A)
Nivel de vibración: 2.5m/s2
Capacidad de reserva: 800 ml
Tamaño de la boquilla:
ɐ
2.5mm
Peso: 0.95kg
20
Other manuals for TSGLI2001
1
Table of contents
Languages:
Other Total Paint Sprayer manuals