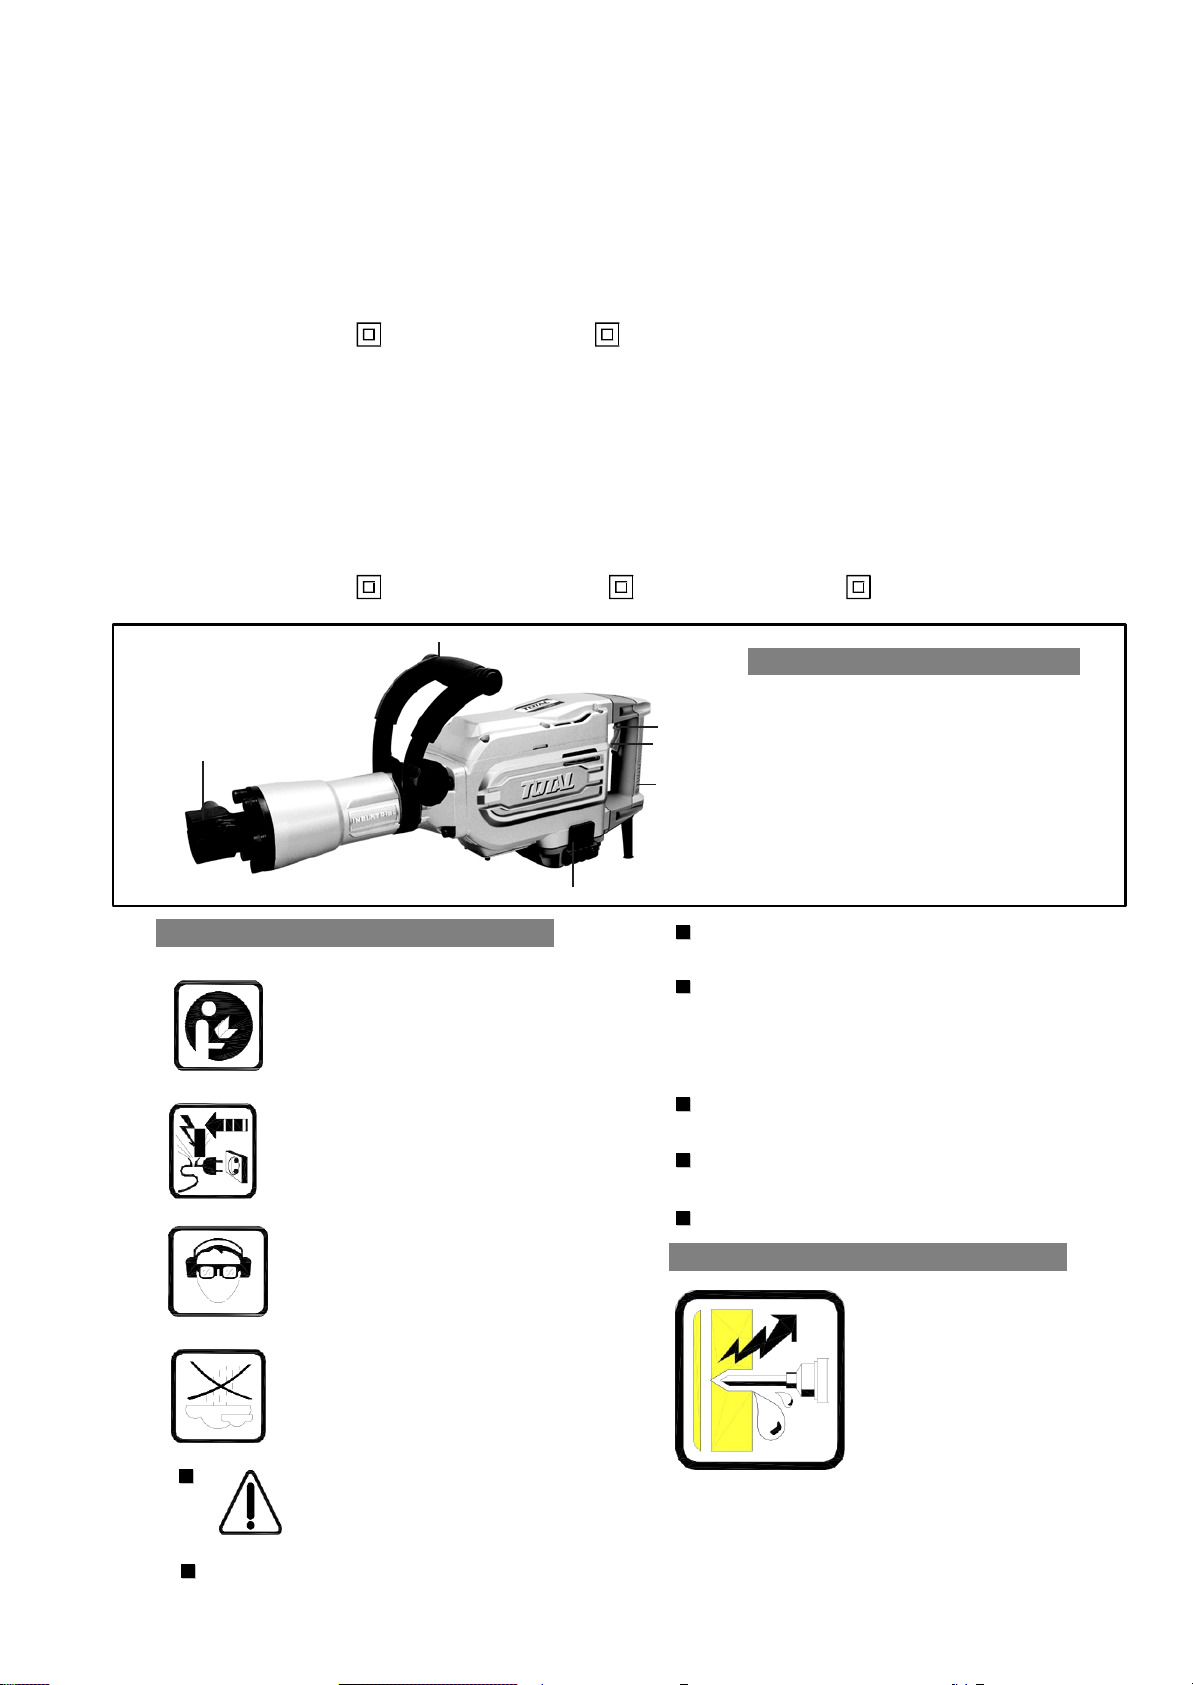
Total TH215456 User manual

Total Tools - Herramientas Eléctricas
1
FICHA TÉCNICA
Marca: Total Tools
Energia de Impacto: 50 J
Potencia: 1700 W
Voltaje: 110-120V~50/60Hz
Demoledora 1700W SDS HEX
DESCRIPCIÓN
CÓDIGO
Total Tools
Demoledora 1700W SDS HEX Total de 1700 W de portencia su voltaje
es 110-120V~50/60Hz, con energia de impacto de 50 joules y una tasa
de impacto de 1900 rpm/min. Incluye maletín y 2 cinceles HEX tiene una
garantia de 3 meses.
UTH215456
Incluye: maletín y 2 cinceles hex
Peso: 16 Kg
Tasa de Impacto: 1900/min
Garantía: 3 meses
Procedencia: Importado
Incluidos
1700W 110-120V
~50/60Hz 1900
min-1
16
50J

DEMOLITION BREAKER
TH215456,UTH215456
TH215456-6,TH215456-8,TH215456S
1700W

2
Specifications:
Model No. TH215456
UTH215456
Rated power input
Rated voltage
Impact rate
Impact force
Chuck system
Machine weight
Protection Class
1700W
220-240V~50/60Hz
1400/min
50J
Hex
16Kg
/
Ⅱ
1700W
110-120V~60Hz
1400/min
50J
Hex
16Kg
/
Ⅱ
Model No. TH215456-6(ISRAEL Plug) TH215456-8(BS Plug) TH215456S(SAA Plug)
Rated power input
Rated voltage
Impact rate
Impact force
Chuck system
Machine weight
Protection Class
1700W
220-240V~50/60Hz
1400/min
50J
Hex
16Kg
/
Ⅱ
1700W
220-240V~50/60Hz
1400/min
50J
Hex
16Kg
/
Ⅱ
1700W
220-240V~50/60Hz
1400/min
50J
Hex
16Kg
/
Ⅱ
3
P
Pr
ro
op
pe
er
r U
Us
se
e
This power tool is suitable to hammer,
6
demolish and plane concrete, brick
1 5
and rock..
2
Elements
1. Tool Hold
2. Hand Grip
3. Auxiliary Handle
4. Brush cap
4
!
F
Fo
o
r
r
Y
Yo
ou
u
r
r
S
S
a
af
fe
et
ty
y
Only after reading the
operation manual and
following all instructions,
you can operate the tool safely.
If the cord is damaged or
broken when operating,do
not touch the cord, but pull
out the plug at once.
Always wear eye protection,
gloves and shoes.Please
wear hearing protection to
prevent hearing damage.
The tool can’t
be exposed
to rain.Please do not op
erate
the tool under damp and
dark working condition.
Only when switch is OFF
you can plug in. After using
please pull out the plug.
Place
the cord
behind
the tool
while
operating.Do not drag the tool with cord.
5. Switch
6. Locking Button
Holdthe toolfirmlywith bothhands
while
operating,
andstandstill.
Pull out the plug when you don’t
use the tool or make adjustment
(such as changing tools, repairing,
maintenance or adjustment).
People under 16 years old are not
allowed to use the tool.
Keep the tool away from the reach
of children.
Please use the original parts.
B
Be
ef
fo
or
re
e U
Us
se
e
Be careful of the
hidden wire, gas
pipe and water pipe.
Please check the
working area first.
For example, use
mental detector.
Use the proper voltage. Power
voltage should be accordant
to
the one given on the nameplate.

3
A* Install-RemoveAccessories
Caution:
2
By installing and removing
accessories,
pleasemake sure
that
the tool is OFF,
and
the cord
should not be plugged
in.
Pull out the bolt
(1)
and swivel
it to
make
the flange towards the direction
ofmotor
housing. 1
Insert accessory into the tool holder
through the dust shield, while twisting
and pushing inward until it locks
automatically into place.
B*
* Auxiliary Handle
The tool must be supported with the
auxiliary handle (1), which can be 1
swiveled 360o. To reposition and/or
swivel the handle, loosen the hand 3
grip (2), move the handle to the 2
desired position along the barrel (3)
and securely retighten the hand grip.
C
C*
* Switch Operation
If you want to operate the tool, you
only need to press the switch (1).If
you want to operate the tool non-stop,
you can switch and press the locking
button (2). If you want to stop the tool,
press the switch again and release
Caution
:
1. Please check if the switch is OFF
when plug in
2. Do not use adhesive tape or rope
to fix the switch on OFF state.

4
D
D*
* Demolish/Plane
Hold the tool firmly with both hands
and press the switch.When operating,
please hold down the tool a little to
prevent form rebounding and out of
control. But do not hold down too
much, because it won’t increase
working efficiency.
Caution: It is possible that some
oil
between
drill and
cylinder
box could
spraywhenoperating.
E
F*
* T
To
oo
ol
l L
Lu
ub
br
ri
ic
ca
at
ti
io
on
n
1
1.
.Your tool has been properly
lubricated and is ready to use.
2
2.
. Time To Lubricate:
When the tool has worked for more
than
60
hours,it
must be
lubricated. First, open the oil cover(1)
with a hex wrench provided, and
then clean up the used lubricant
with a towel. At last, add the
lubrication oil to the machine.
Add oil 50g every time,the oil
grade SAE20W/50
F*
* Caution: If the tool is left unused
too long or used under cold weather
condition, please press the switch
continuously to switch on. Before using
normally, please leave the tool run for
3-5 minutes.
E
En
nv
vi
ir
ro
on
nm
me
en
nt
t p
pr
r
o
o
t
te
ec
ct
t
i
io
on
n
Recyc
l
e raw materials
instead of disposing
as waste.
Machine, accessories
and
packaging should
be
sorted for enviroment-friendly recycling.
These instructions are printed on
recycled paper manufacured without
chlorine.Plastic pieces are recycled
according to their composition.

5
G
G*
* Maintenance
Warning: In working pause, such as
changing working equipment,
maintenance and adjustment, pull
out the plug. After removing the
screw (2) of brushcap (1) with
screwdriver, take out the brush cover,
and then take out the wearing brush.
Place new brush and re-fix the brush
cover, brushcap.
To ensure the security and reliable of
the tool, all repairing, brush checking
or changing, including other
maintenance or adjustment should
be performed by professional
Distractions can cause you
to lose control
personnel in power tool maintenance
center. 2) Electrical Safety
a) Double insulated tools are
equipped with a polarized
S
Sa
af
fe
et
ty
y R
R
u
ul
l
e
es
s
W
a
rning!
Read and understand all
instructions. Failure to follow all
instructions listed below, may result
in electric shock, fire and/or serious
personal injury.
SAVE THESE INSTRUCTIONS
1) Work Area
a) Keep your work area clean and.
well lit.Cuttered benched and dark
areas invite accidents.
b) Do not operate power tools in
explosive atmosphere,such as
in the presence of flammable
liquids,gases, or dust.
Power tools create sparks which
may ignite the dust or flumes .
c) Keep by-standers, children and
visitors away while operating a
power tool.
plug. Do not change the
plug in any way. Do not use
“AC only“ rated tools with a
DC power supply.
b) Avoid body contact with
grounded surfaces such
as pipes, radiators, ranges
and refrigerators. There is
an increased risk of electric
shock if your body is
grounded.
c) Don’t expose power tools
to rain or wet conditions.
Water entering a power tool
will increase the risk of
electric shock.
d) Do not abuse the cord.
Never use the cord to carry
the tools or pull the plug

6
from an outlet. Keep cord away
from heat, oil, sharp edges or
moving parts. Replace damaged
cords
immediately.
Damaged
cords
increase the risk of electric shock.
e) When operating a power
tool outsides, use an
outdoor extension cord.
These cords are rated for
outdoor use and reduce the
risk of electric shock.
3) Personal Safty
a) Stay alert, watch what you
are doing and use common
sense when operating a
power tool. Do not use tool
while tired
or
under
in influence
d) Removing adjusting keys
or wrenches before turning
the tool “NO“. Awrench or a
key that is left attached to a
rotating part of the tool may
result in personal injury.
e) Do not overreach. Keep
proper footing and balance
at all times. Proper footing
and balance enables better
control of the tool in
unexpected situations.
f) Dress property. Do
not
wear loose clothing or
jewelry. Contain long hair.
Keep your hair, clothing,
and gloves away from
moving parts. Loose
chothes, jewelry, or long hair
of
drugs, alcohol,
or
medication.
can be caught in moving
A
moment
of
inattention
while
operating power tools
may
result
in
serious personal
injury.
b)
Use safety
equipment.Always
wear eye protection.
Dust mask,
non-skid safety shoes, hard
hat or hearing protection
must be used for appropriate
conditions.
c) Avoid accidental starting.
Be sure switch is “OFF”
before plugging in. Carring
tools with your finger on the
switch or plugging in tools
that have switch “ON“ invites
accidents.
parts. Keep handles dry,
clean and free from oil and
grease.
4) Tool Use and Care
a) Do not force tool. Use the
correct tool for your
application. The correct tool
will do the job better and
safer at the rate for which it is
designed.
b) Do not use tool if wtich
does not turn it “NO“ or
“OFF“. Any tool that cannot
be controlled with the switch
is dangerous and must be
repaired.
c) Disconnect the plug from
the power source before

7
making any adustments,
changing accessories, or
storing the tool. Such
preventive safety measures
reduce the risk of starting the
tool accidentally.
d) Store idle toolsout of reach
of children and other
untrained persons. Tools
are dangerous in the hands
of untrained users.
e) Maintain tools with care.
Properly maintained tools,Any
alternation or modification
is a misuse and may result in
a dangerous condition.
f) Keep cutting tools sharp
and clean.Sharp cutting
edges are less likely to bind
and are easier to control.
g) Use only accessories that
are recommended by
manufacturer for your
model. Accessories that
may be suitable for one too,
when used on another tool.l
5) Service
When servicing a tool, use only
identical replacement parts.
Follow instructions in the
Maintenance section of this
manual. Useof
unauthorized
parts
or failure to follow Maintecance
instructions may create a risk of
electric shock or injury.

8
TH215456,UTH215456,
TH215456-6,TH215456-8,TH215456S Exploding view

9
TH215456,UTH215456,
TH215456-6,TH215456-8,TH215456S
Spare part
list
NO.
Part Description
Qty
NO.
Part Description
Qty
NO.
Part Description
Qty
1
washer 1
32
Nylock Hex.Socket Hd.Bolt 7
63 Cable 1
2
Spring washer 1
33
Spring Washer 11
64 Self-tapping Screws 2
3 Level Spring 1
34 Board 1
65 Stator 1
4 Spring Case 1 35 Bearing 1 66 House Ass'y 1
5 Pin 1
36 Inner cover 1
67 Self-tapping Screws 4
6
Nylock Hex.Socket Hd.Bolt 6
37 Washer 1
68 Brush Cap 2
7 Spring Washer 6
38 Distance ring 1
69 Brush Cover 2
8 Stop Lever 1
39 Gear 1
70 Brush 2
9 Block Blessing
1
40 O-ring 1
71 Brush Holder 2
10 Damper
1
41 Bearing 1 72
Spring 2
11
O-ring
1
42
Gear Cover 1 73
Oil Gauge 1
12
Shank Sleeve
1 43
Nylock Hex.Socket Hd.Bolt 6 74
O-ring 1
13
Mouth
1 44
Spring Washer 14
75
Nylock Hex.Socket Hd.Bolt
4
14
O-ring
1 45
Washer 14
76
Oil cover 1
15
Washer
2 46
Bearimg 2 77
Oil Cap 1
16
Damper
1 47
Gear 1 78
Crosspan head screws 4
17
Cylinder House
1 48
Nylock Hex. Socketed
Hd.Bolt 2 79
Washer 4
18
Nylock Hex.Socket Hd.Bolt
4 49
Bearing 1 80
Felt Holder
1
19
Spring Washer
5 50
Board 1 81
Felt
1
20
Washer
4 51
Washer 1 82
Nylock Hex.Socket Hd.Bolt
1
21
O-ring
1 52
Bearing
1 83
Board
1
22
Cylinder
1 53
Rotor
1 84
Needle Bearing
1
23
Ring
1 54
Left Handle
1 85
Nut
1
24
Piston
1 55
Right Handle
1 86
Clamping Block
2
25
Piston Pin
1 56
Nylock Hex.Socket Hd.Bolt
8 87
Handle set
1
26
Coneccting rod
1 57
Self-tapping Screws
8 88
Knob
1
27
Pin
2 58
Switch
1 89
Pin
2
28
Housing Ass'y
1 59
Inductance
1 90
Handle Shaft
1
29
Seal Ring(A)
1 60
Capacitance
1 91
Handle Grip
2
30
Crankshaft
1 61
Board
1 92
Handle insulated cover
2
31
Woodruff key
2 62
Cable Cover
1
Other manuals for TH215456
1
This manual suits for next models
4
Table of contents
Other Total Power Tools manuals
Popular Power Tools manuals by other brands

Evotools
Evotools HG2000 user manual

Storehouse
Storehouse 93924 Assembly and operating instructions

Performance Tool
Performance Tool M546 owner's manual

Blast-It-All
Blast-It-All LITTLE BLASTER manual

Parkside
Parkside PAT 12 B2 Operation manual

Chicago Pneumatic
Chicago Pneumatic CP 2190 Safety and operating instructions