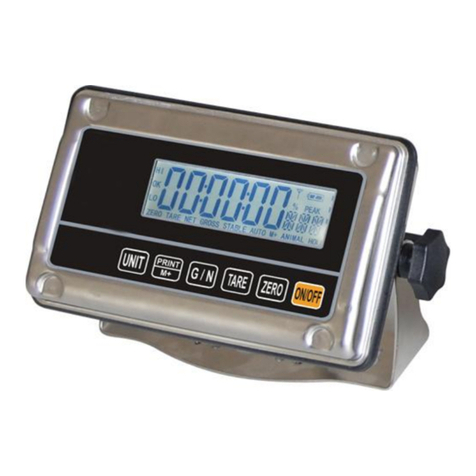
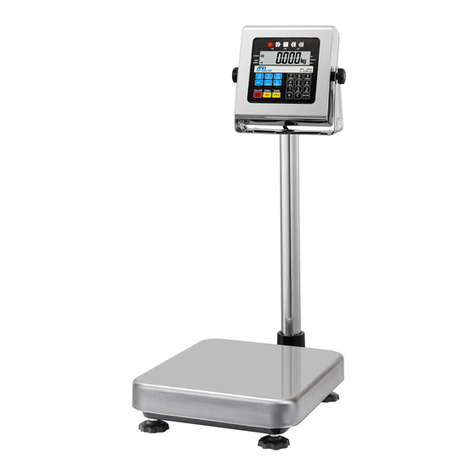
Totalcomp TEI User manual

TEI
Operation Manual
Contents subject to change without notice
Version 1.1
5/2020

CONTENT
CONTENTCONTENT
CONTENTS
SS
S
Specifications
SpecificationsSpecifications
Specifications ............................................................................................................................ 1
Indicator Display
Indicator DisplayIndicator Display
Indicator Display ........................................................................................................................ 1
Function eys
Function eysFunction eys
Function eys ........................................................................................................................... 2
Normal Weighing Mode and Tare
Normal Weighing Mode and TareNormal Weighing Mode and Tare
Normal Weighing Mode and Tare ..................................................................................................... 3
Hold (Dynamic Weighing) Mode
Hold (Dynamic Weighing) ModeHold (Dynamic Weighing) Mode
Hold (Dynamic Weighing) Mode ...................................................................................................... 4
Accumulation Mode
Accumulation ModeAccumulation Mode
Accumulation Mode ..................................................................................................................... 5
Check Weighing (
Check Weighing (Check Weighing (
Check Weighing (Data Compare) Mode
Data Compare) ModeData Compare) Mode
Data Compare) Mode ............................................................................................. 5
Counting Mode
Counting ModeCounting Mode
Counting Mode .......................................................................................................................... 6
Percent Weighing Mode
Percent Weighing ModePercent Weighing Mode
Percent Weighing Mode ................................................................................................................ 7
Set
SetSet
Setup Mode
up Modeup Mode
up Mode .............................................................................................................................. 8
Calibration Mode
Calibration ModeCalibration Mode
Calibration Mode ...................................................................................................................... 14
Geographic Adjustment
Geographic AdjustmentGeographic Adjustment
Geographic Adjustment .............................................................................................................. 16
Miscellan
MiscellanMiscellan
Miscellaneous Submenu Settings
eous Submenu Settingseous Submenu Settings
eous Submenu Settings .................................................................................................. 17
Serial Communication Details
Serial Communication DetailsSerial Communication Details
Serial Communication Details ....................................................................................................... 18
Symbol Definitions
Symbol DefinitionsSymbol Definitions
Symbol Definitions .................................................................................................................... 21
Troubleshooting
TroubleshootingTroubleshooting
Troubleshooting ....................................................................................................................... 21
Display Character Definitions
Display Character DefinitionsDisplay Character Definitions
Display Character Definitions ....................................................................................................... 22
Packing Contents
Packing ContentsPacking Contents
Packing Contents ..................................................................................................................... 22

. 1 .
Specifications
Model
ModelModel
Model
TEI
TEITEI
TEI-
--
-20
2020
20
TEI
TEITEI
TEI-
--
-50
5050
50
TEI
TEITEI
TEI-
--
-100
100100
100
Max
Max Max
Max Capacity
CapacityCapacity
Capacity
44lb/20kg 110lb/50kg 220lb/100kg
Readability
ReadabilityReadability
Readability
0.005lb/0.002kg 0.01lb/0.005kg 0.02lb/0.01kg
Display Resolution
Display ResolutionDisplay Resolution
Display Resolution
1
:
10000 1:10000 1:10000
Min Recommended
Min Recommended Min Recommended
Min Recommended
Weight
WeightWeight
Weight
40g 100g 200g
Construction
ConstructionConstruction
Construction
Epoxy painted carbon steel base with stainless steel platform
Weighing Units
Weighing UnitsWeighing Units
Weighing Units
lb / kg / lb:oz
Calibration unit
Calibration unitCalibration unit
Calibration unit
lb
Application Modes
Application ModesApplication Modes
Application Modes
Weighing, Counting, Check weighing, Percent weighing
Display
DisplayDisplay
Display
6-digit, 7-segment, 1" (25mm) LCD with blue backlight
Zero Range
Zero RangeZero Range
Zero Range
Programmable zero range
Tare Range
Tare RangeTare Range
Tare Range
Full capacity
Stabilization Time
Stabilization TimeStabilization Time
Stabilization Time
<3 seconds
Operating
Operating Operating
Operating
Temperature
TemperatureTemperature
Temperature
15° to 105°F (-10° to 40°C)
Humidity Range
Humidity RangeHumidity Range
Humidity Range
<90% relative humidity, non-condensing
Power supply
Power supplyPower supply
Power supply
Alkaline Batteries: 4 x “AA” size cells
AC Adapter: 6Vdc/500mA, with central positive:
USB
Interface
InterfaceInterface
Interface
RS232 (COM1) and USB (COM2)
Feet
FeetFeet
Feet 4 x fixed bolt design, adjustable height
Max
Max Max
Max
Overload
Overload Overload
Overload
120% of capacity
P
PP
P
l
ll
l
a
aa
a
tform
tform tform
tform
Dimensio
DimensioDimensio
Dimensions
nsns
ns
(L x W x H)
(L x W x H)(L x W x H)
(L x W x H)
14.65 x 12 x 1.97 in.
(372 x 305 x 50mm)
21.65 x 16.54 x 2.56 in.
(550 x 420 x 65mm)
19.7 x 25.6 x 3.07 in.
(650 x 500 x 78mm)
Package
Package Package
Package
Dimensions
DimensionsDimensions
Dimensions
(L x W x H)
(L x W x H)(L x W x H)
(L x W x H)
21.30 x 19.06 x 7.48 in.
(541 x 484 x 190mm)
28.82 x 24.09 x 87.40 in.
(732 x 612 x 222mm)
32.80 x 27.28 x 9.84 in.
(833 x 693 x 250mm)
Indicator
Indicator Indicator
Indicator Display
DisplayDisplay
Display
lb
lblb
lb - Measure unit is lb or lb:oz
Oz
OzOz
Oz - Measure unit is oz or lb:oz
g
gg
g - Measure unit is kg
%
% %
% -
--
-
Measure unit is % (in percentage weighing mode).
Pcs
PcsPcs
Pcs - Measure unit is pieces (in counting mode).
- Scale is zeroed, gross weight is 0, tare is 0.
NET
NETNET
NET - Display reading is net weight; tare is not 0.
TOTAL
TOTALTOTAL
TOTAL - Display data is accumulated total times, weight,
pieces, or percentage.
HOLD
HOLDHOLD
HOLD - Scale is in dynamic weighing mode
- HOLD
HOLDHOLD
HOLD flashes - actual fluctuating weight displayed
- HOLD
HOLDHOLD
HOLD does not flash - locked weight is displayed
HI
HIHI
HI - Data compare (check-weighing) is enabled. Current
data (weight, pieces, or percent) is above the specified
upper limit.
PEA
PEAPEA
PEA - Scale is in dynamic weighing mode. Hold type is
PEA -HOLD.
O
OO
O - Data compare is enabled. Current data is between
the specified upper and lower limits.
- Battery level
LO
LO LO
LO -
--
- Data compare is enabled. Current data is below
the specified lower limit.
- Scale is stable

. 2 .
Function eys
Function eysFunction eys
Function eys
EY
EYEY
EY
MODE
MODEMODE
MODE
DEFINITION
DEFINITIONDEFINITION
DEFINITION
HOLD
HOLDHOLD
HOLD
SETUP
SETUPSETUP
SETUP
Weighing
,
Counting, or
Percent mode
<3 seconds Enters or exits HOLD mode
>3 seconds Enters SETUP mode
Input data mode
<3 seconds Returns to last sub-menu
>3 seconds Inputs decimal point
Menu selection mode Returns to last sub-menu
PRINT
PRINTPRINT
PRINT
FUNC
FUNCFUNC
FUNC
Weighing
,
Counting, or
Percent mode
<3 seconds Sends output data via the serial port
>3 seconds Selects mode: Weighing, Counting, or Percent
Input data mode Increases the digit in the flashing data entry position by one
Menu selection mode Returns to last item of current sub-menu
ACC
ACCACC
ACC
TOTAL
TOTALTOTAL
TOTAL
Weighing
,
Counting, or
Percent mode
<3 seconds Adds accumulation values to memory; displays instances and totals
>3 seconds Displays accumulation instances and totals
Input data mode Decreases the digit in the flashing data entry position by one
Menu selection mode Goes to next item of current sub-menu
UNIT
UNITUNIT
UNIT
DATA
DATADATA
DATA
Weighing mode
<3 seconds Changes weighing unit of measure
Counting or
Percent mode
<3 seconds
Enters the submenu to input
piece weight for counting or to enter
reference weight for percent-weighing
Weighing
,
Counting, or
Percent mode
>3 seconds Enters the submenu to input the comparative data range for
check-weighing
Time or
Date mode >3 seconds Enters time or date setting mode
Input data mode Shifts the flashing data entry position from right to left
Menu selection mode Goes to next item of current sub-menu
TARE
TARETARE
TARE
PRESET
PRESETPRESET
PRESET
Weighing
,
Counting, or
Percent mode
<3 seconds Tares the weight
>3 seconds Enters pre-determined tare input mode
Input data mode Confirms the input data and forwards to next step
Menu selection mode Confirms the input data and forwards to next step
ZERO
ZEROZERO
ZERO
ON/OFF
ON/OFFON/OFF
ON/OFF
Power Off Powers on
Weighing
,
Counting, or
Percent mode
<3 seconds Zeros the platform weight
>3 seconds Powers off
Input data mode Ignores the modification
Menu selection mode Exits from current working mode.

. 3 .
Normal Weighing
Normal Weighing Normal Weighing
Normal Weighing M
MM
Mode
odeode
ode
and
and and
and Tare
TareTare
Tare
1. Power on the scale by pressing the ZERO/ON/OFF
ZERO/ON/OFFZERO/ON/OFF
ZERO/ON/OFF key.
2. When the display stabilizes, press ZERO/ON/OFF
ZERO/ON/OFFZERO/ON/OFF
ZERO/ON/OFF to set new zero point.
3. Place objects on the scale platform and read the weight on the indicator.
Note:
Note:Note:
Note:
Objects should be placed at the center of the platform. Corner or side loading heavy objects can damage the scale.
Yes
YesYes
Yes
No
NoNo
No
No
NoNo
No
4. To change the weight unit of measure, press and release the
UNIT/DATA
UNIT/DATAUNIT/DATA
UNIT/DATA key.
5. To send data to another device via the serial port, press and release the
PRINT/FUNC
PRINT/FUNCPRINT/FUNC
PRINT/FUNC
key.
6. Power off the scale by pressing and holding the ZERO/ON/OFF
ZERO/ON/OFFZERO/ON/OFF
ZERO/ON/OFF key for 4 seconds.
Setting
Setting Setting
Setting a
aa
a
Tare Weight
Tare WeightTare Weight
Tare Weight
1. Zero the scale as described above.
2. Place an empty container on the platform and press the TARE/PRESET
TARE/PRESETTARE/PRESET
TARE/PRESET key.
The display will return to zero, eliminating the
weight of the container. The NET
NETNET
NET indicator will be lit on the display.
3. Put the material or object to be weighed in the container. The net weight will be displayed.
4. To exit tare mode, remove all weight from the scale. The display will show a negative weight. Press the TARE/PRESET
TARE/PRESETTARE/PRESET
TARE/PRESET key to
return the display to zero, eliminating the weight of the container.
Setting a Pre
Setting a PreSetting a Pre
Setting a Pre-
--
-D
DD
Determined
eterminedetermined
etermined
Tare Weight
Tare WeightTare Weight
Tare Weight
1. Zero the scale as described above.
2. Press and hold the TARE/PRESET
TARE/PRESETTARE/PRESET
TARE/PRESET key until and the NET
NETNET
NET indicator flashes and
“
““
“Pr.Tare
Pr.TarePr.Tare
Pr.Tare” shows in the display.
3. Input the tare weight using the arrow keys. After inputting the tare weight, press the TARE/PRESET
TARE/PRESETTARE/PRESET
TARE/PRESET key to confirm. The NET
NETNET
NET
indicator will be lit on the display.
Note:
Note:Note:
Note: Tare weight must be greater than zero and less than the scale’s maximum capacity.
4. Put the material or object to be weighed onto the scale platform. The net weight will be displayed.
5. To exit tare mode, remove all weight from the scale. The display will show a negative weight. Press the TARE/PRESET
TARE/PRESETTARE/PRESET
TARE/PRESET key to
return the display to zero, eliminating the weight of the container.
Note:
Note:Note:
Note: The indicator can only save one tare weight. Entering a new tare weight will automatically replace the old one.

. 4 .
Hold (Dynamic Weighing) Mode
Hold (Dynamic Weighing) ModeHold (Dynamic Weighing) Mode
Hold (Dynamic Weighing) Mode
The hold or dynamic weighing function allows weighing of moving objects, such as live animals, by freezing the display value to a
steady weight; it would otherwise be unsteady due to object movement. This function can be used in normal weighing mode,
counting mode, and percent weighing mode.
1. To enter HOLD
HOLD HOLD
HOLD mode, press and release the HOLD
HOLDHOLD
HOLD/SETUP
/SETUP/SETUP
/SETUP key.
2. Place the material or object to be weighed onto the scale platform. The HOLD
HOLDHOLD
HOLD indicator on the display will flash for up to 3
seconds. It will then stop flashing and the weight will be displayed.
3. The material or object can be removed and the next item can be weighed without pressing any buttons.
4. To exit HOLD
HOLD HOLD
HOLD mode, press and release the HOLD
HOLDHOLD
HOLD/SETUP
/SETUP/SETUP
/SETUP key.
The default hold mode described above is AUTO HOLD
AUTO HOLDAUTO HOLD
AUTO HOLD. Within this mode, the scale will capture the fluctuating weight data at a rate
of 10Hz during the data collection time (default of 3 seconds). It will then display the average value once the scale has reached
stability (HOLD
HOLDHOLD
HOLD no longer flashes).
To reach stability, the weight must be greater than the minimum HOLD
HOLDHOLD
HOLD weight (default of 10d, where d = the scale’s readability,
see specifications) and the fluctuation must be within the
HOLD
HOLDHOLD
HOLD range (default of 5d). Once the held weight has been reached, a
new weight will automatically register only if the weight has changed by more than the HOLD
HOLDHOLD
HOLD range. If a stable value is not
reached within the stabilization time (default of 9 seconds), the scale will display “STB.ER
STB.ERSTB.ER
STB.ER”. Press the TARE/PRESET
TARE/PRESETTARE/PRESET
TARE/PRESET key to HOLD
HOLDHOLD
HOLD
again, or press the HOLD
HOLDHOLD
HOLD/SETUP
/SETUP/SETUP
/SETUP key to exit
HOLD
HOLD HOLD
HOLD mode.
The values of the above parameters can be changed from their defaults within User Setup
User SetupUser Setup
User Setup mode. The following additional HOLD
modes are also available through User Setup
User SetupUser Setup
User Setup mode.
Positive Peak HOLD mode – Holds and displays the largest positive value from the zeroed point. In Peak HOLD mode, both
PEA
PEAPEA
PEA and HOL
HOLHOL
HOLD
DD
D indicators on the display will be lit.
Negative Peak HOLD mode – Holds and displays the largest negative value from the zeroed point. This mode has limited
practical value, but is available for specialized applications. In Peak HOLD mode, both PEA
PEAPEA
PEA and H
HH
HOLD
OLDOLD
OLD indicators on the
display will be lit.
Toggle HOLD mode - Holds and displays an instantaneous value. Pressing HOLD
HOLDHOLD
HOLD/SETUP
/SETUP/SETUP
/SETUP while the weight is fluctuating will
capture and display the value at that moment, but not an average, maximum, or minimum value. Pressing HOLD
HOLDHOLD
HOLD/SETUP
/SETUP/SETUP
/SETUP
again will exit HOLD and return to the fluctuating value.
Average HOLD mode - Holds and displays an average value. The scale will capture the fluctuating weight data during the
data collection time and display the average value once the scale has reached stability. This is similar to the default AUTO
HOLD mode, but where the material or object can be removed and the next item can be weighed without pressing any
buttons in AUTO HOLD mode, Average HOLD mode requires the HOLD
HOLDHOLD
HOLD/SETUP
/SETUP/SETUP
/SETUP key to be pressed each time and pressed
again to exit.

. 5 .
Accumulation
Accumulation Accumulation
Accumulation Mode
ModeMode
Mode
The accumulation function allows storage of weighed values and the summation of those values. This function can accumulate weights,
piece counts, and percentages in normal weighing mode, counting mode, and percent weighing mode respectively.
1. With an object on the scale, press and release the
ACC/TOTAL
ACC/TOTALACC/TOTAL
ACC/TOTAL
key to add the displayed value to the accumulated total. The
indicator will first display the number of accumulation instances (e.g. if this is the 5
th
accumulated value, it will display a 5), and
then display the accumulated sum total thus far.
Note:
Note:Note:
Note: Only loads exceeding the minimum weight (default of 10d, where d = the scale’s readability, see specifications) can be
accumulated. This setting (USER
USERUSER
USER-
--
-OTHER
OTHEROTHER
OTHER-
--
-NLD.RNG
NLD.RNGNLD.RNG
NLD.RNG)
))
) can be modified from its default within User Setup
User SetupUser Setup
User Setup mode, but changes will
impact other functions such as HOLD
HOLDHOLD
HOLD.
2. Remove the load and place another load to continue accumulating, pressing and releasing ACC/TOTAL
ACC/TOTALACC/TOTAL
ACC/TOTAL
to add each value.
Not
NotNot
Note:
e:e:
e: To avoid duplicating a value for a same load, the accumulation function requires the original load to be removed (platform
weight to drop below the minimum weight) before a new value can be accumulated.
3. To view the total accumulated data at any time, remove the platform load and press and hold the
ACC/TOTAL
ACC/TOTALACC/TOTAL
ACC/TOTAL
key for 4 seconds.
The indicator will first display the number of instances and then the accumulated sum total thus far. Accumulated instances and total
values can be displayed or
sent to another device via the serial port by pressing and releasing the
PRINT/FUNC
PRINT/FUNCPRINT/FUNC
PRINT/FUNC
key.
4. To clear and reset the accumulated data, press and release the ZERO/ON/OFF
ZERO/ON/OFFZERO/ON/OFF
ZERO/ON/OFF key while total accumulated data is being displayed.
Note:
Note: Note:
Note: When the HOLD function is enabled and working in PEA HOLD mode, the accumulation function will automatically be disabled.
Check Weighing
Check WeighingCheck Weighing
Check Weighing
(Data Compare)
(Data Compare) (Data Compare)
(Data Compare) Mode
ModeMode
Mode
The check weighing or data compare function allows the user to input a pre-set range, and the display will indicate whether the weighed
value is within that range, or indicate if it is too high or too low. This function can be used in normal weighing mode, counting mode, and
percent weighing mode.
1. From normal weighing,
counting
or
percent weighing
modes,
press and hold the UNIT/DATA
UNIT/DATAUNIT/DATA
UNIT/DATA key for 4 seconds to input the
comparative data range.
2.
“UNIT. G
UNIT. GUNIT. G
UNIT. G” will be displayed. Use the
arrow
keys to select the comparison unit of measure. Press the TARE/PRESET
TARE/PRESETTARE/PRESET
TARE/PRESET key to confirm.
3. HIGH
HIGHHIGH
HIGH will be shown and 000000 will be displayed. The Hi
Hi Hi
Hi indicator on the display will be lit. Use the
arrow
keys to input the upper
limit of the range (weight, piece quantity, or percentage depending on initial mode) and press the TARE/PRESET
TARE/PRESETTARE/PRESET
TARE/PRESET key to confirm
and move to the next step.
4. Low
LowLow
Low will be shown and 000000 will be displayed. The Lo
Lo Lo
Lo indicator on the display will be lit. Use the
arrow
keys to input the lower
limit of the range and press the TARE/PRESET
TARE/PRESETTARE/PRESET
TARE/PRESET key to confirm. Press ZERO/ON/OFF
ZERO/ON/OFFZERO/ON/OFF
ZERO/ON/OFF key to exit and go back to the previous mode
(weight, piece quantity, or percentage).
NOTE:
NOTE: NOTE:
NOTE: If the upper limit is 0, or if it is less than or equal to the lower limit, check weighing mode will automatically be exited.
5. After an acceptable range has been set, check weighing may begin. If the weighed value is within the specified range, O
OO
O
will be
displayed on the indicator and an audible beep will sound. If the value is outside the specified range, HI
HIHI
HI
or
LO
LOLO
LO will be
displayed with
no audible beep. Audible beep parameters can be changed from their defaults within User Setup
User SetupUser Setup
User Setup mode.
6. To switch between weighing mode, counting mode, and percent weighing mode within check weighing, press and hold the
PRINT/FUNC
PRINT/FUNCPRINT/FUNC
PRINT/FUNC
key for 4 seconds, select the desired mode, and press the TARE/PRESET
TARE/PRESETTARE/PRESET
TARE/PRESET key to confirm.
7. To turn check weighing off, follow the above instructions and change the upper limit to zero.

. 6 .
Counting Mode
Counting ModeCounting Mode
Counting Mode
The counting function calculates and displays the piece quantity of the load that is being weighed.
1. From normal weighing mode or percent-weighing mode, press and hold the PRINT/
PRINT/PRINT/
PRINT/FUNC
FUNCFUNC
FUNC key for 4 seconds and
WEIGH/PERCEN
WEIGH/PERCENWEIGH/PERCEN
WEIGH/PERCEN will be shown. Use the up and down arrow keys to select COUNT
COUNTCOUNT
COUNT, then press the TARE/PRESET
TARE/PRESETTARE/PRESET
TARE/PRESET key to
confirm and enter counting mode.
Note
NoteNote
Note: In counting mode, the ZERO, TARE, PRINT, HOLD, PRESET TARE, ACC, SETUP,
ZERO, TARE, PRINT, HOLD, PRESET TARE, ACC, SETUP, ZERO, TARE, PRINT, HOLD, PRESET TARE, ACC, SETUP,
ZERO, TARE, PRINT, HOLD, PRESET TARE, ACC, SETUP, and
ON/OFF
ON/OFF ON/OFF
ON/OFF functions are all available.
2. There are two ways to input the piece weight.
a. To input a known piece weight directly:
i. Press the UNIT/DATA
UNIT/DATAUNIT/DATA
UNIT/DATA
key. When InP.PWt
InP.PWtInP.PWt
InP.PWt is shown, press the TARE/PRESET
TARE/PRESETTARE/PRESET
TARE/PRESET key to enter “Input Piece Weight”
mode.
Note
NoteNote
Note: At any time you can press ZERO/ON/OFF
ZERO/ON/OFFZERO/ON/OFF
ZERO/ON/OFF to exit “Input Piece Weight” and return to counting mode.
ii. When UNIT. G
UNIT. GUNIT. G
UNIT. G is shown, use the up and down arrow keys to select the piece weight unit of measure, then use
the TARE/PRESET
TARE/PRESETTARE/PRESET
TARE/PRESET key to confirm and go to next step.
iii. The previously entered piece weight will be shown. Use the arrow keys to input a new piece weight, then press
and hold the HOLD
HOLDHOLD
HOLD/SETUP
/SETUP/SETUP
/SETUP key for 4 seconds to input the decimal point. Press the TARE/PRESET
TARE/PRESETTARE/PRESET
TARE/PRESET key to confirm
and return to counting mode.
Note
NoteNote
Note:
::
: If the input piece weight is less than 0.5d (where d = the scale’s readability, see specifications), the
indicator will display PWt.Er
PWt.ErPWt.Er
PWt.Er and will automatically return to counting mode.
b. To input the piece weight by weighing a sample of a known quantity:
i. Press the UNIT/DATA
UNIT/DATAUNIT/DATA
UNIT/DATA
key. When InP.PWt
InP.PWtInP.PWt
InP.PWt is shown, use the up and down arrow keys to select SPL.PWT
SPL.PWTSPL.PWT
SPL.PWT.
..
.
Press the
TARE/PRESET
TARE/PRESETTARE/PRESET
TARE/PRESET key to enter “Get Piece Weight” mode.
Note
NoteNote
Note: At any time you can press ZERO/ON/OFF
ZERO/ON/OFFZERO/ON/OFF
ZERO/ON/OFF to exit “Get Piece Weight” and return to counting mode.
ii. When SPL.Lo
SPL.Lo SPL.Lo
SPL.Lo is shown, remove any load from the platform and press the TARE/PRESET
TARE/PRESETTARE/PRESET
TARE/PRESET key to confirm. If the
scale hasn’t stabilized, SPL.Lo
SPL.LoSPL.Lo
SPL.Lo will flash. After it has stabilized, it will go to the next step.
iii. When SPL.Hi
SPL.HiSPL.Hi
SPL.Hi is shown, place a sample of a known quantity onto the scale platform and press the TARE/PRESET
TARE/PRESETTARE/PRESET
TARE/PRESET
key to read the weight. If the scale hasn’t stabilized, SPL.Hi
SPL.HiSPL.Hi
SPL.Hi will flash. After it has stabilized, it will go to the next
step.
iv. When INP.PCS
INP.PCSINP.PCS
INP.PCS is shown, 000000 will be displayed. Use the arrow keys to input the sample quantity and press the
TARE/PRESET
TARE/PRESETTARE/PRESET
TARE/PRESET key to confirm.
Note
NoteNote
Note:
::
: If the input piece weight is less than 0.5d (where d = the scale’s readability, see specifications), the
indicator will display PWt.Er
PWt.ErPWt.Er
PWt.Er and will automatically return to counting mode.
v. Once an acceptable piece weight has been entered, the scale will return to counting mode.
Note:
Note:Note:
Note: The piece weight that has been entered will be saved, even after powering off. The indicator can only save one piece
weight. Entering a new piece weight will automatically replace the old one.

. 7 .
Percent Weighing Mode
Percent Weighing ModePercent Weighing Mode
Percent Weighing Mode
The percent weighing function shows the weight of an item relative to a stored reference weight, expressed as a percentage. In this
mode, the scale will weigh the load and calculate and display its value as a percentage of the reference weight.
1. From normal weighing mode or counting mode, press and hold the PRINT/
PRINT/PRINT/
PRINT/FUNC
FUNCFUNC
FUNC key for 4 seconds and WEIGH/COUNT
WEIGH/COUNTWEIGH/COUNT
WEIGH/COUNT will be
shown. Use the up and down arrow keys to select PERCEN
PERCENPERCEN
PERCEN, then press the TARE/PRESET
TARE/PRESETTARE/PRESET
TARE/PRESET key to confirm and enter percent
weighing mode.
Note
NoteNote
Note: In percent weighing mode, the ZERO, TARE, PRINT, HOLD, PRESET TARE, ACC, SETUP,
ZERO, TARE, PRINT, HOLD, PRESET TARE, ACC, SETUP, ZERO, TARE, PRINT, HOLD, PRESET TARE, ACC, SETUP,
ZERO, TARE, PRINT, HOLD, PRESET TARE, ACC, SETUP, and
ON/OFF
ON/OFF ON/OFF
ON/OFF functions are all
available.
2. There are two ways to input the stored reference weight.
a. To input a percentage and input weight directly:
i. Press the UNIT/DATA
UNIT/DATAUNIT/DATA
UNIT/DATA
key. When InP.Pct
InP.PctInP.Pct
InP.Pct is shown, press the TARE/PRESET
TARE/PRESETTARE/PRESET
TARE/PRESET key to enter “Input Percent” mode.
Note
NoteNote
Note: At any time you can press ZERO/ON/OFF
ZERO/ON/OFFZERO/ON/OFF
ZERO/ON/OFF to exit “Input Percent” and return to percent weighing mode.
ii. Before entering a weight, use the up and down arrow keys to select 100%. This percentage will correspond to the
weight you will input in next step. Percentages from 1%, 2%, 5%, 10%, 20%, 50% or 100% may be selected. For a
reference weight of 80kg, for example, you could select 100% in this step and enter 80kg in the following step, or
enter 50% here and 40kg in the following steps.
iii. When UNIT. G
UNIT. GUNIT. G
UNIT. G is shown, use the up and down arrow keys to select the input weight unit of measure, then use the
TARE/PRESET
TARE/PRESETTARE/PRESET
TARE/PRESET key to confirm and go to next step.
iv. The previously entered input weight will be shown. Use the arrow keys to enter the new input weight, then press and
hold the HOLD
HOLDHOLD
HOLD/SETUP
/SETUP/SETUP
/SETUP key for 4 seconds to input the decimal point. Press the TARE/PRESET
TARE/PRESETTARE/PRESET
TARE/PRESET key to confirm and
return to percent weighing mode.
Note
NoteNote
Note:
::
: If the reference weight is less than 0.5d (where d = the scale’s readability, see specifications), the indicator will
display Pct.Er
Pct.ErPct.Er
Pct.Er and will automatically return to percent weighing mode.
b. To input the stored reference weight by weighing a sample of a known percentage:
i. Press the UNIT/DATA
UNIT/DATAUNIT/DATA
UNIT/DATA
key. When InP
InPInP
InP.Pct
.Pct.Pct
.Pct is shown, use the up and down arrow keys to select SPL.Pct.
SPL.Pct. SPL.Pct.
SPL.Pct. Press the
TARE/PRESET
TARE/PRESETTARE/PRESET
TARE/PRESET key to weigh samples of a known percentage and enter “Get Piece Weight” mode.
Note
NoteNote
Note: At any time you can press ZERO/ON/OFF
ZERO/ON/OFFZERO/ON/OFF
ZERO/ON/OFF to exit “Get Piece Weight” and return to percent weighing mode.
ii. When SPL.Lo
SPL.Lo SPL.Lo
SPL.Lo is shown, remove any load from the platform and press the TARE/PRESET
TARE/PRESETTARE/PRESET
TARE/PRESET key to confirm. If the scale
hasn’t stabilized, SPL.Lo
SPL.LoSPL.Lo
SPL.Lo will flash. After it has stabilized, it will go to the next step.
iii. When SPL.Hi
SPL.HiSPL.Hi
SPL.Hi is shown, place a sample of a known quantity and percentage onto the scale platform and press the
TARE/PRESET
TARE/PRESETTARE/PRESET
TARE/PRESET key to read the weight. If the scale hasn’t stabilized, SPL.Hi
SPL.HiSPL.Hi
SPL.Hi will flash. After it has stabilized, it will go to
the next step.
iv. When INP.PCT
INP.PCTINP.PCT
INP.PCT is shown, 000000 will be displayed. Use the arrow keys to input the percentage of samples sample
quantity and press the TARE/PRESET
TARE/PRESETTARE/PRESET
TARE/PRESET key to confirm.
Note
NoteNote
Note:
::
: If the reference weight is less than 0.5d (where d = the scale’s readability, see specifications), the indicator will
display P
PP
Pct.Er
ct.Erct.Er
ct.Er and will automatically return to percent weighing mode.
v. Once an acceptable reference weight has been entered, the scale will return to percent weighing mode.
Note:
Note: Note:
Note: The reference weight will be saved, even after powering off. The indicator can only save one percentage reference weight.
Entering a new percentage reference weight will automatically replace the old one.

. 8 .
Setup Mode
Setup Mode Setup Mode
Setup Mode
Caution: Setup mode allows access to User Setup, as well as other functions that should NOT be adjusted by the
Caution: Setup mode allows access to User Setup, as well as other functions that should NOT be adjusted by the Caution: Setup mode allows access to User Setup, as well as other functions that should NOT be adjusted by the
Caution: Setup mode allows access to User Setup, as well as other functions that should NOT be adjusted by the
user.
user.user.
user.
If you inadvertently
If you inadvertently If you inadvertently
If you inadvertently enter
enter enter
enter “
““
“CONFIG
CONFIGCONFIG
CONFIG”
””
”
mode,
mode, mode,
mode, press
press press
press
the
the the
the HOLD
HOLDHOLD
HOLD/SETUP
/SETUP/SETUP
/SETUP
key to
key to key to
key to revert
revertrevert
revert
back to
back toback to
back to
the
thethe
the
main menu,
main menu, main menu,
main menu,
or press
or pressor press
or press
the
thethe
the
ZERO/ON/OFF
ZERO/ON/OFFZERO/ON/OFF
ZERO/ON/OFF
key to exit setup.
key to exit setup. key to exit setup.
key to exit setup.
1. To enter Setup
Setup Setup
Setup mode, press and hold the HOLD
HOLDHOLD
HOLD/SETUP
/SETUP/SETUP
/SETUP key for 4 seconds.
2. After entering S
SS
Setup
etupetup
etup Mode, the main menu item CONFIG
CONFIGCONFIG
CONFIG will be shown first. Do NOT enter CONFIG
CONFIGCONFIG
CONFIG
Setup Mode. Use the
arrow
keys
to move to USER
USERUSER
USER Setup Mode, then press TARE/PRESET
TARE/PRESETTARE/PRESET
TARE/PRESET to enter USER
USERUSER
USER Setup mode.
If you enter the wrong mode, press
the
HOLD
HOLDHOLD
HOLD/SETUP
/SETUP/SETUP
/SETUP
key to return to the main menu, or press
ZERO/ON/OFF
ZERO/ON/OFFZERO/ON/OFF
ZERO/ON/OFF
to exit setup.
USER
USER USER
USER
Setup
Setup Setup
Setup
Sub
SubSub
Sub-
--
-menu:
menu:menu:
menu:
USER
USERUSER
USER
Sub
SubSub
Sub
-
--
-
Menu
MenuMenu
Menu
1
11
1
Sub
SubSub
Sub
-
--
-
Menu
MenuMenu
Menu
2
22
2
Option
OptionOption
Option
Remark
RemarkRemark
Remark
Default
DefaultDefault
Default
Set
SetSet
Setting
tingting
ting
RESET NO NO=Retains the current settings No
YES YES=Resets all USER menu parameters to their default settings
COM1
BAUD.RT
1200
Baud rate for the COM1 serial port 9600
2400
4800
9600
19200
38400
BYT.FMT
8N1
COM1
byte format:
(1)8N1=8 data bits, No parity check bit, 1 stop bit
(2)7O1=7 data bits, 1 Odd parity check bit, 1 stop bit
(3)7E1=7 data bits, 1 Even parity check bit, 1 stop bit
8N1
7O1
7E1
OUT.MOD
NONE
COM1
output mode:
(1)NONE =No communication
(2)CONT=Continuous output
(3)PRINT=Output when PRINT/FUNC
PRINT/FUNCPRINT/FUNC
PRINT/FUNC key is pressed (scale must be stable)
(4)CMD=Output when a request command is received (scale must be stable)
(5)PRT.CMD= output when PRINT/FUNC
PRINT/FUNCPRINT/FUNC
PRINT/FUNC key pressed or request command
received (scale must be stable)
(6)STABLE=Output when scale is stable
PRT.CMD
CONT
PRINT
CMD
PRT.CMD
STABLE
LAYOUT
MULTPL
COM1
output content and format:
(1)MULTPL= The output will be in the format specified in OUT1
OUT1OUT1
OUT1 in the next
sub-menu
(2)SINGLE= The output will contain only displayed content and current status
(compatible with NCI-SCP01)
(3) EH-SCP= Command –response mode
MULTPL
SINGLE
EH-SCP
CONFIG
USER
C
AL
MISC
TEST

. 9 .
USER
USERUSER
USER
Sub
SubSub
Sub
-
--
-
Menu 1
Menu 1Menu 1
Menu 1
Sub
SubSub
Sub
-
--
-
Menu 2
Menu 2Menu 2
Menu 2
Option
OptionOption
Option
Remark
RemarkRemark
Remark
Default
DefaultDefault
Default
Set
SetSet
Setting
tingting
ting
OUT1
SCAL.ID
YES
Yes/No=enable/disable output scale's ID number
Prompt is “SCALE ID” NO
NO
GROSS
YES
Yes/No=enable/disable output gross weight
Prompt is “GROSS” NO
NO
TARE
YES
Yes/No=enable/disable output tare weight
Prompt is “TARE” NO
NO
NET
YES
Yes/No=enable/disable output net weight
Prompt is “NET” YES
NO
PERCNT
YES
Yes/No=enable/disable output weight percentage
Prompt is “PERCENTAGE” NO
NO
UPCTWT
YES
Yes/No=enable/disable output weight of 1% percentage
Prompt is “1% REF WT” NO
NO
COUNT
YES
Yes/No=enable/disable output counts
Prompt is “QUANTITY” NO
NO
PCWT
YES
Yes/No=enable/disable output piece weight
Prompt is “PIECE WT” NO
NO
BMI
YES
Yes/No=enable/disable output height and BMI
Prompt is “HEIGHT” and “BMI” (not available on this model scale) NO
NO
ACCUMU
YES
Yes/No=enable/disable output accumulation times and total
Prompt is “ACC. N” and “TOTAL” NO
NO
DATE
YES
Yes/No=enable/disable output date
Prompt is “DATE” NO
NO
TIME
YES
Yes/No=enable/disable output time
Prompt is “TIME” NO
NO
AD.CODE
YES
Yes/No=enable/disable output ADC code
Prompt is “A/D CODE” NO
NO
BAT.VOL
YES
Yes/No=enable/disable output voltage of battery
Prompt is “VOLTAGE” NO
NO
STATUS
YES
Yes/No=enable/disable output scale's status
Prompt is “STATUS” NO
NO
B.LINE
NONE
How many blank lines after the output string:
NONE=no blank line
LINE1/2/3/4= paper feed 1, 2, 3, or 4 blank lines after the output string
LINE1
LINE1
LINE2
LINE3
LINE4

. 10 .
USER
USERUSER
USER
Sub
SubSub
Sub
-
--
-
Menu 1
Menu 1Menu 1
Menu 1
Sub
SubSub
Sub
-
--
-
Menu 2
Menu 2Menu 2
Menu 2
Option
OptionOption
Option
Remark
RemarkRemark
Remark
Default
DefaultDefault
Default
Set
SetSet
Setting
tingting
ting
COM2
BAUD.RT
1200
Baud rate for the COM2 serial port 9600
2400
4800
9600
19200
38400
BYT.FMT
8N1
COM2
byte format:
(1)8N1=8 data bits, No parity check bit, 1 stop bit
(2)7O1=7 data bits, 1 Odd parity check bit, 1 stop bit
(3)7E1=7 data bits, 1 Even parity check bit, 1 stop bit
8N1
7O1
7E1
OUT.MOD
NONE
COM2
output mode:
(1)NONE =No communication
(2)CONT=Continuous output
(3)PRINT=Output when PRINT/FUNC
PRINT/FUNCPRINT/FUNC
PRINT/FUNC key is pressed (scale must be stable)
(4)CMD=Output when a request command is received (scale must be stable)
(5)PRT.CMD= output when PRINT/FUNC
PRINT/FUNCPRINT/FUNC
PRINT/FUNC key pressed or request command
received (scale must be stable)
(6)STABLE=Output when scale is stable
PRT.CMD
CONT
PRINT
CMD
PRT.CMD
STABLE
LAYOUT
MULTPL
COM2
output content and format:
(1)MULTPL= The output will be in the format specified in OUT
OUTOUT
OUT2
22
2 in the next
sub-menu
(2)SINGLE= The output will contain only displayed content and current status
(compatible with NCI-SCP01)
(3) EH-SCP= Command –response mode
MULTPL
SINGLE
EH-SCP

. 11 .
USER
USERUSER
USER
Sub
SubSub
Sub
-
--
-
Menu 1
Menu 1Menu 1
Menu 1
Sub
SubSub
Sub
-
--
-
Menu 2
Menu 2Menu 2
Menu 2
Option
OptionOption
Option
Remark
RemarkRemark
Remark
Default
DefaultDefault
Default
Set
SetSet
Setting
tingting
ting
OUT2
SCAL.ID
YES
Yes/No=enable/disable output scale's ID number
Prompt is “SCALE ID” NO
NO
GROSS
YES
Yes/No=enable/disable output gross weight
Prompt is “GROSS” NO
NO
TARE
YES
Yes/No=enable/disable output tare weight
Prompt is “TARE” NO
NO
NET
YES
Yes/No=enable/disable output net weight
Prompt is “NET” YES
NO
PERCNT
YES
Yes/No=enable/disable output weight percentage
Prompt is “PERCENTAGE” NO
NO
UPCTWT
YES
Yes/No=enable/disable output weight of 1% percentage
Prompt is “1% REF WT” NO
NO
COUNT
YES
Yes/No=enable/disable output counts
Prompt is “QUANTITY” NO
NO
PCWT
YES
Yes/No=enable/disable output piece weight
Prompt is “PIECE WT” NO
NO
BMI
YES
Yes/No=enable/disable output height and BMI
Prompt is “HEIGHT” and “BMI” (not available on this model scale) NO
NO
ACCUMU
YES
Yes/No=enable/disable output accumulation times and total
Prompt is “ACC. N” and “TOTAL” NO
NO
DATE
YES
Yes/No=enable/disable output date
Prompt is “DATE” NO
NO
TIME
YES
Yes/No=enable/disable output time
Prompt is “TIME” NO
NO
AD.CODE
YES
Yes/No=enable/disable output ADC code
Prompt is “A/D CODE” NO
NO
BAT.VOL
YES
Yes/No=enable/disable output voltage of battery
Prompt is “VOLTAGE” NO
NO
STATUS
YES
Yes/No=enable/disable output scale's status
Prompt is “STATUS” NO
NO
B.LINE
NONE
How many blank lines after the output string:
NONE=no blank line
LINE1/2/3/4= paper feed 1, 2, 3, or 4 blank lines after the output string
LINE1
LINE1
LINE2
LINE3
LINE4

. 12 .
USER
USERUSER
USER
Sub
SubSub
Sub
-
--
-
Menu 1
Menu 1Menu 1
Menu 1
Sub
SubSub
Sub
-
--
-
Menu 2
Menu 2Menu 2
Menu 2
Option
OptionOption
Option
Remark
RemarkRemark
Remark
Default
DefaultDefault
Default
Set
SetSet
Setting
tingting
ting
BEEP
EY
YES
Yes/No=enable/disable beep after a key is pressed YES
NO
COMPAR
NONE
(1)NONE=no beep
(2)L.Low=beeps when below the lower limit
(3)IN.LMT=beeps when in range between lower and upper limits
(4)O.HIGH=beeps when above the upper limit
(5)OUT.LMT=beeps when below the lower limit or above the upper limit
IN.LMT
L.LOW
IN.LMT
O.HIGH
OUT.LMT
HOLD
AD.H.SPD
YES
Yes=enable high speed A/D converter
(80 Hz) in
HOLD mode
NO
NO
No=disable high speed A/D converter
(10 Hz) in
HOLD mode
HLD.MOD
NONE
(1)NONE=no
HOLD
function
AUTO
PS.PEA (2)PS.PEA =Positive peak HOLD mode. Displays the most positive value
relative to the last zeroed value.
NG.PEA (3)NG.PEA =Negative peak HOLD mode. Displays the most negative value
relative to the last zeroed value.
TOGGLE (4)TOGGLE=Press HOLD key to hold the data as long as weight is over
(NLD.RNG) and stable. Press HOLD key again to exit.
AVERAG
(5) AVERAG= Average HOLD
. If
weight is over (NLD.RNG) and variation is
less than (HLD.RNG), the average weight within (AVG.TIM) will be displayed.
Press HOLD key or wait for (HLD.TIM) time to elapse to exit HOLD.
AUTO
(6)AUTO=Auto
HOLD
.
Similar to
AVERAG mode, but if
a
held load is removed
and a new load that is over (NLD.RNG) is placed on the scale, the new load
will be automatically held without pressing the HOLD key each time.
AVG.TIM 1-60 Average data time for HOLD mode: 1-60 seconds 3
STB.TIM
3*AVG.TIM
- 255 The wait time to stabilize in HOLD mode: 3*(AVG.TIM) - 255 seconds 3* AVG.TIM
HLD.TIM 0-65535
Data HOLD time
.
0=data will be frozen until HOLD key pressed.
1-65535=data will be frozen for 1-65535 seconds. After the time elapses,
scale will exit HOLD mode.
0
HLD.RNG 0 - 255
Allowable fluctuation
range of data that can be averaged in HOLD mode
.
1-255= only data within 1-255d can be averaged (where d = the scale’s
readability, see specifications). 0=any data can be averaged.
5

. 13 .
USER
USERUSER
USER
Sub
SubSub
Sub
-
--
-
Menu 1
Menu 1Menu 1
Menu 1
Sub
SubSub
Sub
-
--
-
Menu 2
Menu 2Menu 2
Menu 2
Option
OptionOption
Option
Remark
RemarkRemark
Remark
Default
DefaultDefault
Default
Set
SetSet
Setting
tingting
ting
OTHER
NLD.RNG 1-255
1
-
255= range of weight is 1
-
255d
(where
d = the scale’s
readability, see
specifications). If the weight is less than this value, the HOLD or ACCUM
function considers the scale empty (i.e. that the load has been removed).
10
CMD.SRC
NONE
Source of the executed command selection:
(1)NONE=no command will be executed
(2)COM.1= command from COM1 will be executed
(3)COM.2= command from COM2 will be executed
(4)COM.1.2= command from COM1 or COM2 will be executed
COM.1
COM.1
COM.2
COM.1.2
A.OFF.T 0-255
Auto off time:
0=no auto power off
1-255=auto off after 1-255 minutes of no operation or weight change
5
OFF.MOD
OFF Auto off mode:
(1)OFF=when off, display is dark and blank
(2)DSP.TIM=when off, display shows the time
(3)AC.TIME=on battery power, display behaves as (1); on AC power, display
behaves as (2). If time is displayed and continuous COMx output is enabled,
the time will be sent out.
OFF DSP.TIM
AC.TIME
LCD.BLT 0-255
LCD backlight set:
(1)0=always off
(2)1=always on
(3)2=pressing down ZERO+UNIT together for 4 seconds will turn on or off
(4)3-255=auto on when keys are pressed or when weight changes; auto off
after 3-255 seconds
30
LCD.CST CST1---8 LCD contraction level selection CST5
SCAL.ID
000000
-
999999 Scale's ID number: 000000-999999 123456

. 14 .
C
CC
Calibration Mode
alibration Modealibration Mode
alibration Mode
Note:
Note:Note:
Note:
A
AA
A
standard
standard standard
standard calibration
calibration calibration
calibration weight
weightweight
weight
of at least
of at least of at least
of at least 10% of
10% of 10% of
10% of the scale’s rated capacity is required.
the scale’s rated capacity is required.the scale’s rated capacity is required.
the scale’s rated capacity is required.
Us
UsUs
Use
ee
e
80%
80% 80%
80% to 100%
to 100% to 100%
to 100% of
of of
of the scale’s rated capacity
the scale’s rated capacity the scale’s rated capacity
the scale’s rated capacity for optimum results.
for optimum results.for optimum results.
for optimum results.
The calibration operation must be in pounds.
The calibration operation must be in pounds.The calibration operation must be in pounds.
The calibration operation must be in pounds.
P
PP
Press
ress ress
ress ZERO/ON/OFF
ZERO/ON/OFFZERO/ON/OFF
ZERO/ON/OFF
at any time to
at any time toat any time to
at any time to
exit c
exit cexit c
exit calibration mode.
alibration mode.alibration mode.
alibration mode.
1. Enter Setup
Setup Setup
Setup mode by pressing and holding the HOLD
HOLDHOLD
HOLD/SETUP
/SETUP/SETUP
/SETUP key for 4 seconds.
2. After entering S
SS
Setup
etupetup
etup Mode, the main menu item “CONFIG
CONFIGCONFIG
CONFIG”
””
” will be displayed. Do NOT
NOTNOT
NOT enter CONFIG
CONFIG CONFIG
CONFIG Setup Mode. Use the arrow
keys to move to CAL
CALCAL
CAL Mode, then press TARE/PRESET
TARE/PRESETTARE/PRESET
TARE/PRESET to enter calibration mode. If you enter the wrong mode, press the
HOLD
HOLDHOLD
HOLD/SETUP
/SETUP/SETUP
/SETUP
key to return to the main menu, or press
ZERO/ON/OFF
ZERO/ON/OFFZERO/ON/OFF
ZERO/ON/OFF to exit setup.
3. The number of times the scale has been calibrated will be displayed. This number will increase by one after each calibration and
can’t be modified or erased. Press the TARE/PRESET
TARE/PRESETTARE/PRESET
TARE/PRESET
key to go to the next step.
4. “ZERO
ZEROZERO
ZERO” will be displayed. Use the up and down arrow keys to select “LINE
LINELINE
LINE”, then press the TARE/PRESET
TARE/PRESETTARE/PRESET
TARE/PRESET key to confirm and
enter linear calibration mode.
5. “CAL.P0
CAL.P0CAL.P0
CAL.P0“will be displayed to calibrate scale’s zero-point. Remove all weight from the scale platform and press the
TARE/PRESET
TARE/PRESETTARE/PRESET
TARE/PRESET key to confirm. Zero will flash until stability is reached and will then automatically move to the next step.
6. “CAL.P1
CAL.P1CAL.P1
CAL.P1” will be displayed and the scale will be ready to accept the next calibration point. The default calibration input weight is
100% of the scale’s rated capacity. Use the arrow keys adjust the input value to the standard calibration weight you will use.
Note
NoteNote
Note: do not use less than 10% of the scale’s rated capacity.
: do not use less than 10% of the scale’s rated capacity. : do not use less than 10% of the scale’s rated capacity.
: do not use less than 10% of the scale’s rated capacity. Place the standard calibration weight on the platform and
press the TARE/PRESET
TARE/PRESETTARE/PRESET
TARE/PRESET key to confirm your input and move to the next step. If “CAL.Er
CAL.ErCAL.Er
CAL.Er” is displayed, press ZERO/ON/OFF
ZERO/ON/OFFZERO/ON/OFF
ZERO/ON/OFF key
to exit this mode and begin again.
7. “End.y
End.yEnd.y
End.y” will be shown and y
yy
y will be flashing. If you are doing only one point of calibration, use the up and down arrow keys to
select
yes
yesyes
yes and use TARE/PRESET
TARE/PRESETTARE/PRESET
TARE/PRESET to confirm and exit. Otherwise, select
no
nono
no and use TARE/PRESET
TARE/PRESETTARE/PRESET
TARE/PRESET to confirm and continue.
Better linearity will be achieved by calibrating to a second and third point.
8. “CAL.P2
CAL.P2CAL.P2
CAL.P2” will be displayed and the scale will be ready to accept the next calibration point. The default calibration input weight is
100% of the scale’s rated capacity. Use the arrow keys adjust the input value to the standard calibration weight you will use.
Note:
Note: Note:
Note: CAL.P2 must be larger than CAL.P1. D
CAL.P2 must be larger than CAL.P1. DCAL.P2 must be larger than CAL.P1. D
CAL.P2 must be larger than CAL.P1. Do not use less than 20% of the scale’s rated capacity.
o not use less than 20% of the scale’s rated capacity. o not use less than 20% of the scale’s rated capacity.
o not use less than 20% of the scale’s rated capacity. Place the standard
calibration weight on the platform and press the TARE/PRESET
TARE/PRESETTARE/PRESET
TARE/PRESET key to confirm your input and move to the next step. If “CAL.Er
CAL.ErCAL.Er
CAL.Er”
is displayed, press ZERO/ON/OFF
ZERO/ON/OFFZERO/ON/OFF
ZERO/ON/OFF key to exit this mode and begin again.
9. “End.y
End.yEnd.y
End.y” will be shown and y
yy
y will be flashing. To do a third point of calibration, select
no
nono
no, press TARE/P
TARE/PTARE/P
TARE/PRESET
RESETRESET
RESET to confirm, and
repeat step 8 for“CAL.P
CAL.PCAL.P
CAL.P3
33
3”. Note: CAL.P3 must be larger than CAL.P2. Do not use less than 30% of the scale’s rated
Note: CAL.P3 must be larger than CAL.P2. Do not use less than 30% of the scale’s rated Note: CAL.P3 must be larger than CAL.P2. Do not use less than 30% of the scale’s rated
Note: CAL.P3 must be larger than CAL.P2. Do not use less than 30% of the scale’s rated
capacity.
capacity. capacity.
capacity. Otherwise, select
yes
yesyes
yes and remove weight and press TARE/PRESET
TARE/PRESETTARE/PRESET
TARE/PRESET to confirm and exit.
10. Press
ZERO/ON/OFF
ZERO/ON/OFFZERO/ON/OFF
ZERO/ON/OFF to exit setup. Calibration is now complete.

. 15 .
CAL Submenu:
CAL Submenu:CAL Submenu:
CAL Submenu:
SUB
SUBSUB
SUB
-
--
-
MENU1
MENU1MENU1
MENU1
SUB
SUBSUB
SUB
MENU2
MENU2MENU2
MENU2
OPTION
OPTIONOPTION
OPTION
REMAR
REMARREMAR
REMAR
CAL.ON
CAL.OFF
Sealed calibration switch is on or off
ZERO Only does zero point calibration, then moves to CAL.END to end
LINE
CAL.P0 Linear calibration point 0: does zero point calibration. This point is required.
CAL.P1
Linear calibration point
1: do
es
first weight point calibration
. T
his point can't be omitted and
calibration weight must be more than 10% of the scale’s capacity.
END.Y YES End calibration? YES=go to CAL.END; NO=go to next point calibration
NO
CAL.P2 Linear calibration point 2: does second weight point calibration. Standard weight should be
more than 20% of the scale’s capacity and larger than CAL.P1. (This step is optional.)
END.Y
YES
End calibration? YES=go to CAL.END; NO=go to next point calibration
NO
CAL.P3 Linear calibration point 3: does third weight point calibration. Standard weight should be
more than 30% of the scale’s capacity and larger than CAL.P2. (This step is optional.)
GEO
CODE 00-70 Selection of Geographic Adjustment Code 00-70
GRAVT
9.76183
-9.99999 Input gravity of user location via keypad
INPUT Input or view current calibration parameters value
CAL.END
Calibration end and restart

. 16 .
Geographic
Geographic Geographic
Geographic A
AA
Adjustment
djustmentdjustment
djustment
Note:
Note:Note:
Note:
P
PP
Press
ress ress
ress ZERO/ON/OFF
ZERO/ON/OFFZERO/ON/OFF
ZERO/ON/OFF
at any time to
at any time toat any time to
at any time to
exit c
exit cexit c
exit calibration mode.
alibration mode.alibration mode.
alibration mode.
1. Enter Calibration
CalibrationCalibration
Calibration
mode as directed in the previous section.
2. “ZERO
ZEROZERO
ZERO” will be displayed. Use the up and down arrow keys to select “
GEO
GEOGEO
GEO
”, then press the TARE/PRESET
TARE/PRESETTARE/PRESET
TARE/PRESET key to confirm and
enter geographic
adjustment
mode.
3.
There are two ways to input the
geographic
adjustment:
a. For adjustments specific to your actual latitude and elevation:
i. When “CODE
CODECODE
CODE” is shown,
press the TARE/PRESET
TARE/PRESETTARE/PRESET
TARE/PRESET key. U
se
the arrow keys
to select the geographic adjustment code
for your location (00-70) using Table 1. Press TARE/PRESET
TARE/PRESETTARE/PRESET
TARE/PRESET key to confirm.
Note:
Note:Note:
Note: The latitude and elevation for your location can be obtained via an internet search.
Note:
Note:Note:
Note: Elevations in Chart 2 are given in kilometers. 1000 ft = 0.305 km
b. To enter a known acceleration of gravity constant:
i. When “CODE
CODECODE
CODE” is shown, use
the up and down arrow keys
to select “GRAVT
GRAVTGRAVT
GRAVT”.
Press TARE/PRESET
TARE/PRESETTARE/PRESET
TARE/PRESET key to confirm.
ii. When “GRAVT
GRAVTGRAVT
GRAVT” is shown, use
the arrow keys
to enter the acceleration of gravity constant for your latitude position
and elevation (9.76183-9.99999 m/s
2
). Press TARE/PRESET
TARE/PRESETTARE/PRESET
TARE/PRESET key to confirm
4. Press
ZERO/ON/OFF
ZERO/ON/OFFZERO/ON/OFF
ZERO/ON/OFF to exit setup. Geographic
adjustment
is now complete.
TABLE
TABLETABLE
TABLE
1
11
1:
: :
: Global
Geographic Adjustment Code by elevation and latitude.

. 17 .
Miscellaneous Submenu Settings
Miscellaneous Submenu SettingsMiscellaneous Submenu Settings
Miscellaneous Submenu Settings
1. Enter Setup
Setup Setup
Setup mode by pressing and holding the HOLD
HOLDHOLD
HOLD/SETUP
/SETUP/SETUP
/SETUP key for 4 seconds.
2. After entering S
SS
Setup
etupetup
etup Mode, the main menu item “CONFIG
CONFIGCONFIG
CONFIG”
””
” will be displayed. Do NOT
NOTNOT
NOT enter CONFIG
CONFIG CONFIG
CONFIG Setup Mode. Use the arrow keys to
move to MISC
MISCMISC
MISC Mode, then press TARE/PRESET
TARE/PRESETTARE/PRESET
TARE/PRESET to enter miscellaneous setting mode. If you enter the wrong mode, press the
HOLD
HOLDHOLD
HOLD/SETUP
/SETUP/SETUP
/SETUP
key to return to the main menu, or press
ZERO/ON/OFF
ZERO/ON/OFFZERO/ON/OFF
ZERO/ON/OFF at any time to exit setup.
3. After entering MISC
MISCMISC
MISC Mode, the submenu item
“
““
“C
CC
CODE
ODEODE
ODE”
””
” will be shown first. Do NOT
NOTNOT
NOT enter C
CC
CODE
ODEODE
ODE Setup Mode. Use the arrow keys to
move past CODE
CODECODE
CODE and VOL
VOLVOL
VOL Modes to DATE
DATEDATE
DATE Mode, then press TARE/PRESET
TARE/PRESETTARE/PRESET
TARE/PRESET to display the current date. Date format is yy.mm.dd. If
you enter the wrong mode, press the
HOLD
HOLDHOLD
HOLD/SETUP
/SETUP/SETUP
/SETUP
key to return to the previous menu, or press
ZERO/ON/OFF
ZERO/ON/OFFZERO/ON/OFF
ZERO/ON/OFF to exit setup.
4. Press the UNIT/DATA
UNIT/DATAUNIT/DATA
UNIT/DATA
key for 4 seconds to enter date modification mode. Use the arrow keys to modify the date. If no entry is made
within 5 seconds, it will automatically exit modification mode.
5. Press the
HOLD
HOLDHOLD
HOLD/SETUP
/SETUP/SETUP
/SETUP
key to return to the previous menu and use the arrow keys to move to TIME
TIMETIME
TIME Mode, then press
TARE/PRESET
TARE/PRESETTARE/PRESET
TARE/PRESET to display the current time. Time format is hh.mm.ss as a 24 hour format.
6. Press the UNIT/DATA
UNIT/DATAUNIT/DATA
UNIT/DATA
key for 4 seconds to enter time modification mode. Use the arrow keys to modify the time. If no entry is made
within 5 seconds, it will automatically exit modification mode.
7. Press the
HOLD
HOLDHOLD
HOLD/SETUP
/SETUP/SETUP
/SETUP
key to return to the previous menu and use the arrow keys to move to VER
VERVER
VER Mode. Press TARE/PRESET
TARE/PRESETTARE/PRESET
TARE/PRESET to
view the software version. Firmware version format is Vxx.yy, where xx is the hardware version, and yy is the software version.
8. Press
ZERO/ON/OFF
ZERO/ON/OFFZERO/ON/OFF
ZERO/ON/OFF to exit setup.
MISC Submenu:
MISC Submenu:MISC Submenu:
MISC Submenu:
SUB
SUBSUB
SUB
-
--
-
MENU1
MENU1MENU1
MENU1
REMAR
REMARREMAR
REMAR
CODE Displays the ADC (Analog to Digital Converter) code. ADC setting to be adjusted by a technician only.
VOL Displays battery voltage. Normal battery range is 5.6V-7.6V. Replace batteries if below 5.6V.
DATE Displays and sets the date
TIME Displays and sets the time
VER Displays firmware version

. 18 .
Serial Communication
Serial Communication Serial Communication
Serial Communication Details
DetailsDetails
Details
Note:
Note:Note:
Note:
COM1 is RS232
COM1 is RS232COM1 is RS232
COM1 is RS232.
. .
. TXD1, RXD1 and GND
TXD1, RXD1 and GND TXD1, RXD1 and GND
TXD1, RXD1 and GND c
cc
communication wires
ommunication wires ommunication wires
ommunication wires are used.
are used.are used.
are used.
COM2
COM2 COM2
COM2 is USB
is USBis USB
is USB.
. .
.
USB driver
USB driver USB driver
USB driver is available at
is available atis available at
is available at
http://www.
http://www.http://www.
http://www.measuretek.net
measuretek.netmeasuretek.net
measuretek.net
B
BB
Baud rate and byte format
aud rate and byte format aud rate and byte format
aud rate and byte format
can be changed from their defaults within User Setup mode.
can be changed from their defaults within User Setup mode.can be changed from their defaults within User Setup mode.
can be changed from their defaults within User Setup mode.
Responses to serial commands
Responses to serial commands Responses to serial commands
Responses to serial commands are
areare
are
immediate or within one weight measure cycl
immediate or within one weight measure cyclimmediate or within one weight measure cycl
immediate or within one weight measure cycle. On
e. One. On
e. One second should be adequate
e second should be adequate e second should be adequate
e second should be adequate as a
as a as a
as a
time
timetime
time-
--
-out value by remote (controlling) device.
out value by remote (controlling) device.out value by remote (controlling) device.
out value by remote (controlling) device.
Transmission data lengths are as follows for each string:
Read data - 6bytes
Data polarity - 1byte: “-” for negative, followed the first digit; “ ” for positive
Decimal point - 1byte: “.”
Measure unit - 1-5bytes: “ lb”, “ kg”, “lb:oz”, “pcs”, “%”; units are always lower case and left aligned
Current status - 4bytes
If over capacity, the scale will return eight “^” characters.
If under capacity, the scale will return eight “_” characters.
If there is an error in the zeroing of the scale, it will return eight “-” characters.
Leading zeroes before significant digits are suppressed. Reading weight is right aligned.
Serial Communication Symbols
Serial Communication SymbolsSerial Communication Symbols
Serial Communication Symbols
<LF>
Line Feed character (h
ex 0AH)
<CR>
Carriage Return character (hex 0DH)
<ETX>
End of Text character (hex 03)
<SP>
Space (hex 20H)
H
1
H
2
H
3
H
4
Four
status bytes (see below for byte definitions)
<p>
Polarity (minus sign for negative weight and space for positive weight)
W
1
---
W
6
Weight
data, 1
-
6 bytes (six digits)
<DP>
Decimal point
U
1
U
2
U
3
U
4
U
5
Measure units, kg, lb, lb:oz , % or pcs; 2
-
5 Bytes
<Add>
Address of scale; 2 bytes (00
-
99)
<Prompt>
Prompt characters of output content; max. 11
bytes
Status Byte Definitions
Status Byte DefinitionsStatus Byte Definitions
Status Byte Definitions
Bit
BitBit
Bit
B
BB
B
yte 1 (H1)
yte 1 (H1)yte 1 (H1)
yte 1 (H1)
Byte 2 (H2)
Byte 2 (H2)Byte 2 (H2)
Byte 2 (H2)
Byte 3 (H3)
Byte 3 (H3)Byte 3 (H3)
Byte 3 (H3)
Byte
Byte Byte
Byte
4
44
4
(H
(H(H
(H
4
44
4
)
))
)
0
0=stable
0= not under capacity
00=compare disable
01=lower limit
10=ok
11=upper limit
00=normal weighing
01=count weighing
10=percent weighing
11=other mode
1= not stable
1= under capacity
1
0= not at
zero point
0= not over capacity
1= at zero point
1= over capacity
2
0=RAM
O
0=ROM
O
0= gross weight
0=not in HOLD
1= RAM error
1=ROM error
1= net weight
1=in HOLD
3
0= eeprom O
0=calibration
O
0=initial zero
O
0=battery
O
1= eeprom error
1=calibration error
1=initial zero error
1=low battery
4
A
lways 1
Always
1
Always
1
Always
1
5
Always
1
Always
1
Always
1
Always
1
6
Always
0
Always
1
Always
1
Always
0
7
P
arity
Parity
Parity
Parity
This manual suits for next models
3
Other Totalcomp Scale manuals
