oserio MAG-605 User manual

Instruction Manual
MAG-605
Thank you for selecting series of Health Management
Products. This instruction Manual will guide you through the setup
procedures and outline the key features.
PA-0080-V1.0
Please keep the instruction manual at hand all the time for future reference.
www.oserio.com
Made in China
Manufactured by:
Charder Electronic Co., Ltd.
No.103, Guozhong Rd., Dali Dist.,Taichung City, 412
Taiwan (R.O.C.)

Beep
Beep
!
!
Install batteries properly.
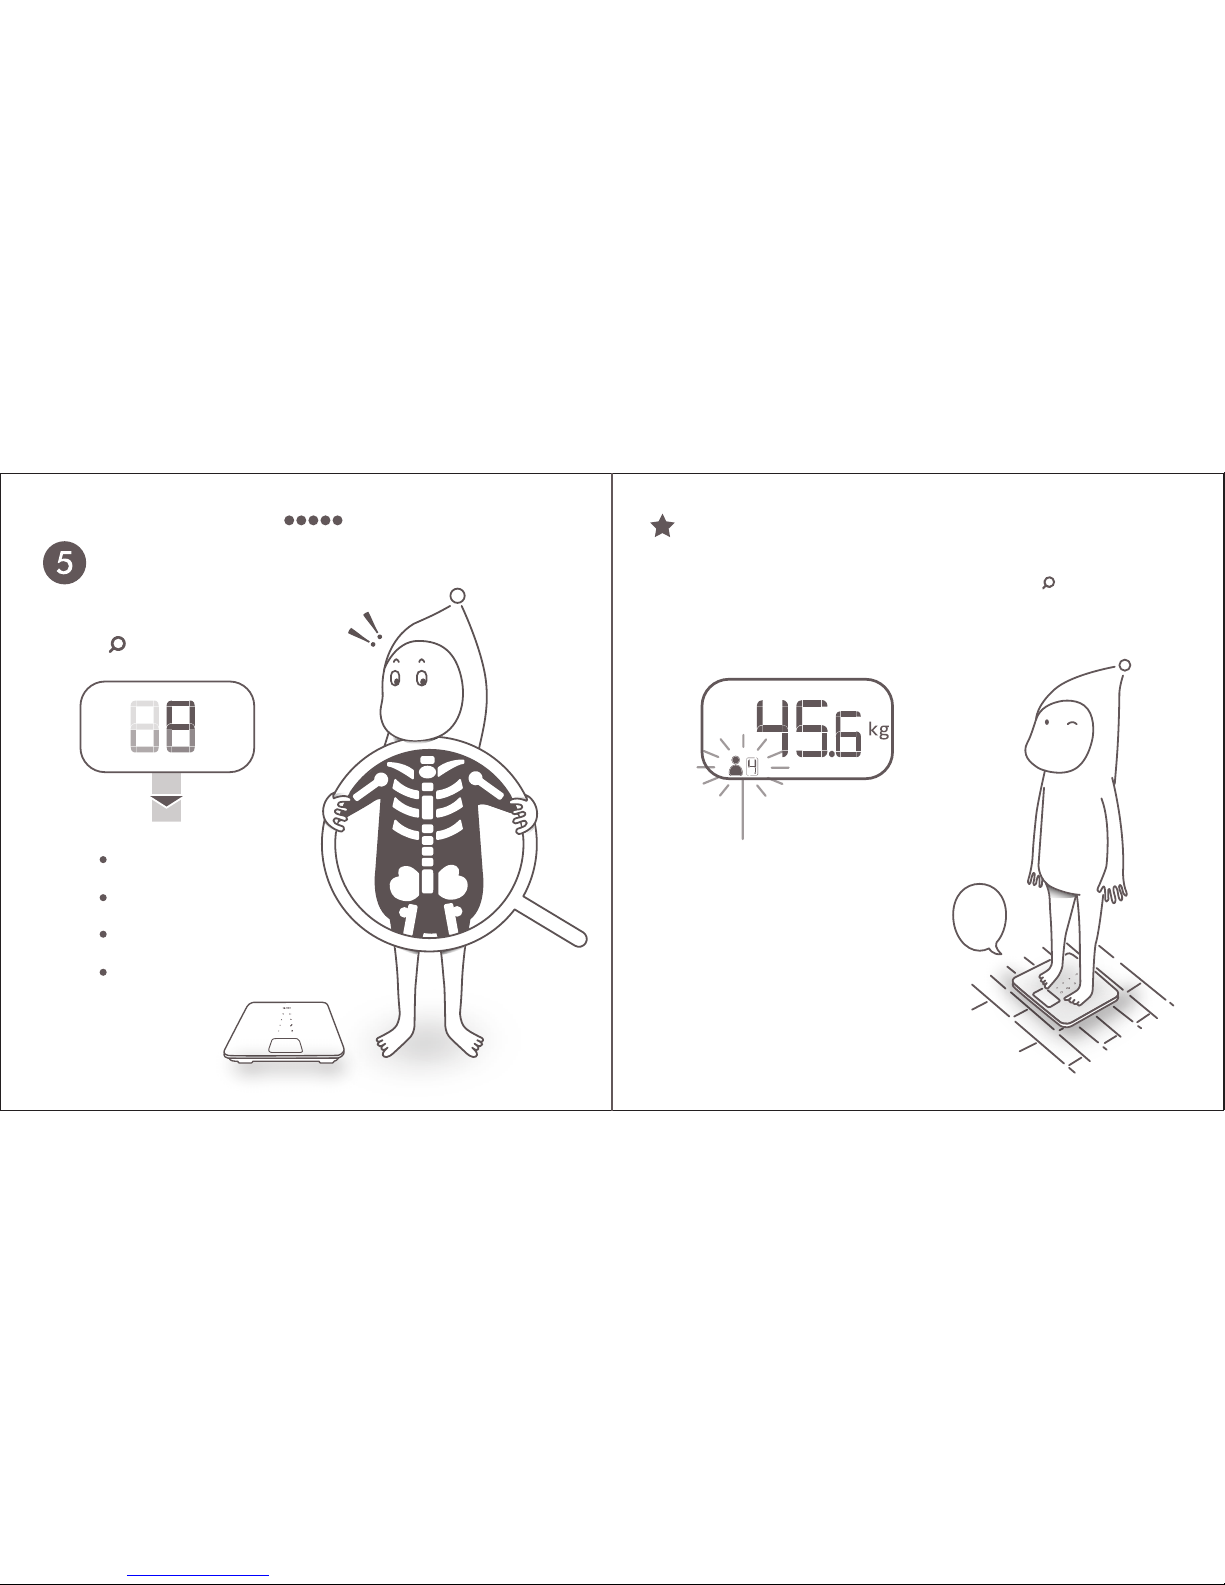
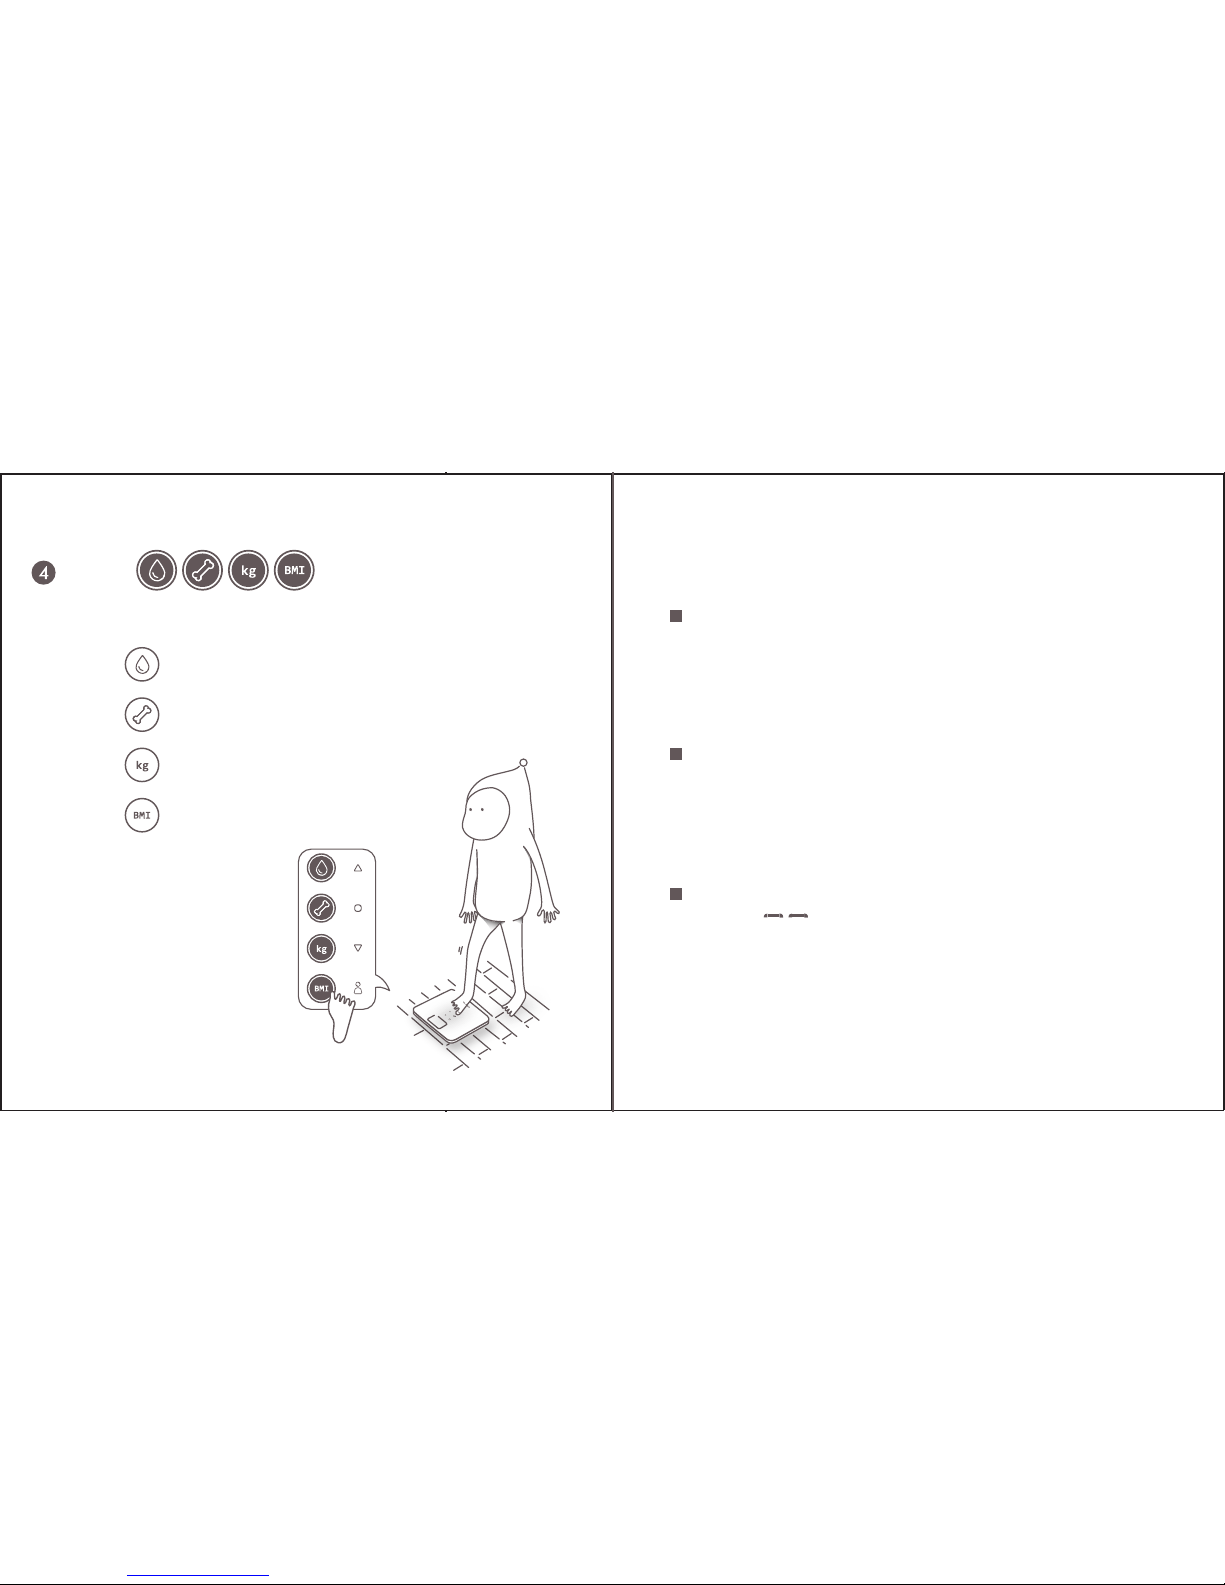
Five quick operation steps
Step on to take a
measurement.
Place the unit on a hard, flat surface.
(4 AAA Batteries) ( page 13)
( page 14)
12
Five quick operation steps

(P1~P8)
(age, gender, and height)
Confirm
Press
34
Step off and select your user
number.
Five quick operation steps
( page 17)
Enter your personal profile.
Five quick operation steps
( page 21)
Long press up and down
buttons to switch faster.
Body weight
BMI
Body Water
Bone Mass
OK !
Beep
Beep
!
!
Congratulations. You’ve completed five quick operation
steps. From now on, the scale can automatically identify
your profile once you step on the scale.
56
Your personal user number
Calculating your body
composition.
Five quick operation steps
( page 25)
( page 14)

Table of Contents
Five quick operation steps
LCD display
Low battery
3D Smart
touch key
Operation
Platform
Before using the scale
How to use the scale?
How to complete settings after measurement ?
Error messages
More information
1
14
32
17
21
23
25
27
31
8
Overview
Error message list
Product specification
Warranties
Warranty card
Ready to take measurement
Set user number
(personal user number / guest mode)
(age, gender, and height)
View measurement values
View historical values
Enter personal profile
Modify user profile
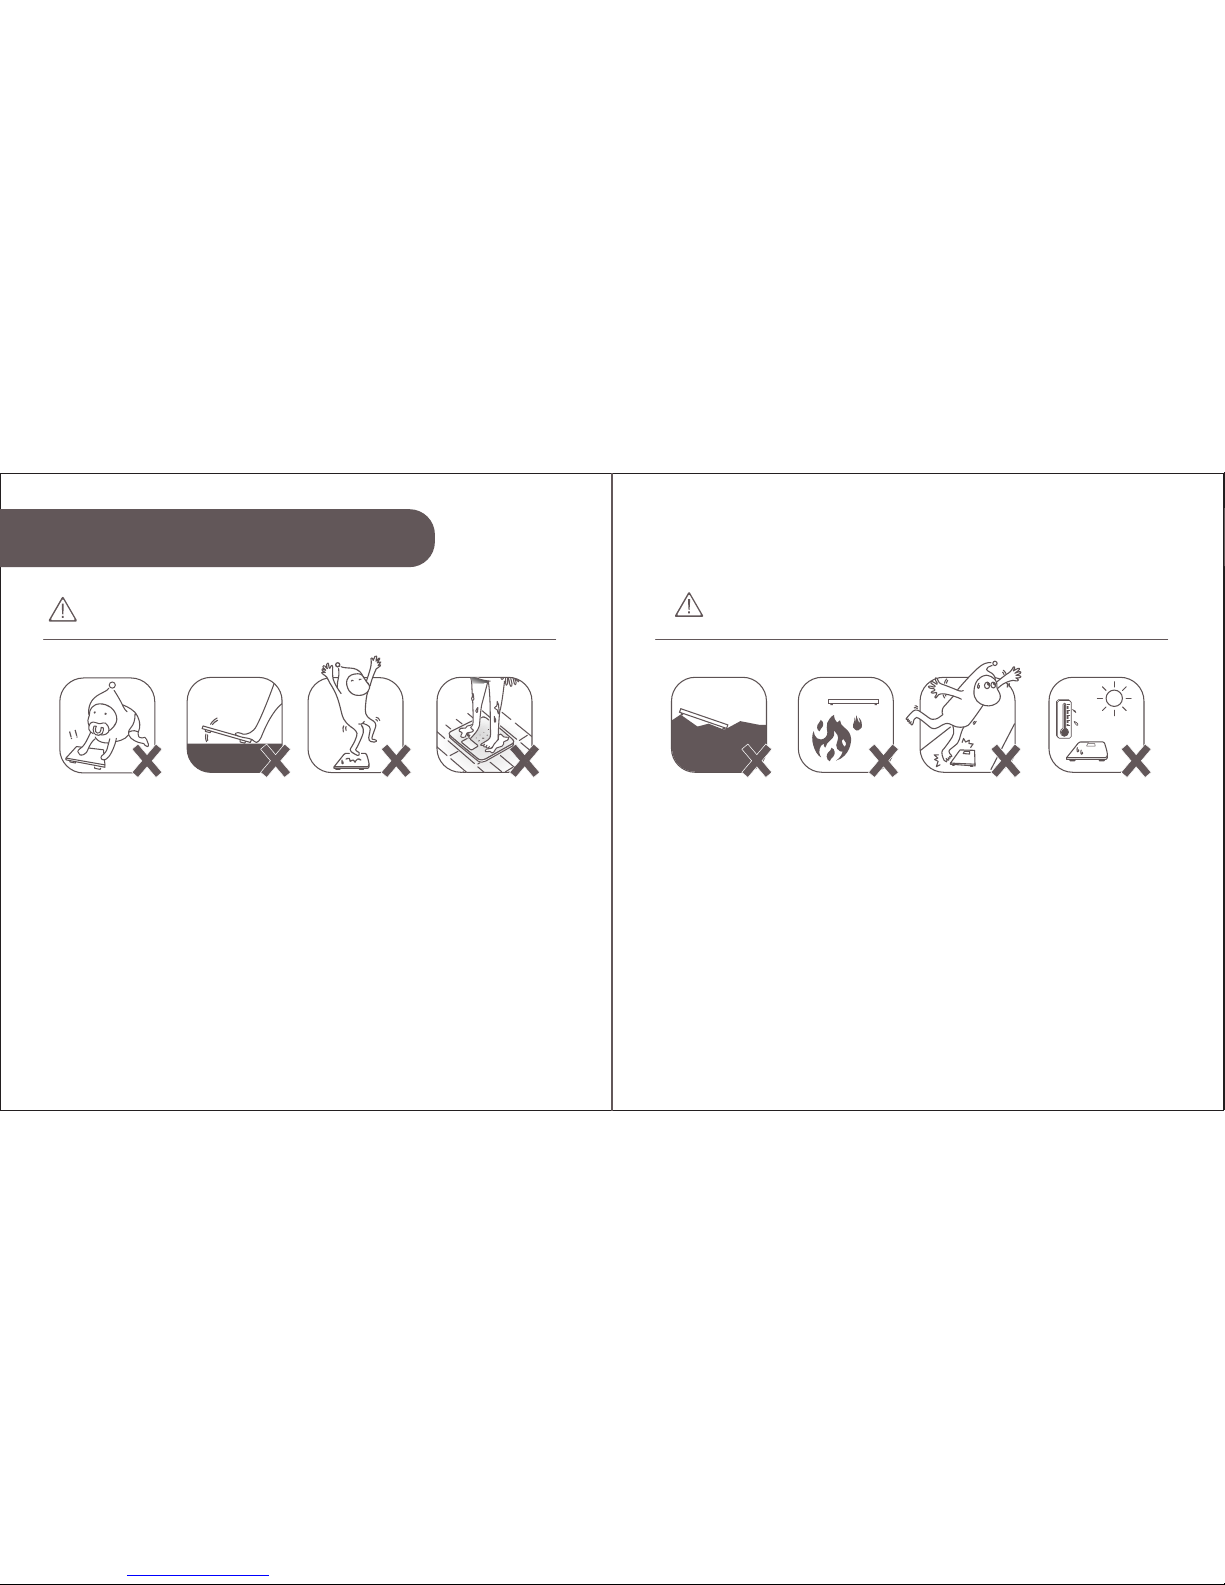
Important safety notes
Battery installation
8
Overview
910
Important safety notes Important safety notes
Using safety notes
•Keep out of reach of young children.
•Do not jumping on the unit platform.
•Do not step on the edge or display of unit platform.
•Person with disabilities or physically frail should be assisted by another
person when using this unit.
•Do not use the unit when your feet or the surface of scale is wet.
•Always remove your shoes before stepping on the scale to take a mea-
surement.
•Do not use this unit while operating transmitters (such as a cell phone)
as this may affect your results.
•Avoid excessive impact or vibration to the unit.
•Place the unit away from slippery surfaces such as tile floors or wet
floors.
•Place the unit in an area free from direct sunlight, heating equipment,
high humidity or extreme temperature change.
•Place the unit on a hard, flat surface where there is minimal vibration
to ensure safe and accurate measurement.
Safety notes about storage

11 12
Important safety notesImportant safety notes
Care and maintenance Safety notes about batteries
•Wiping the glass with clean dry cloth before using to keep the unit shiny.
•Clean the platform and display with a clean, soft and dry cloth. If nece-
ssary, wet the cloth and then wring it out to clean the unit then wipe dry
with dry cloth.
•Never submerge in water or use benzene, oil, paint thinner, alcohol, vo-
latile solvents to clean the unit.
•Do not clean the unit with a rough-surface cloth to avoid scratching the
platform and display.
•Wipe any water on the unit while using immediately to ensure safe and
accurate measurement.
•Remove the batteries if the unit not be used for three months or longer.
•Do not mix old and new batteries or different types of batteries to extend
the life of the unit.
•Using the batteries specify by the product specifications, polarities match
the polarities of the battery compartment as indicated.
•Properly dispose of batteries according to applicable local regulations.

13 14
Open the battery cover
User memory spaces:8 users
Step on to take a measurement.
Step off after the measurement is completed.
The scale will beep twice while the measurement is completed.
Guest mode is for visitors using and the measurement values will not be saved.
NOTE:
•Measurements and user profiles will not be erased during battery
replacement.
•Be sure that the polarity of the battery is set properly.
•Do not mix old and new batteries or different types of batteries
to extend the life of the unit.
•Please replace batteries when the low-battery sign was lighted.
Install 4 ”AAA” size
batteries properly
Battery installation Ready to take a measurement
OK !
Beep
Beep
!
!

( page 17)
( page 25)
Showing measurement values automatically.
If you are a first time user…
Please refer to section ‘’Set user number : step 1~6’’ to enter your profile.
Once the setting has completed, you don’t need to do it again before your
later measurements.
If you’ve done your profile setting before…
The scale will automatically identify your personal user number and you can
view the values immediately.
Ready to take measurement
15 16
( page 23)
If you’d like to modify your profile…
Please refer to section ‘’Modifying user profile: step 1~3’’ to modify your profile
then the scale will show your latest measurement values automatically.
( page 17)
If you are a guest…
Please refer to section ‘’Set user number : step 1~6’’ to enter your profile. In
this case, your measurement values will not be saved.
( page 17)
If the user number which the scale automatically identified is
not yours…
Please refer to section ‘’Set user number : step 1~3’’ to modify your personal
user number then the scale will show your latest measurement values auto-
matically.
Ready to take measurement

Step off after the measurement is completed.
The scale will beep twice while the measurement is completed. Then your weight
value will flash twice. Meanwhile the user sign will start flashing at the
bottom-left of the display.
Set user number (personal user number / guest mode)
Press the user key to select your user
number.
The user number will start flashing at the same time.
17 18
With 3D smart touch key technology and built-in 4 sensors,
please place the high-accuracy weighing scale on a hard,
flat surface to ensure that you can easily use your toe to
press the touch keys smoothly.
*Important*
Set user number (personal user number / guest mode)

Set user number (personal user number / guest mode) Set user number (personal user number / guest mode)
Select your personal user number
(or select guest mode).
Press up and down buttons to switch user number. Then press
confirm button to confirm setting.
Continue entering your profile after you’ve selected personal
user number (or guest mode).
•User numbers are from P1 to P8, and guest mode.
•Long press up and down buttons to switch number faster.
•About guest mode:
means this user number is occupied.
means this user number is available.
Relative to user numbers are for your family members, guest mode is for visitors.
They also can take measurements by setting their profiles. However, their profiles
and measurement values will not be saved. So there is no historical value in guest
mode. Intelligent Identification is not applicable either.
19 20

Age setting will not renew automatically.
Please renew your age on your birthday every year.
*Important*
Enter personal profile (age, gender, and height)
5
Set your age.
Set your gender.
Press up and down buttons to switch user number. Then press
confirm button to confirm setting.
The setting is as same as step 4.
•Age setting range is from 10 to 80.
•Long press up and down buttons to switch number faster.
Set user number (personal user number / guest mode) Set user number (personal user number / guest mode)
The scale will start calculating then show the
measurement values once your profile setting is done.
6Set your height.
The setting is as same as step 4.
•Height setting range is from 100.0 to 199.5cm.
21 22
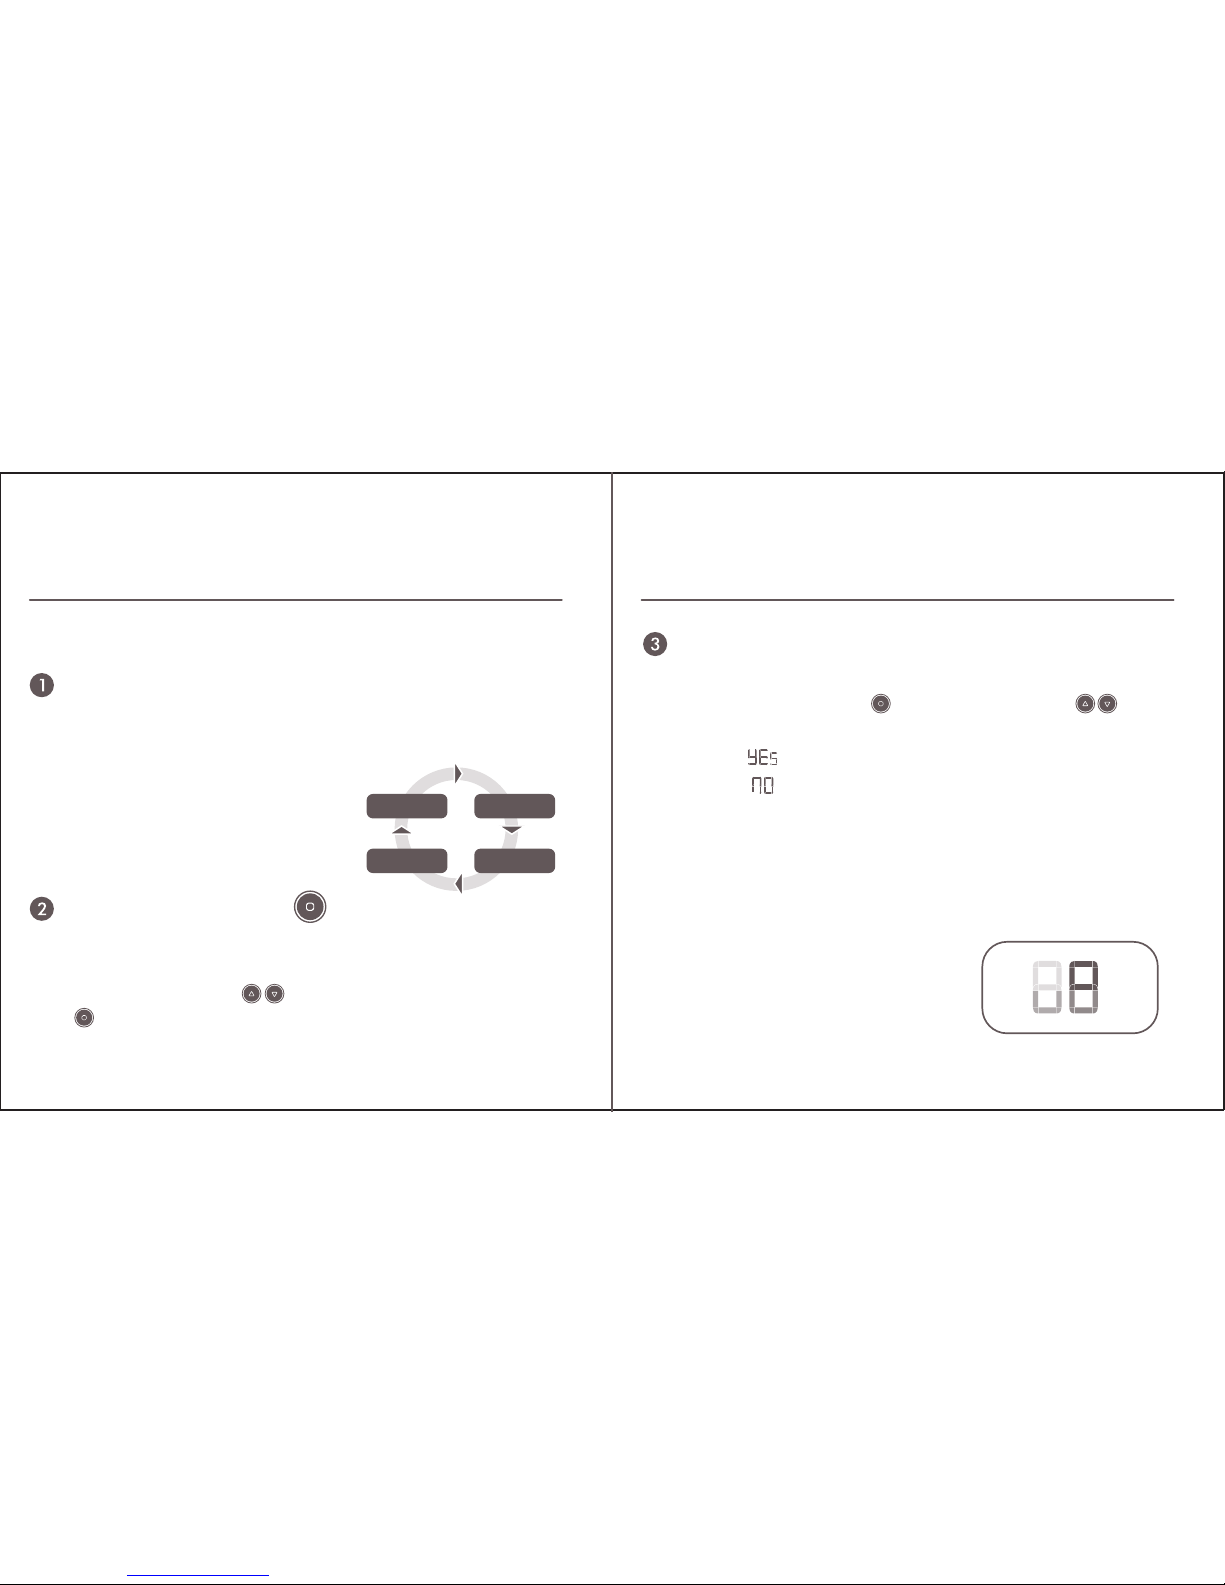
Erase historical values
while the sign ‘’CLr’’ is shown
After pressing confirm button , press up and down buttons to select
’’ yes ’’ or ’’ no ’’ to confirm if the historical values will be erased or not.
•Select ’’ ’’ to erase historical values.
•Select ’’ ’’ not to erase historical values.
Modify user profile (age, gender, and height)
weight BMI
Bone Mass Body Water
Step off when the measurement is completed.
The scale will automatically identify your personal user number immediately and
show your latest measurement values at the same time.
Press confirm button to
modify your profile .
the signs ’’age, gender, height ’’ will keep flashing in turns.
Press up and down buttons to switch numbers then press confirm button
to confirm each setting.
Step off after taking a measurement then modify user profile.
Once the modification completed, the scale will re-calculate
then show your latest measurement values.
Set user number (personal user number / guest mode) Set user number (personal user number / guest mode)
23 24
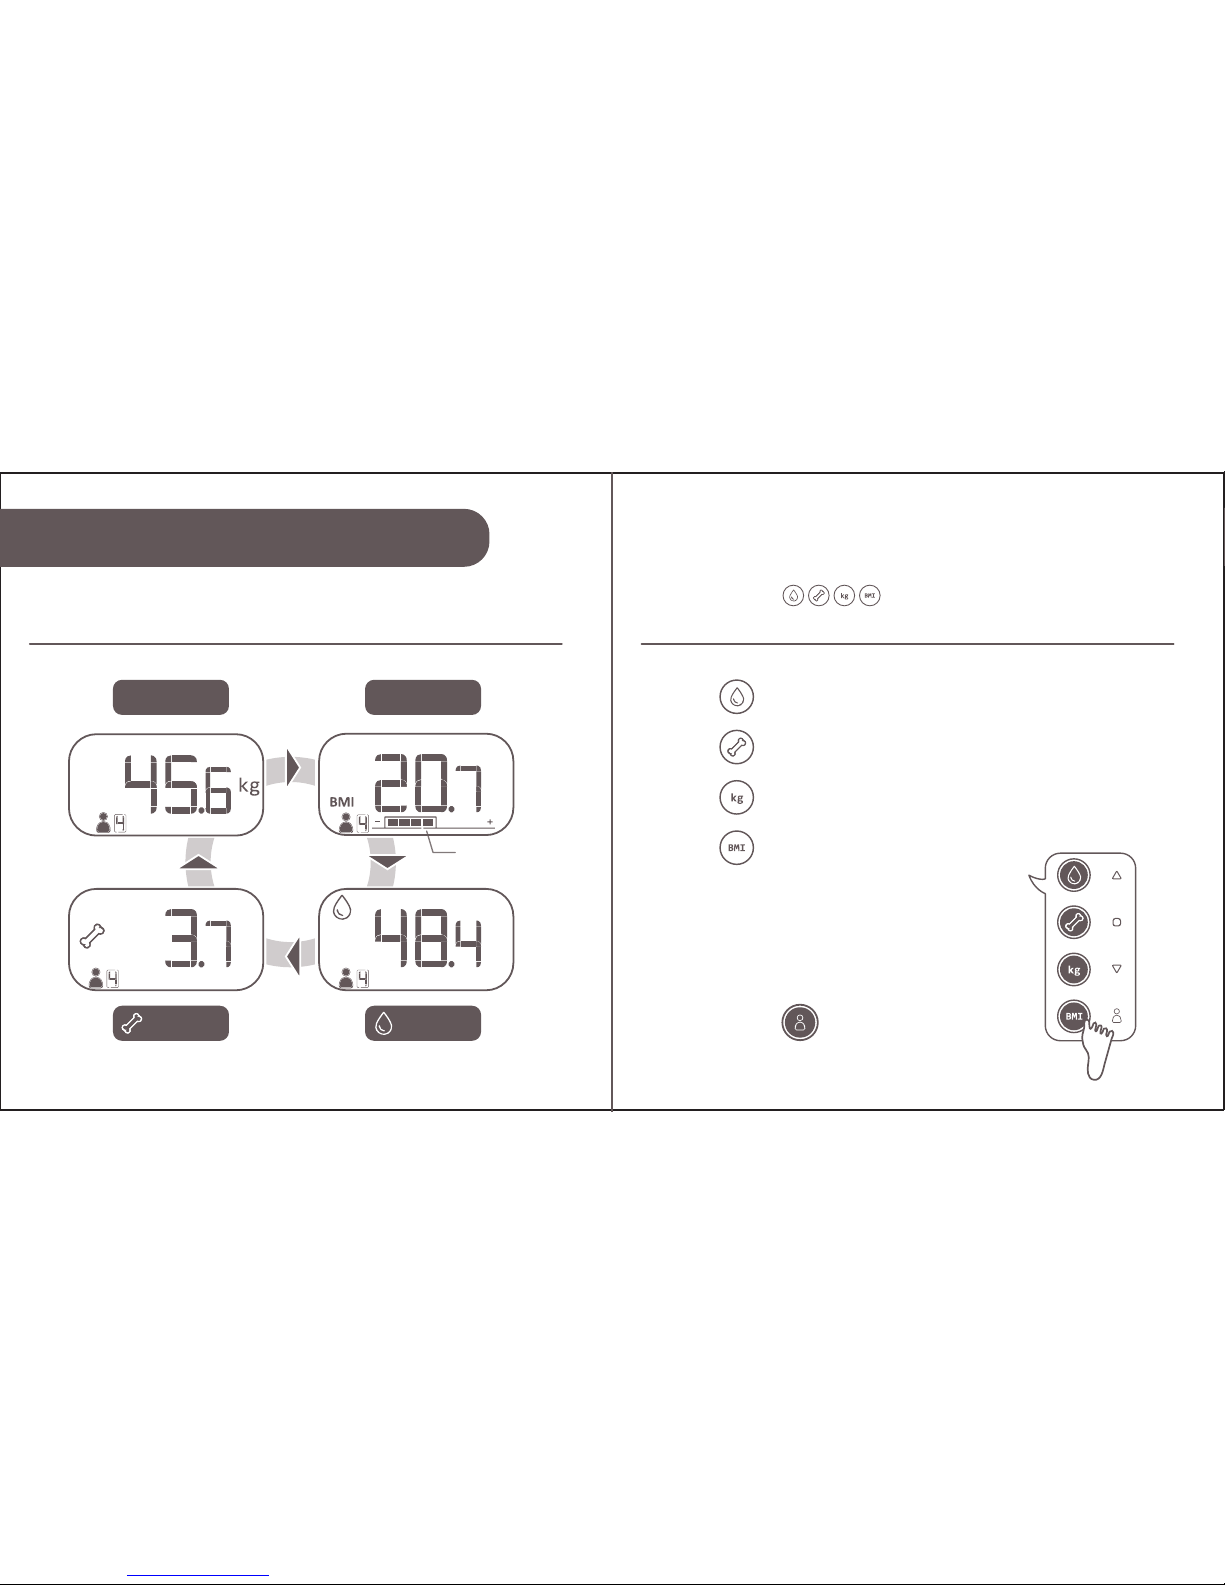
%
kg
weight BMI
BMI
classification
Bone Mass Body Water
Once measurement completed, each measurement value will keep showing
in turns automatically.
View measurement values It is able to do so.…
You can just press buttons to select which value you’d like to
view directly during measurement values are showing in turns automatically.
•Press button to view the value of body water directly.
•Press button to view the value of bone mass directly.
•Press button to view the value of body weight directly.
•Press button to view the value of BMI directly.
Keep pressing button for
3 seconds to turn off power.
View measurement values
25 26

Latest
Step off after the measurement is completed.
The scale will beep twice while the measurement is completed.
The measurement values will be shown
automatically in turns.
Historical values number
27 28
View historical values
The scale will keep each user’s measurement vales for the latest 7 measure-
ments except for guest.
View historical values
Press up and down buttons to view
historical values.
Press up or down buttons to switch which historical values you’d like
to view.
OK !
Beep
Beep
!
!
Press buttons to view other
historical values of the same measurement.
29 30
View historical values
•Press button to view the value of body water directly.
•Press button to view the value of bone mass directly.
•Press button to view the value of body weight directly.
•Press button to view the value of BMI directly.
View historical values
How do the measurement values be memorized?
Each user’s values of the latest 7 measurements will be memorized.
If there are more than 7 measurements, the earliest measurement values will
be erased, and so on.
How does it memorize if I take two measurements on one day?
If you take measurements several times on one day, each measurement will
be sorted by time.
What will be shown on the display if there is no historical value?
It shows ‘’ ’’ on the display.

Overloading or loading is unbalanced within 1 minute.
Please stand still during measurement.
EEPROM is inactive, please reset user profile.
Model MAG-605
Power Supply 4 AAA Batteries
Weight Approx. 1.6kg
External
Dimensions
285 x 285 x 25mm
LCD: 90 x 48 mm
Operating
Environment Limit
Temperature 5℃to 35℃
Humidity 30% to 85% RH
Storage
Environment Limit
Temperature -20℃to 60℃
Humidity 10% to 95% RH
Weight Accuracy 0~40kg: ±0.4kg, 40~150kg: ±1%
Memory 8 users and 1 guest, 7 historical values
Scale Display
Content
Weight: 5~150kg, Graduation: 0.1kg
BMI: 0.0~150.0, Graduation: 0.1
Accessories Manual
The value of body water is over the product specification.
The value of bone mass is over the product specification.
The product is low power but still workable.
Replace batteries as soon as possible.
Replace batteries immediately while “LO” appears.
31 32
Error Message List Product Specification
33 34
oserio warrant the product is free of the meterial and manufactu-
ring defects for a period of one year from the date of purchase.
If the product becomes defects within the warranty, we wil repair
or replace this product, free of charge, and return it prepaid.
If you have any questions regarding this warranty or the product,
please contact your dealer or Customer Service.
If the product need to be returned, warranty card completed by
the dealer confirming date of purchase is necessary.
The warranty does not cover wear & tear parts, damage, accidents
or non-compliance with the instruction manual.
Warranties Warranty Card
3.
2.
1.
Table of contents
Other oserio Scale manuals

oserio
oserio FEP-103 SERIES User manual

oserio
oserio FTG-168 User manual

oserio
oserio FLG-351 Series User manual

oserio
oserio BHG-208 User manual

oserio
oserio FEG-123 series User manual

oserio
oserio FFP-331 SERIES User manual

oserio
oserio BFP-219 User manual

oserio
oserio FEG-115 Series User manual

oserio
oserio MTG-305 Series User manual

oserio
oserio FTG-588 User manual


