Toto Link n500rdg User manual

User Manual
TOTOLINK Dual Band Wireless-N Router

1
Table of Contents
1. ABOUT THIS GUIDE.......................................................................................................3
1.1 Overview of the User’s Guide .............................................................................................3
2. INTRODUCTION .............................................................................................................3
2.1 Overview ..............................................................................................................................3
2.2 Features ...............................................................................................................................3
2.3 Panel Layout........................................................................................................................4
2.3.1 Front Panel........................................................................................................................................ 4
2.3.2 Rear Panel........................................................................................................................................ 5
3. HARDWARE INSTALLATION.........................................................................................6
3.1 Hardware Installation...........................................................................................................6
3.2 Check the Installation..........................................................................................................6
3.3 Set up the Computer ...........................................................................................................6
4. CONNECTING TO INTERNET........................................................................................8
4.1 Login Web Interface ............................................................................................................8
4.2 Changing Password ..........................................................................................................10
4.3 Internet Setup ....................................................................................................................10
4.3.1 DHCP User ......................................................................................................................................11
4.3.2 PPPoE User (ADSL)........................................................................................................................11
4.3.3 Static IP........................................................................................................................................... 12
4.4 Wireless Setup (2.4GHz)....................................................................................................13
4.4.1 Shared Key (WEP).......................................................................................................................... 13
4.4.2 WPA-PSK/WPA2-PSK (Recommended) ........................................................................................ 14
4.5 Wireless Setup (5GHz) ......................................................................................................14
4.6 Firmware Upgrade.............................................................................................................14
5. ADVANCED SETUP......................................................................................................16
5.1 Network..............................................................................................................................16
5.1.1 Internet Status................................................................................................................................. 16
5.1.2 LAN Status...................................................................................................................................... 16
5.1.3 Internet Setup.................................................................................................................................. 17
5.1.4 LAN/DHCP Server .......................................................................................................................... 17
5.2 Wireless (2.4GHz) ..............................................................................................................18
5.2.1 Wireless Status ............................................................................................................................... 18
5.2.2 Wireless Setup................................................................................................................................ 19
5.2.3 Multiple BSS.................................................................................................................................... 19
5.2.4 Wireless Multibridge........................................................................................................................ 20
5.2.5 MAC Authentication......................................................................................................................... 21

2
5.2.6 WDS Setup ..................................................................................................................................... 21
5.2.7 WPS Setup...................................................................................................................................... 22
5.2.8 Advanced Setup.............................................................................................................................. 22
5.3 Wireless (5GHz) .................................................................................................................23
5.4 NAT/Routing.......................................................................................................................24
5.4.1 Port Forwarding............................................................................................................................... 24
5.4.2 DMZ / Twin IP.................................................................................................................................. 25
5.4.3 Port Trigger ..................................................................................................................................... 25
5.4.4 Misc Setup ...................................................................................................................................... 25
5.4.5 Routing Table.................................................................................................................................. 26
5.5 Firewall...............................................................................................................................26
5.5.1 Internet Access Control................................................................................................................... 26
5.5.2 Net Detector.................................................................................................................................... 27
5.5.3 Mgmt Access List............................................................................................................................ 28
5.5.4 Misc Setup ...................................................................................................................................... 28
5.6 Utility ..................................................................................................................................28
5.6.1 VPN Setup ...................................................................................................................................... 29
5.6.2 DDNS.............................................................................................................................................. 29
5.6.3 WOL................................................................................................................................................ 30
5.6.4 Host Scan........................................................................................................................................ 30
5.7 Traffic..................................................................................................................................31
5.7.1 QoS Setup....................................................................................................................................... 31
5.7.2 Connection Info............................................................................................................................... 32
5.7.3 Connection Control ......................................................................................................................... 33
5.7.4 Wired Port Setup............................................................................................................................. 33
5.7.5 Switch Setup................................................................................................................................... 34
5.8 System................................................................................................................................34
5.8.1 System Log..................................................................................................................................... 35
5.8.2 Admin Setup.................................................................................................................................... 35
5.8.3 Firmware Upgrade .......................................................................................................................... 36
5.8.4 System Time ................................................................................................................................... 36
5.8.5 Config Backup/Restore................................................................................................................... 37
5.8.6 Misc Setup ...................................................................................................................................... 37
Copyright Statement
All the photos and product specifications mentioned in this manual are for references only, as the
upgrading of software and hardware. They are subject to change without notice. No part of the
specifications may be reproduced in any form or by any means or used to make any derivative such
as translation, transformation, or adaptation without permission from TOTOLINK. If you want to
know more about our products information, please visit our website at http://www.totolink.net
Copyrights 2014 by TOTOLINKAll rights reserved.

3
1. ABOUT THIS GUIDE
Thank you very much for purchasing this Wireless N Dual Band Router. This guide will
introduce the features of this device and tell you how to connect, use and configure the
Router to connect with Internet. Please follow the instructions in this guide to avoid affecting
the Router’s performance by improper operation.
1.1 Overview of the User’s Guide
Introduction. Describes the wireless router, the features and appearance.
Hardware Installation. Describes the hardware installation and how to setup PC.
Connecting to Internet. Tells how you can access Internet quickly using the router.
Advanced Settings. Lists all technical functions including Wireless, Network, NAT/Routing,
Firewall, Utility, Traffic and System.
2. INTRODUCTION
2.1 Overview
This device is a dual band concurrent wireless router which allows users to access Internet
by DHCP/PPPoE/Static IP and can deliver up to 600Mbps wireless data rate. Since it
provides Wireless Multibridge, WDS and VPN Server settings, this router can be also used
as Repeater, VPN Server and Wireless AP. So it is a high performance and cost-effective
solution for home and small offices.
2.2 Features
Complies with IEEE 802.11n/g/b/a standards.
Advanced MIMO technology enhances the throughput and wireless coverage.
Supports PPPoE, Dynamic IP and static IP broadband functions.
Provides 64/128-bit WEP, WPA, WPA2 and WPA/WPA2 (TKIP+AES) security.
Connects to secure network easily and fast using WPS.
Multi-SSID allows user to create multiple LANs according to their needs.
The IP, MAC and URL filtering makes access and time control more flexibly.
Repeater function expands the wireless coverage and allows more terminals to access
Internet.
The VPN server can not only protect the privacy of your information, but also simplify
network management.
Smart QoS function can assign bandwidth to PCs equally by one click.
4
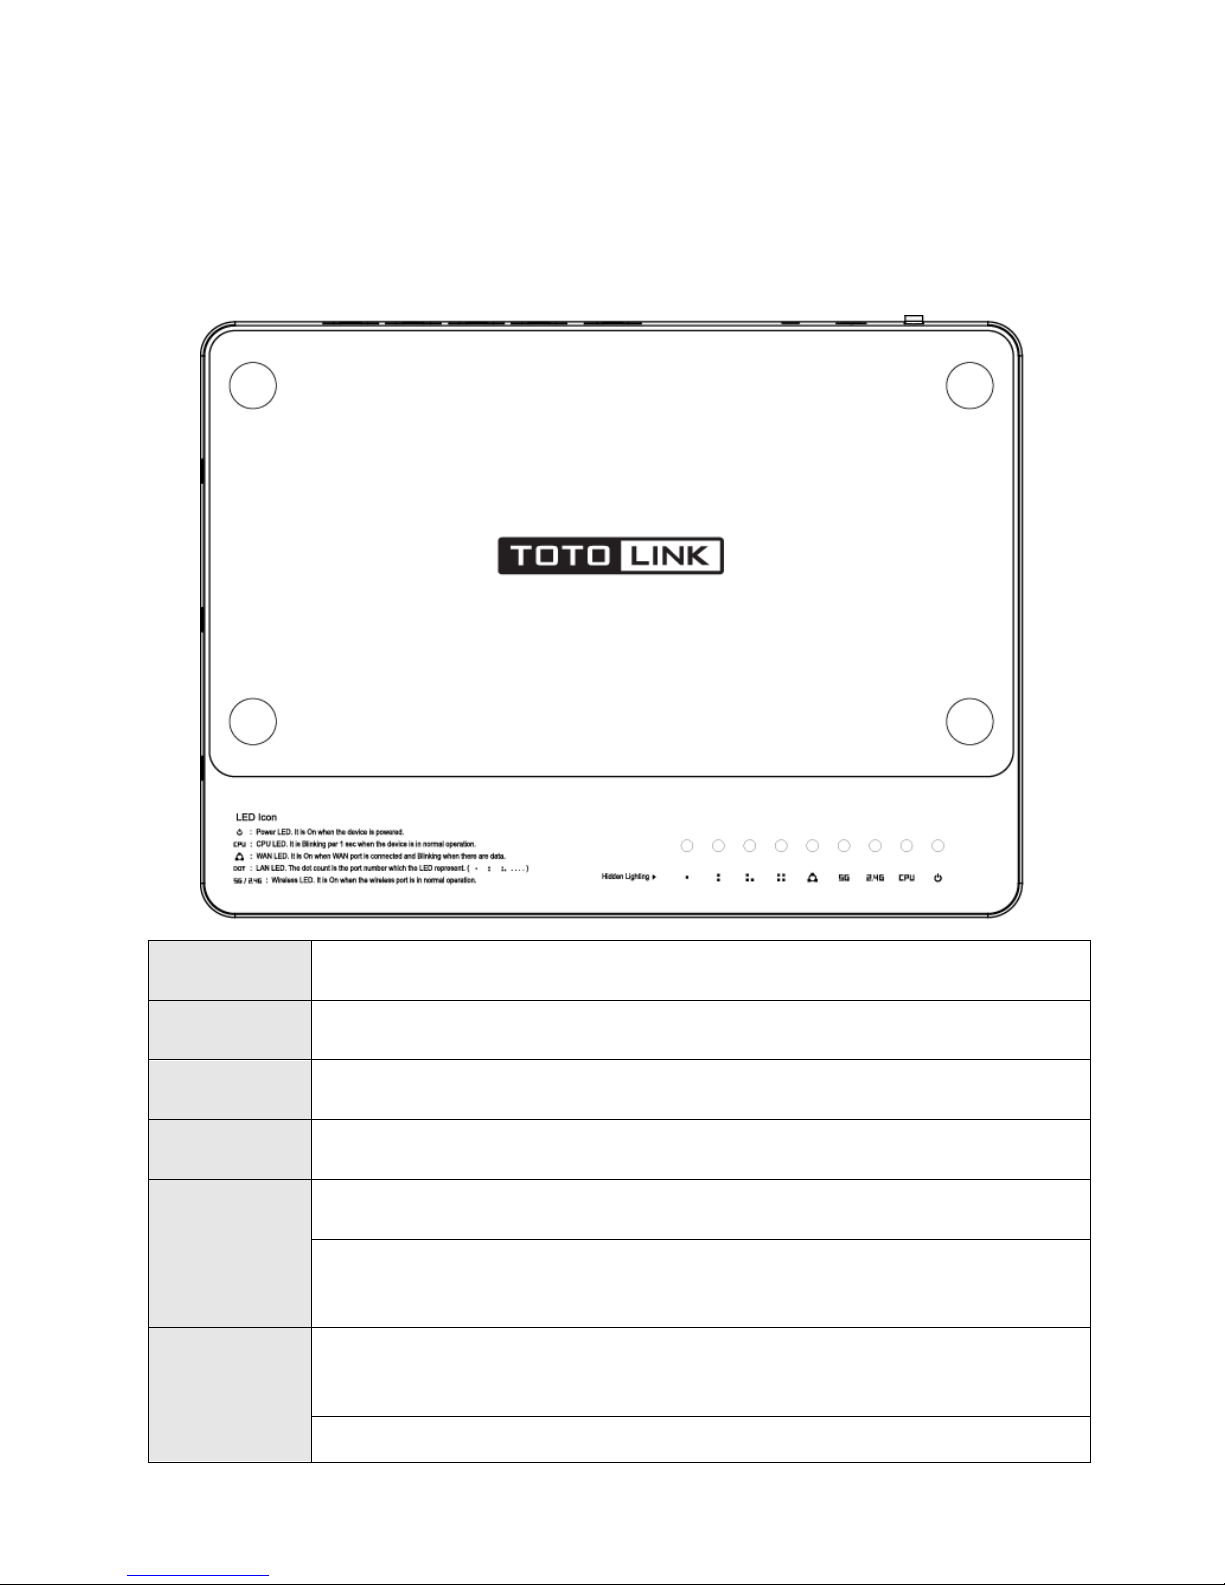
2.3 Panel Layout
2.3.1 Front Panel
The front panel of this wireless router consists of 9 LEDs, which is designed to indicate
connection status.
POWER
This indicator lights blue while the router receiving power, otherwise it is off.
CPU
This indicator keeps blinking blue after the router powered on.
2.4G
This indicator lights blue when the router’s 2.4G wireless enabled.
5G
This indicator lights blue when the router’s 5G wireless enabled.
WAN
When the WAN port is connected successfully the indicator lights blue.
While transmitting or receiving data through the WAN port the indicator
blinks blue.
1/2/3/4 LAN
When one of the LAN ports has a successful connection, the corresponding
indicator lights blue.
While transmitting or receiving data through the LAN port the indicator blinks

5
blue.
2.3.2 Rear Panel
The figure below shows the real panel of the router.
DC IN
The power socket is used to connect the power adapter.
RST/WPS
RST: With the router powered on, press
and hold the button for more than
5 seconds
. The router will reboot to factory default settings.
WPS: If you have client devices you can press this button to quickly
establish a secured connection between router and client devices.
WAN
This port is used to connect the DSL/cable Modem or Ethernet.
1/2/3/4 LAN
This port connects to local PC.
Note: Press and hold RST/WPS button for less than 5 seconds, the router will enable WPS function.
Press and hold WPS/RST button for more than 5 seconds, the router will enable RESET function

6
3. HARDWARE INSTALLATION
3.1 Hardware Installation
For those PCs you wish to access Internet by this router, each of them must be properly
connected with the router through UTP Cables.
1. Connect your PC’s LAN port to one of the router’s LAN port using UTP cable.
2. Connect existing Internet cable (such as ADSL or Modem) to router’s WAN port using
another UTP cable.
3. Plug the PowerAdapter into the router and then into an outlet.
4. Turn on your computer.
5. Check and confirm that the Power LED and LAN LED on the router are ON.
3.2 Check the Installation
The control LEDs of the WLAN Router are clearly visible and the status of the network link
can be seen instantly:
1. With the power source on, the Power, LAN and WAN LEDs of the WLAN Router will keep
lighting blue for a few seconds, the CPU keeps flashing blue.
2. About 5 seconds later, only Power, Enabled wireless (2.4G/5G) and the connected LAN
LEDs keep lighting, CPU keeps flashing. Other LED is off.
3.3 Set up the Computer
The default IP address of the Router is 192.168.1.1, the default Subnet Mask is
255.255.255.0. Both of these parameters can be changed as you want. In this guide, we
will use the default values for description.
Connect the local PC to the LAN port on the Router. There are then two ways to configure
the IP address for your PC.
Configure the IP address manually
Configure the network parameters. The IP address is 192.168.1.xxx (“xxx” range from 2 to
254). The Subnet Mask is 255.255.255.0 and Gateway is 192.168.1.1 (Router’s default IP
address).
Obtain an IP address automatically
Set up the TCP/IP Protocol in Obtain an IP address automatically mode on your PC.
Now, you can run the Ping command in the command prompt to verify the
network connection between your PC and the Router. Open a command prompt,
and type in ping 192.168.1.1, then press Enter.
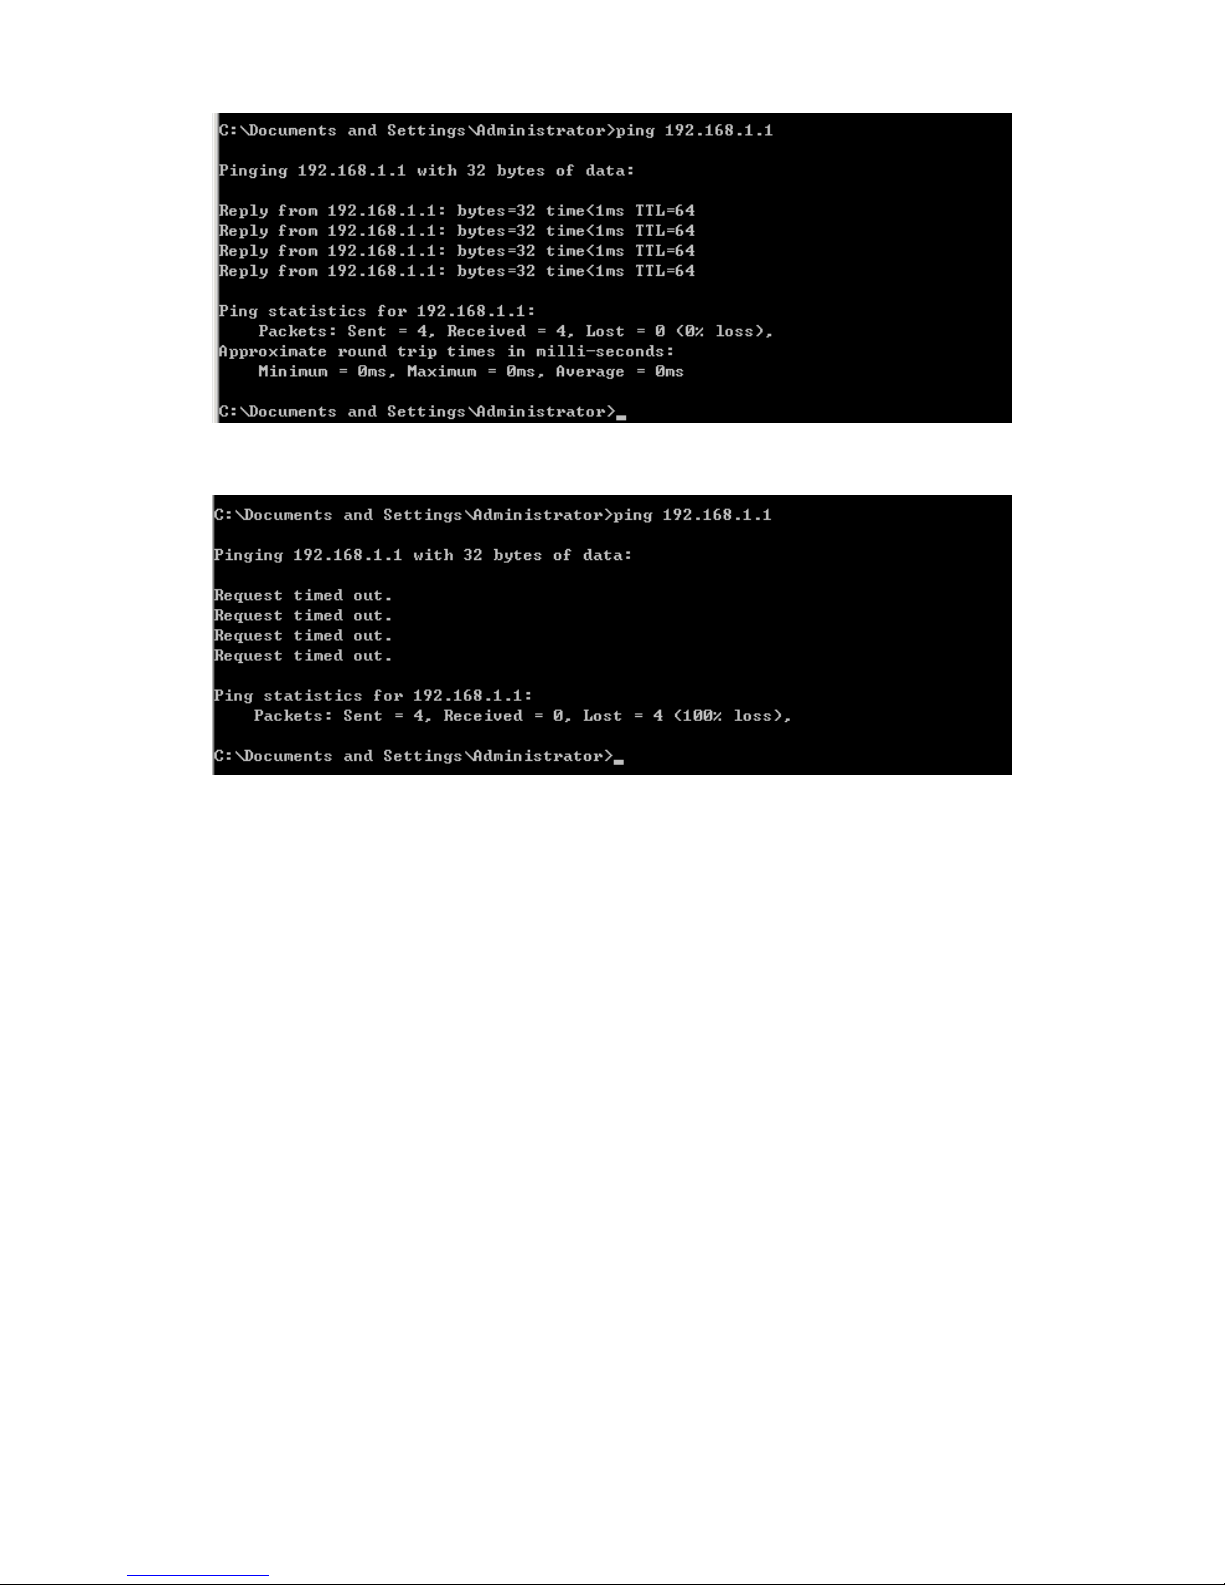
7
If the result displayed is similar to that shown in above figure, it means that the connection
between your PC and the Router has been established.
If the result displayed is similar to that shown in the above figure, it means that your PC has
not connected to the Routersuccessfully. Please check it following below steps:
1. Is the connection between your PC and the Router correct?
If correct, the LAN port on the Router and LED on your PC’s adapter should be lit.
2. Is the TCP/IP configuration for your PC correct?
Since the Router’s IP address is 192.168.1.1, your PC’s IP address must be within the
range of 192.168.1.2 ~ 192.168.1.254, the Gateway must be 192.168.1.1.

8
4. CONNECTING TO INTERNET
This chapter introduces how to configure the basic functions of your Dual Band Wireless
Router so that you can surf Internet.
4.1 Login Web Interface
With a Web-based utility, for example Google Chrome, this Router is easy to configure and
manage.
Connect to the Router by typing 192.168.1.1 in the address field of Web Browser. Then
press Enter key.
It will show up the following page:
Click Setup Tool icon to access the Web Interface of the Router. Then below
window will pop up that requires you to enter valid User Name and Password.
Enter admin for User Name and Password, both in lower case letters. Then click Log In
button or press Enter key.
9
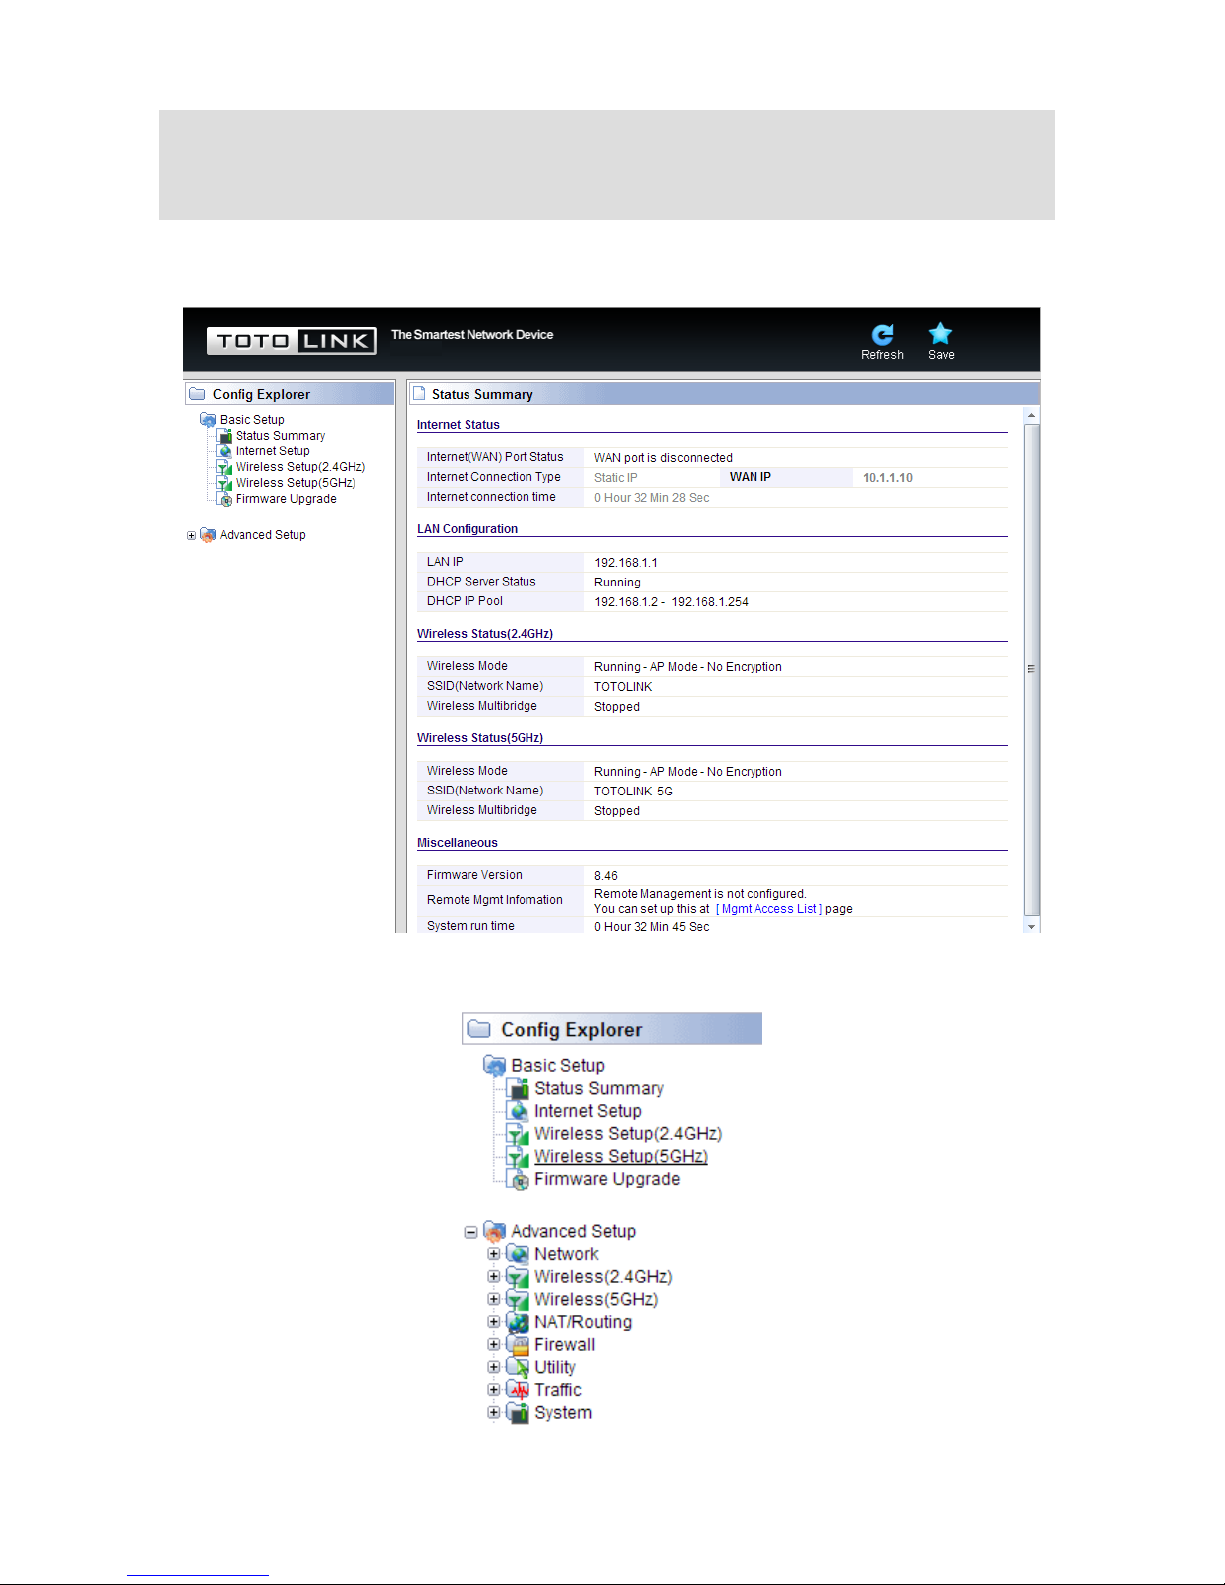
Now, you have got into the Router’s configuration interface. First, you will see the current
status of Router:
On the left, it is the guide bar:
Note: If the above screen does not prompt, it means that your web-browser has been set to using a
proxy. Go to Tools menu>Internet Options>Connections>LAN Settings, in the screen that
appears, cancel the Using Proxy checkbox, and click OK to finish it.

10
4.2 Changing Password
Now, we recommend that you change the password to protect the security of your Router.
Please go to Advanced Setup—System—Admin Setup change the password required to
log into your Router.
New Login ID: type in the name that you use to login the web interface of the router or
change a new one.
New Password: new password is used for administrator authentication.
Re-type New Password: new password should be re-entered to verify its accuracy.
Admin Email Setup we will discuss later.
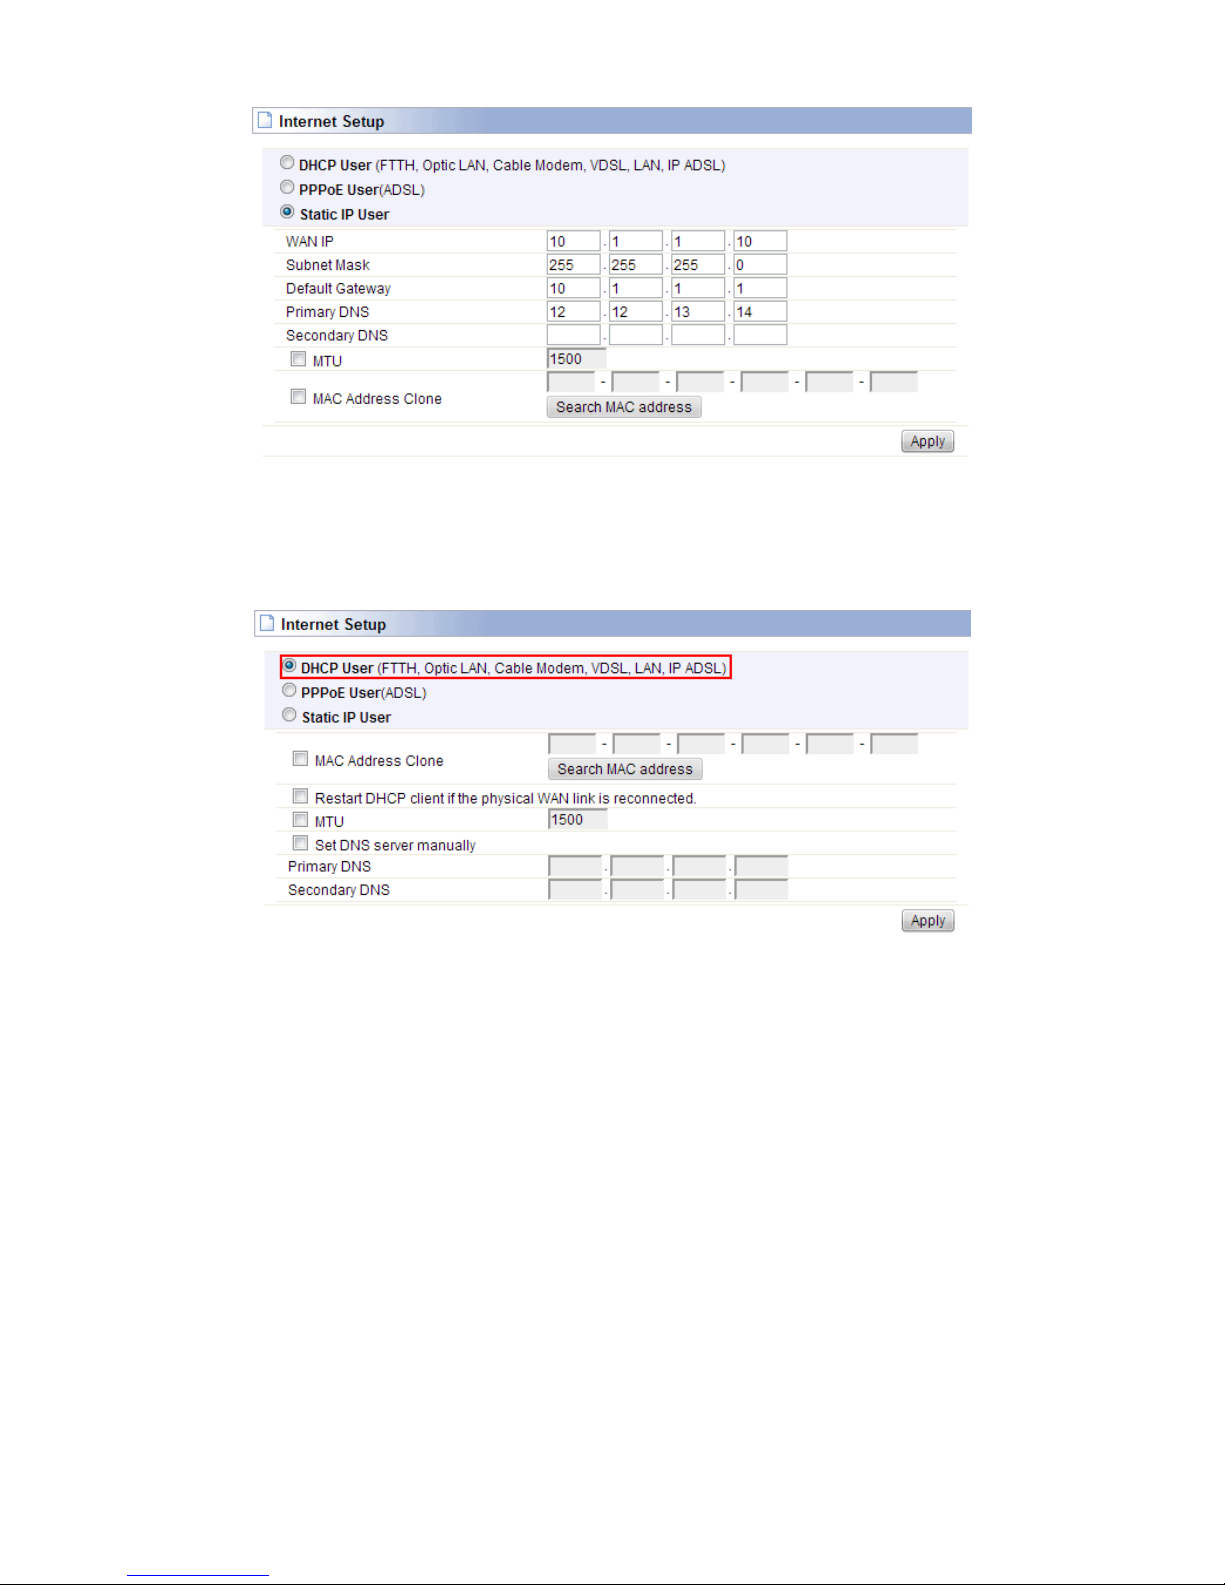
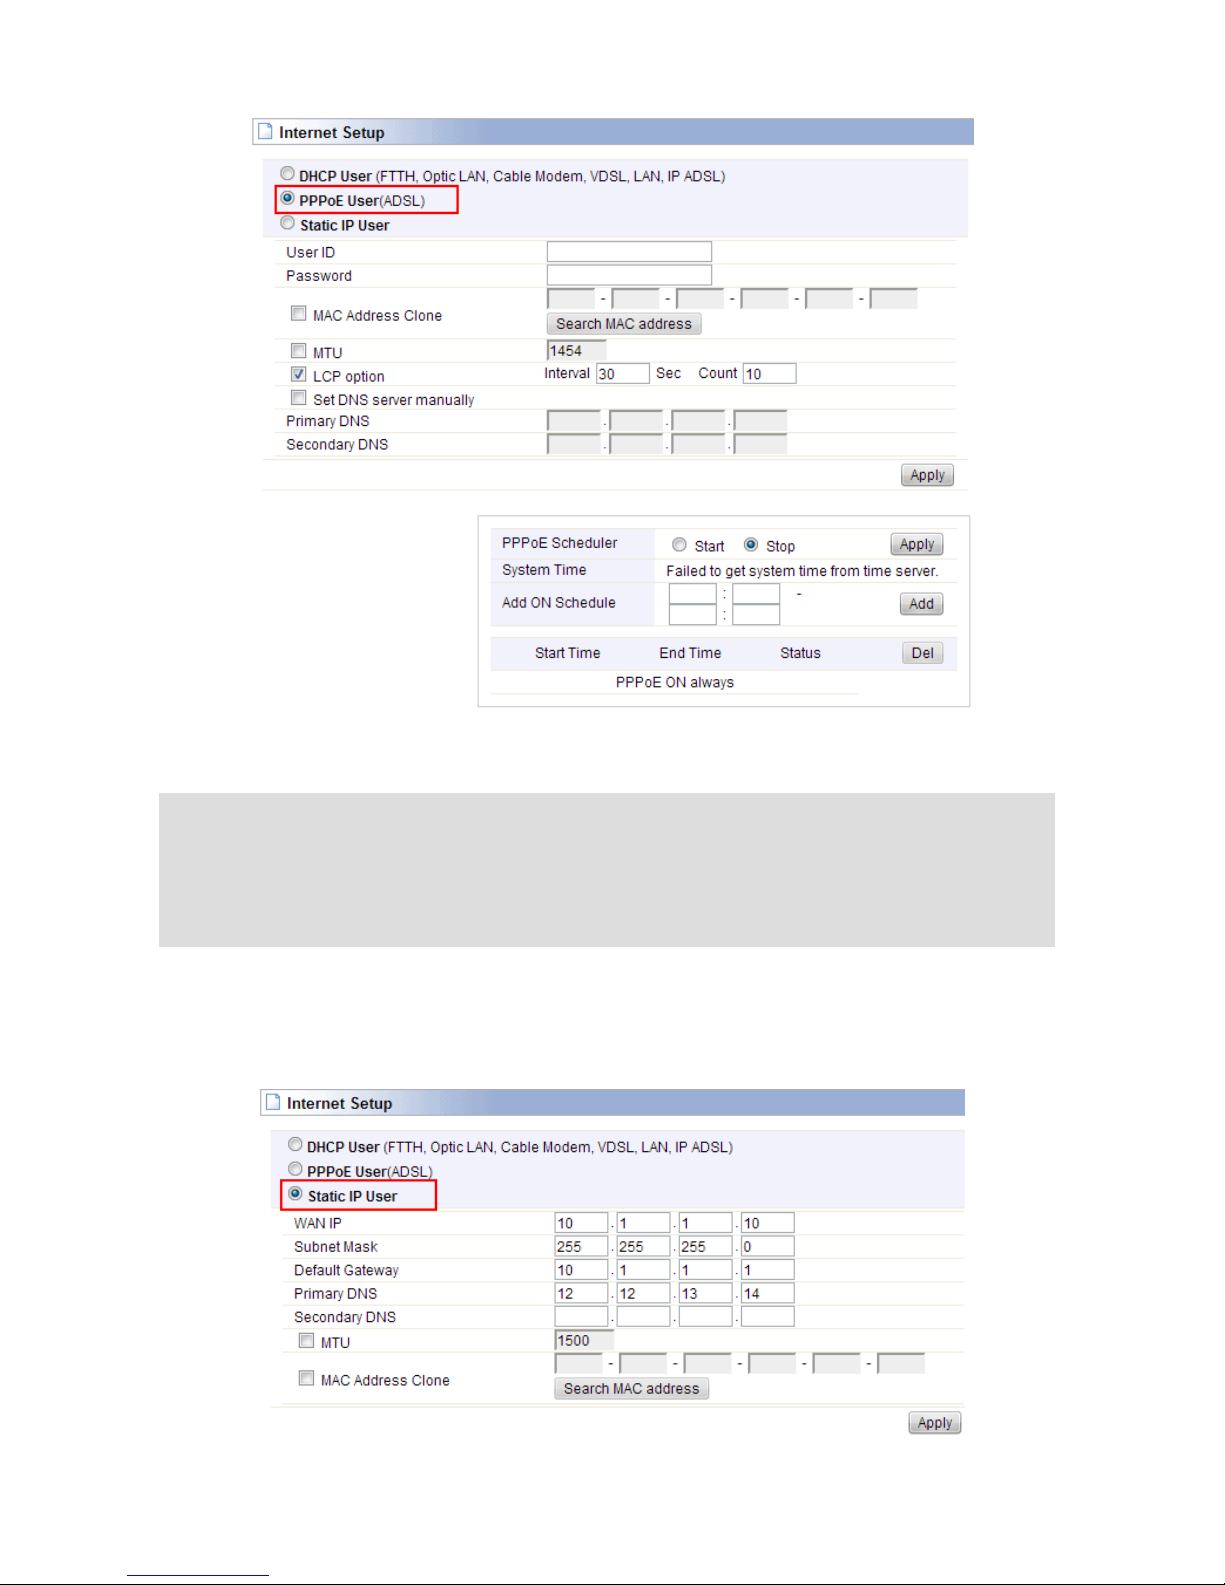
4.3 Internet Setup
Click Basic Setup--Internet Setup, this page is used to configure the parameters for
Internet Network. WAN access modes include DHCP, PPPoE and Static IP.
Note: password length is 8 characters maximum, characters after the 8th position will be truncated.
11
4.3.1 DHCP User
For DHCP User, your computer will get dynamic IP address from your ISP (Internet Service
Provider) automatically. No need to do any settings here.
4.3.2 PPPoE User (ADSL)
If you use ADSL virtual dial-up to connect Internet, please choose this option. Your ISP
must have provided the User ID and Password.
12
User ID: a specific valid ADSL user name provided by your ISP.
Password: the corresponding valid password provided by your ISP.
4.3.3 Static IP
If your ISP provides a static IP to access Internet, please finish the below parameter
settings.
WAN IP: the IP address provided by your ISP.
Knowledge Extension: Point-to-Point Protocol over Ethernet (PPPoE) is a virtual private and
secure connection between two systems that enables encapsulated data transport. It replies on two
widely accepted standards: PPP and Ethernet. It connects users through an Ethernet to the Internet
with a common broadband medium, such as wireless device or cable modem. All the users over the
Ethernet can share a common connection.
13
Subnet Mask: This is used to define the device IP classification for the chosen IP address
range. 255.255.255.0 is a typical net mask value for Class C networks. Generally it is
provided by your ISP.
Default Gateway: This is the IP address of the host router that resides on the external
network and provides the point of connection to the next hop towards the Internet. This can
be a DSL modem, Cable modem, or a WISP gateway router. The router will direct all the
packets to the gateway if the destination host is not within the local network.
Primary DNS: Domain Name System. Every Internet host must have a unique IP address,
also they may have a human-friendly, easy to remember name such as www.yahoo.com.
The DNS server converts the user-friendly name into its equivalent IP address. This is
provided by your ISP.
After you finish the blank that required, you could click Apply to make all the settings work.
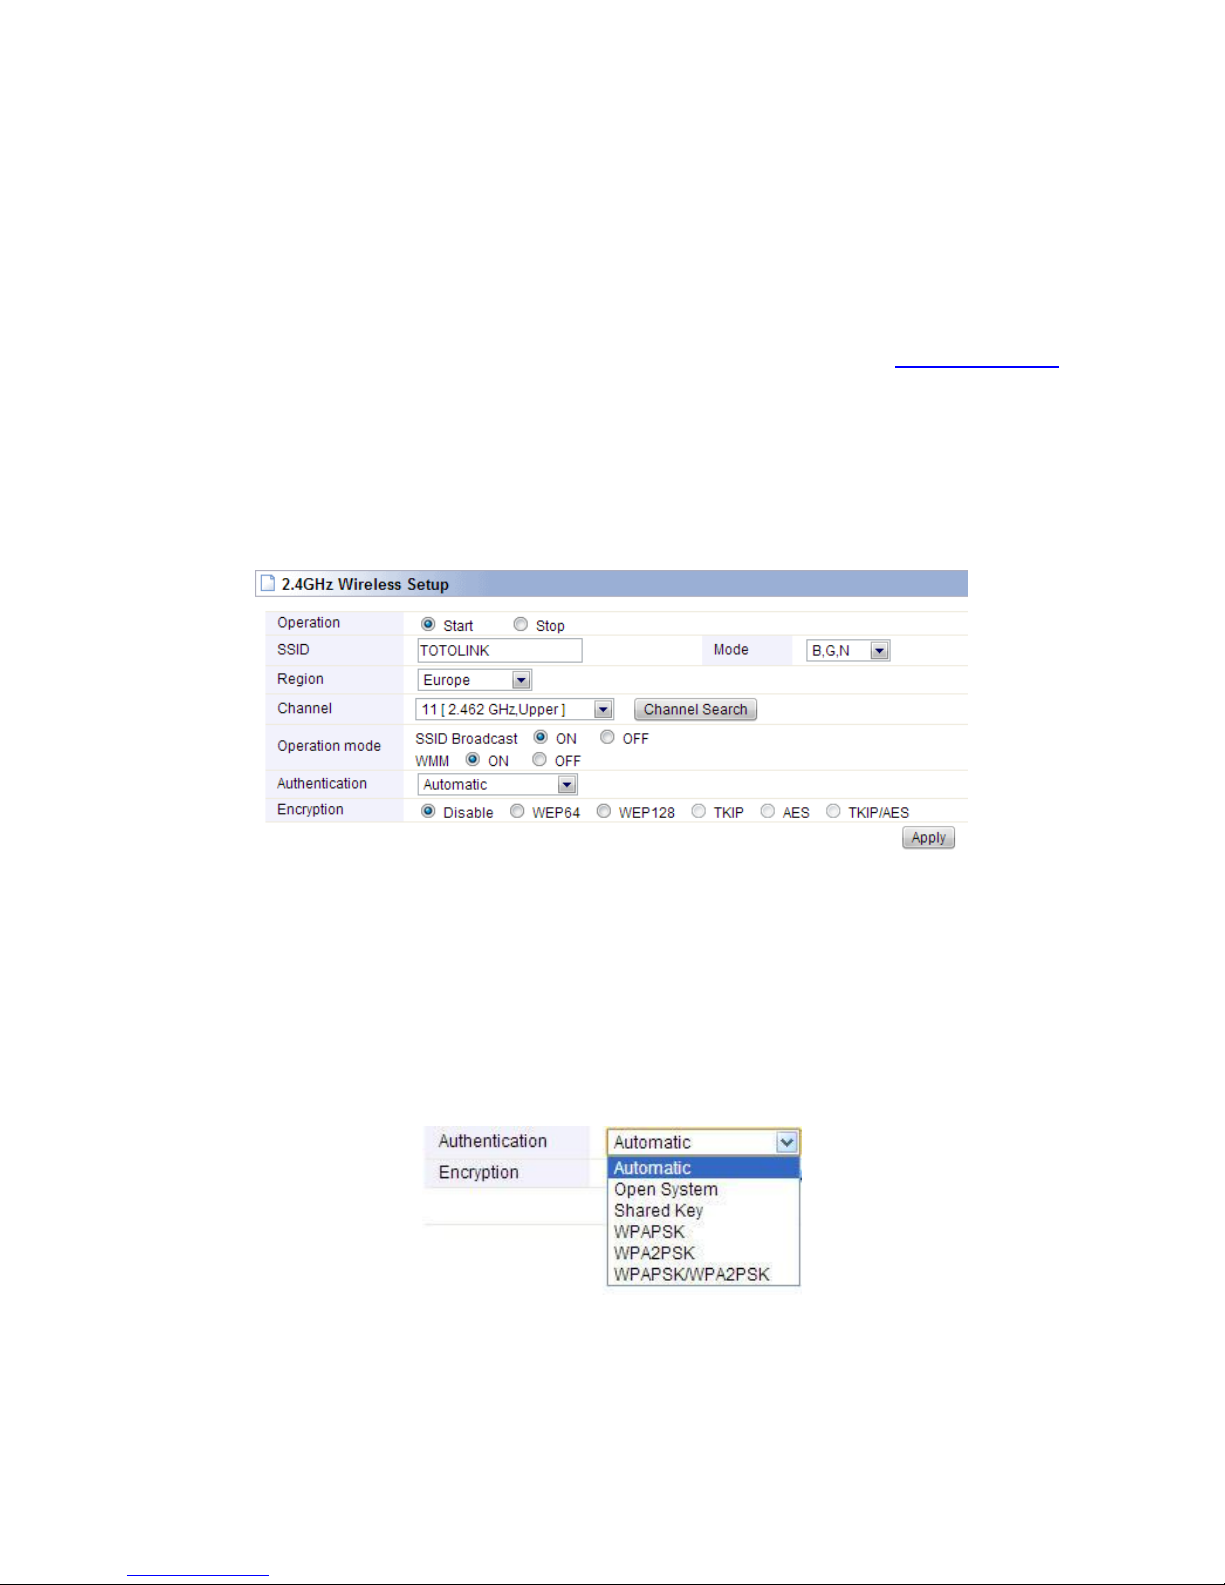
4.4 Wireless Setup (2.4GHz)
This page is used to configure basic wireless parameters and encryption methods.
Operation: choose Start to enable your 2.4G wireless network to access Internet wirelessly.
SSID: This is your wireless network name. If you want to access Internet wirelessly, search
for this SSID and connect to it. You can define it as you like.
Mode: Generally, it is B, G, N selected. Keep the default value.
Region: Area where you are using the wireless router.
Channel:
Choose the
best
wireless channel by clicking
Channel Search
. By default, it
is the best channel.
SSID Broadcast:
This option is used to hide your SSID.
Authentication:
You can choose one encryption method for your wireless network.
4.4.1 Shared Key (WEP)
WEP (Wired Equivalent Privacy) is based on the IEEE 802.11 standard and uses the RC4
encryption algorithm. Enabling WEP allows you to increase security by encryption data
being transferred over your wireless network. WEP is the oldest security algorithm, and

14
there are few applications that can decrypt the WEP key in less than 10 minutes.
4.4.2 WPA-PSK/WPA2-PSK (Recommended)
Wi-Fi Protected Access (WPA) is the most dominating security mechanism in industry. It is
separated into two categories: WPA-personal or called WPA Pre-Share Key (WPA/PSK),
and WPA-Enterprise or called WPA/802.1x. WPA2 means Wi-Fi Protected Access 2, it is
the current most secure method of wireless security and required for 802.11n performance.
Please set one Encryption key (password) for your wireless network to prevent being
occupied by others.
4.5 Wireless Setup (5GHz)
This setting is similar to 2.4GHz, but the Mode and Channel are different. You can just keep
the default settings.
4.6 Firmware Upgrade
Click Firmware Upgrade, you will see firmware upgrade webpage as below.

15
This page allows you to upgrade the wireless router firmware to the latest version. Please
NOTE, do not power off the device during the uploading process because it may
cause damage to your
system.
After finishing the settings above, you’d better restart your computer and the Router to
connect to Internet successfully. Then you can enjoy the high-speed and high-stabilityInternet
through this Router.
16
5. ADVANCED SETUP
The Advanced Setup includes Network, Wireless, NAT/Routing, Firewall, Utility, Traffic and
System. Most of these settings are only for more technically advanced users who have
sufficient knowledge about wireless LAN. Also they should not be changed unless you know
what effect the changes will have on your Wireless Router.
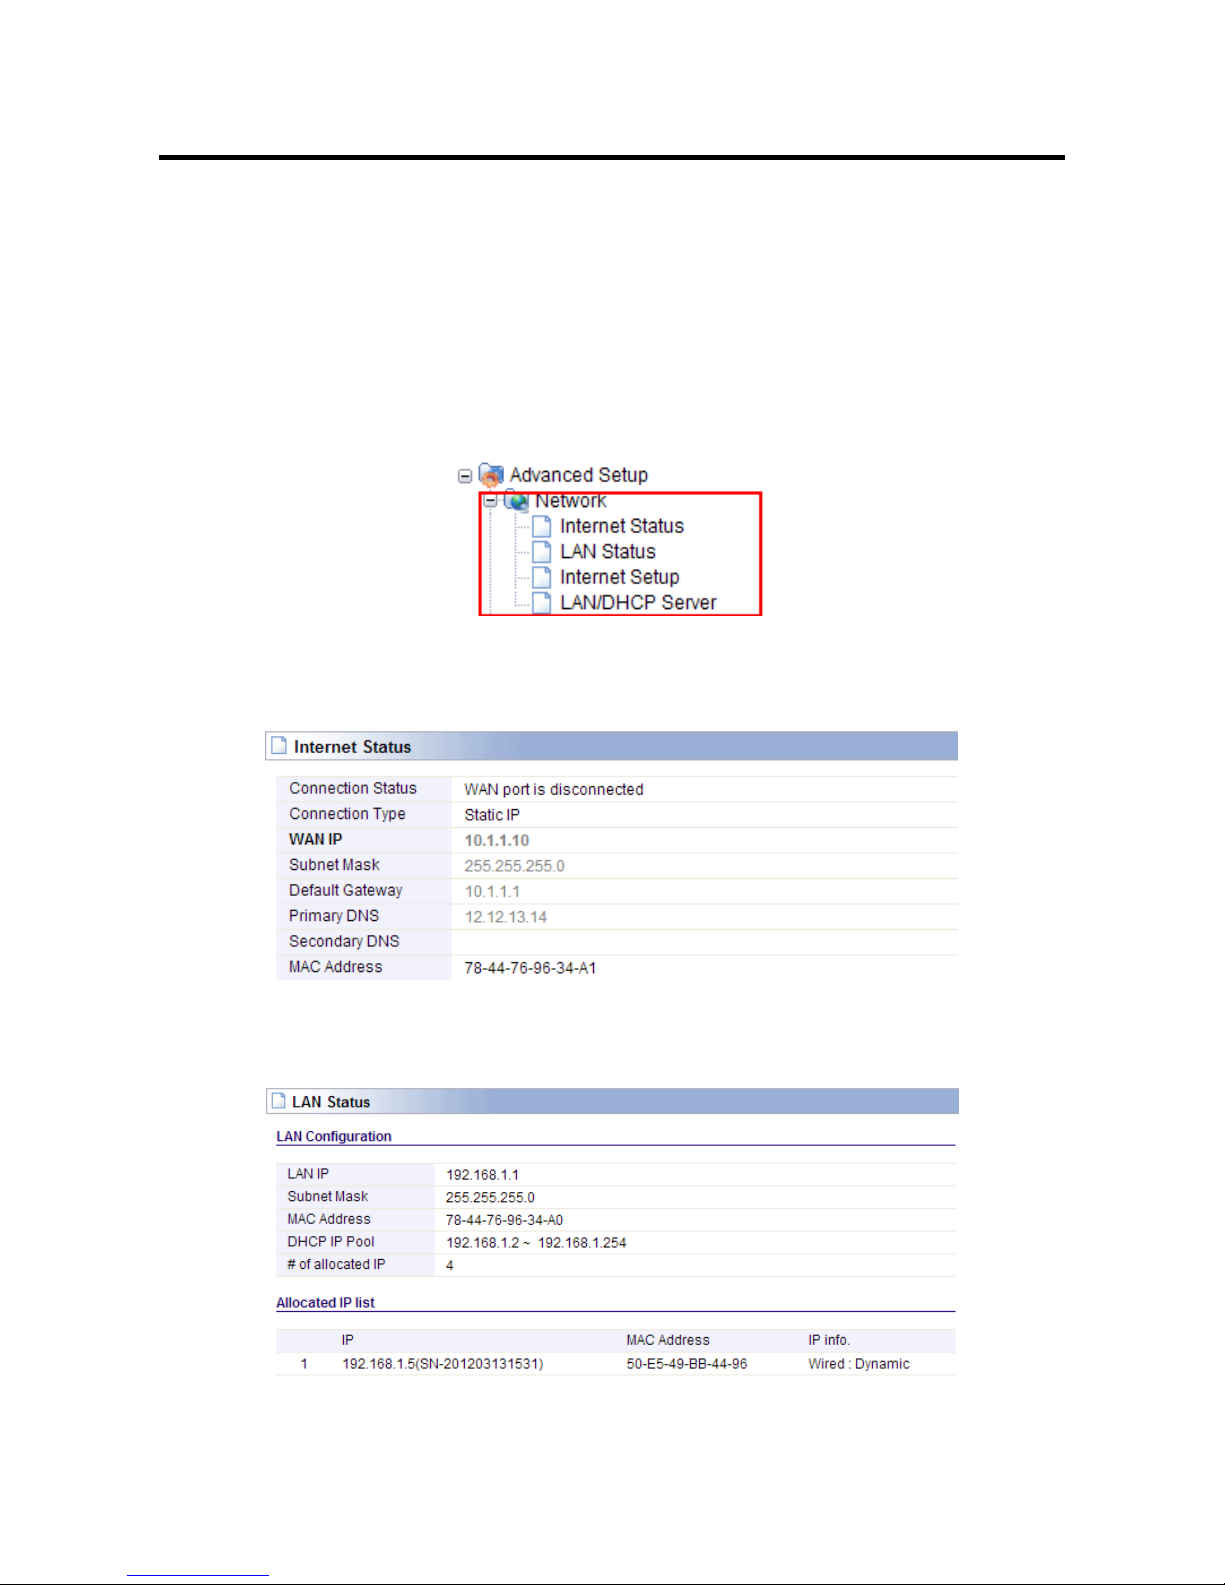
5.1 Network
Click the plus sign beside Network menu to show up all Network parameters you could set
up.
5.1.1 Internet Status
This page shows the WAN Status of this Router
5.1.2 LAN Status
This page shows you LAN Status of your Router.

17
5.1.3 Internet Setup
We have discussed this setting on Internet Setup. You can also reconfigure the
parameters on this page.
5.1.4 LAN/DHCP Server
Click LAN/DHCP Server, you will enter the page that allows you configure the LAN port
and DHCP Server.
IP Address: This is the IP address to be represented by the LAN (including WLAN)
18
interface that is connected to the internal network. This IP will be used for the routing of the
internal network (it will be the Gateway IP for all the devices connected on the internal
network).
Subnet Mask: This is used to define the device IP classification for the chosen IP address
range. 255.255.255.0 is a typical netmask value for Class C networks which support IP
address range from 192.0.0.x to 223.255.255.x. Class C network netmask uses 24 bits to
identify the network and 8 bits to identify the host.
DHCP Server: you can choose to start or stop DHCP.
DHCP IP Pool: it is the IP range that the DHCP server will assign to every PC connected
with the router.
Lease Time: the IP addresses given out by the DHCP server will only be valid for the
duration specified by the lease time. Increasing the time ensure client operation without
interrupt, but could introduce potential conflicts. Lowering the lease time will avoid potential
address conflicts, but might cause more slight interruptions to the client while it will acquire
new IP addresses from the DHCP server. The time is expressed in seconds.
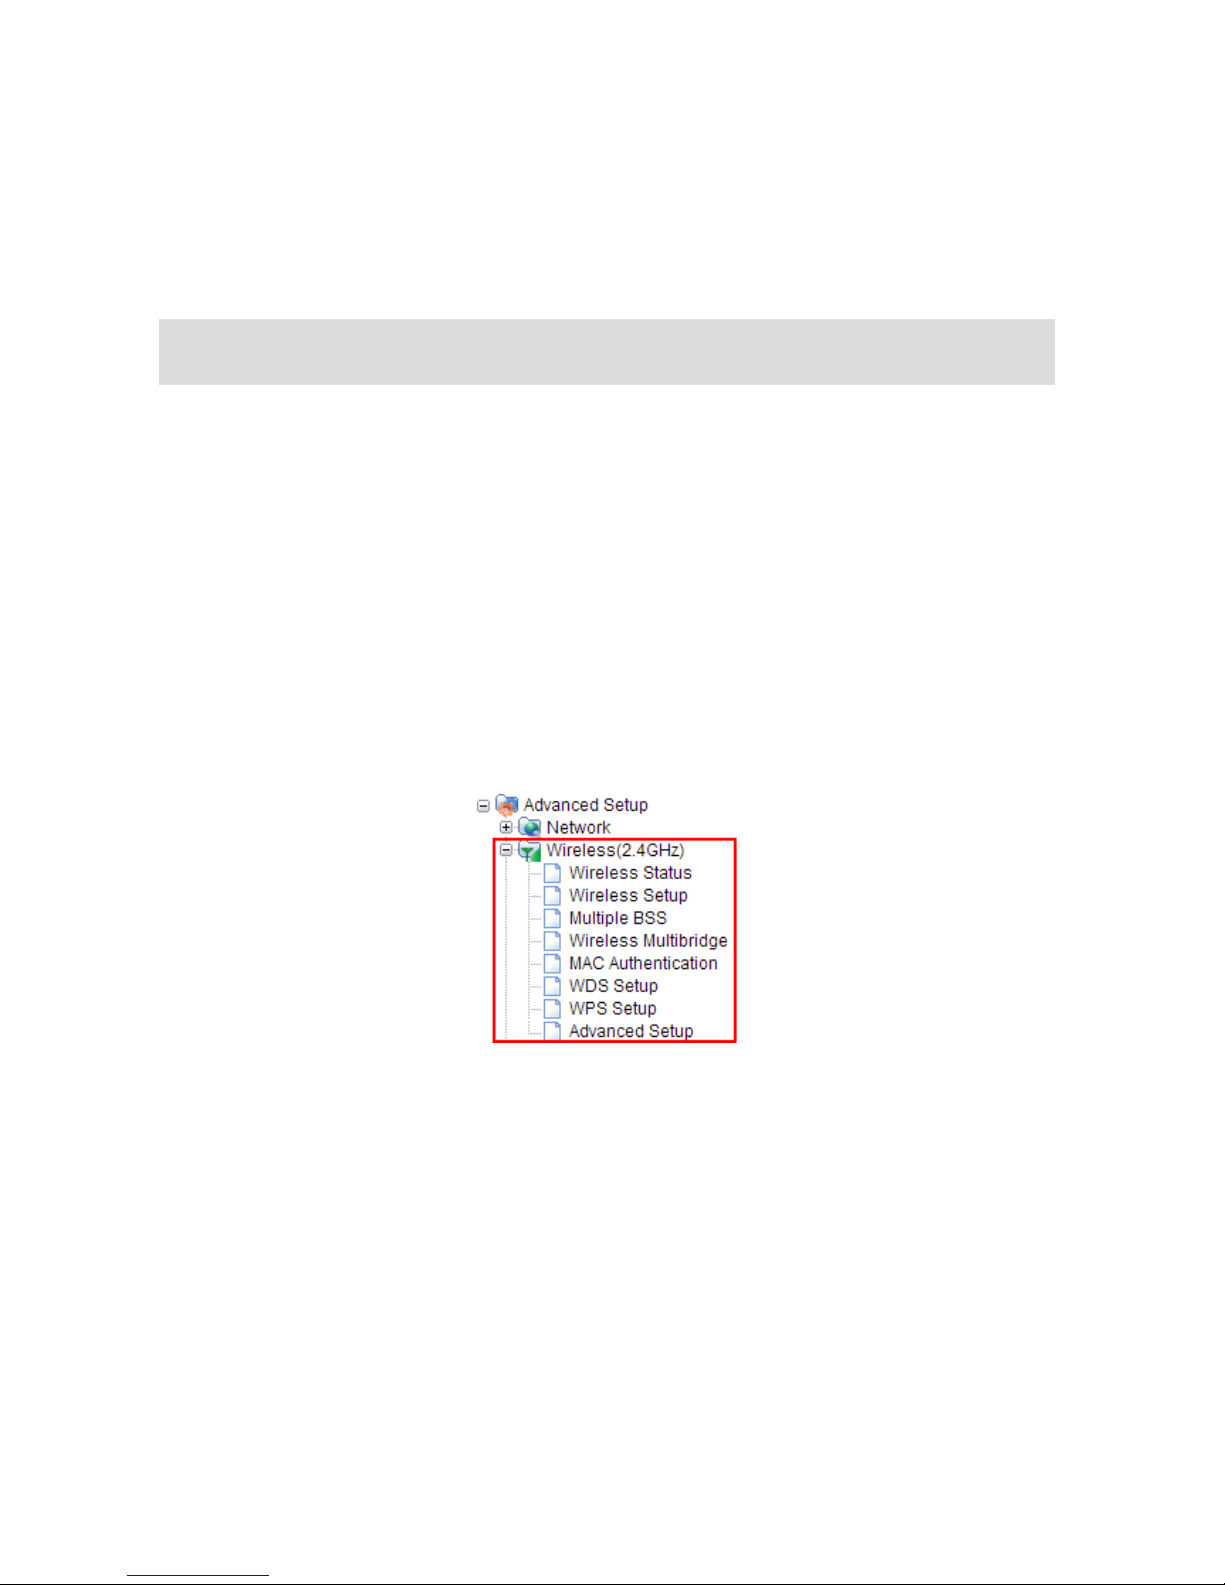
5.2 Wireless (2.4GHz)
Next, you can set up the Wireless parameters. Click the plus sign beside Wireless (2.4G)
menu to open up all wireless parameters, see below figure:
5.2.1 Wireless Status
This page shows you the current wireless status of the router.
Note: If the IP address changed, you can log into the WEB configuration interface only using the
new IP address.

19
5.2.2 Wireless Setup
Click Wireless Setup, you will be able to configure the basic wireless function. We have
discussed this setting on Wireless Setup (2.4GHz).
5.2.3 Multiple BSS
This page is used to create multiple SSID for different LANs.
This manual suits for next models
1
Table of contents
Other Toto Link Network Router manuals


Popular Network Router manuals by other brands


Ruijie
Ruijie Reyee RG-EG Series Configuration guide

Harris
Harris FR6822+ Installation and operation manual

TRENDnet
TRENDnet TEW-435BRM - 54MBPS 802.11G Adsl Firewall M Quick installation guide

Firetide
Firetide HotPort 3100 user manual

ZyXEL Communications
ZyXEL Communications EMG3525-T50B quick start guide

Linksys
Linksys Velop WHW01/VLP01 user guide