Toyomi SJ 9000 User manual

COLD PRESS MASTICATING
SLOW JUICER
Model: SJ 9000
220–240V~ 50/60Hz•200W
Capacity: 500ml
Instruction Manual

IMPORTANT:
1. The Unit is designed for household use only.
2. Commercial users will not obtain the regular warranty as stated in the terms of the warranty card.
3. This is not a toy. Please do not let children play with it or use it.
IMPORTANT SAFEGUARDS
1. Make sure the electricity supply is suitable for this unit.
2. This unit is intended for household use only. Do not use the unit at outdoors or for other
purpose than intended.
3. Use the unit only as described in this manual.
4. To prevent electrical shock, do not immerse the unit, cord set and plug into water.
5. This is not a toy and not to be used by children. Close supervision is required when the unit is
used near children.
6. Ensure to unplug the unit when not in use, assembling or disassembling, and before cleaning.
7. The continuous operation time of this product should be within 20 minutes.
8. No-load or overloaded operation of machine is prohibited.
9. Do not touch or move any moving parts during operation of machine.
10. Do not use nger, spoon or chopsticks to push fruits or vegetables into the chute
of machine. Please only use the provided push rod.
11. Do not open the unit when it is operating.
12. Do not place the unit near any explosives, heated oven or hot surfaces.
13. Operate the unit only on at surfaces.
14. Do not let the cords hang over the edge of table or any other surfaces.
15. Please hold the plug to disconnect from the power socket, not by the wire.
16. If parts of product structure is found to be damaged (especially the safety device and
power cord), please stop using and send it to service centre to be repaired by
our qualied technician.
17. This product is not intended to be operated by persons (including children) with weak
physical condition, slow reaction, intellectual disability, and lack of experience, unless
they are under supervision or instruction by the person who is responsible for their safety.
NOTE:
To avoid hazard of electric shock, unplug the unit from power oulet when not in use or before
cleaning. If the supply cord is damaged, stop using immediately and bring it back to service centre
for repair.
2
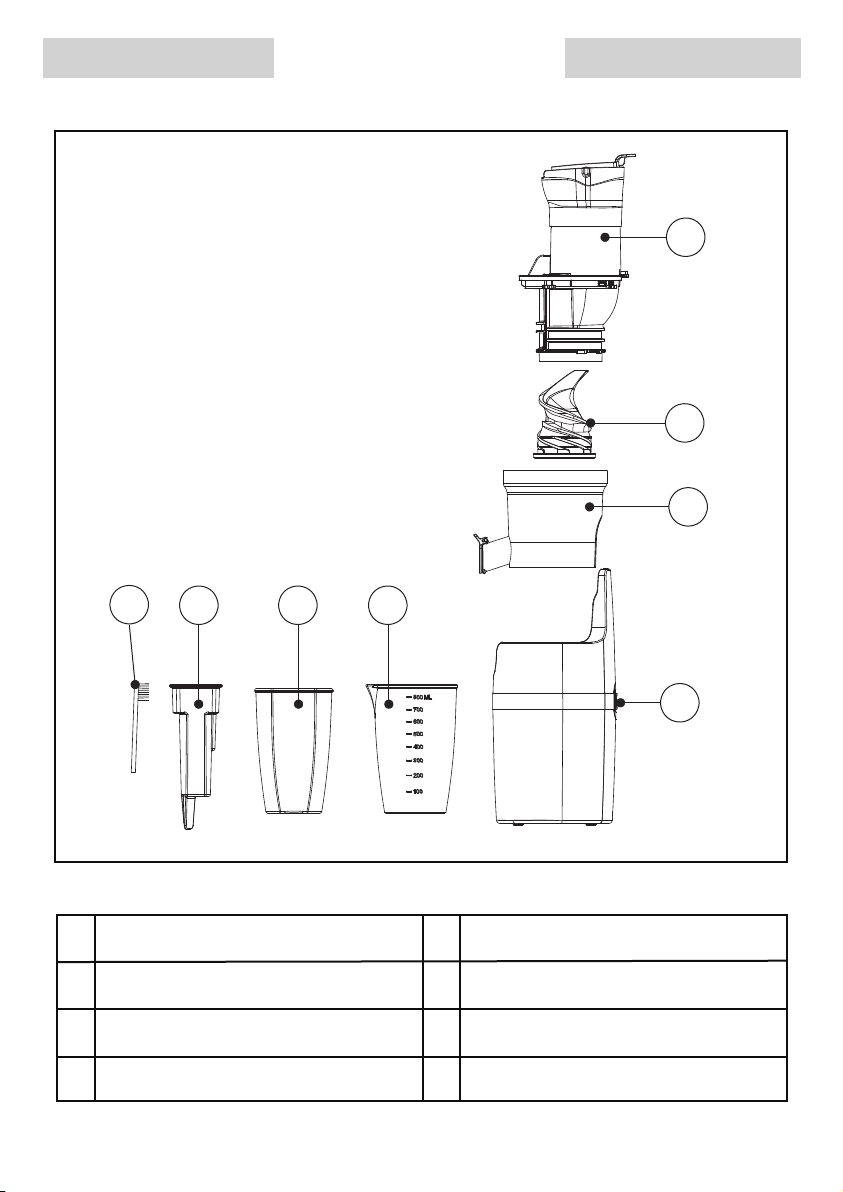
PARTS DIAGRAM
3
1
2
3
4
567
8
1
2
3
4
5
6
7
8
Feeding Chute
Screw Shaft
Juicing Bowl
Power Base
Juice Container
Pulp Container
Push Rod
Cleaning Brush

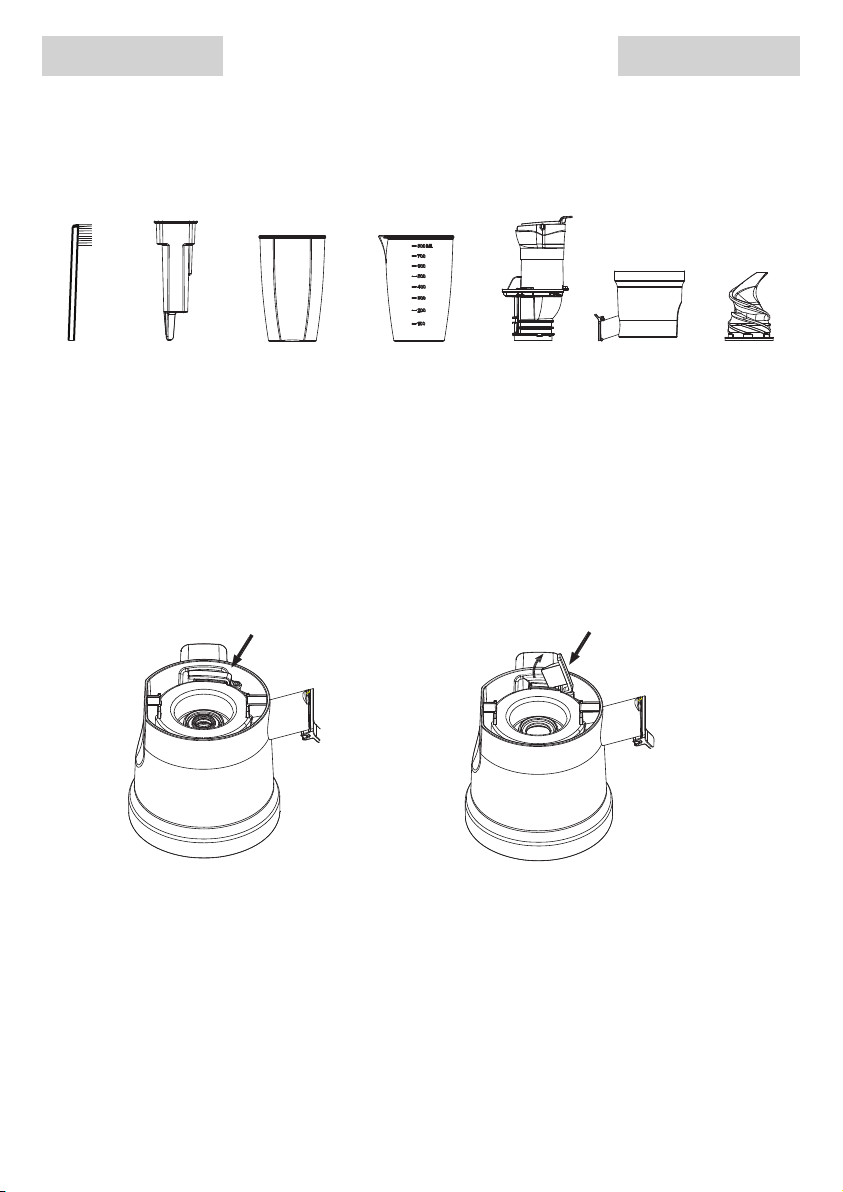
USING FOR THE FIRST TIME
ASSEMBLING METHOD
4
1. Remove all packaging materials, plastic bags and labels.
2. Make sure the electricity supply is 220-240V~ 50/60Hz.
3. Clean the Containers / Feeding Chute / Screw Shaft / Juicing Bowl / Push Rod with
Soapy water. Then rinse and dry thoroughly.
NOTE : DO NOT IMMERSE THE POWER BASE UNIT IN WATER.
4. Assemble the parts per the instruction in the assembling method section.
5. Connect the power cord to the power source.
The unit is ready to use now.
Please make sure the unit is not plugged and the switch is turned to “O” setting prior to
assembling the machine.
1. Position the Juicing bowl on the Power base by aligning the position of the spouts to
the power base openings. (Fig 1)
2. Push the screw shaft rmly into the center of the bowl, making sure that it touches
down the bottom, or else the cover cannot be closed. (Fig 2)
3. Position the chute on the bowl to align the ▲ to the “ ” and twist it clockwise until it
clicks the safety lock. Please make sure that the arrow ▲ on the
cover aligns with the Lock graphic “ ” on the Bowl. (Fig 3)
4. Place the juice container and the pulp container under the relevant spouts. (Fig 4)
Fig 1 Fig 2 Fig 3 Fig 4

OPERATION INSTRUCTION
NOTE:
Please do not use the juicer longer than 20 minutes continuously.
5
1. Connect the unit with Power.
2. Check and make sure all parts are well assembled in correct position.
3. Make sure the machine is at o “O” position.
4. Make sure the juice and pulp containers are in position.
5. Make sure the juice spout cover is closed.
6. Prepare the fruits or vegetables and cut them into pieces max 3cm x 7cm strips or
7cm x 7cm cubes.
7. Put fruit strips/cubes into the chute.
8. Press the switch to Setting “– ” to start the juicing operation.
9. Push the food down with the pusher only.
10. In case of food stuck inside the Bowl, please switch to “R” reverse function instantly.
During the juicing process, you could keep the Leak-Proof Plug closed before the juice is full
in the juicing bowl. (Fig 5)
BENEFITS OF DRIP-STOP COVER :
1. To stop dripping at the end of juicing.
2. To mix the juice with dierent fruits and veggies.
USAGE TIPS :
1. Remove hard pits or seeds prior to pressing to prevent possible damage to the
squeezing screw.
2. If mixed juices are to be made, please begin with harder fruit, and followed by the
softer fruits.
3. Please let the juicer to run for 30 seconds after the last ingredient was fed.
ATTENTION :
The juicer is not suitable for juicing overly hard or brous and starchy fruits or vegetables
such as Sugar Cane. There are some fruits which contain too much starch to juice. Some
examples are Avocado, Bananas, gs, Mango, Papaya, Dragon Fruit, Strawberry, Grape
without seeds etc. They will clog up the stainless steel sieve.
Open & Close Of Juice Spout Cover
Fig 5
Juicer spout
is opened
Juicer spout
is closed

IMPORTANT:
Please wash the juicing parts every time immediately after each used, otherwise the pulp might
stick tightly in Juicing Bowl & Screw Shaft which will then aect the disassembly, cleaning and
juicing performance.
DISASSEMBLING METHOD
CLEANING & MAINTENANCE
NOTE:
If the juicer gets overheated, it will turn o automatically to protect the machine. In this case, please
turn the juicer o “O”. Wait 10 minutes to let the juicer cool down and then turn it on again.
6
To disassemble the unit after use and before cleaning. Please turn the juicer to “O” position
and disconnect the juicer from power source.
Then, please follow the steps below:
1. Remove the Juice and Pulp containers. (Fig 6)
2. Remove the Chute. Turn the chute anti-clockwise until the ▲ aligns with the “ ”
sign. (Fig 7)
3. Remove the Screw Shaft by pulling it out upward. If it is very hard, swing gently
and pull. (Fig 8)
4. Remove the Juicing Bowl by lifting it upward vertically. (Fig 9)
Fig 6 Fig 7 Fig 8 Fig 9
CLEANING & MAINTENANCE
1. Switch o and unplug the juicer.
Wash the disassembled parts (Fig 10) with water. If the meshes are clogged with pulp,
please use the provided cleaning brush to remove the excess ber.
Attention:
• Do not use iron wire brush, abrasive or sharp object tool to clean the unit.
• Please do not use water above 40°C.
3. In case there are any residues remained in the mouth of the pulp spout, please pull out the
silicone valve as shown in (Fig 11) below and clean under running water.
7. 6. 5. 4.
Fig 10
Fig 11
3. 2. 1.
Silicone Valve Pull to open
8
Press the silicone valve to close it property and tightly after cleaning.
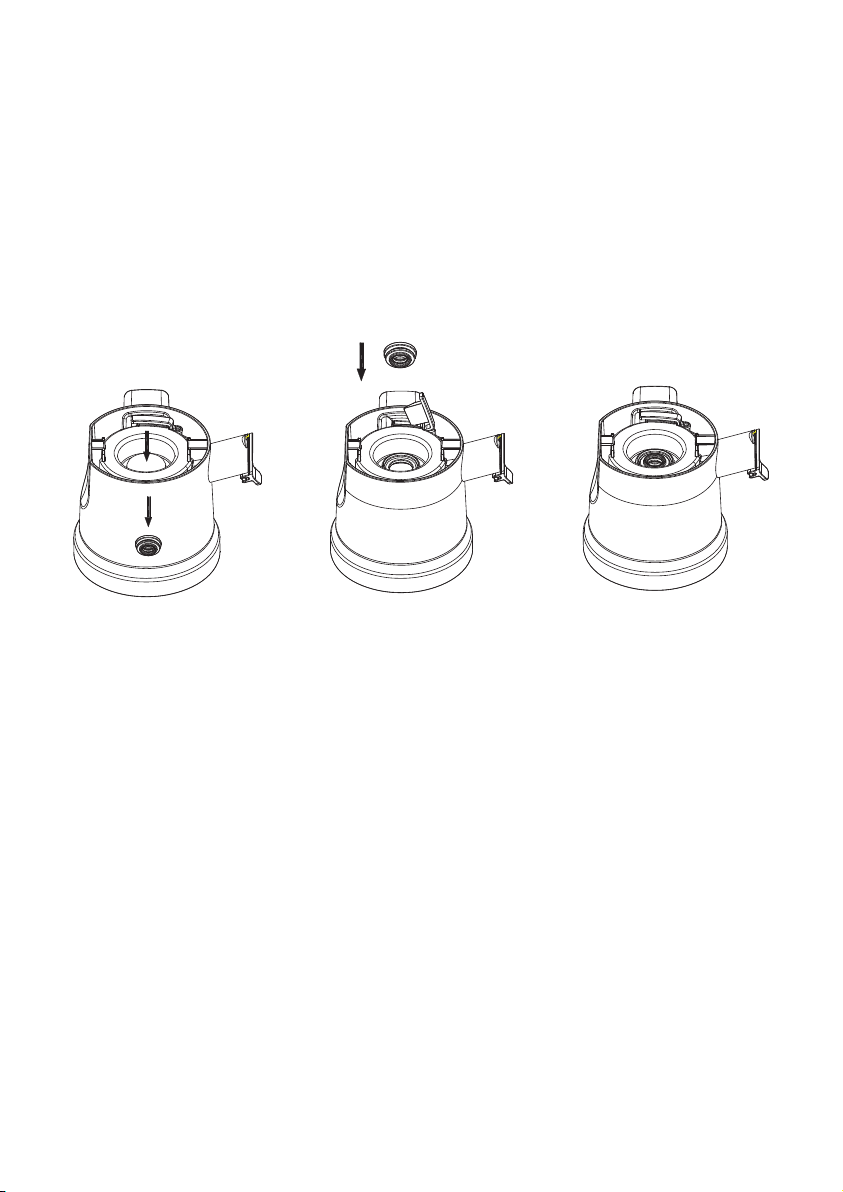
4. To clean the seal ring in the center of the juicing bowl, please follow the steps as below :
a. Turn the Squeezing Bowl upside down for easier handling, Push the seal ring out
with your thumb (Fig 12a) and clean it with water.
b. After Cleaning, please put it back to the center hole. The small ribbed surface should
be should face upward (Fig.12b) Make sure the groove of the seal ring well t in
the squeezing bowl.
c. The big at size of the seal ring will be inside while the small and ribbed side is
outside the Squeezing Bowl. (Fig 12c)
5. Do not put the Power Base into water for cleaning. Wipe it with damp cloth only.
6. After cleaning, please dry the parts thoroughly and store them in a dry, cool place.
Fig 12a Fig 12b Fig 12c
STORAGE
USEFUL TIPS
NOTE:
Please make sure the unit and parts are dry before storing them.
9
1. Follow cleaning instructions to well maintain the unit before storage.
2. Tidy up the power cord set.
3. Keep the unit away from children’s easy access.
4. Store the unit and the accessories at a dry, cool place.
1
2
3
4
5
6
Not for Ice cubes.
The ingredient with long ber needs to
be cut down to 3 × 7 cm thin strips or 7 x
7 cm cubes.
The peel and pits/seeds must be
removed from oranges, lemons,
grapefruit and melons before use.
Do not use other accessory as a pusher.
Each juicing cycle must not longer than
20 minutes.
Never put the spoon, chopsticks into
the opening of the Chute, the juice
and pulp spouts.
Ice cubes are too hard. It may
damage the parts.
Long ber foods may easily block
the spout.
The hard pit or seeds may damage the
squeezing parts. The peel may block
the spout of pulp.
It may damage the juicer and
cause injury.
Working over time may cause damage to
the motor.
It may damage the juicer.
Item Warning Reason

TROUBLE SHOOTING
10
• If the supply cord is damaged, it must be replaced by the manufacturer or its service
agent or a similarity qualified person in order to avoid a hazard.
• WARNING: This appliance is not intended for use by persons (including children) with
reduce physical, sensory or mental capabilities, or lack of experience and knowledge,
unless they have been given supervision or instruction concerning use of the appliance
by a person responsible for their safety.
Trouble Cause Solutions
The juicer
stops running
suddenly.
The juice yield
is low or juice
ows out of the
main housing.
Abnormal noise.
The Feeding
Chute cannot
be opened.
The container &
accessories are
dyed after use.
Too many
ingredients put
into the juicer.
Hard fruits or vegetables have
not been cut in small pieces.
The Bowl and the silicone valve
are not installed properly.
Parts cause extrusion sound
during squeezing.
There is too much pulp inside
the bowl.
There are hard foods
stuck inside.
The pulp mess is stuck.
Dyed parts are due to
natural color of specic
fruits/veggies.
Switch to “R” position instantly to make
the ingredients return upwards. If the
machine still stops running, please clean
the machine before using again.
Hard fruits and vegetables
(such as carrot) should be cut into
thin strips or small cubes before
putting into chute.
Please re-install the Bowl silicone
valve by referring to the installation
method.
The sound is caused by extrusion of
fruits and vegetables, which is normal.
Press switch to “R” setting to eject the
pulps backward.
Press switch to “R” to eject the
object backward.
Pour water into the Chute to soften
the stuck pulp mess overnight.
This is caused by natural coloring
and unavoidable.
SERVICE & IMPORTANT NOTICE
IMPORTED BY NATIONAL ELECTRICAL TRADERS
Table of contents


