TPG BizPhone W76P User manual

Public
TPGBizPhone
Cordless W76P IP DECT Phone
User Guide

TPG BizPhone Cordless W76P IP DECT Phone User Guide P a g e |2
Public
Contents
Overview......................................................................................................................................5
Hardware Component Instructions...........................................................................................5
LED Instructions ......................................................................................................................6
Power Indicator LED.............................................................................................................6
Icon Instructions ......................................................................................................................6
Icons on the Idle Screen.......................................................................................................6
Icons on the Calls Screen.....................................................................................................6
Icons on the Line Status Screen...........................................................................................7
Customising Your Phone .............................................................................................................8
General Settings ......................................................................................................................8
Turning handset On/Off........................................................................................................8
Locking/Unlocking Keypad...................................................................................................8
Backlight..............................................................................................................................8
Language .............................................................................................................................9
Time & Date..........................................................................................................................9
Audio Settings .......................................................................................................................10
Volume...............................................................................................................................10
Ring Tones.........................................................................................................................10
Menu Guidance ......................................................................................................................11
Main Menu..........................................................................................................................11
Accessing the Main Menu Feature..........................................................................................11
Submenu............................................................................................................................12
Accessing the Main Menu Feature..........................................................................................12
Returning to Idle Screen.........................................................................................................12
Idle Screen .........................................................................................................................12
Line Status Screen.............................................................................................................13
Contact Management .............................................................................................................14
Local Directory...................................................................................................................14
Blocklist.............................................................................................................................15
Call History Management ...................................................................................................16
Basic Call Features ....................................................................................................................17
Placing Calls ..........................................................................................................................17
Placing Calls from Local Directory .....................................................................................17
Placing Calls from Call History...........................................................................................17

TPG BizPhone Cordless W76P IP DECT Phone User Guide P a g e |3
Public
Speed Dial..............................................................................................................................17
Assigning a Speed Dial Number .........................................................................................17
Changing a Speed Dial Number..........................................................................................18
Deleting a Speed Dial Number............................................................................................18
Answering Calls.....................................................................................................................18
Answering a call.................................................................................................................18
Answering when in a call....................................................................................................18
Ending Calls...........................................................................................................................18
Redialling Numbers................................................................................................................19
Call Mute................................................................................................................................19
Do Not Disturb (DND) .............................................................................................................19
Call Forward...........................................................................................................................20
Call Transfer ..........................................................................................................................20
Three-Way Conference...........................................................................................................21
Advanced Phone Features .........................................................................................................22
Voice Mail ..............................................................................................................................22

TPG BizPhone Cordless W76P IP DECT Phone User Guide P a g e |4
Public
Getting Started
Welcome to your TPG BizPhone service!
If this is the first time you are using the TPG BizPhone Cordless W76P handset, please first refer to
the TPG BizPhone W76P Quick Startup Guide to assemble and start up your handset. The BizPhone
Quick Startup Guide is available on your BizPhone Resources page:
http://bizphone.net.au/resources/
Topic includes:
•Packaging Contents
•Assembling the Phone
•Startup the Phone
•Basic Handset Settings
•Basic Call Features
If you require additional assistance to your new handset, please contact your assigned System
Administrator.

TPG BizPhone Cordless W76P IP DECT Phone User Guide P a g e |5
Public
Overview
Hardware Component Instructions
The main hardware of the BizPhone Cordless W76P IP DECT phone are the LCD screen and the Keypad.
Hardware component instructions of the BizPhone Cordless W76P IP DECT phone are:
Item
Description
Receiver
Receives audio in receiver mode.
Power Indicator
LED
Indicates call status, message status, and charging status.
Phone Screen
Shows information.
Soft Keys
Access the function directly. It depends on the operating situation.
Message Key
Accesses the voice mail or missed call.
Speakerphone Key
•Switches between the receiver, headset and handsfree modes.
•Answers an incoming call.
•Places a call in handsfree mode
Navigation Keys
Scroll through information or options on the screen.
OK Key
Confirms actions or enters the main menu.
On-hook Key/
Power key
•Press briefly to return to the previous screen.
•Long presses to return to the idle screen.
•Press to turn the handset on.
•Long press on the idle screen to turn the handset off.

TPG BizPhone Cordless W76P IP DECT Phone User Guide P a g e |6
Public
•Cancels actions or ends a call.
•Rejects an incoming call.
Off-hook Key
•Answers an incoming call.
•Enters into the redial calls list.
•Places a call in receiver or handset mode.
Keypad
Provides digits, letters, and special characters.
TRAN Key
Transfer a call to another party.
Mute Key
Toggles Mute feature on or off.
Microphone
Picks up audio.
Speaker
Outputs audio in handsfree mode.
LED Instructions
Power Indicator LED
LED Status
Description
Solid red
The handset is charging.
Fast Flashing red (300ms)
The handset is ringing.
Slow flashing red (1s)
The handset receives the voice mail or missed call.
Off
The handset is powered off.
The handset is idle.
The handset is fully charged.
Icon Instructions
Icons on the Idle Screen
Below are the description of the icons on the idle screen.
Icon
Description
The ringer volume is 0 and the phone is in the silent mode.
/
The phone has enabled the Call Forward feature.
/
The keypad is locked.
The phone has new voice mails.
/
The phone has enabled the Do Not Disturb (DND) feature.
Icons on the Calls Screen
Below are the description of the icons on the calls screen.
Icon
Description

TPG BizPhone Cordless W76P IP DECT Phone User Guide P a g e |7
Public
Receiver Mode On.
/
Handsfree Mode On
/
Call Hold
Conference Call
/
Headset Mode On.
Contact
/
Call Mute
Icons on the Line Status Screen
Below are the description of the icons on the line status screen.
Icon
Description
/
Call Forward
/
Anonymous call rejection is enabled
Unassigned outgoing line
/
Do Not Disturb (DND)
/
Anonymous call is enabled

TPG BizPhone Cordless W76P IP DECT Phone User Guide P a g e |8
Public
Customising Your Phone
General Settings
Turning handset On/Off
To turn the handset on:
•The handset will be turned on automatically when the battery is inserted into the handset.
•Or press the On-hook key. The handset screen lights up.
•Or place the handset to the charging cradle.
To turn the handset off:
•The handset will be turned off automatically when the battery runs out.
•Or to turn off the handset manually, long press the On-hook key when the handset is idle.
Locking/Unlocking Keypad
You can lock the handset keypad to prevent keys from being accidentally pressed.
To lock the keypad:
•Long press the # key when the handset is idle until the phone prompts you the handset is locked.
The lock icon appears in the status bar.
To unlock the keypad:
•Long press the # key when the locked handset is idle until the phone prompts you the
handset is unlocked.
The lock icon disappears from the status bar.
Note: If the keypad is locked, only the emergency numbers can be dialled out. You must enter the emergency
number continuously and completely. To place emergency calls, you should configure the emergency numbers in
advance.
Backlight
Handset backlight status in the charging state or out of the charging state can be configured independently of each
other. If enabled, the backlight is always on. Otherwise, the backlight is turned off after the handset is idle for a period
of time. But the backlight is automatically turned on when an incoming call arrives, a key is pressed or the status of
handset changes. You can disable the backlight to save power.
To configure the backlight on your phone:
1. Go to OK > Settings > Display > Display Backlight.
2. Select the desired value from the Active Level field.
3. Select the desired value from the In Charger or Out of Charger field.
4. Confirm the action.

TPG BizPhone Cordless W76P IP DECT Phone User Guide P a g e |9
Public
Language
The default language of the handset is English. The phone supports several languages that you can choose to use on
the phone. You can change the language according to your requirement.
To change the language on your phone:
1. Go to OK > Settings > Language.
2. Select the desired language.
The phone prompts you whether to change the language.
3. Confirm the action.
The phone language is changed to the selected one.
Time & Date
You can set the time and date manually. The time and date formats are also variable.
To configure the time and date manually on your phone:
1. Go to OK > Settings > Date & Time.
2. Edit the date and time.
3. Confirm the action.
The date and time set on the handset will change accordingly.
To configure the time format on your phone:
You can set the phone to display the time in 12-hour or 24-hour format You can also change the date format, including
the options to display the day (D), month (M), and year (Y).
1. Go to OK > Settings > Display > Time Format or Date Format.
2. Select the desired time format or date format.
3. Confirm the action.

TPG BizPhone Cordless W76P IP DECT Phone User Guide P a g e |10
Public
Audio Settings
Volume
You can adjust the volume of the ringer, media, and audio during a call.
Do one of the following:
•Press the Volume key.
•Press the left or right navigation key when the handset is idle.
•Go to OK > Settings > Audio > Ring Tones > Volume and press the left or right navigation key.
Ring Tones
You can select a unique ring tone for your incoming calls.
To set the Ring Tone:
1. Go to OK > Settings > Audio > Ring Tones > Melodies.
2. Select the desired ring tone.
The ring tone is played automatically.
3. Confirm the action.
TPG BizPhone Cordless W76P IP DECT Phone User Guide P a g e |11
Public
Menu Guidance
Main Menu
The main menu is the top menu, which consists of seven menu items: Status, Intercom, Voice Mail, Call Features,
Directory, Settings, and History.
Accessing the Main Menu Feature
After entering the main menu, you can use the navigation keys to access the desired menu.
1. Press the OK key when the handset is idle.
2. Press the navigation keys to select a different menu icon.
3. Press OK to open the selected menu.
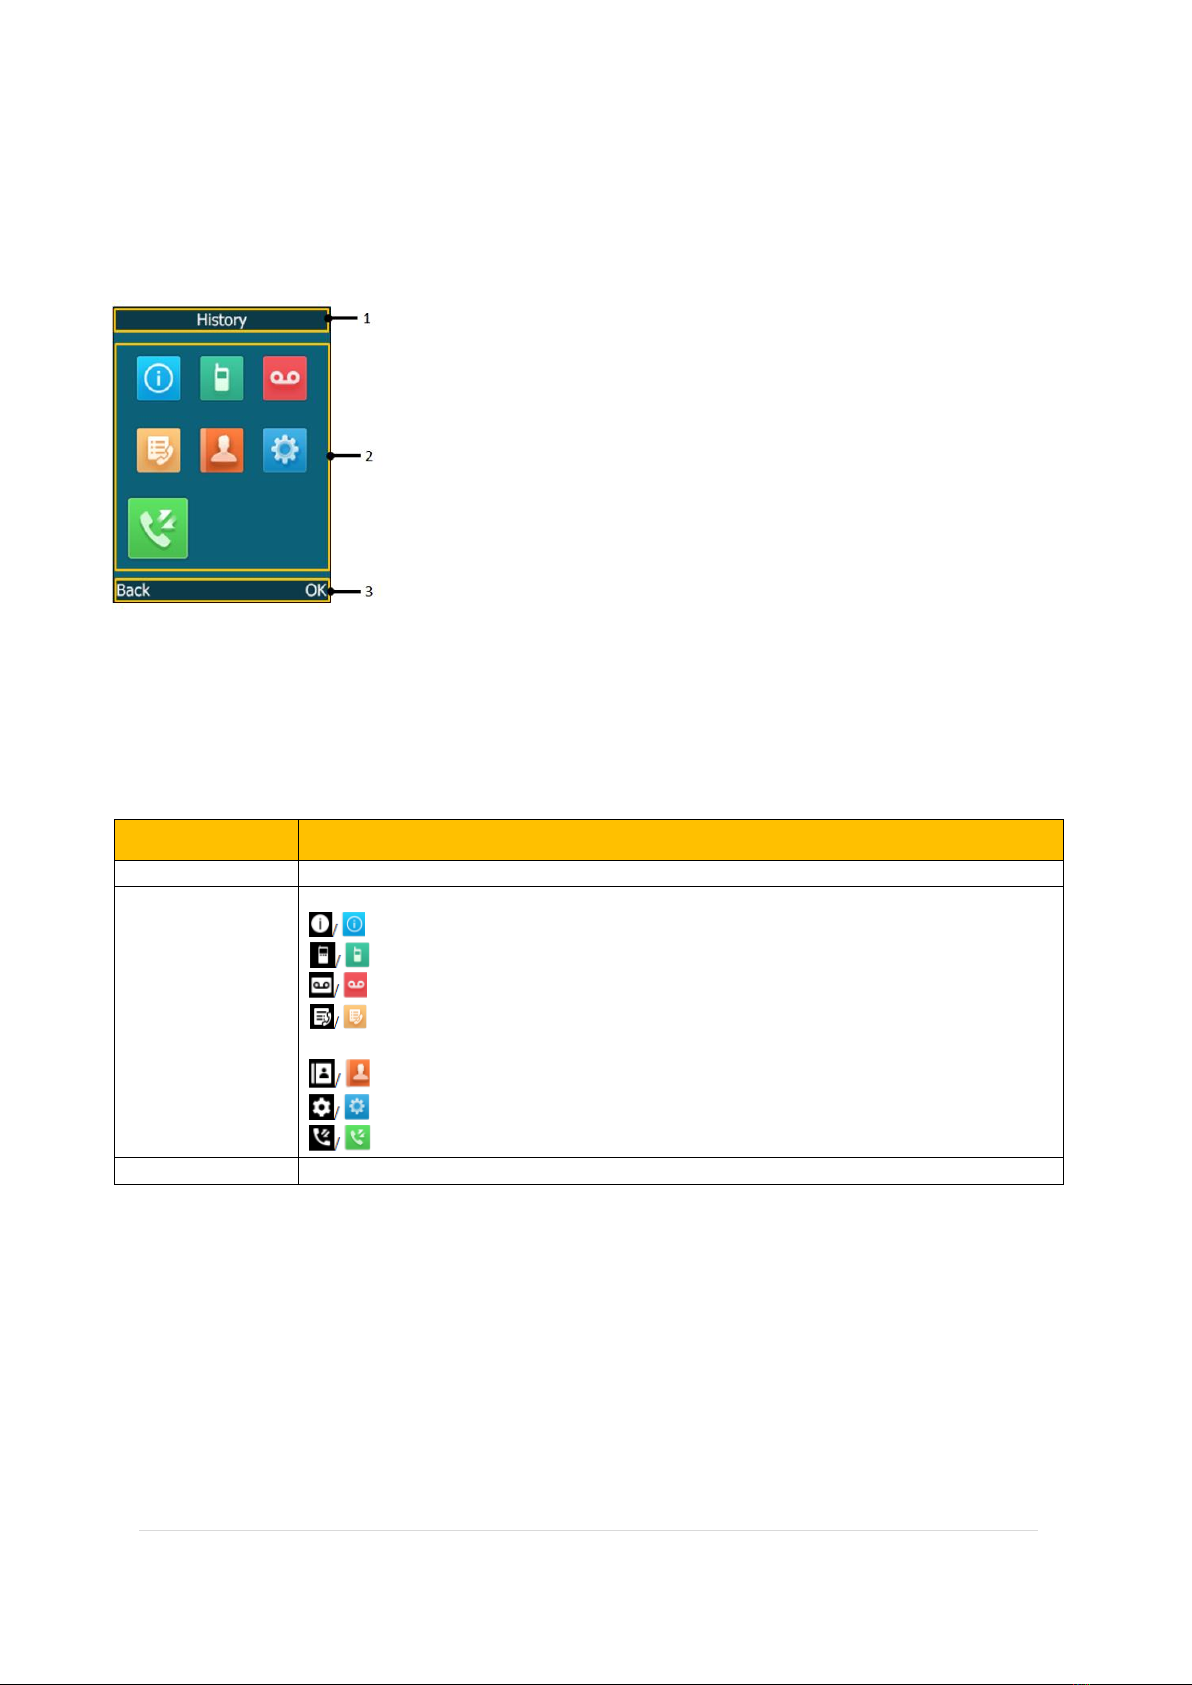
Item
Description
1
Menu item you selected.
2
Menu icon:
: Status –To view the status information of base, handset, and line.
: Intercom –To make an internal call.
: Voice Mail –To set and view voice mail(s).
: Call Features –To access the features of Call Forward, Do Not Disturb, Call
Waiting, Anonymous Call Rejection, Anonymous Call and Paging.
: Directory –To access the directory and manage the contacts.
: Settings –To personalise the setting of your handset.
: History –To access the call history list.
3
Soft key label

TPG BizPhone Cordless W76P IP DECT Phone User Guide P a g e |12
Public
Submenu
The functions in the submenus are displayed as lists. You can open the submenu to access a function.
Accessing the Main Menu Feature
After entering a certain menu, you can use the navigation keys to access the desired submenu.
1. Press the up and down navigation keys to highlight the desired submenu.
2. Press OK to open the submenu.
3. Press the On-hook key or Back to return to the previous screen.
Returning to Idle Screen
Long press the On-hook key to quickly exit the menu and return to the idle screen.
Idle Screen
The idle screen is made up of the signal strength, battery status, status bar, handset name, and soft keys. The time
and date is displayed in the middle of the screen.
Idle Screen Status
Description
Signal Strength
Week to Strong

TPG BizPhone Cordless W76P IP DECT Phone User Guide P a g e |13
Public
No Reception
Eco mode+ is on
Battery Status
Low to full
Need Charging
Status Bar
Displays the feature status icons. The status icons are displayed when features
are activated.
Handset Name
Displays internal handset number and registered handset name.
Soft Keys
The soft key labels on the screen directly above the soft keys shows the
functions available at that particular moment.
Line Status Screen
The line status screen is made up of the outgoing line and line status.
When the handset is idle, you can press Line to enter the line status screen.
Line Status
Description
Outgoing Line
Display the registered line number and the corresponding line.
Line Status
Display the icon of line status. The icon indicates the corresponding feature
assigned to the line.

TPG BizPhone Cordless W76P IP DECT Phone User Guide P a g e |14
Public
Contact Management
Local Directory
You can store the frequently used contacts in the handset’s local directory, where names and numbers can be freely
added, deleted and edited. You can store up to 100 contacts in the handset’s local directory, as well as add, edit and
delete a contact.
Entering Data
In corresponding input mode, you can press the keypad repeatedly to view the character (or numbers) options and
press more times to highlight the desired character (or numbers), the available character under each key appears on
the bottom left-hand corner of the LCD screen. Wait one second, and enter the next character (or numbers).
The default input methods are Abc, 123, ABC and abc.
To enter or edit data by the default input modes, do one of the following as shown below:
If you want to
Then you can
Switch among input modes
Press one or more times to switch among input modes.
The current input mode is displayed on the right bottom of the phone
screen.
Enter letters
Press a key one or more times (depending on what input mode you are in)
to enter the possible characters that are displayed on the keypad key.
Enter special characters
Press to enter the space character or the following special
character list: _ ‘ “ = / \ ^ ; : . , - + * # § % @ ? ! ¿¡ ( ) { } [ ] < > ¥ $ £|~ ¤
Press :
-If it is in the uppercase (ABC), uppercase and lowercase (Abc) or
lowercase (abc) input modes, it will provide space character and
the following special characters: .,?,!,0.
-If it is the numeric (123) input mode, it will only provide the digit 0.
-Long press the key to enter the character +.
Delete the text
Press /-or /+ to position the cursor to the right of the text you want to
delete, and then press the Delete to delete one character at a time or long
press to delete all characters.
Adding Contacts
To add a contact to a local director:
1. Go to OK > Directory or OK > Directory > Local Directory.
2. Select Options > New Contact..
3. Enter the contact’s information.
4. Confirm the action.
Editing Contacts
To edit a contact in the local directory:
1. Go to OK > Directory or OK > Directory > Local Directory.
2. Highlight the desired contact and select Options > Edit.
3. Edit the contact information.

TPG BizPhone Cordless W76P IP DECT Phone User Guide P a g e |15
Public
4. Confirm the action.
Deleting Contacts
To delete a contact from the local directory:
1. Go to OK > Directory or OK > Directory > Local Directory.
2. Highlight the desired contact and select Option (Option) > Delete.
The phone prompts you whether to delete this contact.
3. Confirm the action.
To delete all contact from the local directory:
1. Go to OK > Directory or OK > Directory > Local Directory.
2. Highlight the desired contact and select Option > Delete All.
The phone prompts you whether to delete all contacts.
3. Confirm the action.
Blocklist
Incoming calls from the Blocklist are rejected automatically. You can store up to 30 contacts in the blocklist to block
unwanted callers.
To add a contact to the Blocklist:
1. Go to OK > Settings > Telephony > Blocklist.
2. Select New Entry or Options > New Entry.
3. Enter the contact’s information.
4. Confirm the action.
To edit a Blocklist contact:
1. Go to OK > Settings > Telephony > Blocklist.
2. Highlight the desired blocklist contact and select Options > Edit.
3. Edit the contact information.
4. Confirm the action.
To delete an entry from the Blocklist:
1. Go to OK > Settings > Telephony > Blocklist.
2. Highlight the desired blocklist contact and select Options > Delete
3. Confirm the action.
To delete all Blocklist contacts:
1. Go to OK > Settings > Telephony > Blocklist.
2. Highlight the desired blocklist contact and select Options (Option) > Delete All.

TPG BizPhone Cordless W76P IP DECT Phone User Guide P a g e |16
Public
The phone prompts you whether to delete all contacts.
3. Confirm the action.
Call History Management
The W76P IP DECT phone maintains call history call history lists of Placed Calls, Received Calls and Missed Calls and
each list holds 100 entries.
Call History Icons
Icon
Description
Received Calls
Missed Calls
Placed Calls
To view Call History:
1. Press History.
2. Select the desired list.
3. Highlight the desired entry and select Options (Option) > Detail.
To delete an entry from the Call History list:
1. Press History.
2. Select the desired list.
3. Highlight the desired entry and select Options > Delete.
The selected entry will be deleted successfully.
To delete all entries from the Call History list:
1. Press History.
2. Select the desired list.
3. Select Options (Option) > Delete All.
The phone prompts you whether to delete all records.
4. Confirm the action.

TPG BizPhone Cordless W76P IP DECT Phone User Guide P a g e |17
Public
Basic Call Features
Placing Calls
To place call:
1. Enter the desired number using the keypad.
2. Press the OK or Off-hook key to dial out.
To place call during an active call:
You can place at most two calls on your handset. Do one of the following:
1. Select New Call.
Enter the desired number using the keypad.
Press the OK key.
2. Or Press the Options soft key and select Directory to select a contact from the directory to
dial out.
Placing Calls from Local Directory
To place a call to a contact from the local directory:
1. Go to OK and select Directory.
2. Select the desired directory.
3. Highlight the desired contact and press the Off-hook key or Send.
Placing Calls from Call History
To place a call from the Call History list:
1. Press History or go to OK and select History.
2. The LCD screen displays all history lists: All Calls, Missed Calls, Placed Calls and Received Calls.
3. Highlight a contact and press the Off-hook or Send key.
Speed Dial
You can quickly dial a number by using a speed dial key without entering the directory.
Assigning a Speed Dial Number
You can assign a contact number to the digit key as a speed dial umber. A maximum of 8 speed dial numbers are
allowed.
The assigned number should exist in the directory.
1. Go to OK > Settings > Telephony > Speed Dial.
The phone screen displays all available speed dial keys (2-9).

TPG BizPhone Cordless W76P IP DECT Phone User Guide P a g e |18
Public
2. Highlight the desired digit key, and then press Assign.
3. Select Directory and select the desired contact from the directory.
4. Press OK to assign the number to the selected speed dial key.
Changing a Speed Dial Number
You can assign a contact number to the digit key as a speed dial umber. A maximum of 8 speed dial numbers are
allowed.
The assigned number should exist in the directory.
1. Go to OK > Settings > Telephony > Speed Dial.
2. Highlight an assigned speed dial key.
3. Select Options > Change.
4. Select Directory and select the desired contact from the directory.
5. Press OK to change the assigned speed dial number.
Deleting a Speed Dial Number
You can delete a speed dial number when you no longer use it.
1. Go to OK > Settings > Telephony > Speed Dial.
2. Highlight the desired digit key.
3. Select Options > Clear Key.
Note: Speed Dial is local to the phone, and may be overridden by the admin settings. For more information, contact
your system administrator.
Answering Calls
Answering a call
Do one of the following:
•Press or press Accept or Answer.
•Press the Speakerphone key.
•If a headset is connected, press Accept or the HEADSET key
Answering when in a call
If you have an active call, and an incoming call arrives on your phone, do the following:
1. Press the down navigation key to select the incoming call.
2. Select Accept or Answer.
The incoming call is answered and the original call is placed on hold.
Ending Calls
To end a call:
Do one of the following:
-Press .

TPG BizPhone Cordless W76P IP DECT Phone User Guide P a g e |19
Public
-Press End Call.
Redialling Numbers
To redial the last dialled number from your phone:
1. Press twice when the handset is idle.
A call to your last dialled number is attempted.
To redial a previously dialled number from your phone:
1. Press when the handset is idle to access the redial list.
2. Select a record to dial out.
Call Mute
You can mute the microphone during an active call. When muting the microphone, you can hear the other party but he
or she cannot hear you. For example, if you do not want the other party to listen in while you talk to someone in the
room, you can mute the microphone temporarily.
Press the mute key during a call to mute the microphone. The mute icon appears on the phone screen.
Press the mute key again to unmute. The mute icon disappears from the phone screen.
Call Hold/Resume
You can place an active call on hold. Only one active call can be in progress at any time. Other calls can be made and
received while placing the original call on hold.
To place a call on Hold:
Press the Options soft key during a call, and select Hold.
When you have multiple calls on the phone and the current call is held, you can press the up or down navigation key
to swap the active call.
To resume a held call:
Select Resume.
If multiple calls are placed on hold, select the desired call first.
When you have multiple calls on the phone and the current call is held, you can press the up or down navigation key to
swap the held call.
Do Not Disturb (DND)
You can use DND to reject incoming calls automatically on the phone. All calls you receive while DND is enabled are
logged to your missed calls list.
To activate DND on your phone:
1. Go to OK > Call Features > Do Not Disturb.
2. Enable DND.
3. Confirm the action. The status bar displays the DND icon.

TPG BizPhone Cordless W76P IP DECT Phone User Guide P a g e |20
Public
Note: Do Not Disturb is local to the phone, and may be overridden by the admin settings. For more information,
contact your system administrator.
Call Forward
You can configure your phone to forward incoming calls to another party through Call Forwarding.
There are 3 types of Call Forwarding:
•Always Forward: Incoming calls are immediately forwarded.
•Busy Forward: Incoming calls are immediately forwarded if the phone is busy.
•No Answer Forward: Incoming calls are forwarded if not answered after a period of time.
To enable Call Forward on your phone:
1. Go to OK > Call Features > Call Forward.
2. Select the desired forwarding type and enable it.
3. Enter the destination number you want to forward incoming calls to in the Target field or Forward to field.
4. If you select the No Answer (No Answer Forward), select the desired ring time to wait before forwarding
from the After Ring Time field.
5. Confirm the action.
Note: Call Forward is local to the phone, and may be overridden by the admin settings. For more information, contact
your system administrator.
Call Transfer
You can transfer a call to another party in one of three ways:
•Blind Transfer: Transfer a call directly to another party without consulting.
•Semi-Attended Transfer: Transfer a call when the target phone is ringing.
•Attended Transfer: Transfer a call with prior consulting.
To perform a blind transfer:
1. Select Options > (Call) Transfer, or press the TRAN key during a call.
2. Enter the number you want to transfer the call to or select Directory > Directory/History to choose a
contact.
3. Press TRAN or Transfer to complete the transfer.
To perform a semi-attended/attended transfer:
1. Select Options > (Call) Transfer, or press the TRAN key during a call.
2. Enter the number you want to transfer to and dial out.
3. Do one of the following:
•When you hear the ringback tone, press the TRAN key or Transfer to finish a semi-attended
transfer.
•After the contact answers the call, press the TRAN key or Transfer to finish an attended
transfer.
Table of contents
Other TPG Telephone manuals


